
EL-6360 - Calculator SHARP - Free user manual and instructions
Find the device manual for free EL-6360 SHARP in PDF.


| Brand | Sharp |
| Model | EL-6360 |
| Product Type | Desktop Calculator |
| Display | 12-digit LCD |
| Display Notation | Decimal with signs |
| Power Source | Solar and battery backup |
| Battery Type | 1 x LR44 (estimated) |
| Dimensions (W x H x D) | 165 x 45 x 220 mm (estimated) |
| Weight | 240 g (estimated) |
| Basic Functions | Addition, subtraction, multiplication, division |
| Advanced Functions | Percent, square root, memory operations |
| Memory | One direct memory bank |
| Keyboard | Soft-touch plastic keys |
| Construction | Durable plastic housing |
| Operating Temperature | 0°C to 40°C |
| Storage Temperature | -20°C to 60°C |
| Auto Power Off | After approx. 6 minutes |
| Cleaning | Wipe with a soft, dry cloth |
| Safety | Avoid exposure to direct sunlight and high humidity |
| Repair and Spare Parts | Readily available through authorized service centers |
Frequently Asked Questions - EL-6360 SHARP
User questions about EL-6360 SHARP
0 question about this device. Answer the ones you know or ask your own.
Ask a new question about this device
Download the instructions for your Calculator in PDF format for free! Find your manual EL-6360 - SHARP and take your electronic device back in hand. On this page are published all the documents necessary for the use of your device. EL-6360 by SHARP.
USER MANUAL EL-6360 SHARP
NOTICE
- SHARP strongly recommends that separate permanent written records be kept of all important data. Data may be lost or altered in virtually any electronic memory product under certain circumstances. Therefore, SHARP assumes no responsibility for data lost or otherwise rendered unusable whether as a result of improper use, repairs, defects, battery replacement, use after the specified battery life has expired, or any other cause.
- SHARP assumes no responsibility, directly or indirectly, for financial losses or claims from third persons resulting from the use of this product and any of its functions, such as stolen credit card numbers, the loss of or alteration of stored data, etc.
- The information provided in this manual is subject to change without notice.
CAUTIONS
- Do not carry the Organizer in the back pocket of slacks or trousers.
- Do not drop the Organizer or apply excessive force to it.
- Do not subject the Organizer to extreme temperatures.
- Clean only with a soft, dry cloth.
- Use only a SHARP approved service facility.
Note: Unless otherwise specified, the text material applies to both models.
CONTENTS
Using the Organizer for the First Time 3
When Abnormal Conditions Cause a Malfunction 4
Part Names ....5
Display Symbols 7
Moving the Cursor 8
Changing Operation Modes 8
Entering Characters 10
Turning the Key Touch Tone On and Off 11
Clock Mode 11
Telephone Mode 15
Schedule Mode 22
Anniversary Mode 27
Secret Function 30
Memory Storage 36
Clearing the Memory 38
Calculator Mode 40
Power Supply 43
Specifications 49
Using the Organizer for the First Time
Be sure to perform the following operations before using the Organizer for the first time.
- Pull out the insulation sheet. (Fig. 1) (This sheet was inserted at the factory to prevent battery wear. The Organizer begins operating when it is pulled out.)
- Press the RESET switch on the back. (Fig. 2)
- Press 2nd ENTER.
- Repeat steps 2 and 3 once more.
- Set the date and time of the clock. (Refer to page 11.)
Press the RESET switch with a ball-point pen or similar object. Do not use an object with a breakable or sharp tip.

Fig. 1

Fig. 2
When Abnormal Conditions Cause a Malfunction
If the Organizer is subjected to strong, extraneous electrical noises or shocks during use, an abnormal condition may occur in which no keys (including ON C-CE) will respond. If this happens, press the RESET switch on the back of the Organizer and any key other than 2nd ENTER. If an error occurs internally, "DATA PROBLEM" and "PRESS RESET!" are displayed alternately. Clear all memory by performing steps 2 and 3 above.
Part Names
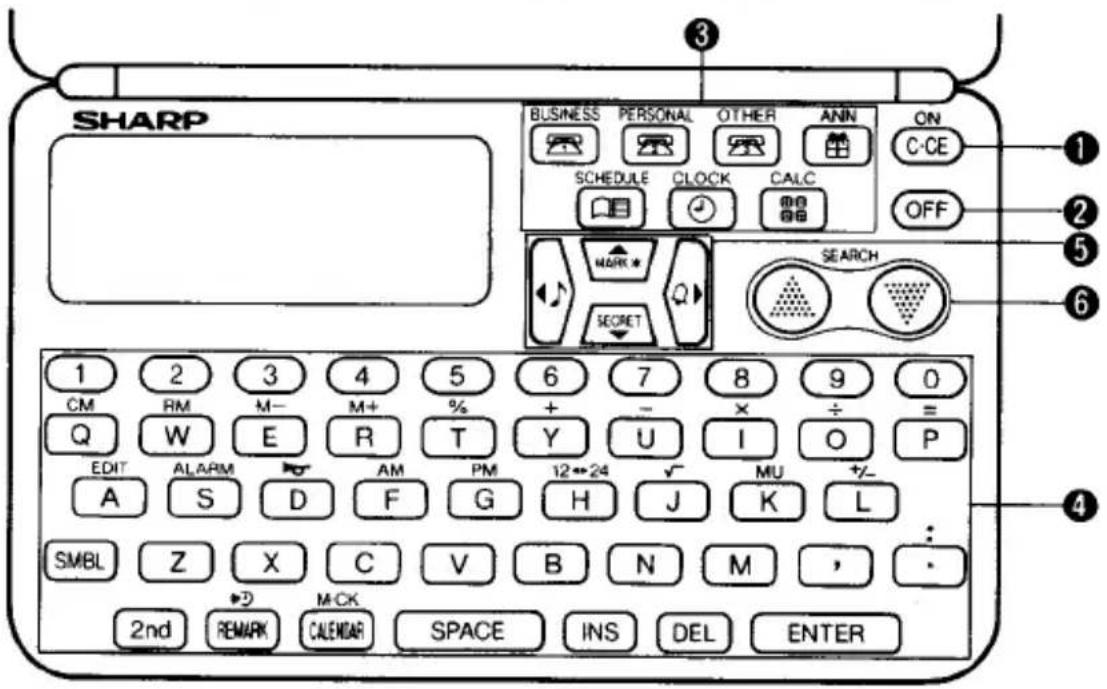
Reset switch (on the back of the unit)
① Power ON/Clear/Clear entry key
② Power OFF key
③ MODE key
④ Key pad
⑤ Cursor movement keys
6 SEARCH keys
In this manual, the keys are represented by symbols, for example:

Keys with only one function always appear in the manual with the function enclosed in a box.
![graph TD A["M+"] --> B["R"] B --> C["2nd"] D["SECRET"] --> E["▼"] C --> F["SECRET"] G["M+"] --> H["R"] H --> I["2nd"]](/content/2026/07/1557839/images/3d1cbcc7b63e24e7bbbbb43a23a9298b67add477889bf65fe73f69e2e30b8d56.jpg)
Indicates the memory plus key.
Indicates the alphabetic R key.
Indicates the secret key.
Indicates the cursor down key.
Display Symbols
A : Letters and symbols can be entered.
: Secret listings can be accessed.
: The schedule alarm will sound.
The daily alarm will sound.
The on-the-hour tone will sound.
AM: The displayed time is morning.
PM: The displayed time is afternoon.
R : A remark entry can be made in the Telephone mode.
: Anniversary reminder function is in effect.
← : More information exists to the left of the current display. (Press ▶.)
→ : More information exists to the right of the current display. (Press ▶.)
↑ : More information exists above the current display. (Press ▲.)
↓ : More information exists below the current display. (Press ▼.)
* : Indicates that the recalled listing is secret.
2nd : Indicates that 2nd has been pressed. The function or character represented on the blue parts of the keypad can be used next.
- At times 🔒 may appear faintly on the display.
This, however, will not affect the operation of the Organizer.
- In this manual, only the symbols necessary for explanation will be shown.
Moving the Cursor
The cursor can be moved by pressing ▶, ◀, ▲ or ▼.
: Moves the cursor to the right.
: Moves the cursor to the left.
▲ : Moves the cursor to the leftmost column of the top line.
: Moves the cursor to the leftmost column of the bottom line.
- Hold ▶, ◀, ▲ or ▼ down for rapid movement.
Changing Operation Modes
This Organizer has five operation modes:
Clock, Telephone, Schedule, Anniversary and Calculator.
- Clock Mode
CLOCK

- Telephone Mode
BUSINESS, PERSONAL or OTHER
- Schedule Mode
SCHEDULE
• Anniversary Mode
ANN
- Calculator Mode
CALC
A NAME?
1994
00-00 00:00
-00-00 00:00
ANN. DATE?
00-00
♪
0.
Entering Characters
1. Entering Letters
Letters can be entered while A is displayed.
Note: The cursor (_ or ■) indicates the position for entry of a character or a number.
2. Entering Symbols
Symbols can be entered while A is displayed.
- Press SMBL. As SMBL is repeatedly pressed, the displayed symbol changes in the following order:
^ →^ ° → → → £ → → ← → (→) → # → * →^ ...
- To enter consecutive symbols, press ▶.
3. Entering Numbers
Use 0 through 9 to enter numbers.
4. Entering Hyphens (−), Dots (•), Spaces ( ) or Colons (:)
Press 2nd - , • , SPACE , and 2nd : , respectively.
Turning the Key Touch Tone On and Off
The key touch tone is turned on and off by pressing 2nd ♪.
When the tone is turned on, ♪ will be displayed in the Calculator mode only.
Clock Mode
1. Setting the Date and Time
Example: Set the date and time to February 8th, 1996, 10:05 AM.
-
Press CLOCK to display the time screen.
-
Press 2nd EDIT.
The cursor start to flash.

(Time screen)

-
Press 12▶24 to select the 12-hour or 24-hour clock. The display switches between them every time 12▶24 is pressed. AM or PM is displayed for the 12-hour clock. For this example, set the 12-hour clock.
-
Enter the hour and minutes.
AM 1 0 0 5
(Enter two digits each for both hour and minutes.)
Seconds are reset to 00.
- Enter the year, month, and date.
1 9 9 6 0 2 0 8
Use ▶ to skip entering a number which does not need to change. (Enter two digits each for both month and date.)
- Press ENTER. The clock begins to count the seconds.
• The built-in calendar extends from January 1st, 1901, to December 31st, 2098.
- If an impossible year, month, date, or time is entered, "ERROR!" will be displayed momentarily when ENTER is pressed. Enter the proper value and press ENTER again.
2. Checking the Date and Time
Press CLOCK to check the date and time. The day of the week is also displayed.
(THU)
1996-2-8
10:05 30
3. Changing the Time
- Press CLOCK to select the Clock mode.
- Press 2nd EDIT . The cursor flashes.
- Move the cursor to the place you wish to change.
- Enter the correct number. Seconds are reset to 00.
- Press ENTER . The clock will begin to function.
4. Switching between 12- and 24-Hour Clocks
- Press CLOCK to display the time screen.
- Press 2nd EDIT.
- Press 12▶24. The clock system switches between the 12-hour and 24-hour clocks every time 12▶24 is pressed.
- Press ENTER.
5. Daily Alarm
When the time clock reaches the alarm time, it beeps for one minute.
Press either CLOCK, ALARM, C-CE or OFF to turn off the alarm.
(1) Setting the daily alarm time
- Press 2nd ALARM to display the daily alarm screen.
ALARM OFF 0:00
-
Press 2nd EDIT.
-
Enter the time.
-
Press ENTER
The daily alarm time is set. The daily alarm is also automatically switched on. ("▶") appears.)
- The clock system for the daily alarm time is the same as that used for the clock.
(2) Turning the daily alarm on and off
The daily alarm will sound when "▶" is displayed.
“▶” is displayed or cleared every time ▶ is pressed while the daily alarm screen is displayed.
(3) Changing the daily alarm time
The daily alarm time can be changed by setting a new time. (Refer to “(1) Setting the daily alarm time”.)
6. Turning the On-The-Hour Tone On
The on-the-hour tone will sound every hour when it is set.
-
Press CLOCK to display the time screen.
-
Press ☐. ("☐" appears.)
- “” is displayed or cleared every time is pressed in the Clock mode.
Telephone Mode
The Telephone mode is divided into three files (BUSINESS, PERSONAL and OTHER). Press BUSINESS, PERSONAL or OTHER to select a telephone file.
In the Telephone mode, a listing consists of three entries: name, number and remark. The maximum number and type of characters that can be entered are as follows:
| Display | No. of characters | Type of characters | |
| Name entry | 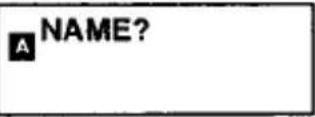 | 36 characters | Letters, symbols, dots, numbers, -, spaces |
| Number entry | 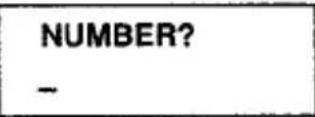 | 60 digits (5 lines) | Numbers, -, spaces, colons, F, H, C |
| Remark entry |  | 36 characters | Letters, symbols, dots, numbers, -, spaces |
1. Storing a Telephone Listing
Example: Store the following listing: "EDWARDS ROBERT" for name, "201-265-5600" and "F 265-1234" for number, and "ABC CO." for remark.
- Press BUSINESS to display the Telephone mode screen.
- Enter the name.


- Press ENTER (or ▼). (The cursor moves to the number entry.)
- Enter the phone number.


- Fax, Home or Cellular numbers can be distinguished by entering the appropriate letter before the phone number.
- Press ENTER. (The cursor moves to the remark entry.)
- Enter the company name.


- When ↑, ↓, → or ← is displayed, there are additional lines or characters which do not fit on the display. Press ▲ ▼ ▶ or ◀ to display them.
7. Press ENTER.
The name and phone number will be displayed briefly, then the next entry prompt will be displayed. The telephone listing is now stored.
- Step 6 can be skipped if nothing is to be entered in the remark entry.
2. Recalling Telephone Listings
Telephone listings in the Telephone mode are stored internally according to the first character of the name entry in the following order:
Space → symbols (° → ° → \$ → ¥ → £ → → ← → ( → ) → # → *) → numbers → letters
• Each time REMARK is pressed, the name and remark entries are displayed alternately.
(1) Sequential search
Press ▼ or ▲. Hold either of these keys down for rapid recall.
√ : Recalls listings in forward order.
^ : Recalls listings in reverse order.
(2) Recalling listings by first character(s) of name
- Enter the first character(s) in the name entry.
- Press √ (or ∧).
Listings that begin with the entered character(s) are recalled.
(3) Recalling listings by remark
- Press ON C-CE REMARK
- Press √ (or ∧).
Listings with remark entries are displayed sequentially. The listings are recalled in the same order as (1).
(4) Recalling listings by first character(s) of remark
- Press ON C-CE REMARK.
- Enter the first character(s) in the remark entry.
- Press ▼ (or △).
Listings that begin with the entered character(s) are recalled sequentially.
- After the desired remark is recalled, pressing 2nd √ (or 2nd ∧) recalls the next listing starting with the same remark. (To recall more listings starting with the same remark, press √ (or ∧). 2nd can be omitted.)
(5) Recalling a listing with a keyword search
To perform a keyword search, press C-CE, then enter any word contained in the desired listing and press 2nd v.
Example: Recall listings containing the word "ROBERT" in the BUSINESS file.
C-CE R O B E R T 2nd
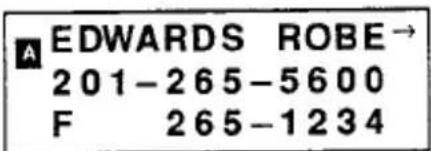
EDWARDS ROBE→ 201-265-5600 F 265-1234
Each time 2nd ▼ are pressed, successive listings containing the word "ROBERT" will be displayed.
★ In (2), (4) and (5), if a listing that begins with the entered character(s) is not in memory, "NOT FOUND!" is displayed and the display returns to the entry prompt.
3. Correction
(1) Correcting during an entry
-
Press ▶, ◀, ▲ or ▼ to move the cursor to the character to be corrected.
-
Enter the correct character.
-
Press ENTER.
- To correct a name or number when the cursor is in the remark entry, press to display the name or number contents and move the cursor.
★ Or re-enter the listing after pressing ON C-CE.
(2) Correcting a stored listing
-
Recall the listing to be corrected.
-
Press 2nd EDIT . The cursor flashes.
-
Correct the listing in the same procedure as (1).
• To correct a remark, press REMARK to display the remark contents.
- Press ENTER.
(Pressing 2nd ENTER creates a new listing without erasing the old listing.)
To insert characters, move the cursor to the desired location, press INS to add a space, and enter the character. To delete characters, move the cursor to the character to be deleted and press DEL.
Schedule Mode
The Schedule mode is used for storing schedule information (year, month, date, hour, minutes, and schedule details) in the memory. In this mode, a schedule listing consists of two entries: item and date. The item entry is used for entering schedule details (36 characters). In the date entry, four digits can be entered for the year and two digits each for the month, date, hour and minutes.
Letters, symbols, numbers, “—” and spaces can be entered in the item entry. Numbers and spaces can be entered in the date entry.
1. Storing a Schedule Item
Example: Store a schedule item (e.g., MEETING at 2:30 PM to 4:30 PM on January 26th, 1996).
- Press SCHEDULE to display the Schedule mode screen.
- Press ▲ to move the cursor to the top line of the display and enter the year (4
digits). To store a schedule listing in the same year, this step can be omitted. Schedules in the following years can be stored: 1901 to 2098.
- Enter the starting date and time on the second line.
0 1 2 6 PM 0 2 3 0
(The month, date, hour, and minutes should each consist of two digits.) The cursor will move to the third line.
- The time can be set using either the 12-hour or 24-hour format. When a schedule entry is recalled, the time is displayed in the format selected in the Clock mode.
- Enter the ending date and time.
0 1 2 6 PM 0 4 3 0
- After entry of the minutes, "DESCRIPTION?" is displayed.
- Enter the schedule details on the upper line.
M E E T I N G
- When → or ← is displayed, there are additional characters which do not fit on the display. Press ▶ or ◀ to display them.
- Press ENTER to store in memory.

- If an attempt is made to store an impossible date or time, "ERROR!" is displayed. Enter the correct date and time and press ENTER.
The contents entered will be automatically arranged chronologically and stored in the order of earliest to most recent, based on the data on the second line (starting time).
2. Recalling a Schedule Entry
(1) Sequential search
Press ▼ or ▲ to recall listings in forward or reverse order.
Hold ▼ or ▲ down for rapid recall.
- Entries with the same starting and ending dates are displayed without the ending date. Press SCHEDULE to recall today's schedule.
- If there is no entry for today, the next entry set for the future (or the past if SCHEDULE is pressed) will be displayed.
(2) Direct search
Press C:CE ▼ ▼ to move the cursor to the DESCRIPTION? prompt, enter the first character(s) of the desired schedule item and press ▼ or ▲ to recall that item directly.
(3) Keyword search
Press ON C-CE ▼ ▼ to move the cursor to the DESCRIPTION? prompt, enter a keyword that is contained in the desired schedule item and press 2nd ▼ or 2nd ▲ to recall that item.
(4) Date search
Enter the date and press ▼ or △ to recall that listing directly.
- If no appropriate listing is found in the memory after a direct search, a keyword search, or a date search, "NOT FOUND!" is displayed momentarily and the display returns to the entry prompt.
3. Correction
Correction is performed following the same procedure used for the Telephone mode (page 21).
• To correct the year, recall the desired schedule listing and press CALENDAR 2nd EDIT.
4. Checking the Day of the Week
There are three ways to check the day of the week in the Schedule mode.
(1) Confirmation by recalling schedule items
Recall that day's schedule, then press CALENDAR.
(2) Confirmation by designating the month and date
Enter the date on the second line, then press and hold CALENDAR.
(3) Confirmation by designating the year, month, and date
Enter the year, month and date. (To enter the year, move the cursor to the top line.) While pressing CALENDAR, the day of the week will be displayed.
5. Alarms for Schedule Mode
The Schedule mode is equipped with the following two alarms:
Advance alarm
There is slow beeping for 20 seconds, 10 minutes before the designated schedule listing.
Schedule alarm
There is rapid beeping for 20 seconds when the time set for a schedule listing is reached.
Turning the alarms on and off
The advance and schedule alarms will sound when "☐" is on the display.
Press 2nd to turn " 🔊" on and off.
- Press either CLOCK, ALARM, C-CE or OFF to turn off the alarm sound.
- If the advance alarm is stopped, the schedule alarm will not sound.
Anniversary Mode
You can enter birthdays, anniversaries, etc.
1. Entering an Anniversary
Example: "NANCY'S BIRTHDAY" on February 12
-
Press ANN.
-
Enter the month and date.
0 2 1 2
- Enter the description of the anniversary.
N A N C Y SMBL S SPACE B I R T H D A Y
- Press ENTER.
ANN. DATE? 00-00
A DESCRIPTION? 02-12
A'S BIRTHDAY_02-12
2. Recalling Anniversaries
(1) Sequential search
Press ▼ or ▲. Hold either of these keys down for rapid recall.
v : Recalls listings in forward order.
^ : Recalls listings in reverse order.
Recall "NANCY'S BIRTHDAY" (assuming today's date is February 8, 1996)
-
Press ANN.
-
Press ▼.
- After CALENDAR is pressed, the year and date appear on the first line. Press CALENDAR again and the display returns to the previous one.
- If the anniversary is in the week following the current date, a broken line as shown in the display appears on the third line.

(2) Direct search
Press ON C-CE ▲ to move the cursor to the 'DESCRIPTION? prompt, enter the first
character(s) of the desired anniversary item and press ▼ or △ to recall that item directly.
(3) Keyword search
Press ON C-CE ▲ to move the cursor to the DESCRIPTION? prompt, enter a keyword that is contained in the desired anniversary item and press 2nd √ or 2nd ∧ to recall that item.
(4) Date search
Enter the date and press ▼ or △ to recall that listing directly.
- If no appropriate listing is found in the memory after a direct search, a keyword search, or a date search, "NOT FOUND!" is displayed momentarily and the display returns to the entry prompt.
3. Correction
Correction is performed following the same procedure used for the Telephone mode (page 21).
4. Anniversary Reminder Function
If 📁 is lit when the power is on, this function is in effect, if not lit, this function is not in effect. Press 2nd ANN to clear 📁.
When the Organizer is turned on, the first anniversary in the week following the current date will be displayed, if one exists. Pressing ▼ displays the anniversaries one by one if there are any more in the week. They can be scrolled back by pressing ▲.
To clear the anniversary reminder function press ON C-CE or any mode key.
- When February 29 is entered as an anniversary, the reminder function will work even though it is not a leap year, but no broken line will appear on the third line.
Secret Function
1. Password Registration
Up to 7 characters can be registered as the password. Spaces are valid only if they are followed by other characters.
If the password is forgotten, it will be necessary to clear the password and all secret listings from memory (see page 39). As a safeguard, make a written record of the password.
Example: Register the password "1234567".
- Press BUSINESS to select the Telephone mode.
- You can also press PERSONAL, OTHER, SCHEDULE or ANN to register a password. (Only one password is registered for all modes.)
-
Press ON C-CE to display the entry prompt.
-
Press 2nd SECRET.
-
Enter the password.
1 2 3 4 5 6 7
- Press ENTER. "→" is displayed and the password is now registered.
The display returns to the entry prompt.
- If "PASSWORD?" is displayed, a password is already registered. To change or delete the password, refer to pages 35 and 39.
• Only one password can be registered, but many secret listings can be entered.
2. Turning the Secret Function On and Off
When the Secret function is off, "■" is displayed (secret listings can be accessed). When
the Secret function is on, "→" is cleared even after the password is registered (secret listings cannot be accessed).
(1) Turning the Secret function on
-
Press 2nd SECRET when the Telephone, Schedule or Anniversary mode entry prompt appears. The password will be displayed.
-
Press ENTER.
The Secret function is now on. "■" is cleared and the display returns to the entry prompt. • Even if the power is turned off, the Secret function is always on.
(2) Turning the Secret function off
- Press 2nd SECRET when the Telephone, Schedule or Anniversary mode entry prompt appears.

- Enter the password and press ENTER. (Press "1234567" in this case.)
The Secret function is now off. "■" is displayed and the display returns to the entry prompt.
3. Designating Listings as Secret
“*” next to a listing indicates it is secret. Secret listings will not be recalled unless the Secret function is off.
(1) Storing listings as secret
Press 2nd MARK* to display " * " during entry and store the listing.
(2) Designating stored listings as secret
Example:
Designate the listing for EDWARDS ROBERT as secret.
-
Recall the listing by pressing ▼ (or △).
-
Presss 2nd EDIT. The cursor flashes.
-
Press 2nd MARK*. “*” is displayed.

- Press ENTER.
The listing for EDWARDS ROBERT is now designated as secret.
-
Changing Secret Listings to Non-Secret
-
Turn the Secret function off. (Refer to page 32.)
-
Recall the desired secret listing by pressing ▼ (or △).
-
Press 2nd EDIT.
The cursor flashes.
- Press 2nd MARK*.
“*” is cleared.
- Press ENTER.
The secret listing is now changed to non-secret.
- Recalling or Correcting Secret Listings
To recall or correct secret listings, the Secret function must first be off.
- Turn the Secret function off. (Refer to page 32.)
- Recall or correct the listings using the same procedure as for non-secret listings.
- During recall, “*” next to a listing indicates it is secret.
★ Recalling secret listings only
To recall only the secret listings in the selected file:
- Turn the Secret function off. (Refer to page 32.)
- Press 2nd MARK*. " * " is displayed.
- Press √ (or ∧).
The secret listings only are sequentially recalled.
6. Changing the password
- Turn the Secret function off ("→" displayed).
- Press C-CE 2nd SECRET.
- Press 2nd EDIT . The first character of the password will flash.
- Enter a new password and press ENTER . The new password is now registered.
Note: If an attempt is made to turn the Secret function off with an incorrect password, the display shown on the right will appear. Press ON C-CE and enter the correct password.

Memory Storage
Checking Memory Storage
- Press BUSINESS.
- You can also press PERSONAL, OTHER, SCHEDULE or ANN to check memory storage.
- Press 2nd M-CK.
The number of bytes in use and remaining are displayed.
- Press M·CK .
The numbers of telephone listings stored are displayed.
-
Press M-CK.
-
Press M·CK.
The number of anniversary and schedule listings stored are displayed.
BUSI. PER. 3 0
OTHER 0
ANN. SCH. 2 1
The Organizer can store up to 9999 (1810: EL-6360) bytes in memory (excluding the calculator mode memory). One byte is required per character in the name, remark and schedule item entries, and one byte is required for two digits in the telephone number entry. When there is an odd number of digits in a number entry, the last digit occupies one byte. Five bytes are required for a schedule date entry when only the starting time is entered, and nine bytes when the starting and ending times are entered. Five bytes are needed to divide each telephone listing, but only four are needed when a remark is not entered. Four bytes are needed for each schedule or anniversary listing. Two bytes each are required for the month and date in the Anniversary mode.
• Each time M-CK is pressed, the display changes in the sequence described in Checking Memory Storage. Pressing ON C-CE displays the entry prompt.
- When ENTER is pressed after data entry and there is insufficient memory.
"FULL! NOT IN" is displayed and entry is no longer possible. Press ON C-CE and either delete previously stored listings or change the listing to be stored so that it will not exceed the memory capacity, then repeat the storing procedure.
- Since the same memory is used for the Telephone, Schedule and Anniversary modes, the number of listings available to be stored in each of these three modes will vary.
Clearing the Memory
1. Deleting a Listing
-
Recall the listing to be deleted.
-
Press DEL.
-
Press ENTER
(To cancel, press any key other than ENTER.)
2. Clearing a File
If the entire contents of a Telephone, Schedule or Anniversary mode are unnecessary, the file can be completely cleared.
Example: Clear a Telephone file.
- Press BUSINESS to enter Telephone mode.
Turn the Secret function off.
- Press DEL.

- Press 2nd ENTER.
(To cancel, press any key other than 2nd ENTER.)
- When "SECRET ON!" is displayed, the Secret function is on and the file cannot be deleted. Press ON C-CE to clear the message, turn the Secret function off, and repeat the procedure above.
All secret and non-secret listings in the file selected in step 1 will be cleared.
3. Deleting the Password and Secret Listings
The password and all secret listings can be deleted at the same time.
- Press BUSINESS.
- You can also press PERSONAL, OTHER, SCHEDULE or ANN to delete the password and all secret listings.
- Press 2nd SECRET.
- Press DEL.
- Press 2nd ENTER.
(To cancel, press any key other than 2nd ENTER.)
4. Clearing all Memory Contents
- Display the number of stored listings using the Checking Memory Storage procedure on
page 36. (Use any step to display the stored listings except step 2.)
- Press DEL.
![graph TD A["Flashes"] --> B["RESET OK?"]](/content/2026/07/1557839/images/d1b2ddf89cc8375fb90edc29b92bb0db8d8234c4e1ec2e794eebd39731fe37aa.jpg)
- Press 2nd ENTER.
(To cancel, press any key other than 2nd ENTER.)
Data in the clock mode, such as the time and daily alarm time, will also be cleared.
Calculator Mode
The Organizer can calculate numbers of up to 12 digits.
Calculation
Press CALC to select the Calculator mode.
Before performing a calculation, press C-CE C-CE and CM to clear the memory and display.
| Example | Operation | Display |
| (-24 + 2) ÷ 4 = -5.5 | 24 +/- + 2 ÷ 4 = | -5.5 |
| 34 + 57 = 9145 + 57 = 102 | 34 + 57 =45 = | 91.102. |
| 68 × 25 = 170068 × 40 = 2720 | 68 × 25 =40 = | 1700.2720. |
| 200 × 10% = 20 | 200 × 10 % | 20. |
| 9 ÷ 36 = 25(%) | 9 ÷ 36 % | 25. |
| 200 + (200 × 10%) = 220 | 200 + 10 % | 220. |
| 500 - (500 × 20%) = 400 | 500 - 20 % | 400. |
| 46 = (43)2 = 4096 | 4 × = = × = | 4096. |
| 1/8 = 0.125 | 8 ÷ = | 0.125 |
| Calculate the percent change between two yearly sales figures, 620,000 one year and500,000 the previous year. | 620000 - 500000 MU | 24. |
| Calculate the selling price and the gross profit from a cost of 8.16 on the basis of a 15% profit on the selling price. | 8.16 ÷ 15 MU MU | 9.6 (Selling price) 1.44 (Gross profit) |
| Calculate the cost and the gross profit from a selling price of100 on the basis of a 25% profit on the cost. | 100 ÷ 25 +/- MU MU | 80. (Cost) 20. (Gross profit) |
| 25 × 5 = 125-84 ÷ 3 = 28+68 + 17 = 85182 | CM 25 × 5 M+84 ÷ 3 M-68 + 17 M+RM | 125.M28.M85.M182.M |
| √25 - 9 = 4 | 25 - 9 = | 4. |
| 123456789098 × 145= 17901234419210 | - E-123456789098 145 = 17.9012344192C-CE 17.9012344192(17.9012344192 × 10 12 = 17901234419200) | |
Errors
When the integer part of a calculation result or any integer in the memory exceeds 12 digits, or other impossible operations are attempted, an error will occur. ("E" will appear on the first line.) Press C-CE to clear the error. Overflow errors can also be cleared with C-CE.
Power Supply
Batteries used
| Type | Model | Quantity | Application |
| Lithium battery | CR2025 | 1 | Main power source |
| Lithium battery | CR2016 | 1 | Memory backup |
- Do not remove both the main and memory backup batteries at the same time. Doing so will clear the memory of its contents.
- Be sure to write down any important information stored in memory before replacing the batteries.
1. Precautions
Since improper use of batteries may cause leakage or explosion, strictly observe the following instructions.
- Insert the battery with its positive side (+) correctly positioned, as indicated, in the holder.
- Never throw batteries into a fire because they might explode.
- Keep batteries out of the reach of children.
Because the batteries in the Organizer were installed at the factory, they may become depleted before the specified expiration time is reached.
2. Main Battery Replacement
(1) Battery replacement time
If the display becomes dim and difficult to read, immediately replace the battery with a new
one. Continued use of the Organizer with a consumed battery can alter or clear the memory contents.
Memory contents may be lost if the battery is improperly replaced or if the following instructions are disregarded.
- Make sure the power is turned off before replacing the batteries.
- Do not press ON C-CE until the battery replacement procedure is completed.
(2) Replacing the battery
- Press OFF to turn the power off.
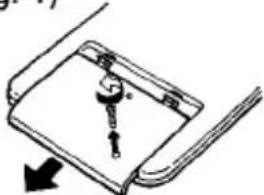
- Remove the screw from the battery holder cover on the back of the unit, then remove the holder cover by moving it in the direction of the arrow. (Fig. 1)
(Fig. 1)
- Remove the old battery using a ball-point pen or similar object. (Fig. 2)
(Fig. 2)

- With the plus side (+) up, insert a new battery, positioning it under the tab.
- Replace the holder cover and secure it with the screw.
- Press C-CE to turn the power on. If nothing appears on the display, press the RESET switch on the back of the unit and press ON C-CE again.
- Set the clock to the correct time.
3. Memory Backup Battery Replacement
(1) Battery replacement frequency
- Replace the battery every 5 years.
(2) Precautions when replacing the battery
- Make sure the main battery is undepleted. If the main battery is weak, first replace it with a new one before replacing the memory backup battery.
- If the memory backup battery is replaced when the main battery is depleted, memory contents will be lost.
(3) Replacing the battery
- Press OFF to turn the power off.
-
Remove the screw from the battery holder cover on the back of the unit. Remove the holder cover in the direction of the arrow. (Fig. 1)
-
While pressing ①, slide the memory backup battery holder cover in the direction ② and remove it. (Fig. 2)


- Remove the old battery using a ball-point pen or similar object. (Fig. 3)
(Fig. 3)

- With the plus side (+) up, insert a new battery, positioning it under the tab.
- Replace both of the holder covers and secure them with the screw.
- Press ON C-CE to turn the power on. If nothing appears on the display, press the RESET switch on the back of the unit and press ON C-CE again.
To minimize battery consumption, the organizer is designed to automatically turn off when no key has been pressed for approximately 7 minutes.
4. Battery Replacement Date Label
This unit has a battery replacement date label.
On the back of the unit a label indicating the date when the batteries were installed at the factory is attached. Write two further dates on the label in 5-year increments after this factory date, and affix the label to the unit.
Label example: Batteries were installed in October 1996.


Specifications
Model: EL-6360/EL-6390
Product name: Electronic Organizer
Display: 3 lines of 12 digits and 2 symbol digits each
Memory capacity: EL-6360: 1810 bytes, EL-6390: 9999 bytes
Clock Mode
Accuracy: ±30 seconds/month (at 25°C/77°F)
Display: Year, month, date, day of the week, hour, minutes, seconds, AM/PM
Clock system: 12-hour/24-hour format (switchable)
Telephone Mode (BUSINESS, PERSONAL and OTHER)
Entry and recall of names, numbers, and remarks
Schedule Mode
Entry and recall of schedule (year, month, date, hour and minutes), day of the week confirmation, schedule alarm setting and clear
Anniversary Mode
Entry and Recall of month and date
Calculator Mode
Digits: 12
Calculation: Addition, subtraction, multiplication, division, percentage, square root, etc.
Power consumption: 0.003 W
Operating temperature: 0°C–40°C (32°F–104°F)
Power supply: Main battery: 3V ... (DC) (Lithium battery CR2025; 1)
Memory backup battery: 3V — (DC) (Lithium battery CR2016; 1)
Battery life: For the main battery, approximately 1 year at an ambient temperature
of 20°C (68°F), assuming the following daily use: 30 minutes display, alarm sounding for 20 seconds and key touch tone turned on/off 100 times.
For the memory backup battery, approximately 5 years (at 20°C/68°F).
Weight: 98 g (0.22 lb.) (Including batteries)
Dimensions: When open 133.5(W) x 162(D) x 7.8(H) mm (5-1/4" (W) x 6-3/8" (D) x 5/16" (H))
When closed 133.5(W) × 83(D) × 11.6(H) mm (5-1/4" (W) × 3-9/32" (D) × 15/32" (H))
Accessories: 2 lithium batteries (installed), operation manual
SERVICE CENTER ADDRESS
SHARP ELECTRONICS CORPORATION
1300 Naperville Drive
Romeoville, Illinois 60441
(708) 759-8555
To order Supplies or Accessories, contact your local SHARP Dealer/Retailer or contact the SHARP Accessories and Supply Center at 1 (800) 642-2122.
REGIONAL SALES OFFICES AND DISTRIBUTION CENTERS:
Eastern: Sharp Plaza, Mahwah, New Jersey 07430-2135. Phone: (201)529-8200
Midwest: 1300 Naperville Drive, Romeoville, Illinois 60441. Phone: (708)759-8555
Western: Sharp Plaza 20600 South Alameda Street, Carson, California 90810. Phone: (310)637-9488
LIMITED WARRANTY
Sharp Electronics Corporation warrants this product to the first consumer purchaser to be free from defective materials and workmanship. Under this warranty the product will be repaired or replaced, at our option, without charge for parts or labor, with the exception of batteries, when returned to a SHARP CONSUMER FACTORY SERVICE CENTER listed in the instruction booklet supplied with your unit.
This warranty does not apply to any appearance items nor to any product whose exterior has been damaged or defaced, nor to any product subjected to misuse, abnormal service or handling, nor to any products altered or repaired by other than a SHARP CONSUMER FACTORY SERVICE CENTER. This warranty does not apply to any product purchased outside the United States, its territories, or possessions.
The period of this warranty covers one (1) year on parts and one (1) year on labor including the solar cell from date of purchase. This warranty entitles the first consumer purchaser to have the warranted parts and labor rendered at no cost for the period of the warranty described above when the unit is carried or shipped, prepaid, to a SHARP CONSUMER FACTORY SERVICE CENTER together with proof of purchase.
THIS SHALL BE THE EXCLUSIVE WRITTEN WARRANTY OF THE FIRST CONSUMER PURCHASER AND NEITHER THIS WARRANTY NOR ANY OTHER WARRANTY, EXPRESSED OR IMPLIED. SHALL EXTEND BEYOND THE PERIOD OF THE TIME LISTED ABOVE. IN NO EVENT SHALL SHARP BE LIABLE FOR CONSEQUENTIAL ECONOMIC DAMAGE OR CONSEQUENTIAL DAMAGE TO PROPERTY. SOME STATES DO NOT ALLOW A LIMITATION ON HOW LONG AN IMPLIED WARRANTY LASTS OR AN EXCLUSION OF CONSEQUENTIAL DAMAGE. SO THE ABOVE LIMITATION AND EXCLUSION MAY NOT APPLY TO YOU. IN ADDITION. THIS WARRANTY GIVES SPECIFIC LEGAL RIGHTS. AND YOU MAY HAVE OTHER RIGHTS WHICH VARY FROM STATE TO STATE.
SHARP
SHARP ELECTRONICS CORPORATION
Sharp Plaza, Mahwah, New Jersey 07430-2135.
SHARP CORPORATION
PRINTED IN TAIWAN / IMPRIMÉ À TAIWAN
HDHDBS1CE19 W30 T(E0178E) ①
- NOTICE
- CAUTIONS
- CONTENTS
- USING THE ORGANIZER FOR THE FIRST TIME
- WHEN ABNORMAL CONDITIONS CAUSE A MALFUNCTION
- DISPLAY SYMBOLS
- MOVING THE CURSOR
- CHANGING OPERATION MODES
- ENTERING CHARACTERS
- ENTERING LETTERS
- ENTERING SYMBOLS
- ENTERING NUMBERS
- ENTERING HYPHENS (−), DOTS (•), SPACES ( ) OR COLONS (:)
- TURNING THE KEY TOUCH TONE ON AND OFF
- CLOCK MODE
- SETTING THE DATE AND TIME
- CHECKING THE DATE AND TIME
- CHANGING THE TIME
- SWITCHING BETWEEN 12- AND 24-HOUR CLOCKS
- DAILY ALARM
- CHANGING THE DAILY ALARM TIME
- TURNING THE ON-THE-HOUR TONE ON
- TELEPHONE MODE
- STORING A TELEPHONE LISTING
- PRESS ENTER
- RECALLING TELEPHONE LISTINGS
- SEQUENTIAL SEARCH
- RECALLING A LISTING WITH A KEYWORD SEARCH
- CORRECTION
- SCHEDULE MODE
- STORING A SCHEDULE ITEM
- RECALLING A SCHEDULE ENTRY
- DIRECT SEARCH
- KEYWORD SEARCH
- DATE SEARCH
- CHECKING THE DAY OF THE WEEK
- CONFIRMATION BY RECALLING SCHEDULE ITEMS
- ALARMS FOR SCHEDULE MODE
- ADVANCE ALARM
- SCHEDULE ALARM
- TURNING THE ALARMS ON AND OFF
- ANNIVERSARY MODE
- ENTERING AN ANNIVERSARY
- RECALLING ANNIVERSARIES
- ANNIVERSARY REMINDER FUNCTION
- SECRET FUNCTION
- PASSWORD REGISTRATION
- TURNING THE SECRET FUNCTION ON AND OFF
- TURNING THE SECRET FUNCTION ON
- TURNING THE SECRET FUNCTION OFF
- DESIGNATING LISTINGS AS SECRET
- STORING LISTINGS AS SECRET
- DESIGNATING STORED LISTINGS AS SECRET
- EXAMPLE
- CHANGING THE PASSWORD
- MEMORY STORAGE
- CHECKING MEMORY STORAGE
- CLEARING THE MEMORY
- DELETING A LISTING
- CLEARING A FILE
- EXAMPLE: CLEAR A TELEPHONE FILE
- DELETING THE PASSWORD AND SECRET LISTINGS
- CLEARING ALL MEMORY CONTENTS
- CALCULATOR MODE
- CALCULATION
- ERRORS
- POWER SUPPLY
- PRECAUTIONS
- MAIN BATTERY REPLACEMENT
- BATTERY REPLACEMENT TIME
- REPLACING THE BATTERY
- MEMORY BACKUP BATTERY REPLACEMENT
- BATTERY REPLACEMENT DATE LABEL
- SPECIFICATIONS
- TELEPHONE MODE (BUSINESS, PERSONAL AND OTHER)
- SERVICE CENTER ADDRESS
- SHARP ELECTRONICS CORPORATION
- REGIONAL SALES OFFICES AND DISTRIBUTION CENTERS
- LIMITED WARRANTY
- SHARP
- SHARP CORPORATION
Brand : SHARP
Model : EL-6360
Category : Calculator