
X-CM31-T - Audio System PIONEER - Free user manual and instructions
Find the device manual for free X-CM31-T PIONEER in PDF.

| Product type | Micro component audio system |
| Brand | Pioneer |
| Model | X-CM31-T |
| Output power | 15 W + 15 W (1 kHz, 10% THD, 8 Ω) |
| Main unit dimensions | 200 mm (W) x 123 mm (H) x 250.6 mm (D) |
| Main unit weight | 2.0 kg |
| Speaker dimensions | 120 mm (W) x 200 mm (H) x 232.6 mm (D) |
| Speaker weight (each) | 2.0 kg |
| Power supply | AC 220 V to 240 V, 50/60 Hz |
| Power consumption (operation) | 37 W |
| Power consumption (standby) | 0.5 W max. |
| FM range | 87.5 MHz to 108 MHz |
| AM range | 522 kHz to 1620 kHz |
| Supported disc types | Audio CD, CD-R/RW (CD format), CD-R/RW MP3/WMA |
| Supported audio formats | MP3, WMA |
| Audio sources | CD, FM/AM tuner, iPod/iPhone/iPad (dock or USB), USB, Auxiliary (AUDIO IN/LINE) |
| Special functions | RDS, alarm, sleep timer, equalizer, P.Bass, bass/treble adjustment, repeat/random/programmed playback |
| Connectivity | USB port (front), headphone jack, mini-jack audio input, RCA line input, iPod/iPhone dock (30-pin), FM/AM antenna |
| Included accessories | Remote control, AAA batteries (x2), AM antenna cable, FM wire antenna, power cord, iPad stand, anti-slip pads (x8), warranty card, user manual |
| Maintenance and cleaning | Unplug before cleaning; use a soft dry or slightly damp cloth (diluted neutral detergent); do not use harsh chemicals |
| Safety | Class 1 laser; do not open the casing; leave ventilation space (≥25 cm above, 15 cm rear, 5 cm sides); do not expose to water or flames |
| Repairability | No user-serviceable parts; refer all servicing to qualified personnel |
Frequently Asked Questions - X-CM31-T PIONEER
User questions about X-CM31-T PIONEER
0 question about this device. Answer the ones you know or ask your own.
Ask a new question about this device
Download the instructions for your Audio System in PDF format for free! Find your manual X-CM31-T - PIONEER and take your electronic device back in hand. On this page are published all the documents necessary for the use of your device. X-CM31-T by PIONEER.
USER MANUAL X-CM31-T PIONEER
Discover the benefits of registering your product online at http://www.pioneer.co.uk (or http://www.pioneer.eu).
Pioneer product via http://www.pioneer.nl -
http://www.pioneer.be (of http://www.pioneer.eu)
Operating Instructions
Mode d'emploi
Bedienungsanleitung
The lightning flash with arrowhead symbol, within an equilateral triangle, is intended to alert the user to the presence of uninsulated "dangerous voltage" within the product's enclosure that may be of sufficient magnitude to constitute a risk of electric shock to persons.
CAUTION
RISK OF ELECTRIC SHOCK
DO NOT OPEN
CAUTION:
TO PREVENT THE RISK OF ELECTRIC SHOCK,DO NOT REMOVE COVER (OR BACK).NO USER-SERVICEABLE PARTS INSIDE.REFER SERVICING TO QUALIFIED SERVICE PERSONNEL.

The exclamation point within an equilateral triangle is intended to alert the user to the presence of important operating and maintenance (servicing) instructions in the literature accompanying the appliance.
D3-4-2-1-A1_En
WARNING
This equipment is not waterproof. To prevent a fire or shock hazard, do not place any container filled with liquid near this equipment (such as a vase or flower pot) or expose it to dripping, splashing, rain or moisture.
D3-4-2-1-3_A1_En
WARNING
Before plugging in for the first time, read the following section carefully.
The voltage of the available power supply differs according to country or region. Be sure that the power supply voltage of the area where this unit will be used meets the required voltage (e.g., 230 V or 120 V) written on the rear panel.
D3-4-2-1-4*A1En
WARNING
To prevent a fire hazard, do not place any naked flame sources (such as a lighted candle) on the equipment.
D3-4-2-1-7a_A1_En
Operating Environment
Operating environment temperature and humidity: +5^ to +35^ (+41^ to +95^) less than 85% RH (cooling vents not blocked)
Do not install this unit in a poorly ventilated area, or in locations exposed to high humidity or direct sunlight (or strong artificial light) D3-4-2-1-7c*A1.En
This product is for general household purposes. Any failure due to use for other than household purposes (such as long-term use for business purposes in a restaurant or use in a car or ship) and which requires repair will be charged for even during the warranty period. K041_A1_EN
VENTILATION CAUTION
When installing this unit, make sure to leave space around the unit for ventilation to improve heat radiation (at least 25cm at top, 15cm at rear, and 5cm at each side).
WARNING
Slots and openings in the cabinet are provided for ventilation to ensure reliable operation of the product, and to protect it from overheating. To prevent fire hazard, the openings should never be blocked or covered with items (such as newspapers, table-cloths, curtains) or by operating the equipment on thick carpet or a bed.
D3-4-2-1-7b*A1_En
CAUTION
This product is a class 1 laser product classified under the Safety of laser products, IEC 60825-1:2007.
CLASS 1 LASER PRODUCT
D58-5-2-2a_A1_En
WARNING
Store small parts out of the reach of children and infants. If accidentally swallowed, contact a doctor immediately.
Information for users on collection and disposal of old equipment and used batteries
(Symbol for equipment)

(Symbol examples) for batteries

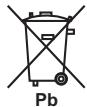
These symbols on the products, packaging, and/or accompanying documents mean that used electrical and electronic products and batteries should not be mixed with general household waste.
For proper treatment, recovery and recycling of old products and used batteries, please take them to applicable collection points in accordance with your national legislation.
By disposing of these products and batteries correctly, you will help to save valuable resources and prevent any potential negative effects on human health and the environment which could otherwise arise from inappropriate waste handling.
For more information about collection and recycling of old products and batteries, please contact your local municipality, your waste disposal service or the point of sale where you purchased the items.
These symbols are only valid in the European Union.
For countries outside the European Union:
If you wish to discard these items, please contact your local authorities or dealer and ask for the correct method of disposal.
K058a_A1_En
If the AC plug of this unit does not match the AC outlet you want to use, the plug must be removed and appropriate one fitted. Replacement and mounting of an AC plug on the power supply cord of this unit should be performed only by qualified service personnel. If connected to an AC outlet, the cut-off plug can cause severe electrical shock. Make sure it is properly disposed of after removal. The equipment should be disconnected by removing the mains plug from the wall socket when left unused for a long period of time (for example, when on vacation). D3-4-2-2-1a_A1_En
D3-4-2-2-1a_A1_En
POWER-CORD CAUTION
Handle the power cord by the plug. Do not pull out the plug by tugging the cord and never touch the power cord when your hands are wet as this could cause a short circuit or electric shock. Do not place the unit, a piece of furniture, etc., on the power cord, or pinch the cord. Never make a knot in the cord or tie it with other cords. The power cords should be routed such that they are not likely to be stepped on. A damaged power cord can cause a fire or give you an electrical shock. Check the power cord once in a while. When you find it damaged, ask your nearest PIONEER authorized service center or your dealer for a replacement.
S002*A1_EN
CAUTION
The OSTANDBY/ON switch on this unit will not completely shut off all power from the AC outlet. Since the power cord serves as the main disconnect device for the unit, you will need to unplug it from the AC outlet to shut down all power. Therefore, make sure the unit has been installed so that the power plug can be easily unplugged from the AC outlet in case of an accident. To avoid fire hazard, the power cord should also be unplugged from the AC outlet when left unused for a long period of time (for example, when on vacation). D3-4-2-2a*A1_EN
Thank you for buying this Pioneer product.
Please read through these operating instructions so that you will know how to operate your model properly. After you have finished reading the instructions, put them in a safe place for future reference.
Contents
01 Contents
01 Before you start
What's in the box 5
Loading the batteries in the remote control 5
Using the remote control 5
02 Part names and functions
Remote control 6
Speaker system 7
Attaching the Non-skid pads 7
Front panel 8
Top panel 9
03 Connections
Speaker connection 10
Connecting a TV 10
Connecting antennas 11
Using external antennas. 11
Plugging in 11
04 Getting started
To turn the power on 12
Setting the clock 12
General control 12
Input function. 12
Display brightness control 12
Volume auto set-in. 12
Volume control. 12
Muting. 12
Sound controls 13
Equalizer 13
P.bass control 13
Bass/treble control 13
Setting the wake-up timer 13
Calling the wake-up timer 14
Cancelling the wake-up timer. 14
Using the wake-up timer. 14
Using the sleep timer 14
Using Headphones 14
05 iPod/iPhone/iPad playback
Confirming what iPod/iPhone/iPad models are supported 15
Connecting your iPod/iPhone/iPad 15
Connecting iPod/iPhone to the top panel 16
Connecting iPod/iPhone/iPad using supplied stand . . 16
Watching iPod/iPhone videos on your TV 17
Playing iPod/iPhone 17
Playing iPad 17
06 Disc playback
Playing discs or files 18
Advanced CD or MP3/WMA disc playback 19
Direct track search 19
Repeat play. 19
Random play 19
Programmed play (CD or MP3/WMA) 20
About downloading MP3/WMA 20
About folder playback order 20
Specify the folder to play. 21
Switch the display contents 21
07 USB playback
Playing USB storage devices 22
Repeat play. 22
Random play 22
Specify the folder to play. 23
Switch the display contents 23
Playing in the desired order
(Programmed Play) 23
08 Using the tuner
Listening to the radio broadcasts 24
Tuning. 24
Saving station presets. 24
To recall a memorised station 25
To scan the preset stations. 25
To erase entire preset memory. 25
Using the Radio Data System (RDS) 25
An introduction to RDS. 25
Searching for RDS programs 25
Information provided by RDS 26
Using the Auto Station program Memory (ASPM) 26
Notes for RDS operation. 26
09 Other connections
Connecting auxiliary components 27
010 Additional information
Troubleshooting 28
Playable discs and formats 30
Regarding copy protected CDs 30
Supported audio file formats 30
Cautions on use 30
When moving this unit 30
Place of installation. 30
Do not place objects on this unit 31
About condensation 31
Cleaning the product. 31
Cleaning the lens. 31
Handling discs 31
Storing 31
Cleaning discs 31
About specially shaped discs 31
About iPod/iPhone/iPad 32
Restoring all the settings to the defaults 32
Specifications 33
Chapter 1: Before you start
What's in the box
Please confirm that the following accessories are in the box when you open it.
Remote Control
Power cord
AM antenna cable
FM wire antenna
AAA batteries (03)× 2
Non-skid pads x 8
- iPad stand
Warranty card
- Operating instructions (this document)
Loading the batteries in the remote control
1 Open the rear lid and load the batteries as illustrated below.

2 Close the rear lid.
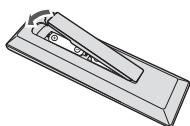
CAUTION
- Do not use any batteries other than the ones specified. Also, do not use a new battery together with an old one.
- When loading the batteries into the remote control, set them in the proper direction, as indicated by the polarity marks ( and ).
- Do not heat batteries, disassemble them, or throw them into flames or water.
WARNING
- Batteries may have different voltages, even if they are the same size and shape. Do not use different types of batteries together.
- To prevent leakage of battery fluid, remove the batteries if you do not plan to use the remote control for a long period of time (1 month or more). If the fluid should leak, wipe it carefully off the inside of the case, then insert new batteries. If a battery should leak and the fluid should get on your skin, flush it off with large quantities of water.
- When disposing of used batteries, please comply with governmental regulations or environmental public institution's rules that apply in your country/area.
Do not use or store batteries in direct sunlight or other excessively hot place, such as inside a car or near a heater. This can cause batteries to leak, overheat, explode or catch fire. It can also reduce the life or performance of batteries.
Using the remote control
The remote has a range of about 7m at an angle of about 30^ from the remote sensor.

Keep in mind the following when using the remote control:
- Make sure that there are no obstacles between the remote and the remote sensor on the unit.
Remote operation may become unreliable if strong sunlight or fluorescent light is shining on the unit's remote sensor. - Remote controllers for different devices can interfere with each other. Avoid using remotes for other equipment located close to this unit.
- Replace the batteries when you notice a fall off in the operating range of the remote.
Chapter 2:
Part names and functions
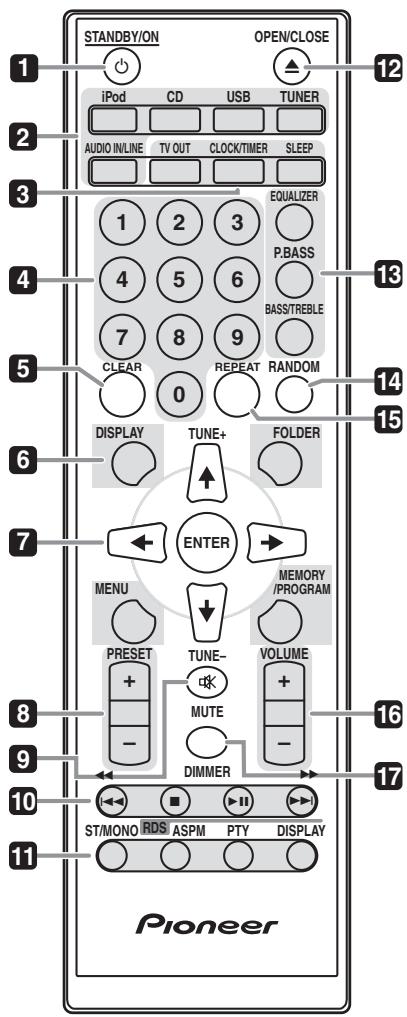
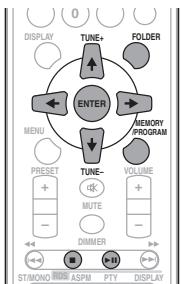
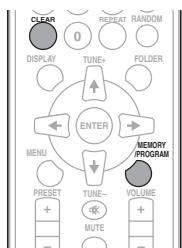
Remote control
1 STANDBY/ON
Switches the receiver between standby and on (page 18).
2 Input function buttons
Use to select the input source to this receiver (page 18).
3 CD Receiver control buttons TV OUT
Setting iPod/iPhone video on/off.
CLOCK/TIMER
Use for setting the clock, as well as for setting and checking the timers (page 12).
SLEEP
See Using the sleep timer on page 14.
4 Numeric buttons (0 to 9)
Use to enter the number (page 19).
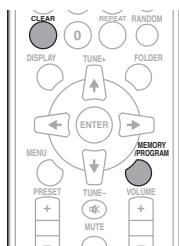
5 CLEAR
Use to clear the programmed play (page 20).
6 CD Receiver control buttons DISPLAY
Press to change the display for songs playing back from CD or USB (page 21).
FOLDER
Use to select the folder of the MP3/WMA disc or USB mass storage device (page 20).
MENU
Use to access the menu.
MEMORY/PROGRAM
Use to memory or program the MP3/WMA disc (page 20).
7 / / / (TUNE + / - ), ENTER
Use to select/switch system settings and modes, and to confirm actions.
Use TUNE + / - can be used to find radio frequencies (page 24).
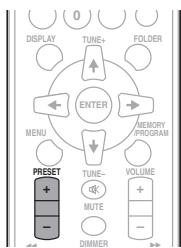
8 PRESET control buttons
Use to select preset radio stations (page 24).
9 MUTE
Mutes/unmates the sound (page 12).
10Playback control buttons
Use to control each function after you have selected it using the input function buttons (page 18).
11 Tuner control buttons ST/MONO
Use to switch the sound mode between stereo and monaural. (page 24)
RDS ASPM
Use to search for RDS Auto station program memory (page 25).
RDS PTY
Use to search for RDS program types (page 25).
RDS DISPLAY
Press to change the RDS display for information mode (page 25).
12 OPEN/CLOSE
Use to open or close the disc tray (page 18).
13 Sound control buttons
Adjust the sound quality (page 13).
14 RANDOM
Press to randomize order play setting from a CD, iPod or USB (page 19).
15 REPEAT
Press to change the repeat play setting from a CD, iPod or USB (page 19).
16 Volume control buttons
Use to set the listening volume (page 12).
17 DIMMER
Dims or brightens the display. The brightness can be controlled in four steps (page 12).
Speaker system
1 Tweeter
2 Woofer
3 Bass Reflex Duct


Important
Speaker grille cannot be removed.
Attaching the Non-skid pads
Apply the accessory non-skid pads to the bottom surfaces of the speakers.

Important
Use the speaker is usually in an upright position.
Front panel

1 Main display
2 Volume control
Use to set the listening volume (page 12).
3 Volume illumination
Light when the power on.
4 Headphone socket
Use to connect headphones. When the headphones are connected, there is no sound output from the speakers.
5 AUDIO IN socket
Use to connect an auxiliary component using a stereo minijack cable (page 27).
6 Remote sensor
Receives the signals from the remote control.
7 Disc tray
Place the disc, label side up (page 18).
8 TIMER indicator
Lights when the receiver is power off with timer setting.
9 USB terminal
Use to connect your USB mass storage device or Apple iPod/ iPhone/iPad as an audio source (page 22).
Top panel
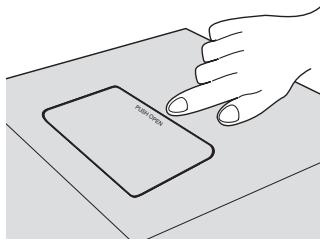
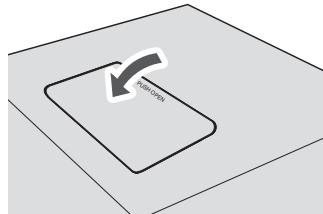
1 iPod/iPhone connector port
To connect the iPod/iPhone, press the PUSH OPEN tab (page 15).
2 STANDBY/ON
Switches the receiver between standby and on (page 18).
3Playback control buttons
Selects the desired track or file to be played back. Use to stop the playback. Stops playback or resumes playback from the pause point.
4 INPUT
Selects the input source.
5 Disc tray open/close button
Use to open or close the disc tray (page 18).
Chapter 3:
Connections

CAUTION
- Be sure to turn off the power and unplug the power cord from the power outlet whenever making or changing connections.
- Connect the power cord after all the connections between devices have been completed.
Speaker connection
To connect the speaker cord to the connector, insert into the speaker connector of the rear of the receiver.

CAUTION
These speaker terminals carry HAZARDOUS LIVE voltage. To prevent the risk of electric shock when connecting or disconnecting the speaker cables, disconnect the power cord before touching any uninsulated parts.
- Do not connect any speakers other than those supplied to this system.
- Do not connect the supplied speakers to any amplifier other than the one supplied with this system. Connection to any other amplifier may result in malfunction or fire.
- Do not attach these speakers to the wall or ceiling. They may fall off and cause injury.
- These speakers are magnetically shielded. However, depending on the installation location, color distortion may occur if the speaker system is installed extremely close to the screen of a television set. If this happens, turn off the television set, and then turn it on after 15 to 30 minutes. If the problem persists, move the speaker system away from the television set.
Connecting a TV
- When an iPod/iPhone is connected to this unit, the TV output setting of iPod/iPhone is automatically set to 'ON'.

Note
- Some iPod allow the TV output setting to be changed while connected.
- When the iPod/iPhone is disconnected from this unit, the iPod/iPhone's TV output setting returns to its original state.
Connecting antennas
Connect the AM loop antenna and the FM wire antenna as shown below. To improve reception and sound quality, connect external antennas (see Using external antennas below).
1 Connect the AM antenna wires.
Holding the connector to connect.
2 Fix the AM loop antenna to the attached stand.
To fix the stand to the antenna, bend in the direction indicated by the arrow (fig. a) then clip the loop onto the stand (fig. b).
3 Place the AM antenna on a flat surface and in a direction giving the best reception.
4 Connect the FM wire antenna into the FM antenna socket.
For best results, extend the FM antenna fully and fix to a wall or door frame. Don't drape loosely or leave coiled up.
Using external antennas
To improve FM reception
Use a PAL connector (not supplied) to connect an external FM antenna.
Plugging in
Before making or changing the connections, switch off the power and disconnect the power cord from the AC outlet. After you've finished making all connections, plug the unit into an AC outlet.
CAUTION
- Do not use any power cord other than the one supplied with this unit.
- Do not use the supplied power cord for any purpose other than that described below.
Chapter 4:
Getting started
To turn the power on
Press the STANDBY/ON to turn the power on.
After use:
Press the STANDBY/ON to enter the power stand-by mode.

Note
- In standby mode, if iPod/iPhone/iPad is connected, the unit turns charge mode.
Setting the clock
1 Press STANDBY/ON to turn the power on.
2 Press CLOCK/TIMER on the remote control.
"CLOCK" is shown on the main display.
3 Press ENTER.
4 Press to set the day, then press ENTER.
5 Press to set the hour, then press ENTER.
6 Press / to set the minute, then press ENTER to confirm.
7 Press ENTER.
To confirm the time display:
Press the CLOCK/TIMER. The time display will appear for about 10 seconds.
To readjust the clock:
Perform "Setting the clock" from step 1.

Note
- When power supply is restored after unit is plugged in again or after a power failure, reset the clock.
General control
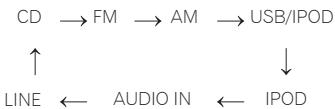
Input function
When the INPUT on main unit is pressed, the current function will change to different mode. Press the INPUT repeatedly to select desired function.
Display brightness control
Press DIMMER to dims the display brightness. The brightness can be controlled in four steps.
Volume auto set-in
If you turn off and on the main unit with the volume set to 17 or higher, the volume starts at 16 and sets in to the last set level.
Volume control
Turn the volume knob towards VOLUME (on main unit) or press VOLUME +/- (on remote control) to increase or decrease the volume.
CAUTION
- The sound level at a given volume setting depends on speaker efficiency, location, and various other factors. It is advisable to avoid exposure to high volume levels. Do not turn the volume on to full at switch on. Listen to music at moderate levels. Excessive sound pressure from earphones and headphones can cause hearing loss.
Muting
The volume is muted temporarily when pressing the MUTE on the remote control. Press again to restore the volume.
Sound controls
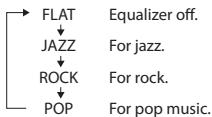
Equalizer
When the EQUALIZER is pressed, the current mode setting will be displayed. To change to a different mode, press the EQUALIZER repeatedly until the desired sound mode appears.
P.bass control
When the power is first turned on, the unit will enter the P.bass mode which emphasises the bass frequencies. To cancel the P.bass mode, press the P.BASS on the remote control.
Bass/treble control
Press the BASS/TREBLE, then press / to adjust the bass or treble.
Note
EQUALIZER, P.BASS and BASS/TREBLE, the simultaneous operation is not possible. Among the features of these three, one feature will only work you have selected.
If you select one of three functions, features that are not selected will be set as follows.
1 If you change the settings of P.BASS (ON/OFF).
EQUALIZER:FLAT
BASS/TREBLE: BASS=0, TREBLE=0
2 If you change the settings of EQUALIZER.
P.BASS:OFF
BASS/TREBLE: BASS=0, TREBLE=0
3 If you change the settings of BASS/TREBLE.
P.BASS:OFF
- EQUALIZER:FLAT
Setting the wake-up timer
Used to change the existing timer setting, or to set a new timer.
1 Press STANDBY/ON to turn the power on.
2 Press and hold CLOCK/TIMER.
3 Press / to select "ONCE" or "DAILY", then press ENTER.
ONCE - Once timer play works for one time only at a preset time.
DAILY - Daily timer play works at the same preset time and days of week.
4 Press / to select "TIMER SET", then press ENTER.
5 Press / to select the timer playback source, then press ENTER.
- CD, FM, AM, USB/IPOD, IPOD, AUDIO IN and LINE can be selected as the playback source.
6 Press / to select the timer day, then press ENTER.
7 Press / to set the hour, then press ENTER.
8 Press / to set the minute, then press ENTER.
- Set the time to finish as in steps 7 and 8 above.
9 Adjust the volume press VOLUME + / - , then press ENTER.
10 Press STANDBY/ON to enter the power standby mode.
- The TIMER indicator lights up.
Calling the wake-up timer
It can be used to re-use an existing timer setting.
1 As well as steps 1 through 3 in "Setting the wake-up timer".
2 Press / to select "TIMER ON", then press ENTER.
Cancelling the wake-up timer
It can be used to turn off the timer setting.
1 As well as steps 1 through 3 in "Setting the wake-up timer".
2 Press / to select "TIMER OFF", then press ENTER.
Using the wake-up timer
1 Press STANDBY/ON to turn the power off.
2 At the wake-up time, this unit will turn on automatically and play the selected input function.

Note
- If at the wake-up time iPod/iPhone/iPad is not connected to this unit or a disc is not inserted, this unit will be turned to on and not play back the track.
Some discs may not be played automatically at the wake-up time. - If you set the timer, take one minute or more between the start and end time.
Using the sleep timer
The sleep timer switches off the unit after a specified time so you can fall asleep without worrying about it.
1 Press SLEEP repeatedly to select a switch off time.
Choose between 10 min, 20 min, 30 min, 60 min, 90 min, 120 min, 150 min, 180 min or OFF. The newly set value displays for 3 seconds, and then the setting is completed.

Note
- The sleep timer can be set by pressing SLEEP while the remaining time is displayed.
Using Headphones
Connect to the jack plug of the headphones.
When the headphones are connected, there is no sound output from the speakers.
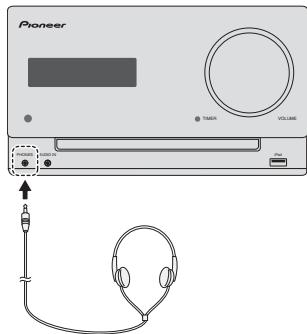
- Do not turn the volume on to full at switch on and listen to music at moderate levels. Excessive sound pressure from earphones and headphones can cause hearing loss.
- Before plugging in or unplugging the headphone, reduce the volume.
- Be sure your headache has a 3.5 ~mm diameter plug and impedance between 16 and 50 . The recommended impedance is 32 .
- Audio from the iPod/iPhone/iPad cannot be heard via the headphones connected to the unit. "HP MUTE" will be displayed if you connect the headphones when the iPod/iPhone/iPad function is selected.
Chapter 5:
iPod/iPhone/iPad playback
Merely by connecting your iPod/iPhone/iPad to this unit, you can enjoy high-quality sound from your iPod/iPhone/iPad. This unit can also be connected to a television set, letting you view videos from your iPod/iPhone. Playback setting for iPod/ iPhone/iPad music can be performed from this unit or the iPod/iPhone/iPad itself.
To connect a TV, see page 10.
Confirming what iPod/iPhone/iPad models are supported
The iPod/iPhone/iPad playable on this unit are shown below.
Video output for iPod/iPhone is only compatible when connected to the Dock connector.
| iPod/iPhone/iPad | Dock connector (Audio/Video) | USB Terminal (Audio only) |
| iPod nano 3G/4G/5G/6G* | ✓ | ✓ |
| iPod nano 7G | — | ✓ |
| iPod touch 1G/2G/3G/4G | ✓ | ✓ |
| iPod touch 5G | — | ✓ |
| iPhone | ✓ | ✓ |
| iPhone 3G | ✓ | ✓ |
| iPhone 3GS | ✓ | ✓ |
| iPhone 4 | ✓ | ✓ |
| iPhone 4S | ✓ | ✓ |
| iPhone 5 | — | ✓ |
| iPad mini | — | ✓ |
| iPad | — | ✓ |
| iPad 2 | — | ✓ |
| iPad 3G/4G | — | ✓ |
- iPod nano 6G is supports audio only.
Note
- Pioneer does not guarantee that this unit plays iPod/ iPhone/iPad models other than the ones specified.
- Some functions may be restricted depending on the model or software version.
- iPod/iPhone/iPad is licensed for reproduction of noncopyrighted materials or materials the user is legally permitted to reproduce.
-
Features such as the equalizer cannot be controlled using this system, and we recommend switching the equalizer off before connecting.
-
Pioneer cannot under any circumstances accept responsibility for any direct or indirect loss arising from any inconvenience or loss of recorded material resulting from iPod/iPhone/iPad failure.
- For detailed instructions on using the iPod/iPhone/iPad, please refer to the manual supplied with the iPod/ iPhone/iPad.
- This system has been developed and tested for the software version of iPod/iPhone/iPad indicated on the website of Pioneer (http://pioneer.jp/homeav/support/ios/eu/).
- Installing software versions other than indicated on the website of Pioneer to your iPod/iPhone/iPad may result in incompatibility with this system.
- This unit cannot be used to record CD, tuner or other content on an iPod/iPhone/iPad.
Connecting your iPod/iPhone/iPad
CAUTION
- Do not use an adaptor that converts into a Lightning connector on the unit's iPod/iPhone connector to connect an iPod/iPhone/iPad. This may lead to malfunction/damage to the connector.
Please connect these Lightning connector devices to the USB port on the front of the unit.
iPhone 5, iPad (4th generation), iPod mini, iPod touch (5th generation), iPod nano (7th generation)
- When connecting iPod/iPhone devices, always use the dock adapter provided with iPod/iPhone devices, or a commercially available adapter designed to support iPod/iPhone. The iPod/iPhone cannot be connected without a dock adapter; attempting to connect an iPod/iPhone without it will cause damage or malfunction.
- An iPod/iPhone universal dock adapter is not supplied with this unit.
Important
- If you are mounting the protective cover of a commercially available iPod/iPhone/iPad, you may not be able to connect iPod/iPhone/iPad to this unit.
Connecting iPod/iPhone to the top panel
1 Press the PUSH OPEN.
2 Open the iPod/iPhone connector port.
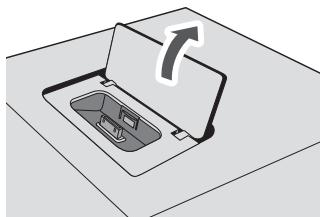
3 Connect your iPod/iPhone.

- When iPod/iPhone is not connected to the unit, close the iPod/iPhone connector port firmly.
Connecting iPod/iPhone/iPad using supplied stand
1 Connect the iPod/iPhone/iPad cable to the unit.
2 Pass the iPod/iPhone/iPad cable through the bottom of the stand and connect it to the iPod/ iPhone/iPad.
3 Set up to stand the iPod/iPhone/iPad.

Watching iPod/iPhone videos on your TV
To watch iPod/iPhone videos on a television, connect it using a video cable. When an iPod/iPhone is connected to this unit, the TV output setting of the iPod/iPhone is automatically set to 'ON'.
CAUTION
- Before making or changing the connections, switch off the power and disconnect the power cord from the power outlet. Plugging in should be the final step.
Note
- For detailed instructions on using the iPod/iPhone, please refer to the manual supplied with the iPod/ iPhone.
- Some iPods allow the TV output setting to be changed while connected.
- When the iPod/iPhone is disconnected from this unit, the iPod/iPhone's TV output setting returns to its original state.
Playing iPod/iPhone
1 Connect your iPod/iPhone.
- If an iPod/iPhone is connected when this unit is on, playback of the iPod/iPhone will not begin.
2 Press iPod or USB as the input source.
"IPOD" or "USB/IPOD" is shown on the main display.
3 When the recognition is completed, will begin playing automatically.
The available iPod/Phone playback control by this unit is II. I. I. I. I.
- In the following case, operate your iPod/iPhone directly: - Searching a file by artist name or genre.
- Playing in the repeat or random mode.
- Watching videos stored in iPod/iPhone on your television.
Playing iPad
1 Connect your iPad.
- If an iPad is connected when this unit is on, playback of the iPad will not begin.
2 Press USB as the input source.
"USB/IPOD" is shown on the main display.
3 When the recognition is completed, will begin playing automatically.
- The available iPad playback control by this unit is II.
- In the following case, operate your iPad directly:
- Searching a file by artist name or genre.
- Playing in the repeat or random mode.
CAUTION
- When your iPod/iPhone/iPad is connected to this unit and you wish to operate the iPod/iPhone/iPad directly, be sure to steady the iPod/iPhone/iPad with the other hand to prevent malfunctions due to faulty contacts.
Note
- For detailed instructions on using the iPod/iPhone/iPad, please refer to the manual supplied with the iPod/ iPhone/iPad.
- iPod/iPhone/iPad recharging occurs whenever an iPod/iPhone/iPad is connected to this unit. (This function is supported in standby mode as well.)
- When input is switched from iPod to another function, iPod/iPhone/iPad playback is temporarily stopped.
Important
If this unit cannot play your iPod/iPhone/iPad, perform the following troubleshooting checks:
- Check whether the iPod/iPhone/iPad is supported by this unit.
- Reconnect the iPod/iPhone/iPad to the unit. If this doesn't seem to work, try resetting your iPod/iPhone/iPad.
- Check the iPod/iPhone/iPad software is supported by this unit.
If the iPod/iPhone/iPad cannot be operated, check the following items:
- Is the iPod/Android connected correctly? Reconnect the iPod/Android to the unit.
- Is the iPod/iPhone/iPad experiencing a hangup? Try resetting the iPod/iPhone/iPad, and reconnect it to the unit.
Chapter 6:
Disc playback
This system can play back a standard CD, CD-R/RW in the CD format and CD-R/RW with MP3 or WMA files, but cannot record on them. Some audio CD-R and CD-RW discs may not be playable due to the state of the disc or the device that was used for recording.
MP3:
MP3 is a form of compression. It is an acronym which stands for MPEG Audio Layer 3. MP3 is a type of audio code which is processed by significant compression from the original audio source with very little loss in sound quality.
- This system supports MPEG-1/2 Audio Layer 3 (Sampling rates: 8kHz to 48kHz ; Bit rates: 64 kbps to 384 kbps).
- During VBR file playback, time counter in the display may differ from its actual playback time.
WMA:
WMA (Windows Media Audio) files are Advanced System Format files that include audio files which are compressed with Windows Media Audio codec. WMA is developed by Microsoft as an audio format file for Windows Media Player.
- This system supports WMA (Sampling rates: 32 kHz/44.1 kHz/48 kHz; Bit rates: 64 kbps to 320 kbps).
During VBR file playback, time counter in the display may differ from its actual playback time.
Playing discs or files
1 Press STANDBY/ON to turn the power on.
2 Press CD on the remote control or INPUT repeatedly on the main unit to select CD input.
3 Press OPEN/CLOSE to open the disc tray.
4 Place the disc on the disc tray, label side up.
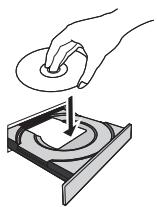
5 Press OPEN/CLOSE to close the disc tray.
6 Press to start playback.
After the last track is played, the unit will stop automatically.
CAUTION
- Do not place two discs in one disc tray.
- Do not play discs of special shapes (heart, octagon, etc). It may cause malfunctions.
- Do not push the disc tray whilst it is moving.
- If the power fails whilst the tray is open, wait until the power is restored.
- Be sure to place 8cm disc in the middle of the disc tray.
Note
- Due to the structure of the disc information, it takes longer to read an MP3/WMA disc than a normal CD (approximately 20 to 90 seconds).
- When the beginning of the first track is reached during fast reverse, the unit will enter the playback mode (only for CD).
- Rewritable multi-session discs with unfinished writing, can still be played.
- If TV or radio interference occurs during CD operation, move the unit away from the TV or radio.
Tip
- When no operation has done in CD mode and the audio file is not played for more than 15 minutes, the power will automatically turn off.
Various disc functions
| Function | Main unit | Remote control | Operation |
| Play | II | II | Press in the stop mode. |
| Stop | Press in the playback mode. | ||
| Pause | II | II | Press in the playback mode. Press▶II to resume playback from the paused point. |
| Track up/down | Press in the playback or stop mode. If you press the button in the stop mode, press▶II to start the desired track. | ||
| Fast forward/reverse | Press and hold down in the playback mode. Release the button to resume playback. |
Advanced CD or MP3/WMA disc playback

Direct track search
By using the numeric buttons, the desired tracks on the current disc can be played.
Use the numeric buttons on the remote control to select the desired track whilst playing the selected disc.
Note
- A track number higher than the number of tracks on the disc cannot be selected.
To stop playback:
Press ■.
Repeat play
Repeat play can play one track, all tracks or a programmed sequence continuously.
To repeat one track:
Press REPEAT repeatedly until "RPT ONE" appears. Press ENTER.
To repeat all tracks:
Press REPEAT repeatedly until "RPT ALL" appears. Press ENTER.
To repeat desired tracks:
Perform steps 1 - 5 in "Programmed play" section on next page and then press REPEAT repeatedly until "RPT ALL" appears. Press ENTER.
To cancel repeat play:
Press REPEAT repeatedly until "RPT OFF" appears. Press ENTER.

Note
After performing repeat play, be sure to press Otherwise, the disc will play continuously.
- During repeat play, random play is not possible.
Random play
The tracks on the disc can be played in random order automatically.
To random play all tracks:
Press RANDOM repeatedly until "RDM ON" appears. Press ENTER.
To cancel random play:
Press RANDOM repeatedly until "RDM OFF" appears. Press ENTER.

Note
- If you press the during random play, you can move to the track selected next by the random operation. On the other hand, the does not allow you to move to the previous track. The beginning of the track being played will be located.
- In random play, the unit will select and play tracks automatically. (You cannot select the order of the tracks.)
- During random play, repeat play is not possible.
Programmed play (CD or MP3/WMA)
You can choose up to 32 selections for playback in the order you like.
1 Whilst in the stop mode, press MEMORY/PROGRAM on the remote control to enter the programming save mode.
2 Press or the numeric buttons on the remote control to select the desired tracks.
3 Press ENTER to save folder and track number.
4 Repeat steps 2 - 3 for other folder/tracks. Up to 32 tracks can be programmed.
- If you want to check the programmed tracks, press MEMORY/PROGRAM.
- If you make a mistake, the last programmed tracks will be canceled by pressing CLEAR.
5 Press II to start playback.
To cancel the programmed play mode:
To cancel the programmed play, press twice on the remote control. The display will show "PRG CLR" and all the programmed contents will be cleared.
Adding tracks to the program:
Press the MEMORY/PROGRAM. Then follow steps 2 - 3 to add tracks.

Note
- When a disc is ejected, the program is automatically cancelled.
- If you press the STANDBY/ON to enter the standby mode or change the function from CD to another, the programmed selections will be cleared.
- During the program operation, random play is not possible.
About downloading MP3/WMA
There are many music sites on the internet that you can download MP3/WMA music files. Follow the instructions from the website on how to download the music files. You can then play back these downloaded music files by burning them to a CD-R/RW disc.
- Your downloaded song/files are for personal use only. Any other usage of the song without owner's permission, is against the law.
About folder playback order
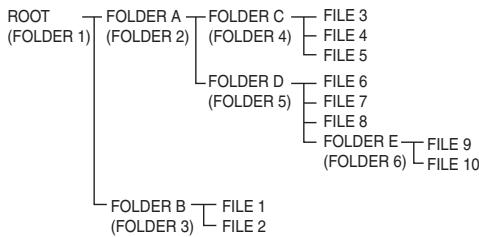
If MP3/WMA files are recorded in several folders, a folder number will be set to each folder automatically.
These folders can be selected by the FOLDER on the remote control. If there is no supported file formats inside the selected folder, the folder is skipped and the next folder will be selected.
Example: How to set folder number if MP3/WMA format files are recorded as below figure.
1 ROOT folder is set as folder 1.
2 As for folders inside ROOT folder (Folder A and Folder B), the folder which is recorded earlier on the disc will be set as folder 2 and folder 3.
3 As for folder inside Folder A (Folder C and Folder D), the folder which is recorded earlier on the disc will be set as folder 4 and folder 5.
4 Folder E that is inside Folder D will be set as folder 6.
- The folder and file order information which is recorded on the disc depends on the writing software. There may be possibilities that this unit will playback the files not according to our expected playback order.
- From a disc with MP3/WMA files up to 255 folders and 999 files (including non playable files) can be read.
Specify the folder to play
Specify the folder to play, do the following steps.

1 Press CD, and load an MP3/WMA disc.
2 Press FOLDER, and press ↑/↓ to select desired playback folder.
3 Press ENTER.
Playback will start from the first song of the selected folder.
In case of stop, press / , and the folder can be selected.
Switch the display contents
1 Press DISPLAY.
If the title, artist and album name has been written to the file, that information will be displayed. (You can view this unit is only alphanumeric characters. Non-alphanumeric character are displayed in the **.)
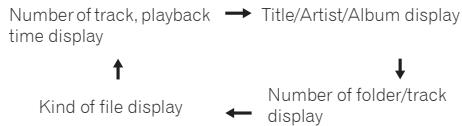

Note
Copyright protected WMA file" or "Not supported playback file" can not be playback. In this case, will be skipped automatically.
- There may be cases where no information can be displayed.
- Displaying title, artist and album name is only supported for MP3 files.
Chapter 7:
USB playback
Playing USB storage devices
It is possible to listen to two-channel audio using the USB interface on the front of this receiver.
- Pioneer does not guarantee that any file recorded on a USB storage device will play or that power will be supplied to a USB storage device. Also note that Pioneer will accept no responsibility whatsoever for loss of files on USB storage devices caused by connection to this unit.
1 Press USB as the input source.
"USB/IPOD" is shown on the main display.
2 Connect the USB storage device.
The number of folders or files stored on the connected USB storage device appear on the main display automatically.
This receiver does not support a USB hub.
- If iPod/iPhone/iPad is connected, the unit will begin charging.

3 When the recognition is completed, press to start playback.
- When changing to a different input source, stop the USB memory playback first, before changing.
4 Disconnect USB storage device from the USB terminal.
Turn the power off before removing the USB storage device.
Note
This unit may not recognize a USB storage device, play files or supply power to a USB storage device. For details, see When a USB storage device is connected on page 29.
- When a USB storage device is not playing and the unit has not been operated for 15 minutes or more, the power will automatically turn off.
Repeat play
Repeat play can play one track, all tracks or a programmed sequence continuously.
To repeat one track:
Press REPEAT repeatedly until "RPT ONE" appears. Press ENTER.
To repeat all tracks:
Press REPEAT repeatedly until "RPT ALL" appears. Press ENTER.
To repeat desired tracks:
Perform steps 1 - 5 in "Programmed play" section on next page and then press REPEAT repeatedly until "RPT ALL" appears. Press ENTER.
To cancel repeat play:
Press REPEAT repeatedly until "RPT OFF" appears. Press ENTER.
Note
- After performing repeat play, be sure to press . Otherwise, the file of USB storage device will play continuously.
- During repeat play, random play is not possible.
Random play
The file of USB storage device can be played in random order automatically.
To random play all tracks:
Press RANDOM repeatedly until "RDM ON" appears. Press ENTER.
To cancel random play:
Press RANDOM repeatedly until "RDM OFF" appears. Press ENTER.
Note
- If you press the during random play, you can move to the track selected next by the random operation. On the other hand, the does not allow you to move to the previous track. The beginning of the track being played will be located.
- In random play, the unit will select and play tracks automatically. (You cannot select the order of the tracks.)
- During random play, repeat play is not possible.
Specify the folder to play
Specify the folder to play, do the following steps.
1 Press USB, and connect the USB storage device.
2 Press FOLDER, and press / to select desired playback folder.
3 Press ENTER.
Playback will start from the first song of the selected folder.
In case of stop, press / , and the folder can be selected.
Switch the display contents
This unit can switch the information recorded in the USB storage device. For details, see Switch the display contents on page 21.
Playing in the desired order (Programmed Play)
This unit can play repeatedly folders stored in the USB storage device. For details, see Programmed play (CD or MP3/WMA) on page 20.
Chapter 8:
Using the tuner
Listening to the radio broadcasts
The following steps show you how to tune in to FM and AM radio broadcasts using the automatic (search) and manual (step) tuning functions. Once you are tuned to a station you can memorize the frequency for recall later. See Saving station presets below for more on how to do this.
Tuning
1 Press the STANDBY/ON to turn the power on.
2 Press TUNER repeatedly to select desired frequency band (FM or AM).
3 Press TUNE +/- on the remote control to tune in to the desired station.
Automatic tuning:
Press and hold TUNE +/- , scanning will start automatically and the tuner will stop at the first receivable broadcast station.
Manual tuning:
Press the TUNE +/- repeatedly to tune in to the desired station.

Note
- When radio interference occurs, automatic tuning may stop automatically at that point.
Automatic tuning will skip weak signal stations. - To stop the automatic tuning, press.
- When an RDS (Radio Data System) station is tuned in, the frequency will be displayed first. Finally, the station name will appear.
Full auto tuning can be achieved for RDS stations using Auto Station Program Memory (ASPM) mode, see page 26.
To receive an FM stereo transmission:
- Press ST/MONO to select stereo mode and "AUTO" will be displayed.
Improving poor FM reception:
1 Press ST/MONO repeatedly to select MONO.
This will change the tuner from stereo to mono and usually improve the reception.
Saving station presets
If you often listen to a particular radio station, it's convenient to have the receiver store the frequency for easy recall whenever you want to listen to that station (Preset tuning). This saves the effort of manually tuning in each time. This unit can memorize up to 45 stations.
(FM 30 stations/AM 15 stations)

1 Tune to a station you want to memorize.
See Tuning above for more on this.
2 Press MEMORY/PROGRAM.
The preset number will flash.
3 Press PRESET + / - to select the preset channel number.
4 Press MEMORY/PROGRAM to store that station in memory.
If the preset number has changed from flashing to lighting, before the station is memorised, repeat the operation from step 2.
- Repeat steps 1 - 4 to set other stations, or to change a preset station. When a new station is stored in the memory, the station previously memorised for that preset channel number will be erased.

Note
- The backup function protects the memorised stations for a few hours should there be a power failure or the AC power cord become disconnected.
To recall a memorised station
1 Press PRESET + / - to select the desired station.
To scan the preset stations
The stations saved in the memory can be scanned automatically. (Preset memory scan)
1 Press and hold PRESET + / -
The preset number will appear and the programmed stations will be tuned in sequentially, for 5 seconds each.
2 Press PRESET + / - again when the desired station is located.
To erase entire preset memory
1 Press TUNER on the remote control.
2 Press CLEAR until "MEM CLR" appears.
Note
All stations will be erased.
Using the Radio Data System (RDS)
An introduction to RDS
Radio Data System (RDS) is a system used by most FM radio stations to provide listeners with various kinds of information—the name of the station and the kind of show they're broadcasting, for example.
One feature of RDS is that you can search by type of program. For example, you can search for a station that's broadcasting a show with the program type, JAZZ.
You can search the following program types:
NEWS - News
AFFAIRS - Current Affairs
INFO - General Information
SPORT-Sport
EDUCATE - Educational
DRAMA - Radio plays, etc.
CULTURE - National or regional culture, theater, etc.
SCIENCE - Science and technology
VARIRED - Usually talk-based material, such as quiz shows or interviews.
POP M - Pop music
ROCK M - Rock music
EASY M - Easy listening
LIGHT M - 'Light' classical music
CLASSICS - 'Serious' classical music
OTHER M - Music not fitting above categories
WEATHER - Weather reports
FINANCE - Stock market reports, commerce, trading, etc.
CHILDREN - Programs for children
SOCIAL - Social affairs
RELIGION - Programs concerning religion
PHONE IN - Public expressing their views by Phone
TRAVEL - Holiday-type travel rather than traffic announcements
LEISURE - Leisure interests and hobbies
JAZZ-Jazz
COUNTRY - Country music
NATION M Popular music in a language other than English
OLDIES - Popular music from the '50s and 60s
FOLK M - Folk music
DOCUMENT - Documentary
TEST - Broadcasting when testing emergency broadcast equipment or receivers.
ALARM - Emergency announcement made under exceptional circumstances to give warning of events causing danger of a general nature.
Searching for RDS programs
You can search a program type listed above.
1 Press TUNER on the remote control.
RDS is only possible in the FM.
2 Press RDS PTY on the remote control.
"SELECT" will appear for about 6 seconds.
3 Press / to select the program type you want to hear.
Each time the button is pressed, the program type will appear. If the button is held down, the program type will appear continuously.
4 Whilst the selected program type is displayed (within 6 seconds), Press RDS PTY again.
After the selected program type has been lit for 2 seconds, "SEARCH" will appear, and the search operation will start.

Note
- If the display has stopped flashing, start again from step 2. If the unit finds a desired program type, the corresponding channel number will lit for about 8 seconds, and then the station name will remain it.
If you want to listen to the same program type of another station, press the RDS PTY whilst the channel number or station name is flashing. The unit will look for the next station. - If no station can be found, "NO FOUND" will appear for 4 seconds.
Information provided by RDS
Each time the RDS DISPLAY is pressed, the display will switch as follows:

When tuning in to a station other than an RDS station or to an RDS station which sends weak signal, the display will change in the following order:
Using the Auto Station program Memory (ASPM)
Whilst in the ASPM operation mode, the tuner will automatically search for new RDS stations. Up to 30 stations can be stored.
If you have already stored some stations in memory, the number of new stations you can store will be less.
1 Press TUNER on the remote control.
2 Press and hold down RDS ASPM on the remote control.
After "ASPM" has flashed for about 4 seconds, scanning will start (87.5 - 108 MHz).
After scanning, the number of stations stored in memory will be displayed for 4 seconds, and then "END" will appear for 4 seconds.
To stop the ASPM operation before it is complete:
Press whilst it is scanning for stations. The stations which are already stored in memory will be kept there.

Note
- If the same station is broadcasting on different frequencies, the strongest frequency will be stored in memory.
- Any station which has the same frequency as the one stored in memory will not be stored.
- If 30 stations have already been stored in memory, the scan will be aborted. If you want to redo the ASPM operation, erase the preset memory.
- If no station have been stored in memory, "END" will appear for about 4 seconds.
- If the RDS signals are very weak, station names may not be stored in memory.
- The same station name can be stored in different channels.
- In a certain area or during certain time periods, the station names may temporarily be different.
Notes for RDS operation
If any of the following events occur, it does not mean that the unit is faulty:
- "PS", "No PS" and a station name appear alternately, and properly.
- If a particular station is not broadcasting properly or a station is conducting tests, the RDS reception function may not work properly.
- When you receive an RDS station whose signal is too weak, information like the station name may not be displayed.
- "No PS", "No PYT" or "No RT" will flash for about 5 seconds, and then the frequency will be displayed.
Notes for radio text:
- The first 8 characters of the radio text will appear and then they will scroll across the display.
- If you tune in to an RDS station which is not broadcasting any radio text, "No RT" will be displayed when you switch to the radio text position.
- Whilst radio text data is received or when the text contents change, "RT" will be displayed.
Chapter 9:
Other connections
CAUTION
- Before making or changing the connections, switch off the power and disconnect the power cord from the AC outlet.
Connecting auxiliary components
Connect the front panel AUDIO IN mini-plug jack to your auxiliary playback component.
- This method can be used to play music on this unit from iPods/iPhones/iPods that do not support use of an iPod Dock and USB terminal.

1 Press AUDIO IN/LINE as the input source.
When AUDIO IN is selected, "AUDIO IN" is displayed on the main display.
Note
- If the AUDIO IN miniplug jack is connected to auxiliary phones jack, the volume of the unit will be adjusted by the volume on the playback component. If the sound is distorted after you lower the volume of the unit, try lowering the volume on the auxiliary playback component.
Connect the rear panel LINE IN audio jacks to your auxiliary playback component.
1 Press AUDIO IN/LINE twice as the input source.
When LINE is selected, "LINE" is displayed on the main display.
Chapter 10:
Additional information
Troubleshooting
Incorrect operations are often mistaken for trouble and malfunctions. If you think that there is something wrong with this component, check the points below. Sometimes the trouble may lie in another component. Investigate the other components and electrical appliances being used. If the trouble cannot be rectified even after exercising the checks listed below, ask your nearest Pioneer authorized service center or your dealer to carry out repair work.
- If the unit does not operate normally due to external effects such as static electricity disconnect the power plug from the outlet and insert again to return to normal operating conditions.
General problem
| Problem | Check | Remedy |
| Settings you have made have been cleared. | Was the power cord unplugged? | When power cord is unplugged, the settings you have made is cleared. Please set the clock again. If you do not want to clear the settings, do not unplug the power cord. |
| Difference in volume between CDs, MP3, WMA, iPod/iPhone/iPad, Tuner, AUDIO IN and LINE. | This is not a problem with this unit. | The volume may sound differently depending on the input source and recording format. |
| This unit cannot be operated with the remote control. | Are you operating from far away? | Operate within 7 m, 30° of the remote sensor on the front panel (page 5). |
| Is the remote control sensor exposed to direct sunlight or strong artificial light from a fluorescent bulb, etc.? | The remote control signals may not be received properly if the remote control sensor is exposed to direct sunlight or strong artificial light from a fluorescent bulb, etc. | |
| Are the batteries dead? | Replace the batteries (page 5). | |
| Disc cannot be played or disc is ejected automatically. | Is the disc scratched? | Scratched discs may not play. |
| Is the disc dirty? | Wipe the dirt off the disc (page 31). | |
| Is this unit placed in a humid location? | There could be condensation inside. Wait a while for the condensation to evaporate. Do not place this unit near an air-conditioner, etc. (page 31). | |
| Folder or file names are not recognized. | Have you exceeded the maximum number of folder or file names this unit can recognize? | Up to 255 folders can be recognized on one disc. Up to 999 files can be recognized within one folder. Depending on the folder structure, however, this unit may not be able to recognize certain folders or files. |
| The unit turns off automatically. | If no play back and no operation has done for 15 minutes or more, the unit turns off automatically. |
When a USB storage device is connected
| Problem | Check | Remedy |
| USB storage device is not recognized. | Is the USB storage device properly connected? | Connect the device securely (all the way in). |
| Is the USB storage device connected via a USB hub? | This unit does not support USB hubs. Connect the USB storage device directly. | |
| This unit only supports USB mass storage class devices. | ||
| This unit supports portable flash memory and digital audio playback devices. | ||
| Only the FAT16 and FAT32 file systems are supported. Other file systems (exFAT, NTFS, HFS etc.) are not supported. | ||
| This device does not support the use of external hard disc drives. | ||
| This is not a problem with this unit. | Turn the power off then back on. | |
| Some USB storage devices may not be recognized properly. | ||
| File cannot be played. | Is the file copyright-protected (by DRM)? | Copyright-protected files cannot be played. |
| This is not a problem with this unit. | Files stored on a computer cannot be played. | |
| It may not be possible to play some files. | ||
| Folder or file names are not displayed or are not properly displayed. | Do the folder of file names contain more than 30 characters? | The maximum number of characters displayable for the folder and file names is 30. |
| Folder or file names are not displayed in alphabetical order. | This is not a problem with this unit. | The order of the folder and file names displayed depends on the order in which the folders or files were recorded on the USB storage device. |
| Much time is required to recognize the USB storage device. | What is the USB storage devices capacity? | Some time may be required to load the data when large capacity USB storage devices are connected (this could take several minutes). |
| Power is not supplied to the USB storage device. | Is AUTH_ERR displayed on the front panel display? No power is supplied if the power consumption is too high. | Turn the power off then back on. |
| Turn the power off, then disconnect and reconnect the USB storage device. | ||
| Press INPUT to switch to the other mode, then switch again to the USB mode. |
When an iPod/iPhone/iPad is connected
| Problem | Remedy |
| Can't operate the iPod/iPhone/iPad by the remote control. | Make sure the iPod/iPhone/iPad is connected correctly (refer to Connecting your iPod/iPhone/iPad on page 15). |
| Can't operate the iPod/iPhone/iPad. | Make sure the iPod/iPhone/iPad is connected correctly (refer to Connecting your iPod/iPhone/iPad on page 15).If the iPod/iPhone/iPad is experiencing a hangup, try resetting the iPod/iPhone/iPad, and reconnect it to the unit. |
Playable discs and formats
| Audio CD | • Commercially available audio CDs • CD-R/ -RW/ -ROM discs containing music recorded in the CD-DA format |
| WMA | WMA files recorded on CD-R/ -RW/ -ROM discs or USB storage devices |
| MP3 | MP3 files recorded on CD-R/ -RW/ -ROM discs or USB storage devices |
Only the discs that have been finalized can be played.
- Discs recorded in packet write mode (UDF format) are not compatible with this unit.
Corporation and product names mentioned herein are trademarks or registered trademarks of the respective corporations.
Only discs recorded in ISO9660 Level 1, Level 2 and Joliet can be played.
- Files protected by DRM (Digital Rights Management) cannot be played.

Note
- This unit does not support multisession discs or multiborder recording.
- Multisession/multiborder recording is a method in which data is recorded on a single disc in two or more sessions/borders. A "session" or "border" is one recording unit, consisting of a complete set of data from lead-in to lead-out.
Regarding copy protected CDs
This unit is designed to conform to the specifications of the audio CD format. This unit does not support the playback or function of discs that do not conform to these specifications.
Supported audio file formats
This unit does not support lossless encoding.
Cautions on use
When moving this unit
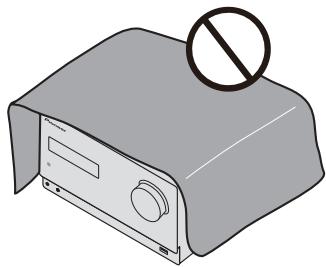
When moving this unit, be sure to first check that there is no disc loaded and disconnect the iPod/iPhone/iPad. Then press STANDBY/ON, wait for "STANDBY" disappears on main display to turn off, then unplug the power cord. Damage may occur if the unit is transported or moved with a disc inserted, or when another device is connected to the iPod/iPhone/iPad connector port, USB terminal, or AUDIO IN mini-plug jack.
Place of installation
- Choose a stable place near the TV or stereo system being used with this unit.
- Do not place this unit on top of a TV or color monitor. Also install it away from cassette decks and other devices easily affected by magnetic forces.
Avoid the following locations:
- Places exposed to direct sunlight
- Humid or poorly ventilated places
- Extremely hot places
- Places exposed to vibrations
- Places in which there is much dust or cigarette smoke
- Places exposed to soot, steam or heat (kitchens, etc.)
Do not place objects on this unit
Do not place any objects on top of this unit.
Do not obstruct the ventilation holes.
Do not use this unit on shaggy rugs, beds, sofas, etc., or wrapped in cloth, etc. Doing so will prevent the heat from dispersing, leading to damage.
Do not expose to heat.
Do not place this unit on top of an amplifier or other component that generates heat. When rack mounting it, to avoid the heat given off by the amplifier or other audio component, place it on a shelf below the amplifier.
- Turn off the unit's power when not using it.
Depending on signal conditions, striped patterns may appear on a TV screen and noise may enter the sound of radio broadcasts when the unit's power is on. If this happens, turn the unit's power off.
About condensation
If this unit is moved suddenly from a cold place into a warm room (in winter, for example) or if the temperature in the room in which this unit is installed rises suddenly due to heater operation, etc., water droplets (condensation) may form inside (on operating parts and the lens). When condensation is present, this unit will not operate properly and playback is not possible. Let this unit stand at room temperature for 1 or 2 hours with the power turned on (the time depends on the extent of condensation). The water droplets will dissipate and playback will become possible. Condensation can also occur in the summer if this unit is directly exposed to the air flow from an air-conditioner. If this happens, move this unit to a different place.
Cleaning the product
- Unplug the power cord from the power outlet when cleaning this unit.
- Clean this unit using a soft cloth. For tough dirt, apply some neutral detergent diluted in 5 to 6 parts water to a soft cloth, wring out thoroughly, wipe off the dirt, then wipe again with a soft, dry cloth.
- Alcohol, thinner, benzene, insecticides, etc., could cause the print or paint to peel off. Also, leaving rubber or vinyl products in contact with this unit for long periods of time could mar the cabinet.
- When using chemical-impregnated wipes, etc., read the cautions included with the wipes carefully.
Cleaning the lens
- This unit's lens should not become dirty in normal use, but if for some reason it should malfunction due to dust or dirt, consult your nearest Pioneer authorized service center. Although lens cleaners for players are commercially available, we advise against using them since some may damage the lens.
Handling discs
Storing
Always place discs in their cases and store them vertically, avoiding hot, humid places, places exposed to direct sunlight and extremely cold places.
- Be sure to read the cautions included with the disc.
Cleaning discs
- Discs may not play if there are fingerprints or dust on them. In this case, use a cleaning cloth, etc., to gently wipe the disc from the inside towards the outside. Do not use dirty cleaning cloths.
- Do not use benzene, thinner or other volatile chemicals. Also do not use record spray or antistatic agents.
- For tough dirt, apply some water to a soft cloth, wring out thoroughly, wipe off the dirt, then wipe off the moisture with a dry cloth.
- Do not use damaged (cracked or warped) discs.
- Do not let the signal surface of discs get scratched or dirty.
- Do not attach pieces of paper or stickers to discs. Doing so could warp discs, making it impossible to play them. Also note that rental discs often have labels attached to them, and the label's glue may have oozed out. Check that there is no glue around the edges of such labels before using rented discs.


About specially shaped discs
Specially shaped discs (heart-shaped, hexagonal, etc.) cannot be played on this unit. Do not attempt to play such discs, as they could damage this unit.

About iPod/iPhone/iPad
Made for

iPod iPhone iPad
"Made for iPod" and "Made for iPhone" and "Made for iPad" mean that an electronic accessory has been designed to connect specifically to iPod, iPhone, or iPad, respectively, and has been certified by the developer to meet Apple performance standards. Apple is not responsible for the operation of this device or its compliance with safety and regulatory standards. Please note that the use of this accessory with iPod, iPhone or iPad may affect wireless performance.
USB works with iPhone 5, iPhone 4S, iPhone 4, iPhone 3GS, iPhone 3G, iPhone, iPad (3rd and 4th generation), iPad 2, iPad, iPad mini, iPod touch (1st through 5th generation) and iPod nano (3rd through 7th generation).
The 30-pin connector works with iPhone 4S, iPhone 4, iPhone 3GS, iPhone 3G, iPhone, iPod touch (1st through 4th generation), and iPod nano (3rd through 6th generation).
iPad, iPhone, iPod, iPad nano and iPod touch are trademarks of Apple Inc., registered in the U.S. and other countries.
Lightning is a trademark of Apple Inc.
Restoring all the settings to the defaults
Use the steps below to restore the all settings to their defaults.
1 Press STANDBY/ON to turn the power on.
2 Press CD on the remote control or INPUT repeatedly on the main unit to select CD input.
3 Press OPEN/CLOSE to open the disc tray.
4 Press STANDBY/ON while pressing.
Use the buttons on this unit's top panel. "DEFAULT" is displayed while the settings are being restored. Power is turned off.
Specifications
- Amplifier section
RMS Power Output: 15 W + 15 W
(1 kHz, 10%, T.H.D., 8Ω)
Tuner section
Frequency Range (FM). 87.5 MHz to 108 MHz
Antenna Input (FM) 75Ω unbalanced
Frequency Range (AM) 522 kHz to 1620 kHz
Antenna (AM) .Loop antenna
Miscellaneous
iPod/iPhone connector port 5V,1A
USB terminal .5V,2.1A
Power source AC 220 V to 240 V, 50 Hz/60 Hz
Power consumption Power on. 37 W
Power stand-by. 0.5 W or less Dimensions. .200 mm (W) x 123 mm (H) x 250.6 mm (D)
Weight (without package) 2.0 kg
Speaker
Magnetically shielded speaker system
Type
2-way type speaker system
5cm Tweeter
9.4 cm Woofer
Maximum input power. 15 W
Impedance 8Ω
Dimensions. . . . . . . 120 mm (W) x 200 mm (H) x 232.6 mm (D)
Weight. 2.0 kg/each
- Accessories
Remote control. 1
AAA batteries (R03) 2
AM antenna cable 1
FM wire antenna. 1
Non-skid pads. 8
Power cord
iPad Stand
Warranty card
Operating instructions (This document)
Note
- The specifications are applicable when the power supply is 230 V.
- Specifications and the design are subject to possible modifications without notice, due to improvements.
- iOS is a trademark on which Cisco holds the trademark right in the US and certain other countries.
© 2012 PIONEER CORPORATION.
All rights reserved.
IMPORTANT

(30 stations FM / 15 stations AM)
Uber iPod/iPhone/iPad 32
(FM 30 Sender / AM 15 Sender)
Uber iPod/iPhone/iPad
Made for

iPod

iPhone

iPad
EDUCATE -Programmi educativi
KLASSE 1 LASERPRODUCT
D58-5-2-2a_A1_NI
WAARSCHUWING
WAARSCHUWING NETSNOER
All stations will be erased.
- RDS is alleen可能导致 in FM.
Busesueda directadepistas 19
EDUCATE - Material educativo
DRAMA - Radionovelas, etc.
CULTURE - Cultura nacional o regional, teatro, etc.
Se做不到 "SELECT" during one second.
Esta�性法は上ご用むと、上ご用む。This is the most common way to use this property in the text.
JIa3EPHbI\PPOdYKT KlACC 1
D58-5-2-2a_A1_Ru
IPEDYIPEXDEHNE
XpaHNTe MaNEbKHe DeTaN B HeDcOtynHOM JIaI
TeJeMeCTe B cNyae cNyauHOro npOrnAtbBaHna
HemeJEnHO oBpaNTecb K BPva.
HOpMaunI nI pIb3OBeTeNe IIO c6OpU yTnJIn3aunI 6bIBweroB 3KcNlpyataunI o6OpyDobAHmI Otpa6oTaBux 3JIeMeHTOB NITAHIN
0603NaeHne 1n8 o6opydoBaHna

06o3HaueHnA nJr 3neMeHTOB NITaHnA

3TN 0603NaueHnHa IpoDyKuIN, ynaKOBKe, H/IIIn cOpBOOHTeIbIbIX DOkymEHTAX O3NaHauOT, YTO bBIIaB N EKcIIpyataHn 3JIeKTPOTeXHHueCKA IN 3JIeKTPOHnA IN POdyKUIN H oTpaObaTahHbte 3JIeMHeTbI pIHaTHAn HE DIOJIHKbI BbIpaCbIbATcb C MBeCTe C obUYHbIM 6bTbOBM MycOpOM.
IIOI TOO T06bI DAHNA B6bIIaB BY NtOte6JIeHHN IPOyUKINH NOtpa6oTaHHBe 3IeMeHTbI INTHAHn B6JIIN COOTBE7CTBYUOIM NH6pAOM IO6pOABtHbYTNH3NPOBAHbN I Nepepa6oTaHbI, IOKaJIyCTa, IpeEJaTe H X B COOTBE7CTBYUOIM IIyHKTc6OpA HCIOJIb3OBAHbIX 3JIeKTOPHHbIX H3dJIIN B COOTBE7CTBH C MeCThBM 3AKOHDAteJIbCTBOM.
YTHIN3HpyaIaHHbIe yctpoIcTbA HJIeMeHTb IITaHHNIIpaBbHbO, BbI NOMoAteTe coXpAHnTB HeHbHe pecSybcH bI npeIoTbPArNTb BO3MOKHe HeHgATNBHe IOcJIeCTBnI JI 3IOPOBb IIOJIeH O kOpKyAIooIe cpebl, KOtOpBe MOrT bO3HNKHbTb B pe3yJIbTaTe HECOOBTCTBHyIOUeO ydaJIeHNOTXTOOB.
IJIIOJIyENHNOIIHNITIELHOINHOpMAIINH OIPABHIbHbIX CnOcO6aX c6opa H yTHIN3AIIHNOTAPoTABIIEVO6OpYIOBAHINH NHCIOJIIBOABAHBX 3JIeMEHTOB INITAHNHO6pAlAIteB CooTBeTCTBYUIOHE MeCTHbE moArhA camOyIPaJIbHENH, B IeHTpbI yTHIN3AIIHNOTOXIOB HII IO MeCTy IOKYIKN DAHHORO H3JIeHN.
Dahhble 603aHn yTBePKeHbI TOnbKO dEbponeckoro Co1o3a.
Длстран,КOTOPье He BXODТВ COCTAB EBponeckoro CoIO3a:
EcIIb BJIeJIaTe TynIINH3IOBArbTJANHHe N3deJIIN, 6OpaTHIEcB CooTBeTCTBYUOnIe MeCTHbIe yUpeKdEHHN K dJIepaM IJIPOUyEnH NnΦOpMaIH O pIpaNBbIX cIcNO6ax TynIIN3aIIN.
K058a_A1_Ru
ECNBIINIKA UNHypa NITAHNA IN3dEINHA He
COOTBETCTBYET IMEIOUeJIc 3NEKTPOPo3TeK, BNIKY
CNEyET 3aMeHNb HA NOXODAUYU K PO3eTKe.
3aMeNA uYCTAHOBKa BNIKN ODOKNb IPOIN3BOIDHTCBs
TOJbKO KBaIMnOuPObAHHbIM TEXHOMK.
OTcoEINHeHHa OT Ka6enB rNlka, NOkKIOUeHHa K
PO3eTKe, MOKET Bbl3BaT TBRAKeNoIPOAKHeHne
3NeKTPuYeCKM ToKOM. Pocne UdaJeHHa BNIKN
yTNIIu3puyIte ee DoONXbMbI O6pa3OM.
O6OpYIOBAHne CNEyET OTKNIOUch AT 3NeKTPocetN,
13BLeKaBNIky Ka6en NITaHna I3 p03ETKn, eCNl
OHO HE 6yDet IcNOJIb3OBAbCS B TceEHMe DOnTRO
BVPemEHn (Hapnpmep, eCNl Bbl Ye3Xaete B OTNYCK).
MEPbI IPEIOCTOPOXHOCTN IPNOBPAUENC CETEBIM UHYPOM
Держпс сеевошур 3а вику. He Btackиьтew BVNK, B3BbUbCb 3a shyP, n HNKOrda He KacaITcB ceteBOrO SHpya, ecn Baun pykN BnaJxKhIbe, taK ka 3To MOket npBvBeTc K KOPOTKOMY 3AmbKaHInO nIN nopAKeHmIO 3JIeKTPuCheckM TOKOM. He CTabTe aannapat, ppeMtebl Me6eIN n T.D. ha cetseBoi shyp, he 3axkmaite erO. He 3ab8bIbaIte y3NoB ha shHype n He CBsBbIaTe noE cDpyMMn SHypamn. CeteBle bshUpbl DOnKbIte NekTaT k, TTObHa nHX HeJb34 bIbNo NaCTynbT. NOpBexdHbN cTeEBoW thHyp MOket cTaNpUHNO Bo3NHKOHeHn NOXapa nIN nopa3Nb Bac 3JIeKTPuCheckM TOKOM. Bpem oT BpemeHnpOBepaTE cTeEBoW hny. B cnyae 6bnapyEHHN NOpBXdHnE O6paTITcE 3a ZAMeHO B 6bnKlssn OfIMuaNBbN cepBnCHbN ceHTp φnMpbl PIONEER nIN K BaWemy dInepy.
BHIMAHNE
BbIKIOUaTeIb OSTANDBY/ON daHHoro yCTpoiCTBa He noHIOCTbIO OTKINIOAeT erO OT 3NEKTPOcTeI. UTo6bI NOHOCbIO OTKIOHHTb IINTAHne yCTpoiCTBa, BbITaUNTE BnIKy Ka6EJI NITAHN I3 3NEKTPOPo3EKn.CneIOBATEbHO,y6eINTOCeB, YTO yCTPOiCTBO YCTAOHBNO TAK, YTO6bI BNIKY Ka6EJI NITAHN MOXHO bIbIO NEKO OTCOEHNbOT PO3ETKn NEpEMeHHORO TOKA B Cnlyae Ype3BbuaHHO cnTuayu.Bo n36EkaHne Noxapa CnEDyET n3BLeKaTaB BNIKy Ka6EJI NITAHN I3 p03ETKn, ECNI yCTPOiCTBO He 6yDeT NCIONb3OBaTbcS B TEeHHe DOnrO RBOpeMeHn (HaNPIMep,ecNI bIy e3Xaete B OTNYCK).
D3-4-2-2-2a*A1Ru
Blaogapm 3a IOKyIky 3TOGIO3JeJINKOMpaHNN Pioneer.
TuBbY3HATb, KAK npAubHoOBpaatbc a DAnHHo MoJeIbHo, NooJaIyIcTa, IpOHTHe HAcTouIe HHCTpyKuHN IIOKcIIyataaHIN. IocJIe TORO KAK BbI O3HaKOMHTec b C HnCTpyKUHe, coXpAHHTe eB HaeJxHOM MeTe dJIa OBpaIeHN K HeB 6ByuHMe.
CopepxaHne
01 Pered nauanom pa6oTbI
KOMIIJEKTIOCTaBKN 5
YcTaHOBka 6aTaapeek B IyJIbT IINCTaHIOHHOHO
yipabJIeHnI 5
HcIOJIb3OBaHHe IyJIbTa HnCTaHnOHnHO ynpabJIeHH... 5
02 Ha3BaHnY qAcTe nФункцm
IyJIbT IV 6
Akyctnuecka cnTeMa 7
IpiHKpeHHeHHeckoJIb3aIIHX IIOKJIaIOK 7
IpeendnaHeJIb 8
BepxHja IaHeJIb 9
03 PoiKJIoueHn
IIOKJIIOHHe IpOMKOROBOpHTeJIe 10
IIOKJIIOUeHHe TeJIeBn3Opa 10
IoiKJIIOUeHHe aHTeHH 11
HcIOJIb3OBaHHe BHEIIHHx aHTeHH 11
IoiKJIIOueHHe 11
04 Hauano pa6oTbI
ДяВКЛHOUeHHI\PHTaHHI 12
HacrpoiKa Yacob 12
O6iee ynpaBJIeHne 12
_YHKIIa 12
PeryIipOBaHHe IpkocTH DnCIIeA 12
ABTomatHueckay yCTaHOBka rPOMKocTH 12
PeryJInpOBAHHe rPOMKoCTH 12
IIprHJIyIeHHe 3ByKa. 12
YIIpaBJIeHHe 3ByKOM 13
KbaJai3ep. 13
PeryJInpoBaHHe Hn3KHX qAcTOT (peXm P.bass) 13
PeryIHPOBKa TEM6pa HN3KHX/ByICOKHX YAcTOT 13
Hactpoika TaMepa BKIOUeHn 13
Bb3OB TaIIMepa BKJIIOueHHN 14
OTmeHa TaIMepa BKJIIOueHHra 14
HcIOJIb3OBAHHe TaIMepa BKJIIOueHHra 14
HcIOJIb3OBAHHe TaIMepa OTKJIHOeHHa 14
HcIOJIb3OBaHHe HayIIHHKOB 14
05 Bocnpo3BedeHne iPod/Phone/iPad
ПОДТВЕРЖДЕННЕ ПОДДЕРЖКМОДЛЕH
iPod/iPhone/iPad 15
IoiKJIIOHHe iPod/iPhone/iPad 15
IoiKJIIOUeHHe iPod/iPhone K BepxHei IaHeiN 16
IIOJIKIOUHHe iPod/iPhone/iPad c NMOUIIbO BXUJIDBI KOMILIEKT NOCTABKN 16
IpocmoT BnDeo c iPod/Phone Ha TeJIeBn3ope. 17
Bocipon3BeJeHne iPad/iPhone 17
Bocipon3BeJeHne iPad 17
06 Bocnpo3BedeHne Dncka
Bocipon3BeHHe HnCKOB HnH qaiIOB 18
YcoBepHHeCTBOBaHHoe BOCIIpOHN3BeJeHne INCKOB CD
HJIN MP3/WMA 19
IIpmaoi IIOHcIopokkn 19
IIOBTOPHoe BOCIIPOH3BeHeHHe 19
BocpoH3BeHeHBE ClyaHNOIocJeIOBaTeJIbHOCTn. 19
3aIporpammnoBaHnoe Bocipno3BedHeNCE (CD HJMPM3/WMA) 20
O 3aŋpy3ke ΦaiIOB MP3/WMA 20
O npjke Bocnpn3BedeHnaIaIKN. 20
Bb6op IIaIKN IJIa BocIpn3BeDeHnR 21
IpekeJIOUeHHe coJeepKHMOrO IHCIIIEe 21
07 Bocnpo3BeDHe n c USB
BocpoH3BeDeHHe 3aIOMHHaIOHx yctPoHCTB USB .22
IIOBTOPHoe BOCIIPOH3BeJeHHe 22
Bocnpoh3BeDHe B cIyauHoiIOcJIeOBAteJIbHOCTn. 23
Bb6op IIaIKN IJI BOCIIPOH3BeHeHH 23
IpekeJIIOueHHe COeepKHMOrO IHCIIIEA 23
BocpoH3BeDeHHe BKeJaemOM IopRKe
(3aIpOgrpaMMHPOBaHHoe BocIpoHNBeJeHHe) 23
08 NcnoJIb3ObaHne TIOhepa
IpocJyHbAHne paHnopeJauch.24
Hacroka 24
CoxpaHHeH 3aIporpamMnpoBaHHbIX paIHOCTAHNI. 24
IIIBbI3OBA 3aHeceHHoB IaMaTb CTaHcHn. 25
IIaCKAHPOBAAHINpeDyCTaHOBJIeHHbIX CTAHIIH. 25
IIIIOJIHOrO CTnHPaHHI IpeDyCTaHOJIeHHOI IAMrTH .25
HcnoJIb3OBAHHe cHCTeMbI paJIOJaHHbIX (RDS) .25
3HaKOMCTBO C cHCTeMoI RDS 25
IIOHCKIPOrpaMMCHCTeMbIpaHIOJaHHbIXRDS. 25
Hhopmaunia, npdeoctabJemaCnCTeMoR DRS. 26
Июльзованые АгматICAL�йн дastroyknHa npEdBarHTeJIbHO 3aHOMHeHbIe IIporpamMbI (paHIOCTaHIN) (ASPM). 26
IIpHMeaHHI IOpeKHMyRDS 26
09Дргип полоченя
IIIOOeINHHeHNE IIOIOJIHHTeIbHbIX KOMIOHOHTOB 27
10 DonoiHntelbHa nHΦopMaun
YcTpaHHe HEnoJaIOK 28
BocipnoH3BOIDMbIe INCKN H oOpMaTbI 30
OTHOCTIELBO KOMIIAKT-DIJKCOB C3AHIHTOIT OIKONPOBAHIN 30
IIOJIepKHaembe fOpMaTb ayHNofoaiIOB 30
MepbI ppeoctopokhoCTn pH 3KcPiyaTaunn .30
IIpH IepemeeHHn ycTpoiCTBa. 30
MecTo yCTaHOBKn 30
He pa3MeiHaTe IpeMteBa Ha ycTpoHCTBe 30
OKoHdEHCaHH 31
UHCTKa H3JeJIHa 31
UHCTKaJIHH3bI 31
O6paIeHHe c IINCKaMn 31
XpaHeHne 31
UHCTKa HNCKOB. 31
O nckax cneuaJIbHOJ opMbI. 32
iPod/iPhone/iPad 32
C6poc Bcex HacTpoek Ha 3HaueHnI IO yMoJIuaHHIO .32
TexHHueckHe xapaKTepeHCTHKn 33
Pazden 1:
YcTaHOBka 6aTapeeK B nylbT DnCTaHcNoHHoro ynpabLeHna
1 OtkpoTe 3aHIO KoBbIcKy uYcTaHObNTe 6bapeiKn, KAK NOKa3aHo HnKe.
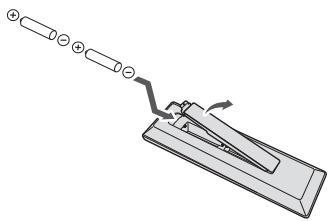
2 3akpoTe 3aHIOIO KpbIiKy.
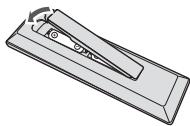
PNEyPPEKJDEHNE
He HcnoIb3yIte IIObBe IJpyIe TINIIb 6batapeek, KpOme Yka3aHHbIX 6batapeek. TaKke He HcnoIb3yIte HObYIO 6batapeiky Bmecte co Stapoi.
IpyuCTAHOBKe 6batapeek B IyIbT IcHCTaHIOHO HOrI ypaBJIeHHB BCTABJIte Hx B paBJIbHIOI pOHeTAAHH B COOTBETCTBHn C 6o33auHHeHHM IOJIpHOCHT ( n).
He harpebaite 6atapereKHe p36bpaire He hKnlaire HX BOHOB IN B0UY
BatapeiMOTyHtMMeTbpa3IHHoe HnapRKeHHe,JaKeEcJIH OHoIINHakOBbIyIO pAsMepyH eOpMe. He hCIOJIb3yIte OJHOBPeMeHNO batapeiKpPa3IHHbX TIIIOB.
- PNEДУПЕХКЕнE
Bo 136eKaHHe IpoTeKaHnHa 3eKToPiHa 6aTaapeek H3BLeKHe 6aTepeKn, eKHe 6oCupaeTe bHcNOb30abT IIyIbT NJIcTaHINHO YUpaBJeHN B TceHne HIOJIOJIKeHrIbHO rpeHOnBa BPEMeHH (1 MecH HIN BoJooie). B C Lyuea IpoTeKaHnHa 3eKToPiHa TtaileE hO npotPte c BHTpEnHe CTOpBOH tOJIeHHe JIA BStaPeAEK, 3aTeM yctAHOBHe HOBBe 6aTaapeiKn. B C Lyuea IpoTeKaHnHa 3eKToPiHa HTa KOGy, CMoiTe er O6BJIIHM KOJIYcETCBOM BOJbI.
IpoH3BOJNTHe yTHINIAaHIO HcIOJIb3OBAHHbIX 6batapeek B COOTBETCTBN CJeTCTBYOHIMN B BAIIe CTpaHE/perHOHE OXApdCTBeHHbIMN IOCTaHOJIeHHMn IIN IIpaBHLMN IO oxpaeKOpkyKaHOUIe cpeIbI.
He HcnoIb3yIe He xpaHnTe 6aTapeiKn NIOI pRmblMN LyuAMH CoJIeHHO CBeTa HnBE MeCTA CIOBbIeHHO TEmIIApETOpN, HanPIMeP B CAIOHE ATObOMoHN IIN BOJI3H 06OIPReBaTeJIA. 3TO MOKeT Bb3BaTb IpOTeKaHHe, NpeRpeB, MKNpOB3bIHN BO3rpanHe 6aTaapeK. KpOme TOHO,MOKeT IIpHBecTH K cokpaIeHHo EpoKa cIyJb6bl HIN npOH3BOHTIEHbHOCT 6aTaapeK.
IcnoIb3OBAHne NylbTa IaCTaHUNOHHO
ynpabJIeHnA
Hactpoika BkJI/BbIKI BnEo Ha iPod/iPhone.
CLOCK/TIMER
HcnoJIb3yETcTdIyycTaHOBKn YacOB,aTakKe dIyycTaHOBKN H IpiOBePKN ycTaHOBOK TaHMepa (ctp.12).
SLEEP
CM. Hcnolb3oabue mailmepa omkHouenHa ctp. 14.
4 LInΦροBsIe KhoNkN (OTo 0 Do 9)
HcnoJIb3yIte IJIA BBOJa HOMepa (CTp. 19).
5 CLEAR
HcnoJIb3yIte IJIA OUHCTKN 3aIpOgPamMnPoBaHHOrBOcIIPOH3BeJeEHN(ctp.20).
6 KhoPkn ynpaBneHnpecnBepom CD DISPLAY
Hajmhte IJIpeKJIIOUeHHI JINCIJIe IIPIH BocipnoH3BeJeHHI IIeC H CD HIN USB (ctp. 21).
FOLDER
HcnoIb3yIe IJIa BbOpa IaIIKn IIuCKa MP3/WMA IIN 3aIOMHaIOero yctpoIcTba 6oJIbIoI emKocTbn USB (ctp.20).
MENU
HcnoJIb3yIte IINIOCTyIIa K MeHIO.
MEMORY/PROGRAM
HcnoJIb3yIteJIA 3aIOMHHaHH HIN IpoIgpaMMnObaHH
IIncKa MP3/WMA (ctp.20).
7 / / / (TUNE + / - ), ENTER
HcnoJIb3yIte IJIA BbIb6opa/IpeKJIIOueHHN HAcTpoE KCHCTeMbI H peKHMOB N DIA IOITBepKJeHHN DeIcTBNI.
KHOIIKN TUNE + / - MOYr HcIOJIb3OBaTbcra IINHcKa paIIOHocAtrot (ctp.24).
8 KhoNkynpabJeHn PRESET
HcnoJIb3yIte IaIbYbI6opa 3aIIpOgPamMnPoBaHHbIX paIHOCTaHIuN (ctp.24).
9 MUTE
OTKJIIOUeHHe/BKJIIOUeHHe 3Byka (ctp.12).
10 Khonkn ynpaBHeHn BocpOn3BeDeHnEM
HcnoJIb3yIte IJIA yIipabJIeHHaKaJIOI cyHKIIeHIOJIce ee bIbOpa c NOMOIIbIO KHOIIOK YHKIIIN BxoJa (ctp. 18).
11 KhoNkynypaBneHn Tuner
ST/MONO
HcnoJIb3yIte IJIpeKeJIIOueHnIpeKHMa 3ByKa MeKJy cTepeo H moHO (ctp.24).
RDS ASPM
HcNIOJI3yIte IJINOCHKa ATOBMATUHeCKoH NaHCTPOIKHa IpeJbArpTeJIbHO 3aONMHeHHbIe IIporpAMMbI (paHIOCTaHH) IJIO cSCTMeB rDS (ctp.25).
RDS PTY
HcnoJIb3yETcraIINIONcKa TINIOB IIOprrMaRMS RDS (ctp. 25).
RDS DISPLAY
Hajkmhte iIepekeIIOueHHaHcIIJIe RDS dIg peKHMa HHΦopMaIH (ctp. 25).
12 OPEN/CLOSE
HcnoJIb3yIte IJIg OTKpbITHa HJIH 3aKpbITHa JOTKa IJIg DnCKOB (ctp.18).
13 KhoNkynpaBneHn 3ByKOM
PeryinpyiOT KaueCTBO 3Byka (ctp.13).
14 RANDOM
Hajmte JIA NaCTPOIKN BOCIPON3BEJENH B CJIyauHHO HocJeIOBATEJIbHOCTn C CD, iPod nIIN USB (ctp. 19).
15 REPEAT
Hajmhte JIAI H3MeHeHHaHCTPOiKN HOBTOPHORO BOCpOH3BeHEnHc CD, iPod HIN USB (ctp. 19).
16 Khonkn ynpabJeHnra Volume
HcnoJIb3yIe IyIpyIINpOBKn yOByONr pOMKoCTn IpoClyIINBAHN (ctp.12).
17 DIMMER
PeryIINPOBka IpKocTH nHcIIJIe. HMeETcY cTbIpe ypOBHn H3MeHeHHa IpKocTH (ctp.12).
Akyctnuecka cnCTema
1 BbICOKOyACTOTHbIM DnHaMnK
2 Hn3KoYaCTOThbIM INHaMVK
3 Φa30HbepTophbi nopt


BAXHO
HeIb3y ydaJIaTb peIeHTky rIpOMKOrOBOpHTeJIa.
PnukpenneHHe HeckOJIb3aunx NODKnaDOK
PnKpeHNTe DIOJIHNHTeJIbHbIe HecKOJIb3aIIne IOJIKlaIaKN K HNKHMM IOBepXHOCTm rPOMKOrOBOpHTeJIeJ.
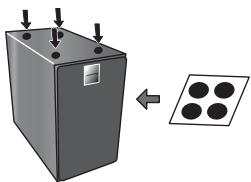

BAXHO
IpOMKOrOBOpHTeJIb O6bIyHO HcIIb3yETcB BBeptHKaJIbHOM IIOJKeHH.
PepednnaheB
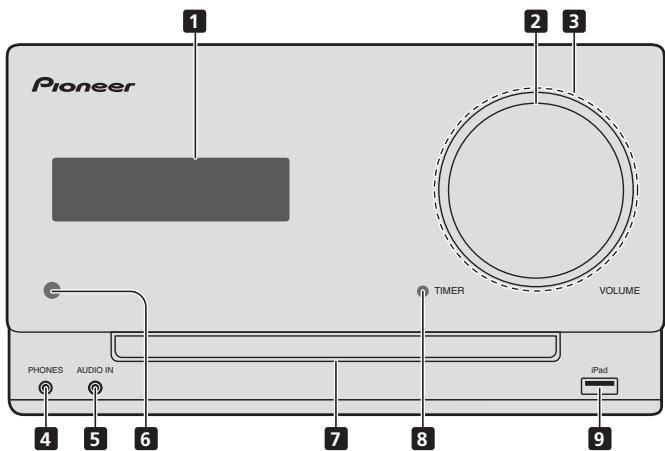
1 TnaBbI dncnnei
2 PerynipobAHne rpomKoCTn
HcnoJIb3yIte IJIpepyIINpOBKHN yPObHnI pOMKocTHI npocJIyIIHHaHHN (ctp.12).
3 Iopcbetka pyuken peyunipOBkn rpoMKoctn
3aropaetc npn BkJIIOueHHH IIHTAHN.
4 He3do dnaHayuHnKOB
HcNpI3yIeI IJIIOKIIIOUeHHaHIuHHIOB.IIpi IIOkIIIOUeHHH HauHHIOB 3bYK 6bET BOCIIPOHOBIOHTbcYepe3 rIpOMKOrOBOPTEJI.
5 THe3do AUDIO IN (aydnoBxoJ)
HcnoIb3yeTcIyIIOJIKJIOUeHHB BCINOMORATElbHOrO KOMIOHENTa C POMIOMbIg Ka6eJIa CMHHaTHOpHbIM CTpeo paBaEMonm (ctp. 27).
6 DaTnK nCTaHcNoHHOrO ynpabJIeHnR
PnHHMaET CnHajIbI OT NyJIbTa IY.
7 IOTOKIaIaNCKOB
5 Khonka OTKpbITn/3aKpbITn JOTKa IJIy DnCKOB
HcnoJIb3yIte IJIa OTKpbITnHa HIN 3aKpbITnHa IOTKa IJIa DnCKOB (ctp.18).
Глaba 3:
Поклоченья
I PENEYIPPEKDEHNE
O63atBbHO BbKIOHOTe NITAHNE HOTcEOHNHTe KABeIb NITAHNOr OTpO3ETKN IIpr BbNOJIHEHHN IOJIKIOHEnH NII INI HmEHeHHN CoEINHEnH.
IIOJIKIOUHTe Ka6eJIb IINTaHHN IOcJIe BbIIIOJIHeHHN BCEX coeINHeHH MeKJy yCtpoHCTBaAMH.
IopknioeHne rpoMkorOBopnteNei
HaKMHTe KHOIIky O STANDBY/ON, YTObI BOITN BpeKHM OKHJaHH.

Приимеанно
B peKHMe OxHJdHnH, eCIN IIOJKIIOHaetc8yUptOHiCTBO iPod/iPhone/iPad, anIIapar IpeKJIIOHaetc8 B peKHM 3apJKN.
Hacptponka yacob
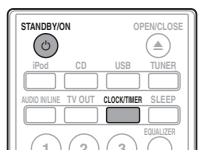
1 Haxmnte STANDBY/ON, yTo6bl BkIIOHTb NtAHne.
2 Haxmte CLOCK HA npIbTe DnCTaHcNHOHOrO ynpabHeHn.
HaTJIABHOMIINCHIIeOTO6paKaTaC8A
3 Haxmte ENTER.
4 Haxmnte KhoNk / ,yTo6bl yCTaHOBnTb DeHb,3aTeM Haxmnte ENTER.
5 Haxmnte KhoNk ,yTo6bI yCTaHOBNTb acsb, 3aTeM haxmnte ENTER.
6 HaxmTe KhoNk / ,YTObIyCTaHOBtB MHyTb,3aTEM HaxmTe ENTER dIe NOdTBePxxDeHn.
7 HaxmTe ENTER.
PerylnpobKa Tem6pa Hn3Knx/BbICOKnx YactOT
HaKMHTe BASS/TREBLE, 3aTeM HaKMHTe / , TTO6bI oTepyIInpOBAt bH3KHe HJIN BcOKHe qACToTI.
PpimMeaHne
Hebo30mKha OJIOHBOPMeHnHa PA6Ota YHKuHIN EQUALIZER, P.BASS H BASS/TREBLE. H3 3THx TpEx yHKuHIN 6yEd pa6OtaTb TOJIbKO OJHa BbIbPAHnBAMn YHKuHIN.
Ecnn Bbl BbIbnpaete Ondy n3 Tpex fynkun,To fynkun, KOTOpBle He BblbpaHb, 6dyT yctahOBJIeHb CJeDyUOIm o6pa3OM.
1 Ecni Bbl N3MeHReTe HacTpoiKn P.BASS (ON/ OFF).
- EQUALIZER:FLAT
BASS/TREBLE: BASS = 0 TREBLE = 0
2 EcInn Bbl n3MeHReTe HacTpoiKN EQUALIZER.
P.BASS:OFF
BASS/TREBLE:BASS=0,TREBLE=0
3 EcJIN Bbl N3MeHReTe HaCTpoiKn BASS/ TREBLE.
P.BASS:OFF
- EQUALIZER:FLAT
HactpoKa TaMepa BkJIIOUeHnA
HcnoJIb3yETcI IJI H3MeHENH TKeYIeY cTaHOBKn TaHMePa IJIIN IJIa YcTAHOBKN HOBOrTO TaHMePa.
1 Haxmnte STANDBY/ON, yTo6bl BKJIIOHTb NITaHne.
2 HaxmTe u ydepxnBaTKe KhoNky CLOCK/ TIMER.
3 Haxmnte KhoNk ,YTO6bI Bbl6paTb napamTp «ONCE» nnn «DALY》,3atem Haxmnte KhoNky ENTER.
ONCE- OJHopar3OBuTaiHemcpa6bTaBcAetOINHpa3 TOJIbkoB 3aDaHHOE BPEM.
DAILY - EzeJHeBnI TaHMeP cpaBaTbIaET B OJHO I TO Je 3aJaAHHOe BpeM I dH N HeJeJIH.
4 HaxmTe KHONK ,YTO6bl BbIpaTb napaMeTp «TIMER SET》,3aTe m HaxmTe ENTER.
5 Haxmnte KhoNk / ,TTO6bl BbIbpaTb HCTOuHnK BOCnpon3BeHeHnC TaMepom, 3aTe m Haxmnte ENTER.
B KauyeCTBE HCTOUnHKA BOCINIOB3EJENMOKHO Bb6PbATC CD,FM,AM,USB/IPOD,IPOD,AUDIO IN H LINE.
6 Haxmnte KhoNKn / ,yTo6bIyCTaHOBnTb DeHb Ha Taimepe, 3aTeM Haxmnte ENTER.
7 Haxmnte KhoNk / ,YTo6bIyCTaHOBnTb acsb, 3aTeM Haxmnte ENTER.
8 HaxMNTe KhoNk ,YTObIyCTaHOBtB MInHyTb,3aTEM HaxMNTe ENTER.
- YCTAHOBHTE OOKOHATeJIbHO BpEMa, KAK OHnCaHO BIIarX 7 H 8 BIIHae.
9 Otperyu npyte rpmokctb haxaTne VOLUME + / - 3aTe m haxmnte ENTER.
10 HaxmTe KhoNky STANDBY/ON, YTo6bl BOITn BpeKIM OxuJaHna.
3aropaetcHnDnKaTOp TIMER.
BbI3OB TaIMepa BKJIIOUeHIN
MoJcT HcIOJIb3ObATbCS DIA IOBTOPHOro IIPMHHeHnI TKeUIIeYctAHOBKn TaHmepa.
1 TaKxe BbInOpHnTe 7arn c 1 do 3B pa3dene «HaCtpoKa TaMepa BkIIOUeHnE».
2 HaxmTe / = BBb6epnte《TIMERON》n HaxmTe ENTER.
OTMeHa TaMepa BkIIOUeHnA
Mozet HcIIOb3OBAbTcBd IIN OTKIOUeHn yCTaHOBKn TaHmepa.
1 TaKxe BbInOpHnTe 7aRn c 1 do 3 b pa3dene «HaCtpoKa TaMepa BkIIOUeHnra
2 HaxmTe / BbIbepnTe «TIMER OFF» n HaxmTe ENTER.
IcnoJb3OBaHne TaMepa BKnIOueHnA
1 Haxmnte STANDBY/ON, yTo6bl BbIKIOUHTb NITaHne.
2 Pn HactynIeHn BpeMeH BKIOueHn DaHHoe yCTpoICTBO aBTOMaTHueCKN BKIOHTcN HaCHET BOCpON3BeDeHne Ha BbIbpaHHo FyHKuIN BXOJa.
Приимechанинe
Ecln npn HactynIeHH BpeMeHH BKIOueHHe N DaHOMy yctpoiCTBNe He IIOcOeHNHe IPOd/iPhone/iPad Hne 3aRpyKeH DnCK, daHHeoe yctpoiCTBO BKIOuHTcN, Ho He 6yJET BoCIOPN3BODnITb IOpOKKy.
- HekotopbteKnHcNcHoRTOBtOcPiINBOHTbCnBTOMATMOTHueCKnPnHACTNUJIeHNI BVPemEHN BKJUOHEN.
-Пин Habtroponke taiMepa OTBeHHTe OJHy HJIH 6OJIee MHHyt MeKJy BpeMeHem Haayala H BpeMeHem KOIIa.
IcnoJb3ObaHne TaMepa OTKJIouyehn
TaiHempOTKIOHOENOTKIOUOAEYCTPOIcTB0Yepe3aADAHHHI nepHOBVPemEHNIOBLOAIIIOKOIOHO 3aBnIATb,He6CIOIOKOBcO HeoEOHOIOMOCTB BkIOIOHOeHHyOCTpOBCTBa.
1 Haxmnte SLEEP HeckoIbko pa3, YTo6bl BbIbpaTb Bpemr OTKIOUeHn.
Bb6epHTe MeKJy 3HaueeHHMn B MmHytax 10 min, 20 min, 30 min, 60 min, 90 min, 120 min, 150 min, 180 min HN OFF (BbIK). BBohB 3aJaHHe 3aHueHn OTObpaKaetcB TceHHe 3 cekyHd, NocIe YTeO BbIOJIHeHHe NaCTPOHs 3AbePHeHO.
Приимechанинe
TaimepOTKIOHUEHHMOJHOyCTaHOBHtHaKaTHEM SLEEP BO BpemrOTO6paKeHHN0CTaIIIEcROBpEmHI.
NcnoJIb3OBAHnE HayuHNKOB
3 PoiKIIouHTe Baw iPod/iPhone.
- EcJIN iPod/iPhone He IIOJKIHOueH K aIIIapATy, IIIOTHO 3aKpOITe pa3bEm dJIa iPod/iPhone.
Iopknouhenie iPod/iPhone/iPad c IOMOsbBxOJaB E B KOMNJIeKT IODCTaBKN
1 Поdkночи Кабел iPod/iPhone/iPad K yctpoiCTBy.
2 Iponycntte Ka6ebIb iPod/iPhone/iPad uepe3 HnXHHIOU cactb cToiKn n noDcoeHNHTe ero K iPod/iPhone/iPad.
3 YctahOBtte iPod/iPhone/iPad B noCDtABky.
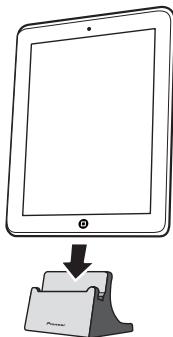
ПюсмOTР ВIDeo c iPod/iPhone Ha ТелевиЗоpe
YTo6bI IPOcMatPnBaTb BnJeO c i POD/iPhone Ha TeJIeBn3ope, IIOJIKNoHTE erO c IIOMOUBo BnJEoKa6EJI. IIpH IOJcOeJIInHeHHi POD/iPhone K DaHHOMy yCTpoiCTBy HAcTpoiKa BbIXoJa Ha TeteBn3Op ha iPod/iPhone abTOMaTHueckN yctAHaBIIHaBeTcHa ON》(BKJI).
PNEUYPTPEKJDEHNE
- IpejkeJe yem BbIIOJIINHTb HIN IIM3MeHHTb coeIHHeHHNBAIKIOJauaTE IIITAHNE HOTcOeIHINHTe Ka6EJI bIITAHNIOT cTeBEOB pOsetKN. IIOKIOJUHeNE BIIKN BPOSETKY DOJIKNBOIIOJTHCBa I NOCIEJIHOIO OuepeJIb.
Приимechанинe
Дллолученин Длрб6ьх Иструкший OTHOCHTELHNOHIOJIb3OBAHnI iPod/iPhone obpaaiAtebc K pykoBOCTBy, pIIaIgAeMoMy K iPod/iPhone.
- Hekotophe yctpoiCTBa iPod IO3B0JIaHT IpeKJIIOuATb HacTPOHy BvXoJa HA TeJeBn3Op, B To BpEma KaK OHN IOJIKIIOUHb.
- IpiO tOcoEINHENHH iPD/iPhone oT dAnHOrO yCTPOICTBA hACTPOKa bXbOJaHa Na TEleBn3Op Ha yCTPOICTBe iPD/ iPhone BO3BpaAaTeC RA H3NaUahLHoE 3auHene.
Bocpnon3BeJeHne iPad/iPhone
1 Поклочи Ваш iPod/iPhone.
Ecln iPod/iPhone IIOIcOeDMHAEETC,KOTLA yCTPOIHTBCO BKNIOEO,BOCNPOB3BEHNEe c iPod/iPhone HHeNHAHTCA.
2 HaxmTe iPod nIu USB dIy BbIbopa B KaueCTBe BXoHOrO NcToUHnKa.
HA OCHOBHOM IHCNJIEEI KOKA3bBAECTCR HINJIKNKIAHNI «IPOD» HJN «USB/IPOD».
3 Pocne 3aBepseHn paCno3HaBaHnABTOMaTHueCKn HaHETcBOcPpOu3BeHeHne.
- Имедиеся на данном спарate opганы уравлийь Всироньдением iPod/iPhone -этο | | | | | | | | | | | | | | | | | | | | | | | | | | | | | | | | | | | | | | | | | |
B CJIeJyUoiem CJIyuae YIpyabJIte IPOd/IFhoneHnIePcIeTBeHHO:
-Понсфайla IO HMeHH HcIOJIHHTeJI JIIN KaHyp.
Bocnpno3BeJHNE BpKHe MIOBTOPA HIN CUYAHHOI NOcIEBOATEJIbHOCTN.
-ПрOCMOTР Na TeJIeBn3Ope BnIeO, coXpaHeHOrO B nAMrTH iPod/iPhone.
Bocnpoun3BeDeHne iPad
1 Poioknloutye Baw iPad.
- Ecln iPad nIOJIIOAetaCER, KOrla dAnHH anIaIAPat BKIOHoeN, BOCPOINB3EeIDne iPad He hauHETc.
2 Haxmnte USBДЯ BbIbopaВKaueCTBe BXoDHOrO NCTOCHNka.
Ha oCHOBHOM HnCIIJIeI IOKa3bIbAeTcR HnIHKaIINR «USB/IPOD»
3 Pocne 3aBepueHn paCno3HaBaHnABTOMaTHueckn HaHTcR BOCpOu3BeHeHne.
- Imeoiuee na Hdannm annapate orpahnbl npvablenhna Bocipon3BSeBHeHem IPod - 30e 1,14
-
HenocpeCTBeHHeO yIpyaBIIeHne iPad oCyIeCTBJIeTcB CJIeJyIOxN cIJyAax:
-
IOnck qaiJa II HMeHH HcIOJIHInTeJr HIN JkaHy.
- BocipnoH3BeHeNHe B pekHMe NOBtOpa HIn cIyauHNoHIOcJIeIOBATEJIbHOCTH.
PNEyPExKDEHNE
Korda iPod/iPhone/iPad HIOcOeHNHe KdAHHOMy yctpoCTbY,ecIN bI JKeJIaTe ynpABJtB HnEOpeCTBeHNO iPod/iPhone/iPad,HaNekHo YepKHBaiTe iPod/iPhone/iPad npTou pyko,TO6bI IpiOTbPArTH c60H Bpa6ote, KOtOpbe MOrY BO3HHKHTb H3-3a IIIOXToKOHTaKa.
Приимechаиме
IocSeBbIPOJIHHeHIOBTOPTHOBOCPOH3BeJHHeHIO6BaTaeJIbHO HAKMHe T. HNaue, dNcK 6yTeB OBCPOH3BOJITtCHeIePbIHo.
BoBpeKHMnOBTOpHOroBOcIpOn3BeHnHO BOCIpOn3BeHnHe B CJIyauHnOIOcHeOBaTeJIbHOCTNHEBO3MOXHO.
Bocnpo3BeDeHne B CnyaHNoIPOCNeOBoTaTeNbHOCTN
IopokKH Ha NcKe MOKHO ABTOMATUeCKH BOCIIPOH3BOIDHTB CUYaHHOIOCEJIOBATeJIbHOCTH.
ДяВOCПОИЗBEDEHЯ BCEX DOPOXEK BCJUaHNoI NocJIeOBoAteIbHOCTN:
HakMMTE HECKBOLE P35 RANDOM. NOKA HE POIBHTTCAHINDKAHIAK
ДяТМЕнБI BOCПОИЗBEDEHINBA CNYUHAHNO NOCLEDOBATEJIbHOCTN:
HauKMHTE NOCEKBO KA3 RANDOM. IOKA HE IOBHTTCA HINDKAIAH
Приимechанинe
EclnKHOIka 1 HaxHMaetcBO BpEmBocnpOH3BeEHnB CbIyauHIOH NocJIeOBATeJbHcOTN,MOxHOpeTIHa CJIeYIOUHO bIbApHHyOdoPOKkY B pKeHMe BOCnpOH3BeEHnB CbluyauHIO NocJIeOBATeJBHoCTN. B To KBEpMBA,KHOIIA He NIOBJOAE TpeHTn Ha IIpIbIyUHO doPOKkY. ByET OpiPeJIeHEo MecTo hauJaLA BOCnpOH3BOHMOI doPOKkN.
- PnB BocIpnOB3BeEHNH B ClyuayaHNo IIOcJIeOBAteJIbHOCTN yTOPICBTO 6yETBb6HpATb N pOIOHrpBaBAT IOPOJKKN ABTOMATueckN. (HeJIz3 RaIBOpAtpB IOcJIeOBATeJIbHOCTI npOKeK.)
- Bo vempa pekhma Bocipnoh3BedeHn B cIyauHoi nOcIeIOBATEJIbHOCTN IOBTropHe BOCIPNO3BeHHe HEB03MOKHO.
3anporpaMMPOBaHHoe Bocpon3BeJeHne (CD nIIM MP3/WMA)
Mozho CJIeIbT aO 32 Bi6OpB Ia NBOcIPOn3BeHnH B JEAeMaON PocIEIOBATEBJEHOCTH.
1 B pexmme octaHOBn HaxmTe KhONky MEMORY/PROGRAM Ha nyIbTe IY, YTObI BOITN B pexm COxpaHEnn npOrpAmMbI.
2 HaxmTe KhONK I 一 一 nIuIcIpObIe KhONK Ha npIbTe Dy IaBbIbopa Tpe6yeMbIX dopoKeK.
3 Haxmnte ENTER yTo6bI coXpaHntb Homep nankn iDopoxkN.
4 NOBTOPHe 3n2 n3nIpynx nanok/ dopoxek. Moxho 3anporpammpoBaTb do 32 dopoxek.
EclIN BbXOTHTe IPOBepHTb 3aIporpaMMHPOBaHHBe IopOJKKN, HauKMHTe KHOIIKY MEMORY/PROGRAM.
Ecln Bbl cIeIaete OIIH6Ky,IOcJIeIHHe 3aIIpOrpaMMNPOBaHHbIe IOpOgKbI 6yUT OTMeMHbI pIN HAKKaTHN CLEAR.
5 HaxmTe KhONky II nla Haana BocnpOn3BeDeHn.
B CJIyueae OCTaHOBKN HaxKMHTe KHOINK / ,HMOJHO Bb6paTbPiKy.
IpeeknueHne coepxMoro dncnner
1 HaxmTe DISPLAY.
EclnB afaJIaIINcAHaHfOpMaIIH OHa3BaHHN IeCNH,MeHNH HcIOJIHHTeJI Ha3BaHHN AJIb6OMo,TO 3Ta HfOpMaIIH 6yET otO6paKATbey HAJNCIIIEe. (Bb MyoKete BnDEt, YoHa 3OTM anPiapate OT6paKaiaOTcTo TLIKo 6yKBeHHO-iiHpPOBBE cHMBOIIb. CmBOJIb,OTiHuHbte OT 6yKBeHHO-iiHpPOBbX, IIOKA3bBAOTcB B VIDe ※ _

Приимechанинe
- Mojket He BOCIpOn3BDoIbTc8a FaaiJ WMA, oxpaHaeMbb ABtopcKMM IpABOM] HIN HenOJIepKHaBaEMbI aiJIIA BOCIpOn3BVeDEHnR. B 3TOM cIyuea faai6byet ABtomATuYeCKN IIpoIuyEn.
Bo3MOKbI cIyuaH, KOgDa He oTo6paKaetc HnKaKoHnHOpMaunH. - Oto6paKeHHe Na3BaHNHa PecnH, HmEHn HCIOJIHHTeJI H Na3BaHNa aIIObOma IIOJIePJKBaEaTc TOnIbKO dIaIIOB MP3.
Pa3dien 7:
Bocnpon3BedeHne c USB
Bocnpoun3BeDene 3aONMnHaIoUx yctpoiCTB USB
C NOMOIOH NHTERpeJcA USB HA nepeJHn PAHEIN 3TOG peCHBepaMOKHO pOcJIyHbATb DByXKaHbNb3ByK c USB -ycptOBTc.
Pioneer He rapaTHpyet, YTO 6yET BOCIPOIN3BOIDHTbce IIO60I qaiH, 3IAHNCAHHN HAI ZAOIMHAAOHEM yCTPOIHCTBE USB, INH YTO 6yET IOJABATbCE IIITAHHe HA 3AIONMHAIOOe yCTPOIcTBo USB. TaKke O6pAHrTe BHAMHHe, YTO KOMIIAHN Pioneer He Hecet HIKAKoI OTBcTCTBEHOCTn 3A JIO6yIO HOTepHO qaiIOB Ha 3AIONMHAIOOxh yCTPOIcTBx USB B cB83n C IOJKHQUeHEM K DAHHOMY yCTPOIcTBy.
1 Haxmnte USB dIy BbIbopa B KaueCTBe BXoHOrO NCTOuHnka.
Ha oCHOBHOM dncJIeE IOKa3bIbAeTc HnIINKaIIH «USB/IPOD»
2 IopKnIouHTe 3aONMHaIOoee yCTpOiCTBO USB.
HomepaianokniiphiJIOB,coxpaAHENHbHeHaIOJIHOUeHHOM 3aONMHAAIOHcYCTPOIcTBSEUSBIOBBAIOHTcHaOCHOBH MINJIIEABOTMATNUeCKN.
-Даннbi pechBep He IIOJIePKNBaet USB-pa3BETBHTeIb.
I\PiopKJIOUeHHH iPod/iPhone/iPad aHnapat Hauhet 3apKatb.c.
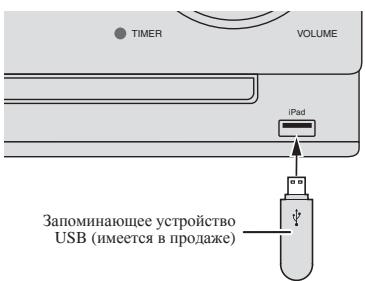
3 Pocne 3aBepseHnpaCno3HaBaHnna HaxMNTe KhoNkY II nla Hauana BOCPon3BeDeHn.
-Пипескiiюченин На Дутугь BXOДНИСТОЧИК ChaJaIa OCTAHOBHTE BOCIPPOH3BVEdHHe C yctpoiCtBa ПЯЯтUSB.
4 OToeDHHte yCTpoNCTBO nAMrTn USB ot pa3bema USB.
IIpeJbHbIeueHHem3aONMHaIOIoEro yCTPOBCTBA USB OTKJIOnHTI INITAHNE.

Приимейанne
Даанhoeустбо может He paio3habt b 3anomnhaoiuee yctpoiCTBO USB, He bocnpo3BOIHTb faJIbIиHHe noBaoBATb IITaHne Ha 3anomnHaoiuee eyctpoiCTBO USB. IIOpO6hee, cm. Ko20a nookJoueno 3ano.muaiooe ycmpoicm6o USB ha ctr. 29.
Korda He Hiet Bocipno3BedeHHe c 3aOpMHHaioeero yctpoihtbxa USB, ebn H TeueHHe 15 MmHyt N doJIbHe C yctpoihtbOM He bIoHHaTcN HKKaHX ONepaHIn, HNTaHHe abOTMAthueckn OTKJHOaTeTc.
IOBTOHoe BOCnpon3BeJeHne
IIINIOBTOPHOMBOICIPON3EeHNMOJHOHNEIpepbHBO BOCIOPOHN3BOIDHTOJHDOPOKKYBCELOPOKKHNJIOPOKKBN 3aIporpammporOBAHNOIOCIEJOBADATEBJHOCTN.
1 HaxmTe KhoNky USB n PoNcoeHNHTe 3aONMaHOoee yCtpoCTBO USB.
2 HaxmTe KhoNky FOLDER n 3aTEM HaxmTe KhoNk / ,YTO6bI BbI6paTb JcEJaemyo npKy dny BocnpOn3BeDeHnA.
3 Haxmnte ENTER.
Bocnpon3BeDHe NaHcTcS c npBbN neCTn Bb6paHNo napani.
B CnYue ocTaHOBKN HaKMHTe KHOIIKN ↑/↓, H MOKHO Bb6paTb IaIKy.
IpeeknueHne coepxMoro Dncnpej
JaHHeO yCTPOBTO MOKETIpeKIOUaTH bHIOfOpMaIHIO, 3aIIHCaHHIO HA 3aIOMIHHOEM eYCTPOCTBE USB. IIIOpObHee CM.IPEKIOUeHne cOePcKUMoO duNtJIe HA ctr.21.
Bocnpoun3BeDeHne B xeJaemOM npraKe (3anporpamMnpoBaHhoe Bocnpoun3BeDeHne)
JaHnbl anHapat MoKet IOBtropHO BocnpO3BOJHTb IaHKn, coXpaHeHHbIe Ha 3aOpOMHHaOHem UcTPOJCTBE USB. IIOpO6Hee, cm. 3anpoZpaMmuObaHHoe BocnpOu3BedeHue (CD uIu MP3/WMA)Ha ctrp.20.
Pa3dien 8:
Исpenьзоване Тюнера
PpocnyuBbHne paDnonepepa
B IIpHBeIeHNbIX HNKe IyHKtax OINCbBaTeTc IpoIeJypa
HaCTPOKn HApaIOCTAHuHH DnAHA3OHa FM n AM c
HCIOJIb3OBaHHem 0fYHKII ABTOMATHueckoi (IOHcK) HINpyHO
(IIPOIAHOB) HaCTPOKn. BBoIIOJIHb HAcTPOKY Ha
paHOCTAHUHO, ee cactotry MOxHO CoXPAHHTB B pAMTH dI
noCIE LyIOUeBOB3OBA. IIOpO6HbIe IHCTpyKIIIMo 3OM CM. B
pa3JeCe COxpanHeue 3anpOzpaMMmuOpBaHHbx paDOUCMANI
HNIke.
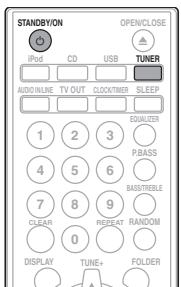
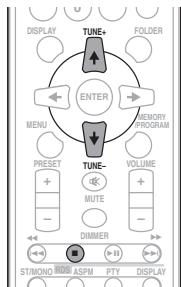
Hac troponka
1 Haxmte KhoNky STANDBY/ON nBkJIIOUeHnI NITaHn.
2 Haxmnte KhoNky TUNER HeckoJbko pa3, yTo6bl Bbl6paTb Jeaembl YactOTHbI dHaana3OH (FM nAmAM).
3 HaxmTe KhONky TUNE + / - Na nyIbTe DY, YTO6blHAcTpOHTbcra Ha XeJaemyo CTAHUIO.
ABTomatueckaHaCTpoKa:
HakmHTe n ydepKbHaiTe khoNkY TUNE + / - , abTomatnueckn 3aynCTHc cAnHPoBaHNHe, n ToHep octAHOBITcHa nePboI pinnHMAeON paJIOCTaHNu.
Puchna HacTroponka:
HaKMHTe KHOIIky TUNE+/-HeCKoJIbKO pa3, YTO6bl HAcTPOHbC8 Ha JeJIaemyIO CTaHIIO.
Приимechаиме
- IIPh NOBJIENHH PAJHOHONOX EM BATOMMHTCEK HACTPOIKA MOKET ABTOMATHM'CHCN OCTAHOBITCB3 BTOM MECTE.
-
ABMATOHueckaa HACTropka 6ydet npOnyuckab tcaHINco cIa6bIM cHrHJIoM.
-Дя OCTaHOBKN ABTOMaTHueCKOHaCTpoKHaJKMHTe ■ -
Ipn h achtpoiKe h a CTanHIO RDS (Cnctema paHIOaHHbIX) chana 6ydt OtO6paKaTb8 cAchToTa. HakoHe, PnoBHTc8 h3BaHNBe CTaanHIO
IIOJIHOABOTOMATHueCKOH HAcTPOHKNMOKHOOCHTHbIJIaTahnIHRS,HCIOJIb3yPeJHMABOTOMATHueCKOH HAcTPOHKnHaIpeIbArHteJIbHO3aONHEHbIePiORpaMMbI (paHocTAnHH) 一 A S P M _ 一 .cm.276.
1 HaxmTe KhoNky PRESET + / - ,TTo6bl BbIbpaTbKeJaemyIO CTaHnIO.
OTHER M - My3bika, He
COOTBCTCTBYIOIIa
IpeHcJIeHHbIMKaTeFOpHm
WEATHER-CBOVDIKH INIPOTHO3BIOIPOID3
FINANCE -bprkEeBbCBOJKN, KOMMepcckAaT, TropOBaH NHOpMaUNI H.T.I.
SOCIAL - OБICIETBEHHA
KN3Hb
RELIGION -IpoIpaMMbI O peJIINH
PHONE IN -IpoIpaMMbI, IpeIyMaTpHbAoIIHne 06cJxDHeN KAcoi-JInbO TeMbl H 06JIeHHe co cIyIaTeJIaMn IIO TEJIeOHy
TRAVEL - NyeIeIeCTBnH O TONYB
LEISURE-CB60DIOHBEPMA, INItepeus X606H
KazdIpa3,KoIgIaHaKMaAeTcKaHIIKaRDS DISPLAY, HcHIIe8yETpeKeJIHOuATcbcCJeDuOHHM6pbzOM:


USB pa60aert c iPhone 5, iPhone 4S, iPhone 3GS, iPhone 3G, iPhone, iPad (3-e n 4-e no10-10 no10-10 no10-10 no10-10 no10-10 no10-10 no10-10 no10-10 no10-10 no10-10 no10-10 no10-10 no10-10 no10-10 no10-10 no10-10 no10-10 no10
30-KONTAKTTHHbpa3bEmpa60taertc iPhone 4S, iPhone 4, iPhone 3GS, iPhone 3G, iPhone, iPod touch (c 1-ro no 4-e iokolienHe) n iPod nano (c 3-ro no 6-e iokolienHe).
iPad, iPhone, iPod, iPod nano u iPod touch xiaomc mop26bmu 3hakami kamannu Apple Inc., 3aepzucmpuroboanbmu 6 CIIU a ouyxu cmpaanx.
Lightning jeiemc mopoeBbM 3naKOM komnauu Apple Inc.
C6poc Bcex HacTpoek Ha 3HaueHnIyMOnJIaHnIO
ДявOCCTaHOBJIeHINBCExHAcTpoEKNyMOJUaHHIOBbIIOJIHHTeJeICTBnO,OIIHCaHHMeHNKe.
1 Haxmnte STANDBY/ON, yTo6bl BkIIOHTb NtTaHne.
2 HaxmTe CD Ha npIbTe Dn HeckoJIbKO pa3 KhoNky INPUT Ha oChOBHom 6Noke, YTo6bl BbIpaTb FyHKuNIO CD.
3 Haxmnte OPEN/CLOSE, yTo6bIOTKpbITb ILOTOKdIaNCKOB.
4 HaxmTe STANDBY/ON, Haxmma npn 3TOM
HcNpO13yIte KHOHNHa BepXHen PAHeIN YCTPOIeCTBa. IIOKA HETIpoIeCCBocTAHOBJIeHN HAcTPOeK, OTObpaKaTaCER<“DEFAULT”. IIITAHNEOTKIIHouaETcR.
TexHnueckne xapaKTepeNCTNK
- ycnjnteJb
BbIXoHna CpeHneKBaIpaTHuecka MoIIOHOCTb:
15BT+15BT
(1KΓI, 10% KO3ΦΦHIIHeHT rapMOHHK, 8OM)
Cekzna Tiohepa
YactotbI nnana3OH (FM).87,5 Mg10 108 M
BxoJ aHTeHHb (FM) .75 OM Hec6aJaHcHpOBaHHbI
1aactoTHbI dHaana3OH (AM) 522 Ktio 1620 Kt
AHTeHHa (AM) .PaMoUHa aHTeHHa
OctaIbHoe
CoeHHHTeJIbHbIpa3bEmIJa iPod/iPhone. 5V,1A
Pa3bEm USB 5V,2,1A
HcTOUHHK IITAHNIA
Or 220 Bdo 240 B IpepeMeHHoro Toka,50 T/60 T
Iotppe6JiaemajMOuHocTb
BkJIOueHHe IIHTaHH 37 Br
MoHocbBpeKHeOxHaHn
0,5BTHIMMeHBIIe
Pa3MepbI 200 MM (III) x 123 MM (B) x 250,6 MM (Γ)
Bec (6e3 ynaKOBKn) 2,0 K
- FrpomkoorOBopnteB
Akyctnuecka cnTeMa c MaHHTbIM 3KpaHnpOBaHHem
Tn
CnCTema rPOMKOROBOPHTeJ 2-IOLOCHORO TIIa
BbICOKOaCTOTHbI rPOMKOrOBOpHTeJIb 5cm
Hn3KoayactOThBn rPOMKOrOBOpHTeJIb 9,4cm
MaKcHmAJbHaB BXoJHaa MOIOHOCTb. 15BT
CoipoTHBJIeHHe. 8OM
a6apHTbI 420MM (III) x 200 MM (B) x 232,6 MM (Γ)
Bec. 2,0 kT/kaxkDy
-Пинадлжноctи
IyIbT IInCTaHIOHHORO yIpaBJIeHHN 1
BatapeiAAA (R03) 2
Ka6eJIb aHTeHHbI AM 1
IpoBoJIOuHa aHTeHHa FM. 1
IoiKJIaIKN IpoTHBOCKOJIbKeHH. 8
Ka6eJIb IIITaHINr
Iopctabka iJa iPad
TapaHTnHbI cepTHΦHKaT
HHeTpkyuH NIO KcIJIyatauHn (daHHbI JOKyMeHT)
Приимechаиме
- TexHHueckHe xapaKtepHCTKN yka3AHbI IaII HapPrKeHHA 230 B.
B C83H CIOCTOAHHBM COBpeIEHCTBOBaHHEM I3EJIIN TEXHUECKHe XAPaTEpTHKCHN K HOKHCTpyKIIN MOYT 6bIbI HmMEHEHb63 npEJaBPteJIbHO rYo bELOJMeHHJe. - iOS hyememocpopoob mapoku, na komopuyo Cisco umeem npa60 popoobb6 mapok 6 CIIU u hekomopb odyux.
PIONEER CORPORATION, 2012.
Bce npaba 3aunuienbI.
10 (DonoJIHNTeJIbHaI HΦOpMaζη
Daty n3rOToBJIeHnO bOpUdOBaHn MoXHo OnPpeIeNt b No cepiHOMy Homepy, KOToPbI CoepeKHT INΦopMauHIO o MeCaue N rOde Ipon3BODCTBa.
http://www.pioneer.co.uk
http://www.pioneer.fr
http://www.pioneer.de
http://www.pioneer.it
http://www.pioneer.nl-http://www.pioneer.be
http://www.pioneer.es
http://www.pioneer-rus.ru
http://www.pioneer.eu
© 2012 PIONEER CORPORATION.
All rights reserved.
© 2012 PIONEER CORPORATION.
HmnpTeP: OOO "TMOHEP PUC"
125040, Pocca, r. MockBa, yI. IpaBbl, d.26 TeI.: +7(495) 956-89-01
PIONEER ELECTRONICS (USA) INC.
P.O. BOX 1540, Long Beach, California 90801-1540, U.S.A. TEL: (800) 421-1404
PIONEER ELECTRONICS OF CANADA, INC.
340 Ferrier Street, Unit 2, Markham, Ontario L3R 2Z5, Canada TEL: 1-877-283-5901, 905-479-4411
PIONEER EUROPE NV
Haven 1087, Keetberglaan 1, B-9120 Melsele, Belgium TEL: 03/570.05.11
PIONEER ELECTRONICS ASIACENTRE PTE. LTD.
253 Alexandra Road, #04-01, Singapore 159936 TEL: 65-6472-7555
PIONEER ELECTRONICS AUSTRALIA PTY. LTD.
5 Arco Lane, Heatherton, Victoria, 3202, Australia, TEL: (03) 9586-6300
PIONEER ELECTRONICS DE MEXICO S.A. DE C.V.
Blvd. Manuel Avila Camacho 138 10 piso Col.Lomas de Chapultepec, Mexico, D.F. 11000 TEL: 55-9178-4270
K002_B4_Ru

- CAUTION
- RISK OF ELECTRIC SHOCK
- DO NOT OPEN
- CAUTION:
- WARNING
- Operating Environment
- VENTILATION CAUTION
- Information for users on collection and disposal of old equipment and used batteries
- POWER-CORD CAUTION
- Contents
- Contents
- Before you start
- Part names and functions
- Connections
- Getting started
- iPod/iPhone/iPad playback
- Disc playback
- USB playback
- Using the tuner
- Other connections
- Additional information
- Chapter 1: Before you start
- What's in the box
- Loading the batteries in the remote control
- Using the remote control
- Chapter 2:
- Part names and functions
- STANDBY/ON
- Input function buttons
- CD Receiver control buttons TV OUT
- CLOCK/TIMER
- SLEEP
- Numeric buttons (0 to 9)
- CLEAR
- CD Receiver control buttons DISPLAY
- FOLDER
- MENU
- MEMORY/PROGRAM
- / / ← / (TUNE + / - ), ENTER
- PRESET control buttons
- MUTE
- 10Playback control buttons
- Tuner control buttons ST/MONO
- RDS ASPM
- RDS PTY
- RDS DISPLAY
- OPEN/CLOSE
- Sound control buttons
- RANDOM
- REPEAT
- Volume control buttons
- DIMMER
- Speaker system
- Important
- Attaching the Non-skid pads
- Front panel
- Main display
- Volume control
- Volume illumination
- Headphone socket
- AUDIO IN socket
- Remote sensor
- Disc tray
- TIMER indicator
- USB terminal
- Top panel
- iPod/iPhone connector port
- STANDBY/ON
- 3Playback control buttons
- INPUT
- Disc tray open/close button
- Chapter 3:
- Connections
- Speaker connection
- Connecting a TV
- Note
- Connecting antennas
- Connect the AM antenna wires.
- Fix the AM loop antenna to the attached stand.
- Place the AM antenna on a flat surface and in a direction giving the best reception.
- Connect the FM wire antenna into the FM antenna socket.
- Using external antennas
- To improve FM reception
- Plugging in
- Chapter 4:
- Getting started
- To turn the power on
- After use:
- Setting the clock
- Press ENTER.
- To confirm the time display:
- To readjust the clock:
- General control
- Input function
- Display brightness control
- Volume auto set-in
- Volume control
- Muting
- Sound controls
- Equalizer
- P.bass control
- Bass/treble control
- If you select one of three functions, features that are not selected will be set as follows.
- Setting the wake-up timer
- Calling the wake-up timer
- Cancelling the wake-up timer
- Using the wake-up timer
- Using the sleep timer
- Press SLEEP repeatedly to select a switch off time.
- Using Headphones
- Chapter 5:
- iPod/iPhone/iPad playback
- Confirming what iPod/iPhone/iPad models are supported
- Connecting your iPod/iPhone/iPad
- Connecting iPod/iPhone to the top panel
- Connecting iPod/iPhone/iPad using supplied stand
- Watching iPod/iPhone videos on your TV
- Playing iPod/iPhone
- Connect your iPod/iPhone.
- Press iPod or USB as the input source.
- When the recognition is completed, will begin playing automatically.
- Playing iPad
- Connect your iPad.
- Press USB as the input source.
- Chapter 6:
- Disc playback
- MP3:
- WMA:
- Playing discs or files
- Tip
- Advanced CD or MP3/WMA disc playback
- Direct track search
- To stop playback:
- Repeat play
- To repeat one track:
- To repeat all tracks:
- To repeat desired tracks:
- To cancel repeat play:
- Random play
- To random play all tracks:
- To cancel random play:
- Programmed play (CD or MP3/WMA)
- Press II to start playback.
- To cancel the programmed play mode:
- Adding tracks to the program:
- About downloading MP3/WMA
- About folder playback order
- ROOT folder is set as folder 1.
- Specify the folder to play
- Press CD, and load an MP3/WMA disc.
- Press FOLDER, and press ↑/↓ to select desired playback folder.
- Press ENTER.
- Switch the display contents
- Press DISPLAY.
- Chapter 7:
- USB playback
- Playing USB storage devices
- Press USB as the input source.
- Connect the USB storage device.
- When the recognition is completed, press to start playback.
- Disconnect USB storage device from the USB terminal.
- Playing in the desired order (Programmed Play)
- Chapter 8:
- Using the tuner
- Listening to the radio broadcasts
- Tuning
- Automatic tuning:
- Manual tuning:
- To receive an FM stereo transmission:
- Improving poor FM reception:
- Press ST/MONO repeatedly to select MONO.
- Saving station presets
- Tune to a station you want to memorize.
- Press MEMORY/PROGRAM.
- Press PRESET + / - to select the preset channel number.
- Press MEMORY/PROGRAM to store that station in memory.
- To recall a memorised station
- Press PRESET + / - to select the desired station.
- To scan the preset stations
- Press and hold PRESET + / -
- Press PRESET + / - again when the desired station is located.
- To erase entire preset memory
- Using the Radio Data System (RDS)
- An introduction to RDS
- Searching for RDS programs
- Press TUNER on the remote control.
- Press RDS PTY on the remote control.
- Press / to select the program type you want to hear.
- Whilst the selected program type is displayed (within 6 seconds), Press RDS PTY again.
- Information provided by RDS
- Using the Auto Station program Memory (ASPM)
- Press and hold down RDS ASPM on the remote control.
- To stop the ASPM operation before it is complete:
- Notes for RDS operation
- If any of the following events occur, it does not mean that the unit is faulty:
- Notes for radio text:
- Chapter 9:
- Other connections
- Connecting auxiliary components
- Press AUDIO IN/LINE as the input source.
- Press AUDIO IN/LINE twice as the input source.
- Chapter 10:
- Additional information
- Troubleshooting
- General problem
- Playable discs and formats
- Regarding copy protected CDs
- Supported audio file formats
- Cautions on use
- When moving this unit
- Place of installation
- Avoid the following locations:
- Do not place objects on this unit
- Do not obstruct the ventilation holes.
- Do not expose to heat.
- About condensation
- Cleaning the product
- Cleaning the lens
- Handling discs
- Storing
- Cleaning discs
- About specially shaped discs
- About iPod/iPhone/iPad
- Restoring all the settings to the defaults
- Specifications
- - Amplifier section
- Tuner section
- Miscellaneous
- Speaker
- - Accessories
- Uber iPod/iPhone/iPad
- WAARSCHUWING
- WAARSCHUWING NETSNOER
- EDUCATE - Material educativo
- IPEDYIPEXDEHNE
- HOpMaunI nI pIb3OBeTeNe IIO c6OpU yTnJIn3aunI 6bIBweroB 3KcNlpyataunI o6OpyDobAHmI Otpa6oTaBux 3JIeMeHTOB NITAHIN
- Dahhble 603aHn yTBePKeHbI TOnbKO dEbponeckoro Co1o3a.
- Длстран,КOTOPье He BXODТВ COCTAB EBponeckoro CoIO3a:
- MEPbI IPEIOCTOPOXHOCTN IPNOBPAUENC CETEBIM UHYPOM
- BHIMAHNE
- CopepxaHne
- Pered nauanom pa6oTbI
- Ha3BaHnY qAcTe nФункцm
- PoiKJIoueHn
- Hauano pa6oTbI
- Bocnpo3BedeHne iPod/Phone/iPad
- Bocnpo3BedeHne Dncka
- Bocnpo3BeDHe n c USB
- NcnoJIb3ObaHne TIOhepa
- 09Дргип полоченя
- DonoiHntelbHa nHΦopMaun
- Pazden 1:
- YcTaHOBka 6aTapeeK B nylbT DnCTaHcNoHHoro ynpabLeHna
- PNEyPPEKJDEHNE
- - PNEДУПЕХКЕнE
- IcnoIb3OBAHne NylbTa IaCTaHUNOHHO
- ynpabJIeHnA
- LInΦροBsIe KhoNkN (OTo 0 Do 9)
- KhoPkn ynpaBneHnpecnBepom CD DISPLAY
- KhoNkynpabJeHn PRESET
- Khonkn ynpaBHeHn BocpOn3BeDeHnEM
- KhoNkynypaBneHn Tuner
- ST/MONO
- KhoNkynpaBneHn 3ByKOM
- Khonkn ynpabJeHnra Volume
- Akyctnuecka cnCTema
- BAXHO
- PnukpenneHHe HeckOJIb3aunx NODKnaDOK
- PepednnaheB
- TnaBbI dncnnei
- PerynipobAHne rpomKoCTn
- Iopcbetka pyuken peyunipOBkn rpoMKoctn
- He3do dnaHayuHnKOB
- THe3do AUDIO IN (aydnoBxoJ)
- DaTnK nCTaHcNoHHOrO ynpabJIeHnR
- IOTOKIaIaNCKOB
- Khonka OTKpbITn/3aKpbITn JOTKa IJIy DnCKOB
- Глaba 3:
- Поклоченья
- I PENEYIPPEKDEHNE
- IopknioeHne rpoMkorOBopnteNei
- Приимеанно
- Hacptponka yacob
- Haxmnte STANDBY/ON, yTo6bl BkIIOHTb NtAHne.
- Haxmte CLOCK HA npIbTe DnCTaHcNHOHOrO ynpabHeHn.
- Haxmte ENTER.
- HaxmTe ENTER.
- PerylnpobKa Tem6pa Hn3Knx/BbICOKnx YactOT
- PpimMeaHne
- HactpoKa TaMepa BkJIIOUeHnA
- BbI3OB TaIMepa BKJIIOUeHIN
- OTMeHa TaMepa BkIIOUeHnA
- IcnoJb3OBaHne TaMepa BKnIOueHnA
- Приимechанинe
- IcnoJb3ObaHne TaMepa OTKJIouyehn
- Haxmnte SLEEP HeckoIbko pa3, YTo6bl BbIbpaTb Bpemr OTKIOUeHn.
- NcnoJIb3OBAHnE HayuHNKOB
- PoiKIIouHTe Baw iPod/iPhone.
- Iopknouhenie iPod/iPhone/iPad c IOMOsbBxOJaB E B KOMNJIeKT IODCTaBKN
- YctahOBtte iPod/iPhone/iPad B noCDtABky.
- ПюсмOTР ВIDeo c iPod/iPhone Ha ТелевиЗоpe
- PNEUYPTPEKJDEHNE
- Bocpnon3BeJeHne iPad/iPhone
- Поклочи Ваш iPod/iPhone.
- HaxmTe iPod nIu USB dIy BbIbopa B KaueCTBe BXoHOrO NcToUHnKa.
- Pocne 3aBepseHn paCno3HaBaHnABTOMaTHueCKn HaHETcBOcPpOu3BeHeHne.
- Bocnpoun3BeDeHne iPad
- Poioknloutye Baw iPad.
- Haxmnte USBДЯ BbIbopaВKaueCTBe BXoDHOrO NCTOCHNka.
- Pocne 3aBepueHn paCno3HaBaHnABTOMaTHueckn HaHTcR BOCpOu3BeHeHne.
- PNEyPExKDEHNE
- Приимechаиме
- Bocnpo3BeDeHne B CnyaHNoIPOCNeOBoTaTeNbHOCTN
- ДяВOCПОИЗBEDEHЯ BCEX DOPOXEK BCJUaHNoI NocJIeOBoAteIbHOCTN:
- ДяТМЕнБI BOCПОИЗBEDEHINBA CNYUHAHNO NOCLEDOBATEJIbHOCTN:
- 3anporpaMMPOBaHHoe Bocpon3BeJeHne (CD nIIM MP3/WMA)
- IpeeknueHne coepxMoro dncnner
- HaxmTe DISPLAY.
- Pa3dien 7:
- Bocnpon3BedeHne c USB
- Bocnpoun3BeDene 3aONMnHaIoUx yctpoiCTB USB
- Haxmnte USB dIy BbIbopa B KaueCTBe BXoHOrO NCTOuHnka.
- IopKnIouHTe 3aONMHaIOoee yCTpOiCTBO USB.
- Pocne 3aBepseHnpaCno3HaBaHnna HaxMNTe KhoNkY II nla Hauana BOCPon3BeDeHn.
- OToeDHHte yCTpoNCTBO nAMrTn USB ot pa3bema USB.
- Приимейанne
- IOBTOHoe BOCnpon3BeJeHne
- HaxmTe KhoNky USB n PoNcoeHNHTe 3aONMaHOoee yCtpoCTBO USB.
- HaxmTe KhoNky FOLDER n 3aTEM HaxmTe KhoNk / ,YTO6bI BbI6paTb JcEJaemyo npKy dny BocnpOn3BeDeHnA.
- Haxmnte ENTER.
- IpeeknueHne coepxMoro Dncnpej
- Bocnpoun3BeDeHne B xeJaemOM npraKe (3anporpamMnpoBaHhoe Bocnpoun3BeDeHne)
- Pa3dien 8:
- Исpenьзоване Тюнера
- PpocnyuBbHne paDnonepepa
- Hac troponka
- ABTomatueckaHaCTpoKa:
- Puchna HacTroponka:
- HaxmTe KhoNky PRESET + / - ,TTo6bl BbIbpaTbKeJaemyIO CTaHnIO.
- C6poc Bcex HacTpoek Ha 3HaueHnIyMOnJIaHnIO
- TexHnueckne xapaKTepeNCTNK
- - ycnjnteJb
- Cekzna Tiohepa
- OctaIbHoe
- - FrpomkoorOBopnteB
- -Пинадлжноctи
- (DonoJIHNTeJIbHaI HΦOpMaζη
- HmnpTeP: OOO "TMOHEP PUC"
- PIONEER ELECTRONICS (USA) INC.
- PIONEER ELECTRONICS OF CANADA, INC.
- PIONEER EUROPE NV
- PIONEER ELECTRONICS ASIACENTRE PTE. LTD.
- PIONEER ELECTRONICS AUSTRALIA PTY. LTD.
- PIONEER ELECTRONICS DE MEXICO S.A. DE C.V.
Brand : PIONEER
Model : X-CM31-T
Category : Audio System