
DDJ-SZ - DJ Controller PIONEER - Free user manual and instructions
Find the device manual for free DDJ-SZ PIONEER in PDF.
| Product type | Professional 4-channel DJ controller |
| Brand | Pioneer |
| Model | DDJ-SZ |
| Dimensions (W x H x D) | 870 mm x 98.4 mm x 419.5 mm |
| Weight | 10.4 kg |
| Power supply | AC 110-240 V, 50/60 Hz |
| Power consumption | 30 W (standby 0.4 W) |
| Sampling frequency | 44.1 kHz |
| A/D and D/A converter | 24 bit |
| S/N ratio (USB) | 111 dB |
| Total harmonic distortion (USB) | 0.002% |
| Audio inputs | 4 x CD/LINE (RCA), 2 x PHONO/LINE (RCA), 1 x MIC1 (XLR/6.3 mm jack), 1 x MIC2 (6.3 mm jack) |
| Audio outputs | MASTER OUT 1 (XLR), MASTER OUT 2 (RCA), BOOTH (6.3 mm jack), PHONES (6.3 mm jack + 3.5 mm mini-jack) |
| Main features | 4 virtual decks, jog wheel, performance pads, effects, mixer with 3-band equalizer, crossfader, Serato DJ compatible |
| Maintenance | Clean with a dry, soft cloth. Avoid water and moisture. Do not block ventilation openings. |
| Safety | Do not open the device. Use a grounded outlet. Disconnect if not used for an extended time. |
| Repairability | Entrust all repairs to qualified personnel. Contact Pioneer support or an authorized dealer. |
| General information | PDF manual downloadable from Pioneer support site. Serato DJ manual available at Serato.com. |
Frequently Asked Questions - DDJ-SZ PIONEER
User questions about DDJ-SZ PIONEER
0 question about this device. Answer the ones you know or ask your own.
Ask a new question about this device
Download the instructions for your DJ Controller in PDF format for free! Find your manual DDJ-SZ - PIONEER and take your electronic device back in hand. On this page are published all the documents necessary for the use of your device. DDJ-SZ by PIONEER.
USER MANUAL DDJ-SZ PIONEER
The Pioneer DJ support site shown above offers FAQs, information on software and various other types of information and services to allow you to use your product in greater comfort. For the latest version of the Serato DJ software, access Serato.com and download the software from there.
This equipment is not waterproof. To prevent a fire or shock hazard, do not place any container filled with liquid near this equipment (such as a vase or flower pot) or expose it to dripping, splashing, rain or moisture.
D3-4-2-1-3_A1_En
WARNING
This product equipped with a three-wire grounding (earthed) plug - a plug that has a third (grounding) pin. This plug only fits a grounding-type power outlet. If you are unable to insert the plug into an outlet, contact a licensed electrician to replace the outlet with a properly grounded one. Do not defeat the safety purpose of the grounding plug.
D3-4-2-1-6_A1_En
WARNING
To prevent a fire hazard, do not place any naked flame sources (such as a lighted candle) on the equipment.
D3-4-2-1-7a_A1_En
Operating Environment
Operating environment temperature and humidity: +5^ to +35^ (+41^ to +95^) ; less than 85% RH (cooling vents not blocked)
Do not install this unit in a poorly ventilated area, or in locations exposed to high humidity or direct sunlight (or strong artificial light).
D3-4-2-1-7c*A2_En
VENTILATION CAUTION
When installing this unit, make sure to leave space around the unit for ventilation to improve heat radiation (at least 5 cm at top, 5 cm at rear, and 5 cm at each side).
D3-4-2-1-7d*_A1_EN
CAUTION
The switch on this unit will not completely shut off all power from the AC outlet. Since the power cord serves as the main disconnect device for the unit, you will need to unplug it from the AC outlet to shut down all power. Therefore, make sure the unit has been installed so that the power cord can be easily unplugged from the AC outlet in case of an accident. To avoid fire hazard, the power cord should also be unplugged from the AC outlet when left unused for a long period of time (for example, when on vacation).
D3-4-2-2-2a*A1_EN
WARNING
Store small parts out of the reach of children and infants. If accidentally swallowed, contact a doctor immediately.
D41-6-4_A1_En
This product is for general household purposes. Any failure due to use for other than household purposes (such as long-term use for business purposes in a restaurant or use in a car or ship) and which requires repair will be charged for even during the warranty period.
K041_A1_En
POWER-CORD CAUTION
Handle the power cord by the plug. Do not pull out the plug by tugging the cord and never touch the power cord when your hands are wet as this could cause a short circuit or electric shock. Do not place the unit, a piece of furniture, etc., on the power cord, or pinch the cord. Never make a knot in the cord or tie it with other cords. The power cords should be routed such that they are not likely to be stepped on. A damaged power cord can cause a fire or give you an electrical shock. Check the power cord once in a while. When you find it damaged, ask your nearest PIONEER authorized service center or your dealer for a replacement.
S002*A1En
For Europe

If you want to dispose this product, do not mix it with general household waste. There is a separate collection system for used electronic products in accordance with legislation that requires proper treatment, recovery and recycling.
Private households in the member states of the EU, in Switzerland and Norway may return their used electronic products free of charge to designated collection facilities or to a retailer (if you purchase a similar new one).
For countries not mentioned above, please contact your local authorities for the correct method of disposal.
By doing so you will ensure that your disposed product undergoes the necessary treatment, recovery and recycling and thus prevent potential negative effects on the environment and human health.
K058b_A1_En
For Finland customers
For Norway customers
Apparatet må tilkopies jordet stikkontakt
For Sweden customers
FEDERAL COMMUNICATIONS COMMISSION DECLARATION OF CONFORMITY
This device complies with part 15 of the FCC Rules. Operation is subject to the following two conditions: (1) This device may not cause harmful interference, and (2) this device must accept any interference received, including interference that may cause undesired operation.
Product Name: DJ Controller
Model Number: DDJ-SZ
Responsible Party Name: PIONEER ELECTRONICS (USA) INC.
SERVICE SUPPORT DIVISION
Address: 1925 E. DOMINGUEZ ST. LONG BEACH, CA 90810-1003, U.S.A.
Phone: 1-800-421-1404
URL: http://www.pioneerelectronics.com
D8-10-4*C1_En
NOTE:
This equipment has been tested and found to comply with the limits for a Class B digital device, pursuant to Part 15 of the FCC Rules. These limits are designed to provide reasonable protection against harmful interference in a residential installation. This equipment generates, uses, and can radiate radio frequency energy and, if not installed and used in accordance with the instructions, may cause harmful interference to radio communications. However, there is no guarantee that interference will not occur in a particular installation. If this equipment does cause harmful interference to radio or television reception, which can be determined by turning the equipment off and on, the user is encouraged to try to correct the interference by one or more of the following measures:
— Reorient or relocate the receiving antenna.
— Increase the separation between the equipment and receiver.
- Connect the equipment into an outlet on a circuit different from that to which the receiver is connected.
— Consult the dealer or an experienced radio/TV technician for help.
D8-10-1-2_A1_En
CAUTION
This product satisfies FCC regulations when shielded cables and connectors are used to connect the unit to other equipment. To prevent electromagnetic interference with electric appliances such as radios and televisions, use shielded cables and connectors for connections.
D8-10-3a_A1_En
Information to User
Alterations or modifications carried out without appropriate authorization may invalidate the user's right to operate the equipment.
D8-10-2_A1_En
Contents
How to read this manual
- Thank you for buying this Pioneer product.
Be sure to read this booklet and the "Operating Instructions" provided on the Pioneer DJ support site. Both include important information that should be fully understood before using this product. After you have finished reading the instructions, put them away in a safe place for future reference.
For instructions on obtaining the Serato DJ software's manual, see Acquiring the manual (p.5). - In this manual, names of screens and menus displayed on the product and on the computer screen, as well as names of buttons and terminals, etc., are indicated within brackets. (e.g.: [CUE] button, [Files] panel, [MIC1] terminal)
- Please note that the screens and specifications of the software described in this manual as well as the external appearance and specifications of the hardware are currently under development and may differ from the final specifications.
- Please note that depending on the operating system version, web browser settings, etc., operation may differ from the procedures described in this manual.
This manual consists mainly of explanations of functions of this unit as hardware. For detailed instructions on operating the Serato DJ software, see the Serato DJ software manual.
- The Serato DJ software manual can be downloaded from "Serato. com". For details, see Downloading the Serato DJ software manual (p. 5).
- The most recent version of the Operating Instructions can be downloaded from the Pioneer DJ support site. For details, see Downloading this unit's operating instructions (p.5).
01 Before start
What's in the box. 5
Acquiring the manual 5
Installing the software. 5
Names of Parts 8
Operation
Connections 11
Starting the system. 12
Quitting the system 14
Additional information
Changing the settings. 15
Troubleshooting 15
About trademarks and registered trademarks 15
Cautions on copyrights 15
Specifications. 15
Before start
What's in the box
- CD-ROM (Installation Disc)
Power cord
USB cable
Warranty card - Operating Instructions (Basic Edition)
1 Only one USB cable is included with this unit.
To connect two units, use a cable conforming to USB 2.0 standards.
Acquiring the manual
The operating instructions may be in a file in PDF format. Adobe®
Reader® must be installed to read files in PDF format. If you do not
have Adobe Reader, please install it from the download link on the
CD-ROM's menu screen.
Downloading this unit's operating instructions
1 Insert the CD-ROM into the computer's optical drive.
The CD-ROM menu is displayed.
If the CD-ROM's menu does not appear when the CD-ROM is inserted, perform the operations below.
For Windows
Open the optical drive from [Computer (or My Computer)] in
the [Start] menu, then double-click the [CD_menu.exe] icon.
For Mac OS X
In Finder, double-click the [CD_menu.app] icon directly.
2 When the CD-ROM's menu is displayed, select [DDJ-SZ: Download the Operating Instructions (PDF file)], then click [Start].
3 "An internet environment is required to access the site. Connected to the internet?" is displayed. Click [Yes].
The web browser is launched and the Pioneer DJ support site is displayed.
4 On the Pioneer DJ support site, click "Manuals" under "DDJ-SZ".
5 Click on the required language on the download page.
Downloading of the operating instructions begins.
Downloading the Serato DJ software manual
1 Insert the CD-ROM into the computer's optical drive.
The CD-ROM menu is displayed.
If the CD-ROM's menu does not appear when the CD-ROM is inserted, perform the operations below.
For Windows
Open the optical drive from [Computer (or My Computer)] in
the [Start] menu, then double-click the [CD_menu.exe] icon.
For Mac OS X
In Finder, double-click the [CD_menu.app] icon directly.
2 When the CD-ROM's menu is displayed, select [Serato DJ: Download the Software Manual (PDF file)], then click [Start].
3 "An internet environment is required to access the site. Connected to the internet?" is displayed. Click [Yes].
The web browser is launched and the Pioneer DJ support site is displayed.
To close the CD-ROM menu, click [Exit].
4 Click [Software Info] under [DDJ-SZ] on the Pioneer DJ support site.
[Serato DJ Support Information] is displayed.
5 Click the link to the Serato DJ download page.
The Serato DJ download page is displayed.
6 Log in to your "Serato.com" user account.
Input the e-mail address and password you have registered to log in to "Serato.com".
7 From "More Downloads" on the right side of the download page, click "Serato DJ x.x User Manual".
Downloading of the Serato DJ software manual starts.
Installing the software
Before installing the software
For the latest version of the Serato DJ software, access Serato.com and download the software from there. A software download link is also provided on the included CD-ROM.
- For details, refer to Installation procedure (Windows) or Installation procedure (Mac OS X).
- The user is responsible for preparing the computer, network devices and other elements of the Internet usage environment required for a connection to the Internet.
About the driver software
This driver software is an exclusive ASIO driver for outputting audio signals from the computer.
Checking the latest information on the driver software
For detailed information on this unit's designated driver software, see the Pioneer DJ support site below.
About the Serato DJ software
Serato DJ is a DJ software application by Serato. DJ performances are possible by connecting the computer on which this software is installed to this unit.
Minimum operating environment
| Supported operating systems | CPU and required memory | |
| Mac OS X: 10.8, 10.7 and 10.6 | 32-bit version | Intel® processor, Core™ 2 Duo 2.0 GHz or better |
| 1 GB or more of RAM | ||
| 64-bit version | Intel® processor, Core™ 2 Duo 2.4 GHz or better | |
| 4 GB or more of RAM | ||
| Windows: Windows 7 | 32-bit version | Intel® processor, Core™ 2 Duo 2.0 GHz or better |
| 2 GB or more of RAM | ||
| 64-bit version | Intel® processor, Core™ 2 Duo 2.4 GHz or better | |
| 4 GB or more of RAM | ||
| Others | |
| Optical drive | Optical disc drive on which the CD-ROM can be read |
| USB port | A USB 2.0 port is required to connect the computer with this unit. |
| Display resolution | Resolution of 1280 x 720 or greater |
| Internet connection | An Internet connection is required for registering the “Serato.com” user account and downloading the software. |
- For the latest information on the required operating environment and compatibility as well as to acquire the latest operating system, refer to "Software Info" under "DDJ-SZ" on the Pioneer DJ support site below. http://pioneerdj.com/support/
- Operating System support assumes you are using the latest point release for that version.
- Operation is not guaranteed on all computers, even if all the required operating environment conditions indicated here are fulfilled.
- Depending on the computer's power-saving settings, etc., the CPU and hard disk may not provide sufficient processing capabilities. For notebook computers in particular, make sure the computer is in the proper conditions to provide constant high performance (for example by keeping the AC power connected) when using Serato DJ.
- Use of the Internet requires a separate contract with a provider offering Internet services and payment of provider fees.
Installation procedure (Windows)
Do not connect this unit and the computer until installation is completed.
- Log on as the user which was set as the computer's administrator before installing.
If any other programs are running on the computer, quit them.
1 Insert the CD-ROM into the computer's optical drive. The CD-ROM menu is displayed.
- If the CD-ROM menu does not appear when the CD-ROM is inserted, open the optical drive from [Computer (or My Computer)] in the [Start] menu, then double-click the [CD_menu.exe] icon.
2 From the menu that appears, select [Installing device driver software], then click [Start].
3 "Download the latest version? An internet environment is required to access the site." is displayed. Click [Yes].
The web browser is launched and the Pioneer DJ support site is displayed.
4 Click [Software Download] under [DDJ-SZ] on the Pioneer DJ support site.
5 Click [Driver Software].
6 From the download page, download the driver software for Windows (DDJ-SZ_X.XXX.exe).
7 Double-click the downloaded file.
The driver installation screen appears.
8 Carefully read the Software end user license agreement and if you consent to the provisions, put a check mark in [I agree.] and click [OK].
If you do not consent to the provisions of the Software end user license agreement, click [Cancel] and stop installation.
9 Proceed with installation according to the instructions on the screen.
If [Windows Security] appears on the screen while the installation is in progress, click [Install this driver software anyway] and continue with the installation.
When the installation program is completed, a completion message appears.
After installing the driver software, install the Serato DJ software.
10 Select [Download Serato DJ Software] from the CD-ROM's menu, then click [Start].
11 "An internet environment is required to access the site. Connected to the internet?" is displayed. Click [Yes].
The web browser is launched and the Pioneer DJ support site is displayed.
12 Click [Software Info] under [DDJ-SZ] on the Pioneer DJ support site.
13 Click the link to the Serato DJ download page.
The Serato DJ download page is displayed.
14 Log in to your "Serato.com" user account.
If you have already registered a user account on "Serato.com", proceed to step 16.
If you have not completed registering your user account, do so following the procedure below.
- Following the instructions on the screen, input your e-mail address and the password you want to set, then select the region in which you live.
If you check [E-mail me Serato newsletters], newsletters providing the latest information on Serato products will be sent from Serato. -
Once user account registration is completed, you will receive an e-mail at the e-mail address you have input. Check the contents of the e-mail sent from "Serato.com".
-
Be careful not to forget the e-mail address and password specified when you performed user registration. They will be required for updating the software.
- The personal information input when registering a new user account may be collected, processed and used based on the privacy policy on the Serato website.
15 Click the link in the e-mail message sent from "Serato. com".
This takes you to the Serato DJ download page. Proceed to step 17.
16 Log in.
Input the e-mail address and password you have registered to log in to "Serato.com".
17 Download the Serato DJ software from the download page.
Unzip the downloaded file, then double-click the unzipped file to launch the installer.
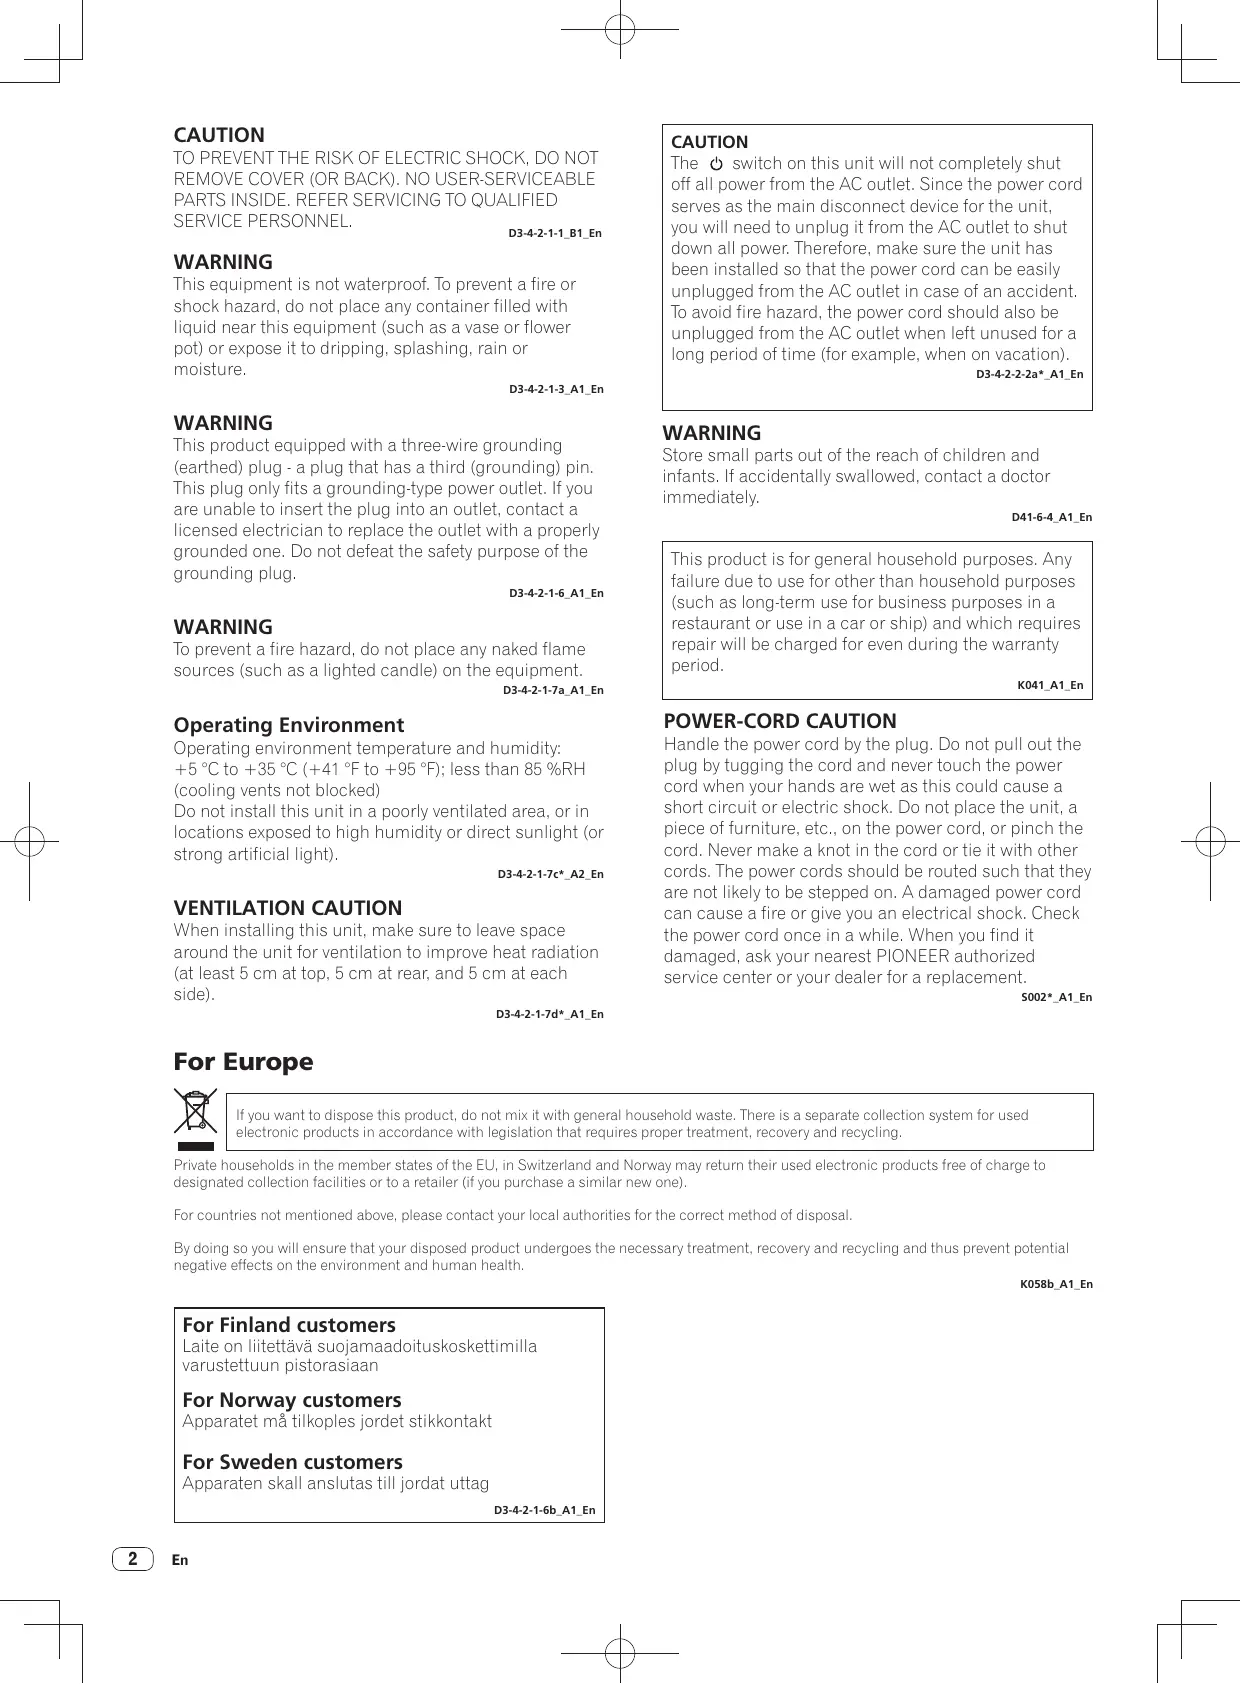
18 Read the terms of the license agreement carefully, and if you agree, select [I agree to the license terms and conditions], then click [Install].
- If you do not agree to the contents of the license agreement, click [Close] to cancel installation.
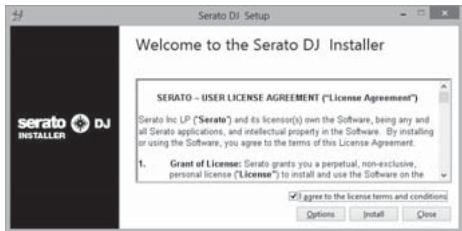
Installation begins.
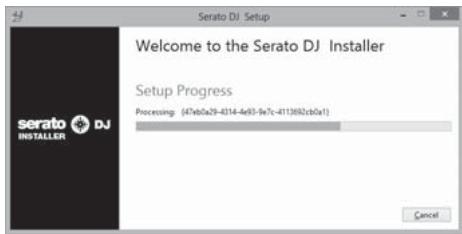
The message of successful installation appears once installation is completed.
19 Click [Close] to quit the Serato DJ installer.
Installation procedure (Mac OS X)
Do not connect this unit and the computer until installation is completed.
If any other programs are running on the computer, quit them.
1 Insert the CD-ROM into the computer's optical drive.
The CD-ROM menu is displayed.
- If the CD-ROM menu does not appear on the screen when the CD-ROM is inserted, open the optical driver from Finder, then double-click the [CD_menu.app] icon.
2 From the menu that appears, select [Installing device driver software], then click [Start].
3 "Download the latest version? An internet environment is required to access the site." is displayed. Click [Yes].
The web browser is launched and the Pioneer DJ support site is displayed.
4 Click [Software Download] under [DDJ-SZ] on the Pioneer DJ support site.
5 Click [Driver Software].
6 From the download page, download the driver software for Mac OS (DDJ-SZ_M_X.X.dmg).
7 Double-click the downloaded file.
The [DDJ-SZ_AudioDriver] menu screen appears.
8 Double-click [DDJ-SZ_AudioDriver pkg].
The driver installation screen appears.
9 Check the details on the screen and click [Continue Anyway].
10 When the end user license agreement appears, read Software end user license agreement carefully, then click [Continue Anyway].
11 If you consent to the provisions of the Software end user license agreement, click [Agree].
If you do not consent to the provisions of the Software end user license agreement, click [I disagree] and stop installation.
12 Proceed with installation according to the instructions on the screen.
13 Select [Download Serato DJ Software] from the CD-ROM's menu, then click [Start].
14 "An internet environment is required to access the site. Connected to the internet?" is displayed. Click [Yes].
The web browser is launched and the Pioneer DJ support site is displayed.
15 Click [Software Info] under [DDJ-SZ] on the Pioneer DJ support site.
16 Click the link to the Serato DJ download page.
The Serato DJ download page is displayed.
17 Log in to your "Serato.com" user account.
If you have already registered a user account on "Serato.com", proceed to step 19.
If you have not completed registering your user account, do so following the procedure below.
- Following the instructions on the screen, input your e-mail address and the password you want to set, then select the region in which you live.
If you check [E-mail me Serato newsletters], newsletters providing the latest information on Serato products will be sent from Serato.
- Once user account registration is completed, you will receive an e-mail at the e-mail address you have input. Check the contents of the e-mail sent from "Serato.com".
- Be careful not to forget the e-mail address and password specified when you performed user registration. They will be required for updating the software.
- The personal information input when registering a new user account may be collected, processed and used based on the privacy policy on the Serato website.
18 Click the link in the e-mail message sent from "Serato. com".
This takes you to the Serato DJ download page. Proceed to step 20.
19 Log in.
Input the e-mail address and password you have registered to log in to "Serato.com".
20 Download the Serato DJ software from the download page.
Unzip the downloaded file, then double-click the unzipped file to launch the installer.
21 Read the terms of the license agreement carefully, and if you agree, click [Agree].
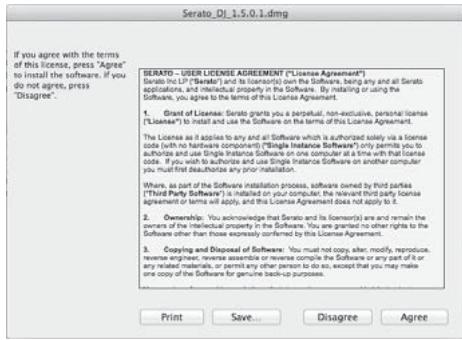
- If you do not agree to the contents of the usage agreement, click [Disagree] to cancel installation.
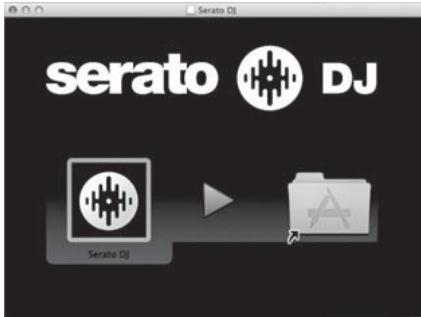
22 If the following screen appears, drag and drop the [Serato DJ] icon on the [Applications] folder icon.
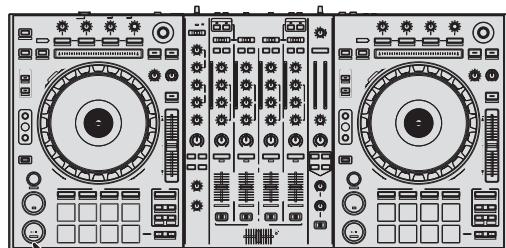
Names of Parts
- For details on the functions of the various buttons and controls, see Names of Parts in the Operating Instructions.
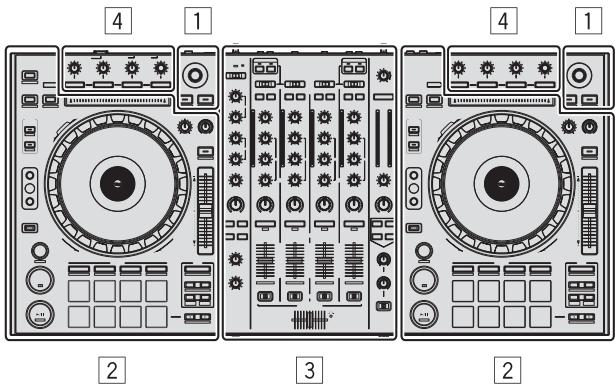
1 Browser section
2 Deck section
3 Mixer section
4 Effect section
Browser section
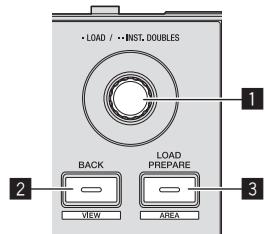
1 Rotary selector
2 BACK (VIEW) button
3 LOAD PREPARE (AREA) button
Deck section
This section is used to control the four decks. The buttons and controls for operating decks 1 and 3 are located on the left side of the controller, those for operating decks 2 and 4 are located on the right side of the controller.
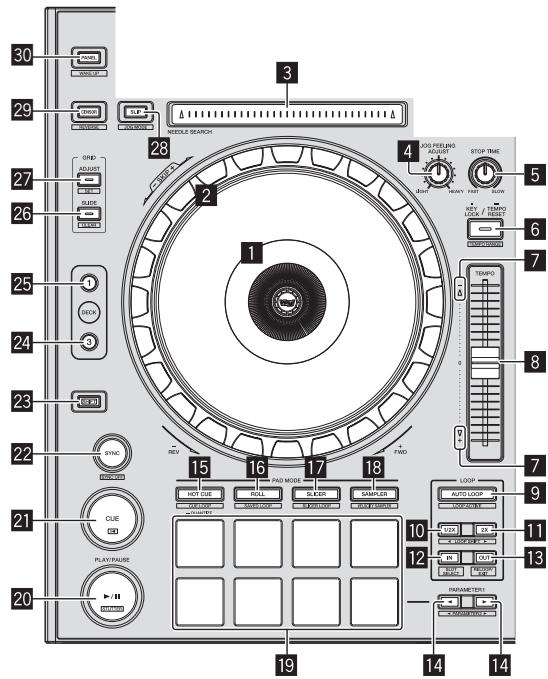
1 Jog dial display section
2 Jog dial
NEEDLE SEARCH pad
4 JOG FEELING ADJUST control
STOP TIME control
6 KEY LOCK button
7 Takeover indicator
8 TEMPO slider
9 AUTO LOOP button
10 LOOP 1/2X button
LOOP 2X button
LOOP IN button
18 LOOP OUT button
14 PARAMETER< button, PARAMETER> button
15 HOT CUE mode button
16 ROLL mode button
17 SLICER mode button
18 SAMPLER mode button
Performance pads
20 PLAY/PAUSE▶II button
21 CUE button
SYNC button
2 SHIFT button
24 DECK 3 button
25 DECK 1 button
26 GRID SLIDE button
27 GRID ADJUST button
28 SLIP button
CENSOR button
30 PANEL button
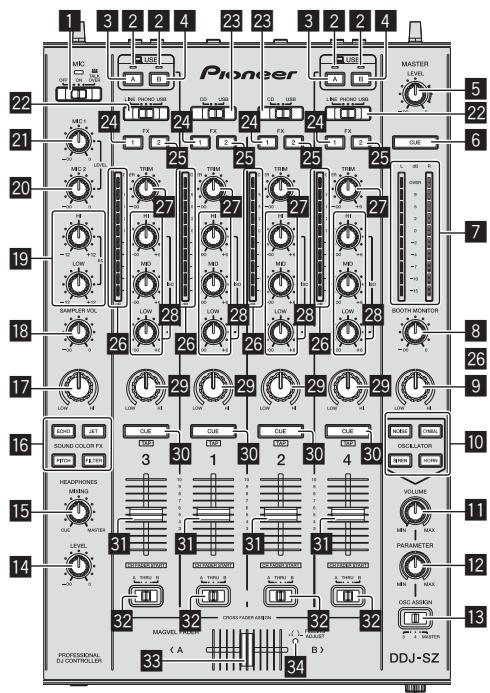
Mixer section
OFF, ON, MIC TALK OVER selector switch
2 USB connection indicator
3 USB (A) button
4 USB (B) button
5 MASTER LEVEL control
6 MASTER CUE button
7 Master level indicator
8 BOOTH MONITOR control
9 MASTER OUT COLOR control
10 OSCILLATOR SELECT button
1 OSCILLATOR VOLUME control
12 OSCILLATOR PARAMETER control
18 OSC ASSIGN selector switch
14 HEADPHONES LEVEL control
15 HEADPHONES MIXING control
16 SOUND COLOR FX buttons
17 SAMPLER, MIC COLOR control
18 SAMPLER VOL control
EQ (HI, LOW) controls
20 MIC2 control
MIC1 control
22 LINE, PHONO, USB selector switch
CD, USB selector switch
24 FX 1 assign button
FX2 assign button
26 Channel Level Indicator
27 TRIM control
ISO (HI, MID, LOW) controls
29 COLOR control
30 Headphones CUE button
31 Channel fader
Crossfader assign selector switch
33 Crossfader
FEELING ADJUST adjustment hole
Effect section
This section is used to control the two effect units (FX1 and FX2).
Controls and buttons to operate the FX1 unit are located on the left side of the controller, those to operate the FX2 unit are located on the right side of the controller. The channels to which the effect is to be applied are set using the effect assign buttons.
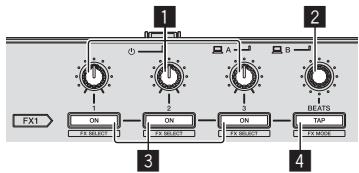
1 Effect parameter controls
2 FX BEATS control
3 Effect parameter buttons
4 TAP button
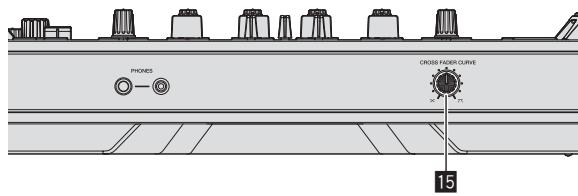
Front panel
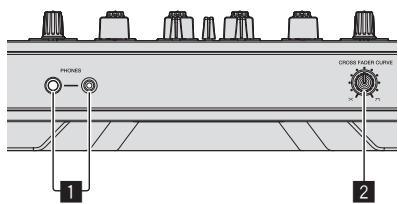
1 PHONES jacks
2 CROSS FADER CURVE selector switch
Operation
Connections
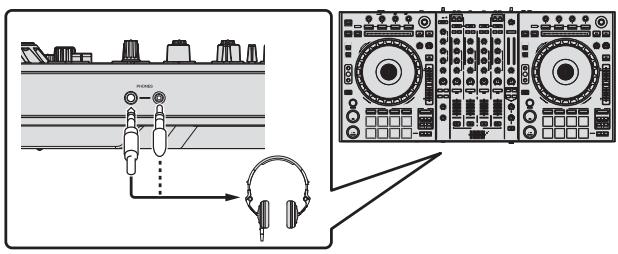
1 Connect headphones to one of the [PHONES] terminals.
2 Connect powered speakers, a power amplifier, components, etc., to the [MASTER OUT 1] or [MASTER OUT 2] terminals.
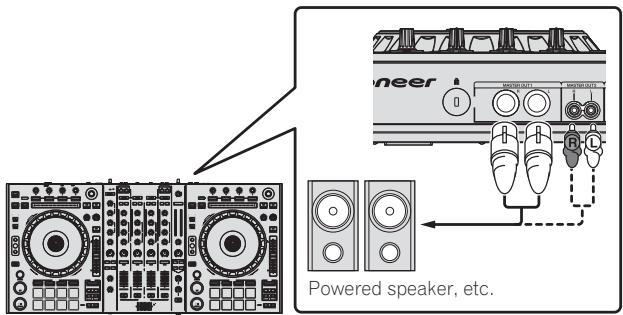
- To output the sound from the [BOOTH] terminals, connect speakers or other devices to the [BOOTH] terminals.
- For details on connecting the input/output terminals, see the Operating Instructions.
3 Connect this unit to your computer via a USB cable.
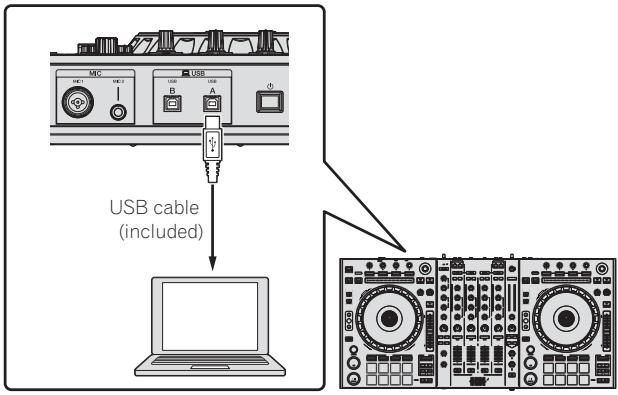
This product satisfies electromagnetic noise regulations when it is connected to other equipment through shielded cables and connectors. Use only the furnished accessory connecting cables.
D44-8-2_A1_En
4 Turn on the computer's power.
5 Connect the power cord.
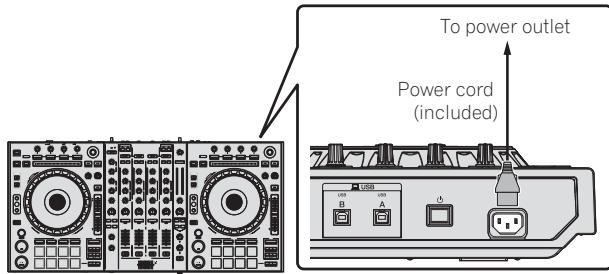
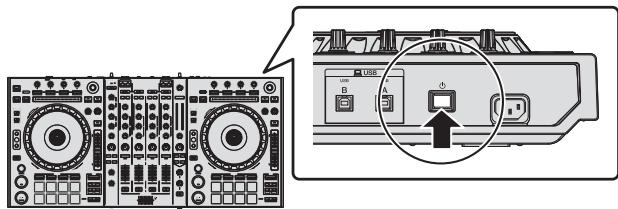
6 Press the [ ] switch on this unit's rear panel to turn this unit's power on.
Turn on the power of this unit.
For Windows users
The message [Installing device driver software] may appear when this unit is first connected to the computer or when it is connected to a different USB port on the computer. Wait a while until the message [Your devices are ready for use] appears.
7 Turn on the power of the devices connected to the output terminals (powered speakers, power amplifier, components, etc.).
- When a microphone, DJ player or other external device is connected to input terminals, the power of that device also turns on.
Starting the system
Launching Serato DJ
For Windows
From the Windows [Start] menu, click the [Serato DJ] icon under [All Programs] > [Serato] > [Serato DJ].
For Mac OS X
In Finder, open the [Application] folder, then click the [Serato DJ] icon.
Computer screen directly after the Serato DJ software is launched
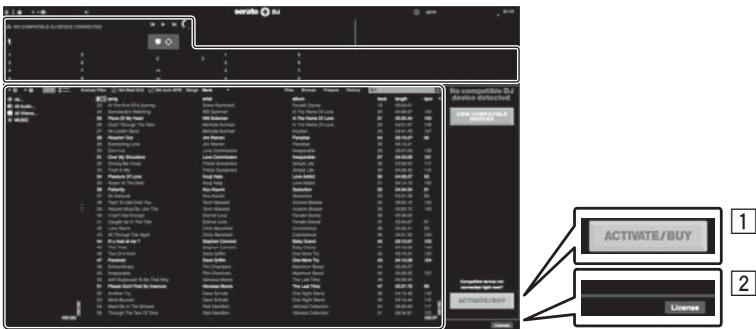
A
The [ACTIVATE/BUY Serato DJ] icon may appear on the right side of the screen that is displayed when Serato DJ is launched the first time, but there is no need to activate or purchase a license for those using DDJ-SZ.
2 Check [DO NOT SHOW AGAIN] at the bottom right of the screen, then click [License] and continue to use Serato DJ as such.
To operate the beat grid
With Serato DJ, [SYNC PREFERENCE] is set to [Simple sync] by default, but this must be switched to [Smart sync] in order to perform beat grid operations.
SETUP—DJ Preference—SYNC PREFERENCE
For instructions on displaying the settings screen and details on the beat grid, see the Serato DJ manual.
Computer screen when a track is loaded in the Serato DJ software
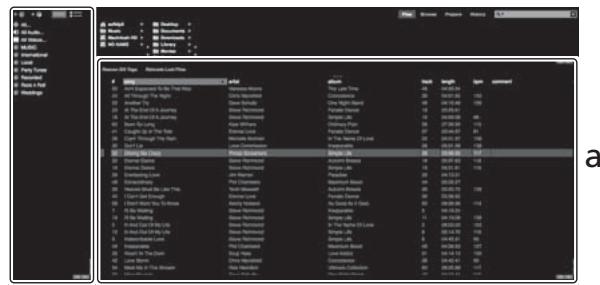
Click [Library] at the upper left of the computer screen, then select [Vertical] or [Horizontal] from the pull-down menu to switch the Serato DJ screen.
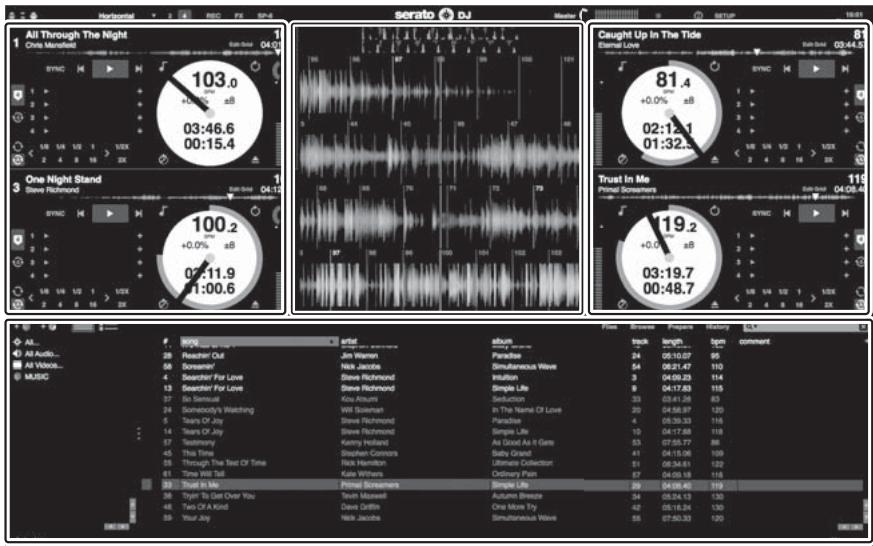
A
A Deck section
The track information (the name of the loaded track, artist name, BPM, etc.), the overall waveform and other information is displayed here.
B Waveform display
The loaded track's waveform is displayed here.
C Browser section
Crates in which tracks in the library or sets of multiple tracks are stored are displayed here.
This manual consists mainly of explanations of functions of this unit as hardware. For detailed instructions on operating the Serato DJ software, see the Serato DJ software manual.
Importing tracks
The following describes the typical procedure for importing tracks.
There are various ways to import tracks with the Serato DJ software. For details, see the Serato DJ software manual.
If you are already using Serato DJ software (Scratch Live, ITCH or Serato DJ Intro) and have already created track libraries, the track libraries you have previously created can be used as such.
If you are using Serato DJ Intro and have already created track libraries, you may have to reanalyze the tracks.
1 Click the [Files] key on the Serato DJ software screen to open the [Files] panel.
The contents of your computer or the peripheral connected to the computer are displayed in the [Files] panel.
2 Click the folder on the [Files] panel containing the tracks you want to add to the library to select it.
3 On the Serato DJ software screen, drag and drop the selected folder to the crates panel.
A crate is created and the tracks are added to the library.
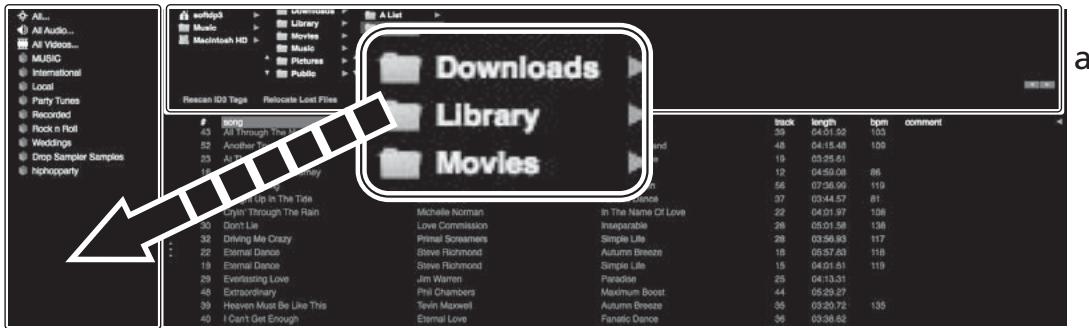
b
a [Files] panel
b Crates panel
Loading tracks and playing them
The following describes the procedure for loading tracks into deck [1] as an example.
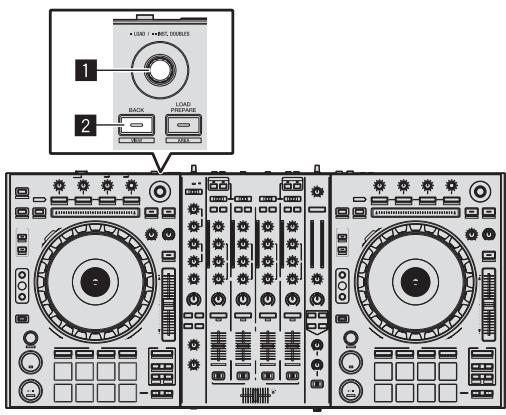
1 Rotary selector
2 BACK (VIEW) button
1 Press this unit's [BACK (VIEW)] button, move the cursor to the crates panel on the computer's screen, then turn the rotary selector to select the crate, etc.
2 Press the rotary selector, move the cursor to the library on the computer's screen, then turn the rotary selector and select the track.
b
a Library
b Crates panel
3 Press the [DECK1] button.
4 Press the rotary selector to load the selected track onto the deck.
Playing tracks and outputting the sound
The following describes the procedure for outputting the channel 1 sound as an example.
- Set the volume of the devices (power amplifier, powered speakers, etc.) connected to the [MASTER OUT 1] and [MASTER OUT 2] terminals to an appropriate level. Note that loud sound will be output if the volume is set too high.

3 CD, USB selector switch
4 TRIM control
ISO (HI, MID, LOW) controls
6 Headphones CUE button
7 Channel fader
HEADPHONES MIXING control
9 HEADPHONES LEVEL control
10 Crossfader assign selector switch
11 Crossfader
12 MASTER LEVEL control
13 MASTER CUE button
14 BOOTH MONITOR control
15 CROSS FADER CURVE selector switch
1 Set the positions of the controls, etc., as shown below.
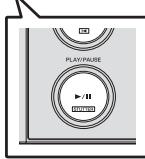
2 Press the [ /II] button to play the track.
| Names of controls, etc. | Position |
| MASTER LEVEL control | Turned fully counterclockwise |
| CD, USB selector switch | [USB] position |
| TRIM control | Turned fully counterclockwise |
| ISO (HI, MID, LOW) controls | Center |
| Channel fader | Moved forward |
| Crossfader assign selector switch | [THRU] position |
3 Move the channel fader away from you.
4 Turn the [TRIM] control.
Adjust [TRIM] so that the orange indicator on the channel level indicator lights at the peak level.
5 Turn the [MASTER LEVEL] control to adjust the audio level of the speakers.
Adjust the sound level output from the [MASTER OUT 1] and [MASTER OUT 2] terminals to an appropriate level.
Monitoring sound with headphones
Set the positions of the controls, etc., as shown below.
| Names of controls, etc. | Position |
| HEADPHONES MIXING control | Center |
| HEADPHONES LEVEL control | Turned fully counterclockwise |
1 Press the headphones [CUE] button for the channel 1.
2 Turn the [HEADPHONES LEVEL] control.
Adjust the sound level output from the headphones to an appropriate level.
![PIONEER DDJ-SZ - Turn the [HEADPHONES LEVEL] control. - 1](/content/2024/12/119078/images/c2355090023ddbdb9aebdd605ebf8f8566562e1967c98d0c5163a525a6e27f91.jpg)
Note
This unit and the Serato DJ software include a variety of functions enabling individualistic DJ performances. For details on the respective functions, see the Serato DJ software manual.
- The Serato DJ software manual can be downloaded from "Serato.com". For details, see Downloading the Serato DJ software manual (p. 5).
Quitting the system
1 Quit [Serato DJ].
When the software is closed, a message for confirming that you want to close it appears on the computer's screen. Click [Yes] to close.
2 Press the [O] switch on this unit's rear panel to set this unit's power to standby.
3 Disconnect the USB cable from your computer.
Additional information
Changing the settings
- For detailed instructions on changing this unit's settings, see Changing the settings in the Operating Instructions.
Troubleshooting
- Incorrect operation is often mistaken for trouble or malfunction. If you think that there is something wrong with this component, check the items in the "Troubleshooting" section of this unit's operating instructions and the [FAQ] for the [DDJ-SZ] on the Pioneer DJ support site.
Sometimes the problem may lie in another component. Inspect the other components and electrical appliances being used. If the problem cannot be rectified, ask your nearest Pioneer authorized service center or your dealer to carry out repair work. - This unit may not operate properly due to static electricity or other external influences. In this case, proper operation may be restored by turning the power off, waiting 1 minute, then turning the power back on.
About trademarks and registered trademarks
- Pioneer is a registered trademark of PIONEER CORPORATION. The names of companies and products mentioned herein are the trademarks of their respective owners.
Cautions on copyrights
Recordings you have made are for your personal enjoyment and according to copyright laws may not be used without the consent of the copyright holder.
- Music recorded from CDs, etc., is protected by the copyright laws of individual countries and by international treaties. It is the full responsibility of the person who has recorded the music to ensure that it is used legally.
- When handling music downloaded from the Internet, etc., it is the full responsibility of the person who has downloaded the music to ensure that it is used in accordance with the contract concluded with the download site.
Specifications
Power requirements.. AC 110 V to 240 V, 50 Hz/60 Hz
Power consumption. 30 W
Power consumption (standby) 0.4 W
Main unit weight 10.4 kg
Max. external dimensions ....870 mm (W) × 98.4 mm (H) × 419.5 mm (D)
Tolerable operating temperature +5^ to +35^
Tolerable operating humidity. 5% to 85% (no condensation)
Audio Section
Sampling rate. 44.1 kHz
A/D, D/A converter. 24 bits
Frequency characteristic USB, CD/LINE, MIC1, MIC2. 20 Hz to 20 kHz
S/N ratio (rated output, A-WEIGHTED)
USB. 111 dB
CD/LINE 97 dB
PHONO. 90 dB
MIC1 .84 dB
MIC2 84 dB
Total harmonic distortion (20 Hz — 20 kHzBW)
USB. 0.002%
CD/LINE 0.004%
Standard input level / Input impedance
CD/LINE. -12 dBu/47 kΩ
PHONO. -52 dBu/47 kΩ
MIC1 -52 dBu/8.5 kΩ
MIC2. -52 dBu/8.5 kΩ
Standard output level / Load impedance / Output impedance
MASTER OUT 1. +6dBu / 10k /390 or less
MASTER OUT 2. +2dBu / 10k /820 or less
BOOTH +6 dBu/10 kΩ/390 Ω or less
PHONES. +8dBu / 32 /10 or less
Rated output level/Load impedance
MASTER OUT 1 24 dBu/10 kΩ
MASTER OUT 2. 20 dBu/10 kΩ
Crosstalk
CD/LINE 82 dB
Channel equalizer characteristic
HI .dB to +6 dB (13 kHz)
MID. - dB to +6 dB (1 kHz)
LOW. - dB to +6dB (70 Hz)
Microphone equalizer characteristic
HI .-12 dB to +12 dB (10 kHz)
LOW -12 dB to +12 dB (100 Hz)
Input / Output terminals
CD/LINE Input terminals
RCA pin jacks. 4 sets
PHONO/LINE input terminals
RCA pin jacks. 2 sets
MIC1 terminal
XLR connector/phone jack (Ø 6.3 mm) 1 set
MIC2 terminal
Phone jack (6.3 mm) 1 set
MASTER OUT 1 output terminal
XLR connector. 1 set
MASTER OUT 2 output terminal
RCA pin jacks. 1 set
BOOTH output terminal
Phone jack (6.3 mm) 1 set
PHONES output terminal
Stereo phone jack (6.3 mm) 1 set
Stereo mini phone jack (Ø 3.5 mm)............1 set
USB terminals
B type. 2 sets
- Be sure to use the [MASTER OUT 1] terminals only for a balanced output. Connection with an unbalanced input (such as RCA) using an XLR to RCA converter cable (or converter adapter), etc., may lower the sound quality and/or result in noise.
For connection with an unbalanced input (such as RCA), use the
[MASTER OUT 2] terminals. - The specifications and design of this product are subject to change without notice.
© 2013 PIONEER CORPORATION. All rights reserved.
SETUP—DJ Preference—SYNC PREFERENCE
SETUP—DJ Preference—SYNC PREFERENCE
a [Files]-Feld
b Crates-Feld
SETUP—DJ Preference—SYNC PREFERENCE
WAARSCHUWING NETSNOER
SETUP—DJ Preference—SYNC PREFERENCE
a [Files]-panel
b Crates-panelel
SETUP—DJ Preference—SYNC PREFERENCE
a Panel [Files]
b Panel de cajas
SETUP—DJ Preference—SYNC PREFERENCE
[Serato DJ Support Information] OTo6paKaaTeTcA.
9 BbINOHNHe yCTaHOBky, cIeDy INcTpyKzmaM Ha 3kpaHe.
Ecnn BO Bpemr yctaHOBKn Ha 3kpaHe oTo6paKaaeTcra [Be3onacHocTb Windows], 1eJKNHTe [Bce paBHO yctaHOBnTB 3TO T dpaBep] n npdoJoknTe yCTaHOBky.
IIO 3aBepseHIO yCTaHOBKn OTObpaKaetcra COoBSeHne o 3aBepseHnN.
18 BhimataIbHO npOHTe ycNObra IInueH3nOHnHO corlaaHeHry, n ecIn BBcORJaChbl, To BbI6epnte [I agree to the license terms and conditions], 3atem ueJKNHTe no [Install].
![PIONEER DDJ-SZ - BhimataIbHO npOHTe ycNObra IInueH3nOHnHO corlaaHeHry, n ecIn BBcORJaChbl, To BbI6epnte [I agree to the license terms and conditions], 3atem ueJKNHTe no [Install]. - 1](/content/2024/12/119078/images/f26de0772f4b063b6cf94d479e52e47638c70880a1fb5428a8b5c4c6d4768cdd.jpg)
- EcINBbHe corlaacbIc ycIOBMAc corlaueHn6 nCNOJIb3OBAHN, uEKNHITe NO [Close] andTMeHNTE yCTaHOBky.3AnvCKaETCA vCTaHOBka.
![PIONEER DDJ-SZ - BhimataIbHO npOHTe ycNObra IInueH3nOHnHO corlaaHeHry, n ecIn BBcORJaChbl, To BbI6epnte [I agree to the license terms and conditions], 3atem ueJKNHTe no [Install]. - 2](/content/2024/12/119078/images/db8cb1ddfe4a3614f62accdb5f366ebcd46ab3d85d2c7f6c76a5a3d0a110ea05.jpg)
- Ecni Bbl He corlncbI C yCIOBnMI cornlaeHnO 6 nCOnJIb3oBaHN, 10EKNHTe I0 [Disagree] N OTMeHNTE yCTaHOBky.
22 Ecnn OTo6paKaTc8 CnEduOuIe 3KpaH, npeTaunTe NkOHky [Serato DJ] Ha NkOHky C n3o6paXeHNem nAnKn [Applications].
![PIONEER DDJ-SZ - BhimataIbHO npOHTe ycNObra IInueH3nOHnHO corlaaHeHry, n ecIn BBcORJaChbl, To BbI6epnte [I agree to the license terms and conditions], 3atem ueJKNHTe no [Install]. - 3](/content/2024/12/119078/images/3147f2f149239af3c4f62a32f929c259652b329949f1fde8ac7cefacadbbe66d.jpg)
Ha3BaHna YacteI
SETUP—DJ Preference—SYNC PREFERENCE
a Panaelb [Files]
b PanaheIb crate
3a rgy3ka dopoJek n Ix BocnpOn3BedeHne
a Bn6nnoTeka
b PanaheIb crate
3 HaxmTe KhoNky [DECK1].
4 Haxmnte noBOpOTbI CEneKTop n 3arpy3nTe Bbl6paHHyIO dopOxy B deky.
Bocnpon3BeDeHne DopOJek N BbIBoD 3ByuHaHn
Otperynpyte Do COOTBeTCTBMyoIeero ypOBHrypOBeHb 3ByaHnIA, BbIOyAunCt OT TepMNHaJIOB [MASTER OUT 1] n [MASTER OUT 2].
KoHTpoJIb 3ByaHnIc NOMOuBIO HayuHnKOB
YctaHOBInTeNo3nIpyueK,dp.Kak noka3aHo HnKe.
Bo3MOxHbIe HeNCpPaBHOCTn I cnOco6blnx yCTpaHeHna
3aayactyo HnnpabnIbHoe cpa6aTbIbAHne OoNboOHO BocpHmHaETcra 3a HeNoIaKy IIN HeNCpBAbHOCTb. Ecnbl CHTaeTe, YTO CdaHHbIM KOMNoHEtOM YTO-TO HE TAK, npOHTte NHyKTbI B pa3dene "Bo3MOxHbIe HncPABHOCTHn CnOc6bIbX UYCTPAHEnH" B INCTpykUnx NO 3KcNlPyATAuIN daHORO annapaTa, a TaKke [FAQ] dJa [DDJ-SZ] Ha caTBe NoDepKKn Pioneer DJ. B HeKToTOPbIX cIyuaX HeNpAka MoKet 3akNIOuATcbSra HdpYrom KOMNoHEtE. IPoBepHe DpyrNe KOMNoHEtB, a TAKKe IcNOlb3yeMbIe 3JIeKTPOnPi6bOpI. EcnI npO6bMemy HeOB3MOxHo peuNTb, 06patNTecB B 6nnKaiIshn ABTopIN3OBAHbN b cepBcNchbI ceHTp Pioneer IIn K dInnepy dJa npOBeENHnpeMOHTa.
Даньий annapaT MoKET He cpa6aTbIbA Tb COOTBeTCTByUOuMm O6p3oM NO npnHHe CTatmHeCKrO 3JekTpncYeCTBa IIN NO dpyrMn BHeuHIM pInyHnAM. T TakOM Cnyuae, O6bHuYPO pa60Tu MOxHO BO3ObHOBtB, OTKIIIOuH NITaHne, O6OxJaB 1 MmHyTu 3aTeM CHOBA BKNIOHIV NITaHne.
O ToproBbIX MapKaxи 3apeRnCTpHpOBaHHbIX TopROBbIX MapKax
Pioneerявл紧凑аzerinctprpoBaHHNoToproBmMapKoI PIONEER CORPORATION.
Yka3aHHbIe 3dcb Ha3BaHnI KOMPnHi N I3dJIy RaBIAOTc TOpKO- BbIMM MapkAMN IX COOTBeTCTByOuNX BlaJeJIbIeB.
Преупразждени по副市长а павам
BbIOnHeHbIe Bamn 3aIcn npedHa3NaueHb I nIaBwero IuHoro yDoBOJIbCTBnI NO 3aKoHAM O 3aUInTe ABTOPCKNX Ipab He MOrYt NcOJb3OBaTbc6e3 corNacn BnaJeNbca ABTOPCKNX npab.
- My3bIka, 3aIncanHna Ha CD nckax, dp., 3aIuIuaeTc8 3aKoHaMn o 3aIuIte ABTOpCKHX npabAx OTdeIbHbIx CTpaH I MekJyHapOJbIMn CORlaUeHnMI. OTBETCTBeHHOCt b 3a IeralbHoe IcN0lb3ObaHne 3aIncanHNO My3bIK NOnHOCTbIO JekNT Ha YeIOBeKe, BblONHNB- WEM 3aINCb.
- Пи образецни с мystikов, загужени с Intерета, д. 3арузвший Мульку человек Несс.TПОНУНТСВЕСТБ 3a Исплобьзовни мystikов COOTBEТСВИК KOHTРАКТOM, ЗAKПОНЧЕ HыIMС CAITOM загушик.
TexHnueckne xapaKTepNCTnKN
Tpe6oBaHnK nHTaHnIO
110Bdo240BnepeMeHHoroToka,50T/60T
Iotppe6JIeMaJ MoUHocTb. 30BT
Iotppe6JIeMaMA MoUHocTb (B pexmme OxuHaHn) 0.4 Bt
Bec ochobhoro annapata 10.4 kr
MaKc. r6apuTbI 870 MM (U) × 98.4 MM (B) × 419.5 MM (Γ)
Yactota dnckpetn3aun 44.1K
Ppeo6pa3ObaTeIb A/D,D/A 24 6nt
YacToTHaXapaKTepeNCTnKa
USB, CD/LINE, MIC1, MIC2. 0T 20 Tdo 20 KTu
COOTHOseHne CnHaJI/7yM (HOMHaJIbHbI BbIXoI, A-WEIGHTED)
USB 111dB
CD/LINE 97
PHONO 90
MIC1 84D6
MIC2 84
Obee HeiHeHoe nckaeHne (20 Hz — 20 kHzBW)
USB. 0.002%
CD/LINE 0.004%
CtanhapThbIypoBeHbBXOa/IMnpeDaHC BXOda
CD/LINE. 12 d6u/47 KΩ
PHONO. -52 6u/47 KΩ
MIC1 -52 DbU/8.5 KΩ
MIC2 -52 8u/8.5 KΩ
CtahapThbI ypoBeH BbIXOa /IMneHaHc Harpy3Kn/
IMpeDAnC BixOda
MASTER OUT 1. +6 1bU/10 KΩ/390 Ω nIIN HnKe
MASTER OUT 2. +2 έБu/10 κΩ/820 Ωιηνινινη
BOOTH +6 DbU/10 KΩ/390 Ω nIu HnKe
PHONES. +8 16u/32 0/10 0 nnnn Hnke
HomHaIbHbI yPoBeH bIxOda/IMpeHaHc Harpy3Kn
MASTER OUT 1. 24 dEu/10 kΩ
MASTER OUT 2. 20 dBu/10 KΩ
IpehexoHoe 3aTyxHnne
CD/LINE 82d6
XapakTepeNCTKn 3kBaJaI3epa KaHana
HI. 一 16+6 13K
MID .0T-∞Dδdo+6Dδ(1KΓu)
LOW. .0T--Dbdo+6dB(70Tu)
XapakTepeNCTKn 3KBaJnaI3epa MmKpOΦoHa
HI .-12Dbdo+12Db(10K
LOW. -12 d6 100
TepMnHaJIb BXOJa / BbIXOJa
BxOdHbIe TepMHaJIbI CD/LINE
山TbipbKOBblte rHe3da RCA 4 ha6op
BxOndbte TepMnHaJIb PHONO/LINE
山TbipbKOBbIe rHe3da RCA 2Ha6op
TepMNHaI MIC1
KoHneKToP XLR/rgHe3do Jn HayuHnKOB (6,3 MM).1 ha6op
TepMNHaN MIC2
Гнебушников (6,3 MM) 1 ha6op
BbIXoHoi TePMHaJI MASTER OUT 1
KoHHeKTop XLR 1 ha6op
BbIXoHoi TepmHaI MASTER OUT 2
山TbipbKOBblte rHe3da RCA 1 ha6op
BbIXoHoi TePmHaJI BOOTH
Гнебушников (6,3 MM) 1 ha6op
BbIXoHoi TepmHnAn PHONES
CtepeoHnueckoe HTe3do HayuHnKOB (6,3 MM) 1 ha6op
CtepeofoHnueckoe HHe3do MHN-IXKeK HayuHmKOB (0 3,5 MM)
1 ha60p
TepmHaJIb USB
TunB 2na6opa
IcnoB3yTe TepMHaJIb [MASTER OUT 1]ToJIbKO IJN CmMMetpruHOro BvIXOa. IOpKIIIOUeHKe HcEIMMeTpUHOMy BXOy (KaK RCA) Upe3 pIeO6pa3yUoi Kab6eNb XLR Ha RCA (IInn IpeO6pa3yUoi aadTep), Dp., M0Ket npBBeCTN K cHNKeHIO KaueCTBa 3ByuaHry N/INn BvI3BaTb Shym. IJa IopKIIIOUeHKe HcEIMMeTpUHOMy BXOy (KaK RCA) IcNoJIb3yIte TepMHaJIb [MASTER OUT 2].
TexHnueckne xapaKTepeNCTkN IN KOHcTpkyuJaHHOrO n3deJInaMOrYT n3MeHrTbC8 Be3 yBeDoMJIeHnI.
— © PIONEER CORPORATION, 2013. BCE npaba 3auniuenebl.
Приимechаиме:
B coOTBeTCTBm CO cTaTbe 5 3aKoHa Pocnncko Phedepaun "O 3aUnte npab notpe6nteJ" u Kka3aHnem PpaNTbctBa Pocnncko Phedepaun N9 720 ot 16 nioh 1997 roda kopnpaun Pioneer Europe NV yCTaHabnBaet ycNoBne Ha cNeDyUoSyI npdoJXnTeNbHoctb cPoka cnyk6bl oΦnuaJIbHO nocTabIeMbIX Ha Pocnnckn pbIHOK TObApOB.
Aydinoи видаообудане:7лет
Ipehenochoe aydnoo6opydoBaHne: 6 let
P2-Mecya n3roTOBNeHn
| Мессяц | 1 | 2 | 3 | 4 | 5 | 6 | 7 | 8 | 9 | 10 | 11 | 12 |
| Символ | A | B | C | D | E | F | G | H | I | J | K | L |
D3-7-10-7_A1_Ru
© 2013 PIONEER CORPORATION.
All rights reserved.
© 2013 PIONEER CORPORATION.
PIONEER ELECTRONICS (USA) INC.
P.O. BOX 1720, Long Beach, California 90801-1720, U.S.A. TEL: (800) 421-1404
PIONEER ELECTRONICS ASIACENTRE PTE. LTD.
253 Alexandra Road, #04-01, Singapore 159936 TEL: 65-6472-7555
PIONEER ELECTRONICS AUSTRALIA PTY. LTD.
5 Arco Lane, Heatherton, Victoria, 3202, Australia, TEL: (03) 9586-6300
PIONEER ELECTRONICS (THAILAND) CO., LTD.
17th Fl., KPN Tower, 719 Rama 9 Road, Bangkapi, Huaykwang, Bangkok 10310 TEL: 66-2-717-0777
PIONEER TECHNOLOGY (MALAYSIA) SDN. BHD
16th Floor, Menara Uni. Asia 1008 Jalan Sultan Ismail 50250 Kuala Lumpur TEL: 60-3-2697-2920
先锋股份有限公司
Printed in / Imprimé