
DDJ-SP1 - DJ Controller PIONEER - Free user manual and instructions
Find the device manual for free DDJ-SP1 PIONEER in PDF.
User questions about DDJ-SP1 PIONEER
0 question about this device. Answer the ones you know or ask your own.
Ask a new question about this device
Download the instructions for your DJ Controller in PDF format for free! Find your manual DDJ-SP1 - PIONEER and take your electronic device back in hand. On this page are published all the documents necessary for the use of your device. DDJ-SP1 by PIONEER.
USER MANUAL DDJ-SP1 PIONEER
The Pioneer website shown above offers FAQs, information on software and various other types of information and services to allow you to use your product in greater comfort.
The contents of the warranty for the United States and Canada are provided on the last pages of the instructions in English and French.
For the latest version of the Serato DJ software, access Serato.com and download the software from there.
Operating Instructions (Basic Edition)
This product is for general household purposes. Any failure due to use for other than household purposes (such as long-term use for business purposes in a restaurant or use in a car or ship) and which requires repair will be charged for even during the warranty period.
K041_A1_En
Operating Environment
Operating environment temperature and humidity: +5 °C to +35 °C (+41 °F to +95 °F); less than 85 %RH (cooling vents not blocked) Do not install this unit in a poorly ventilated area, or in locations exposed to high humidity or direct sunlight (or strong artificial light).
D3-4-2-1-7c*_A2_En
For Europe

If you want to dispose this product, do not mix it with general household waste. There is a separate collection system for used electronic products in accordance with legislation that requires proper treatment, recovery and recycling.
Private households in the member states of the EU, in Switzerland and Norway may return their used electronic products free of charge to designated collection facilities or to a retailer (if you purchase a similar new one).
For countries not mentioned above, please contact your local authorities for the correct method of disposal.
By doing so you will ensure that your disposed product undergoes the necessary treatment, recovery and recycling and thus prevent potential negative effects on the environment and human health.
K058b_A1_En
For U.S.A.
WARNING: Handling the cord on this product or cords associated with accessories sold with the product may expose you to chemicals listed on proposition 65 known to the State of California and other governmental entities to cause cancer and birth defect or other reproductive harm.
Wash hands after handling.
D36-P5_B1_En
IMPORTANT NOTICE
THE MODEL NUMBER AND SERIAL NUMBER OF THIS EQUIPMENT ARE ON THE REAR OR BOTTOM. RECORD THESE NUMBERS ON PAGE 11 FOR FUTURE REFERENCE.
D36-AP9-3*_A1_En
For U.S.A. and other areas
FEDERAL COMMUNICATIONS COMMISSION DECLARATION OF CONFORMITY
This device complies with part 15 of the FCC Rules. Operation is subject to the following two conditions: (1) This device may not cause harmful interference, and (2) this device must accept any interference received, including interference that may cause undesired operation.
Product Name: DJ Controller
Model Number: DDJ-SP1
Responsible Party Name: PIONEER ELECTRONICS (USA) INC.
SERVICE SUPPORT DIVISION
Address: 1925 E. DOMINGUEZ ST. LONG BEACH, CA 90810-1003, U.S.A.
Phone: 1-800-421-1404
URL: http://www.pioneerelectronics.com
D8-10-4*_C1_En
NOTE:
This equipment has been tested and found to comply with the limits for a Class B digital device, pursuant to Part 15 of the FCC Rules. These limits are designed to provide reasonable protection against harmful interference in a residential installation. This equipment generates, uses, and can radiate radio frequency energy and, if not installed and used in accordance with the instructions, may cause harmful interference to radio communications. However, there is no guarantee that interference will not occur in a particular installation. If this equipment does cause harmful interference to radio or television reception, which can be determined by turning the equipment off and on, the user is encouraged to try to correct the interference by one or more of the following measures:
— Reorient or relocate the receiving antenna.
— Increase the separation between the equipment and receiver.
— Connect the equipment into an outlet on a circuit different from that to which the receiver is connected.
— Consult the dealer or an experienced radio/TV technician for help.
D8-10-1-2_A1_En
Information to User
Alterations or modifications carried out without appropriate authorization may invalidate the user's right to operate the equipment.
D8-10-2_A1_En
Before start
How to read this manual
• Thank you for buying this Pioneer product.
Be sure to read this booklet and the “Operating Instructions (Advanced Edition)” provided on the Pioneer DJ support site. Both include important information that should be fully understood before using this product.
After you have finished reading the instructions, put them away in a safe place for future reference.
- In this manual, names of screens and menus displayed on the product and on the computer screen, as well as names of buttons and terminals, etc., are indicated within brackets. (e.g.: [CUE] button, [Files] panel, [VINYL] mode, [AUX IN] terminal)
- Please note that the screens and specifications of the software described in this manual as well as the external appearance and specifications of the hardware are currently under development and may differ from the final specifications.
- Please note that depending on the operating system version, web browser settings, etc., operation may differ from the procedures described in this manual.
This manual consists mainly of descriptions of the functions of this unit as hardware. For details about operating the Serato DJ software, see the Serato DJ software's manual, and for instructions on operating Serato DJ-certified devices, see the respective devices' operating instructions.
Features
This unit is a DJ controller that carries over the operability and reliability of Pioneer DJ equipment that has gained a high reputation among many professional DJs and clubs. It supports and is designed specifically for use with "Serato DJ", the DJ software by Serato. Adding this unit to a digital DJ system consisting of a Pioneer DJ player or turntable and a Serato DJ-supporting mixer, or a DJ controller and Serato DJ makes it possible to bring out the best in the performance functions provided by Serato DJ to achieve a wide variety of performance possibilities intuitively and with a highly operable interface.
What's in the box
- USB cable
• Operating Instructions (Basic Edition)
• Warranty (for some regions) ^1 - Serato Video voucher ^2
1 The included warranty is for the European region.
— For the North American region, the corresponding information is provided on the last page of both the English and French versions of the “Operating Instructions (Basic Edition)”.
— For the Japanese region, the corresponding information is provided on the last page of the Japanese version of the “Operating Instructions (Basic Edition)”.
2 The voucher will not be reissued. Be sure to store it in a safe place.
Acquiring this unit's Operating Instructions (Advanced Edition)
The various instructions are sometimes provided as files in PDF format. Adobe ^® Reader ^® must be installed in order to view files in PDF format.
1 Launch a web browser on the computer and access the Pioneer DJ support site below.
2 On the Pioneer DJ support site, click "Manuals" under "DDJ-SP1".
3 Click on the required language on the download page.
Downloading of the operating instructions begins.
Operating environment
The equipment and software below are required in order to operate this unit.
DJ controller or DJ mixer
A separate Serato DJ-certified mixer (e.g. DJM-900SRT) or controller (e.g. DDJ-S1) is required.
Serato DJ software
Serato DJ is a DJ software application by Serato. DJ performances are possible by connecting the computer on which this software is installed to this unit.
- Serato DJ is not included with this unit. Download the latest version of Serato DJ from the Serato site below.
http://serato.com/
• For information on the Serato DJ software, contact Serato.
Computer on which the Serato DJ software operates
A USB 2.0 port is required to connect the computer with this unit.
- A total of two USB 2.0 ports are required on the computer: one for this unit, one for the Serato DJ-certifiable DJ mixer or DJ controller.
Environment allowing connection to the Internet
An environment allowing connection to the Internet is necessary to download the Operating Instructions (Advanced Edition), Serato DJ, Serato Video, etc.
Note on using an Internet connection
- A separate contract with and payment to a provider offering Internet services is required.
About the Serato Video software
Serato Video is a software plug-in for Serato DJ allowing DJ performances with sound and video.
Minimum operating environment
| Windows | Mac | |
| Operating system | Microsoft Windows 7 | Mac OS X: 10.8, 10.7 and 10.6 |
| CPU | Intel®processor, CoreTM Duo 2.0 GHz or greater | |
| Required memory | 2 GB or more of RAM | |
| Free space on hard disk | 5 GB or greater | |
| Graphics card | NVIDIA GeForce® 8400 or higher, or ATI RadeonTM X1650 or higher | |
- For the latest information on the required operating environment for Serato Video, see "Software Info" under "DDJ-SP1" on the Pioneer DJ support site. http://pioneerdj.com/support/
- Operation is not guaranteed on all computers, even if all the required operating environment conditions indicated here are fulfilled.
- Depending on the computer's status (power savings setting, etc.), the processing capabilities of the CPU or hard disk may be insufficient. When using a notebook computer in particular, always use Serato Video with the computer connected to an AC power source and set to the high performance mode.
- Operating System support assumes you are using the latest point release for that version.
Acquiring Serato Video
Access the Pioneer DJ support site below.
Instructions on acquiring Serato Video are provided on this unit's support page.
For detailed instructions on operating Serato Video, a description of its functions and information on usable codecs, see the Serato Video operating instructions.
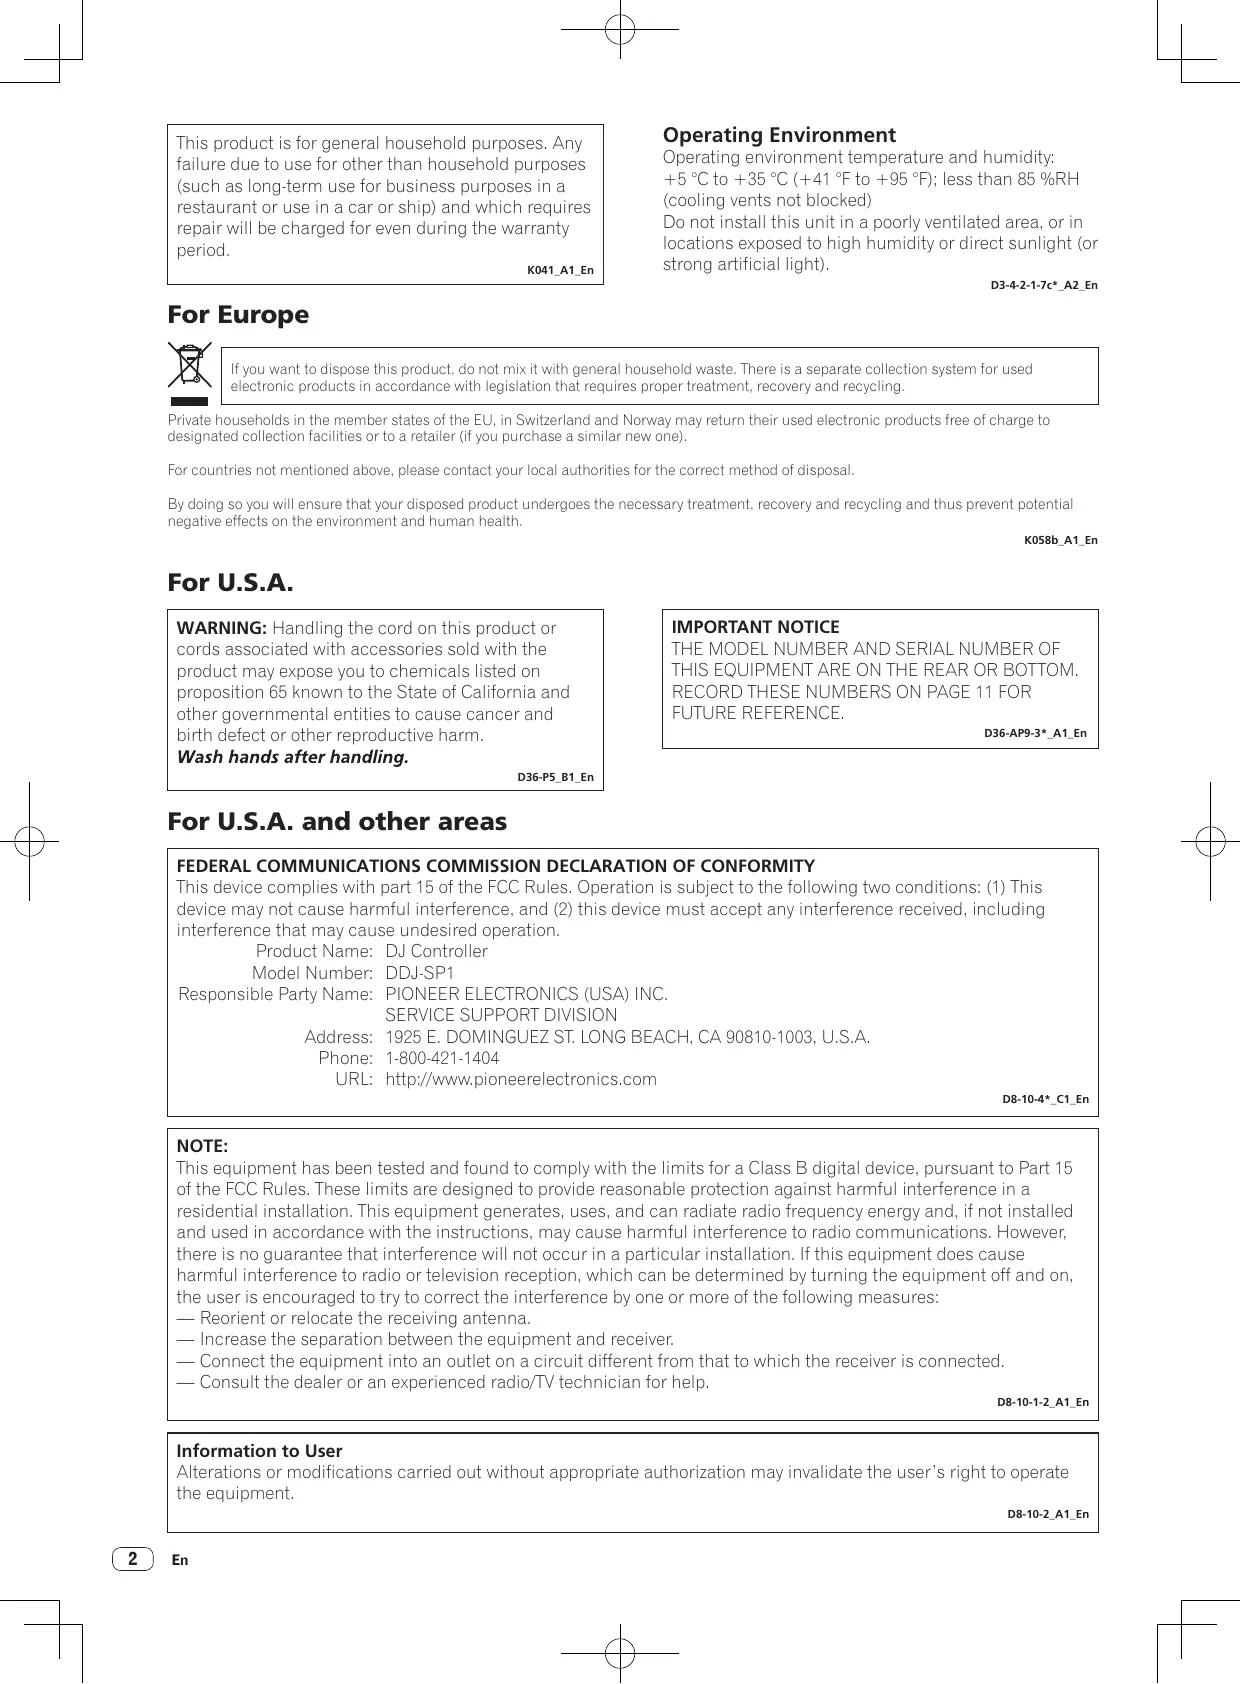
Part names and functions
The typical functions of the buttons and controls when using Serato DJ are described below.
For the functions and details of buttons and controls not described here, see the Operating Instructions (Advanced Edition).
text_image
1 1 2 3 BEATS ON P2 SELECT ON P2 SELECT ON P2 SELECT TAP P2 SELECT 1 2 3 BEATS ON P2 SELECT ON P2 SELECT TAP P2 SELECT 1 2 3 BEATS SIP CENSOR PARALLEL RRC RCS PARALLEL OFF/ORDER 3 +/- - R/C R/C ROLL SLICER SAMPLER SPLC1 SPLC2 SPLC3 SPLC4 SPLC5 SPLC6 SPLC7 SPLC8 SPLC9 SPLC10 SPLC11 SPLC12 SPLC13 SPLC14 SPLC15 SPLC16 SPLC17 SPLC18 SPLC19 SPLC20 SPLC21 SPLC22 SPLC23 SPLC24 SPLC25 SPLC26 SPLC27 SPLC28 SPLC29 SPLC30 SPLC31 SPLC32 SPLC33 SPLC34 SPLC35 SPLC36 SPLC37 SPLC38 SPLC39 SPLC40 SPLC41 SPLC42 SPLC43 SPLC44 SPLC45 SPLC46 SPLC47 SPLC48 SPLC49 SPLC50 SPLC51 SPLC52 SPLC53 SPLC54 SPLC55 SPLC56 SPLC57 SPLC58 SPLC59 SPLC60 SPLC61 SPLC62 SPLC63 SPLC64 SPLC65 SPLC66 SPLC67 SPLC68 SPLC69 SPLC70 SPLC71 SPLC72 SPLC73 SPLC74 SPLC75 SPLC76 SPLC77 SPLC78 SPLC79 SPLC80 SPLC81 SPLC82 SPLC83 SPLC84 SPLC85 SPLC86 SPLC87 SPLC88 SPLC89 SPLC90 SPLC91 SPLC92 SPLC93 SPLC94 SPLC95 SPLC96 SPLC97 SPLC98 SPLC99 SPLC1001 Effect section
2 Deck section
3 Browser section
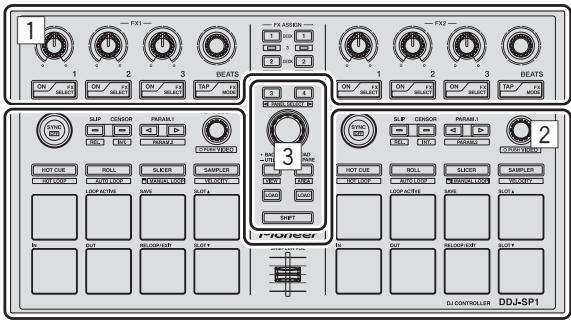
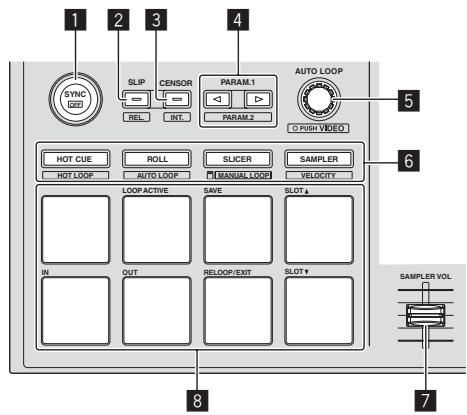
Effect section
text_image
FX1 BEATS FX ASSIGN 1 2 3 4 5 ON/ F2 SELECT ON/ F2 SELECT ON/ F2 SELECT TAP/ F2 MODE1 Effect parameter controls
These adjust the effects' parameters.
2 FX BEATS control
Adjusts the effect time.
3 FX ASSIGN buttons
Press:
Turns the effects unit for deck 1 or deck 2 on and off.
[SHIFT] + press:
Turns the effects unit for deck 3 or deck 4 on and off.
4 TAP button
Press:
When the [TAP] button is pressed three times or more while in the auto-tempo mode, the mode switches to the manual tempo mode.
When the tap tempo mode is set to manual, the BPM value to serve as reference for the effect is calculated from the intervals at which the button is tapped.
When the [TAP] button is pressed for over 1 second while in the manual-tempo mode, the mode switches to the auto tempo mode.
[SHIFT] + press:
Switches the effect mode.
5 Effect parameter buttons
Press:
These turn the effects on and off or switch the parameters.
[SHIFT] + press:
Switches the effect type.
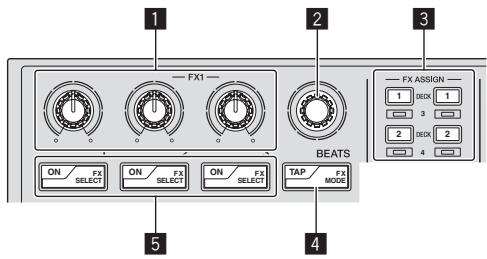
Deck section
text_image
SYNC SLP CENSOR PARAM.1 AUTO LOOP REL INT PARAM.2 O Push VIDEO HOT CUE ROLL SLICER SAMPLER HOT LOOP AUTO LOOP MANUAL LOOP VELOCITY LOOP ACTIVE SAVE SLOT # IN OUT RELOOP/EXIT SLOT # SAMPL ER VOL 8 71 SYNC button
Press:
The tempos (pitches) and beat grids between tracks on multiple decks can be synchronized automatically.
[SHIFT] + press:
Cancels the sync mode.
2 SLIP button
Press:
Turns the slip mode on and off.
[SHIFT] + press:
Sets Serato DJ to the relative mode.
3 CENSOR button
Press:
The track is played in the reverse direction while the [CENSOR] button is pressed, and normal playback resumes when the button is released.
[SHIFT] + press:
Sets Serato DJ to the internal mode.
4 PARAM.1/PARAM.2 button
Press:
Sets a parameter for the loop roll, auto loop, slicer, manual loop and sampler modes.
[SHIFT] + press:
Sets a different parameter for the auto loop, slicer and manual loop modes.
5 AUTO LOOP control
Turn:
Selects the auto loop loop beat.
Press:
Turns the auto loop function on and off.
[SHIFT] + press:
Switches to the mode for using Serato Video.
6 Pad mode button
Press:
Selects the pad mode from among the hot cue, loop roll, slicer and sampler (velocity disabled) modes.
[SHIFT] + press:
Selects the pad mode from among the hot loop, auto loop, manual loop and sampler (velocity enabled) modes.
7 SAMPLER VOLUME fader
Adjusts the sampler's overall sound level.
8 Performance pads
Used for hot cue, hot loop, loop roll, auto loop, slicer, manual loop and sampler playback.
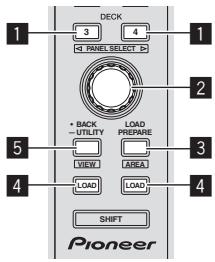
Browser section
text_image
DECK 3 4 + PANEL SELECT > • BACK UTILITY LOAD PRESHARE VIEW AREA LOAD LOAD SHIFT Pioneer1 DECK button
Press:
Selects the deck to be used.
The [DECK] button lights when deck 3 or deck 4 is selected. It does not light when deck 1 or deck 2 is selected.
[SHIFT] + press:
Selects and opens the [REC] panel, [DJ-FX] panel or [SP-6] panel.
2 Rotary selector
Turn:
The cursor in the library or on the [CRATES] panel moves up and down.
Press:
The cursor moves between the [CRATES] panel and library each time the rotary selector is pressed.
3 LOAD PREPARE (AREA) button
Press:
Loads tracks to the [Prepare] panel.
[SHIFT] + press:
Selects and opens the [Files] panel, [Browse] panel, [Prepare] panel or [History] panel.
4 LOAD button
Loads the selected track onto the currently selected deck.
5 BACK button
Press:
The cursor moves between the [CRATES] panel and library each time the button is pressed.
Press for over 1 second:
Switches to the utilities mode. For details on the utilities mode, see Changing this unit's settings (p.7).
[SHIFT] + press:
Switches the Serato DJ layout.
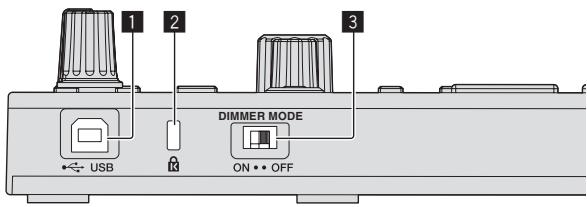
Main unit side panel
text_image
1 2 3 USB DIMMER MODE ON •• OFF1 USB port
Connect to a computer.
• USB hubs cannot be used.
2 Kensington security slot
3 DIMMER switch
ON: Sets the LED's brightness to dim.
OFF: Sets the LED's brightness to bright.
- Power consumption can be decreased by setting the LED's brightness to dim.
Disconnect the USB cable connected to this unit before switching the [DIMMER] switch from the [ON] position to the [OFF] position.
The indicators will not get brighter if the switch is set to the [OFF] position while the USB cable is connected.
System setup example
When using in combination with a DJ mixer
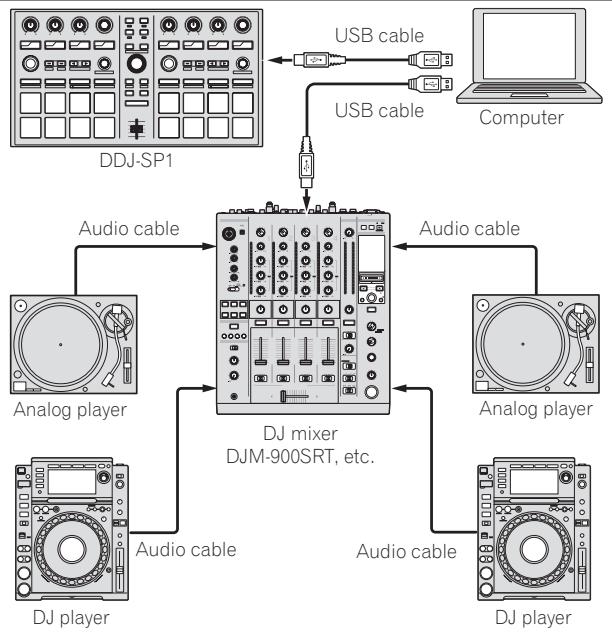
flowchart
graph TD
    A["Computer"] -->|USB cable| B["DJ mixer DJM-900SRT, etc."]
    B -->|Audio cable| C["Analog player"]
    B -->|Audio cable| D["DJ player"]
    B -->|Audio cable| E["Analog player"]
    B -->|Audio cable| F["DJ player"]
    B -->|Audio cable| G["DDJ-SP1"]
When using in combination with a DJ controller
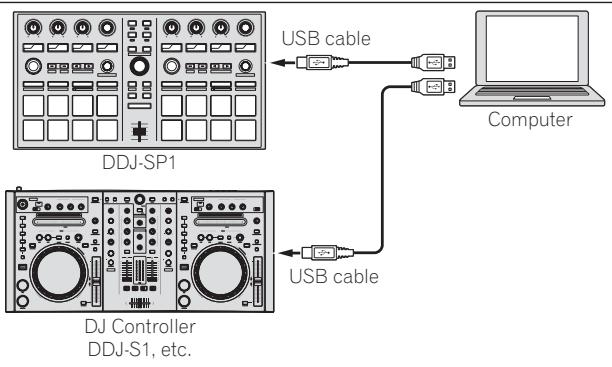
flowchart
graph TD
    A["Computer"] -->|USB cable| B["DDJ-SP1"]
    A -->|USB cable| C["DJ Controller DDJ-S1, etc."]
Operation
Starting the system
The computer and Serato DJ-certifiable DJ controller or DJ mixer must be connected beforehand.
- For instructions on operating the Serato DJ software and the Serato DJ-certifiable DJ mixer or DJ controller, see their respective operating instructions.
1 Connect the Serato DJ-certifiable DJ mixer or DJ controller to the computer by USB cable.
2 Turn on the computer's power.
3 Turn on the power of the Serato DJ-certifiable DJ mixer or DJ controller.
4 Launch Serato DJ.
- When using Windows 7
From the Windows [Start] menu, click the [Serato DJ] icon under [All Programs] > [Serato] > [Serato DJ]. - For Mac OS X
In Finder, open the [Applications] folder, then click the [Serato DJ] icon.
5 Connect this unit to your computer via a USB cable.
When this unit and Serato DJ are properly connected, this unit's pad mode button (by default the [HOT CUE] mode button) lights.
- This unit operates with the operating system's standard driver. There is no need to install separate driver software for this unit.
Importing tracks
Operate the Serato DJ software to add tracks to the library.
- For instructions on operating the Serato DJ software and the Serato DJ-certifiable DJ mixer or DJ controller, see their respective operating instructions.
Loading tracks
1 Press this unit's [BACK] button or rotary selector and move the cursor to the crates panel on the computer's screen.
2 Turn the rotary selector to select the crate, etc.
3 Press the rotary selector and move the cursor to the library on the computer's screen.
4 Turn the rotary selector and select the track.
5 Press the [LOAD] button to load the selected track onto the deck.
To load the track onto deck 3 or deck 4, first press the [DECK] button so that it lights. The deck onto which tracks are loaded is associated with deck selection.
Playing tracks
Operate the DJ player, analog player, DJ controller, etc., to play the track.
- For instructions on operating the Serato DJ software and the Serato DJ-certifiable DJ mixer or DJ controller, see their respective operating instructions.
Using the performance pads
The performance pads control the hot cue, hot loop, loop roll, auto loop, slicer, manual loop and sampler functions.
These functions are switched using the respective pad mode buttons (the [HOT CUE] mode button, [ROLL] mode button, [SLICER] mode button and [SAMPLER] mode button).
This example describes using the hot cue mode.
- For instructions on using other pad modes, see this unit's Operating Instructions (Advanced Edition).
1 Press the [HOT CUE] mode button.
The [HOT CUE] mode button lights and the mode switches to the hot cue mode.
2 In the play or pause mode, press a performance pad to set the hot cue point.
When a hot cue point is set, that performance pad lights.
3 Press the performance pad at which the hot cue point was set.
Playback starts from the hot cue point.
Using effects
Serato DJ includes two effects units, FX1 and FX2. These effects can be applied to the overall sound or to the sound of the selected deck. Here we describe the procedure for operating this unit to assign effects unit 1 (FX1) when Serato DJ's DJ-FX mode is set to the multi-FX mode.
- For instructions on when the DJ-FX mode is set to the single FX mode, see the Operating Instructions (Advanced Edition).
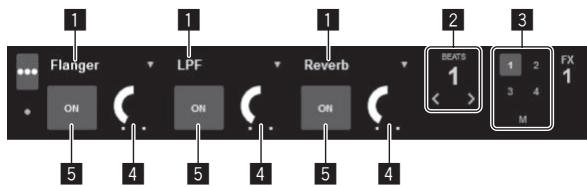
Serato DJ effects unit screen display
text_image
1 Flanger LPF Reverb BEATS 1 2 FX 1 3 4 M 5 4 5 4 5 4 5 41 This displays the currently selected type of effect.
2 This displays the effect time.
3 The number of the deck to which that effects unit is assigned is highlighted.
4 This displays the effect parameter status.
5 This displays whether the effect is on or off.
1 Press the [FX ASSIGN] button on the left side to select the deck to which the effect is to be assigned.
![PIONEER DDJ-SP1 - Press the [FX ASSIGN] button on the left side to select the deck to which the effect is to be assigned. - 1](/content/2020/04/119075/images/85da70f60d93a8f9565008c10dd0f20c97b1b99bcb2965b10a2b221114839e9f.jpg)
text_image
FX ASSIGN 1 DECK 1 3 2 DECK 2 4Press the [FX ASSIGN] 1 button to assign the effect to deck 1, the [FX ASSIGN] 2 button to assign the effect to deck 2.
- Press the [FX ASSIGN] 1 button while pressing the [SHIFT] button to assign the effect to deck 3, press the [FX ASSIGN] 2 button while pressing the [SHIFT] button to assign the effect to deck 4.
- To apply the effects to the overall (master) sound, click [M] on the computer.
2 Press the effect parameter 1 button while pressing the [SHIFT] button to select the first effect type.
To select the second effect type, press the effect parameter 2 button while pressing the [SHIFT] button.
To select the third effect type, press the effect parameter 3 button while pressing the [SHIFT] button.
![PIONEER DDJ-SP1 - Press the effect parameter 1 button while pressing the [SHIFT] button to select the first effect type. - 1](/content/2020/04/119075/images/e93915b5f499acbba33eda66f64d516dc18a48b136bc922073b6527c8350fe10.jpg)
text_image
FX1 1 2 3 BEATS ON FX SELECT ON FX SELECT ON FX SELECT TAP FX MODE FX ASSIGN 1 DECK 1 3 2 DECK 2 4 DECK 3 4The currently selected effect type is displayed on the Serato DJ screen.
3 Press the effect parameter 1 button to turn the first effect on.
Press the effect parameter 2 button to turn the second effect on. Press the effect parameter 3 button to turn the third effect on.

text_image
FX1 1 ON FX SELECT ON FX SELECT ON FX SELECT TAP FX MODE BEATS FX ASSIGN 1 DECK 1 2 DECK 3 3 DECK 2 4 DECK 4 3 4The [ON] button of the corresponding effect is highlighted on the Serato DJ screen.
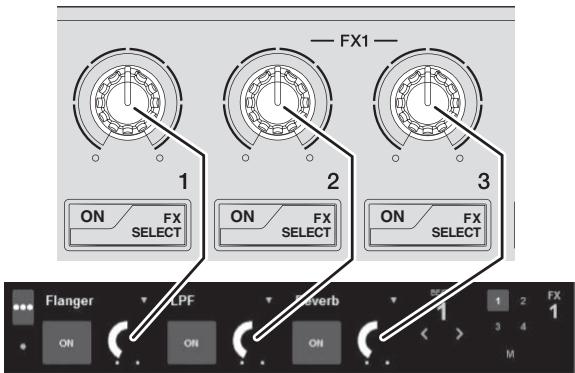
4 Operate the effect parameter 1 control to adjust the parameter of the first effect.
Operate the effect parameter 2 control to adjust the parameter of the second effect.
Operate the effect parameter 3 control to adjust the parameter of the third effect.
text_image
FX1 1 ON FX SELECT 2 ON FX SELECT 3 ON FX SELECT Flanger LPF Forward ON ON ON ON 1 2 FX 1 3 4 M5 Turn the [FX BEATS] control to adjust the effect time.
![PIONEER DDJ-SP1 - Turn the [FX BEATS] control to adjust the effect time. - 1](/content/2020/04/119075/images/0ff85be8c80216a73e7f45167cab058efdebc4bd38b8e7ded34d53e4d1f447f6.jpg)
text_image
FX1 1 2 3 BEATS ON/ FX SELECT ON/ FX SELECT ON/ FX SELECT TAP/ FX MODE FX ASSIGN 1 DECK 1 3 2 DECK 2 4 DECK 3 4Switching the effect's tempo mode
With Serato DJ effects, there are two ways to set the effect's tempo: with the "auto tempo mode" and the "manual tempo mode".
- By default, the auto tempo mode is set.
Auto tempo mode
The track's BPM value is used as the basis for the effect's tempo.
Manual tempo mode
The BPM value used as the effect's basis is calculated from the interval at which the [TAP] button is tapped.
❖ Switching to the manual tempo mode
While in the auto tempo mode, press the [TAP] button three times.
- When the [TAP] button is pressed for over 1 second while in the manual-tempo mode, the mode switches to the auto tempo mode.
Quitting the system
1 Quit Serato DJ.
When the software is closed, a message for confirming that you want to close it appears on the computer's screen. Click [Yes] to close.
2 Disconnect the USB cable from your computer.
Changing this unit's settings
Switching to the mode for changing this unit's settings (utilities mode)
Press the [BACK] button for over 1 second.
This unit switches to the utilities mode and the FX1 effect parameter 1 button ([A] on the diagram) flashes.
Selecting the setting item and changing the parameter
1 Turn the rotary selector.
When the rotary selector is turned, the setting item switches.
The buttons on the effects section flash to indicate which setting item is currently selected.
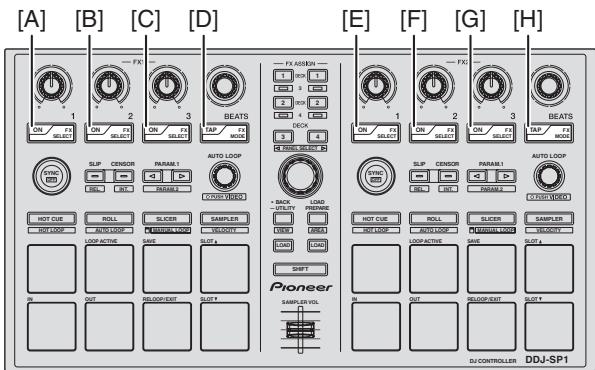
text_image
[A] [B] [C] [D] [E] [F] [G] [H] FX 2 3 BEATS 1 2 3 4 5 6 7 8 9 10 11 12 13 14 15 16 17 18 19 20 21 22 23 24 25 26 27 28 29 30 31 32 33 34 35 36 37 38 39 40 41 42 43 44 45 46 47 48 49 50 51 52 53 54 55 56 57 58 59 60 61 62 63 64 65 66 67 68 69 70 71 72 73 74 75 76 77 78 79 80 81 82 83 84 85 86 87 88 89 90 91 92 93 94 95 96 97 98 99 100 SPX SELECT 10000000000000000000000000000000000000000000000000000000000000000000000000000000000000000000000000000Setting preferences
| Name of selected item | Flashing button | Parameter |
| Sampler velocity mode velocity curve selection1 | FX1 effect parameter 1 button ([A] on diagram) | Pad 1: Curve 1*Pad 2: Curve 2Pad 3: Curve 3Pad 4: Curve 4 |
| Sampler velocity mode after-touch setting2 | FX1 effect parameter 2 button ([B] on diagram) | Pad 1: After-touch disabled*Pad 2: After-touch enabled |
| Setting of method to enter sampler velocity mode | FX1 effect parameter 3 button ([C] on diagram) | Pad 1: Switch to sampler velocity mode when [SHIFT] + [SAMPLER] buttons are pressed*Pad 2: Switch to sampler velocity mode when [SAMPLER] button is pressed for over 1 second. |
| Setting of DJ software to be used | FX1 [TAP] button ([D] on diagram) | Pad 1 lit: Software other than Serato DJ usedPad 1 off: Serato DJ used* |
| Demo mode setting3 | FX2 effect parameter 1 button ([E] on diagram) | Pad 1 lit: Turns demo mode on*Pad 1 off: Turns demo mode off |
| Setting of slip mode flashing4 | FX2 effect parameter 2 button ([F] on diagram) | Pad 1: Slip mode flashing enabled*Pad 2: Slip mode flashing disabled |
| Setting of illumination when tracks are loaded | FX2 effect parameter 3 button ([G] on diagram) | Pad 1: Illumination type 1*Pad 2: Illumination type 2 |
| Advanced MIDI settings5 | FX2 [TAP] button ([H] on diagram) | Pad 1: Advanced MIDI settings disabled*Pad 2: Advanced MIDI settings enabled |
“*” indicates the default setting.
For details of the characteristics of the respective velocity curves, see this unit's Operating Instructions (Advanced Edition).
2 When after-touch is enabled, the sampler volume changes while the performance pad is being pressed according to the strength with which the pad is pressed.
3 The demo mode is a function by which a demonstration using this unit's illumination is conducted if no operation is performed for 10 minutes under normal usage conditions.
4 When slip mode flashing is enabled, the buttons and controls that can be operated in the slip mode (the [AUTO LOOP] control, [HOT CUE] mode button, etc.) flash when the [SLIP] button is pressed.
For the slip functions that can be operated with this unit, see this unit's Operating Instructions (Advanced Edition).
For details about the advanced MIDI settings, see this unit's Operating Instructions (Advanced Edition).
— To control Serato Video, disable the advanced MIDI settings.
2 Press the performance pad on the left side.
This selects the parameter or turns the parameter on and off.
- When this turns the parameter on and off, the parameter turns on and off each time pad 1 is pressed. When on, pad 1 is lit.
• To select a parameter from among multiple parameters, select and press one of the lit pads. The pad that was pressed flashes.
Example: Setting items for which 1 parameter is selected
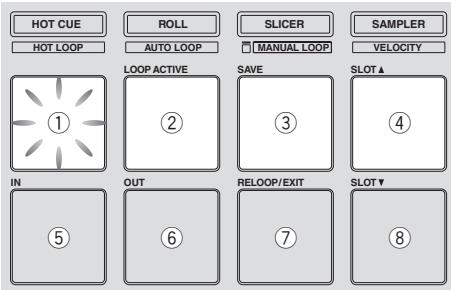
text_image
HOT CUE HOT LOOP ROLL AUTO LOOP SLICER MANUAL LOOP SAMPLER VELOCITY LOOP ACTIVE SAVE SLOT ▲ ① ② ③ ④ IN ⑤ OUT ⑥ RELOOP/EXIT ⑦ SLOT▼Saving the changed parameters on this unit
1 Press the rotary selector.
This saves the parameters that have been set in this unit's memory.
While the parameters are being saved, the eight buttons in the effect section flash. Do not disconnect the USB cable from this unit during this time.
2 Press the [BACK] button.
This unit switches from the utilities mode back to normal operation.
Additional information
Troubleshooting
- Incorrect operation is often mistaken for trouble or malfunction. If you think that there is something wrong with this component, check the points below and the [FAQ] for the [DDJ-SP1] on the Pioneer DJ support site.
Sometimes the problem may lie in another component. Inspect the other components and electrical appliances being used. If the problem cannot be rectified, ask your nearest Pioneer authorized service center or your dealer to carry out repair work.
- This unit may not operate properly due to static electricity or other external influences. In this case, proper operation may be restored by turning the power off, waiting 1 minute, then turning the power back on.
| Problem | Check | Remedy |
| The power is not turned on. | Is the included USB cable properly connected? | Connect the included USB cable properly. |
| Is the supply of power from the connected computer's USB port insufficient? | Connect to a USB port providing sufficient power. | |
| If devices not being used for the DJ performance are connected to other USB ports, also disconnect them to provide sufficient power. | ||
| Try running the connected computer with the power supplied from an AC power source rather running it on the battery. | ||
| This unit is not recognized. (The pad mode button does not light.) | Is the included USB cable properly connected? | Connect the included USB cable properly. |
| Are you using a USB hub? | USB hubs cannot be used. Connect the computer and this unit directly using the included USB cable. | |
| Is a Serato DJ-certified controller, audio interface or mixer connected to the computer? | Connect the Serato DJ-certified devices to the computer using USB cables. | |
| Are you using the latest version of the Serato DJ software? | Update the software to the latest version. | |
| The indicators are dim. | Is the [DIMMER] switch set to the [ON] position? | Set the [DIMMER] switch to the [OFF] position.Disconnect the USB cable connected to this unit before switching the [DIMMER] switch from the [ON] position to the [OFF] position. The indicators will not get brighter if the switch is set to the [OFF] position while the USB cable is connected. |
| The sampler volume does not change while the performance pad is being pressed according to the strength with which the pad is pressed. | Is after-touch disabled? | Switch to the utilities mode and enable after-touch. |
| Tracks are not displayed in the library. | Have music files been imported? | Import the music files properly.For details on importing music files, see the Serato DJ software manual. |
| Is a crate or subcrate that does not contain any tracks selected? | Either select a crate or subcrate that contains any tracks or add tracks to the crate or subcrate. | |
| Serato Video cannot be controlled. | Is Serato Video installed? | Access the Pioneer DJ support site (http://pioneerdj.com/support/), acquire Serato Video from this unit's support page then install it. |
Using as a controller for other DJ software
The DDJ-SP1 also outputs the operating data for the buttons and controls in MIDI format. If you connect a computer with a built-in MIDI-compatible DJ software via a USB cable, you can operate the DJ software on this unit.
To use as a controller to operate DJ software other than the Serato DJ software, switch to the setting for using software other than the Serato DJ software in the utilities mode. Also, make the DJ software's MIDI-related settings.
- For details, see your DJ software's operating instructions.
About MIDI messages
For details on this unit's MIDI messages, see "List of MIDI Messages".
- "List of MIDI Messages" can be acquired from the following URL: http://pioneerdj.com/support/
About installation locations
- Do not place this unit on objects radiating heat, such as an amplifier, or expose it to a spotlight for an extended period of time, as this may damage this unit.
- Install this unit away from a tuner or a TV. Otherwise, image distortion or noise may result. Also, image distortion or noise can easily occur if an indoor antenna is used. In such cases, use an outdoor antenna or disconnect the USB cable from this unit and turn off the power.
Cleaning the product
Under normal circumstances, wipe it with a dry cloth. For hard-to-remove stains, soak a soft cloth in a neutral detergent diluted with 5 to 6 times of water, wring it thoroughly, wipe off the stains, and wipe the surface with a dry cloth again. Do not use alcohol, thinner, benzene, or insecticide, as these may peel off the printed label or the coated film. Avoid leaving rubber or vinyl products in contact for an extended period of time, as this may also damage the surface of the cabinet. When using chemical-impregnated wipes, etc., read the cautions carefully. Unplug the USB cable from this unit before cleaning.
About trademarks and registered trademarks
- Pioneer is a registered trademark of PIONEER CORPORATION. The names of companies and products mentioned herein are the trademarks of their respective owners.
Cautions on copyrights
Recordings you have made are for your personal enjoyment and according to copyright laws may not be used without the consent of the copyright holder.
- Music recorded from CDs, etc., is protected by the copyright laws of individual countries and by international treaties. It is the full responsibility of the person who has recorded the music to ensure that it is used legally.
- When handling music downloaded from the Internet, etc., it is the full responsibility of the person who has downloaded the music to ensure that it is used in accordance with the contract concluded with the download site.
Specifications
General – Main Unit
Power supply.....DC 5 V
Rated current 500 mA
Main unit weight 1.4 kg (3.1 lb)
Max. dimensions....328 mm (W) × 47.4 mm (H) × 178.7 mm (D) (13 in. (W) × 1.9 in. (H) × 7.1 in. (D))
Tolerable operating temperature ..... +5 °C to +35 °C (+41 °F to +95 °F)
Tolerable operating humidity .... 5 % to 85 % (no condensation)
Input / Output terminals
USB terminal B type....1 set
- The specifications and design of this product are subject to change without notice.
• © 2013 PIONEER CORPORATION. All rights reserved.
Pioneer
PIONEER ELECTRONICS (USA) INC.
LIMITED WARRANTY
WARRANTY VALID ONLY IN THE U.S.A. AND CANADA
WARRANTY
Pioneer Electronics (USA) Inc. (PUSA) warrants that products distributed by PUSA in the U.S.A. and Canada that fail to function properly under normal use due to a manufacturing defect when installed and operated according to the owner's manual enclosed with the unit will be repaired or replaced with a unit of comparable value, at the option of PUSA, without charge to you for parts or actual repair work. Parts supplied under this warranty may be new or rebuilt at the option of PUSA.
THIS LIMITED WARRANTY APPLIESTO THE ORIGINAL OR ANY SUBSEQUENT OWNER OF THIS PIONEER PRODUCT DURING THE WARRANTY PERIOD PROVIDED THE PRODUCT WAS PURCHASED FROM AN AUTHORIZED PIONEER DISTRIBUTOR/DEALER IN THE U.S.A. OR CANADA. YOU WILL BE REQUIRED TO PROVIDE A SALES RECEIPT OR OTHER VALID PROOF OF PURCHASE SHOWING THE DATE OF ORIGINAL PURCHASE OR, IF RENTED, YOUR RENTAL CONTRACT SHOWING THE PLACE AND DATE OF FIRST RENTAL. IN THE EVENT SERVICE IS REQUIRED, THE PRODUCT MUST BE DELIVERED WITHIN THE WARRANTY PERIOD, TRANSPORTATION PREPAID, ONLY FROM WITHIN THE U.S.A. AS EXPLAINED IN THIS DOCUMENT. YOU WILL BE RESPONSIBLE FOR REMOVAL AND INSTALLATION OF THE PRODUCT. PUSA WILL PAY TO RETURN THE REPAIRED OR REPLACEMENT PRODUCT TO YOU WITHIN THE U.S.A.
PRODUCT WARRANTY PERIOD
Parts Labor
DJ Audio and Video
1 Year 1 Year
The warranty period for retail customers who rent the product commences upon the date product is first put into use (a) during the rental period or (b) retail sale, whichever occurs first.
WHAT IS NOT COVERED
IF THIS PRODUCT WAS PURCHASED FROM AN UNAUTHORIZED DISTRIBUTOR, THERE ARE NO WARRANTIES, EXPRESS OR IMPLIED, INCLUDING THE IMPLIED WARRANTY OF MERCHANTABILITY AND THE IMPLIED WARRANTY OF FITNESS FOR A PARTICULAR PURPOSE AND THIS PRODUCT IS SOLD STRICTLY "AS IS" AND "WITH ALL FAULTS". PIONEER SHALL NOT BE LIABLE FOR ANY CONSEQUENTIAL AND/OR INCIDENTAL DAMAGES.
THIS WARRANTY DOES NOT APPLY IF THE PRODUCT HAS BEEN SUBJECTED TO POWER IN EXCESS OF ITS PUBLISHED POWER RATING.
THIS WARRANTY DOES NOT COVER THE CABINET OR ANY APPEARANCE ITEM, USER ATTACHED ANTENNA, ANY DAMAGE TO RECORDS OR RECORDING TAPES OR DISCS, ANY DAMAGE TO THE PRODUCT RESULTING FROM ALTERATIONS, MODIFICATIONS NOT AUTHORIZED IN WRITING BY PIONEER, ACCIDENT, MISUSE OR ABUSE, DAMAGE DUE TO LIGHTNING OR TO POWER SURGES, SUBSEQUENT DAMAGE FROM LEAKING, DAMAGE FROM INOPERATIVE BATTERIES, OR THE USE OF BATTERIES NOT CONFORMING TO THOSE SPECIFIED IN THE OWNER'S MANUAL.
THIS WARRANTY DOES NOT COVER THE COST OF PARTS OR LABOR WHICH WOULD BE OTHERWISE PROVIDED WITHOUT CHARGE UNDER THIS WARRANTY OBTAINED FROM ANY SOURCE OTHER THAN A PIONEER AUTHORIZED SERVICE COMPANY OR OTHER DESIGNATED LOCATION. THIS WARRANTY DOES NOT COVER DEFECTS OR DAMAGE CAUSED BY THE USE OF UNAUTHORIZED PARTS OR LABOR OR FROM IMPROPER MAINTENANCE.
ALTERED, DEFACED, OR REMOVED SERIAL NUMBERS VOID THIS ENTIRE WARRANTY
NO OTHER WARRANTIES
PIONEER LIMITS ITS OBLIGATIONS UNDER ANY IMPLIED WARRANTIES INCLUDING, BUT NOT LIMITED TO, THE IMPLIED WARRANTIES OF MERCHANTABILITY AND FITNESS FOR A PARTICULAR PURPOSE, TO A PERIOD NOT TO EXCEED THE WARRANTY PERIOD. NO WARRANTIES SHALL APPLY AFTER THE WARRANTY PERIOD. SOME STATES DO NOT ALLOW LIMITATIONS ON HOW LONG AN IMPLIED WARRANTY LASTS AND SOME STATES DO NOT ALLOW THE EXCLUSIONS OR LIMITATIONS OF INCIDENTAL OR CONSEQUENTIAL DAMAGES, SO THE ABOVE LIMITATIONS OR EXCLUSIONS MAY NOT APPLY TO YOU. THIS WARRANTY GIVES YOU SPECIFIC LEGAL RIGHTS AND YOU MAY HAVE OTHER RIGHTS WHICH MAY VARY FROM STATE TO STATE.
TO OBTAIN SERVICE
PUSA has appointed a number of Authorized Service Companies throughout the U.S.A. and Canada should your product require service. To receive warranty service you need to present your sales receipt or, if rented, your rental contract showing place and date of original owner's transaction. If shipping the unit you will need to package it carefully and send it, transportation prepaid by a traceable, insured method, to an Authorized Service Company. Package the product using adequate padding material to prevent damage in transit. The original container is ideal for this purpose. Include your name, address and telephone number where you can be reached during business hours.
On all complaints and concerns in the U.S.A. and Canada call Customer Support at 1-800-872-4159.
For hook-up and operation of your unit or to locate an
Authorized Service Company, please call or write:
CUSTOMER SUPPORT
PIONEER ELECTRONICS (USA) INC.
P.O. BOX 1720
LONG BEACH, CALIFORNIA 90801
1-800-872-4159
http://www.pioneerelectronics.com
DISPUTE RESOLUTION
Following our response to any initial request to Customer Support, should a dispute arise between you and Pioneer, Pioneer makes available its Complaint Resolution Program to resolve the dispute. The Complaint Resolution Program is available to you without charge. You are required to use the Complaint Resolution Program before you exercise any rights under, or seek any remedies, created by Title I of the Magnuson-Moss Warranty-Federal Trade Commission Improvement Act, 15 U.S.C. 2301 et seq.
To use the Complaint Resolution Program call 1-800-872-4159 and explain to the customer service representative the problem you are experiencing, steps you have taken to have the product repaired during the warranty period and the name of the authorized Distributor/Dealer from whom the Pioneer product was purchased. After the complaint has been explained to the representative, a resolution number will be issued. Within 40 days of receiving your complaint, Pioneer will investigate the dispute and will either: (1) respond to your complaint in writing informing you what action Pioneer will take, and in what time period, to resolve the dispute; or (2) respond to your complaint in writing informing you why it will not take any action.
RECORD THE PLACE AND DATE OF PURCHASE FOR FUTURE REFERENCE
Model No.
Serial No.
Purchase Date
Purchased From
KEEP THIS INFORMATION AND YOUR SALES RECEIPT IN A SAFE PLACE
UCP0212
Acquisition Serato Video
[SHIFT] + pression :
[SHIFT] + pression :
[SHIFT] + pression :
[SHIFT] + pression :
Annule le mode sync.
2 Touche SLIP
Pression :
Active et désactive le mode Slip.
[SHIFT] + pression :
[SHIFT] + pression :
[SHIFT] + pression :
[SHIFT] + pression :
[SHIFT] + pression :
[SHIFT] + pression :
[SHIFT] + pression :
[SHIFT] + pression :
Change la disposition de Serato DJ.
text_image
FX ASSIGN 1 DECK 1 3 2 DECK 2 4PIONEER ELECTRONICS (USA) INC.
GARANTIE LIMITÉE
GARANTIE VALABLE UNIQUEMENT AUX ÉTATS-UNIS ET AU CANADA
GARANTIE
PIONEER ELECTRONICS (USA) INC.
P.O. BOX 1720
LONG BEACH, CALIFORNIA 90801
1-800-872-4159
http://www.pioneerelectronics.com
RÉSOLUTION DES LITIGES
text_image
FX ASSIGN 1 DECK 1 3 2 DECK 2 4text_image
[A] [B] [C] [D] [E] [F] [G] [H] FX1 FN 3 BEATS DECK FN 4 COALIUM SWITCH SLIP CENSOR PARAM1 AUTO LOOP SAMPLER Pioneer SWIFT SWIFT SWIFT SWIFT SWIFT SWIFT SWIFT SWIFT SWIFT SWIFT SWIFT SWIFT SWIFT SWIFT SWIFT SWIFT SWIFT SWIFT SWIFT SWIFT SWIFT SWIFT SWIFT SWIFT SWIFT SWIFT SWIFT SWIFT SWIFT SWIFT SWIFT SWIFT SWIFT SWIFTtext_image
FX ASSIGN 1 DECK 1 3 2 DECK 2 4text_image
1 1 2 3 PAX1 PAX2 PAX3 PAX4 PAX5 PAX6 PAX7 PAX8 PAX9 PAX10 PAX11 PAX12 PAX13 PAX14 PAX15 PAX16 PAX17 PAX18 PAX19 PAX20 PAX21 PAX22 PAX23 PAX24 PAX25 PAX26 PAX27 PAX28 PAX29 PAX30 PAX31 PAX32 PAX33 PAX34 PAX35 PAX36 PAX37 PAX38 PAX39 PAX40 PAX41 PAX42 PAX43 PAX44 PAX45 PAX46 PAX47 PAX48 PAX49 PAX50 PAX51 PAX52 PAX53 PAX54 PAX55 PAX56 PAX57 PAX58 PAX59 PAX60 PAX61 PAX62 PAX63 PAX64 PAX65 PAX66 PAX67 PAX68 PAX69 PAX70 PAX71 PAX72 PAX73 PAX74 PAX75 PAX76 PAX77 PAX78 PAX79 PAX80 PAX81 PAX82 PAX83 PAX84 PAX85 PAX86 PAX87 PAX88 PAX89 PAX90 PAX91 PAX92 PAX93 PAX94 PAX95 PAX96 PAX97 PAX98 PAX99 PAX100 3 PIONEER 2 PIONEER 1 PIONEER 2 PIONEER 3 PIONEER 4 PIONEER 5 PIONEER 6 PIONEER 7 PIONEER 8 PIONEER 9 PIONEER 10 PIONEER 11 PIONEER 12 PIONEER 13 PIONEER 14 PIONEER 15 PIONEER 16 PIONEER 17 PIONEER 18 PIONEER 19 PIONEER 20 PIONEER 21 PIONEER 22 PIONEER 23 PIONEER 24 PIONEER 25 PIONEER 26 PIONEER 27 PIONEER 28 PIONEER 29 PIONEER 30 PIONEER 31 PIONEER 32 PIONEER 33 PIONEER 34 PIONEER 35 PIONEER 36 PIONEER 37 PIONEER 38 PIONEER 39 PIONEER 40 PIONEER 41 PIONEER 42 PIONEER 43 PIONEER 44 PIONEER 45 PIONEER 46 PIONEER 47 PIONEER 48 PIONEER 49 PIONEER 50 PIONEER 51 PIONEER 52 PIONEER 53 PIONEER 54 PIONEER 55 PIONEER 56 PIONEER 57 PIONEER 58 PIONEER 59 PIONEER 60 PIONEER 61 PIONEER 62 PIONEER 63 PIONEER 64 PIONEER 65 PIONEER 66 PIONEER 67 PIONEER 68 PIONEER 69 PIONEER 70 PIONEER 71 PIONEER 72 PIONEER 73 PIONEER 74 PIONEER 75 PIONEER 76 PIONEER 77 PIONEER 78 PIONEER 79 PIONEER 80 PIONEER 81 PIONEER 82 PIONEER 83 PIONEER 84 PIONEER 85 PIONEER 86 PIONEER 87 PIONEER 88 PIONEER 89 PIONEER 90 PIONEER 91 PIONEER 92 PIONEER 93 PIONEER 94 PIONEER 95 PIONEER 96 PIONEER 97 PIONEER 98 PIONEER 99 PIONEER 1003 LOAD PREPARE (AREA)-toets
Druk op:
text_image
FX ASSIGN 1 DECK 1 3 2 DECK 2 4To register your product, find the nearest authorized service location, to purchase replacement parts, operating instructions, or accessories, please go to one of following URLs :
© 2013 PIONEER CORPORATION.
All rights reserved.
© 2013 PIONEER CORPORATION.
PIONEER ELECTRONICS (USA) INC.
P.O. BOX 1720, Long Beach, California 90801-1720, U.S.A. TEL: (800) 421-1404
PIONEER ELECTRONICS ASIACENTRE PTE. LTD.
253 Alexandra Road, #04-01, Singapore 159936 TEL: 65-6472-7555
PIONEER ELECTRONICS AUSTRALIA PTY. LTD.
5 Arco Lane, Heatherton, Victoria, 3202, Australia, TEL: (03) 9586-6300
PIONEER ELECTRONICS (THAILAND) CO., LTD.
17th Fl., KPN Tower, 719 Rama 9 Road, Bangkapi, Huaykwang, Bangkok 10310 TEL: 66-2-717-0777
PIONEER TECHNOLOGY (MALAYSIA) SDN. BHD
16th Floor, Menara Uni. Asia 1008 Jalan Sultan Ismail 50250 Kuala Lumpur TEL: 60-3-2697-2920
先鋒股份有限公司
Plaza Credicorp Bank, 14th Floor, Calle 50, No.120 Panama City
0816-01361 Republic of Panama TEL: 507-300-3900