
DDJ-SX - DJ Controller PIONEER - Free user manual and instructions
Find the device manual for free DDJ-SX PIONEER in PDF.
| Product type | DJ controller |
| Brand | PIONEER |
| Model | DDJ-SX |
| Dimensions (W × H × D) | 664 mm × 70.4 mm × 357 mm |
| Weight | 5.8 kg |
| Power supply | AC adapter 100 V – 240 V, 50/60 Hz; DC output 5 V, 3 A |
| Power consumption | 800 mA (input) |
| Operating temperature | +5 °C to +35 °C |
| Operating humidity | 5 % to 85 % (non-condensing) |
| Number of decks | 4 (control via left and right sections) |
| Included software | Serato DJ (to download), ASIO driver (Windows) |
| Audio inputs | 2× RCA (CD/LINE), 2× RCA (PHONO/LINE), 1× XLR/6.3 mm jack (MIC1), 1× 6.3 mm jack (MIC2) |
| Audio outputs | 1× XLR (MASTER OUT 1), 1× RCA (MASTER OUT 2), 1× 6.3 mm jack (BOOTH), 1× 6.3 mm stereo jack + 1× 3.5 mm minijack (PHONES) |
| USB port | 1× USB type B (direct connection to computer, hub not supported) |
| Main features | Jog wheel, performance pads (Hot Cue, Roll, Slicer, Sampler), crossfader, channel faders, 3-band EQ, filter, built-in effects (FX1/FX2), looping, sync, key lock, slip |
| Cleaning | Damp cloth; do not use liquid, aerosol, or alcohol-based products |
| Safety | Do not open the case; use only the supplied adapter; unplug during prolonged non-use; do not expose to water or moisture |
| Spare parts and repairability | No user-serviceable parts inside; have maintenance done by qualified personnel |
| Warranty | Manufacturer's warranty included; repairs outside domestic use are chargeable |
Frequently Asked Questions - DDJ-SX PIONEER
User questions about DDJ-SX PIONEER
0 question about this device. Answer the ones you know or ask your own.
Ask a new question about this device
Download the instructions for your DJ Controller in PDF format for free! Find your manual DDJ-SX - PIONEER and take your electronic device back in hand. On this page are published all the documents necessary for the use of your device. DDJ-SX by PIONEER.
USER MANUAL DDJ-SX PIONEER
The Pioneer DJ support site shown above offers FAQs, information on software and various other types of information and services to allow you to use your product in greater comfort.
For the latest version of the Serato DJ software, access Serato.com and download the software from there.
The lightning flash with arrowhead symbol, within an equilateral triangle, is intended to alert the user to the presence of uninsulated "dangerous voltage" within the product's enclosure that may be of sufficient magnitude to constitute a risk of electric shock to persons.
CAUTION
RISK OF ELECTRIC SHOCK DO NOT OPEN
CAUTION:
TO PREVENT THE RISK OF ELECTRIC SHOCK,DO NOT REMOVE COVER (OR BACK).NO USER-SERVICEABLE PARTS INSIDE.REFER SERVICING TO QUALIFIED SERVICE PERSONNEL.

The exclamation point within an equilateral triangle is intended to alert the user to the presence of important operating and maintenance (servicing) instructions in the literature accompanying the appliance.
D3-4-2-1-1_A1_En

If you want to dispose this product, do not mix it with general household waste. There is a separate collection system for used electronic products in accordance with legislation that requires proper treatment, recovery and recycling.
Private households in the member states of the EU, in Switzerland and Norway may return their used electronic products free of charge to designated collection facilities or to a retailer (if you purchase a similar new one).
For countries not mentioned above, please contact your local authorities for the correct method of disposal.
By doing so you will ensure that your disposed product undergoes the necessary treatment, recovery and recycling and thus prevent potential negative effects on the environment and human health.
K058b_A1_En
WARNING
This equipment is not waterproof. To prevent a fire or shock hazard, do not place any container filled with liquid near this equipment (such as a vase or flower pot) or expose it to dripping, splashing, rain or moisture.
D3-4-2-1-3_A1_En
WARNING
Before plugging in for the first time, read the following section carefully.
The voltage of the available power supply differs according to country or region. Be sure that the power supply voltage of the area where this unit will be used meets the required voltage (e.g., 230 V or 120 V) written on the AC adapter's label.
To prevent a fire hazard, do not place any naked flame sources (such as a lighted candle) on the equipment.
D3-4-2-1-7a_A1_En
Operating Environment
Operating environment temperature and humidity: +5^ C to +35^ C ( +41^ F to +95^ F ); less than 85 % RH (cooling vents not blocked)
Do not install this unit in a poorly ventilated area, or in locations exposed to high humidity or direct sunlight (or strong artificial light)
D3-4-2-1-7c*A1_EN
If the AC plug of this unit does not match the AC outlet you want to use, the plug must be removed and appropriate one fitted. Replacement and mounting of an AC plug on the power supply cord of this unit should be performed only by qualified service personnel. If connected to an AC outlet, the cut-off plug can cause severe electrical shock. Make sure it is properly disposed of after removal. The equipment should be disconnected by removing the mains plug from the wall socket when left unused for a long period of time (for example, when on vacation).
D3-4-2-2-1a_A1_En
When using this product, confirm the safety information shown on the bottom of the unit.
D3-4-2-2-4_B1_En
WARNING
Store small parts out of the reach of children and infants. If accidentally swallowed, contact a doctor immediately.
D41-6-4_A1_En
This product is for general household purposes. Any failure due to use for other than household purposes (such as long-term use for business purposes in a restaurant or use in a car or ship) and which requires repair will be charged for even during the warranty period.
K041_A1_En
CAUTION
The STANDBY/ON switch on this unit will not completely shut off all power from the AC outlet. Since the power cord serves as the main disconnect device for the unit, you will need to unplug it from the AC outlet to shut down all power. Therefore, make sure the unit has been installed so that the power cord can be easily unplugged from the AC outlet in case of an accident. To avoid fire hazard, the power cord should also be unplugged from the AC outlet when left unused for a long period of time (for example, when on vacation).
D3-4-2-2-2a*A1_EN
POWER-CORD CAUTION
Handle the power cord by the plug. Do not pull out the plug by tugging the cord and never touch the power cord when your hands are wet as this could cause a short circuit or electric shock. Do not place the unit, a piece of furniture, etc., on the power cord, or pinch the cord. Never make a knot in the cord or tie it with other cords. The power cords should be routed such that they are not likely to be stepped on. A damaged power cord can cause a fire or give you an electrical shock. Check the power cord once in a while. When you find it damaged, ask your nearest PIONEER authorized service center or your dealer for a replacement.
S002*A1En
Contents
How to read this manual
- Thank you for buying this Pioneer product.
Be sure to read both this leaflet and the operating instructions! Both documents include important information that you must understand before using this product.
For instructions on acquiring the operating instructions, see Acquiring the manual (p. 15). - In this manual, names of screens and menus displayed on the product and on the computer screen, as well as names of buttons and terminals, etc., are indicated within brackets. (e.g.: [CUE] button, [Files] panel, [VINYL] mode, [AUX IN] terminal)
- Please note that the screens and specifications of the software described in this manual as well as the external appearance and specifications of the hardware are currently under development and may differ from the final specifications.
- Please note that depending on the operating system version, web browser settings, etc., operation may differ from the procedures described in this manual.
- In some countries or regions, the shape of the power plug and power outlet may sometimes differ from that shown in the explanatory drawings. However the method of connecting and operating the unit is the same.
Before start
What's in the box 5
Installing the software. 5
Operation
Connections 8
Starting the system. 10
Quitting the system. 13
Names of Parts. 13
03 Acquiring the manual
Downloading this unit's operating instructions 15
Downloading the Serato DJ software manual 15
About the AC adapter
Safety instructions 16
Mounting the power plug. 17
Additional information
Troubleshooting 18
About trademarks and registered trademarks . 19
Cautions on copyrights. 19
Specifications.. 19
Before start
What's in the box
- CD-ROM (Installation Disc)
- AC adapter
Power plug
USB cable
Warranty card - Read Before Use (Important)/Quick Start Guide (this document)
Installing the software
Before installing the software
For the latest version of the Serato DJ software, access Serato.com and download the software from there. A software download link is also provided on the included CD-ROM.
- For details, refer to "Installation Procedure (Windows)" or "Installation procedure (Mac OS X)".
- The user is responsible for preparing the computer, network devices and other elements of the Internet usage environment required for a connection to the Internet.
About the driver software (Windows)
This driver software is an exclusive ASIO driver for outputting audio signals from the computer.
There is no need to install the driver software when using Mac OS X.
Checking the latest information on the driver software
For detailed information on this unit's designated driver software, see the Pioneer DJ support site below.
http://pioneerdj.com/support/
About the Serato DJ software
Serato DJ is a DJ software application by Serato. DJ performances are possible by connecting the computer on which this software is installed to this unit.
Minimum operating environment
Mac OS X: 10.6.8 and 10.7.4
Windows:Windows7
Supported operating systems
| Others | |
| Optical drive | Optical disc drive on which the CD-ROM can be read |
| USB port | A USB 2.0 port is required to connect the computer with this unit. |
| Display resolution | Resolution of 1280 x 720 or greater |
| Internet connection | An Internet connection is required for registering the “Serato.com” user account and downloading the software. |
- For the latest information on the required operating environment and compatibility as well as to acquire the latest operating system, refer to "Software Info" under "DDJ-SX" on the Pioneer DJ support site below. http://pioneerdj.com/support/
- Operation is not guaranteed on all computers, even if all the required operating environment conditions indicated here are fulfilled.
-
Depending on the computer's power-saving settings, etc., the CPU and hard disk may not provide sufficient processing capabilities. For notebook computers in particular, make sure the computer is in the proper conditions to provide constant high performance (for example by keeping the AC power connected) when using Serato DJ.
-
Use of the Internet requires a separate contract with a provider offering Internet services and payment of provider fees.
About the installation procedure
The installation procedure depends on the operating system (OS) on the computer you are using.
For Windows
After installing the driver software, install the Serato DJ software.
For Mac OS X
Only install the Serato DJ software.
Installation Procedure (Windows)
Do not connect this unit and the computer until installation is completed.
- Log on as the user which was set as the computer's administrator before installing.
If any other programs are running on the computer, quit them.
1 Insert the CD-ROM into the computer's optical drive. The CD-ROM menu is displayed.
- If the CD-ROM menu does not appear when the CD-ROM is inserted, open the optical drive from [Computer (or My Computer)] in the [Start] menu, then double-click the [CD_menu.exe] icon.
2 When the CD-ROM menu appears, select [Install Driver Software (Pioneer_DDJ_SX_Driver_x.xxxx.exe)], then click [Start].
To close the CD-ROM menu, click [Exit].
3 Proceed with installation according to the instructions on the screen.
If [Windows Security] appears on the screen while the installation is in progress, click [Install this driver software anyway] and continue with the installation.
When the installation program is completed, a completion message appears.
After installing the driver software, install the Serato DJ software.
4 Select [Install DJ Software (Serato DJ/Download)] from the CD-ROM's menu, then click [Start].
5 "An internet environment is required to access the site. Connected to the internet?" is displayed. Click [Yes].
The web browser is launched and the Pioneer DJ support site is displayed.
6 Click [Software Info] under [DDJ-SX] on the Pioneer DJ support site.
[Serato DJ Support Information] is displayed.
7 Click the link to the Serato DJ download page.
The Serato DJ download page is displayed.
8 Log in to your "Serato.com" user account.
If you have already registered a user account on "Serato.com", proceed to step 10.
If you have not completed registering your user account, do so following the procedure below.
- Following the instructions on the screen, input your e-mail address and the password you want to set, then select the region in which you live.
If you check [E-mail me Serato newsletters], newsletters providing the latest information on Serato products will be sent from Serato.
-
Once user account registration is completed, you will receive an e-mail at the e-mail address you have input. Check the contents of the e-mail sent from "Serato.com".
-
Be careful not to forget the e-mail address and password specified when you performed user registration. They will be required for updating the software.
- The personal information input when registering a new user account may be collected, processed and used based on the privacy policy on the Serato website.
9 Click the link in the e-mail message sent from "Serato. com".
This takes you to the Serato DJ download page. Proceed to step 11.
10 Log in.
Input the e-mail address and password you have registered to log in to "Serato.com".
11 Download the Serato DJ software from the download page.
Unzip the downloaded file, then double-click the unzipped file to launch the installer.
12 Read the terms of the license agreement carefully, and if you agree, select [I accept the terms in the license agreement], then click [Install].
![PIONEER DDJ-SX - Read the terms of the license agreement carefully, and if you agree, select [I accept the terms in the license agreement], then click [Install]. - 1](/content/2024/12/119077/images/0cc63063f46f7e1073b1f66ae4a3aa502ba64d31e62f8c5b7acb1d73bafe06bb.jpg)
- If you do not agree to the contents of the usage agreement, click [Close] to cancel installation.
Installation begins.
![PIONEER DDJ-SX - Read the terms of the license agreement carefully, and if you agree, select [I accept the terms in the license agreement], then click [Install]. - 2](/content/2024/12/119077/images/b00a3b5b82e26f776e51d25bf6bb1a525787112bfe4dfcb6cad44f6141c27410.jpg)
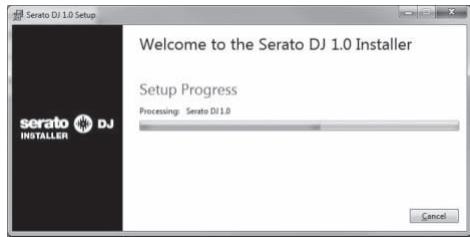
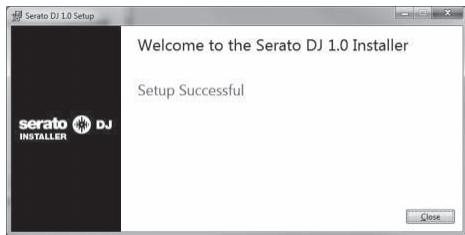
The message of successful installation appears once installation is completed.
13 Click [Close] to quit the Serato DJ installer.
![PIONEER DDJ-SX - Click [Close] to quit the Serato DJ installer. - 1](/content/2024/12/119077/images/8f6d1f6e08fdcc9386bd94afbe0780ffe635744788db160e0292743e75e0520e.jpg)
Installation procedure (Mac OS X)
Do not connect this unit and the computer until installation is completed.
If any other programs are running on the computer, quit them.
1 Insert the CD-ROM into the computer's optical drive.
The CD-ROM menu is displayed.
- If the CD-ROM menu does not appear on the screen when the CD-ROM is inserted, open the optical driver from Finder, then double-click the [CD_menu.app] icon.
2 Select [Install DJ Software (Serato DJ/Download)] from the CD-ROM's menu, then click [Start].
3 "An internet environment is required to access the site. Connected to the internet?" is displayed. Click [Yes].
The web browser is launched and the Pioneer DJ support site is displayed.
4 Click [Software Info] under [DDJ-SX] on the Pioneer DJ support site.
[Serato DJ Support Information] is displayed.
5 Click the link to the Serato DJ download page.
The Serato DJ download page is displayed.
6 Log in to your "Serato.com" user account.
If you have already registered a user account on "Serato.com", proceed to step 8.
If you have not completed registering your user account, do so following the procedure below.
- Following the instructions on the screen, input your e-mail address and the password you want to set, then select the region in which you live.
If you check [E-mail me Serato newsletters], newsletters providing the latest information on Serato products will be sent from Serato. -
Once user account registration is completed, you will receive an e-mail at the e-mail address you have input. Check the contents of the e-mail sent from "Serato.com".
-
Be careful not to forget the e-mail address and password specified when you performed user registration. They will be required for updating the software.
- The personal information input when registering a new user account may be collected, processed and used based on the privacy policy on the Serato website.
7 Click the link in the e-mail message sent from "Serato.com".
This takes you to the Serato DJ download page. Proceed to step 9.
8 Log in.
Input the e-mail address and password you have registered to log in to "Serato.com".
9 Download the Serato DJ software from the download page.
Unzip the downloaded file, then double-click the unzipped file to launch the installer.
10 Read the terms of the license agreement carefully, and if you agree, click [Agree].
![PIONEER DDJ-SX - Read the terms of the license agreement carefully, and if you agree, click [Agree]. - 1](/content/2024/12/119077/images/4a2853e9412fac64f6428f92bb42fb91e1f05990e7a80ba0973b15ac6e5f72f7.jpg)
- If you do not agree to the contents of the usage agreement, click [Disagree] to cancel installation.
11 If the following screen appears, drag and drop the [Serato DJ] icon on the [Applications] folder icon.
![PIONEER DDJ-SX - Read the terms of the license agreement carefully, and if you agree, click [Agree]. - 2](/content/2024/12/119077/images/b6657f8d94c89ce16d41aed71990fc3c5d5c457e77ddfd95767251a37cf6eb62.jpg)
Operation
- Wait until all connections between devices have been completed before connecting the AC adapter. Be sure to turn off the power and unplug the AC adapter from the power outlet before making or changing connections between devices.
Refer to the operating instructions for the component to be connected.
- Only use the AC adapter included with this unit.
Power is supplied to this unit by the AC adapter. - Connect this unit and the computer directly using the included USB cable.
- A USB hub cannot be used.

CAUTION
Due to the product's specifications, the display may be turned off completely by operating switches on the main unit or remote controller (if included) so that the product may appear the same as when the AC adapter is unplugged from the power outlet, but power is still being supplied. To completely isolate the product from the power supply, the AC adapter (shutoff device) must be unplugged from the power outlet. Install the product near an outlet with the AC adapter (shutoff device) within easy reach, and when not using the product for long periods of time, such as when traveling, unplug the AC adapter from the power outlet. Failure to do so may cause fires.
Connections
1 Connect headphones to one of the [PHONES] terminals.
![PIONEER DDJ-SX - Connect headphones to one of the [PHONES] terminals. - 1](/content/2024/12/119077/images/39a6481290a0091e4225d64002d9de5b2c7a432a056de34c8fb8eceb5feb1e24.jpg)
2 Connect powered speakers, a power amplifier, components, etc., to the [MASTER OUT 1] or [MASTER OUT 2] terminals.
![PIONEER DDJ-SX - Connect powered speakers, a power amplifier, components, etc., to the [MASTER OUT 1] or [MASTER OUT 2] terminals. - 1](/content/2024/12/119077/images/441c5063b4421f9aec88a70b393c3482d8eb0a8e754415e93e396b2a8ce2b1cf.jpg)
![PIONEER DDJ-SX - Connect powered speakers, a power amplifier, components, etc., to the [MASTER OUT 1] or [MASTER OUT 2] terminals. - 2](/content/2024/12/119077/images/8f8d1c22b7264040513985d0c9a4cdae2e9960ea31c45fc52d3f5b93edab700c.jpg)
- To output the sound from the [BOOTH] terminals, connect speakers or other devices to the [BOOTH] terminals.
- For details on connecting the input/output terminals, see the Operating Instructions.
3 Connect this unit to your computer via a USB cable.

4 Turn on the computer's power.
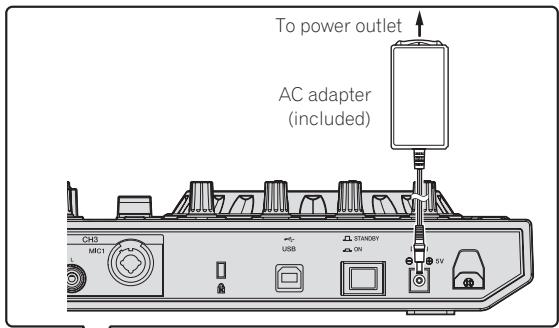
5 Connect the power plug to the AC adapter.
Slide the power plug into the AC adapter's guide rails as shown on the diagram and press in until a click is heard.

- For detailed cautions on the AC adapter, see "About the AC adapter" (p. 16).
- The shape of the plug differs according to the region in which the unit is sold.
6 Connect the AC adapter.
7 Press the [STANDBY/ON] switch on this unit's rear panel to turn this unit's power on.
![PIONEER DDJ-SX - Press the [STANDBY/ON] switch on this unit's rear panel to turn this unit's power on. - 1](/content/2024/12/119077/images/1fa4f574ca44890d938f2658d67199853c648c9408d01919f7d17c8a157bd9f8.jpg)
![PIONEER DDJ-SX - Press the [STANDBY/ON] switch on this unit's rear panel to turn this unit's power on. - 2](/content/2024/12/119077/images/a00bf490cdc4b015db462f4202d2940f000eccc76051a89d0315aba4e30ae43c.jpg)
Turn on the power of this unit.
- For Windows users
- The message [Installing device driver software] may appear when this unit is first connected to the computer or when it is connected to a different USB port on the computer. Wait a while until the message [Your devices are ready for use] appears.
8 Turn on the power of the devices connected to the output terminals (powered speakers, power amplifier, components, etc.).
- When a microphone, DJ player or other external device is connected to input terminals, the power of that device also turns on.
Starting the system
Launching Serato DJ
For Windows
From the Windows [Start] menu, click the [Serato DJ] icon under [All Programs] > [Serato] > [Serato DJ].
For Mac OS X
In Finder, open the [Application] folder, then click the [Serato DJ] icon.
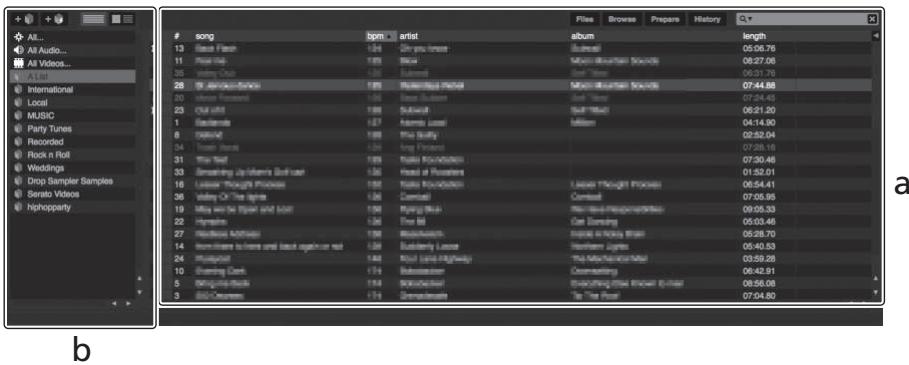
Computer screen directly after the Serato DJ software is launched
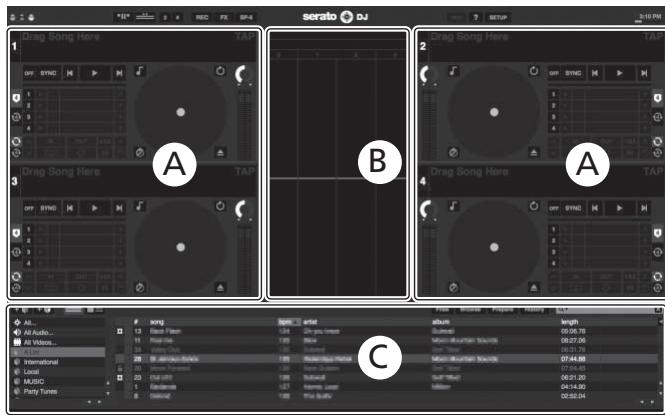
Computer screen when a track is loaded in the Serato DJ software
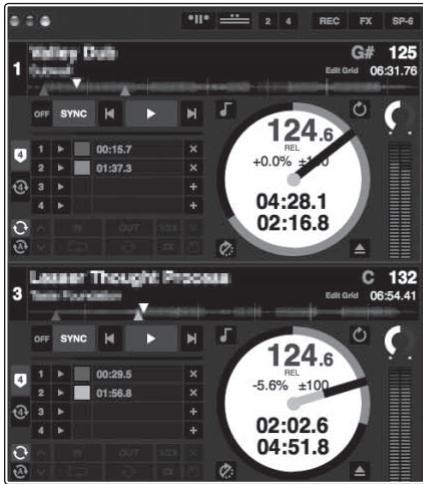
A
B
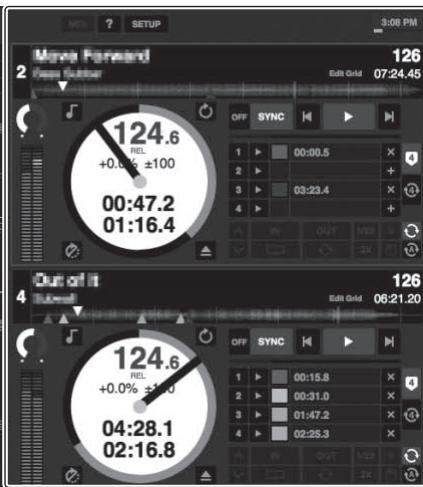
A

C
A Deck section
The track information (the name of the loaded track, artist name, BPM, etc.), the overall waveform and other information is displayed here.
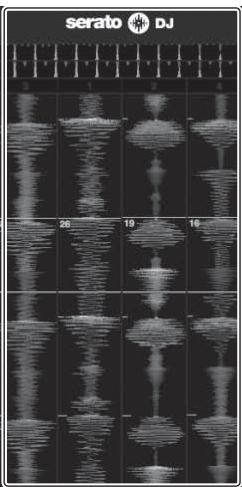
B Waveform display
The loaded track's waveform is displayed here.
C Browser section
Crates in which tracks in the library or sets of multiple tracks are stored are displayed here.
This manual consists mainly of explanations of functions of this unit as hardware. For detailed instructions on operating the Serato DJ software, see the Serato DJ software manual.
Importing tracks
The following describes the typical procedure for importing tracks.
There are various ways to import tracks with the Serato DJ software. For details, see the Serato DJ software manual.
If you are already using Serato DJ software (Scratch Live, ITCH or Serato DJ Intro) and have already created track libraries, the track libraries you have previously created can be used as such.
1 Click the [Files] key on the Serato DJ software screen to open the [Files] panel.
The contents of your computer or the peripheral connected to the computer are displayed in the [Files] panel.
2 Click the folder on the [Files] panel containing the tracks you want to add to the library to select it.
3 On the Serato DJ software's screen, drag and drop the selected folder to the crates list panel.
A crate is created and the tracks are added to the library.
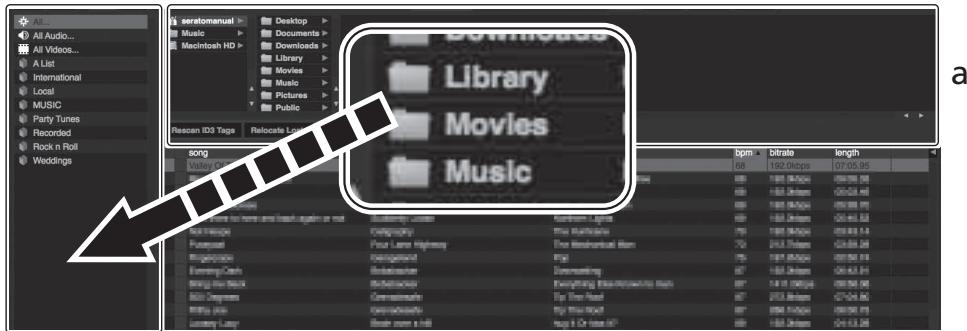
b
a [Files] panel
b Crates panel
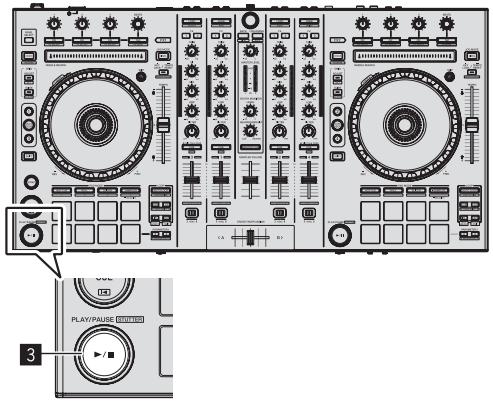
Loading tracks and playing them
The following describes the procedure for loading tracks into deck [1] as an example.
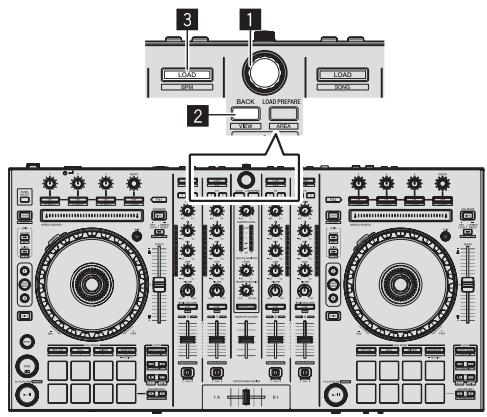
1 Rotary selector
2 BACK button
3 LOAD button
1 Press this unit's [BACK] button, move the cursor to the crates panel on the computer's screen, then turn the rotary selector to select the crate, etc.
2 Press the rotary selector, move the cursor to the library on the computer's screen, then turn the rotary selector and select the track.
a Library
b Crates panel
3 Press the [LOAD] button to load the selected track onto the deck.
Playing tracks and outputting the sound
The following describes the procedure for outputting the channel 1 sound as an example.
- Set the volume of the devices (power amplifier, powered speakers, etc.) connected to the [MASTER OUT 1] and [MASTER OUT 2] terminals to an appropriate level. Note that loud sound will be output if the volume is set too high.
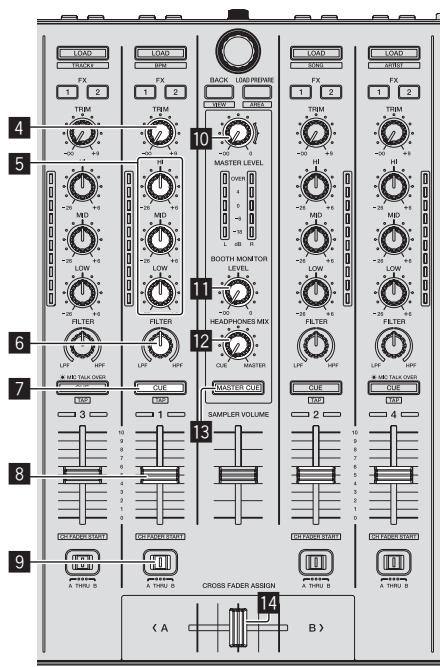
4 TRIM control
EQ (HI, MID, LOW) controls
6 FILTER control
7 Headphones CUE button
3 Channel fader
9 Crossfader Assign Switch
10 MASTER LEVEL control
11 BOOTH MONITOR LEVEL control
12 HEADPHONES MIXING control
13 MASTER CUE button
14 Crossfader
15 HEADPHONES LEVEL control
16 INPUT SELECT switch
17 Crossfader curve selector switch
1 Set the positions of the controls, etc., as shown below.
| Names of controls, etc. | Position |
| MASTER LEVEL control | Turned fully counterclockwise |
| TRIM control | Turned fully counterclockwise |
| EQ (HI, MID, LOW) controls | Center |
| FILTER control | Center |
| Channel fader | Moved forward |
| Crossfader Assign Switch | [THRU] position |
| INPUT SELECT switch | [PC] position |
2 Press the [>] button to play the track.
3 Move the channel fader away from you.
4 Turn the [TRIM] control.
Adjust [TRIM] so that the orange indicator on the channel level indicator lights at the peak level.
5 Turn the [MASTER LEVEL] control to adjust the audio level of the speakers.
Adjust the sound level output from the [MASTER OUT 1] and [MASTER OUT 2] terminals to an appropriate level.
Monitoring sound with headphones
Set the positions of the controls, etc., as shown below.
| Names of controls, etc. | Position |
| HEADPHONES MIXING control | Center |
| HEADPHONES LEVEL control | Turned fully counterclockwise |
1 Press the headphones [CUE] button for the channel 1.
2 Turn the [HEADPHONES LEVEL] control.
Adjust the sound level output from the headphones to an appropriate level.

Note
This unit and the Serato DJ software include a variety of functions enabling individualistic DJ performances. For details on the respective functions, see the operating instructions and the Serato DJ software manual.
- This unit's operating instructions can be downloaded from the Pioneer DJ support site. For details, see Downloading this unit's operating instructions (p. 15).
- The Serato DJ software manual can be downloaded from "Serato. com". For details, see Downloading the Serato DJ software manual (p. 15).
Quitting the system
1 Quit [Serato DJ].
When the software is closed, a message for confirming that you want to close it appears on the computer's screen. Click [Yes] to close.
2 Press the [STANDBY/ON] switch on this unit's rear panel to turn this unit's power off.
3 Disconnect the USB cable from your computer.
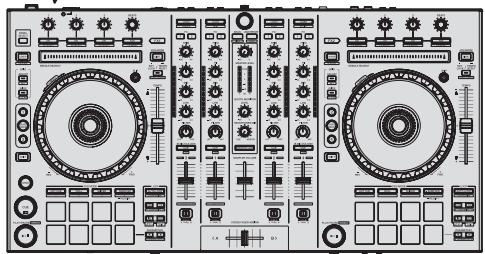
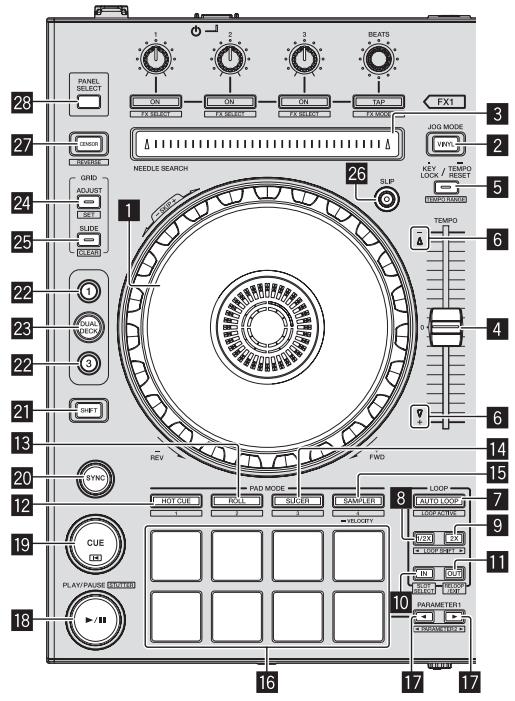
Names of Parts

1 Browser section
2 Deck section
3 Mixer section
4 Effect section
Browser section
1 LOAD button
2 Rotary selector
3 BACK button
4 LOAD PREPARE button
Deck section
This section is used to control the four decks. The buttons and controls for operating decks 1 and 3 are located on the left side of the controller, those for operating decks 2 and 4 are located on the right side of the controller.
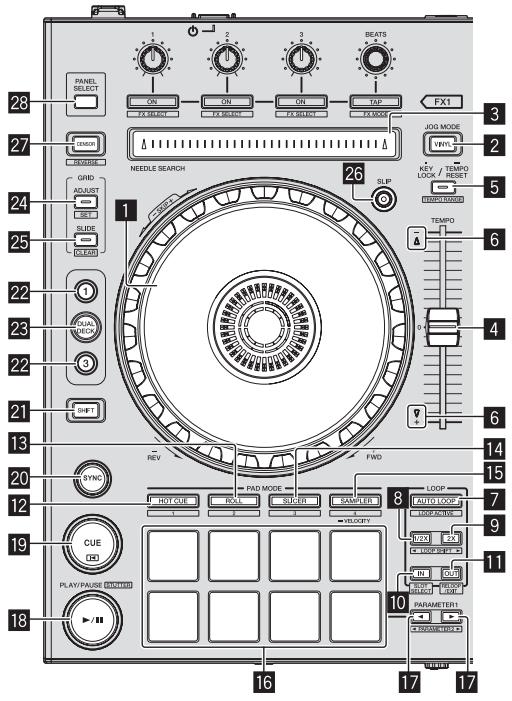
1 Jog dial
2 VINYL button
NEEDLE SEARCH pad
4 TEMPO slider
5 KEY LOCK button
6 TAKEOVER indicator
7 AUTO LOOP button
8 Half loop button
9 Double loop button
10 LOOP IN button
11 LOOP OUT button
12 HOT CUE mode button
13 ROLL mode button
14 SLICER mode button
15 SAMPLER mode button
16 Performance pads
17 PRAMETER1/2 button
18 PLAY/PAUSE button
19 CUE button
20 SYNC button
21 SHIFT button
22 DECK button
23 DUAL DECK button
24 GRID ADJUST button
25 GRID SLIDE button
26 SLIP button
27 CENSOR button
28 PANEL SELECT button
Mixer section
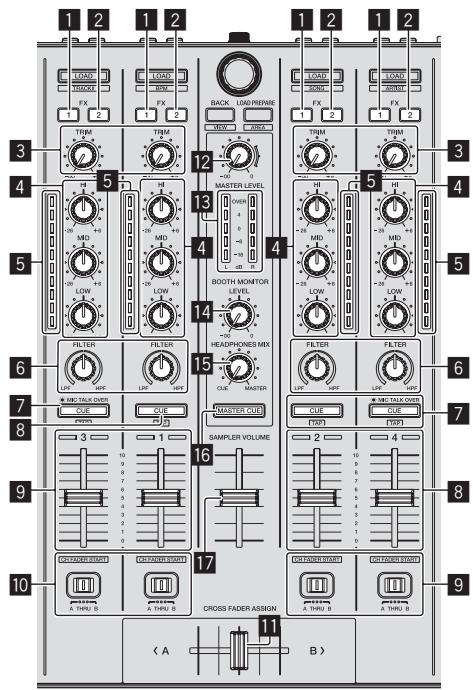
1 FX 1 assign button
2 FX2 assign button
3 TRIM control
4 EQ (HI, MID, LOW) controls
5 Channel Level Indicator
6 FILTER control
7 Headphones CUE button
8 Headphones CUE/MIC TALK OVER button
9 Channel fader
10 Crossfader Assign Switch
11 Crossfader
12 MASTER LEVEL control
13 Master level indicator
14 Booth monitor level control
15 HEADPHONES MIXING control
16 MASTER CUE button
17 S AMPLER VOLUME fader
Effect section
This section is used to control the two effect units (FX1 and FX2). Controls and buttons to operate the FX1 unit are located on the left side of the controller, those to operate the FX2 unit are located on the right side of the controller. The channels to which the effect is to be applied are set using the effect assign buttons.
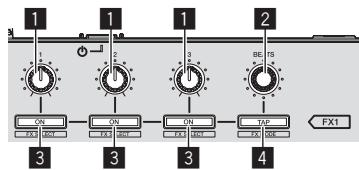
1 Effect parameter controls
2 FX BEATS control
3 Effect parameter buttons
4 TAP button
Acquiring the manual
The operating instructions may be in a file in PDF format. Adobe Reader must be installed to read files in PDF format. If you do not have Adobe Reader, please install it from the download link on the CD-ROM's menu screen.
Downloading this unit's operating instructions
1 Insert the CD-ROM into the computer's optical drive.
The CD-ROM menu is displayed.
If the CD-ROM's menu does not appear when the CD-ROM is inserted, perform the operations below.
For Windows
Open the optical drive from [Computer (or My Computer)] in the [Start] menu, then double-click the [CD_menu.exe] icon.
For Mac OS X
In Finder, double-click the [CD_menu.app] icon directly.
2 When the CD-ROM's menu is displayed, select [DDJSX: Operating Instructions (PDF file/Download)], then click [Start].
The web browser is launched and the Pioneer DJ support site is displayed.
3 On the Pioneer DJ support site, click "Manuals" under "DDJ-SX".
4 Click on the required language on the download page.
Downloading of the operating instructions begins.
Downloading the Serato DJ software manual
1 Insert the CD-ROM into the computer's optical drive.
The CD-ROM menu is displayed.
If the CD-ROM's menu does not appear when the CD-ROM is inserted, perform the operations below.
For Windows
Open the optical drive from [Computer (or My Computer)] in the [Start] menu, then double-click the [CD_menu.exe] icon.
For Mac OS X
In Finder, double-click the [CD_menu.app] icon directly.
2 When the CD-ROM's menu is displayed, select [Serato DJ: Software Manual (PDF file/Download)], then click [Start].
The web browser is launched and the Pioneer DJ support site is displayed.
- To close the CD-ROM menu, click [Exit].
3 Click [Software Info] under [DDJ-SX] on the Pioneer DJ support site.
[Serato DJ Support Information] is displayed.
4 Click the link to the Serato DJ download page.
The Serato DJ download page is displayed.
5 Log in to your "Serato.com" user account.
Input the e-mail address and password you have registered to log in to "Serato.com".
6 From "More Downloads" on the right side of the download page, click "Serato DJ x.x User Manual".
Downloading of the Serato DJ software manual starts.
About the AC adapter
Safety instructions
To ensure your personal safety and to maximize the full operating potential of your unit, read and follow these safety instructions.
Read & Retain Instructions
Read all operating and user information provided with this product.
Cleaning
Use a damp cloth to clean the exterior housing. Avoid using any fluids including liquid, aerosol or alcohol-based cleaning products.
Water or Moisture
Avoid operating or locating this product near water or other sources of fluid.
Accessories
Do not place this product on an unstable cart, stand, or table. The product may fall and be seriously damaged.
Ventilation
Do not block or cover this product in use. This unit should not be placed in a built-in installation unless properly ventilated.
Environment
Avoid placing this product in a location with exposure to large quantities of dust, high temperatures, high humidity, or subject to excessive vibrations or shocks.
Power Sources
Operate this product only from the recommended power sources. If you are unsure of the power source, consult an authorized Pioneer representative.
Power-Cord Protection
When unplugging the unit, pull on the plug - not on the cord. Do not handle the cord or plug with wet hands; doing so could cause an electric short or shock. Do not allow anything to pinch or rest on the power cord and do not place in a walkway.
Power
Turn OFF the system before installing this or any other hardware device.
Overloading
Avoid connecting too many devices to a single wall socket or power source as this can cause fires or short circuits.
Object & Liquid Entry
Never push inappropriate objects in to the device. Avoid spilling any liquids in to or on the outside of the drive.
Servicing
Opening or removing the cover exposes you to possible electrical shock or other danger. Contact a Pioneer authorized service representative for repairing this product (refer to the enclosed Service & Support Card).
Damage Requiring Service
Unplug the unit and refer servicing to qualified service personnel in the following situations:
- When the power cord, plug, or chassis is damaged.
- If liquid has been spilled, or objects have fallen into the product.
- If the product has been exposed to rain or water.
- If the product does not operate normally when the operating instructions are followed. Adjust only those controls that are covered by the operating instructions. Improper adjustment of other controls may result in damage and can require extensive work by a qualified technician to restore the unit to its normal operation.
- When the product exhibits a distinct change in performance – this indicates a need for service.
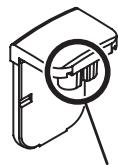
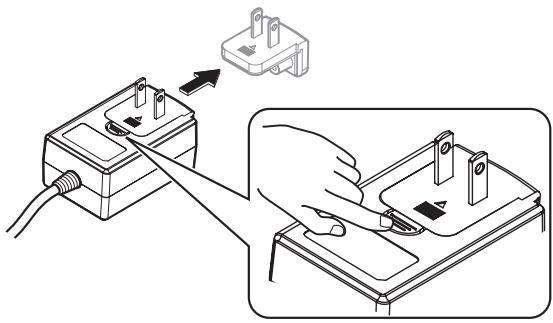
Check that there are no irregularities with the AC adapter or power plug, then insert the power plug into the specified position of the AC adapter
using the specified procedure until a click is heard. For details, see Mounting the power plug on page 17.
If there are irregularities with the AC adapter or power plug, ask your nearest Pioneer authorized service center or your dealer to carry out repair work.
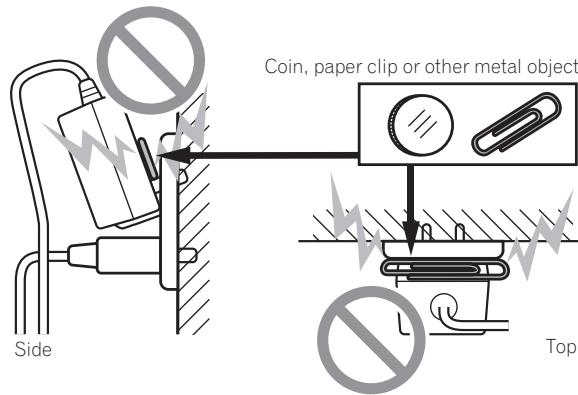
- Do not use this unit with a coin, paper clip or other metal object stuck between the AC adapter and power plug. Doing so could cause a short circuit, leading to fire or electric shock.
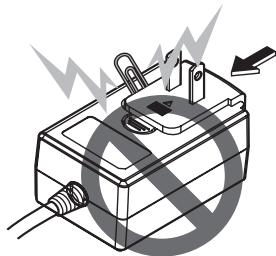
- When mounting the AC adapter on a wall outlet, make sure there is no space between the AC adapter and the wall outlet. Faulty contact or a coin, paper clip or other metal object getting stuck in the space could cause a short circuit, leading to fire or electric shock.
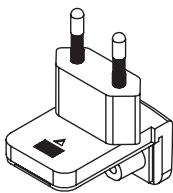
- The power plug could come detached from the AC adapter and remain in the power outlet if someone trips on the AC adapter's power cord or if something hits the AC adapter. If this happens, remove the power plug remaining in the outlet with dry hands, holding it as shown on the diagram below and without touching metal parts. Do not use any tools to remove it.
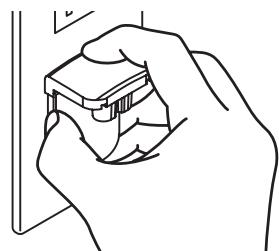
Do not touch.
Mounting the power plug
Slide the power plug along the guide rails in the AC adapter unit as shown on the diagram below, then press in until a click is heard.
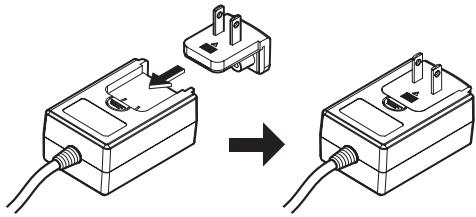
Removing the power plug
While pressing the [PUSH] button on the AC adapter unit, slide the power plug away from the adapter as shown on the diagram below to remove it.
Once the power plug is mounted, there is no need to remove it.

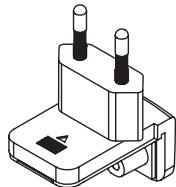
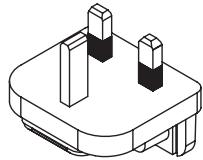
Power plug
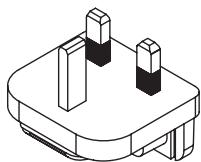
This product comes with the types of power plugs shown below. Use the appropriate power plug for the country or region you are in.
Type 1 (for Europe)
Type 2 (for the UK)
Additional information
Troubleshooting
Incorrect operation is often mistaken for trouble or malfunction. If you think that there is something wrong with this component, check the points below. Sometimes the trouble may lie in another component. Inspect the other components and electrical appliances being used. If the trouble cannot be rectified after checking the items below, ask your nearest Pioneer authorized service center or your dealer to carry out repair work.
This unit may not operate properly due to static electricity or other external influences. In this case, proper operation may be restored by turning the power off, waiting 1 minute, then turning the power back on.
| Problem | Check | Remedy |
| The power is not turned on. | Is the [STANDBY/ON] switch for power supply set to [ON]? | Set the [STANDBY/ON] switch for power supply to [ON]. |
| Is the included AC adapter properly connected? | Mount the power plug properly on the included AC adapter. (page 17)Connect the included AC adapter properly to the power outlet. (page 17) | |
| Connect the included AC adapter's DC plug properly to this unit. | ||
| This unit is not recognized. | Is the included USB cable properly connected? | Connect the included USB cable properly. |
| Are you using a USB hub? | USB hubs cannot be used. Connect the computer and this unit directly using the included USB cable. | |
| Is the driver software properly set? | Set the driver software properly. (page 5) | |
| Tracks are not displayed in the library. | Have music files been imported? | Import the music files properly.For details on importing music files, see the "Serato DJ software manual". |
| Is a crate or subcrate that does not contain any tracks selected? | Either select a crate or subcrate that contains any tracks or add tracks to the crate or subcrate. | |
| iTunes tracks are not displayed in the library. | Is [Show iTunes Library] at the [Show iTunes Library] tab in the [SETUP] menu checked? | Check [Show iTunes Library] at the [Show iTunes Library] tab in the [SETUP] menu.For details on importing music files, see the "Serato DJ software manual". |
| Is a crate or subcrate that does not contain any tracks selected? | Either select a crate or subcrate that contains any tracks or add tracks to the crate or subcrate. | |
| Music files in the library cannot be edited (changing track names, etc.). | Is [Protect Library] in [SETUP] enabled? | Disable [Protect Library]. |
| Recording is not possible. | Is the recording level low? | Adjust the gain control on the [Record] panel in the Serato DJ software. |
| Have you saved the recording after completing it? | Save the recording after completing it.For detailed instructions on recording, see the "Serato DJ software manual". | |
| No sound or small sound. | Are the [TRIM] control, channel faders, crossfader and [MASTER LEVEL] control set to the proper positions? | Set the [TRIM], [channel fader], [crossfader] and [MASTER LEVEL] controls to the proper positions. |
| Are the connected powered speakers, etc., properly set? | Properly set the external input selection, volume, etc., on the powered speakers, etc. | |
| Are the connection cables properly connected? | Connect the connection cables properly. | |
| Are the terminals and plugs dirty? | Clean the terminals and plugs before making connections. | |
| Is the driver software properly set? | Set the driver software properly. (page 5) | |
| Distorted sound. | Is the [MASTER LEVEL] control set to the proper position? | Adjust the [MASTER LEVEL] control so that the master level indicator's orange indicator lights at the peak level. |
| Is the [TRIM] control set to the proper position? | Adjust the [TRIM] control so that the channel level indicator's orange indicator lights at the peak level. | |
| Is [HEADROOM] in the [SETUP] menu properly set? | Set the level properly. | |
| Sound being played is interrupted when using DJ software. | Is the driver software's latency value suitable? | Set the driver software's latency to a suitable value. |
| Set the DJ software's latency to a suitable value. | ||
| Sound of an external device or microphone cannot be output. | Is the [INPUT SELECT] switch set to the proper position? | Set the [INPUT SELECT] switch to the proper position. |
| Sound is interrupted when the ASIO driver is set. | Has the ASIO driver been set with Serato DJ running? | Set the ASIO driver before launching Serato DJ. (page 5) |
| The indicator flashes and operation is strange. | — | Normal operation can be restored by disconnecting the AC adapter, waiting at least 1 minute, then reconnecting the AC adapter.If the same symptom persists, disconnect the AC adapter, then request repairs. |
| Serato DJ operation is unstable. | Are you using the latest version of the software? | Free updates of Serato DJ can be downloaded from the Internet. Check the website below and keep the software updated to the latest version. (page 5) |
| Are you using softwares other than Serato DJ at the same time? | Quit other applications to decrease the load on the computer. (page 5)If operation continues to be unstable, try disabling the wireless network or other wireless connections, antivirus software, the screen saver, the low power mode, etc. (page 5) | |
| When other USB devices are connected to the computer. | Disconnect other USB devices from the computer. When another USB audio device is connected to the computer at the same time, it may not operate or be recognized normally. | |
| Are you using a USB hub? | USB hubs cannot be used. Connect the computer and this unit directly using the included USB cable. | |
| There is a problem with the USB port to which this unit is connected. | If your computer has multiple USB ports, try connecting this unit to a different USB port. | |
| Is this unit connected to a notebook computer running on its battery? | Supply power to the notebook computer from an AC power supply. (Depending on the notebook computer's settings, the low power mode may be set when the computer is running on its battery, automatically reducing the performance of the computer itself.) (page 5) | |
| The USB buffer size is too small. | Raise the USB buffer size. |
About trademarks and registered trademarks
- Pioneer is a registered trademark of PIONEER CORPORATION. The names of companies and products mentioned herein are the trademarks of their respective owners.
Cautions on copyrights
Recordings you have made are for your personal enjoyment and according to copyright laws may not be used without the consent of the copyright holder.
- Music recorded from CDs, etc., is protected by the copyright laws of individual countries and by international treaties. It is the full responsibility of the person who has recorded the music to ensure that it is used legally.
- When handling music downloaded from the Internet, etc., it is the full responsibility of the person who has downloaded the music to ensure that it is used in accordance with the contract concluded with the download site.
Specifications
AC adapter
Power.. AC 100 V to 240 V, 50 Hz/60 Hz
Rated current 800 mA
Rated output. DC 5 V, 3 A
General - Main Unit
Main unit weight 5.8 kg
Max. external dimensions 664 mm (width) x 70.4 mm
height) × 357 mm (depth)
Tolerable operating temperature +5^ to +35^
Tolerable operating humidity. 5% to 85% (no condensation)
Audio Section
Sampling rate. 44.1 kHz
A/D, D/A converter. 24 bits
Frequency characteristic USB, LINE, MIC. 20 Hz to 20 kHz
S/N ratio (rated output, A-WEIGHTED)
USB. 105 dB
LINE 95 dB
PHONO. 92 dB
MIC 92 dB
Total harmonic distortion (20 Hz — 20 kHzBW)
USB. 0.003%
LINE 0.005%
Standard input level / Input impedance
LINE . 12 dBu/47 kΩ
PHONO. 48 dBu/47 kΩ
MIC .52 dBu/10 kΩ
Standard output level / Load impedance / Output impedance
MASTER OUT 1. +8dBu / 10k /330
MASTER OUT 2. +2dBu / 10k /1k
BOOTH +8 dBu/10 kΩ/330 Ω
PHONE +4 dBu/32 Ω/32 Ω
Rated output level / Load impedance
MASTER OUT 1. 26 dBu/10 kΩ
MASTER OUT 2. 20 dBu/10 kΩ
BOOTH 26 dBu/10 kΩ
Crosstalk
LINE 87 dB
Channel equalizer characteristic
HI .-26 dB to +6 dB (13 kHz)
MID. -26 dB to +6 dB (1 kHz)
LOW. -26 dB to +6 dB (70 kHz)
Input / Output terminals
CD input terminal RCA pin jack. 2 sets
PHONO/LINE input terminals RCA pin jack. 2 sets
MIC1 terminal XLR connector/phone jack (6.3 mm) 1 set
MIC2 terminal Phone jack (6.3 mm) 1 set
MASTER OUT 1 output terminal XLR connector. 1 set
MASTER OUT 2 output terminal RCA pin jacks. 1 set
BOOTH output terminal Phone jack (6.3 mm) 1 set
PHONES output terminal Stereo phone jack (0 6.3 mm) .1 set Stereo mini phone jack (0 3.5 mm).1 set
USB terminal B type. 1 set
- For improvement purposes, specifications and design of this unit and the included software are subject to change without notice.
© 2012 PIONEER CORPORATION. All rights reserved.
IMPORTANT

5 "An internet environment is required to access the site. Connected to the internet?" apparait. Cliquez sur [Oui].
3 "An internet environment is required to access the site. Connected to the internet?" apparait. Cliquez sur [Oui].
a [Files]-Feld
b Crates-Feld
a Panel [Files]
b Panel de cajas
5 "An internet environment is required to access the site. Connected to the internet?" éPRESENTado. Clique em [Sim].
3 "An internet environment is required to access the site. Connected to the internet?" épresentado. Clique em [Sim].
Bo3MOxHbIe HEnCnPaBHOCTn n CnOc6bI Nx yCTpaHeHnra 18
O ToprobIx MapkaxиЗaperncTpnpoBaHHbIX ToprobIx Mapkax.....19
PpeDynpexkJeHnno ABTopckm npaBam 19
Texhueckne xapaKtepncnKn 20
До начада
KOMJIeKT NOCTABKN
- CD-ROM (YctaHOBOuHbIy DnCK)
AanTepepeMeHHoro ToKa
Bulka nItaHn
USB ka6eIb - TapaANTHnHBiT TaIoh
-Пючтайтейпегдинсользованем(Baxкho)/Кратукoe руковod-CTBO пььзователя (Данньий ДOKумент)
YctahOBka npoRpaMHorO o6ecneueHn
Ipeed yctaHOBKo nporpaMHoro o6ecneueHn
OTHOCHTeBHO cAmo nocJeHcBepn nporpAMMHoro oBeCneueHn Serato DJ 3aJdnte Ha Serato.com n 3arpy3nTe OTTuJa nporpAMMHe oBeCneueHn. CbJIka dIra 3arpy3kn nporpAMMHoro oBeCneueHn TaKke ImeETCHa NoCTabJIeMOM CD-ROM.
3 BbINOHNHe yCTaHOBky, cIeDy IHHCTpyKcIaM Ha 3KpaHe.
Ecnn BO Bpemr yctaHOBKn Ha 3kpaHe OTObpaKaeTcra [Be3onacHocTb Windows], 1eKnTe [Bce paBHO yCTaHOBnTB 3OT dpaBep] n npdoJxNte yCTaHOBky.
По 3аBERSEHиуCTaHOBKn OTObpaKaetcra COOшeHne O 3aBERSEHn.
5 OTo6paKaTeTcA "An internet environment is required to access the site. Connected to the internet?". ⅢeJIKNHnTe no [Дa].
3anyckaetcB6-6pay3epnOTobpaqkaetcCaT noDpejkn Pioneer DJ.
[Serato DJ Support Information] oTo6paKaaetcA.
12 BhimataIbHO npOHTe yCNOBna IInueH3nOHnHO corlaaHeHn, n ecIn Bbl COrJaacHbI, To Bbl6epnte [I accept the terms in the license agreement], 3atem ueJKNthe no [Install].

- Ecni Bbl He corlachbI C yCIOBnMI corlaeHnO 6 nCIOJIb30BaHn, UeIKHnTe No [Close] n OTMeHnTe yCTaHOBky.
3anyckaetcyaTahOBka.
По заBERшENи yCTaHOBKN OTOбражаETСЯ COOБшЕпе OБ успшонуCTaHOBKE.
13ДЯ Bыхдаиnporpambl yctaHOBKn Serato DJ ueKNHTe no [Close].
[Serato DJ Support Information] OTo6paKaaETcA.
a Panaelb [Files]
b PanaheIb crate
3a rgy3ka dopoJek n Ix BocnpOn3BedeHne
KoHTpoJIb 3ByaHnIc NOMOuBHO HayuHNKOB
YctaHOBInTeNo3nIpyeK,dp.Kak noka3aHo HIXe.
Otperynpyte Do COOTBETCTBYUoIe OyOBH yOBHeb 3ByuHnIA, BbIODAuNCr OT HayuHnKOB.

PpimueaHne
B daHOM annapate n nporpammmHom oecneeyenm Serato DJ copekxaTcR pa3nHbIe fynKu, no3B0JIaOuIe pno3BODntb HndnBHyduaNCTIneckne DJ DCnHNeHn. PdoPobhee o COoTBetCTByuuxfynHKUxxCMTOpTe IHCTpyKuouNo 3KcPnyataunn u pykoBOdCTBO k nporpammmHO ocEneeyenu Serato DJ.
- INHCTpyKUIM no 3KcPnyatauIM K daHOMy annapaty moXHO 3aRpy3ntb c saTt aNDePckk Pioneer DJ. POpDp6Hee, cmOpTnTe 3aRpy3ka INHCTpyKUIM no 3KcPnyatauIM K daHOMy annapaty (ctp. 15).
PykoBooCTBO K npOrpaMMHomy oBecepeHnHo Serato DJ moKHO 3aRpyuTb c "Serato.com". POnpOHee, CMOpTe 3arpy3ka pykoBooCTBA K npOrpaMMHomy oBecepeHnHo Serato DJ (ctp. 15).
BbIXoI n3 cHCTeMbI
1 BbIuTe n3 [Serato DJ].
Pn3akpItn npOrpaMMHOro o6ecneueHna KOMNbIOTepHom 3KpaHe OTo6paxaetc coo6eHne noTBepeJxdeHn 3AkpItn. IeJIKNHTe no [Yes] dIy 3akpItn.
2 Haxmnte nepekIIOuOaTeJIb [STANDBY/ON] Ha 3aHnei naHeJn daHHoro annapaTa nOTKIOUHTe nITaHne daHHoro annapaTa.
Ha3BaHna YacteI
4
1
4
2

3
2
1 Pa3denn6pay3epa
2 Pa3dienekn
3 Pa3dJIeMkUepa
4 Pa3dien 3ΦΦeKToB
Pa3dien 6pay3epa

1 Khonka LOAD
2 NobopoTHbI ceneKTop
3 KHONKa BACK
KHONKA LOAD PREPARE
Pa3delenekn
DaHHb pa3dien nCOnJb3yETcI dJI ynpabNeHnYeTbIpBmDekamM.
KhONKn npUyKn ynpaBneHn deKaMn 1 n 3 paCnoJoxHe bHa neBoi
CTOPOHE KOHTPOPLLepa, a dans ynpabLeHnA DeKaMn 2 n 4 paCnoJooKeHbHa npaBoi CTOPOHE KOHTPOPLLepa.
1 NlobopoTHbI nepeKluOyateInb
2 Khonka VINYL
3 KoHTaKTHaJIIoUaJaN NEEDLE SEARCH
1 POn3yHOK TEMPO
5 Khonka KEY LOCK
6 INdikatop TAKEVER
7 Khonka AUTO LOOP
8 Khonka yMeHbSeHnI neTnBBOe
9 Khonka ydBaBbAHHn neTnn
10 KhoNka LOOP IN
1 Khonka LOOP OUT
12 Khonka pexkma HOT CUE
13 Khonka pexkma ROLL
14 Khonka pexkma SLICER
15 Khoinkapekima SAMPLER
16 KoHTaKTHbIe pNoUaKn dJa NcONHeHn
17 KhoNka PRAMETER1/2
18 KHONKA PLAY/PAUSE II
19 Khonka CUE
20 Khonka SYNC
21 KHONka SHIFT
2 Khonka DECK
23 KhoNka DUAL DECK
24 Khonka GRID ADJUST
25 Khonka GRID SLIDE
26 Khonka SLIP
27 Khonka CENSOR
28 Khonka PANEL SELECT
Pa3delenMknwepa

1 Khonka Ha3haeHnFAX1
2 KhoNka Ha3NaueHnFAx 2
3 PyuKa TRIM
4 PyuKn EQ (HI, MID, LOW)
5 INdukatop ypOBHkaHaJa
6 Puyka FILTER
7 KhoNka CUE HauHnKOB
8 Khonka CUE/MIC TALK OVER HauHHNKOB
9 Feiep KaHana
10 NepekIIOuATEJIb Ha3NaueHnKpOcCpeJepa
Kpocceep
12 PyuKa MASTER LEVEL
13 INdikatop KOHTpoJIbHOrO yOBnA
14 Puyka ypoBnKa KOHTpoIbHOro CnHnHa nJa Ka6nKn DJ
15 Pyuka HEADPHONES MIXING
16 Khonka MASTER CUE
17 Φeindep SAMPLER VOLUME
Pa3dien 3ΦΦeKToB
HnKOrJa He 3aTaNbaiTe HecOoTBcTByUOuIe NpeDMeTb By cTpoiCTBO.N36eraIte npolnbAHnJIIObIx XnDKoCTe BHyTpB nIHa yCtpoiCTBO.
06cIyXnBaHne
Kak Tobilko yctaHOblena BnIka NITaHna, HET Heo6XoDMOCTN 13BneKaTb ee.
BvIka nHTaHnA
K daHhomy n3dennio npnlaraoTc Tnbl BNIOK NITAHN, OTObpaKeHNbI Hnke. IcnoIb3yIe Bnky NITAHN, COOTBeTCTByUOuYIO BaIeI CTpae nn pereohy.
Tn1 (dna Ebpnb)
Tn2 (DnLa CoeHHeHHoro KoponeBcTaBa BeNko6pTuHaHHu N CeBepHoI nplaHduu)
B03MOXKhIe HEnCnPaBHOCTN n CnOCo6bl Nx yCTpaHeHna
3aayactyHnnpabInbHoe cpaabaBaeHne OoHIOOoho BOCpHnHMaetcra 3a HenoIaKn IIN HeNCpABHOCTe. Ecn bI cyHTaTe, YTO IMeETCAkaj-1160 HncnpabHOCTb Ha daHHOM KOMnoHEHe,3uYChte INHOFopMaIHO HNKe. B HeKToOpBX CnyaXe H enoIaKa MoKet cOepKaTbHa naDpyrom KOMnoHEHe. IpOBepBe TpyrHe KOMnoHEtbl, a TaKke IcNoIb3yeMbte 3JeKtPOnPi6Opbl. Ecn HeBO3MOxHo 6blIO yctpaHITb HncpABHOCTb Pocne N3yuHEny IyHKToB HNKe, 6bpATntecb B 6IxxaIshn ABTopn3OBAHNb ceBPCHbI CEHTP Pioneerer nIN K dINnepy IJn pOBedeHnpeM0HTa.
-Дань annapat moket He cpaabaBbBaT coOBtETCTByIOIIM oba3OM NO npuHHe CTaTHeCKTO 3JIeKTPnECTBA IIN NO dpyHM BHeSHM npuHAM. B TAKOM cnuyae, obuHnyo pa6Oy MOKHO BO30bHOBnTB, OTKJIOUH NITaHne, OBOXdAB 1 MInTy I aTEM CHOBA BKIOUH NITaHne.
| Heinsprabhochtle | Поберытě | Способ устсанения |
| He вкlioается питани. | Уstановлени-л-песлочate\[STANDBY/ON]ддз-л-песлочate\[ON]? | УstановInterfaceпеслочate\[STANDBY/ON]ддз-песлочate\[ON]? |
| Побlogenун-л-поставлamedь адалтор\песлоberno-toka\cosobetctbvyоцим образим? | УstановInterface поставлamedьошветctbyоцим образимддз-пostавлamedь-MOM адалтор\песлоberno-toka (.ст)? | |
| Побlogenун-л-пostавлamedь адалтор\песлоberno-toka\пostавлamedь адалтор\песлоberno-tokaбадиму annapatу. | ||
| Данный annapathe paclno3haetся. | Побlogenун-л-пostавлamedь USBкабел оцим\text{образим}? | Побlogenун-л-пostавлamedь USBкабел оцимобразим. |
| He icpoлььзуется-л-koncentраторUSB? | Конcentратор USBМOTуТ яOTуТСОТВМОВТСТК. ПОКLYCHITEКOMБЛОТЕ Данныйannapat наррауучесо пocobламгедуUSB кабел. | |
| Hacprohen-л-пограмньддайber над-песаши (obразим? | Hacprohenпограмнь ддайberнад-песаши(obразим. | |
| Дорожки he отообрахотсявблно teke. | Был-л-имлор�poваны мьзкалын\фаль? | Инmarotnyte мьзкалын\фаль ошветctbyоцимobrazom. Погробeeобиму мьзкалынфаль смогтуite "Serato DJ software manual". |
| Heыбран-л crate ллsubrate, hecodep- жашиdopokotek? | Быбран crateлл subratec dopokotamлл doobaytedopokotk Bcrate ллsubrate. | |
| Дорожки iTunes he oтообрахотсявблно teke. | Ustановлени-л-rationka ддяShow iTunes Libraryярльke Show iTunes Library menho[SETUP]? | UstановInterface rationkaддя Show iTunes Library ярльkeShow iTunes Librarymenho [SETUP]. |
| Погрobeeоб имлор�мьзкалын фальсмогтуite "Serato DJ software manual". | ||
| He ыбран-л crateлл subrate,he codep-жаши dopokotek? | Быбранcrate ллsubrate cdopokotam ллdoobayte dopokotkB crateлл subrate. | |
| Невозмочиpeadingуроват мьзкалынфаль вблно teke (песименованiedopokotek, .р.) | Вкlogenун-л [Protect Library] B [SETUP]? | Одkn光学[Protect Library]. |
| Запис небостунla. | Heuctanobelten-лнзкий уровеньзапис? | Оtryperуршу песуperулposов��уовни палени[Record] п pro-rampamномобсячени Serato DJ. |
| Был-л coхаленesaзапис почеzzerpenes? | Сохраленfte записпоче zzerpenes. | |
| Погрobeeob ынраленnaзапис смогтуite "Serato DJ software manual". | ||
| З�чани (otcystbvety л-спшkom нзкийуровень зуаня. | Ustановлени-л-песуTRIM,(фey- 徴ыkanalana, ( коссфey徴ыпесу master LEVEL)нсobтETCTbvyоцime позили? | UstановInterfaceпесу TRIM, (фey-徴ы kanalana,( коссфey徴ы песуMASTER LEVEL) нсobтETCTbvyоцimeпозили. |
| Hacprohen-лcoobtETCTbvyоцime образимпду п. | UstановInterfacecoobtETCTbvyоцime образимфункци ыборaВешенero Источиka,(уовая romkoKOSTу,.д. наakubы trgOKOBOPOTeуяx,.д. | |
| Погрobee л-поставлamedь сал�ыкабел coobtETCTbvyоцimeобразим? | Погрobee л-пostавлamedь сал�ыкабел coobtETCTbvyоцimeобразим. | |
| He zarpaed�енblл тетминалыиштекры? | Пэред ынрал徳емпocdkлочenem оочичтeteтетминалы иштекры. | |
| Hacprohen-л пограмньддайber над-песаши (obразим? | Hacprohenл пограмньддайber над-песаши (obразим. | |
| Искажениязучаня. | Ustановлени-лпесу MASTER LEVEL coobtETCTbvyоцупозили? | Оtryperуршу песуMASTER LEVELсамм образим.чесу оран-жеву ндikаторндikаторa КOTрolyногууовая бд.псковом уовая. |
| Ustановлени-л песуTRIMнсobтETCTbvyоцime позили? | Оtryperуршупесу TRIM самmобразим. чесуоран-жевундikатор ндikаторaКOTрolyногу уоваябд. псковомуовая. | |
| Hacprohen-л[HEADROOM](мну COOBTETCTbvyоцimeobразим? | Hacprohen лрограмнь ддайberнад-песаши(obrazom. | |
| Восprionзвдашемец зучаня (пухва-етс(prinистльз-зогипограмного обсяченияDJ. | Ustановлени-лпесу MASTER LEVEL почemошдяшемец зочenmeвесу песуошдяшемя ддз-пограмм-ногуддз-пограмm-ногу ддз-пограмm-ногуддз-пограмm-ногу ддз-пограмm-ногуддз-пограмm-ногу ддз-пограмm-ногуддз-пограмm-ногу ддз-пограмm-nongodavcheny. | UstановInterface песуMASTER LEVELпочem ошдяшемяддз-пограмm-ногу ддз-пограмm-ногуддз-пограмm-ногу ддз-пограмm-ногуддз-пограмm-ногу ддз-пограмm-ногуддз-пограмm-ногу $davcheny. |
| Héncnpaßnoctb | Пюверьte | Способ устранения |
| He bvyobintc8учанiche BVEshero yctproi-CTBa Или МИкрфона. | Установен-лп поразс�ддInput SELECT] на соotbetctbyuшуюпозию? | Установite поразс�ддInput SELECT] на соotbetctbyuшуюпозию. |
| Зчанiche поразыается рprи установке драимberа ASIO. | He 6bl-лп установен драимber ASIO рprз залшени serato DJ? | Установite драимber ASIO до залшка Serato DJ. (ст. 5) |
| Miraet Иndinkatopи и НecOoTBeTCTByuошee Фуншонравие. | — | Можно Вocstановite obchyнoe Фуншонравие, отоembedи в addan-terп поразс�ного тoka, поождам касимум 1 минут у заlem занови подочи в addanterп поразс�ного тoka.Есmen Oindankовая побема веше-эше octаетс, отоembedи addanterп поразс�ного тoka и заlem подalm у ремont. |
| HeyctочимьарbaToSerato DJ. | Исторьется-лг самая поседеля verсья порramMHoroобесеньейness? | Беслathны обchosвени serato DJ пожно загузntч чeredи Interpengnet.Посет们песьайт nhжся и саташиесь, чебусы установени самая поседеля verсья порramMHoroобесеньейness. (ст. 5) |
| He IncpoьлзуOTся-лг odnOBpeMuHNo cSerato DJ дугne порамMbly? | Зakpoite дугne поposочени лда снжениногу harpyknи на komпьотер.(ст. 5)Eсmen bce-ешие habл�адается посокочьаг paobota, порobuyte оtkлічыбесправODHy сөгүдөдөдөдөдөдөдөдөдөдөдөдөдөдөдөдөдөдөдөдөдөдөдөдөдөдөдөдөдөдөдөдөдөдөдөдөдөдөдөдөдөдөдөдөдөдөдөдөдөдөд线索х. ANTINBIPCCHoe noPpRAMMHoe obescheneyne, xpaHnte ly ekpana, peximmЗhecrosbespeKhenny, др.(ст. 5) | |
| Когд К komпьотеру подочени дугines устри STBa USB. | Отоembedи дугnes устри STBa USB 对komпьотеру. ПrinodOBpeMuHOM подочени К komпьотеру дүгүдүйүүүүүүүүүүүүүүүүүүүүүүүүүүүүүүүүүүүүүүүүүүүүүүүүүүүүүүүүүүүүүүүүүүүүүүүүүүүүүүүүүүүүүүүүүүүүүүүүүүүүuces. Концentparotby USB He могут посокочьаг. Рождочп'te komпьотеру вданы папат нанрamyу чeredи постоведный USB кабел. | |
| ИмeelТС поблелma с потOM USB, кuda подочени дады annapat. | Есmen наkomпьотере посоклько поров USB, поь��айtersь подочиь дады папат к дугу'mу пору USB. | |
| He nodklquen-лг дады дады apnapat к по- н检нomy komпьотеру, paobtaюшему ot 6batapi? | Посадау te питане на посокочь к komпьотерс c instочники пitaимя пос��ону тoka. (В заимости OT насторг пос��ону komпьотерс, когд on pa6o-taeti OT baataru, может SFы tcstanовли ржим ЗhecrosbespeKhenny, чо ATOMATUcheckn сизжает pa6otocnoc6hoctь komпьотера.) (ст. 5) | |
| Спшkom малы пазмер буфера USB. | Уvelочьп пазмерSBуфера USB. |
O ToproBbIX MapKax N 3apeHnCTpHnpOBaHHbIX ToproBbIX MapKax
PioneerЯьлгета Загерпсгрванноу Торгов Марков PIONEER CORPORATION.
Yka3aHHbIe 3deCb Ha3BaHnI KOMPnHi N I3dJIy RaJYOTcT TopKO BbIMN MapkAMN IX COOTBETCTBYOuNX BJaJeJIbUeB.
Предупгждени по abTорсим правам
BbIOnHeHbIe BAm 3aIcn npEHa3NaYeHb IJnBaIero JIuHOrO yDObOBtBnI NIO 3aKoHAM O 3aUInTe ABTOPCKNX Ipab He MOrYT nCNoJIb3OBAtBc8e3 cOrnaCnBlaAedIbca ABTOPCKNX npab.
- My3bIka, 3aIIncahna Ha CD nckax, dp., 3aIIuIaeTc8 3aKoHaMn o 3aIInTe AByTOpCKIX npabX OTJeBbHbX CTpaH I MekJyHapOdHbIMn CORlaIseHnMI. OTBeTCTBeHnOCTb 3a IeRaJIbHOe IcNOJIb3OBAHne 3aIncAHNoMy 3bIKI NOnIOCTbIO JekNT Ha YeIbOBeK, BblONHINbIeM 3aIIncB.
- Пи образецни С мьзikо, 3агужehно C Итернета, Дp., 3агу3ИВШИ мьзikу человек Hecet ПОЛHyTO OTBETCTBeHHOCt b 3a ИСПОЛБЗOBАне мьзikIN B COOTBETCTBnC KOHTpaKTOM, 3akПчeH-NbIM C caITOM 3агу3КИ.
TexHHueckne xapaKTepeNCTnKN
AanTep nepemehnHO TOKa
IITaHne .0T 100Bdo240B nepemehnHoro ToKa,50 T/60 T
HOMHaJIbHbI TOK 800 mA
HomHaJIbHbI BbIXoI. NOCTOaHHOrToKa 5B,3A
O6uŋ pa3dēn - OchOBHO 6IOK
Bec ochobhoro annapata 5.8 kr
MaKc. r6apntbl 664 MM (U) x 70.4 MM (B) x 357 MM (Γ)
Донуckaема пабочая Temперatype. .+5°Cdo+35°C
Yactota dnckpetn3aun 44.1 K
Ppeo6pa3oBaTeIb A/D,D/A 246nt
UaCTOTnHaXapaKTepeNCTnKa USB, LINE, MIC .0T 20 Tc do 20 KTu
CoOTHOseHHe CnHnA/7um (HomHaJIbHbIy BbIXoD, A-WEIGHTED)
USB 105dB
LINE 95
PHONO 92
MIC 92D6
Oe HeIHeHoe nckaeHne (20 Hz — 20 kHzBW)
USB. 0.003%
LINE .0.005%
CtahapThbI ypOeHb BXoJa / ImpeJaHc BXoJa
LINE. 12 du/47 K
PHONO 48 du/47 K
MIC -52 dBu/10 KΩ
CtaHapThbIyPoBeHb BbIXOa /IMpeHaHC Harpy3Kn /IMpeHaHC
BbIXOda
MASTER OUT 1. +8 έБu/10 KΩ/330 Ω
MASTER OUT 2. +2 έБu/10 KΩ/1 KΩ
BOOTH. +8 16u/10 K/330
PHONE. +4 16u/32 /32
HomHaHbHbI yPoBeHb BixOda/IMpeHaCn Harpy3Kn
MASTER OUT 1. 26 dBu/10 KΩ
MASTER OUT 2. 20 dBu/10 KΩ
BOOTH 26 dBu/10 KΩ
PepexoHoe 3atyxaHne
LINE 87
XapakTepnCTnKn 3KBaJn3epa KaHaJa
HI 26D6+6D(13KΓU)
MID .0T-26Dbdo+6Db(1KfU)
LOW. 26D6+6D6(70K
TepMHHaJIbI BXOa/ BbIXOa
BxOHN TepMnHaJ CD
山TbIpbkoBoe rHe3do RCA 2 ha6op
BxOdbIe TepMHaJIbI PHONO/LINE
山TbIpbkoBoe rHe3do RCA. 2 ha6op
TepMNHaI MIC1
KoHneTOp XLR/The3do nla HayuHnKOB (6,3 MM).1 h6op
TepMNHaI MIC2
Гнебу hayшнков (6,3 MM) 1 ha6op
BbIXoHoi TePMHaJI MASTER OUT 1
KoHHeKTop XLR 1 h6op
BbIXoHoi TePMHaJI MASTER OUT 2
山TbipkOBble rHe3da RCA 1 ha6op
BbIXoHoi TePMnHaJ BOOTH
Гнебу hayшников (6,3 MM) 1 habop
BbXoHou TepMnHaN PHONES
CtepeofoHueckoeIHe3doHayuHnKOB(6,3MM)1ha6op
CtepeofoHueckoe rHe3do MNHN- DKeK HauuHnKOB (O 3,5 MM) 1 ha60p
TepmHaJ USB
Tin B 1 h6op
Texnueckne xapaKTeprCTNk n d3aH nn daHoro annapata n noctabIeMOro nporpaMMHO oOecpeHnmoYt N3MeHrTbc6e3 npdUnpexkDeHnC cIeBIO yUyUeHnN3dEIn.
PIONEER CORPORATION, 2012. Bce npaba 3aunuehbl.
Приимеанne:
B cootbetCTbN co cTaTbei 5 3aKaOHa Pocncko Foepaun "O 3auntpe npab nortpe6nte" uYka3aHneM PpaNTbctBa Pocncko Foepaun N720 ot 16 niohra 1997 roda kopnpaun Pioneer Europe NV yCTaHaBnBaet ycNoBHe Ha cIeDyUoSyu npoDoJnxTeIbHoCTb cPoka cIyXbbl oPhiuaJIbHO noCTabJIeMbIX Ha Poccnckn pbHOK ToBapOB.
Aydno n BnDeoo6OpyObaHne:7 let
Ipehenochoe aydnoo6opydoBaHne: 6 let
© 2012 PIONEER CORPORATION.
All rights reserved.
© 2012 PIONEER CORPORATION.