
EEG8000 - Electric coffee grinder AEG-ELECTROLUX - Free user manual and instructions
Find the device manual for free EEG8000 AEG-ELECTROLUX in PDF.
| Product type | Electric coffee grinder |
| Brand | AEG-ELECTROLUX |
| Model | EEG8000 |
| Bean hopper capacity | 250 g |
| Burr type | Hardened steel conical burrs |
| Number of grind settings | 25 settings |
| Power supply voltage | 220-240 V / 50-60 Hz |
| Power consumption | 125-150 W |
| Portafilter supports | Wide and narrow |
| On-demand grinding | Yes, via push button |
| Cord storage | Under the appliance |
| Included accessories | Burr cleaning brush, ground coffee container with lid |
| Cleaning and maintenance | Hopper and container washable with soapy water; burrs cleanable with brush; base wiped with a damp cloth |
| Safety | Unplug before cleaning; do not immerse; do not use with damaged cord |
| Spare parts and repairability | Contact consumer service for burr replacement |
| Compliance | EC directives 2006/95/EC, 89/336/EEC |
Frequently Asked Questions - EEG8000 AEG-ELECTROLUX
User questions about EEG8000 AEG-ELECTROLUX
0 question about this device. Answer the ones you know or ask your own.
Ask a new question about this device
Download the instructions for your Electric coffee grinder in PDF format for free! Find your manual EEG8000 - AEG-ELECTROLUX and take your electronic device back in hand. On this page are published all the documents necessary for the use of your device. EEG8000 by AEG-ELECTROLUX.
USER MANUAL EEG8000 AEG-ELECTROLUX
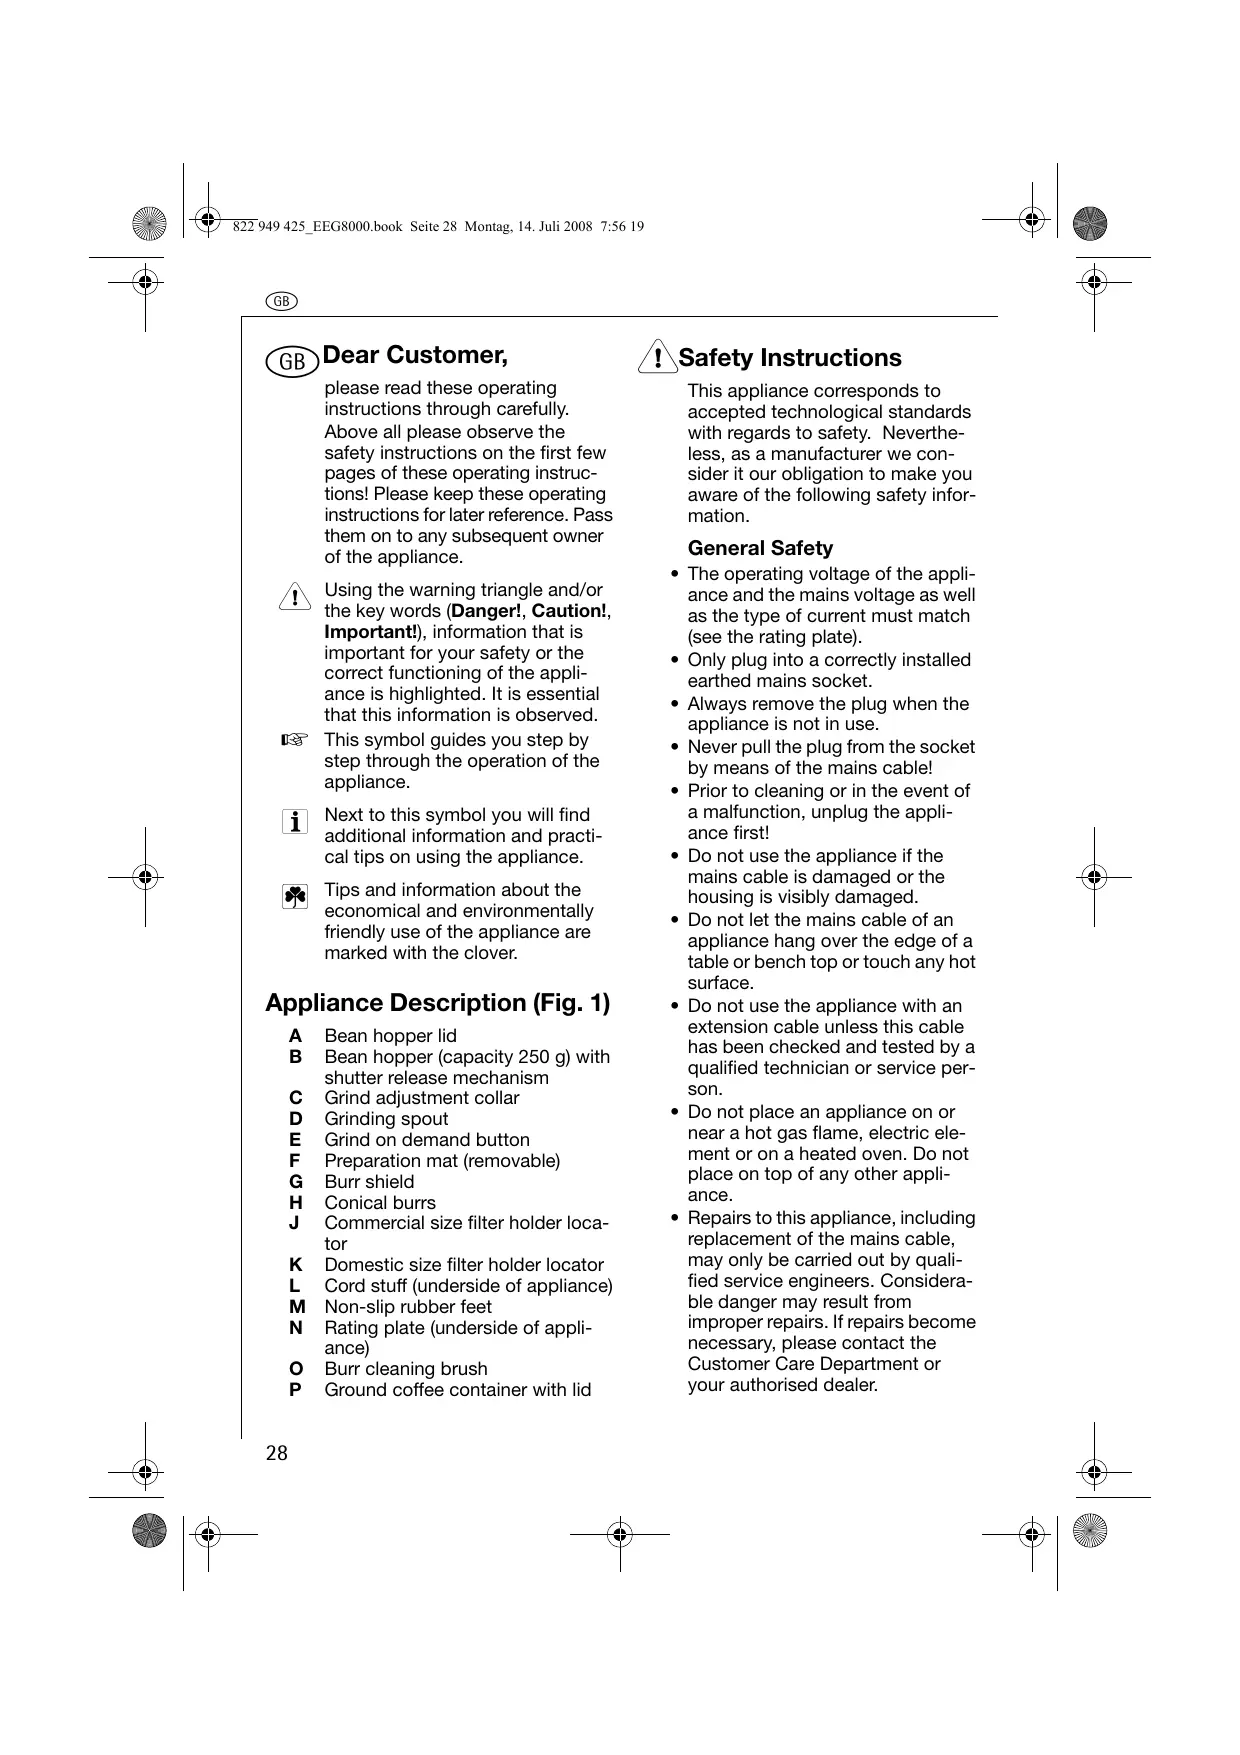
please read these operating instructions through carefully. Above all please observe the safety instructions on the first few pages of these operating instructions! Please keep these operating instructions for later reference. Pass them on to any subsequent owner of the appliance.

Using the warning triangle and/or the key words (Danger!, Caution!, Important!), information that is important for your safety or the correct functioning of the appliance is highlighted. It is essential that this information is observed.

This symbol guides you step by step through the operation of the appliance.

Next to this symbol you will find additional information and practical tips on using the appliance.

Tips and information about the economical and environmentally friendly use of the appliance are marked with the clover.
Appliance Description (Fig. 1)
A Bean hopper lid
B Bean hopper (capacity 250 g) with shutter release mechanism
C Grind adjustment collar
D Grinding spout
E Grind on demand button
F Preparation mat (removable)
G Burr shield
H Conical burrs
J Commercial size filter holder loca- tor
K Domestic size filter holder locator
L Cord stuff (underside of appliance)
M Non-slip rubber feet
N Rating plate (underside of appliance)
0 Burr cleaning brush
P Ground coffee container with lid

Safety Instructions
This appliance corresponds to accepted technological standards with regards to safety. Nevertheless, as a manufacturer we consider it our obligation to make you aware of the following safety information.
General Safety
- The operating voltage of the appliance and the mains voltage as well as the type of current must match (see the rating plate).
- Only plug into a correctly installed earthed mains socket.
Always remove the plug when the appliance is not in use. - Never pull the plug from the socket by means of the mains cable!
- Prior to cleaning or in the event of a malfunction, unplug the appliance first!
- Do not use the appliance if the mains cable is damaged or the housing is visibly damaged.
- Do not let the mains cable of an appliance hang over the edge of a table or bench top or touch any hot surface.
- Do not use the appliance with an extension cable unless this cable has been checked and tested by a qualified technician or service person.
- Do not place an appliance on or near a hot gas flame, electric element or on a heated oven. Do not place on top of any other appliance.
- Repairs to this appliance, including replacement of the mains cable, may only be carried out by qualified service engineers. Considerable danger may result from improper repairs. If repairs become necessary, please contact the Customer Care Department or your authorised dealer.
- If the appliance is used for purposes other than those intended or used incorrectly, no liability can be accepted for any damage that may be caused.
- This appliance is not intended for use by persons (including children) with reduced physical, sensory or mental capabilities or lack of experience and knowledge unless they have been given initial supervision or instruction concerning use of the appliance by a person responsible for their safety.
Child Safety
- Never leave the appliance unattended while in use.
- Keep children away from electrical appliances.
- Packaging material, e.g. plastic bags, should not be accessible to children.
- Children should be supervised to ensure that they do not play with the appliance.
Safety in operation
- Check the bean hopper (Fig. 1/B) for the presence of foreign objects before using.
- Do not put frozen or caramelised coffee beans in the bean hopper. Use only roasted coffee beans! Remove any foreign objects, such as small stones, from the coffee beans. Blocking or damage caused by foreign objects in the grinder might be excluded from the guarantee.
- Always operate the grinder with the ground coffee container properly inserted in the grinder.
- Do not place your hand in or near the burrs while the grinder is in operation.
Always place the unit on a flat, level surface. - Do not attempt to re-grind ground coffee.
Safety in cleaning and care
- Follow the cleaning instructions.
- Prior to cleaning, unplug the appliance first!
- Do not immerse the appliance in water or any other liquid unless recommended.
- Do not place any parts of the coffee grinder in the dishwasher.
Operating
Before using the coffee grinder, wipe the base exterior with a damp cloth.
Wash the bean hopper (Fig. 1/B), hopper lid (Fig. 1/A) and ground coffee container (Fig. 1/P) in warm soapy water, then rinse and dry.
Do not immerse the burrs in water or any other liquid.
Place the coffee grinder on a dry, level surface.
To attach the bean hopper, position bean hopper onto the top of the motor base, push down and turn clockwise (see Fig. 2).
Fill the bean hopper with coffee beans.
Remember to keep the hopper full at all times. Having an even weight bearing down on the burrs is important to ensure a consistent grind.
This coffee grinder is intended to grind whole coffee beans only.
Place the hopper lid onto the bean hopper.
Plug the power cord into a 220-240 V power outlet and switch the power on.
You can hide unwanted cord in the cord stuff (Fig. 1/L) on the underside of the appliance.
Select the grind by turning the grind adjustment collar to the desired setting (see Fig. 3).
GB
Refer to the grind setting table in section „Adjusting the Grind Setting" to assist you in selecting the correct grind level for the desired brewing method.
You can grind coffee into a filter holder of any espresso coffee maker, or, for other brewing styles, into the ground coffee container (Fig. 1/P).
To grind coffee into a filter holder:
Position the filter holder into the filter holder locator (see Fig. 4).
There are two filter holder locators provided: a smaller size to fit domestic handles (Fig. 1/K) and a larger size for commercial handles (Fig. 1/J).
To grind coffee, press the filter holder against the button (Fig. 1/E) located in the centre of the filter holder locator (see Fig. 5).
When the basket is full, pull the filter holder off the button. Collapse the coffee in the basket by tapping it on the bench and repeat until the desired amount of coffee has been ground.
To grind coffee into the ground coffee container:
Remove the lid from the ground coffee container (Fig. 1/P).
To grind coffee, press the ground coffee container against the grind on demand button (Fig. 1/E) (see Fig. 6).
When the desired amount of coffee is ground, pull the ground coffee container off the button. Close the container with the lid to preserve freshness of the ground coffee.
! Foreign objects like stones or twigs can sometimes be found in whole bean coffee and can cause the coffee grinder to jam. Should this occur refer to the „Care and
Cleaning" section as these objects need to be removed immediately.
Adjusting the Grind Setting
A starting point for grind settings:
SETTING
BREWING METHOD
1-5
Turkish
10-15
Espresso
10-15
Stove Top
20-25
Drip Filter
20-25
Plunger
The settings noted in the table above are a starting guide only. For example the setting for espresso will vary depending on the quality and roast degree of the beans and the type of espresso extraction desired.
The wide-range of 25 grind settings allows for precision adjustment. The coffee maker has complete control of the particle size and ultimately the quality of the resulting brew.
Some things to remember when using the coffee grinder:
- The smaller the particle size the longer it will take to grind.
- When using the finer settings the coffee may become stuck, we recommend tapping on the lid of the bean hopper to dislodge any clumps of coffee blocking the flow.
- After long periods of using the finer settings we recommend removing the upper burr and sweeping away any residual coffee to avoid clogging. See „Care and Cleaning“ for more details.
Tips
- Select the correct grind for the brewing method you are using. 25 grind settings are available to ensure precision adjustment. Setting 1 produces the finest grind, 10 to 15 are medium grinds appropriate for espresso coffee makers, and 25 is the coarsest grind you can achieve. Experiment with the grind settings to achieve the ideal brew that best suits your tastes.
- For drip filter coffee machines, a good starting point is to use 8 grams (1 scoop) of coffee for every 4 cups of brew water as measured with the carafe. Finer grinds usually require less coffee, but using too fine a grind will result in a brew that is bitter in flavour.
- For those that prefer weaker coffee, continue to use the recommended amount of ground coffee and then dilute the resulting brew with fresh hot water. Doing this will maximise flavour and minimise bitterness.
- Coffee that is ground too fine for a particular brewing process will result in over-extraction and the coffee will taste bitter. On the other hand, coffee that is too coarse for a particular brewing method will result in under-extraction and the coffee will be thin and poor in flavour.
- Once coffee is ground it quickly loses its flavour and aroma. For the best results we recommend you grind beans immediately prior to brewing.
- Buy fresh whole coffee beans weekly.
- To retain freshness, store whole coffee beans in an airtight container in a cool, dark, dry place. It is not recommended that you store beans in the grinder's bean hopper for a prolonged period. The bean hopper has a shutter release
mechanism for easy removal and preventing accidental spills. It allows to transfer any un-used beans to an ideal storage unit.
8. To ensure the best results from the coffee grinder clean the bean hopper and conical burrs regularly.
Always Remember
PROBLEM DESCRIPTION RESULT
OVER-
EXTRAC-
TION
Over develop
ment of flavour
particles
(sugars etc.)
Sharp,
burnt.
bitter
UNDER-
EXTRAC-
TION
Under devel
opment of fla
your particles
Thin,
watery.
Care and Cleaning

Ensure the coffee grinder is switched off and unplugged from the power outlet prior to cleaning.
Do not immerse the motor base of the coffee grinder in water.
Do not immerse any part of the burr assembly in water or any other liquid.
Do not place any parts of the coffee grinder in the dishwasher.
Do not use abrasive cleansers or scouring pads.

Spots and marks on the surface of the burrs are part of the hardening process. These marks do not affect the performance of the grinder or the taste of the coffee.
Cleaning the motor base, bean hopper and coffee container

Remove the bean hopper from the motor base: push down and turn anti-clockwise, then lift off (see Fig. 7). Store unused beans in an airtight container to preserve their freshness.
GB
Clean the motor base exterior using a damp soft sponge with mild detergent and wipe dry.
Wash the bean hopper and coffee container in warm soapy water, then rinse and dry.
Cleaning the burrs
If the coffee grinder is used frequently (every day), the burrs need to be cleaned every three weeks to ensure best performance of the coffee grinder. Regular cleaning helps the burrs achieve consistent grinding results, which is especially important when grinding coffee for espresso.
Ensure the coffee grinder is switched off and unplugged from the power outlet. Remove the bean hopper from the motor base (see Fig. 7).
To remove the top burr turn the grind adjustment collar in an anticlockwise direction until it stops (see Fig. 8).
Press and hold down the 'UNLOCK' button at the rear of the motor base and with the other hand turn the grind adjustment collar anti-clockwise until it stops and the graphic line on the collar is aligned with the line on the motor base (see Fig. 9).
Lift out the top burr from the grind adjustment collar using the handle (see Fig. 10). Clean using the burr-cleaning brush.
Lift the grind adjustment collar away from the motor base.
Clean the bottom burr using the burr-cleaning brush (see Fig. 11).
Once both burrs are cleaned, return the grind adjustment collar to its position in the motor base. With the grind adjustment collar in hand align the graphic line on the collar with the line on the rear of the motor base, press down (see Fig. 12).
Replace the top burr back into position in the grind adjustment collar. Ensure the marker on the top burr is aligned with the marker inside the grind adjustment collar and push firmly into place.
Turn grind adjustment collar clockwise to the desired grind setting.
Adjusting the burrs for wear
The conical burrs are made of tool hardened steel for extra long life. However after prolonged use the burrs will require adjustment to compensate for wear. A sign of this is when the grinds are not as fine as they used to be, check by rubbing some of the grinds between two fingers or for espresso the extraction will also show signs that the grind needs adjusting. Please contact the Customer Service Centre.
Replacing the burrs
To inquire about having the burrs replaced contact the Customer Service Centre.
Technical Data
Mains voltage: 220 - 240 V / 50 - 60 Hz
Power consumption: 125 - 150 W
This appliance conforms with the following EC Directives:
- Low Voltage Directive 2006/95/EC
EMC Directive 89/336/EEC with amendments 92/31/EEC and 93/68/EEC
Disposal

Packaging material
The packaging materials are environmentally friendly and can be recycled. The plastic components are identified by markings, e.g. >PE < , >PS < , etc. Please dispose of the packaging materials in the appropriate container at the community waste disposal facilities.

Old appliance
The symbol on the product or on its packaging indicates that this product may not be treated as household waste. Instead it shall be handed over to the applicable collection point for the recycling of electrical and electronic equipment. By ensuring this product is disposed of correctly, you will help prevent potential negative consequences for the environment and human health, which could otherwise be caused by inappropriate waste handling of this product. For more detailed information about recycling of this product, please contact your local city office, your household waste disposal service or the shop where you purchased the product.

D
F Chere cliente, cher client,
| PROBLEMA | DESCRÊÇÂO | RESUL-TADO |
EXTRAC- CAO
EXCESSIVA
Gust patrunzator, 1ars, amar
EXTRAGEREA A PREA PUTINE SUBSTANTE
KoJIN EMHICTb HAnOBHTbcra, 3a6epiB EMHICTb BiD KHOKN. LIOb KaBa 3cunapnacr cKpi3b ciTyk, NOCTyKaIte EMHICTNo 6yDb-kyu NOBepxHi I npOIOBKyuTe, DOKN He HAmEnTe DOCTaTHBO KABN.
Lio6 moIOTn Kaby B cMHiCTb dIy MeJIeHOi KabN:
3Himits Kpuiuky 3 emhocti dmeheoi Kabn (Ma1. 1/P).
LIO6 MOJOTN KABY, HATNCiTB emHicTNo Ha KNONky (MaI. 1/E), pO3TaWOBaHb Y CHTpi TpIMaHa emHOCTi (DNB. MaJI. 6).
KoJIN MeJeHOI KABN 6yDe DOCTaTHbO,3a6epiTB EMHICTb BiD KHOJKN.3aKpNiTe EMHICTb KpNIshKOIO,106 36epeTn CBIXICtB MeJeHOI KaBN.
IHOJIcepeK KaBOBHX 3epeH MOxTyb6yTnUyXopiDHi npEmdTeN, Taki JK KAMInu a6o rInOuyKn, UO MoKyTp 3a6NoKYBaTN KabOMOnKy. JkUO CE cTaHeTbcR, 3BepHtbcrdo Po3diny "DOrJra Ta YnCTka", TOMU UcPi npEmdTeN nOTpiHo BuaJIHTn HeaiHO.
BcTaHOBJIeHnA CTynHeHIO nOmeJy
OpiEHTOBHa Ta6nua po3mipib nomeJy:
3HAUHH
METOДAPIOBAHHI
1-5
Ipo-typeuBki
10-15
Ecnpeco
10-15
Ha Kxohnni nnnti
20-25
KpanJIHHHa KaBOBapKa 3 φɪnbTpɒm
20-25
ДязаваркIN OkponOM
UA
i 3NaueHnB, Bka3aHI b Ta6nui c opieHTOBHmN. HanpNKlaD 3NaueHHn DJI eCnpco 6yde KOINBaTnCBA 3aIeXHOCTi BiJ kOcTi i CtynHeIO 3axapIOBaHN 3epeH i 6axaHOIMiUHOCTi ecnpco.
Iupokn diana3oH 3a 25
3HaueHHMaN Do3BOJNe TOUHe peYIHOBaHn. IIOJIna, 10 Bapntb KaBy MaE NOBnKoHTpOJIb HaI pO3MipOM qACTnHOK, OTKe i HaI kICTTOROTOBoi KABN.
LTo noTpiBHO nam'YaTn npn BVKOpNCtAHHH KABOMONK:
-ЧИМ МЕнше розмір пOMeЛУ,ТИМdoВше ьуde roTуВаТиСЯКаBA.
ПивсановленидірібHoro po3mipynomeNy,KaBa moKe 3aCtprTn,Mn paДIMO NOCTyKATn NO KpNiUZI EMHOCTI ДЯ зерн,цOB 3pyuHTN rpydkn KaBn,L0 6bNoKyoHt bpyx.
ПисяdoBrix nepioiB nepemelOBaHH3dpHm p03mpom KaBn, Mn paIIMO 3HrTu BepXHi MInHOK i BndaJIHTn 3aBy KabY, uO6 yNkHyTN 3aNBaHH. NbiTbc "DorIaid i YnueHH" dJa doatkoBoi iHfOpMauii.
Iopadn
1.ObupaTe npabnIbHy yctaHObky po3Mipy KaBn dIy BaWoO rCNoCo6y 3aBaPbOBaHH. E 25 3NaYeHb po3Mipy nomEny, zo 3aBe3neUHYtB BeCb dIana3OH po3MipIB nomEny. 3NaYeHNr 1 dae haindpi6Hiu nomEn, 3 10 no 15 - cepenHi 3NaYeHNr, zoPiXoJrTb dIra KaBObApok ecnpecO, a 25 - ce Hainpy6iWi nOMeI, koro MoKHa doCyrtn. EkCepmEHTyTe 3 yCTaHOBkAmn po3Mipy nomEny dIy OTPMaHnH iDeaJIbHo rHaNO, IIO BiDnOBiDa BAsOMy CMAky.
2.Дя кралиннх кавоварok 3
Фльтом Добим的新атуkom 6уde
8 рам (1 мірна loжka) кави на
Кожни 4 чашки rapяwoi BODи, сio
Виміряетсь в EMHOCTI дя BODи.
Більш DiPIбHi nomeni 3BNUaHNo
Notpe6yIb MeHSe KABи, ane
ВИКОРИСТАНHAЗДTO DiP6HOrO
nOMeNy 3po6Nt b Haniip ripKIM Ha
CMAk.
3.Якwo BV BiДаTe nepebary 6iIbI cna6ki KABI, npOIOBkyIte BIKOPNCTOBYBaTN peKOMeHDOBAHy KINbKICTB MeJIeHOI KABN, a NOTIM PO36aBTe rOToBn Hani NcHToO rapraUO BOIOLO. Lc NocnInTb CMAk i 3MeHUnTb ripKOTy.
4. Kaba 3aHaITo Dpi6Horo nomeny IJRA Bn3HaueHoro HanoIO CnpuHnHTb HaMipHy ekCTpaKciio i Kaba 6ynde ripkoHO Ha Cmak.
3 iHsoro 60ky, KaBa, 1o 3aHaITo rpy6a DnBn3HaueHO MetOdy 3aBapuBaHHa, He DaCTb NtpiHoI ekCTpaKci i KaBa 6yde Cna6ka i 6iHa Ha Cmak.
5. Onda3y nicI na nepemelOBaHH na KaBa WbNdko Btpauec Cbi Cmak i apomat.ДЯ OTpIMaHH NaHkPaunx pe3yNbTaTIB Mn peKOMeHNyEMO MoJIoTN 3epHa 6e3NocepeDnHbO nepeD 3aBapuOBaHHM.
6. Knyte CBixn KaboBi 3epHa KOxHOrO TIXKHe.
7. 706 36epeTn CBIXICb, trpMaTe KaBOBi 3epHa B repMeTnUHni EMHOCTi B npOXOIOHOMy, TEMHOMy, cyXOMy Miczi. He peKoMeHdYcTBcT pUmATn 3epHa B EMHOCTi DnI 3epeH KABOMONKn Ha npOTa3I TpIBaNOrO yacy. EmHcTB DnI 3epeH MaE MexaHI3M cNYCKy 3aTBOPy DnI NERKOrO 3HimaHH i 3anobiraHHBnuaIKOBOMy po3CnpanHHo. Lc Do3BOJAE nepeMictnTn HeBVKOpNCtHi 3epHa B iDeJIbHy EMHICTb DnI 36epirAHnn.
UA
8.Дя краших pe3yIbTaTIB 3 KABOMONKHO,peryIpyHO YnCTbTe EMHiCTbДЯ 3epeH i KOHI Hi MJIINKn.
3aBxnnam'TaTte
He MnTe HiaKi chaTnHi npuApy B nocydomnHm MaunHi.
He BnKOpNCtOBuIte DnIy CnIeHnR roCTpi npEaMeTu a6o abpa3uBHi peOvBuHn.

ПлЯМи рубци Ha NOBepxHMI MlnHkIB -цуactnHa npoecy 3akJIIOBaHHa. Llpy6zHe BnINBaHOt b Ha ekCpIpyataciHi kOcTi KabOMOLKn iHa CMAK KABN.
YnueHHa MOTOPHOro Kopnycy, cMHOCTi dIg 3epeH i cMHOCTi dIg KABN

3HIMITb EMHICTb dIJI 3epeH 3 MOTOPHOKOpNcy: HATNCHTb BHN3 I pOTn rOdHHNKOBoI CTPIKN, nICNA YORO NIDHIMITb (INB. Man.7). TpMaJte HeBNKOpNCTaHI 3epHa B rePMeTNUHII EMHOCTI, UO6 36epeRTn IX CBIXICTb.

BntpiTb MOTOPHNI KOpNc BONoroIO M'RAKOIO rboKOIO 3 NOMIPHNM MNHOOM 3acoobom, nicra YORo Bnptb Hacyxo.

MnTe eMHictb dny 3epeH i
EMHICTb DnA MeNeHO' KaBN B
TENII BODI 3 MNOM, nicra Qoro
BNTpTB i BucywiTb.
UHHeHHMnHKiB
JaKuo KaBOMOJIka
BVKOPNCOTBOYETbCyaCTO (KOxHOro
DnHa), MInHKn NpOTPi6HO YnCTNTu
KoXHi TpN TnXHi, 3o6 3a6e3neuNTu
NaKpaU pOboTy KaBOMOJIku.
PeryIrpHe YnIeHHN DaONomarae
OTpIMyBaTn JaKiChi pe3yIbTaTu NIOpeMeJIIOBAHHIO, 10 OOC6JIINBO
BaxJInBO, JaKuo BN MeJeTe KabY
dIra ecnpco.

IpekeohaiTecra, 10 KaBOMonka BIMKHeHa i Ka6eJIb JxNBHeHHB BITaHTO 3 pO3ETKn. 3HIMiTb EMHICTb dIy 3epeH 3 MOTOPHO KOpNcy (INB.MaI.7).

Lio6 3nT BepxHm MInHOK, nobepHtB peryIaTOp cTyneHa nOmeJy npOTn rOuHHNKOBoCTpJIKN, DOKN BiH He 3ynHHTbCra (DnB.MaI.8).

HaTnCHiB i TpIMaIte KHONKy "PO3BLOKBYATN" Ha 3aJHi CTInCi MOTOpHOrO KOpNcY, a IHsOIO pyKOIO NOBepHIb peyIaTOp CTyneHЯ NOMEly npOTn rOINHHNKOB0I CTPIKNI, DOKNI BIn He 3yINHNbCra, a rpaΦiUHa PNCKa Ha peryIaTOpI He cniBnaIe C pNcKOHO HA MOTOpHOMy KOpNci (DnB. Man. 9).

3aMiHa KaBOBmX MInHkIB
LIOI NITaHb NO 3amHi MmNHIb 3B'jXtcb3 CepBICHM UeHTpOM.
Texhichi xapaKTepeNTnKn
Hanpyra B Mepexi:
220-240B/50-60T
CnoXnBaHa nOtUxHicTb:
125-150Bt
CnHnn npNJad BiNOBiJaehacTynHM CbponeecbKmDnpeKTuBam:
Директва по НИЗБКУ habругу 2006/95/EC
Директува поелковомагitiHTусуmichiсть 89/336/EEC 3Виправлениms 92/31/EEC i 93/68/EEC
Ytulizauia
NakyBaJIbHi MaTepiAn
PakyBaJIbHi MaTepiAIne
eKoIorIChNo YnCTmM i MoKyTb 6BytN
NoBToPHO BnKOpNCtAHi.
PiactNKOBi DeTani Ni3NaYeHi
MapKyuBaHHaM, Hnnp. >PE<, >PS<,
i T.D. ByDb NaCkA, BnKnJaIte
naKyBaJIbHi MaTepiAIn y
BiDnOBIHn KOHTeHep
KOMyHaJIbHnx OprAhI3aCiJ dJIaIKBldaCiI BiIXoDiB.
CTapi npnilaani
CnMBoN Ha npOyKti a6oHa noIpyKaBahi O3Hauae, 10 daHni npOyKT He niDjrae yTunl3aui jkNo6yTOBe CmTT. 3amictbZbORo Heo6xIDHa noR nepeDaayu BviNobiDn nnYHK 36Opuy dne nepepO6Kn eJeKtpnuHoro i eJeKTPoHHoro yCTaTKBaHHa. 3a6e3neUOn npabInbHy yTnI3aCiIO daHoro npOyKTy, BN donOMarAcTe 3anObirn HeratNBHM HacIiKaM dIra HABKOINShBOrO cepeoBnua i 3dOpOB'JIODei, npuHNOHO kIXMOKe cTaTN He npabInbHe NOOBJKeHHa 3 BiXoAMn daHoro npOyKTy. DnA oedpkAnHn DOkNaHnIooi InfOpMaui npo nepepO6Ky daHoro npOyKTy, 6db NaCa, 3B'JkItbcra 3 BaWoIO MicceBOO MicbKOIO aDMHiCTpaueIO, npedCTabHNKOM BaWOI cnYkbN yTnI3aCiII npOyTOBO r CMITTA a6o 3 KpAmHnueo, De Bn npndbaNN npOyKT.

822 949 425 EEG8000.book Side 100 Montag, 14. Juli 2008 7:56 19

Thinking of you
Electrolux
Share more of our thinking at www.electrolux.com
EEG8000 (822 949 425 - 01 - 0508)


- Appliance Description (Fig. 1)
- Safety Instructions
- General Safety
- Child Safety
- Safety in operation
- Safety in cleaning and care
- Operating
- GB
- To grind coffee into a filter holder:
- To grind coffee into the ground coffee container:
- Adjusting the Grind Setting
- Tips
- Always Remember
- PROBLEM DESCRIPTION RESULT
- Care and Cleaning
- Cleaning the burrs
- Adjusting the burrs for wear
- Replacing the burrs
- Technical Data
- Disposal
- Packaging material
- Old appliance
- D
- F Chere cliente, cher client,
- BcTaHOBJIeHnA CTynHeHIO nOmeJy
- 3HAUHH
- METOДAPIOBAHHI
- UA
- Iopadn
- 3aBxnnam'TaTte
- YnueHHa MOTOPHOro Kopnycy, cMHOCTi dIg 3epeH i cMHOCTi dIg KABN
- UHHeHHMnHKiB
- 3aMiHa KaBOBmX MInHkIB
- Texhichi xapaKTepeNTnKn
- Ytulizauia
- NakyBaJIbHi MaTepiAn
- CTapi npnilaani
- Electrolux
Brand : AEG-ELECTROLUX
Model : EEG8000
Category : Electric coffee grinder