
DP-S1 - Portable audio player ONKYO - Free user manual and instructions
Find the device manual for free DP-S1 ONKYO in PDF.
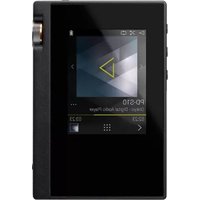
| Product Type | High-resolution portable audio player |
| Brand | ONKYO |
| Model | DP-S1 |
| Dimensions (L x H x D) | 63 mm x 94 mm x 15 mm |
| Weight | 130 g |
| Display | 2.4 inches, 240 × 320 pixels resolution |
| Power supply | Lithium-ion battery 1630 mAh, charging via micro USB port (5V, 1.5A) |
| Battery life | Up to 15 hours of FLAC 24-bit/96 kHz playback (screen off, 3.5 mm headphones) |
| Internal memory | 16 GB (including system area) |
| Expandable storage | 2 micro SD card slots (FAT, FAT32, exFAT) |
| Supported audio formats | MP3, AAC, FLAC, ALAC, WAV, AIFF, MQA, DSF, DSDIFF (up to 192 kHz/24-bit, DSD 5.6 MHz) |
| Network connectivity | Wi-Fi IEEE 802.11 a/b/g/n, Bluetooth A2DP/AVRCP |
| Headphone outputs | 1 3.5 mm unbalanced jack (16–300 Ω), 1 2.5 mm balanced jack (32–600 Ω) |
| Audio functions | 10-band equalizer, Bass Enhancer, oversampling, digital filter, Line Out mode |
| Connectivity | Micro USB port (charging and data transfer) |
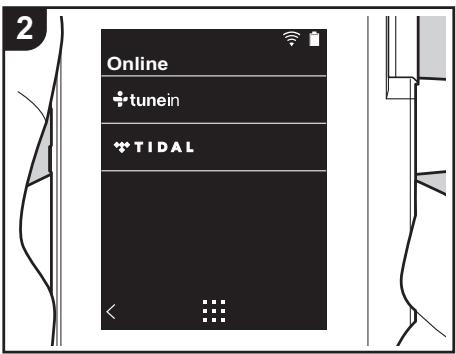
| Network services | TuneIn Radio, TIDAL (via Wi-Fi) |
| Care and cleaning | Clean with a soft, dry cloth. Avoid moisture and dust. |
| Safety | Do not use both headphone jacks simultaneously. Protect from shocks and extreme temperatures (5–35 °C). |
| Spare parts and repairability | Micro USB cable, screen protector included. No spare parts listed. Software update possible via Wi-Fi or SD card. |
| General information | EU importer: Gutenberg str. 3, D-82178 Puchheim, Germany. USA/Canada importer: Onkyo U.S.A. Corporation. |
Frequently Asked Questions - DP-S1 ONKYO
User questions about DP-S1 ONKYO
0 question about this device. Answer the ones you know or ask your own.
Ask a new question about this device
Download the instructions for your Portable audio player in PDF format for free! Find your manual DP-S1 - ONKYO and take your electronic device back in hand. On this page are published all the documents necessary for the use of your device. DP-S1 by ONKYO.
USER MANUAL DP-S1 ONKYO
High Fidelity Audio Player
取掇說明書
Instruction Manual
Mode d'emploi
MP3(44.1 kHz/48 kHz)、AAC(44.1 kHz/48
k Hz/96 kHz)
FLAC/ALAC/WAV/AIFF (44.1 kHz/48 kHz /88.2
kHz/96 kHz/176.4 kHz/192 kHz)※、
MQA、DSF/DSDIFF (2.8 MHz/5.6 MHz)
The Wi-Fi CERTIFIED Logo is a certification mark of Wi-Fi Alliance®.
- onkyo music
High Fidelity Audio Player
取掇說明書
Instruction Manual
Mode d'emploi
Turning the power on and initial settings 6
Playback 8
Copying music with "X-DAP Link" 8
Dragging and dropping to copy music 11
Listening to music from the "Library" 12
Creating a play list 14
Using network services 15
Connecting BLUETOOTH 16
Line Out 17
Advanced Setup 18
Various settings 18
Audio Adjust 21
Customizing the Home screen 23
Software Update 24
Supplementary Information 26
Supplementary Information 26
Others 27
Entering text 27
General Specifications 28
Cautions for use 29
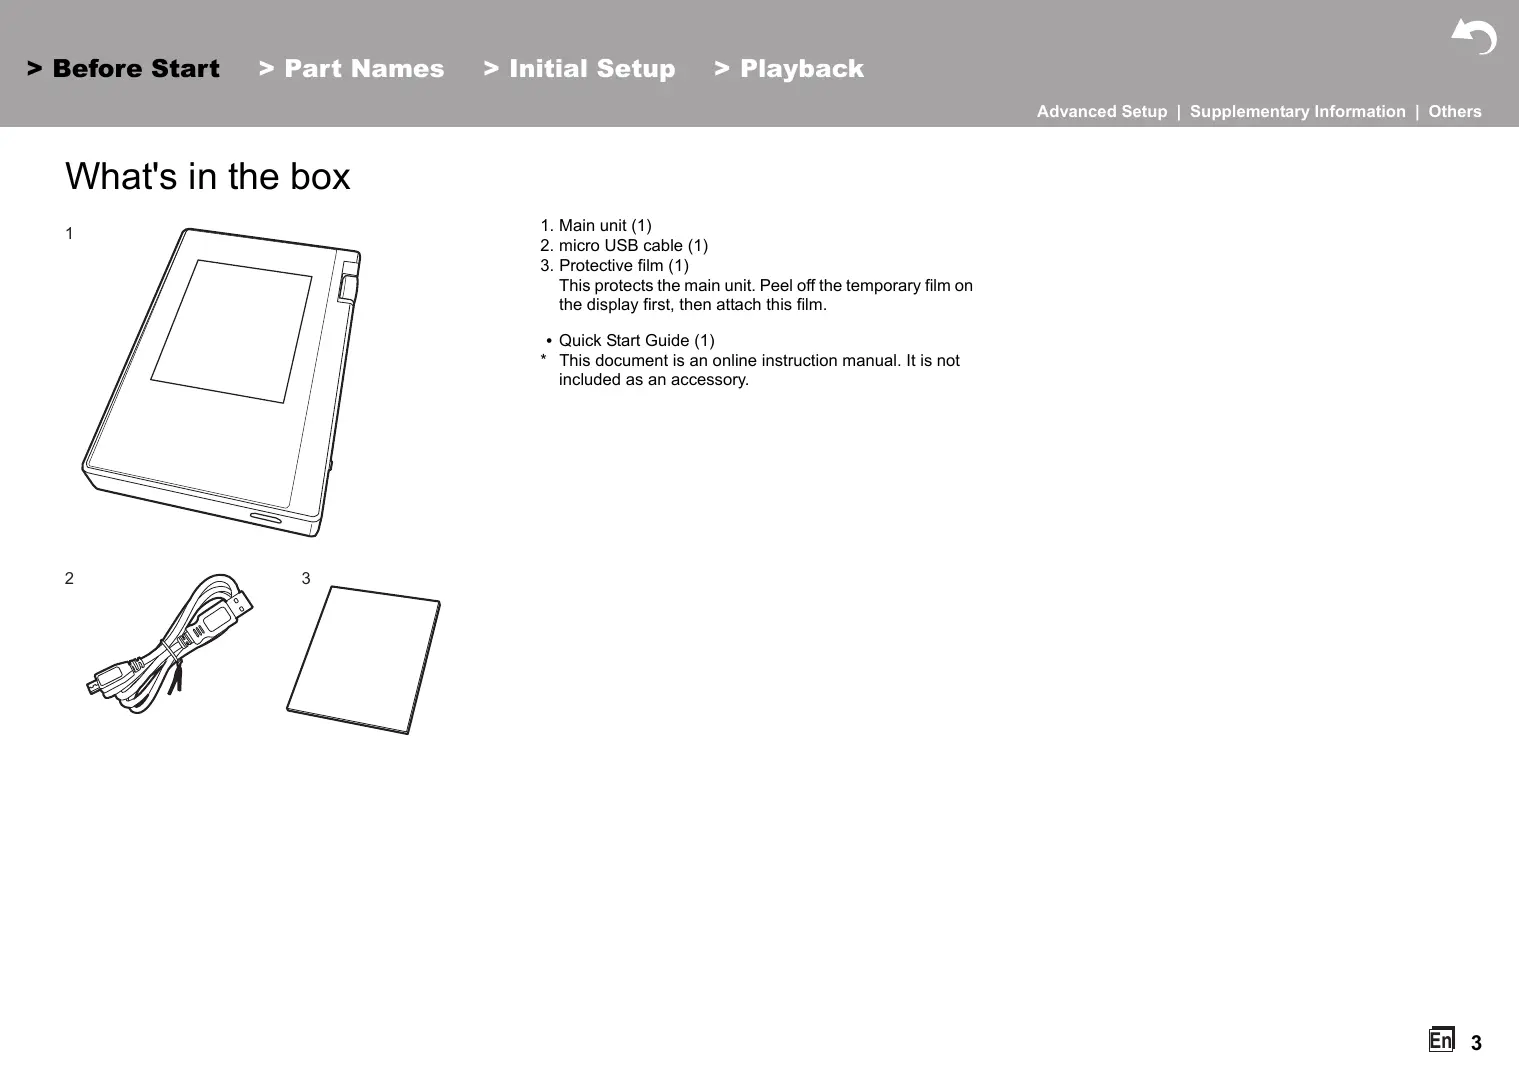
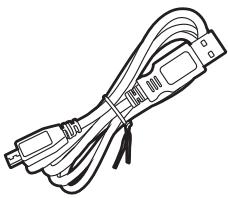
What's in the box
1
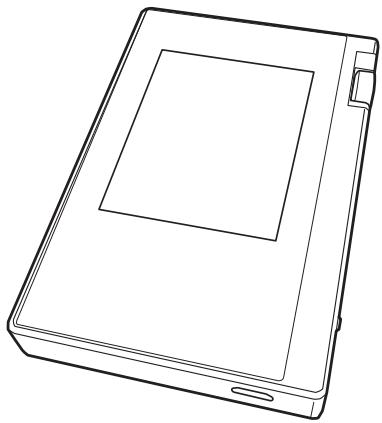
2
:
- Main unit (1)
- micro USB cable (1)
- Protective film (1) This protects the main unit. Peel off the temporary film on the display first, then attach this film.
- Quick Start Guide (1)
- This document is an online instruction manual. It is not included as an accessory.
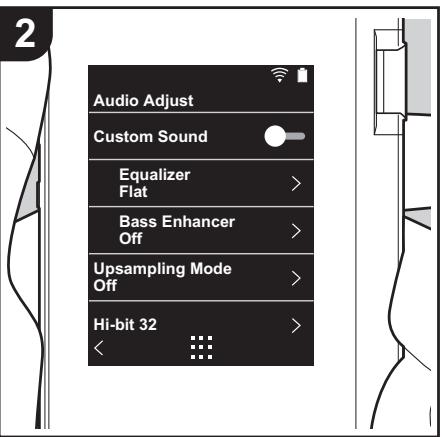
Part Names
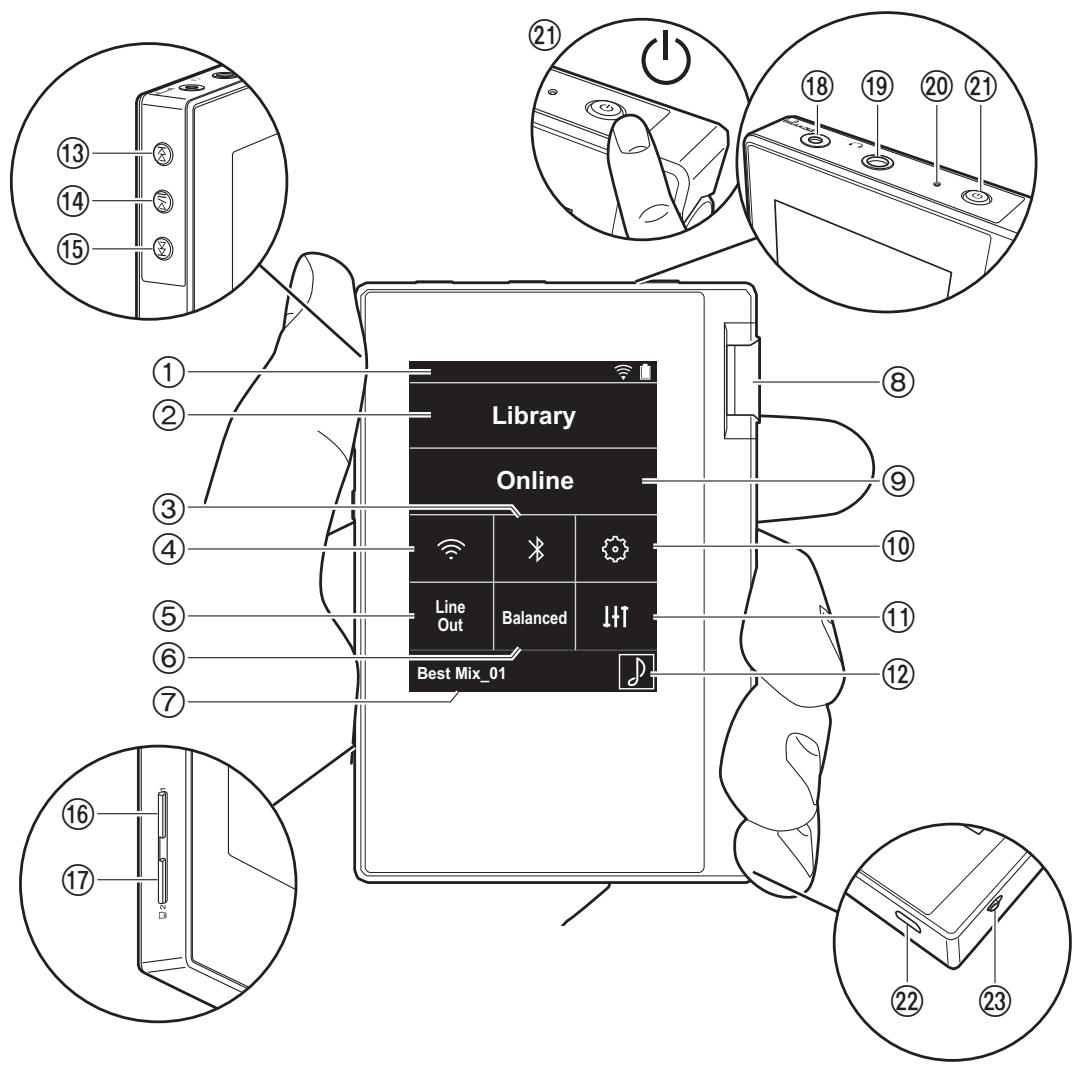
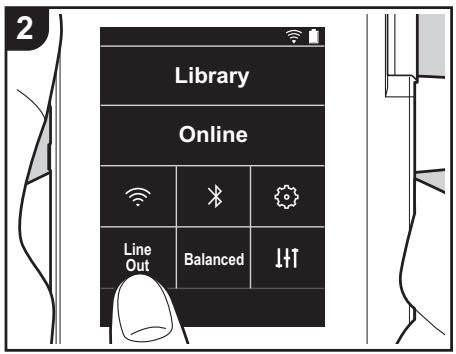
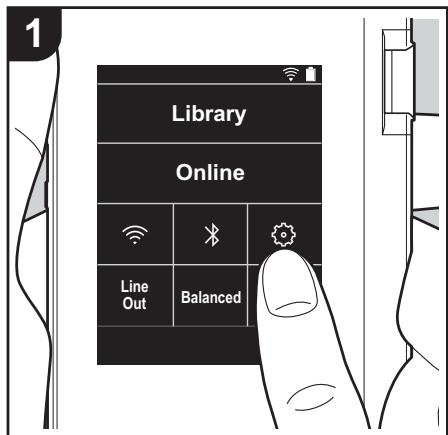
- Status bar
- Library: Tap to display the tracks copied from your computer (P12).
- Turn on or off the BLUETOOTH feature. " " is displayed on the status bar when this is on. Pairing is necessary to connect BLUETOOTH wireless technology enabled devices. Refer to "Connecting BLUETOOTH®" (P16) for connection settings.
- Turn on or off the Wi-Fi feature. " " is displayed on the status bar when this is on. Connection settings are necessary to use Wi-Fi features. Refer to "2. Wi-Fi" (P7) for connection settings.
- Line Out: You can switch the headphone output to the line output mode to connect external equipment. "Line Out" is displayed on the status bar when this is on.
- Tap when using balanced headphones and switch between the "Balanced" and "ACG" modes.
Balanced: Compared to the normal single-ended operation, this mode enables you to get a larger output and as the high voltage is not grounded together with the small signal, you can anticipate superior music quality. Because you get a larger output, you can drive headphones with a higher impedance.
ACG: The basic operating method is the same as Balanced (mode), but uses technology to even more forcefully fix grounding standards, so you can enjoy a sound quality with improved clarity and stability than Balanced (mode). Output volume is the same as the regular single-ended operation, however.
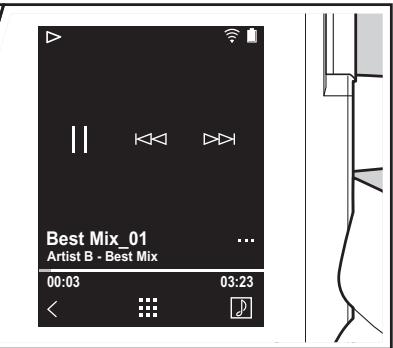
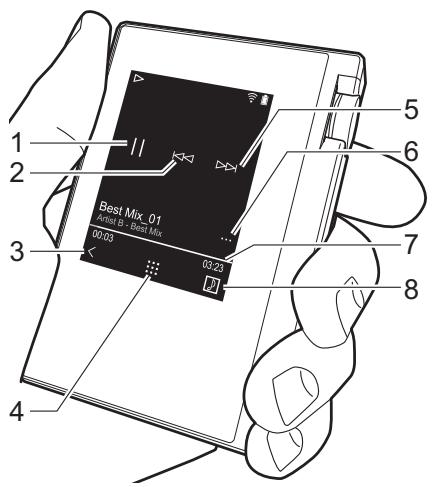
- Shows the name of the track being played. Tap to display the play screen.
- Volume dial: Turn the dial to adjust the volume.
- Online: Tap to switch to a screen showing a list of network services, such as Tuneln Radio, etc. (P15).
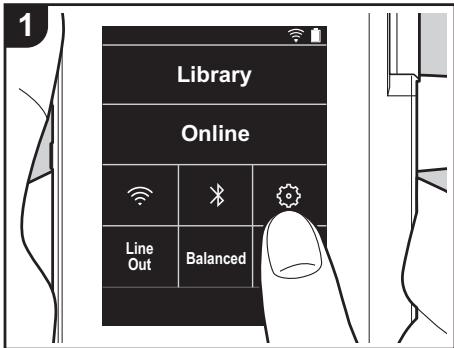
- You can make various settings for the unit, such as Wi-Fi and BLUETOOTH settings (P18).
- You can set to your preferred sound quality (P21).
- Artwork: Displays the album art of the track being played. Tap to display the play screen.
- Skip (▶▶I) button: Skip to the next track. Press and
hold to fast-forward through the track.
- Play/pause (▶/■) button
-
Skip (▶) button: Skip to the beginning of the track or to the previous track. Press and hold to rewind the track quickly.
16.micro SD card slot 1
17.micro SD card slot 2 -
When inserting the micro SD card into the card slot, insert with the contacts facing up and push in completely so the card clicks into place.
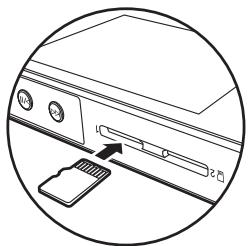
-
To remove the micro SD card, first unmount it (P29). After unmounting, push the micro SD card in until you hear a click and then pull straight out. The micro SD card may spring out so take care not to lose it.
-
Headphone jack ( balanced ): Connect headphones compatible with balanced output. (2.5 mm/4-conductor)
- Headphone jack (): Connect regular headphones. (3.5 mm/3-conductor)
- This unit does not support simultaneous use of the balanced headphone jack and the headphone jack. Using both jacks at the same time may result in damage.
- Charging lamp: This lights white when charging starts. It turns off when recharging finishes. If the unit is in a state that prevents charging, it flashes white. Try charging again after waiting a while.
21.Power button (O): Press and hold the power button to turn the power on. To turn the power off, press and hold the power button so the "Power Off?" screen is
displayed. You can turn the power off by tapping "Yes". To turn the display on or off, just press the button.
-
If operation becomes unstable, you can shutdown the unit by pressing and holding the power button for 10 or more seconds. Refer to "If operation becomes unstable" (P29) for details.
-
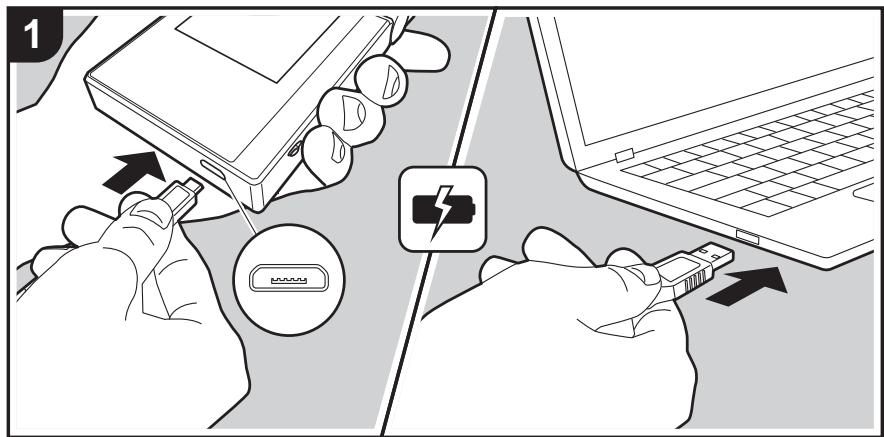
micro USB port: To charge the unit (P6) or transfer music files (P8, P11), connect the supplied micro USB cable.
-
HOLD switch: You can lock operations on this unit by sliding the switch up. When the "Operations while Holding" (P19) setting is "Enable", the volume dial and side buttons for play, etc., can still be used.
Turning the power on and initial settings
Initial Setup starts automatically
-
The battery is not charged at the time of purchase. Charge the unit with the supplied micro USB cable before use. Connect so the wider side of the plug is down when inserting into this unit's micro USB port. The recharging mark is displayed at the top right of the screen when recharging.
-
You can also recharge while the unit is on. The time for recharging may increase in this case.
-
The power comes on automatically when recharging starts, and the initial settings start.
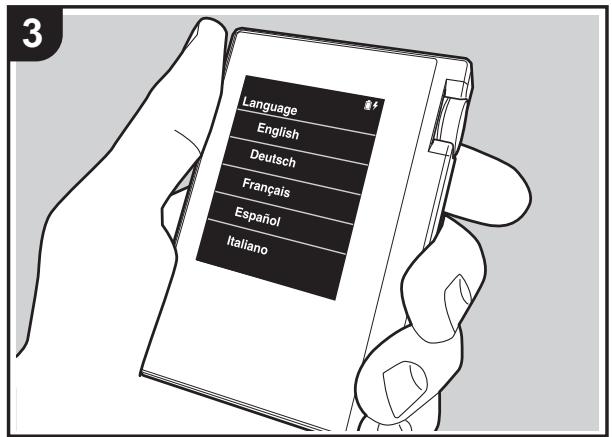
- Select the language you want to use first. Flick the list of languages up or down, then tap the language you want to use. When you select the language, a confirmation for the initial settings is displayed. Tap "Yes". If you tap "No", you will ext the initial settings and the home screen is displayed.
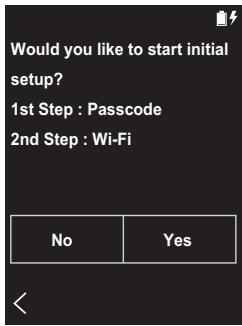
- "Passcode (P19)" and "Wi-Fi (P18)" settings can be completed later.
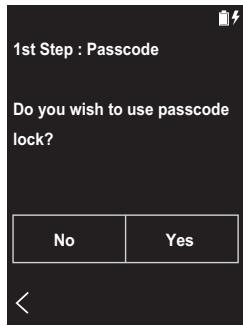
1.Passcode
Set the pass code used to protect this unit. When you set a pass code, the pass code screen is displayed when the power is turned on or when restoring from display off. You should create a pass code to protect your account if you are going to use a network service.
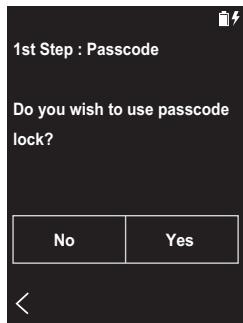
- Enter any four digit number. If you made a mistake with an entry, tap "×".
-
Enter the pass code again to confirm.
-
If you enter the wrong pass code three times, a message appears asking if you want to initialize the unit's settings. Note that even if the settings are initialized, the copied music files are not deleted.
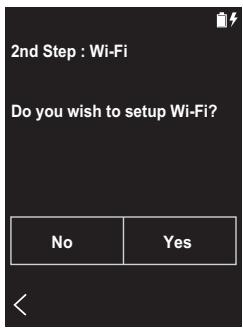
2. Wi-Fi
Set to use network services such as Tuneln Radio on this unit.


Wi-Fi can be connected in the following two ways.
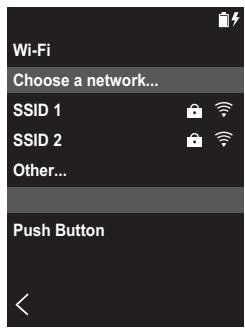
Selecting SSID:
- Tap the SSID of the access point you want to connect from the SSID displayed.
- If the SSID of the access point is not displayed, tap "Other..." in the SSID list and follow the on screen instructions to configure.
- After tapping the field for entering the password, enter the password of the access point, then tap "Connect". For details on how to enter text, refer to "Entering text" (P27).
- " " is displayed on the status bar on the screen when
the connections are complete.
Using the push button:
- The access point needs to have an automatic setting button.
-
Tap "Push Button" on the screen and press the automatic setting button on the access point.
-
The operation of the automatic setting button depends on your device. Refer to the instruction manual of your device for instructions.
- " " is displayed on the status bar on the screen when the connections are complete.
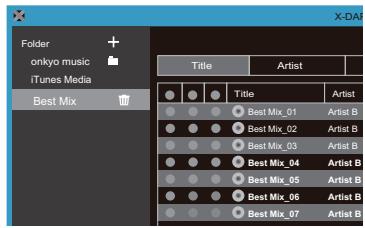
Copying music with "X-DAP Link"
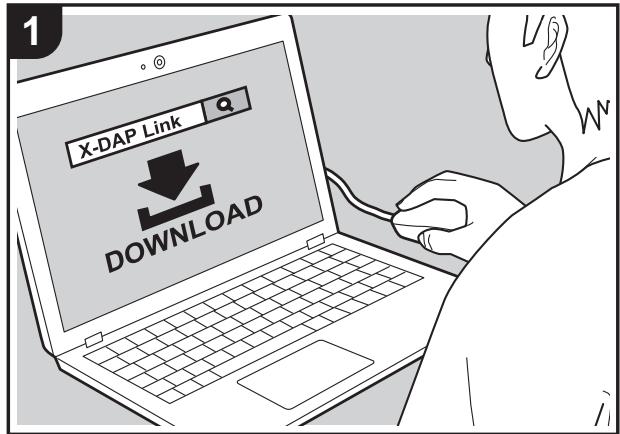
You can copy music files stored on your computer to the built-in storage on this unit or to a micro SD card in this unit, then listen to the music through the "Library" (P12). You can copy either using the data copying software "X-DAP Link" or by dragging and dropping (P11).
- X-DAP Link is compatible with Windows® 10 (32bit/64 bit), Windows® 8/8.1 (32 bit/64 bit), and Windows® 7 (32 bit/64 bit).
- To copy to a micro SD card, insert a micro SD card into the card slot (P5).
- When removing the micro SD card, unmount the micro SD card before removing it (P29).
- NTFS format micro SD cards are not supported on this unit.
Install [X-DAP Link] on your computer
This unit supports X-DAP Link versions 1.2.0 and later. When using version 1.2.0 or earlier, install the latest version before continuing.
Perform the following procedure when the unit is on.
- Start your computer and download the installer for X-DAP Link from the following site. http://www.jp.onkyo.com/audiovisual/portable/dap/ license.htm Double-click "setup.exe" to install. Follow the on-screen instructions to install. A shortcut is created on the desktop after installation.
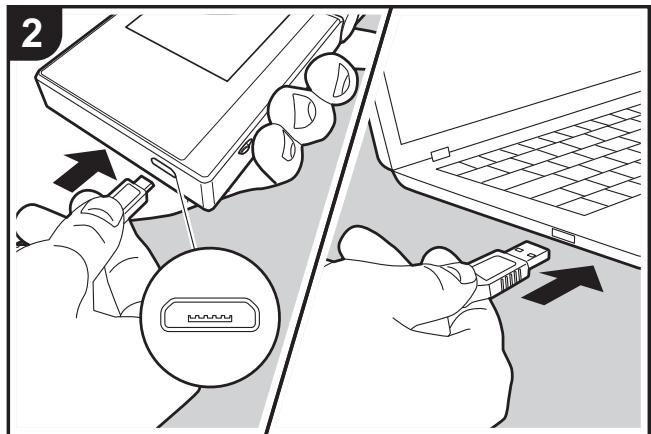
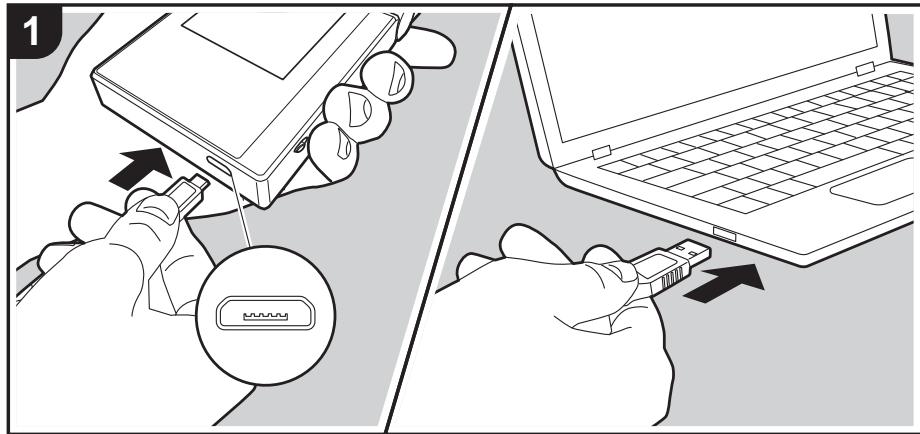
- Connect this unit to a computer with the supplied micro USB cable. Connect so the wider side of the plug is down when inserting into this unit's micro USB port. You may damage the plug or jack if you try to insert it the wrong way.
Do not tap "Unmount", displayed on this unit's screen, until copying is complete. If you do tap it, unplug the micro USB cable, then connect it again.
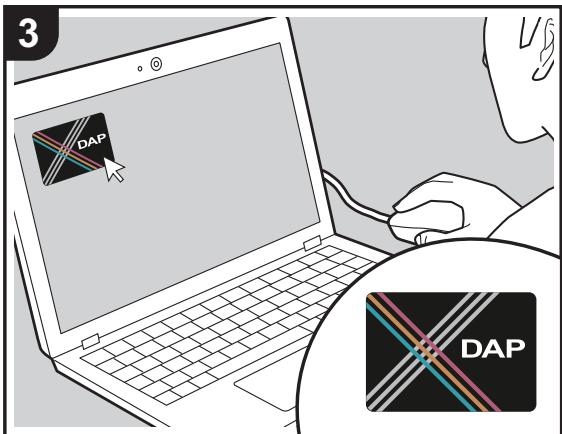
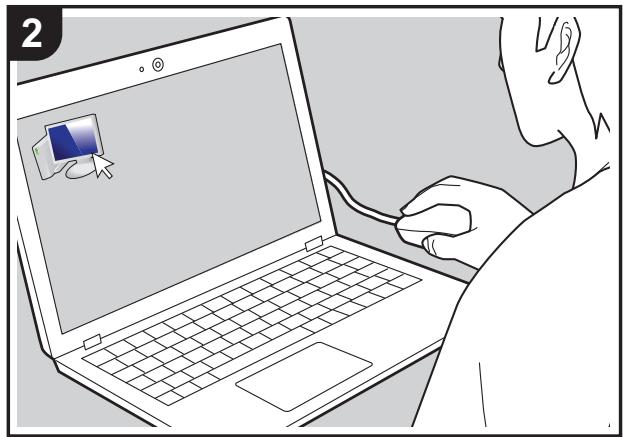
- Start X-DAP Link. The following types of screens are displayed when you start it.
![ONKYO DP-S1 - Install [X-DAP Link] on your computer - 1](/content/2019/10/11550/images/060a74cde131983f7e9d7ad9ef024b0876638527eaad2dd76235b8af46e67d58.jpg)
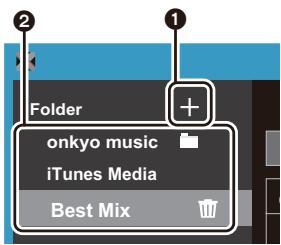
Copying music from a computer
- Click ① and select the folder that contains the music files you want to copy. If the folder you want to copy is already displayed, start selecting from ②.
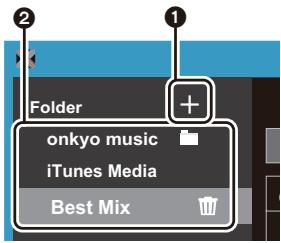
onkyo music
If there are music files you have downloaded from onkyo music (a site that distributes music files), select this folder.
iTunes Media
If you are using iTunes®, a play list and content are displayed. If iTunes cannot be selected, open "Preferences" - "Advanced" in iTunes, then put a check mark next to "Share iTunes Library XML with other applications".
- There may be some differences in the operations screens and how operations are performed depending
on the iTunes version. For details, see the operating instructions for iTunes.
- A list of music files is displayed in the center of the screen when you select it.

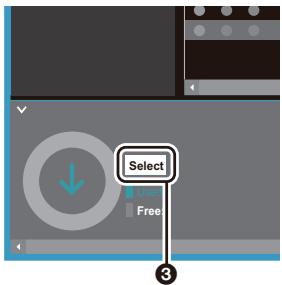
- Click ③ in the bottom left of the screen and select the copy destination. When copying to the Internal Storage of this unit, select "Internal", when copying to a micro SD card, select the "Removable Storage" for the card to be copied to, then click "OK". You can also click ④ ⑤ to specify different copy destinations to ③.
-
Select the music files you want to copy according to the copy destination specified in step 3. If the copy destination was selected by clicking ③ , put check marks in the column ⑨ to the left of the music files to be added. By clicking the check button ⑦ at the very top of the list, you can either select or deselect all tracks.
-
If there are already copied music files in the copy destination, the check button is automatically selected. If there are music files that you want to delete from this unit, deselect them.
If the copy destination was selected by clicking 4, click 8 in the central column, and if 5 was clicked to select the copy destination, click the check button 9 in the column on the right.
- If the copy destination was selected by clicking 3 in step 3, click 10.
If the copy destination was selected by clicking 4, click 1, and if 5 was selected click 12.
-
When "OK" is selected in the confirmation screen, the selected music files are copied to this unit.
-
When copying a music file and an error message is displayed, restart this unit and perform the operation again. If the error message is displayed again, use your computer to delete the "xdaplink" folder from the built-in storage of this unit.
-
Tap "Unmount" on this unit's screen and unplug the micro USB cable. Refer to "Listening to music from the "Library""(P12) for play operations.
Dragging and dropping to copy music
You can copy music files stored on your computer to the built-in storage on this unit or dragging and dropping to a micro SD card in this unit, then listen to the music through the "Library" (P12).
- To copy to a micro SD card, insert a micro SD card into the card slot (P5).
- When removing the micro SD card, unmount the micro SD card before removing it (P29).
- NTFS format micro SD cards are not supported on this unit.
Copying music from a computer
- Connect this unit to a computer with the supplied micro USB cable. Connect so the wider side of the plug is down when inserting into this unit's micro USB port. You may damage the plug or jack if you try to insert it the wrong way.
Do not tap "Unmount", displayed on this unit's screen, until copying is complete. If you do tap it, unplug the micro USB cable, then connect it again.
-
If "AutoPlay" or similar is displayed on your computer, select "Open folder to view files" and then proceed to step 3.
-
Open "PC", "My Computer", etc., on your computer.
- Select the save destination from the list. To copy to the built-in storage in this unit, open "Internal". To copy to a micro SD card, open the "Removable Storage" card you want to copy to.
- The screen displayed depends on the OS and language of your computer.
- Drag and drop the folder on your computer that contains the music files that you want to copy to the copy destination.
- Tap "Unmount" on this unit's screen and unplug the micro USB cable. Refer to "Listening to music from the "Library""(P12) for play operations.
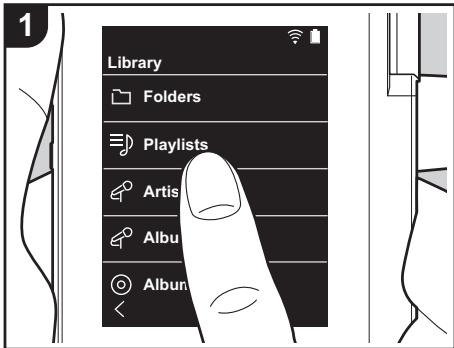
Listening to music from the "Library"


You can listen to music files copied from your computer or to music on an inserted micro SD card. Note that the operations to play are the same for both.
Refer to (P5) for how to insert the micro SD card.
- When removing the micro SD card, unmount the micro SD card before removing it (P29).
- NTFS format micro SD cards are not supported on this unit.
Playing Music with the "Library"
-
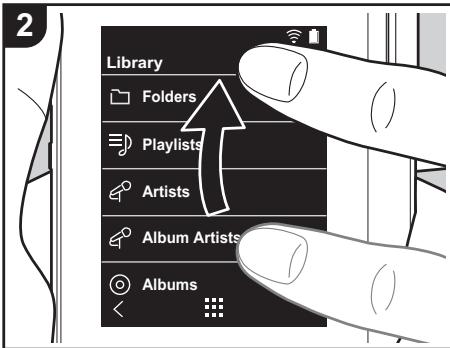
A categorized list of tracks you copied from your computer is displayed when you tap "Library" in the home screen.
-
It may take some time for synchronized tracks to be displayed.
-
Flick the list screen up and down then tap on the display category you want.
Folders
All tracks saved in the same folder level are displayed.
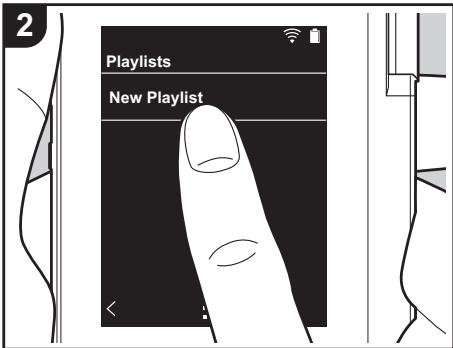
Playlists
Displays a list of play lists you have created (P14).
Artists
Displays by artists as recorded in the music files as participating artists.
Album Artists
Displays by artists as recorded in the music files as artists participating in the album.
Albums
Displays by album.
Songs
Displays all tracks.
Genres
Displays by genre.
-
When you tap the track you want to play in the list of tracks, the screen changes to the play screen and play starts. To return to the list of tracks, tap << at the bottom left of the screen.
-
Do not connect headphones that have
an impedance outside the rated range as this may result in damage. Refer to "General Specifications"(P28) for the headphone specifications.
- At the time of purchase, the Auto sync feature is on, so when music files are copied to this unit or a micro SD card with music files on it is inserted (P5), the data is automatically synchronized. When "Auto sync" (P19) has not been set, tracks may not be displayed.
Adjusting the volume
Turn the volume dial to adjust the volume.
- The volume bar is displayed on the screen when you turn the volume dial.
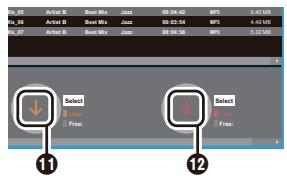
The play screen
Screen A
Screen 8
- Play/pause (▶/■)
-
Skipping (↓)
-
Return to the list of tracks.
- Switches to the home screen.
-
Skipping (▶▶I)
-
Switches to screen B
- Seek bar
Skip to the beginning of the track or to the previous track.
Skip to the next track.
Progresses along with the track's progress. By swiping left or right from the current play position, you can move the play position to the position where you lift your finger.
8. Tap to display the album art.
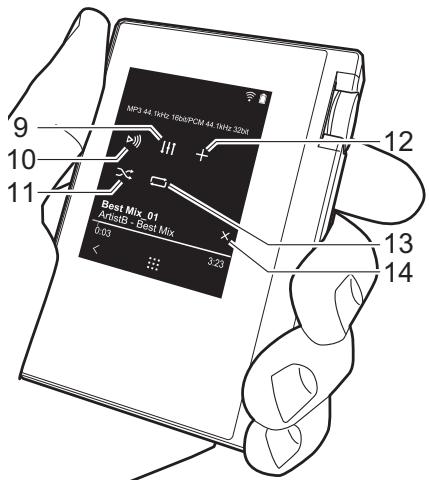
- Audio Adjust
You can set to your preferred sound quality (P21).
-
Switch output between "Headphone", "Line Out", or "Bluetooth".
-
When "Line Out" is selected, output through the headphone jack is at maximum volume, so do not use headphones. Adjust the volume on the connected device.
-
"Bluetooth" is displayed when BLUETOOTH is on and a BLUETOOTH wireless technology enabled device is connected.
11.Shuffle mode
You can switch shuffle play on or off by tapping this. " > " is displayed on the
status bar on the screen when this is on.
- The track being played is added to the play list (P14).
- Repeat mode
Tap to change the mode: 1 track repeat,
all track repeat, no repeat. "[]1"
is displayed on the status bar on thescreen when 1-track repeat is set, and
" " is displayed for all-track repeat. - 1-track repeat cannot be set when the shuffle mode is on.
- Switches to screen A. When you have switched to screen B from the album art screen, this switches to the album art screen.
Creating a play list
You can select the tracks you like to create your own play list.
- Tap "Playlists" in the categorized list in the "Library".
- Tap "New Playlist" and enter the title. For details on how to enter text, refer to "Entering text" (P27). Tap < at the bottom left of the screen to switch to the track list when you have finished entering text.
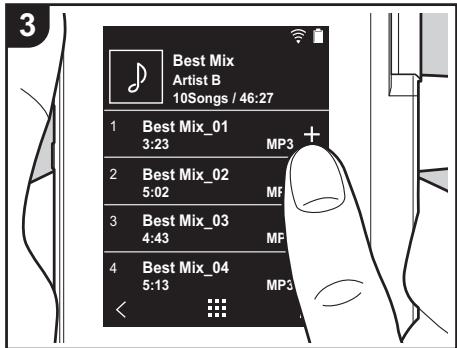
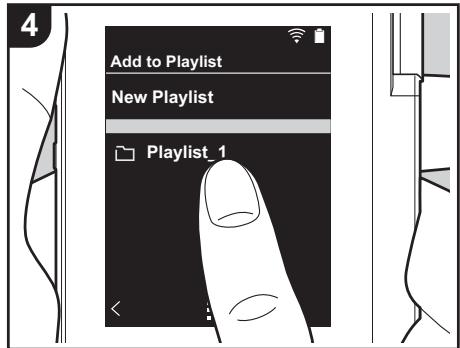
- In the list, tap the "+" to the right of the track you want to add to the play list.
- Tap a play list you have created to register the track in the play list.
-
Repeat steps 3 and 4 to keep adding tracks to the play list.
-
Play lists created outside the "Library", such as in iTunes, are not displayed in the list of play lists on this unit.
■ Editing a play list
Tap "Playlists" in the list of categories in the "Library" to display the list of play lists.
To delete a play list:
Tap " : " at the top right of the play list you want to delete, then tap " ".
To change the name of a play list:
Tap " : " at the top right of the play list whose name you want to change, then tap
■ Editing tracks in a play list
Tap "Playlists" in the list of categories in the "Library" to display the list of play lists. Tap the play list you want to edit next.
To delete a track from a play list:
Tap " : " at the top right of the track you want to delete, then tap " ".
Tracks are not deleted from the unit even if you delete them from a play list.
To change the order of tracks in a play list:
Tap " "at the top right of the track you want to reorder, then tap " ".
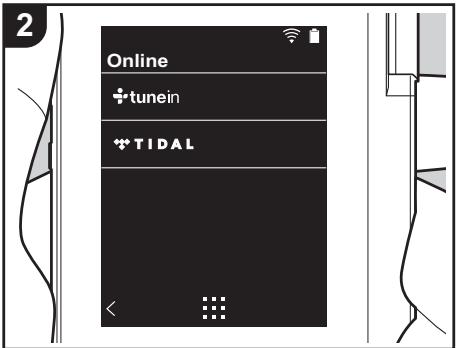
Using network services
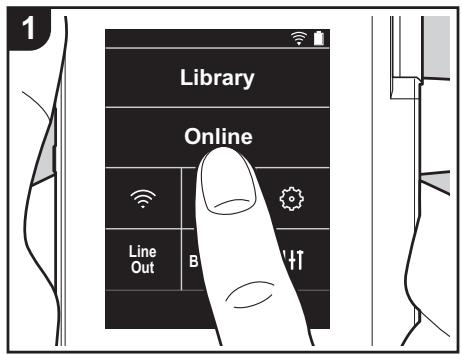
You can use network services such as Tuneln Radio and TIDAL by connecting this unit to a network that has an internet connection.
- There needs to be a Wi-Fi connection in order to play network services.
Depending on the network service, the user may need to register from their computer first. Refer to the websites for each of the services for details about them. - Functionality may be introduced by software updates and service providers may cease services, meaning that some network services and content may become unavailable in the future.
Playing Back
Perform the following procedure when the unit is on.
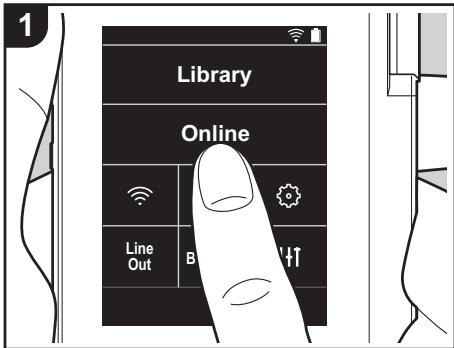
- Tap "Online" in the home screen of this unit.
- Tap the network service you want to use.
- Follow the on screen instructions and tap the radio station or program to start
play.
- To return to the preceding screen, tap " < " at the bottom left of the screen.
Network service menus
You can register certain stations as your favorites or delete stations you have registered from your favorites. The menu displayed depends on the service currently selected.
A menu is displayed by tapping "..." at the bottom right of the screen while playing a station and then tapping " " in the middle of the screen.
Regarding the Tuneln Radio Account
Creating an account on the TuneIn Radio website (tunein.com) and logging in from the unit allows you to automatically add your favorite radio stations and programs to your "My Presets" on the unit as you follow them on the website. "My Presets" are displayed in the level under TuneIn
Radio.
To display a radio station registered in "My Presets", you must log into Tuneln Radio from the unit. To log in, select "Login" - "I have a Tuneln account" in the "tunein" top list on the unit, and then enter your user name and password.
- If you associate the device on My Page within the Tuneln Radio website using the registration code obtained by selecting "Login" on the unit, you can log in from "Login" - "Login with a registration code" without entering the user name and password.
Connecting BLUETOOTH®
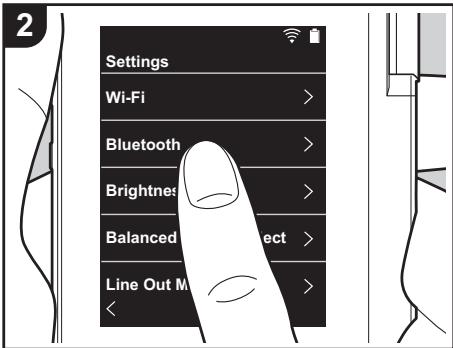
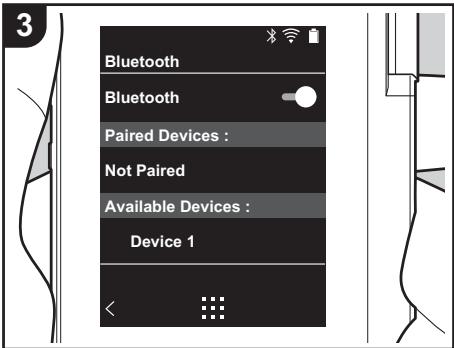
You can listen to music wirelessly by using BLUETOOTH wireless technology enabled devices such as headphones or speakers. Reception is possible over a distance of 10 m with a clear line of sight. The communication distance will be reduced in some conditions.
Pairing for play
Pairing is necessary when connecting the BLUETOOTH wireless technology enabled devices for the first time. Make sure the BLUETOOTH wireless technology enabled device you want to connect is ready to be detected.
- Tap " 念 " in the home screen.
- Tap "Bluetooth".
- Turn on the BLUETOOTH feature and select the device to connect from the "Available Devices" list.
- Pairing will end after a short time.
- Tap "Library" or "Online" in the home screen.
- This unit can store the data of up to eight paired devices.
When connecting after the first time
- Tap " " in the home screen.
- Tap "Bluetooth" and tap the device you want to connect in "Paired Devices".
Canceling a connection
- Tap " © " in the home screen.
- Tap "Bluetooth".
- Tap " : " at the top right of the device you want to disconnect, then tap "Disconnect".
- Pairing information is not deleted even if you cancel the connection. Tap "Forget this device" to delete the pairing information.
Line Out
You can connect a headphone amplifier or D/A converter, for example, that has line input. You will need a headphone plug (commercially available) to connect to this unit. Make sure you have the correct type of headphone plug for the jack of the device you are connecting.
Connecting a device
- Connect the device to this unit through the headphone jack.
-
Turn on the power of this unit, and select "Line Out" in the home screen to turn Line Out on. "Line Out" is displayed on the status bar on the screen when this is on.
-
When "Line Out" is on, output through the headphone jack is at maximum volume, so do not use headphones. Adjust the volume on the connected device.

Various settings
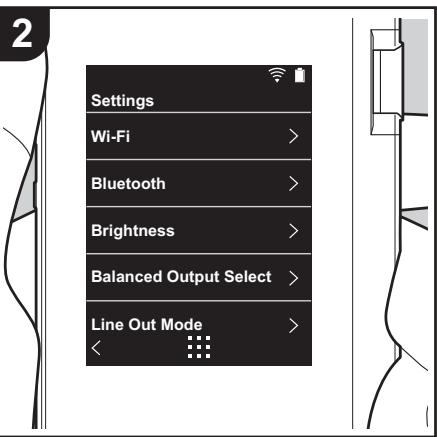
Tap to make settings for Wi-Fi and BLUETOOTH, settings for audio output, pass code settings, software updates, and a variety of other settings.
- Tap " 品 " in the home screen.
- Tap the item you want to set.
Wi-Fi
"On": Connection to a network via Wi-Fi is enabled. This also enables you to make various settings related to Wi-Fi, such as selecting the SSID of the access point to be connected. "Off (default value)": Connection by Wi-Fi is not enabled
Bluetooth
"On": Enables connection with a BLUETOOTH wireless technology enabled device. This also enables you to make various settings related to BLUETOOTH, such as pairing. "Off (default value)": When BLUETOOTH is not to be used
Brightness
You can adjust the brightness of the screen. The brightness can be set with the slide bar in 10 steps between " (1)" and " (10)". The screen becomes brighter when you slide it to the right (default value is "9").
Balanced Output Select
Use when balanced headphones are to be connected.
"Balanced (default value)": Compared to the normal single-ended operation, you can get a larger output and the high voltage is not grounded together with the small signal, so you can anticipate a superior effect in the quality of the music. Because you get a larger output, you can drive headphones with a higher impedance.
"ACG": The basic operating method is the same as Balanced (mode), but uses technology to even more forcefully fix grounding standards, so you can enjoy a sound quality with improved clarity and stability than Balanced (mode). Output volume is the same as the regular single-ended operation, however.
- This unit does not support simultaneous use of the balanced headphone jack and the headphone jack. Using both jacks at the same time may result in damage.
Line Out Mode
"On": Switch the headphone output to the line output mode to connect external equipment. When "Line Out Mode" is on, output through the headphone jack is at maximum volume, so do not use headphones. Adjust the volume on the connected device.
- When turned on for European models, you can then select either "Fixed (default value)"
or "Variable". When "Variable" is selected, volume can be adjusted on this unit. If you select "Fixed", adjust the volume on the connected external device. "Off (default value)": Line output is not enabled
Audio
Gain: You can select the headphone output level to suit your headphones. Select "High (default value)", "Normal", or "Low".
- Lower the volume first if you intend to select "High".
- When connecting a pair of headphones for the first time, set to "Low" and change the volume level gradually.
Volume Limiter: You can set an upper limit for the maximum volume so that the volume does not increase too much. Select between "0" and "60 (default value)".
Music Library Sync
Auto sync: When this is on, music files you have copied to this unit from a computer or music files on a micro SD card are automatically synchronized with the library. "On (default value)": When this function is to be used "Off": When this function is not to be used
Sync Now
If "Auto sync" is off, tap this to manually synchronize the music files with the library. You can select "Sync All" or "Sync Added Songs" after tapping this. Sync All: Select to synchronize all transferred tracks. Sync Added Songs: Select to synchronize only tracks that have been added.
SD Card
Unmount SD Card: You can unmount a micro SD card. The card can be damaged or may stop working properly if you fail to unmount the card first.
Format SD Card: You can initialize a micro SD card. All the data on the card will be deleted when you initialize it, so make sure you save data you want to keep to a computer, etc. To initialize, after tapping the micro SD card to be initialized, tap "Format" - "Confirm".
Physical Buttons
Volume Rotation: You can set the direction to turn the dial when adjusting the volume.
Normal (default value): Turn clockwise to increase the volume.
Reverse: Turn anticlockwise to increase the volume.
Operations while Holding
When set to "Enable", even when you slide the hold switch (P5) up to lock operations on this unit, the Volume dial and side buttons for play (P5), etc., can still be used. Tap this to change the settings for "Volume" and "Side Buttons".
Volume: "Disable (default value)"/"Enable"
Side Buttons: "Disable (default value)"/"Enable"
Home
You can change the buttons displayed in the home screen to buttons for features you prefer. Change the buttons displayed in the home screen from the home screen. Refer to "Customizing the Home screen" (P23) for how to change.
Power Management
Auto Display Off: The unit's LCD automatically switches off when the specified time elapses with no operations. Select "Off", "15 seconds", "30 seconds (default value)", "1 minute", "2 minutes", or "5 minutes".
Auto Power Off: The unit's power automatically switches to "Off" when the specified time elapses with no operations. Select "Off (default value)", "10 minutes", "30 minutes", or "60 minutes".
Passcode
Passcode Lock: Set a four-digit pass code to protect this unit. (This is not set by default)
Change Passcode: Change the number for the set pass code. This can not be selected if a pass code has not been set.
- If you enter the wrong pass code three times, a message appears asking if you want to initialize the unit's settings. Even if the settings are initialized copied music files are not deleted.
- You should create a pass code to protect your account if you are going to use a network service.
■ Language
Select the language you want to use. Flick the list of languages up or down, then tap the language you want to use.
English, German, French, Spanish, Italian, Swedish, Russian, Traditional Chinese, Simplified Chinese, Japanese
Software Update
Update Notice: Availability of a software update will be notified via network when "Enable" is set.
"Disable": Do not notify
"Enable (default value)": Notify
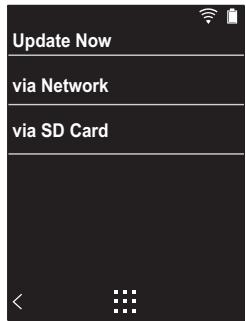
Update Now: Software can be updated via a network or via a micro SD card.
Select "via Network" or "via SD Card". You can not select if there is no software update.
Device Information
Software Version: The current software version is displayed.
MAC Address: The MAC address of this unit. This value is specific to the component and cannot be changed.
Serial Number: The unique identifier for this unit.
License: Displays a guide to our privacy policy and the licenses for open source software.
Certification: The certificates for acquired safety standards are displayed.
Reset
Reset All Settings: The settings of the unit are initialized. Note that music files copied to the internal storage are not deleted. Also, after resetting, the initial settings screen is automatically displayed.
Factory Reset: Reset the unit to the condition it was in when you purchased it. Note that music files copied to the internal storage and settings data are all deleted.
Audio Adjust
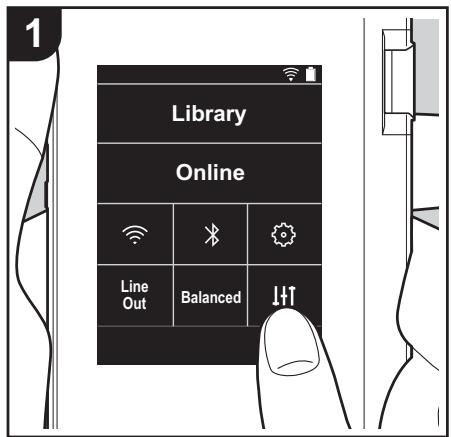
Tap to set to your preferred sound quality.
- Tap "
in the home screen.
- Tap the item you want to set.
Custom Sound
"On": Select to use "Equalizer" and "Bass Enhancer"
"Off (default value)": When this function is not to be used
Equalizer: You can select the sound quality you like from "Flat (default value)", "Pop", "Rock", "Jazz", "Dance", "Vocal", "Custom 1", "Custom 2", or "Custom 3". Note that you can register your own original equalizers in Custom 1 to 3 using the following operations.
- To edit an equalizer, first tap the equalizer you want to edit, then tap it again.
- Tap "< >" to modify the frequency and tap " " to adjust the volume of the selected frequency.
- Tap "Save" when editing is finished and select the location to save to from Custom 1 to 3.
Bass Enhancer: Select a bass sound effect from one of five levels.
Select "Off (default value)", "1", "2", "3", "4", or "5".
Upsampling Mode
The sampling frequencies of the tracks played are upsampled for output.
Select "Off (default value)", "96k/88.2k", or "192k/176.4k".
Hi-bit 32
"On": 16bit or 24bit audio is re-quantized to 32 bit so that a smoother, more refined sound is realized.
"Off (default value)": When this function is not to be used
Digital Filter
By modifying the filter characteristics of the built-in digital converter you can enjoy three different types of modified sound quality.
Select "SHARP (default value)", "SLOW", or "SHORT".
Lock Range Adjust
You can improve sound quality by adjusting the lock range of the audio input signal's jitter (modulation). The lock range can be adjusted from the more precise "Narrow" up to "Wide" in seven steps. (Default Value is "Normal")
- If you change the lock range and the sound is interrupted, adjust to the Normal or Wide ends.
Customizing the Home screen
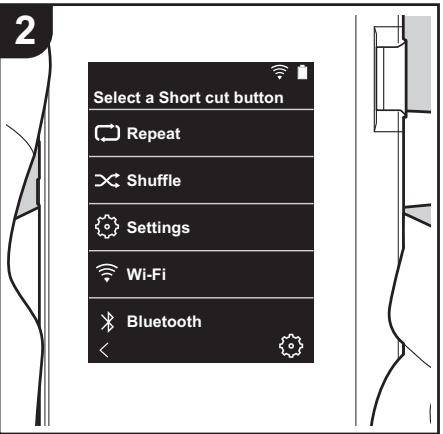
By pressing and holding the buttons in the home screen of this unit, you can change the buttons displayed to ones for features you prefer.
- "Library" and "Online" cannot be changed.
Changing shortcut buttons
- In the home screen, press and hold the button you want to change.
- In the "Select a Short cut button" screen, tap the feature you want to display in the home screen. Features that are already displayed in the home screen will be displayed in gray and you will be unable to select them. Select "None" if you do not want to place a button.
Software Update
The updating function on this unit
This unit has functionality to update the software over a network or a micro SD card. This enables us to make improvements to a variety of operations and to add features.
How to update
There are two methods for updating the firmware: via network and via micro SD card.
Use the one that best suits your environment. The update may take about 3 minutes to complete for either method: via network or micro SD card. Furthermore, existing settings are guaranteed regardless of the method used for update.
-
For the latest information on updates, visit our website. There is no need to update the software on this unit if there is no update available.
During an update, do not -
Disconnect and reconnect any cable or micro SD card, headphones, or perform any operation on the component such as turn off its power
- Accessing this unit from your computer
Disclaimers: The program and accompanying online documentation are furnished to you for use at your own risk.
We will not be liable and you will have no remedy for damages for any claim of any kind whatsoever concerning your use of the program or the accompanying online documentation, regardless of legal theory, and whether arising in tort or contract.
In no event will we be liable to you or any third party for any special, indirect, incidental, or consequential damages of any kind, including, but not limited to, compensation, reimbursement or damages on account of the loss of present or prospective profits, loss of data, or for any other reason whatsoever.
Updating the Firmware via Network
First make sure the unit is connected by Wi-Fi.
-
Make sure the unit is charged sufficiently before updating.
-
Tap "O" in the home screen.
- Tap "Software Update".
-
After tapping "Update Now", the software update starts when you tap "via Network".
-
You will not be able to select "via Network" if there is no software update.
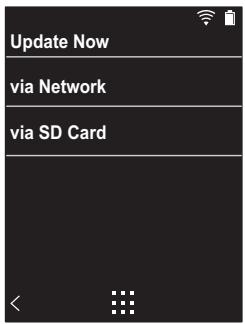
-
"Completed!" is displayed when the update is complete.
-
If "Failed to Update" screen is displayed, the update has failed. Redo from the beginning.
Updating via micro SD card
Refer to (P5) for how to insert the micro SD card.
- When removing the micro SD card, unmount the micro SD card before removing it (P29).
- NTFS format micro SD cards are not supported on this unit.
- Make sure the unit is charged sufficiently before updating.
- Insert a micro SD card into your computer.
- Download the software file from the our website to your
PC and unzip.
- Copy all unzipped files and folders to the root folder of a micro SD card.
- Make sure to copy the unzipped files.
- Insert the micro SD card into a card slot (either 1 or 2) on this unit.
- Tap " " in the home screen.
- Tap "Software Update".
-
After tapping "Update Now", the software update starts when you tap "via SD Card".
-
You will not be able to select "via SD Card" if there is no software update.
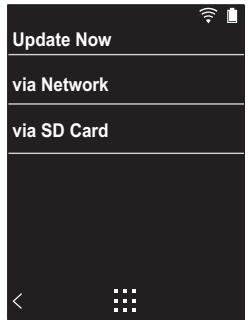
-
"Completed!" is displayed when the update is complete.
-
If "Failed to Update" screen is displayed, the update has failed. Redo from the beginning.
Supplementary Information
Due to software updates after you make your purchase or software changes during production of the product, there may be additions or changes to the settings and operation available compared to what is in the instruction manual. For information about the settings and operations that have been added or changed, see the following references.
Supplementary Information
Click here <<

Entering text
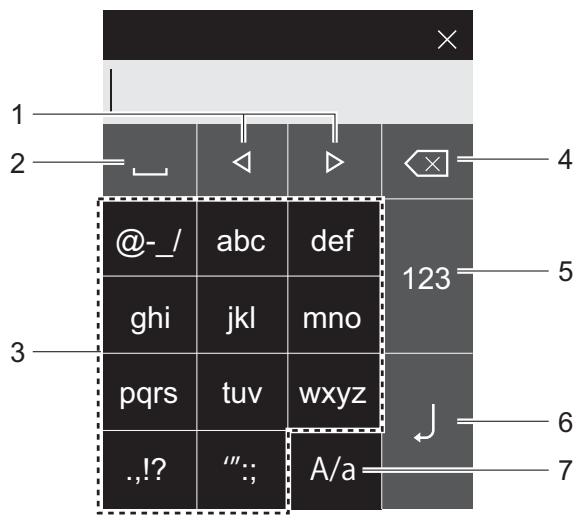
- Moves the cursor.
- Enters a space.
- Tap to enter text.
- Removes a character on the left of the cursor.
- Change the type of text.
- Confirm the text you entered.
- Switch between upper and lower case by tapping while entering text.
- This unit enables input of the alphabet, symbols, and numbers only.
General Specifications
Display
2.4-inch, 240 × 320 dot resolution
Interfaces and input/output jacks
Headphone jack: 3-conductor, Ø3.5 mm, impedance: 16 to 300 Ω*
Headphone jack (balanced output): 4-conductor, Ø2.5 mm, impedance: 32 to 600 Ω*
- Do not connect headphones that have an impedance outside the rated range as this may result in damage. 1 micro USB port, 2 micro SD card slot
Network Section
Wireless LAN: IEEE802.11 a/b/g/n compliant BLUETOOTH: A2DP, AVRCP
Rated input
5VDC,1.5A
Battery power
1,630 mAh
Operating temperature
5^ C to 35^ C
Internal memory
16 GB (including system area)
Mass of main unit
130 g (4.6 oz)
External dimensions (excluding protrusions)
63 mm × 94 mm × 15 mm
2-1/2" × 3-11/16" × 9/16" (width/height/depth)
Supported playback formats
MP3(44.1 kHz/48 kHz), AAC(44.1 kHz/48 kHz/96 kHz)
FLAC/ALAC/WAV/AIFF (44.1 kHz/48 kHz/88.2 kHz/96 kHz/176.4 kHz/192 kHz)*,
MQA, DSF/DSDIFF (2.8 MHz/5.6 MHz)
- Files that are protected by DRM cannot be played.
Continuous play time
Times shown are a guide. Playback times depend on settings.
FLAC lossless 24 bit 96 kHz: 15 hours
- With the screen off, playing with Music, and using a 3-contact Ø3.5 mm headphone connection
Number of music files recordable
This is a guide to the number of music files you can record to the internal memory of this unit.
Approximately 2,400 tracks (MP3 format: when 5 MB)
Approximately 60 tracks (FLAC lossless 24 bit/192 kHz: when 200 MB)
Supported SD card formats
FAT, FAT32, exFAT
Specifications and appearance are subject to change without prior notice.
We will not accept responsibility for damage arising from the connection of equipment manufactured by other companies.
Cautions for use
If operation becomes unstable
- The issue may be fixed by restarting this unit. Press and hold the power button on this unit for 10 or more seconds to restart the unit. (The settings in the unit are maintained.)
Removing the micro SD card
- When removing the micro SD card, in the home screen tap "O" - "Unmount SD Card" - "SD Card 1" - or "SD Card 2" to unmount the micro SD card, then remove it. The card can be damaged or may stop working properly if you fail to unmount the card first. Refer to (P5) for how to remove.
This unit
- Use a 4-conductor plug for the 2.5mm diameter headphone jack of this unit, and use a 3-conductor plug for the 3.5mm diameter headphone jack. It is not compatible with microphone input.
- This unit does not support simultaneous use of the balanced headphone jack and the headphone jack. Using both jacks at the same time may result in damage.
- Take care that dust and foreign objects do not get into the entrance of the micro SD card slot, as this can cause a malfunction.
- Do not press down with force on the unit when the unit is placed with the screen facing down. This can damage the LCD and the volume dial.
- The antenna is built into the bottom of the back of the main unit. The transmission speed of the unit may be adversely affected if you block the antenna area with your hand.
Electronic authorization labeling
You can confirm information related to authorizations using
the following procedure:
- Tap "O" in the home screen.
- Tap "Device Information".
- Tap "Certification".
License and Trademark
Bluetooth
The Bluetooth® word mark and logos are registered trademarks owned by Bluetooth SIG, Inc.
Windows® 7, Windows® Media, and the Windows® logo are trademarks or registered trademarks of Microsoft Corporation in the United States and/or other countries.

CERTIFIED
The Wi-Fi CERTIFIED Logo is a certification mark of Wi-Fi Alliance®.
iTunes is a trademark of Apple Inc., registered in the U.S. and other countries.
DSD and the Direct Stream Digital logo are trademarks of Sony Corporation.
"All other trademarks are the property of their respective owners."
"Toutes les autres marques commerciales sont la propriété de leurs propriétaires respectifs."
"El resto de MARCAS comerciales son propidad de sus respectivos propriétarios."
"Tutti gli altri marchi di fabbrica sono di proprietà dei rispetti proprietari."
"Alle anderen Warenzeichen sind Eigentum ihrer jeweiligen Eigentümer."
"Alla andra varumärken tillhör deras respektive agare."
" BCE TOBAPbHbIe 3HAKn RANHOTC0 C06CTBEHNHOCTBO COOTBETCTBYOUIXN BVAJADJIbJE."
所有其他商標為各自所有者所有。
所有其他商标均为其各自所有者的财产。
ONKYO
2-3-12 Yaesu, Chuo-ku, Tokyo 104-0028 JAPAN
18 PARK WAY, UPPER SADDLE RIVER, NEW JERSEY 07458, U.S.A.
Tel: 1-201-785-2600
Gutenberg str. 3, D-82178 Puchheim Germany
Tel: +49-8142-4401-0
Unit 1033, 10/F, Star House, No 3, Salisbury Road, Tsim Sha Tsui Kowloon, Hong Kong,
Tel: +852-2429-3118
E-mail: service.hk@pioneeronkyoasia.com
安桥(上海)商贸有限公司
High Fidelity Audio Player
取掇說明書
Instruction Manual
Mode d'emploi
The Bluetooth® word mark and logos are registered trademarks owned by Bluetooth SIG, Inc.
Windows® 7, Windows® Media, and the Windows® logo are trademarks or registered trademarks of Microsoft Corporation in the United States and/or other countries.

CERTIFIED
The Wi-Fi CERTIFIED Logo is a certification mark of Wi-Fi Alliance®.
iTunes is a trademark of Apple Inc., registered in the U.S. and other countries.
DSD and the Direct Stream Digital logo are trademarks of Sony Corporation.
"All other trademarks are the property of their respective owners."
"Toutes les autres marques commerciales sont la propriété de leurs propriétaires respectifs."
"El resto de MARCAS comerciales son propidad de sus respectivos propriétarios."
"Tutti gli altri marchi di fabbrica sono di proprietà dei rispetti proprietari."
"Alle anderen Warenzeichen sind Eigentum ihrer jeweiligen Eigentümer."
"Alla andra varumärken tillhör deras respektive agare."
" BCE TOBAPbHbIe 3HAKn RANHOTC0 C06CTBEHNHOCTBOOHTBCTBYIOUX BNAJDEHbIe8."
所有其他商標為各自所有者所有。
所有其他商标均为其各自所有者的财产。
ONKYO
2-3-12 Yasu, Chuo-ku, Tokyo 104-0028 JAPAN
18 PARK WAY, UPPER SADDLE RIVER, NEW JERSEY 07458, U.S.A.
Tel: 1-201-785-2600
Gutenberg str. 3, D-82178 Puchheim Germany
Tel: +49-8142-4401-0
Unit 1033, 10/F, Star House, No 3, Salisbury Road, Tsim Sha Tsui Kowloon, Hong Kong,
Tel: +852-2429-3118
E-mail: service.hk@pioneeronkyoasia.com
安桥(上海)商贸有限公司
High Fidelity Audio Player
取掇說明書
Instruction Manual
Mode d'emploi
The Bluetooth® word mark and logos are registered trademarks owned by Bluetooth SIG, Inc.
Windows® 7, Windows® Media, and the Windows® logo are trademarks or registered trademarks of Microsoft Corporation in the United States and/or other countries.

CERTIFIED
The Wi-Fi CERTIFIED Logo is a certification mark of Wi-Fi Alliance®.
iTunes is a trademark of Apple Inc., registered in the U.S. and other countries.
DSD and the Direct Stream Digital logo are trademarks of Sony Corporation.
"All other trademarks are the property of their respective owners."
"Toutes les autres marques commerciales sont la propriété de leurs propriétaires respectifs."
"El resto de MARCAS comerciales son propidad de sus respectivos propriétarios."
"Tutti gli altri marchi di fabbrica sono di proprietà dei rispetti proprietari."
"Alle anderen Warenzeichen sind Eigentum ihrer jeweiligen Eigentümer."
"Alla andra varumärken tillhör deras respektive agare."
" BCE TOBAPbHbIe 3HAKn RANJIKOTC OoCTBEHNHOCTbIO COOTBETCTBYOUIXN BVAJADJIbJE."
所有其他商標為各自所有者所有。
所有其他商标均为其各自所有者的财产。
ONKYO
2-3-12 Yasu, Chuo-ku, Tokyo 104-0028 JAPAN
18 PARK WAY, UPPER SADDLE RIVER, NEW JERSEY 07458, U.S.A.
Tel: 1-201-785-2600
Gutenberg str. 3, D-82178 Puchheim Germany
Tel: +49-8142-4401-0
Unit 1033, 10/F, Star House, No 3, Salisbury Road, Tsim Sha Tsui Kowloon, Hong Kong,
Tel: +852-2429-3118
E-mail: service.hk@pioneeronkyoasia.com
安桥(上海)商贸有限公司
High Fidelity Audio Player
取掇說明書
Instruction Manual
Mode d'emploi
The Bluetooth® word mark and logos are registered trademarks owned by Bluetooth SIG, Inc.
Windows® 7, Windows® Media, and the Windows® logo are trademarks or registered trademarks of Microsoft Corporation in the United States and/or other countries.

CERTIFIED
The Wi-Fi CERTIFIED Logo is a certification mark of Wi-Fi Alliance®.
iTunes is a trademark of Apple Inc., registered in the U.S. and other countries.
DSD and the Direct Stream Digital logo are trademarks of Sony Corporation.
"All other trademarks are the property of their respective owners."
Unit 1033, 10/F, Star House, No 3, Salisbury Road, Tsim Sha Tsui Kowloon, Hong Kong,
Tel: +852-2429-3118
E-mail: service.hk@pioneeronkyoasia.com
安桥(上海)商贸有限公司
- HactpoKy npaMeTPOB "Papoiy (P19)" u "Wi-Fi (P18)" MoXKnO 3aBepuNTb P03dHee.
1. Napopolb
Дязштby yctpoctBa 3aадаite napOB.Пocne 3aadHn npaONI OTObpa3ntc3kpan, NOBbIooHc npB KJIIOUeHHN NITaHIN NII IN DcNIIeE.CsIn Bbl HAM epebaTeCB IcNoIb3ObATb CeTBeBle CnyK6bl, CO3aIte npoNB dЯ 3aunTB BaWey uHTHOJ 3aHcN.
-
BBeHnTe YeTbIpeX3HaHNo YncNo. B cIyuae Oun6Kn npn Habope KocHTecb" l
2.ДлЯ посторждень вьеди паюься pa3. -
Ecni Bbl BVeDeTe He npabInbHbI npoIb Tpu p3a, OTO 6pa3ntc4 3apoc HnHuaNHa3aunn HacTpoek ycTpo ICTBa. Obpatnte BnImaHne, YTO daXe npi INHuaJn3aunn HacTpoEK CKOpINpOBaHHbI M y3bikalhbIe paJIbI He ydaJIaHTC8.
2. Wi-Fi
3aJaIe 3TN HAcTPOKIN, YTO6bl NcIOb3ObA Tb Ha 3Tom yCTPOIcTBe cTeBbIe CnyKbI, TaKne KaTunEn Radio.
Wi-Fi MoXHo IOnKJIOnHTb CJIeDyUOuIMN DByMra CnOCo6aM n.
Bb16op SSID:
-
Bыберпгь в сиисе SSD подкюа EMуToчу Do CTyna.
-
Ecnn SSID tockn doctyna He oTo6paKaetc, BbIbePnte "Dpyrooe...B cncske SSID u cnedeyute oTo 6paKaembln Ha 3kpaH e HNCTpyKUmaM nO Ko HnfuRpaun.
-
Kocnntecb nojnapoTouKnDcTyna, BVeJnte npoIb nKocnTeB "PoiKJIuChyT". PoiPobHyIOHΦopM aunOToM, KaK BBOJNTb TeKCT, CM. B pa3JeNe "BBo
TeKCTa" (P27).
3.ПослЕ ВьИОПнЕнЯ BCEX ПОДКЛЮЧЕНВ CTPOKE COCTO RAHAЗКРАЕ OTOБРаЖAEТС"
IcnoJb3OBaHne KhoNk:
Tocka DocTyna DoJnxHa NMeTb KHOJky aBTOMaTnuecko NaCTpoiKn.
1. KocHTecb "KHONka" Ha 3kpaHe n HaxMNTe KHONky aBTo MaTnueCKoN HAcTpoiKn Ha ToUke DoCTyna.
KoHnpoBaHHe My3bIKc KOMNbIbTepa
- Μεικητε 1и BBi6epnte πanky C My3bikalhblIMn ΦaIIamnДг KONIPoBaHnry. Ecπn 3ta πanka yke OTO 6paxaetc, NaHnHTe BBi6npaTb B oBnaCTn 2.
onkyo music
Ecnn mHeoTcMy3bIkaJIbHbIe paJNbI, 3aRpyKeHHbIe c onkyo music (Be6-caIT My3bIkaJIbHbIX paJIOB), BbIbepnte 3Ty npKy.
iTunes Media
EcIn BbI nCnOJIb3yete cIyJx6y iTunes,OTOBpa3ntcra CnICOK BOCnpOn3BVeDHeHn N KOHTe. EcIn Bbl6paTb iTunes HeJIb3r,OTKpoIte "HAcTPOIkn" - "DOnONHeHn" B iTunes uYCTaHOBtE pAnXoK "PpeOcTAbTb DpymM nporpammm Doctyn K paIny XML MedinaTeKn iTunes".
BnD ekpaHOB nФyHKUOHNIOBaHne MOrY 3aBnCtB o T Bercn iTunes. PoiPbOHee cm. INcTpkyuNn noIb3o BateTn iTunes.
2.После ee ВьбopaВцentpeЗкранаОтobpa3ntсспсok My3bikalnbHbIXФaINOB.
OTo6paKaTaCnUCoN JxHaHpAm.
3.Пинхашии Haжелаую KOMNO 3ицив CBNUCKE KOMN03ициь Кран М eняетсЯ на 3кран BOCNPOUN3BeDEHnI, И 3anyckaetc BOCNPON3BeDEHne.YTObI BEHPYtbcB CNTNCOK KOMN03ици, KO CHNTECb "C"В HIXKHem JEBOM YrJy 3kpanaH.
He nodklouaHTe hayuHnKc cIM neDaHCOM BHe HOpMnPOBaHHOrO dHaNa3OHa, NocKoJbky 3TO MOKeT npUBeCTN K NOBpeXdEHHO.
XapakTepncTNKn HayuHnKOB CM. B
pa3dene "O6uNe
xapakTepncTNK"(P28).
Ha MOMENT NOKyKNI FyHKUINA Bt. CnHxPOHN3aUNB KNIIOHeA, IIO3TOMy PnKoNIPOBAHm My3bIKaJIbHbIX faiIOB Ha yCTPOINCTBO INIu YCTaHO BKe KapTbI mICRO SD C My3bIKaJIbHBIM n Fainamn (P5) daHhble cInxpo H3yOTcABTOMATueCKN. EcIn NfYHKUIN "ABt. CnHXPOHN3aUN" (P19)
He BKJIIOUeHa, KOMN03nCmN MOrYT He OTo6paKaTaBcR.
Perylnpobka rporkoctn
PereyInpOBKa rpoMkoCTn BbINOJIHReTcBbaueHneM DnCKa peRyInpOBKn rpoMKOCTN.
KoCHNTecb "CnNCKB OBCpOn3B." B CnNcKe KaTeoropn B "Bn6JInOTeKa", YTO6bl OTO 6pa3ntb CnNcOK CnNcKB OBCpO n3BeDeHn. KocHTecb CnNcKa BOCpO n3BeDeHn, KOToPbI Tpe6yEtcN3MeHnTb.
YdaJIeHHe KOMnO3nCmN n3 CnNcKa BO CnpOn3BeDeHn:
KoCHNTecb" "B BepxHne npaBoW qactN KOMnO3nUIN, KOtOpYTOpe6yETc8 ydaIHTb, n 3aTEM KoCHNTecb " 日
Дахе ecn Bbl ydaJInte KOMNo3nIuN I3 cIncKa BOCIpOn3BedeHEnO, OH He ydaJIaHOTcN 13 yCTpoNCTBa.
N3meHHe NopAka KOMnO3nCnB CnNCKe BocnpOn3BeDeHn:
KoCHNTecb" "B BepxHe npaBoy qactn KOMN03uIN, NIOJKeHne KOtopoI Tpe6yETcN 3MeHHTb, N 3aTeM KoCHNTecb "↑↓".
IcnoJb3OBaHne cTeBbIX cIyX6
IoiKlnOuHbYcTPOiCTBO K cTeN C HHTepHeT-CoeDInHeHnEM,MOxHO BOCNO Jb3OBaTbCBA TAKIMNCeTeBbIMCNyK6aMn, KaK Tuneln Radio n TIDAL.
-Дявocрpon3BedeHnCeTeBbIX cnyK6 Tpe6yeTcnoKnHouHne Wi-Fi.
B HeKOTopbIX cTeBbIX cnyk6ax noJIb30 BaTeIb DoJKeH npEdBaPnteIbHO 3apeRicTpnpoBaTbCc KOMNbIoTepa. IdoPo6hBie CBeDeHnO KOHKpeTHbIX cnyk6ax CM. Ha IN Be6-caITax.
-ПиOBHOBJIeHINnporpAMMHOrO o 6ecneueHnMOryTbIOabHbHO BbIeФyHKUIN,aNOCTaBUNKYNCnyrMO ryt npekpaNTbIX npedocTabHeHne,TO ecTB HeKOtOpbIE cTeBbIe CnyxkbI N KO HTeHTB6dyuemMOrYcTaTbHeo CTyHbIMN.
Bocnpon3BeHne
Пи ВКЛЮЧЕНСОУТРОДСТBEВБИОПНИТECLEDEYOUYO pOUEdpy.
- KocHTecb "OhnaH" Ha HauJaHbHom 3KpaHe yCTpoIcTba.
- KocHTecb cTeBoi cnJx6bl, KOtopyo
XeJIaTe IcNOJb3OBAtB.
3.CIeNyTe OTo6paKaembIM Ha 3KpaHe INHCTpyKUm I KOCHNTecb paINO CTaHcnn nnpepaN dnHaJa npocLnyuBaHn.
- YTO6bI BepHyTbCЯ HppeIbIyUHIN 3KpaH, KOCHTecB" <" B HIXHEm JIeBO M yrJy 3KpaHa.
MeHIO ceTeBbIX cnyx6
Bb mokeTe 3apeHnctpnpoBaT paAnO CTaHmN B KaYeCTBe N36paHHbIX NN ydAInTb INx IN3 YnCNa IN36paHHbIX. OTo 6paXaEMoe MeHIO 3aBnCIT OT BbIpaHHoB B DaHHOe BpeM CnyKbI.
Дя OTOбрахенЯ MeHIO KOCHITecb npi npocnyuBaHn IPAuOCTaHcNIM""B HxHem PpaBOM yIyIy 3KpaHa I 3aTeM KO CHITecb"" B CpeDInHe 3KpaHa.
06 yuetno 3aunc Tuneln Radio
Cozdahne yueTHoH 3aIncn Ha Be6-caiTe Tuneln Radio (tunein.com) n BxOJ ha Hero c yctpoiCTBa I03BOLJIOT ABTOMaTuceckn Do6abTb paAnOCTaHcNn N nepeDaun B
Bau cncoc "My Presets" Ha yctpoiCTBe B npoucece INx OTKpbTnHa Be6-caIte.
Cnncok "My Presets" oTo6paKaetcHa npOBHe HnKe TunEn Radio.
Длг отобрахени радиocтанци,Заргпстрированнов B синcke "My Presets", Heo6xodIMO BOITN B CNTeMу Tuneln Radio c yctpoiCTBa. YTO6bl BOITN B CNTeMу C yctpoiCTBa: BbIbepHTe
"Login" - "I have a Tuneln account" в Верхнem списе "tunein" на устристов в ВебдитЕ ИМЯ ПОЛьзователя и палов.
BbIbepuTe"BbIKHoue"H,"15cekyHd,"30cekyHd(3HaueHne no yMoJuaHIO),"1MnHyTa", "2 MmHyTb"I IIN "5 MmHyT".
ABT. BbIKI. NITaHn: NITaHne yCTpoiCTBa ABtOMaTIueCKn IpeKJIIOuAeTCsB COcToHne "BbIKJIoueH" no nCTeUeHN oNpeDeJIeHHOro BpeMeHN npocToJ.
BbI6epnte"BbIKJIOueH (3NaueHne no yMOJuaHnIO), "10 MInHyT", "30 MInHyT" nIIN "60 MInHyT".
■ Napojb
3KbanaJ3ep: Bbl MoKeTe Bbl6paTb Kelaemoe KaueCTBO 3Byka n3 BapnaHTOB "Flat (3NaHeHne no yMoJIaHnIO)," Pop", Rock", Jazz", Dance", Vocal", POnIb3ObaTeIbckn 1", "POnIb3ObaTeIbckn 2" n "POnIb3ObaTeIbckn 3".
ObpaTHe BHMaHne, YTO Bbl MoXeTe 3apeRnCTpnpoBaTb Co6cTBeHHbIe oprHaJIbHbIe 3KbAnaJ3epbI POnJIb3ObaTeBckn 1-3 cJeDyUOuMm Obpa3OM:
OboBHeHcKapTbimicroSD
- Дarya поунеця сбеденno no yctanobke kaptbimicro SD cm.(P5).
- ПерациЗьачевим Кары micro SD кару micro SD Heo6xOДМо ДемоHTИровать (P29).
- YcTpoiCtBO He noDJIepKINBaET KApTbI micro SD φopm aTa NTFS.
-
3apädnte yctpoCTBO neped oHOBneHnEM.
-
Bctabte KapTy micro SD B KOMnbHTope.
-
3arpynte paan nporpammmoro oecneuenca hawero Be6-caTn npa3apxmbpynte ero.
3.СкогириTe BCE pa3apxNbUPOBaHHbIe PaIbI n pankn B KOpHeByIO panky KapTbI micro SD. -
ObpaTte BHNMaHHe, YTO KOnIpuBaTb CneJyET pa3apXnBnPoBaHHBe faJIbl.
-
BcTaBbTe KapTy micro SD b rHe3do dJa KapT (1 nIin 2) Ha yCtpoiCTBe.
- KocHTecb "Ha HaayaJIbHOM 3KpaHe.
- Haxmnte KhoNky "O6HOBJeHne IIO".
- KocHTecb "ObHOBITb ceuac" n 3aTeM "Yepe3 KapTy SD", nocJe yero 3aynCTnTcra npOeDpya obHOBJIeHn npOrpamMHoro oBeCneUeHn.
Hebo3MOxHO BbIpaTb NyHKT "Yepe3 KapTy SD" npu o TcyTCTBn O6HOBNeHn IporpamMHO oOecneueHn.
Mbl He Hecem OTBETCTBEHHOCTn 3a yUeep6, BO3HKuNn n3-3a IIOKJIIOUeHnO OBOpYDoBaHnN, IN3rOToBJeHHOrO DpyrIMN KOMNaHnA M.
Пре dioctepeженья
■ DeiCTBnB B cIyuae HeCTa6nJIbHoi pa6o Tbl
The Bluetooth® word mark and logos are registered trademarks owned by Bluetooth SIG, Inc.
Windows® 7, Windows® Media, and the Windows® logo are trademarks or registered trademarks of Microsoft Corporation in the United States and/or other countries.

CERTIFIED
The Wi-Fi CERTIFIED Logo is a certification mark of Wi-Fi Alliance®.
iTunes is a trademark of Apple Inc., registered in the U.S. and other countries.
DSD and the Direct Stream Digital logo are trademarks of Sony Corporation.
"All other trademarks are the property of their respective owners."
"Bce ToBAPbHMe 3NAKn ABNIAOTC BOCCTBEHNHOCTBO COOTBETCTBYIOXNX BNAJDENBUE."
所有其他商標為各自所有者所有。
所有其他商标均为其各自所有者的财产。
ONKYO
2-3-12 Yasu, Chuo-ku, Tokyo 104-0028 JAPAN
18 PARK WAY, UPPER SADDLE RIVER, NEW JERSEY 07458, U.S.A.
Tel: 1-201-785-2600
Gutenberg str. 3, D-82178 Puchheim Germany
Tel: +49-8142-4401-0
Unit 1033, 10/F, Star House, No 3, Salisbury Road, Tsim Sha Tsui Kowloon, Hong Kong,
Tel: +852-2429-3118
E-mail: service.hk@pioneeronkyoasia.com
安桥(上海)商贸有限公司
High Fidelity Audio Player
取掇說明書
Instruction Manual
Mode d'emploi
MP3 (44.1 kHz/48 kHz)、AAC (44.1 kHz/48 kHz/96 kHz)
FLAC/ALAC/WAV/AIFF (44.1 kHz/48 kHz/88.2 kHz/96
kHz/176.4 kHz/192 kHz)*
MQA、DSF/DSDIFF (2.8 MHz/5.6 MHz)
- 無法播放受 DRM 保護的檔案。
連續播放時間
Windows® 7, Windows® Media, and the Windows® logo are trademarks or registered trademarks of Microsoft Corporation in the United States and/or other countries.

CERTIFIED
The Wi-Fi CERTIFIED Logo is a certification mark of Wi-Fi Alliance®.
iTunes is a trademark of Apple Inc., registered in the U.S. and other countries.
DSD and the Direct Stream Digital logo are trademarks of Sony Corporation.
"All other trademarks are the property of their respective owners."
Unit 1033, 10/F, Star House, No 3, Salisbury Road, Tsim Sha Tsui Kowloon, Hong Kong,
Tel: +852-2429-3118
E-mail: service.hk@pioneeronkyoasia.com
安桥(上海)商贸有限公司
High Fidelity Audio Player
取掇說明書
Instruction Manual
Mode d'emploi
MP3(44.1 kHz/48 kHz), AAC(44.1 kHz/48 kHz/96 kHz)
FLAC/ALAC/WAV/AIFF (44.1 kHz/48 kHz/88.2 kHz/96
kHz/176.4 kHz/192 kHz) *
MQA,DSF/DSDIFF(2.8MHz/5.6MHz)
- 无法播放受 DRM 保护的文件。
连续播放时间
显示的时间是参考。播放时间取决于设置。
FLAC无损24位96kHz:15小时
Windows® 7, Windows® Media, and the Windows® logo are trademarks or registered trademarks of Microsoft Corporation in the United States and/or other countries.

CERTIFIED
The Wi-Fi CERTIFIED Logo is a certification mark of Wi-Fi Alliance®.
iTunes is a trademark of Apple Inc., registered in the U.S. and other countries.
DSD and the Direct Stream Digital logo are trademarks of Sony Corporation.
"All other trademarks are the property of their respective owners."
- 取掇說明書
- - onkyo music
- Instruction Manual
- What's in the box
- Part Names
- Turning the power on and initial settings
- Initial Setup starts automatically
- 1.Passcode
- Wi-Fi
- Selecting SSID:
- Using the push button:
- Copying music with "X-DAP Link"
- Install [X-DAP Link] on your computer
- Copying music from a computer
- onkyo music
- iTunes Media
- Dragging and dropping to copy music
- Listening to music from the "Library"
- Playing Music with the "Library"
- Folders
- Playlists
- Artists
- Album Artists
- Albums
- Songs
- Genres
- Adjusting the volume
- The play screen
- Screen A
- Screen 8
- Creating a play list
- ■ Editing a play list
- To delete a play list:
- To change the name of a play list:
- ■ Editing tracks in a play list
- To delete a track from a play list:
- To change the order of tracks in a play list:
- Using network services
- Playing Back
- Network service menus
- Regarding the Tuneln Radio Account
- Connecting BLUETOOTH®
- Pairing for play
- When connecting after the first time
- Canceling a connection
- Line Out
- Connecting a device
- Various settings
- Wi-Fi
- Bluetooth
- Brightness
- Balanced Output Select
- Line Out Mode
- Audio
- Music Library Sync
- Sync Now
- SD Card
- Physical Buttons
- Operations while Holding
- Home
- Power Management
- Passcode
- ■ Language
- Software Update
- Device Information
- Reset
- Audio Adjust
- Custom Sound
- Upsampling Mode
- Hi-bit 32
- Digital Filter
- Lock Range Adjust
- Customizing the Home screen
- Changing shortcut buttons
- The updating function on this unit
- How to update
- Updating the Firmware via Network
- Updating via micro SD card
- Supplementary Information
- Entering text
- General Specifications
- Display
- Interfaces and input/output jacks
- Network Section
- Rated input
- Battery power
- Operating temperature
- Internal memory
- Mass of main unit
- External dimensions (excluding protrusions)
- Supported playback formats
- Continuous play time
- Number of music files recordable
- Supported SD card formats
- Cautions for use
- If operation becomes unstable
- Removing the micro SD card
- This unit
- Electronic authorization labeling
- License and Trademark
- CERTIFIED
- ONKYO
- Napopolb
- Bb16op SSID:
- IcnoJb3OBaHne KhoNk:
- KoHnpoBaHHe My3bIKc KOMNbIbTepa
- Perylnpobka rporkoctn
- YdaJIeHHe KOMnO3nCmN n3 CnNcKa BO CnpOn3BeDeHn:
- N3meHHe NopAka KOMnO3nCnB CnNCKe BocnpOn3BeDeHn:
- IcnoJb3OBaHne cTeBbIX cIyX6
- Bocnpon3BeHne
- MeHIO ceTeBbIX cnyx6
- yuetno 3aunc Tuneln Radio
- ■ Napojb
- OboBHeHcKapTbimicroSD
- Пре dioctepeженья
- ■ DeiCTBnB B cIyuae HeCTa6nJIbHoi pa6o Tbl
- 连续播放时间
Brand : ONKYO
Model : DP-S1
Category : Portable audio player