
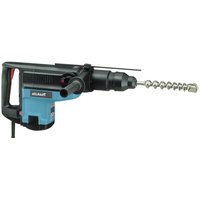
HP1641FJ - Drill MAKITA - Free user manual and instructions
Find the device manual for free HP1641FJ MAKITA in PDF.


| Product Type | Hammer Drill (Impact Drill) |
| Model | HP1641FJ |
| Brand | Makita |
| Drilling Capacities | Concrete: 16 mm; Steel: 13 mm; Wood: 30 mm |
| No Load Speed | 0 - 2,800 min⁻¹ (variable speed) |
| Blows Per Minute | 0 - 44,800 bpm |
| Overall Length | 303 mm |
| Net Weight | 2.0 kg (according to EPTA-Procedure 01/2003) |
| Safety Class | Double insulated (Class II) |
| Power Supply | AC single phase, voltage as per nameplate |
| Sound Pressure Level | 92 dB(A) (A-weighted) |
| Sound Power Level | 103 dB(A) (A-weighted) |
| Vibration Emission (Impact Drilling) | 19 m/s² (K=2.0 m/s²) |
| Vibration Emission (Drilling Metal) | 2.5 m/s² (K=1.5 m/s²) |
| Chuck Type | Keyless chuck (sleeve and ring mechanism) |
| Action Mode Selection | Rotation with hammering / Rotation only |
| Reversing Switch | Yes, for clockwise/counterclockwise rotation |
| Variable Speed Trigger | Yes, with lock button for continuous operation |
| Side Grip (Auxiliary Handle) | Included, 360° adjustable |
| Depth Gauge | Yes, for uniform depth drilling |
| Lamp | Yes (model HP1641FJ has lamp) |
| Optional Accessories | Tungsten-carbide tipped bit, hole saw, blow-out bulb, safety goggles, keyless drill chuck 13, chuck key, grip assembly, plastic carrying case |
| Intended Use | Impact drilling in brick, concrete, stone; drilling without impact in wood, metal, ceramic, plastic |
| Compliance | EC Declaration of Conformity per 2006/42/EC, EN60745 |
Frequently Asked Questions - HP1641FJ MAKITA
User questions about HP1641FJ MAKITA
0 question about this device. Answer the ones you know or ask your own.
Ask a new question about this device
Download the instructions for your Drill in PDF format for free! Find your manual HP1641FJ - MAKITA and take your electronic device back in hand. On this page are published all the documents necessary for the use of your device. HP1641FJ by MAKITA.
USER MANUAL HP1641FJ MAKITA
GB Hammer Drill INSTRUCTION MANUAL
| S | Slagborrmaskin | BRUKSANVISNING |
| N | Borhammer | BRUKSANVISNING |
| FIN | Iskuporakone | KÄYTTÖOHJE |
| LV | Tiecienurbjmašina | LIETOŠANAS INSTRUKCIJA |
| LT | Smūginis gręžtuvas | NAUDOJIMO INSTRUKCIJA |
| EE | Lööktrell | KASUTUSJUHEND |
| RUS | Ударная дрель | РУКОВОДСТВО ПО ЭКСПЛУАТАЦИИ |
HP1640
HP1640F
HP1641
HP1641F
natural_image
Line drawing of a power tool with handle and screw base (no text or symbols)

1

2

3
4

natural_image
Mechanical assembly diagram showing a rotating shaft and connecting pin (no text or symbols)5

natural_image
Technical line drawing of a mechanical device with a hand adjusting a tool (no text or symbols present)6

7
8

natural_image
Illustration of a hand using a drill bit on a grid background (no text or symbols)9

1 0
001302
ENGLISH (Original instructions)
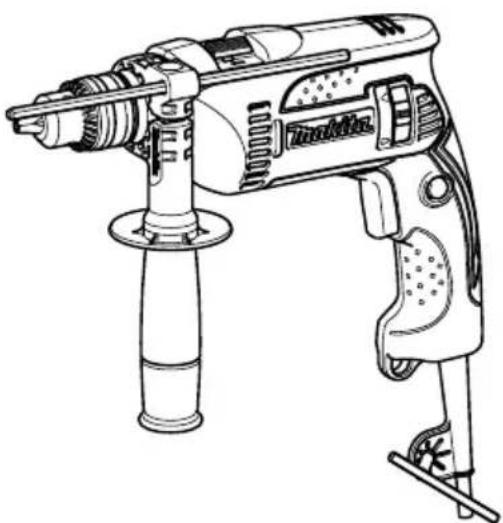
Explanation of general view
| 1-1. Switch trigger | 5-1. Side grip | 8-2. Side grip |
| 1-2. Lock button | 6-1. Chuck key | 8-3. Grip base |
| 2-1. Lamp | 7-1. Sleeve | 10-1. Blow-out bulb |
| 3-1. Reversing switch | 7-2. Ring | |
| 4-1. Action mode changing lever | 8-1. Depth gauge |
SPECIFICATIONS
| Model | HP1640/HP1640F/HP1641/HP1641F | |
| Capacities | Concrete | 16 |
| Steel | 13 | |
| Wood | 30 | |
| No load speed (min -1 ) 0 - 2,800 | ||
| Blows per minute 0 - 44,800 | ||
| Overall length 303 mm | ||
| Net weight 2.0 kg | ||
| Safety class /II | ☐ | |
- Due to our continuing program of research and development, the specifications herein are subject to change without notice.
- Specifications may differ from country to country.
• Weight according to EPTA-Procedure 01/2003
ENE039-1
Intended use
The tool is intended for impact drilling in brick, concrete and stone as well as for drilling without impact in wood, metal, ceramic and plastic.
ENF002-1
Power supply
The tool should be connected only to a power supply of the same voltage as indicated on the nameplate, and can only be operated on single-phase AC supply. They are double-insulated in accordance with European Standard and can, therefore, also be used from sockets without earth wire.
For Model HP1640, HP1641, HP1641F
ENG102-3
Noise
The typical A-weighted noise level determined according to EN60745:
Sound pressure level ( LpA ): 92 dB (A)
Sound power level ( LWA ): 103 dB (A)
Uncertainty (K) : 3 dB (A)
Wear ear protection
ENG203-2
Vibration
The vibration total value (tri-axial vector sum) determined according to EN60745:
Work mode: impact drilling into concrete
Vibration emission (ah, ID): 19 m/s 2
Uncertainty (K) : 2.0 m/s
ENG301-1
Work mode : drilling into metal
Vibration emission (ah,D): 2.5 m/s²
Uncertainty (K) : 1.5 m/s
ENG901-1
- The declared vibration emission value has been measured in accordance with the standard test method and may be used for comparing one tool with another.
- The declared vibration emission value may also be used in a preliminary assessment of exposure.
WARNING:
- The vibration emission during actual use of the power tool can differ from the declared emission value depending on the ways in which the tool is used.
- Be sure to identify safety measures to protect the operator that are based on an estimation of exposure in the actual conditions of use (taking account of all parts of the operating cycle such as the times when the tool is switched off and when it is running idle in addition to the trigger time).
ENH101-17
For European countries only
EC Declaration of Conformity
Makita declares that the following Machine(s):
Designation of Machine:
Hammer Drill
Model No./ Type: HP1640,HP1641,HP1641F
Conforms to the following European Directives:
2006/42/EC
They are manufactured in accordance with the following
Standard or standardized documents:
EN60745
The Technical file in accordance with 2006/42/EC is available from:
Makita, Jan-Baptist Vinkstraat 2, 3070, Belgium
31.12.2013

000331
Yasushi Fukaya
Director
Makita, Jan-Baptist Vinkstraat 2, 3070, Belgium
GEA010-1
General Power Tool Safety Warnings
WARNING Read all safety warnings and all instructions. Failure to follow the warnings and instructions may result in electric shock, fire and/or serious injury.
Save all warnings and instructions for future reference.
GEB003-5
HAMMER DRILL SAFETY WARNINGS
- Wear ear protectors when impact drilling. Exposure to noise can cause hearing loss.
- Use auxiliary handle(s), if supplied with the tool. Loss of control can cause personal injury.
- Hold power tool by insulated gripping surfaces, when performing an operation where the cutting accessory may contact hidden wiring or its own cord. Cutting accessory contacting a "live" wire may make exposed metal parts of the power tool "live" and could give the operator an electric shock.
- Always be sure you have a firm footing. Be sure no one is below when using the tool in high locations.
- Hold the tool firmly with both hands.
- Keep hands away from rotating parts.
- Do not leave the tool running. Operate the tool only when hand-held.
- Do not touch the bit or the workpiece immediately after operation; they may be extremely hot and could burn your skin.
- Some material contains chemicals which may be toxic. Take caution to prevent dust inhalation and skin contact. Follow material supplier safety data.
SAVE THESE INSTRUCTIONS.
WARNING:
DO NOT let comfort or familiarity with product (gained from repeated use) replace strict adherence to safety rules for the subject product. MISUSE or failure to follow the safety rules stated in this instruction manual may cause serious personal injury.
FUNCTIONAL DESCRIPTION
CAUTION:
- Always be sure that the tool is switched off and unplugged before adjusting or checking function on the tool.
Switch action
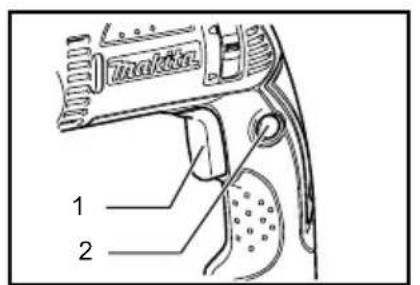
Fig.1
CAUTION:
- Before plugging in the tool, always check to see that the switch trigger actuates properly and returns to the "OFF" position when released. - Switch can be locked in "ON" position for ease of operator comfort during extended use. Apply caution when locking tool in "ON" position and maintain firm grasp on tool.
To start the tool, simply pull the switch trigger. Tool speed is increased by increasing pressure on the switch trigger. Release the switch trigger to stop.
For continuous operation, pull the switch trigger and then push in the lock button.
To stop the tool from the locked position, pull the switch trigger fully, then release it.
Lighting up the lamps
For Model HP1640F,HP1641F
Fig.2
CAUTION:
- Do not look in the light or see the source of light directly.
To turn on the lamp, pull the trigger. Release the trigger to turn it off.
NOTE:
- Use a dry cloth to wipe the dirt off the lens of lamp. Be careful not to scratch the lens of lamp, or it may lower the illumination.
- Never use gasoline or thinner to clean the lens of the lamp, or it will be damaged.
Reversing switch action
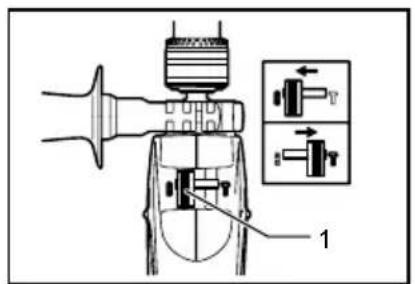
Fig.3
This tool has a reversing switch to change the direction of rotation. Move the reversing switch to the position (A side) for clockwise rotation or the position (B side) for counterclockwise rotation.
CAUTION:
• Always check the direction of rotation before operation.
- Use the reversing switch only after the tool comes to a complete stop. Changing the direction of rotation before the tool stops may damage the tool.
- If the switch trigger can not be depressed, check to see that the reversing switch is fully set to position (A side) or (B side).
Selecting the action mode
Fig.4
This tool has an action mode change lever. For rotation with hammering, slide the action mode change lever to the right (☐ symbol). For rotation only, slide the action mode change lever to the left (☐ symbol).
CAUTION:
- Always slide the action mode change lever all the way to your desired mode position. If you operate the tool with the lever positioned halfway between the mode symbols, the tool may be damaged.
ASSEMBLY
⚠️CAUTION:
- Always be sure that the tool is switched off and unplugged before carrying out any work on the tool.
Installing side grip (auxiliary handle)
Fig.5
Always use the side grip to ensure operating safety. Install the side grip on tool barrel.
Then tighten the grip by turning clockwise securely at the desired position. It may be swung 360irc so as to be secured at any position.
NOTE:
- The side grip cannot swing 360irc when the depth gauge is installed.
Installing or removing drill bit
For Model HP1640, HP1640F
Fig.6
To install the bit, place it in the chuck as far as it will go. Tighten the chuck by hand. Place the chuck key in each of the three holes and tighten clockwise. Be sure to tighten all three chuck holes evenly.
To remove the bit, turn the chuck key counterclockwise in just one hole, then loosen the chuck by hand.
After using the chuck key, be sure to return to the original position.
For Model HP1641, HP1641F
Fig.7
Hold the ring and turn the sleeve counterclockwise to open the chuck jaws. Place the bit in the chuck as far as it will go. Hold the ring firmly and turn the sleeve clockwise to tighten the chuck.
To remove the bit, hold the ring and turn the sleeve counterclockwise.
Depth gauge
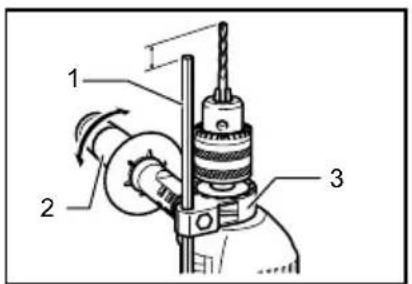
Fig.8
The depth gauge is convenient for drilling holes of uniform depth. Loosen the side grip and insert the depth gauge into the hole in the side grip. Adjust the depth gauge to the desired depth and tighten the side grip.
NOTE:
- The depth gauge cannot be used at the position where the depth gauge strikes against the tool body.
OPERATION
Hammer drilling operation
Fig.9
CAUTION:
- There is a tremendous and sudden twisting force exerted on the tool/bit at the time of hole break-through, when the hole becomes clogged with chips and particles, or when striking reinforcing rods embedded in the concrete. Always use the side grip (auxiliary handle) and firmly hold the tool by both side grip and switch handle during operations. Failure to do so may result in the loss of control of the tool and potentially severe injury.
When drilling in concrete, granite, tile, etc., move the action mode changing lever to the position of symbol to use "rotation with hammering" action.
Be sure to use a tungsten-carbide tipped bit.
Position the bit at the desired location for the hole, then pull the switch trigger. Do not force the tool. Light pressure gives best results. Keep the tool in position and prevent it from slipping away from the hole.
Do not apply more pressure when the hole becomes clogged with chips or particles. Instead, run the tool at an idle, then remove the bit partially from the hole. By repeating this several times, the hole will be cleaned out and normal drilling may be resumed.
Blow-out bulb (optional accessory)
Fig.10
After drilling the hole, use the blow-out bulb to clean the dust out of the hole.
Drilling operation
When drilling in wood, metal or plastic materials, move the action mode changing lever to the position of Ⓞ symbol to use "rotation only" action.
Drilling in wood
When drilling in wood, the best results are obtained with wood drills equipped with a guide screw. The guide screw makes drilling easier by pulling the bit into the workpiece.
Drilling in metal
To prevent the bit from slipping when starting a hole, make an indentation with a center-punch and hammer at the point to be drilled. Place the point of the bit in the indentation and start drilling.
Use a cutting lubricant when drilling metals. The exceptions are iron and brass which should be drilled dry.
CAUTION:
- Pressing excessively on the tool will not speed up the drilling. In fact, this excessive pressure will only serve to damage the tip of your bit, decrease the
tool performance and shorten the service life of the tool.
- There is a tremendous force exerted on the tool/bit at the time of hole break through. Hold the tool firmly and exert care when the bit begins to break through the workpiece.
- A stuck bit can be removed simply by setting the reversing switch to reverse rotation in order to back out. However, the tool may back out abruptly if you do not hold it firmly.
- Always secure small workpieces in a vise or similar hold-down device.
MAINTENANCE
CAUTION:
- Always be sure that the tool is switched off and unplugged before attempting to perform inspection or maintenance.
NOTICE:
- Never use gasoline, benzine, thinner, alcohol or the like. Discoloration, deformation or cracks may result.
To maintain product SAFETY and RELIABILITY, repairs, carbon brush inspection and replacement, any other maintenance or adjustment should be performed by Makita Authorized Service Centers, always using Makita replacement parts.
OPTIONAL ACCESSORIES
CAUTION:
• These accessories or attachments are recommended for use with your Makita tool specified in this manual. The use of any other accessories or attachments might present a risk of injury to persons. Only use accessory or attachment for its stated purpose.
If you need any assistance for more details regarding these accessories, ask your local Makita Service Center.
• Tungsten-carbide tipped hammer bit
- Hole saw
- Blow-out bulb
- Safety goggles
• Keyless drill chuck 13
- Chuck key
- Grip assembly
- Depth gauge
- Plastic carrying case
NOTE:
- Some items in the list may be included in the tool package as standard accessories. They may differ from country to country.
Äänenpainetaso (L pA ): 92 dB (A)
Modelim HP1640F, HP1641F
Att.2
⚠UZMANĪBU:
Tik modeliams HP1640, HP1640F
Pav.6
- Intended use
- Power supply
- For Model HP1640, HP1641, HP1641F
- Noise
- Wear ear protection
- Vibration
- WARNING:
- For European countries only
- EC Declaration of Conformity
- Makita declares that the following Machine(s):
- Conforms to the following European Directives:
- General Power Tool Safety Warnings
- HAMMER DRILL SAFETY WARNINGS
- SAVE THESE INSTRUCTIONS.
- FUNCTIONAL DESCRIPTION
- CAUTION:
- Switch action
- Fig.1
- Lighting up the lamps
- For Model HP1640F,HP1641F
- Fig.2
- NOTE:
- Reversing switch action
- Fig.3
- Selecting the action mode
- Fig.4
- ASSEMBLY
- ⚠️CAUTION:
- Installing side grip (auxiliary handle)
- Fig.5
- Installing or removing drill bit
- For Model HP1640, HP1640F
- Fig.6
- For Model HP1641, HP1641F
- Fig.7
- Depth gauge
- Fig.8
- OPERATION
- Hammer drilling operation
- Fig.9
- Blow-out bulb (optional accessory)
- Fig.10
- Drilling operation
- Drilling in wood
- Drilling in metal
- MAINTENANCE
- NOTICE:
- OPTIONAL ACCESSORIES
- Modelim HP1640F, HP1641F
- Att.2
- ⚠UZMANĪBU:
- Tik modeliams HP1640, HP1640F
- Pav.6
Brand : MAKITA
Model : HP1641FJ
Category : Drill