
EW-DL83 - Electric toothbrush PANASONIC - Free user manual and instructions
Find the device manual for free EW-DL83 PANASONIC in PDF.
| Product type | Sonic vibration electric toothbrush |
| Brand | Panasonic |
| Model | EW-DL83 |
| Power supply | AC adapter (RE7-87) – 100-240 V, 50-60 Hz |
| Battery | Built-in rechargeable lithium-ion (3.6 V, 400 mAh) |
| Charging time | Approximately 1 hour |
| Usage time | Approximately 60 minutes after full charge |
| Brushing modes | REGULAR (normal) and SOFT (gentle) |
| Vibration frequency | Approximately 31,000 strokes per minute |
| Special functions | Gradual start, 30-second timer, automatic stop after 2 minutes |
| Included accessories | Brush head holder, travel case |
| Replacement parts | Extra-fine brush heads (WEW0935), multi-use (WEW0936), interdental (EW0940) |
| Cleaning and maintenance | Main unit and head washable with water (max 40°C). Do not wash adapter and charging stand. |
| Safety | Automatic stop, overcharge protection, instructions to avoid electric shock |
Frequently Asked Questions - EW-DL83 PANASONIC
User questions about EW-DL83 PANASONIC
0 question about this device. Answer the ones you know or ask your own.
Ask a new question about this device
Download the instructions for your Electric toothbrush in PDF format for free! Find your manual EW-DL83 - PANASONIC and take your electronic device back in hand. On this page are published all the documents necessary for the use of your device. EW-DL83 by PANASONIC.
USER MANUAL EW-DL83 PANASONIC
Operating Instructions
(Household) Sonic Vibration Toothbrush
Model No. EW-DL83

English 3 Dansk 111 Cesky 219
Operating Instructions
(Household) Sonic Vibration Toothbrush
Model No. EW-DL83
Contents
Safety precautions.. 6
Parts identification 10
Charging the toothbrush 11
Before cleaning your teeth 12
Using the toothbrush 13
Tips on usage 14
After use 15
Troubleshooting 17
Battery life 18
Removing the built-in rechargeable battery. 18
Specifications 18
Changing the brush head (Sold separately) 18
Thank you for purchasing this Panasonic product.
Before operating this unit, please read these instructions completely and save them for future use.
Warning
- Be sure to switch off the appliance and remove the power plug from a household outlet before performing any maintenance. Failure to do so may result in electric shock.
- Do not wash the AC adaptor and the charging stand. Doing so may result in electric shock.
- The supply cord cannot be replaced. If the cord is damaged, the AC adaptor should be scrapped.
- Toothbrushes can be used by children and persons with reduced physical, sensory or mental capabilities or lack of experience and knowledge if they have been given supervision or instruction concerning use of the appliance in a safe way and understand the hazards involved.
-
Cleaning and user maintenance shall not be made by children without supervision.
Children shall not play with the appliance. -
Do not use anything other than the supplied AC adaptor and the charging stand. Also, do not charge any other product with the supplied AC adaptor and the charging stand.
- The following symbol indicates that a specific detachable power supply unit is required for connecting the electrical appliance to the supply mains. The type references of power supply unit and charging stand are marked near the symbol.

Safety precautions
To reduce the risk of injury, loss of life, electric shock, fire, and damage to property, always observe the following safety precautions.
Explanation of symbols
The following symbols are used to classify and describe the level of hazard, injury, and property damage caused when the denotation is disregarded and improper use is performed.

DANGER
Denotes a potential hazard that will result in serious injury or death.

WARNING
Denotes a potential hazard that could result in serious injury or death.

CAUTION
Denotes a hazard that could result in minor injury or property damage.
The following symbols are used to classify and describe the type of instructions to be observed.

This symbol is used to alert users to a specific operating procedure that must not be performed.

This symbol is used to alert users to a specific operating procedure that must be followed in order to operate the unit safely.

WARNING
Preventing accidents
Do not store within the reach of children or infants.
Do not let them use it.
- Doing so may cause an accident or injury due to accidental ingestion of removable parts.
Power supply

Do not connect or disconnect the adaptor to a household outlet with a wet hand.
- Doing so may cause electric shock or injury.
Do not immerse the AC adaptor and the charging stand in water or wash it with water.
Do not place the AC adaptor and the charging stand over or near water filled sink or bathtub.

Do not use when the AC adaptor is damaged or when the fitting into the household outlet is loose. Do not damage, modify, forcefully bend, pull, twist, or bundle the cord. Also, do not place anything heavy on or pinch the cord.
- Doing so may cause electric shock or fire due to a short circuit.

Do not use in a way exceeding the rating of the household outlet or the wiring.
- Exceeding the rating by connecting too many power plugs to one household outlet may cause fire due to overheating.

Always ensure the appliance is operated on an electric power source matched to the rated voltage indicated on the AC adaptor.
Fully insert the adaptor.
- Failure to do so may cause fire or electric shock.

WARNING

Always unplug the adaptor from a household outlet when cleaning the AC adaptor and the charging stand.
- Failure to do so may cause electric shock or injury.

Regularly clean the power plug and the appliance plug to prevent dust from accumulating.
- Failure to do so may cause fire due to insulation failure caused by humidity.
Disconnect the adaptor and wipe with a dry cloth.
In case of an abnormality or malfunction
Immediately stop using and remove the adaptor if there is an abnormality or failure.
- Failure to do so may cause fire, electric shock, or injury.
- The main unit, adaptor, charging stand or cord is deformed or abnormally hot.
- The main unit, adaptor, charging stand or cord smells of burning.
- There is abnormal sound during use or charging of the main unit, adaptor, charging stand or cord.
- Immediately request inspection or repair at an authorized service centre.
This product

This product has a built-in rechargeable battery. Do not throw into fire, apply heat, or charge, use, or leave in a high temperature environment.
- Doing so may cause overheating, ignition, or explosion.
Do not modify or repair.
- Doing so may cause fire, electric shock, or injury. Contact an authorized service centre for repair (battery change, etc.).

Never disassemble except when disposing of the product.
- Doing so may cause fire, electric shock, or injury.

CAUTION
Preventing damage to teeth and gums
Do not use the brush with toothpaste that contains a high abrasive content, such as toothpaste for removing tar or for whitening.
Do not apply the brush head strongly against teeth or gums, or use it continuously against same spot.
Do not apply the plastic part of the main unit or brush head to teeth.
Do not let anyone who cannot operate the brush by themselves use it.
People with low sensitivity in their mouth should not use the brush.
- Doing so may cause injury or damage to teeth and gums.

People who may have periodontal disease, have teeth being treated, or who are concerned about symptoms in their mouth should consult a dentist before use.
- Failure to do so may cause injury or damage to teeth and gums.

CAUTION
This product

Never use for a purpose other than cleaning your teeth.
- Doing so may cause an accident or injury.

Do not use if doing so causes you to feel unwell.
- Doing so may result in accidents or cause you to feel unwell.

Do not share the brush head with your family or other people.
- Doing so may result in infection or inflammation.

Do not place a metallic object such as a coin or a clip on top of the charging stand.
- Doing so may cause burns due to excessive heat.
Note the following precautions

Do not drop or hit against other objects.
- Doing so may cause injury.

Do not wrap the cord around the adaptor when storing.
- Doing so may cause the wire in the cord to break with the load, and may cause fire due to a short circuit.

Do not allow metal objects or trash to adhere to the power plug or the appliance plug.
- Doing so may cause electric shock or fire due to a short circuit.

Disconnect the adaptor from the household outlet when not charging.
- Failure to do so may cause electric shock or fire due to electrical leakage resulting from insulation deterioration.

Disconnect the adaptor or the appliance plug while holding onto the adaptor or the appliance plug instead of the cord.
- Failure to do so may cause electric shock or injury.

Persons using medical pacemakers, etc. should consult their physician before use.
- Use may affect pacemakers, etc.
Disposing of the rechargeable battery

DANGER
The rechargeable battery is exclusively for use with this appliance. Do not use the battery with other products. Do not charge the battery after it has been removed from the product.
- Do not throw into fire or apply heat.
- Do not hit, disassemble, modify, or puncture with a nail.
- Do not let the positive and negative terminals of the battery get in contact with each other through metallic objects.
- Do not carry or store the battery together with metallic jewellery such as necklaces and hairpins.
- Do not charge, use, or leave the battery where it will be exposed to high temperatures, such as under direct sunlight or near other sources of heat.
- Never peel off the tube.
- Doing so may cause overheating, ignition, or explosion.

WARNING

After removing the rechargeable battery, do not keep it within reach of children and infants.
- The battery will harm the body if accidentally swallowed. If this happens, consult a physician immediately.
If the battery fluid leaks out, take the following procedures. Do not touch the battery with your bare hands.
- The battery fluid may cause blindness if it comes in contact with your eyes.
Do not rub your eyes. Wash immediately with clean water and consult a physician. - The battery fluid may cause inflammation or injury if it comes in contact with the skin or clothes.
Wash it off thoroughly with clean water and consult a physician.

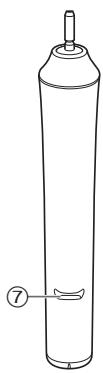
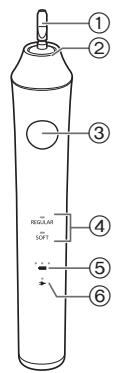
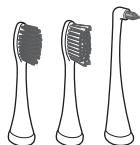
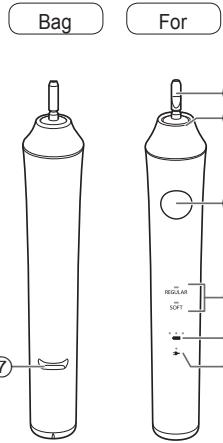
Parts identification
A
Back
Front
B
C
D

E
F
G
H
Storage diagram

Main unit
① Toothbrush shaft
② Waterproof rubber seal
③ Power switch (power off/on/modeselection)
④ Mode indicator
⑤ Battery capacity lamp (
⑥ Charge status lamp (▶)
⑦ Charging ring stopper (Insert the main unit into the charging stand up to this position while charging.)
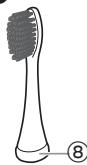
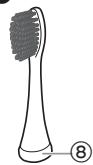
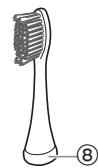
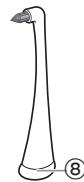
3 Extra fine brush
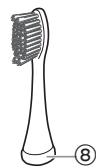
⑧ Identification ring
Multi-fit brush
D Point brush
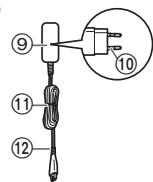
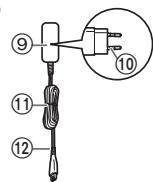
AC adaptor (RE7-87)
⑨ Adaptor
10 Power plug
① Cord
⑫ Appliance plug
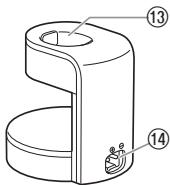
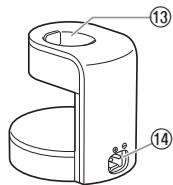
F Charging stand (RC8-1)
③ Charging ring
14 Stand socket
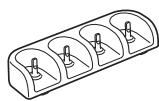
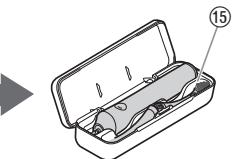
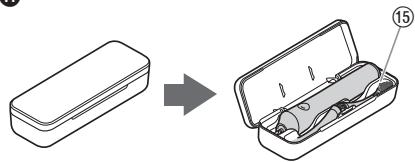
Accessories
Brush stand
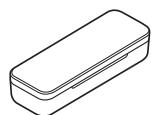
H Carrying case
15 Inner frame
Charging the toothbrush
About charging
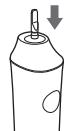
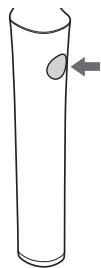
1 Place the charging stand on a horizontal and stable place such as sink or shelf.
2 Insert the appliance plug firmly into the stand socket.
- Align with the symbol as illustrated.
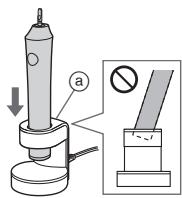
3 With the main unit facing forwards, set straight into the charging ring.
- The main unit will stop in a raised position. (When the charging ring stopper (a) touches the charging ring)
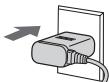
4 Insert the adaptor into the household outlet.
(How to check if charging is completed) Removing or attaching the main unit while
charging will cause the charge status lamp (▶) to glow and then turn off after 5 seconds.
5 Disconnect the adaptor from the household outlet. (for safety and to reduce energy usage)
-
Charging the battery for more than 1 hour will not damage the main unit.
-
Charging is completed after approx. 1 hour.
The charging time may differ with the charging capacity.
- A full charge will supply enough power for approx. 60 minutes use. (Use time may vary depending on ambient temperature and use conditions.)
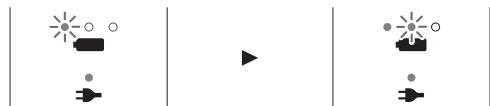
Display while charging
The charge status lamp () glows.
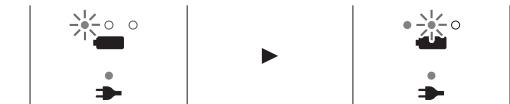
While charging
(Low battery capacity)
After charging is completed
The battery capacity lamp (←) and the charge status lamp (→) glow and then turn off after 5 seconds.
Notes
- The charging time may vary when using for the first time, or when it has not been in use for more than 6 months. Also, the charge status lamp (▶) may not glow for a few minutes after charging starts, but it will glow if charging continues.
- Recommended ambient temperature for charging is 5 - 35^ . The battery may not charge properly or not at all under extreme low or high temperatures.
- If the charge status lamp () blinks quickly (twice per second), it may be due to a charging error or because the main unit is not properly mounted on the charging stand. Confirm the recommended temperature and mount the main unit on the charging stand properly.
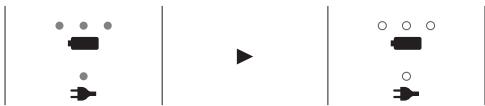
About battery capacity display
High battery capacity
Low battery capacity


- The battery capacity is indicated in 3-level LEDs.
- The battery capacity lamp (●) glows or blinks when the main unit is turned on.
The battery capacity lamp ( ) will go off after 5 seconds when the main unit is turned off.
- The lamp on the left side blinks, indicating it is time to charge.
- When you turn off the main unit while the battery capacity is low, the unit beeps.
About quick charge
Even if the charge runs out, charging for 2 minutes will provide approximately 2 minutes of use.
(Use time may vary depending on ambient temperature and use conditions.)
Before cleaning your teeth
The Sonic Vibration Toothbrush is an electric toothbrush with sonic vibration* of approximately 31 000 brush strokes/minute.
- Sonic vibration in acoustic wave field
When you first begin using the toothbrush, you may experience slight bleeding of the gums even though your gums may be healthy. This is because your gums are receiving stimulation by the toothbrush for the first time. The bleeding should stop after one or two weeks of use. Bleeding that persists for more than two weeks may be indication of an abnormal condition of your gums, such as pyorhea. In this case, stop using the toothbrush and consult your dentist.
About soft start function (For REGULAR mode only)
To prevent toothpaste from spattering and to get accustomed to the high speed vibration, the toothbrush will gradually reach the selected speed and vibration approximately 2 seconds after it starts operating.
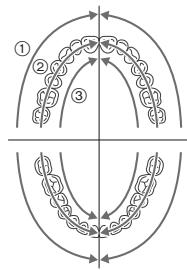
About the 30-second brushing notification timer function
The toothbrush will pause once at 30-second intervals to indicate the brushing time. The main unit pauses twice at 2-minute intervals then starts again.
- Divide your teeth into 4 parts (upper and lower, left and right), and brush one part in order such as "① front of the teeth", "② biting plane of the teeth", and "③ back of the teeth" spending 30 seconds.
By brushing the above 4 parts for 30 seconds each (about 2 minutes), you can evenly brush your teeth without missing any spots in your mouth.
Using the toothbrush
- The appliance may not operate in an ambient temperature approximately 5^ or lower.
- Do not put the main unit in contact with hair products, hand creams, etc.
Doing so may damage the exterior.
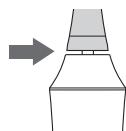
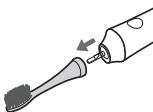
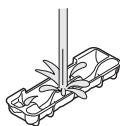
1 Place the brush head firmly onto the toothbrush shaft.
- Ensure that the direction is correct. Align the front of the main unit and the front of the brush head.
- Do not attach the brush head by twisting it into place. Doing so may damage the brush head and main unit.
- The toothbrush shaft will move when a force is applied. This is required for operation, and is not a malfunction.
- There is a small gap between the brush head and the main unit (a few mm). This is necessary for operation and is not a malfunction.
2 Place the toothbrush in your mouth.
To avoid spattering of toothpaste, put the brush head in your mouth before turning the power on.
- Apply a small amount of toothpaste.

3 Press the power switch to turn on the main unit.
- Move the brush head with the bristles lightly touching your teeth.
- When first using this appliance, some people may experience a tickling or tingling sensation caused by the sonic vibrations. The sensation should subside after you use the toothbrush several more times.
- A sound may be heard when the brush head is pressed too strongly against the teeth, but this is not a malfunction.
4 Select the mode.
Each time you press the power switch, the mode changes. (When you turn the power on, the unit is in REGULAR mode.)
uSs6
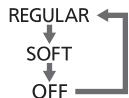
| Mode | Description |
| REGULAR | Recommended for normal brushing. |
| SOFT | Recommended when you feel the REGULAR mode is too powerful. |


Brushing

See page 14.

Brush difficult-to-reach areas

See page 14.
5 Turn off the main unit when you have finished brushing.
- Turn off the main unit before removing it from your mouth to prevent saliva from spattering.

Tips on usage
Brushing

Extra fine brush
When you want to brush mainly the periodontal pocket. (You can also brush the teeth front surface and the biting surface.)

Multi-fit brush
When you want to make your teeth front surface and biting surface clean. (You cannot brush the periodontal pocket.)
- Choose the brush head depending on use and area.
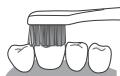
How to apply/move the toothbrush
Apply the bristles of the brush lightly against the teeth and move the toothbrush slowly.
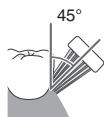
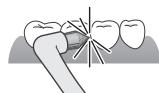
Periodontal pocket
- Use the extra fine brush.
- Place the brush head at a 45^ angle.
- Apply the bristles of the extra fine brush lightly into the periodontal pocket and move the toothbrush slowly.

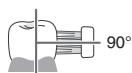
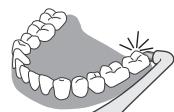
Front surface and the biting surface of teeth
- Apply the brush head at a 90^ angle.
For the back of the front teeth or misaligned teeth
- Place the brush vertically.
- Move toothbrush to match the angle of the teeth.

For the boundary between the teeth and gums
- Apply the brush head at a 45^ angle.

Brush difficult-to-reach areas

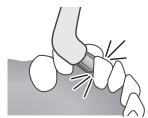
Point brush
For the gap between teeth, the rear of the back teeth or misaligned teeth.
How to apply/move the toothbrush
Apply the bristles of the brush lightly against your teeth.
Gap between teeth
- Place the brush at gap between teeth or areas that are hard to brush.
- Move the toothbrush slowly in line with the gums.
Rear of the back teeth
- Brush the rear of the back teeth thoroughly, as they are hard to reach.
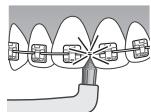
Misaligned teeth
Braces
- Apply the brush into the gap between braces and teeth, and then brush.
After use
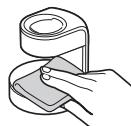
Cleaning the brush head and the main unit
1 Remove the brush head.
- Remove the brush head straight from the toothbrush shaft.
2 Wash the brush head under running water.
Wash the following parts thoroughly:
- Soiling on the inside and bottom areas of the brush head
Observe caution regarding the following points: - Do not pull the bristles of the brush forcefully.
- Do not wash with water hotter than 80^ . Doing so may damage the brush head.
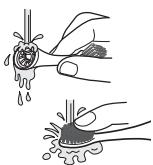
3 Wash the main unit under running water.
- Do not damage or rub the waterproof rubber seal (A) with hard materials.
Do not leave the main unit under water. Water may enter inside.
- Do not wash with water hotter than 40^ .
Doing so may damage the main unit.

us6
4 Wipe off water from the brush head and main unit for storage.
Do not charge while it is wet.
Doing so may cause soiling.
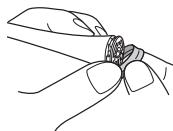
If the identification ring comes off
As shown in the diagram at right, attach by aligning the indentation in the brush head with the raised part of the identification ring.
- Do not forcefully pull the identification ring. Doing so may cause damage.
- Using the toothbrush without the identification ring has no effect on its performance.
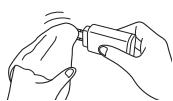
Cleaning the AC adaptor and the charging stand
Remove dirt with a cloth.
- Do not wash with water.

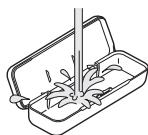
Cleaning the brush stand and the carrying case
Brush stand
Wipe off water after washing.
Carrying case
- Remove the inner frame.
① Hold the right end of the carrying case.
(2) With the right end of the inner frame facing up, pull up the inner frame.
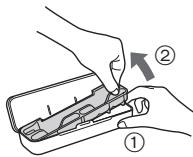
- Wash with water and wipe off water.
Notes
- Use neutral kitchen detergent when cleaning the toothbrush with detergent.
- Do not use thinner, benzine, alcohol, etc. to clean the appliance. Doing so may cause failure, cracking or discoloration of the parts.
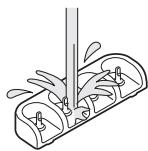
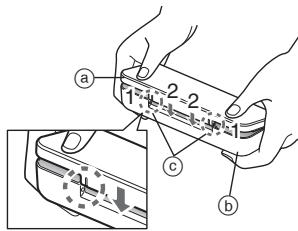
If the top case has come off
- Align the mounting section (c) of the top case (a) and the bottom case (b) as shown in the figure.
- Press the top case in the direction indicated by arrows.
Troubleshooting
| Problem | Possible cause | Action |
| The charge status lamp (▶) does not glow when charging starts. | You have just purchased the toothbrush or have not used it for a while. | The charge status lamp (▶) may not glow for several minutes after starting to charge it, but it will glow if you continue to charge it. If the charge status lamp (▶) does not glow after a while, consult with an authorized service centre for repair. |
| The main unit is not properly mounted on the charging stand. | Insert the main unit in the charging ring and check that the charge status lamp (▶) glows. (See page 11.) | |
| The charge status lamp (▶) is blinking rapidly. (Twice every second) | The temperature is too low or high while charging. | Charge the toothbrush within the recommended charging temperature of 5 °C to 35 °C. If the charge status lamp (▶) blinks even when charging within the recommended temperature range, please contact an authorized service centre for repair. |
| The toothbrush can only be used for a few minutes, even if it is charged. | The main unit is not properly mounted on the charging stand. | Insert the main unit in the charging ring and check that the charge status lamp (▶) glows. (See page 11.) |
| The battery capacity lamp (▶) turns off without blinking. | The rechargeable battery has reached its operating life. (Approx. 3 years) | Replace the battery. (See page 18.) Contact the authorized service centre where purchased. |
| The toothbrush does not operate. | The appliance is used with approximately 5 °C or lower. | Do not use the appliance with approximately 5 °C or lower. |
| The toothbrush stops operating every once in a while. | The “30-second brushing notification timer function” is in operation. (See page 12.) | This is not a malfunction. Continue using it. |
| The vibration increases gradually when pressing the power switch. | The “Soft start function” is in operation. (See page 12.) | This is not a malfunction. Continue using it. |
| The toothbrush shaft moves. | ▶▶▶▶▶▶▶▶▶▶▶▶▶▶▶▶▶▶▶▶▶▶▶▶▶▶▶▶▶▶▶▶▶▶▶▶▶▶▶▶▶▶▶▶▶▶▶▶▶▶▶▶▶▶▶▶▶▶▶▶▶▶▶▶▶▶▶▶▶▶▶▶▶▶▶▶▶▶▶▶▶▶▶▶▶▶▶▶▶▶▶▶▶▶▶▶▶▶▶▶● | This is not a malfunction. (See page 13.) |
If the problems still cannot be solved, contact the store where you purchased the unit or a service centre authorized by Panasonic for repair.
Battery life
Approximately 3 years. The battery may have reached its operating life if the usage frequency decreases drastically, even after a full charge. (The operating life of the battery may differ depending on usage or storage conditions.)
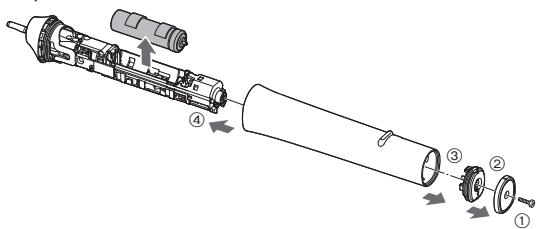
Removing the built-in rechargeable battery
Remove the built-in rechargeable battery before disposing the toothbrush.
Please make sure that the battery is disposed of at an officially designated location if there is one.
This figure must only be used when disposing the toothbrush, and must not be used to repair it. If you dismantle the toothbrush yourself, it will no longer be waterproof, which may cause it to malfunction.
- Press the power switch to turn on the power and then keep the power on until the battery is completely discharged.
Disassemble the toothbrush after discharging the battery completely. - Perform steps ① to ④ and lift the battery, and then remove it.
- Take care not to short circuit the positive and negative terminals of the removed battery, and insulate the terminals by applying tape to them.
For environmental protection and recycling of materials
This toothbrush contains a Li-ion battery.
Please make sure that the battery is disposed of at an officially assigned location, if there is one in your country.
Specifications
| Power source | See the name plate on the product (Automatic voltage conversion) |
| Charging time | Approx. 1 hour (Room temperature: 5 °C- 35 °C) |
| Battery | 1 Lithium-ion battery (3.6 V; 400 mAh) |
| Airborne Acoustical Noise | 60 (dB (A) re 1 pW) |
This product is intended for household use only.
Changing the brush head (Sold separately)
- The brush should be replaced with a new one every 3 months or so due to hygiene reasons, even if its shape is unchanged.
Even within 3 months, please exchange the brush head if the bristles are frayed.
| Part number | Replacement Brush for EW-DL83 | |
| WEW0935 | Extra fine brush | |
| WEW0936 | Multi-fit brush | |
| EW0940 | Point brush | |
Disposal of Old Equipment and Batteries Only for European Union and countries with recycling systems
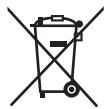
These symbols on the products, packaging, and/or accompanying documents mean that used electrical and electronic products and batteries must not be mixed with general household waste.
For proper treatment, recovery and recycling of old products and batteries, please take them to applicable collection points in accordance with your national legislation.
By disposing of them correctly, you will help to save valuable resources and prevent any potential negative effects on human health and the environment.
For more information about collection and recycling, please contact your local municipality.
Penalties may be applicable for incorrect disposal of this waste, in accordance with national legislation.

Note for the battery symbol (bottom symbol)
This symbol might be used in combination with a chemical symbol. In this case it complies with the requirement set by the Directive for the chemical involved.

Panasonic
Brossette extra fine
Brossette multi-usage
Identification of dele. 118
Identification of dele
A
B
C
D
E
F

G
H
Opbevaringsoversigt
A
Hoveddel
Lampenes lys under lading
Lampen for Iadestatus (一 - 一) lyser.
Under lading
(Lav batterikapatitet)
Satt in adaptern welt.
- I annat fall kan det resulteda i brand ell erl stot.

WARNING

Nakladać mala ilosć pasty.

Mohlo by to poskodit vnejsi ccast.
Multi-fit tisztlatas
© Panasonic Corporation 2016
EN,GE,FR,IT,DU,SP,DA,PT,NW,SW,FI,PL,CZ,SK,HU,RO
Printed in Japan
EW9700DL831E Y0116-0