
EW-DE92 - Electric toothbrush PANASONIC - Free user manual and instructions
Find the device manual for free EW-DE92 PANASONIC in PDF.
| Product type | Sonic vibration electric toothbrush |
| Brand | Panasonic |
| Model | EW-DE92 |
| Power supply | Charger RE8-52, 100-240 V (automatic adjustment) |
| Battery type | Built-in rechargeable lithium-ion (3.6 V; 500 mAh) |
| Charging time | Approximately 17 hours |
| Battery life | Approximately 90 minutes (after full charge) |
| Brushing modes | WHITE, SOFT, SENSITIVE, GUM CARE |
| Special functions | Ionic technology, gradual start (WHITE mode), 30 s / 2 min timer, mode memory |
| Included brush heads | Ionic stain care brush head, bidirectional silicone ionic brush head, interdental brush head |
| Bristle material | Nylon (high-density bristles and extra-fine side bristles); silicone for gum brush head |
| Cleaning | Washable under running water (unit and heads); do not immerse unit; water ≤ 40 °C for unit, ≤ 80 °C for heads |
| Safety | Do not use with implanted medical devices (pacemakers, etc.); consult a doctor in case of serious illness; not recommended for pregnant women or within one month postpartum |
| Head lifespan | Recommended replacement every 3 months for hygiene reasons |
| Replacement parts (references) | Replacement head WEW0908, stain care brush head WEW0906, bidirectional brush head EW0940, interdental brush head WEW0929 |
| Operating temperature | 5 °C to 35 °C |
Frequently Asked Questions - EW-DE92 PANASONIC
User questions about EW-DE92 PANASONIC
0 question about this device. Answer the ones you know or ask your own.
Ask a new question about this device
Download the instructions for your Electric toothbrush in PDF format for free! Find your manual EW-DE92 - PANASONIC and take your electronic device back in hand. On this page are published all the documents necessary for the use of your device. EW-DE92 by PANASONIC.
USER MANUAL EW-DE92 PANASONIC
Operating Instructions
(Household) Sonic Vibration Toothbrush
Model No. EW-DE92
natural_image
Line drawing of a toothbrush with multiple teeth and a circular button on the handle (no text or symbols)| English | 3 | Dansk | 121 | Česky | 237 |
| Deutsch | 21 | Português | 141 | Slovensky | 257 |
| Français | 41 | Norsk | 161 | Magyar | 277 |
| Italiano | 61 | Svenska | 179 | Română | 295 |
| Nederlands | 81 | Suomi | 197 | Türkçe | 315 |
| Español | 101 | Polski | 217 |
Panasonic
Operating Instructions
(Household) Sonic Vibration Toothbrush
Model No. EW-DE92
Contents
Safety precautions......5
Parts identification 8
Storing and charging the toothbrush ...9
Before cleaning your teeth .... 10
Using the toothbrush 12
Tips on usage 13
How to clean 15
Frequently Asked Questions (lon lamp) ... 16
Troubleshooting 17
Battery life....19
Removing the built-in rechargeable battery....19
Specifications ...... 19
Changing the brush head (Sold separately)....19
Thank you for purchasing this Panasonic product.
Before operating this unit, please read these instructions completely and save them for future use.

Warning
- Be sure to switch off the appliance and remove the plug from a household outlet before performing any maintenance. Failure to do so may result in electric shock.
- Do not wash the charger. Doing so may result in electric shock.
- If the power cord of the charger is damaged, the entire charger should be discarded.
- Toothbrushes can be used by children and persons with reduced physical, sensory or mental capabilities or lack of experience and knowledge if they have been given supervision or instruction concerning use of the appliance in a safe way and understand the hazards involved.
- Cleaning and user maintenance shall not be made by children without supervision.
• Children shall not play with the appliance.
Safety precautions
To reduce the risk of injury, loss of life, electric shock, fire, malfunction, and damage to equipment or property, always observe the following safety precautions.
Explanation of symbols
The following symbols are used to classify and describe the level of hazard, injury, and property damage caused when the denotation is disregarded and improper use is performed.

DANGER
Denotes a potential hazard that will result in serious injury or death.

WARNING
Denotes a potential hazard that could result in serious injury or death.

CAUTION
Denotes a hazard that could result in minor injury.
The following symbols are used to classify and describe the type of instructions to be observed.

This symbol is used to alert users to a specific operating procedure that must not be performed.

This symbol is used to alert users to a specific operating procedure that must be followed in order to operate the unit safely.


DANGER
Never use this product near electronic medical devices or home electrical therapy devices such as the following:
- Pacemakers and other electronic medical devices implanted in the body
• Heart-lung machines and other life-supporting electronic medical devices - Wearable electronic medical devices, such as electrocardiographs and intravenous drip equipment
- Doing so may cause incorrect operation of electronic medical devices and home electrical therapy devices, resulting in accidents or causing patients to feel unwell.

This product has a built-in rechargeable battery.
Do not throw into fire, apply heat, or charge, use, or leave in a high temperature environment.
- Doing so may cause overheating, ignition, or explosion.

WARNING
Immediately stop using and remove the power plug if there is an abnormality or failure.
- Failure to do so may cause fire, electric shock, or injury.
- The main unit or charger is deformed or abnormally hot.
• The main unit or charger smells of burning. - There is abnormal sound during use or charging of the main unit or charger.
- Immediately request inspection or repair at an authorized service center.


WARNING

Always ensure the appliance is operated on an electric power source matched to the rated voltage indicated on the charger.
Fully insert the power plug.
- Failure to do so may cause fire or electric shock.

Regularly clean the power plug to prevent dust from accumulating.
- Failure to do so may cause fire due to insulation failure caused by humidity.
Disconnect the power plug and wipe with a dry cloth.

The following people should consult with a physician before using this product.
• People with heart disease
• People who have had severe illnesses in the past
• People suffering from acute diseases
• People with febrile conditions
• People with abnormal blood pressure
• People with infectious diseases
• People with malignant tumors
• People with hemophilia
• People with allergic tendencies or who have experienced irritation from metals or other items
- Failure to do so may result in accidents or cause them to feel unwell.

Do not connect or disconnect the power plug to a household outlet with a wet hand.
- Doing so may cause electric shock or injury.

Do not place the charger over or near water filled sink or bathtub.
- Doing so may cause electric shock or fire due to a short circuit.

Never disassemble except when disposing of the product.
- Doing so may cause fire, electric shock, or injury.

Do not store within the reach of children or infants.
Do not let them use it.
- Doing so may cause an accident or injury due to accidental ingestion of removable parts.

Do not use this product if you are pregnant or are within one month of having given birth. Do not use if you feel unwell or have a fever.
- Doing so may result in accidents or cause them to feel unwell.

Do not use when the cord or the power plug is damaged or when the fitting into the household outlet is loose.
Do not damage, modify, forcefully bend, pull, twist, or bundle the cord.
Also, do not place anything heavy on or pinch the cord.
- Doing so may cause electric shock or fire due to a short circuit.

Do not use anything other than the supplied charger. Also, do not charge any other product with the supplied charger.
- Doing so may cause burn or fire due to a short circuit.

Do not use in a way exceeding the rating of the household outlet or the wiring.
- Exceeding the rating by connecting too many power plugs to one household outlet may cause fire due to overheating.

Do not modify or repair.
- Doing so may cause fire, electric shock, or injury. Contact an authorized service center for repair (battery change, etc.).

CAUTION

Disconnect the power plug from the household outlet when not using for extended period of time.
- Failure to do so may cause electric shock or fire due to electrical leakage resulting from insulation deterioration.

Disconnect the power plug by holding onto it instead of the cord.
- Failure to do so may cause electric shock or fire due to a short circuit.

People who have severe gum disease, have teeth being treated, or are concerned about symptoms within their mouth should consult a dentist before use.
- Failure to do so may cause injury or damage to teeth and gums.

Do not use the brush with toothpaste that contains a high abrasive content, such as toothpaste for removing tar or for whitening.
Do not let anyone that cannot operate the brush themselves use it.
People with a low sensitivity within their mouth should not use the brush.
Do not apply the brush head strongly against teeth or gums, or use it continuously against same spot. Do not apply the plastic part of the main unit or brush head to teeth.
- Doing so may cause injury or damage to teeth and gums.

Never use for a purpose other than cleaning your teeth.
- Doing so may cause an accident or injury.

Do not use if doing so causes you to feel unwell.
- Doing so may result in accidents or cause them to feel unwell.

Do not share the brush head with your family or other people.
- Doing so may result in infection or inflammation.

Do not drop or subject to shock.
- Doing so may cause injury.

Do not wrap the cord tightly around the charger when storing.
- Doing so may cause the wire in the cord to break with the load, and may cause fire due to a short circuit.

Do not place a metallic object such as a coin or a clip on top of the charger.
- Doing so may cause burns due to excessive heat.
Notes
When you first begin using the toothbrush, you may experience slight bleeding of the gums even though your gums may be healthy. This is because your gums are receiving stimulation by the toothbrush for the first time. The bleeding should stop after one or two weeks of use. Bleeding that persists for more than two weeks may be indication of an abnormal condition of your gums, such as pyorrhea. In this case, stop using the toothbrush and consult your dentist.


Parts identification
A
text_image
① ② ③ ④ ⑤ ⑥ WHITE SOFT SENSITIVE GUANCARE ⑦ ⑧ ⑨
text_image
Technical diagram showing labeled parts of a hairbrush and its internal structure with numbered annotations©

D

E

text_image
Diagram of a device with numbered parts, likely an electrical or mechanical component, showing connections between pins and a plug.F

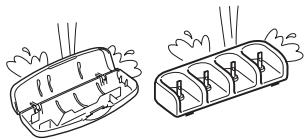
natural_image
Isometric line drawing of a three-segment connector or housing (no text or symbols)G

natural_image
Line drawing of a rectangular electronic device with a flat top and side button (no text or symbols)A Main unit
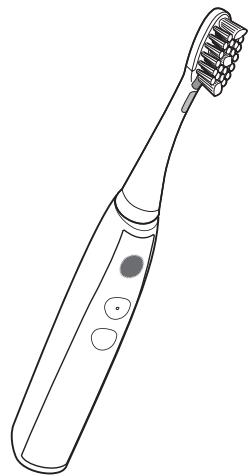
① Ion panel
② Toothbrush shaft
③ Waterproof rubber seal
④ Ion lamp
⑤ Power switch [0/1]
⑥ Mode selector
⑦ Mode indicator
⑧ Charge status lamp (→)
⑨ Battery capacity lamp (☐)
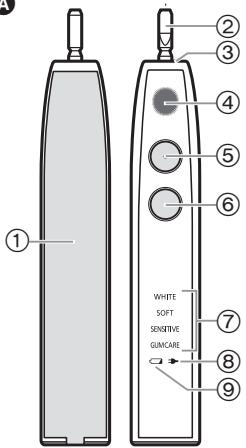
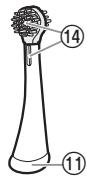
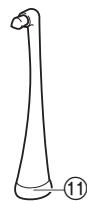
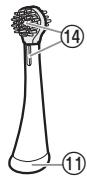
B Ionic stain care brush
⑩ Tongue cleaner
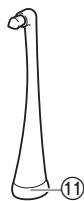
⑪ Identification ring
⑫ Extra fine side bristles
⑬ High-density bristles
⑭ Brush head electrode section
© Ionic two-way silicone brush
D Point brush
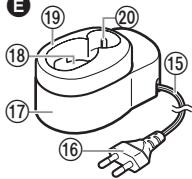
E Charger (RE8-52)
(The shape of the power plug differs depending on the area.)
⑮ Cord
⑯ Power plug
⑰ Charger base
⑱ Charging section
⑲ Main unit guide
⑳ Brush head storage
Accessories
F Brush stand
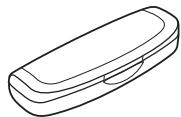
G Carrying case
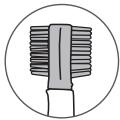
Characteristics of brush bristles (⑬)
The bristles in the center (high-density bristles) are arranged in a diamond shape, which is designed for stain care.
Storing and charging the toothbrush
- If the toothbrush stops operating when first using it (immediately after purchasing it, or after not using it for 3 months or more) or during use, charge the main unit.
- Adequate ambient temperature for charging is 5^ - 35^ . The battery may not charge properly or not at all under extreme low or high temperatures.
- You can keep the main unit attached on the charger when not in use to maintain the full battery capacity. It will not overcharge the main unit.
- The main unit may become warm during use and charging. However, this is normal.
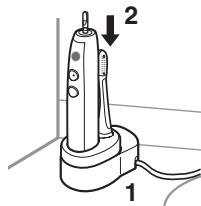
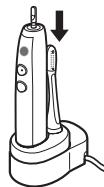
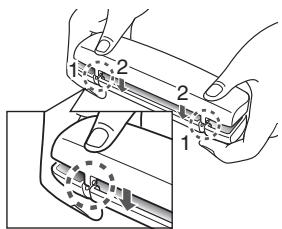
1 Place the charger on a stable horizontal surface such as countertop.
2 Align the main unit so it is facing forward, and set it straight into the charging section.
3 Insert the power plug into the household outlet.
- The charge status lamp glows and the charging will start.
- Charging cannot start when the main unit is tilted or the bottom of the main unit is not in contact with the charging section.
text_image
Diagram of a handheld electric shaver with labeled parts 1 and 2, showing internal components and wiring.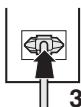
If not charging constantly
- You can fully charge the toothbrush in approx. 17 hours. The charging time may decrease depending on the charging capacity.
- A full charge will supply enough power for approx. 90 minutes use.
- Disconnect the power plug when the charge status lamp turns off.
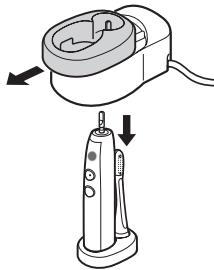
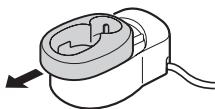
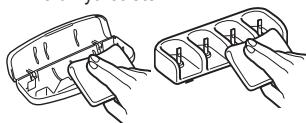
▶ About storage
The toothbrush can only be stored in a compact size with the main unit guide.
-
Slide and remove the main unit guide, and place it on horizontal and stable place.
-
Store the main unit and the brush head.
natural_image
Illustration of a handheld electric shaver with two arrows indicating motion (no text or symbols)

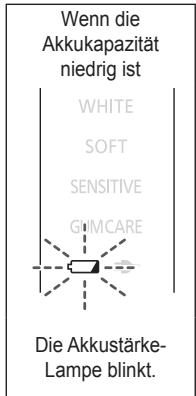
About the lamp
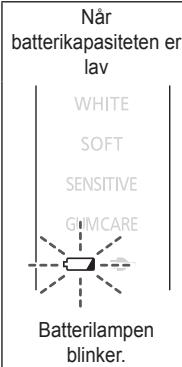
When the battery capacity is low
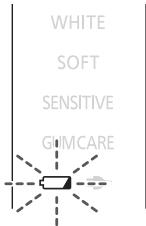
text_image
WHITE SOFT SENSITIVE GUMCAREThe battery capacity lamp blinks.
While charging
WHITE
SOFT
SENSITIVE
GUMCARE

The charge status lamp glows.
After charging is completed
WHITE
SOFT
SENSITIVE
GUMCARE

The charge status lamp turns off
- The toothbrush may not charge even if the charge status lamp turns on when a charger other than the supplied charger is used.
Before cleaning your teeth
The brush head of this sonic vibration toothbrush vibrates at a high speed.
Therefore:
- You only need to lightly press the bristles against your teeth for brushing.
- When first using this appliance, some may experience a tickling or tingling sensation caused by the high-speed vibrations. The sensation should subside after you use the toothbrush several more times.
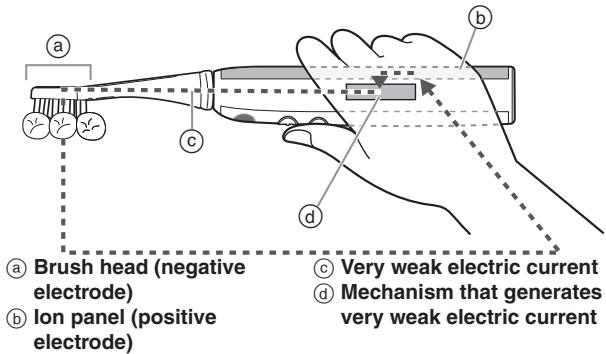
- When in use, the main unit of this toothbrush emits a very weak electric current (ionic current) in the oral cavity.
- Touching the ion panel with your hand when you hold the main unit to brush your teeth causes a very weak electric current (ionic current) to flow between your teeth and the brush head.
text_image
a Brush head (negative electrode) Ion panel (positive electrode) b c d b c Very weak electric current d Mechanism that generates very weak electric current- The ion lamp on the mechanism that generates the very weak electric current (see figure above) turns on or blinks to indicate whether ionic power is being applied to the teeth.

- You can easily see the lamp status if you use a mirror while brushing.
- Ionic power is not employed with the point brush. (The ion lamp blinks.)
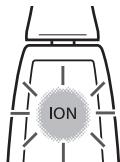
Pressing the power switch
text_image
IONActivates the mechanism that generates the very weak electric current, and the ion lamp blinks on and off.
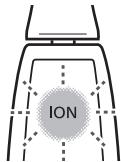
Putting the brush in your mouth
text_image
IONPasses a very weak electric current in the oral cavity, ionic power is activated and the ion lamp turns on.
Notes
- Recommended ambient temperature for using is 5^ - 35^ .
- Do not allow hair products (e.g., gel or oil) or hand lotion to come in contact with the unit as they may damage its surface.
- Do not forcefully turn the brush head with the brush head attached to the main unit. Doing so may cause the brush head or main unit to become damaged.
▶ About uses and operating modes
| Brush head | Use | Mode | Description |
 | Brushing (dental plaque removal) | WHITE | Recommended for removing plaque and stain care with normal tooth brushing |
| SOFT | Recommended when you feel the WHITE mode is too powerfulRecommended for tongue cleaning | ||
| SENSITIVE | Recommended for brushing carefully between the teeth and gums | ||
 | Gum care | GUM CARE | Uses rhythmical vibrations to care for your gums. |
 | Point brushing | WHITE | Recommended for removing dental plaque from between teeth and areas where teeth are misaligned |
| SOFT | Recommended when you feel the WHITE mode is too powerful | ||
| SENSITIVE | Particularly recommended when brushing to care for areas between teeth |
- Stains refer to discolouration on the surface of the teeth due to food and drink such as coffee, wine and tea.
- It is not possible to whiten the color of teeth beyond their original color, yellowing teeth due to aging, or discolored teeth.
▶ About soft start function (For WHITE mode only)
The toothbrush will gradually reach the selected speed and vibration approximately 2 seconds after it starts operating.
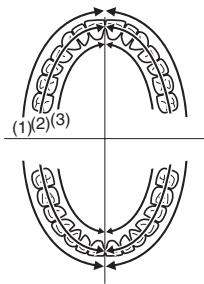
▶ About the 30-second brushing notification timer function
The timer will signal once at 30-second intervals to indicate the brushing time for each part of your mouth. It will signal twice at 2-minute intervals to indicate the recommended total brushing time. It is important to brush each area in the same sequence and with the same amount of time, every time you brush, to uniformly brush and clean your teeth.
Use the 30-second brushing notification timer function wisely so there will be no missed spot in your mouth.
- Divide your teeth into 4 parts (upper and lower, left and right), and brush one part in order such as “(1) front of the teeth”, “(2) biting plane of the teeth”, and “(3) back of the teeth” spending 30 seconds.
Brush the other parts in the same manner, and brush your whole mouth in about 2 minutes.
text_image
(1)(2)(3)▶ About mode storage function
This function stores the previously selected mode of operation, allowing the same mode to be used again.
Mode storage is reset if the unit has discharged and has been unused for a long period of time, or if the battery has been completely drained.
After charging, the product starts in WHITE mode, however this is not a malfunction.
Using the toothbrush
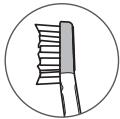
- If dried toothpaste or water stains have adhered to the ion panel, the very weak electric current may be unable to pass into the oral cavity. Please clean the ion panel.
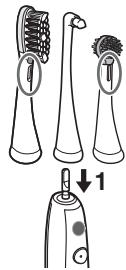
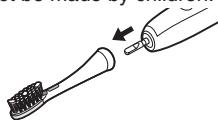
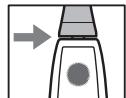
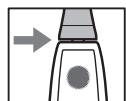
1 Place the brush head firmly onto the toothbrush shaft.
- As shown in the picture, align the front of the electrode section of the ionic stain care brush or silicone brush with the main unit.
- Attaching or removing diagonally or while twisting may cause the brush head or the main unit to become damaged.
- The toothbrush shaft will move when a force is applied. This is required for operation, and is not a malfunction.
- There will be a small gap between the brush head and the main unit.
text_image
Diagram illustrating the step of using a toothbrush to prevent electric shock, with labeled parts and directional arrow.
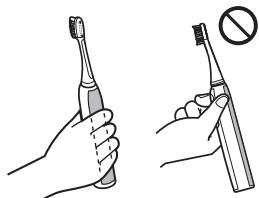
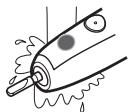
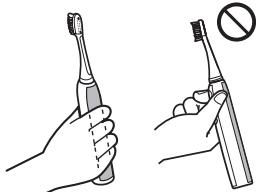
2 Grasp the main unit.
- The very weak electric current may not pass into the oral cavity if the toothbrush is held in the same way as a pen so that your hand does not touch the ion panel.
Please grasp the main unit as shown in the figure, so that your hand comes in contact with the ion panel.
natural_image
Illustration of two hand gestures: one using a toothbrush, the other holding a toothbrush with a prohibition symbol (no text or labels)
3 Press the mode selector to select the mode.
- The previously selected operating mode is stored, and the mode indicator turns on.
• Each time you press the mode selector, the mode changes. (See page 11.)

flowchart
graph TD
    A["White"] --> B["SOFT"]
    B --> C["SENSITIVE"]
    C --> D["GUMCARE"]
    style A fill:#f9f,stroke:#333
    style B fill:#ccf,stroke:#333
    style C fill:#cfc,stroke:#333
    style D fill:#fcc,stroke:#333
4 Place the toothbrush in your mouth.
- Apply a small amount of toothpaste to the brush head, if desired, before turning the power on to prevent the toothpaste from spattering.
5 Press the power switch to turn on the main unit.
- During operation, the operating mode changes each time the mode change switch is pressed.
- The sound may increase when the brush head is pressed too strongly against the teeth, but this is not a malfunction. Apply the brush head lightly against the teeth.
6 Turn off the main unit when you have finished brushing.
- Turn off the main unit before removing it from your mouth to prevent foam from spattering.
Tips on usage
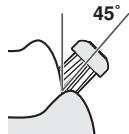
How to apply/move when brushing your teeth
Mode: WHITE/SOFT/SENSITIVE
▶ For the boundary between the tooth surfaces, or teeth and gums
Place the bristles at a 45^ angle.
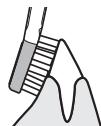
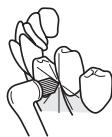
▶ For the back of the front teeth or misaligned teeth
Brush vertically.
Move toothbrush to match the angle of the teeth.
▶ For the biting surface (back teeth)
Apply from top.
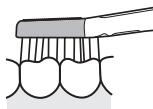
- Place the bristles of the brush gently against your teeth and move the toothbrush slowly.
The movement will slow down when the brush head is applied too strong. - Apply a small amount when using toothpaste.

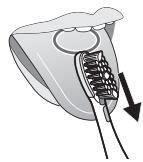
How to apply/move when cleaning your tongue
Mode: SOFT
Apply the tongue cleaner so that it barely touches the tongue, and move forward with slight force from the area that becomes dirty.
Repeat several times.
- You may injure your tongue if the tongue cleaner is pressed against the tongue too hard.
natural_image
Illustration of a medical device with a catheter inserted, showing internal structure and a downward arrow (no text or symbols)▶ To prevent emetic response
Poke your tongue out and apply the brush while you are breathing out.
How to use the point brush
Mode: WHITE/SOFT/SENSITIVE
Use in areas where your teeth are misaligned or in areas that are hard to reach with a standard brush head.
- Use the brush perpendicularly.
- Move the brush gently between your teeth.
- Apply just enough strength so that the tips of the brush head bristles are lightly touching your teeth.
How to use the ionic two-way silicone brush
Mode: GUM CARE
- Carbon is used in the rubber section, so gripping it firmly may cause a black powder to adhere to your hands, however this is not a safety concern.
- This toothbrush is different to one with a brush head with nylon bristles, as there is no sense of scouring-type brushing.
- Be careful when using the brush head - forcefully pulling or biting the rubber section may cause it to come off.
- Do not apply the brush to your teeth. (This can cause the silicone brush to degrade.)
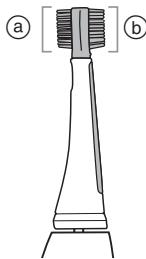
- Select your preferred stiffness from "normal" or "stiff."
natural_image
Diagram of a toothbrush with labeled parts (a) and b, showing tooth structure without any text or symbols.a “Normal” stiffness
⑥ “Stiff” stiffness
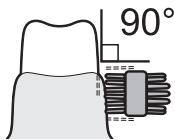
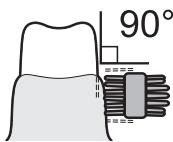
▶ Application to gums/movement
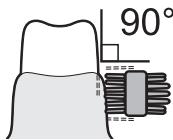
- Use as close as possible to a right angle.
- Use the toothbrush so that the tips of the silicone brush bristles are lightly touching your gums. Move the brush back and forth gently across your entire gums.
- Recommended usage is once a day, for approximately 2 minutes.
- Use gently at points of concern. (Use for around 10 to 20 seconds at each area.)
text_image
90°How to clean
Use mild detergent when cleaning the product with detergent. Never use chemical agents such as thinner, benzine, or alcohol.
Cleaning the main unit and the brush head
- Cleaning and user maintenance should not be made by children.
- Turn off the main unit and remove the brush head before cleaning them with water.
natural_image
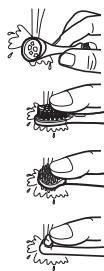
Illustration of a toothbrush applying product to a toothpaste tube (no text or symbols)▶ Brush head
Wash the brush head under running water.
- Carefully wash the inside and the bottom areas of the brush head, as well as the brush head electrode section.
- Shake well to remove water after washing.
- Do not pull the bristles of the brush.
- Do not force apart the rubber section of the silicone brush.
- Do not wash with water hotter than 80^ .
- Do not wash the tongue cleaner excessively with a pointed object or fingernails.
▶ Main unit
Wash the main unit under running water.
- Do not rub or damage the waterproof rubber seal.
- Do not immerse the main unit under water.
- Do not wash with water hotter than 40^ .
- Completely remove any toothpaste or water stains from the ion panel.
▶ After washing with water
- Wipe dry with a cloth.
- Do not charge while it is wet.
- Return the main unit and the brush head to the charger.
- Return other brush heads to the brush stand.
natural_image
Line drawing of a dental orental brush tool with a downward arrow indicating compression (no text or symbols present)English
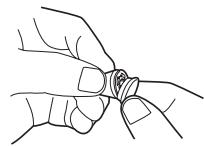
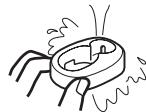
If the identification ring comes off
Put the identification ring back on.
- The identification ring may break if pulling it too strong.
- Using the toothbrush without the identification ring has no effect on its performance. The ring is simply for user identification purposes.
natural_image
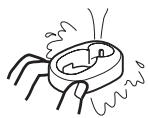
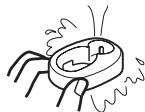
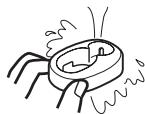
Line drawing of two hands holding a small object, possibly a flower or seed pod (no text or symbols)Cleaning the charger
- Slide and remove the main unit guide from the charger base.
- Wipe off any dirt on the charger base using a soft cloth.
natural_image
Diagram of a mechanical device with a circular component and directional arrow (no text or symbols)


-
Wash the main unit guide with water.
-
Wipe off water after washing.
-
Only use water to wash the main unit guide.
-
Wipe the prongs of the power plug with a dry cloth about once every 6 months.
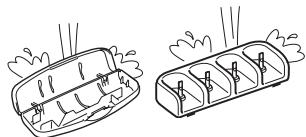
Cleaning the carrying case and the brush stand
- Wash with water.
natural_image
Two hand-drawn illustrations of a container with steam rising, showing internal compartments and no text or symbols.- Wipe off water after washing.
natural_image
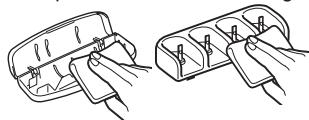
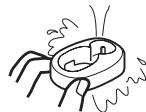
Two technical line drawings of a battery pack with clamps, showing internal compartments (no text or symbols)If the top case has come off
- Align the mounting section of the top case and the bottom case as shown in the figure.
- Press the top case in the direction indicated by arrows.
text_image
Technical diagram showing hands operating a mechanical device with numbered components and alignment indicatorsFrequently Asked Questions (Ion lamp)
| Q | The lamp does not turn on, even though the toothbrush is in my mouth. | |
| A | Your hands are dry. | ► Moisten your hands and try using it again. |
| Toothpaste or water stains have adhered to the ion panel. | ► Clean the ion panel thoroughly and try using it again. | |
| You are brushing without touching the ion panel. | ► Hold the main unit so that your hand is touching the ion panel and try using it again. | |
| Q | The lamp turns on even though the toothbrush is not in my mouth. (This is not a malfunction.) |
| A | During use, you may have touched the ion electrode section of the ion panel and brush head (or the toothbrush shaft) with your hand. | The very weak electric current may be flowing through the moisture that is on your hands. |
| You washed the main unit with water while using it. | The very weak electric current may be flowing through the moisture between the toothbrush shaft and the ion panel. |
| You removed the brush head from your mouth just after brushing without turning off the power switch. | The very weak electric current may be flowing through saliva or other liquid on the surface of the brush head and main unit. |
Troubleshooting
| Problem | Possible cause | Action |
| The charge status lamp does not turn on. | You have just purchased the toothbrush or have not used it for a while. | The toothbrush may not blink or turn on for several minutes after starting to charge it, however it will turn on if you continue to charge it. If it continues to blink after a while, contact an authorized service center for repair. |
| The charge status lamp is blinking rapidly.(Twice every second) | The temperature is too low or high while charging. | Charge the toothbrush within the recommended charging temperature of 5 °C to 35 °C. If it continues to blink even when charging within the recommended charging temperature, contact an authorized service center for repair. |
| The toothbrush can be used only for several minutes, even if it is charged. | The charging time is short. | Charge the toothbrush for 17 hours or longer.(See page 9.) |
| The main unit does not stand straight on the charger. | Stand the main unit so the bottom is in contact with the charging section of the charger, and check that the charge status lamp comes on. | |
| The toothbrush does not operate without the battery capacity lamp blinks. | The rechargeable battery has reached its operating life.(Approx. 3 years) | Contact an authorized service center for repair. |
| The toothbrush does not operate. | The temperature is too low or high while using it. | Use within the recommended usage temperature of 5 °C to 35 °C. |
| The toothbrush stops operating every once in a while. | The “30-second brushing notification timer function” is in operation.(See page 12.) | This is not a malfunction.Continue using it. |
| The vibration increases gradually when pressing the power switch. | The “Soft start function” is in operation.(See page 12.) |
English


| Problem | Possible cause | Action |
| The movement decreases when the brush head is pressed against teeth. | The brush head is pressed against teeth too strong.(See page 13.) | Apply the brush head lightly against teeth. |
| The sound increases when the brush head is pressed against teeth. | ||
| The toothbrush shaft moves. | ▶▶▶▶▶▶▶▶▶▶▶▶▶▶▶▶▶▶▶▶▶▶▶▶▶▶▶▶▶▶▶▶▶▶▶▶▶▶▶▶▶▶▶▶▶▶▶▶▶▶▶▶▶▶▶▶▶▶▶▶▶▶▶▶▶▶▶▶▶▶▶▶▶▶▶▶▶▶▶▶▶▶▶▶▶▶▶▶▶▶▶▶▶▶▶▶▶▶▶▶ | This is not a malfunction. (See page 12.) |
| There is an acidic taste. | Some people may notice a taste or sense an electric current. This is because of the very weak electric current running inside the oral cavity.• This differs depending on the person. | This is not a malfunction.Concerned users are advised to use SOFT mode or SENSITIVE mode. (These modes use a weaker electric current than WHITE mode, so you should be less aware of it.) |
| The ion lamp turns on, even though you are not brushing. | ▶▶▶▶▶▶▶▶▶▶▶▶▶▶▶▶▶▶▶▶▶▶▶▶▶▶▶▶▶▶▶▶▶▶▶▶▶▶▶▶▶▶▶▶▶▶▶▶▶▶▶▶▶▶▶▶▶▶▶▶▶▶▶▶▶▶▶▶▶▶▶▶▶▶▶▶▶▶▶▶▶▶▶▶▶▶▶▶▶▶▶▶▶▶▶▶▶ | Thisis not a malfunction.(See page 16.) |
| The ion lamp does not turn on, even though you are brushing. | ▶▶▶▶▶▶▶▶▶▶▶▶▶▶▶▶▶▶▶▶▶▶▶▶▶▶▶▶▶▶▶▶▶▶▶▶▶▶▶▶▶▶▶▶▶▶▶▶▶▶▶▶▶▶▶▶▶▶▶▶▶▶▶▶▶▶▶▶▶▶▶▶▶▶▶▶▶▶▶▶▶▶▶▶▶▶▶▶▶▶▶▶▶▶▶▶ | This is Not a malfunction. |
Battery life
Approximately 3 years. The battery may have reached its operating life if the usage frequency decreases drastically, even after a full charge.
(The operating life of the battery may differ depending on usage or storage conditions)
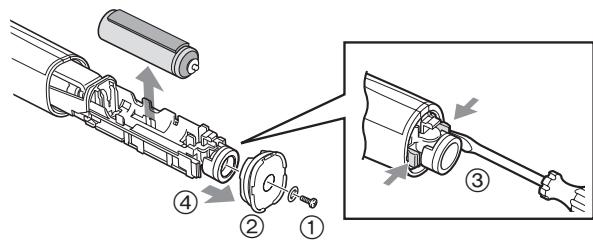
Removing the built-in rechargeable battery
Remove the built-in rechargeable battery before disposing the toothbrush.
Please make sure that the battery is disposed of at an officially designated location if there is one.
This figure must only be used when disposing the toothbrush, and must not be used to repair it. If you dismantle the toothbrush yourself, it will no longer be waterproof, which may cause it to malfunction.
- Remove the toothbrush from the charger when removing the battery.
- Press the power switch to turn on the power and then keep the power on until the battery is completely discharged.
- Perform steps ① to ④ and lift the battery, and then remove it.
- Please take care not to short-circuit the battery.
text_image
Technical diagram showing exploded view of mechanical assembly with numbered components and directional arrows indicating assembly steps.For environmental protection and recycling of materials
This toothbrush contains a Li-ion battery.
Please make sure that the battery is disposed of at an officially assigned location, if there is one in your country.
Specifications
| Power source | See the name plate on the product (Automatic voltage conversion) |
| Battery | 1 Lithium-ion battery(3.6 V; 500 mAh) |
| Charging time | Approx. 17 hours |
| Airborne Acoustical Noise | 55 (dB (A) re 1 pW) |
This product is intended for household use only.
Changing the brush head (Sold separately)
- The brush should be replaced with a new one every 3 months or so due to hygiene reasons, even if its shape is unchanged.
- If the bristles are bent to one side or worn, the toothbrush is not effective for brushing. Replace the brush head with a new one.
| Part number | Replacement Brush for EW-DE92 | |
| WEW0908 | Ionic stain care brush | 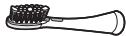 |
| WEW0906 | Ionic two-way silicone brush | 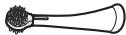 |
| EW0940 | Point brush |  |
| WEW0929 | Stain care brush |  |

English
Information for Users on Collection and Disposal of Old Equipment and used Batteries
These symbols on the products, packaging, and/or accompanying documents mean that used electrical and electronic products and batteries should not be mixed with general household waste.

For proper treatment, recovery and recycling of old products and used batteries, please take them to applicable collection points, in accordance with your national legislation and the Directives 2002/96/EC and 2006/66/EC.
By disposing of these products and batteries correctly, you will help to save valuable resources and prevent
any potential negative effects on human health and the environment which could otherwise arise from inappropriate waste handling.
For more information about collection and recycling of old products and batteries, please contact your local municipality, your waste disposal service or the point of sale where you purchased the items.
Penalties may be applicable for incorrect disposal of this waste, in accordance with national legislation.
For business users in the European Union
If you wish to discard electrical and electronic equipment, please contact your dealer or supplier for further information.
[Information on Disposal in other Countries outside the European Union]
These symbols are only valid in the European Union. If you wish to discard these items, please contact your local authorities or dealer and ask for the correct method of disposal.
![PANASONIC EW-DE92 - [Information on Disposal in other Countries outside the European Union] - 1](/content/2019/11/105524/images/8ec528b8de29158ec77ce1a3cd40a6d0d1c2a388102e6f86673059465541cc1e.jpg)
Panasonic
text_image
Technical diagram showing labeled parts of a hairbrush and iron, with numbered annotations for each component.©

D

E

text_image
Diagram of a device with numbered parts, likely an electrical or mechanical component, showing connections between pins and a plug.F

natural_image
Isometric line drawing of a three-cylinder container with four side compartments and two cylindrical pins (no text or symbols)G

natural_image
Line drawing of a closed rectangular object with a rounded top and side gap (no text or symbols)A Hauptgerät
E Ladestation (RE8-52)
text_image
Diagram of a handheld electric shaver with labeled parts 1 and 2, showing internal components and wiring.
natural_image
Illustration of a hand holding an electric shaver device, showing the internal components and base (no text or symbols present)Kontrollleuchten
text_image
Diagram illustrating a hand holding a tool with labeled parts (a, b, c, d) and directional arrows indicating movement or process.text_image
(1)(2)(3)text_image
Diagram showing three types of electric toothbrushes with a labeled component '1' indicating the step.
natural_image
Illustration of two hand gestures: one using a toothbrush, the other holding a toothbrush with a prohibition symbol (no text or labels)
natural_image
Illustration of a medical device with a catheter inserted, showing internal structure and a downward arrow (no text or symbols)natural_image
Technical line drawing of a mechanical component with labeled parts (a) and b, showing no text or symbols beyond labels.natural_image
Illustration of a toothbrush applying product to a toothpaste tube (no text or symbols)▶ Bürstenkopf
natural_image
Illustration of a dental or oral care device with a brush and screwdriver, showing no text or symbols.natural_image
Line drawing of two hands holding a small object, no text or symbols presentnatural_image
Diagram of a mechanical device with a curved top and internal components, showing directional arrow (no text or symbols)

natural_image
Two line drawings of a container with internal compartments and steam rising (no text or symbols)natural_image
Two line drawings of a battery pack with internal compartments and connectors (no text or symbols)text_image
Technical diagram showing a mechanical assembly with numbered components, likely illustrating a turning or disassembly process.
text_image
Technical diagram showing exploded view of mechanical assembly with numbered components and directional arrows indicating assembly steps.text_image
Technical diagram showing labeled parts of a hairbrush with numbered annotations©

D

E

text_image
Diagram of a device with numbered parts, likely an electrical or mechanical component, showing connections between pins and a plug.F

natural_image
Line drawing of a three-cylinder container with four side slots and two cylindrical pins (no text or symbols)G

natural_image
Line drawing of a closed rectangular object with a rounded top and side gap (no text or symbols)A Appareil principal
text_image
Diagram of a handheld electric shaver with labeled parts 1 and 2, showing internal components and wiring.
natural_image
Illustration of a hand holding an electric shaver device, showing top-down and side-view views (no text or symbols)À propos du voyant
text_image
Diagram illustrating a hand holding a syringe with labeled parts (a, b, c, d) and directional arrows indicating movement or flow.text_image
(1)(2)(3)text_image
Diagram illustrating the step of using an electric toothbrush, showing three stages from cleaning to cleaning and a final step labeled '1'.Français
natural_image
Illustration of two hand positions: one holding a toothbrush, the other holding a toothbrush with a prohibition symbol (no text or labels)natural_image
Illustration of a medical device with a catheter inserted, showing internal structure and a downward arrow (no text or symbols)natural_image
Technical line drawing of a mechanical component with labeled parts (a) and b, showing no text or symbols beyond labels.natural_image
Illustration of a toothbrush being inserted into an electric toothbrush (no text or symbols present)▶ Tête de la brosse
▶ Appareil principal
natural_image
Illustration of a dental or oral care device with a brush and screwdriver, showing no text or symbols.natural_image
Line drawing of two hands holding a small object, possibly a flower or seed pod (no text or symbols)natural_image
Diagram of a mechanical device with a curved housing and directional arrow (no text or symbols)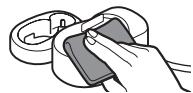

natural_image
Two line drawings of a container with steam rising, showing internal compartments and no text or symbols.natural_image
Two hand-drawn diagrams showing a device with pins inserted into a tray, no text or symbols present.text_image
Technical diagram showing a mechanical assembly with numbered components and directional arrows indicating motion or force.text_image
Technical diagram showing exploded and assembled views of a mechanical assembly with numbered componentstext_image
Technical diagram showing labeled parts of a mechanical device with numbered components and magnified views©

D

E

text_image
Diagram of a device with numbered parts, likely an electrical or mechanical component, showing connections between pins 15 to 20.F

natural_image
Line drawing of a three-cylinder container with four side slots and two cylindrical pins (no text or symbols)G

natural_image
Line drawing of a rectangular electronic device with a flat top and side button (no text or symbols)A Unità principale
text_image
Diagram of a handheld electric shaver with labeled parts 1 and 2, showing internal components and wiring.
natural_image
Illustration of a handheld electric shaver with two arrows indicating motion (no text or symbols)text_image
Diagram illustrating a hand holding a tool with labeled parts (a, b, c, d) and directional arrows indicating movement or process.text_image
(1)(2)(3)text_image
Diagram illustrating the step of using an electric toothbrush, showing three stages from cleaning to cleaning and a final step labeled '1'.Italiano
natural_image
Illustration of two hand gestures: one using a toothbrush, the other holding a toothbrush with a prohibition symbol (no text or labels)
natural_image
Illustration of a medical device with a catheter inserted, showing internal structure and a downward arrow (no text or symbols)Mode: GUM (GUM) CARE
natural_image
Technical line drawing of a mechanical component with labeled parts (a) and b, showing no text or symbols.natural_image
Illustration of a toothbrush applying product to a toothpaste tube (no text or symbols)▶ Testina
natural_image
Illustration of four hand gestures showing a droplet being held, with no text or symbols present.▶ Unità principale
natural_image
Line drawing of a dental orental brush tool with a downward arrow indicating compression (no text or symbols present)natural_image
Line drawing of two hands holding a small object, possibly a flower or seed pod (no text or symbols)natural_image
Diagram of a mechanical device with a circular component and directional arrow (no text or symbols)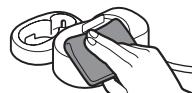

natural_image
Two line drawings of a container with internal compartments and steam rising (no text or symbols)natural_image
Two technical line drawings of a battery pack with internal components and connectors (no text or symbols)text_image
Technical diagram showing a mechanical assembly with numbered components, likely illustrating a turning or disassembly process.text_image
Technical diagram showing exploded view of mechanical assembly with numbered components and directional arrows indicating assembly steps.text_image
Technical diagram showing labeled parts of a hairbrush with numbered annotations©

D

E

text_image
Diagram of a device with numbered parts, likely an electrical or mechanical component, showing connections between pins 15 to 20.F

natural_image
Line drawing of a three-cylinder container with four side slots and two cylindrical pins (no text or symbols)G

natural_image
Line drawing of a rectangular electronic device with a lid and handle (no text or symbols)A Hoofdapparaat
① lon-paneel
② Tandenborstelkop
③ Waterbestendig rubberen sluiting
④ lon-lampje
⑤ Stroomschakelaar [0/1]
⑥ Keuzestand
⑦ Standindicator
⑧ Oplaadlampje (→)
⑨ Batterijlampje (☐)
text_image
Diagram of a handheld electric shaver with labeled parts 1 and 2, showing internal components and wiring.
natural_image
Illustration of a hand holding an electric shaver device, showing the internal components and directional arrows (no text or symbols present)
Het lampje
text_image
Diagram illustrating a hand holding a syringe with labeled parts (a, b, c, d) and directional arrows indicating movement or flow.text_image
(1)(2)(3)text_image
Diagram showing three types of toothbrushes with a downward arrow indicating step 1 for the last type.
natural_image
Illustration of two hand gestures: one holding a toothbrush, the other holding a toothbrush with a prohibition symbol (no text or labels)natural_image
Illustration of a dental implant or dental tool inserted into a tooth (no text or symbols visible)natural_image
Technical line drawing of a mechanical component with labeled parts (a) and b, showing no text or symbols beyond labels.natural_image
Illustration of a toothbrush applying product to a toothpaste tube (no text or symbols)▶ Borstelkop
natural_image
Line drawing of an electric toothbrush with a downward arrow indicating compression (no text or symbols)natural_image
Line drawing of two hands holding a small object, no text or symbols presentReinigen van de oplader
natural_image
Diagram of a mechanical device with a circular housing and a curved handle, showing directional arrow (no text or symbols)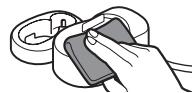
natural_image
Two line drawings of a battery pack with steam rising, showing internal compartments and heat dissipation (no text or symbols)natural_image
Two technical line drawings of a battery pack with internal compartments and connectors (no text or symbols)

Nederlands
text_image
Technical diagram showing hands operating a device with numbered components and directional arrows indicating movement or assembly.text_image
Technical diagram showing exploded view of mechanical assembly with numbered components and directional arrows indicating assembly steps.text_image
Technical diagram showing labeled parts of a hairbrush and iron, with numbered annotations for each component.©

D

E

text_image
Diagram of a device with numbered parts, likely an electrical or mechanical component, showing connections between pins 15 to 20.F

natural_image
Isometric line drawing of a three-cylinder container with four side compartments and two cylindrical pins (no text or symbols)G

natural_image
Line drawing of a closed rectangular object with a rounded top and side gap (no text or symbols)A Unidad principal
text_image
Diagram of a handheld electric shaver with labeled parts 1 and 2, showing internal components and wiring.
natural_image
Illustration of a handheld electric shaver with two arrows indicating motion (no text or symbols)
text_image
(1)(2)(3)text_image
Diagram illustrating the step of using an electric toothbrush, showing three stages from cleaning to cleaning and before cleaning.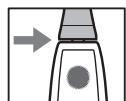
natural_image
Illustration of a hand holding an electric toothbrush (no text or symbols)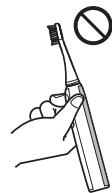
natural_image
Illustration of a hand holding a toothbrush with a prohibition symbol (no text or labels)Español

natural_image
Illustration of a medical device with a catheter inserted, showing internal structure and a downward arrow (no text or symbols)natural_image
Technical line drawing of a mechanical component with labeled parts (a) and b, showing no text or symbols.natural_image
Illustration of a toothbrush applying product to a toothpaste tube (no text or symbols)natural_image
Line drawing of a dental orental brush tool with a downward arrow indicating compression (no text or symbols present)natural_image
Line drawing of two hands holding a small object, no text or symbols presentnatural_image
Diagram of a mechanical device with a circular component and directional arrow (no text or symbols)


natural_image
Two hand-drawn illustrations of a food item with steam rising, showing interior and exterior views (no text or symbols)natural_image
Two technical line drawings of a mechanical component with pins, shown from different angles (no text or symbols)text_image
Technical diagram showing a mechanical assembly with numbered components, likely illustrating a turning or disassembly process.text_image
Technical diagram showing mechanical assembly steps with numbered components and directional arrows indicating movementtext_image
Technical diagram showing labeled parts of a mechanical device with numbered components and magnified views©

D

E

text_image
Diagram of a device with numbered parts, likely an electrical or mechanical component, showing connections between pins 15 to 20.F

natural_image
Line drawing of a three-cylinder container with four side slots and two cylindrical pins (no text or symbols)G

natural_image
Line drawing of a rectangular electronic device with a flat top and side button (no text or symbols)A Hoveddel
text_image
Diagram of a handheld electric shaver with labeled parts 1 and 2, showing internal components and wiring.
natural_image
Illustration of a hand holding an electric toothbrush with a device inside (no text or symbols)Om lampen
text_image
(1)(2)(3)text_image
Diagram illustrating the step of using an electric toothbrush, showing three stages from cleaning to cleaning.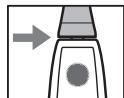
natural_image
Illustration of two hand gestures: one holding a toothbrush, the other holding a toothbrush with a prohibition sign (no text or symbols on the objects)natural_image
Illustration of a medical device with a catheter inserted, showing internal structure and a downward arrow (no text or symbols)▶ For at undgå opkastningsfornemmelse
natural_image
Technical line drawing of a mechanical component with labeled parts (a) and b, showing no text or symbols beyond labels.① “Normal” stivhed
⑥ "Stiv" stivhed
natural_image
Illustration of a toothbrush applying product to a toothpaste tube (no text or symbols)▶ Børstehoved
natural_image
Line drawing of an electric toothbrush with a downward arrow indicating compression or disassembly (no text or symbols present)natural_image
Line drawing of two hands holding a small object, possibly a flower or seed pod (no text or symbols)natural_image
Illustration of a mechanical device with a circular component and a curved handle, showing an arrow indicating direction (no text or symbols present)
natural_image
Two technical line drawings of a mechanical component with pins, shown from different angles (no text or symbols)text_image
Technical diagram showing a mechanical assembly with numbered components, likely illustrating a cutting or fastening process.text_image
Technical diagram showing exploded view of mechanical assembly with numbered components and directional arrows indicating assembly steps.text_image
Technical diagram showing labeled parts of a mechanical device with numbered components and magnified views©

D

E

text_image
Diagram of a device with numbered parts, likely an electrical or mechanical component, showing connections between pins 15 to 20.F

natural_image
Isometric line drawing of a three-cylinder container with four side compartments and two cylindrical pins (no text or symbols)G

natural_image
Line drawing of a rectangular electronic device with a flat top and side button (no text or symbols)A Unidade principal
text_image
Diagram of a handheld electric shaver with labeled parts 1 and 2, showing internal components and wiring.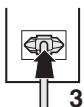
natural_image
Illustration of a hand holding an electric shaver device, showing the blade and handle (no text or symbols present)
text_image
Diagram illustrating a hand holding a handheld device with labeled parts (a, b, c, d) and directional arrows indicating movement or flow.① Cabeça da escova (eléctrodo negativo)
(b) Painel de iões (eléctrodo positivo)
text_image
(1)(2)(3)text_image
Diagram illustrating the step of using an electric toothbrush, showing three stages from cleaning to cleaning and before cleaning.
2 Segure na unidade principal.
natural_image
Illustration of a hand holding an electric toothbrush (no text or symbols present)
natural_image
Line drawing of a hand holding a toothbrush with a prohibition symbol (no text or labels)


Português
natural_image
Illustration of a medical device with a catheter inserted, showing internal structure and a downward arrow (no text or symbols)natural_image
Technical line drawing of a mechanical component with labeled parts (a) and b, showing no text or symbols.① Rigidez "Normal"
b Rigidez "Rígida"
text_image
90°Português


Portugues
Como limpar
natural_image
Illustration of a toothbrush being inserted into an electric toothbrush (no text or symbols present)▶ Cabeça da escova
natural_image
Line drawing of a dental orental brush tool with a downward arrow indicating compression (no text or symbols)natural_image
Line drawing of two hands holding a small object, no text or symbols presentnatural_image
Diagram of a mechanical device with a circular component and directional arrow (no text or symbols)


natural_image
Two hand-drawn illustrations of a food item with steam rising, showing interior and exterior views (no text or symbols)natural_image
Two technical line drawings of a battery pack with clamps, showing internal compartments and wiring (no text or symbols)Se a parte superior se soltar
text_image
Technical diagram showing hands operating a device with labeled parts 1 and 2, likely illustrating a mechanical or electronic assembly.text_image
Technical diagram showing exploded view of mechanical assembly with numbered components and directional arrows indicating assembly steps.text_image
Technical diagram showing labeled parts of a hairbrush with numbered annotations©

D
E

text_image
Diagram of a device with numbered parts, likely an electrical or mechanical component, showing connections between pins 15 to 20.F

natural_image
Line drawing of a three-cylinder container with four side slots and two cylindrical pins (no text or symbols)G

natural_image
Line drawing of a rectangular electronic device with a flat top and side button (no text or symbols)A Hoveddel
① lon-panel
② Tannbørsteskaft
③ Vanntett gummipakning
④ lon-lampe
⑤ Strømbryter [0/1]
⑥ Modusvelger
⑦ Modusindikator
⑧ Lampe for ladestatus (→)
⑨ Batterilampe (☐)
text_image
Diagram of a handheld electric shaver with labeled parts 1 and 2, showing internal components and wiring.
natural_image
Illustration of a handheld electric shaver with two arrows indicating motion (no text or symbols)Om lampen
text_image
Når batterikapasiteten er lav WHITE SOFT SENSITIVE GMCARE Batterilampen blinker.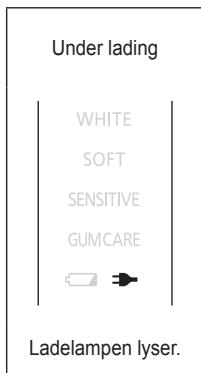
text_image
Under lading WHITE SOFT SENSITIVE GUMCARE Ladelampen lyser.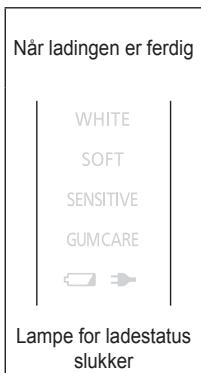
text_image
Når ladingen er ferdig WHITE SOFT SENSITIVE GUMCARE Lampe for ladestatus slukkertext_image
(1)(2)(3)text_image
Diagram illustrating the step of using an electric toothbrush, showing three stages from cleaning to cleaning.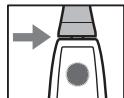
2 Holde hoveddelen.
natural_image
Illustration of two hand positions: one using a toothbrush, the other holding a toothbrush with a prohibition symbol (no text or labels)170
natural_image
Illustration of a medical device with a catheter inserted, showing internal structure and a downward arrow (no text or symbols)natural_image
Technical line drawing of a mechanical component with labeled parts (a) and b, showing no text or symbols beyond labels.(a) "Normal" hardhet
(b) "Hard" hardhet
text_image
90°natural_image
Illustration of a toothbrush applying product to a toothpaste tube (no text or symbols)▶ Børstehode
Vask børstehodet under rennende vann.
natural_image
Line drawing of an electric toothbrush with a downward arrow indicating compression or disassembly (no text or symbols present)natural_image
Line drawing of two hands holding a small object, possibly a flower or seed pod (no text or symbols)Vask av laderen
natural_image
Diagram of a mechanical device with a circular component and directional arrow (no text or symbols)
Vask av reiseetuiet og børsteholderen
- Vaskes i vann.
natural_image
Two line drawings of a container with internal compartments and steam rising (no text or symbols)natural_image
Two line drawings of a battery pack with internal compartments and connectors (no text or symbols)text_image
Technical diagram showing a mechanical assembly with numbered components, likely illustrating a cutting or fastening process.


text_image
Technical diagram showing mechanical assembly steps with numbered components and directional arrows indicating movementtext_image
Technical diagram showing labeled parts of a hairbrush with numbered annotations©

D

E

text_image
Diagram of a device with numbered parts, likely an electrical or mechanical component, showing connections between pins 15 to 20.F

natural_image
Line drawing of a three-cylinder container with four side slots and two cylindrical pins (no text or symbols)G

natural_image
Line drawing of a rectangular electronic device with a flat top and side button (no text or symbols)A Huvudenheten
text_image
Diagram of a handheld electric shaver with labeled parts 1 and 2, showing internal components and wiring.
natural_image
Illustration of a handheld electric shaver and its base, showing internal components and directional arrows (no text or symbols)Svenska
Om lampan
text_image
(1)(2)(3)text_image
Diagram illustrating the step of using an electric toothbrush, showing three stages from cleaning to cleaning.
natural_image
Illustration of two hand positions: one holding a toothbrush, the other holding a toothbrush with a prohibition symbol (no text or labels)natural_image
Illustration of a medical device with a catheter inserted, showing internal structure and a downward arrow (no text or symbols)natural_image
Diagram of a toothbrush with labeled parts (a) and b, showing tooth structure without any text or symbols.a “Normal” styvhet b “Styv” styvhet
natural_image
Illustration of a toothbrush applying a toothpaste to a tooth (no text or symbols present)▶ Borsthuvud
natural_image
Line drawing of an electric toothbrush with a downward arrow indicating compression or disassembly (no text or symbols present)natural_image
Line drawing of two hands holding a small object, possibly a flower or seed pod (no text or symbols)natural_image
Diagram of a mechanical device with a circular component and directional arrow (no text or symbols)

natural_image
Two line drawings of a container with internal compartments and steam rising (no text or symbols)natural_image
Two line drawings of a battery pack with internal compartments and connectors (no text or symbols)text_image
Technical diagram showing a mechanical assembly with labeled parts 1 and 2, likely illustrating a component or assembly.
text_image
Technical diagram showing mechanical assembly steps with labeled components and directional arrowstext_image
Technical diagram showing labeled parts of a hairbrush with numbered annotations©
D

E
text_image
Diagram of a device with numbered parts, likely an electrical or mechanical component, showing connections between pins 15 to 20.F

natural_image
Line drawing of a three-cylinder container with four side slots and two cylindrical pins (no text or symbols)G

natural_image
Line drawing of a closed rectangular object with a rounded top and side gap (no text or symbols)A Päälaite
text_image
Diagram of a handheld electric shaver with labeled parts 1 and 2, showing internal components and wiring.
natural_image
Illustration of a handheld device with a circular housing and a separate electric drill bit (no text or symbols)text_image
(1)(2)(3)text_image
Diagram illustrating the step of using an electric toothbrush, showing three stages from cleaning to cleaning.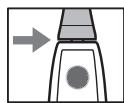
natural_image
Illustration of two hand positions: one holding a toothbrush, the other holding a toothbrush with a prohibition symbol (no text or labels)natural_image
Illustration of a medical device with a catheter inserted, showing internal structure and a downward arrow (no text or symbols)natural_image
Diagram of a hairbrush with labeled parts (a) and b, showing no text or symbols beyond labelsnatural_image
Illustration of a toothbrush being inserted into an electric toothbrush (no text or symbols present)▶ Harjan pää
natural_image
Line drawing of an electric toothbrush with a downward arrow indicating compression or disassembly (no text or symbols present)natural_image
Line drawing of two hands holding a small object, possibly a flower or seed pod (no text or symbols)natural_image
Diagram of a mechanical device with a circular component and directional arrow (no text or symbols)

natural_image
Two line drawings of a container with internal compartments and steam rising (no text or symbols)natural_image
Two technical line drawings of a mechanical component with pins, shown from different angles (no text or symbols)text_image
Technical diagram showing a mechanical assembly with labeled parts 1 and 2, likely illustrating a component or assembly.text_image
Technical diagram showing mechanical assembly steps with numbered components and directional arrows indicating movementtext_image
Technical diagram showing labeled parts of a hairbrush with numbered annotations©

D

E

text_image
Diagram of a device with numbered parts, likely an electrical or mechanical component, showing connections between pins 15 to 20.F

natural_image
Line drawing of a three-cylinder container with four side slots and two cylindrical pins (no text or symbols)G

natural_image
Line drawing of a closed rectangular object with a rounded top and side gap (no text or symbols)A Jednostka główna
text_image
Diagram of a handheld electric shaver with labeled parts 1 and 2, showing internal components and wiring.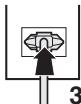
natural_image
Illustration of a handheld device with a circular component and a separate electric shaver (no text or symbols)text_image
Diagram illustrating a dental procedure with labeled parts (a, b, c, d) and directional arrows indicating movement or flow.text_image
(1)(2)(3)text_image
Diagram illustrating the step of using an electric toothbrush, showing how to change the tooth's tip.
natural_image
Illustration of two hand positions: one holding a toothbrush, the other holding a toothbrush with a prohibition symbol (no text or labels)
natural_image
Illustration of a medical device with a catheter inserted, showing internal structure and a downward arrow (no text or symbols)natural_image
Diagram of a toothbrush with labeled parts (a) and b, showing tooth structure without any text or symbols.natural_image
Illustration of a toothbrush being inserted into a toothpaste tube (no text or symbols present)▶ Główka szczoteczki
natural_image
Illustration of an electric toothbrush with a downward arrow indicating compression (no text or symbols present)natural_image
Line drawing of a hand holding a small object, possibly a tool or device, with no visible text or symbols.natural_image
Diagram of a mechanical component with a curved housing and directional arrow (no text or symbols)

natural_image
Two hand-drawn diagrams showing a container with contents and steam rising, next to a rack with six panes (no text or symbols)natural_image
Two line drawings of a battery pack with handles and internal compartments, no text or symbols presenttext_image
Technical diagram showing hands operating a device with numbered components and directional arrows indicating movement or assembly.text_image
Technical diagram showing exploded and assembled views of a mechanical assembly with labeled parts ① to ④text_image
Technical diagram showing labeled parts of a hairbrush with numbered annotations©

D
E

text_image
Diagram of a device with numbered parts, likely an electrical or mechanical component, showing connections between pins 15 to 20.F

natural_image
Line drawing of a three-cylinder container with four side slots and two cylindrical pins (no text or symbols)G
natural_image
Line drawing of a rectangular electronic device with a flat top and side button (no text or symbols)A Hlavní jednotka
text_image
Diagram of a handheld electric shaver with labeled parts 1 and 2, showing internal components and wiring.
natural_image
Illustration of a handheld device with a circular housing and a base-mounted stand, showing directional arrows (no text or symbols)text_image
Diagram illustrating a dental tool application with labeled parts (a, b, c, d) and directional arrows indicating process flow.text_image
(1)(2)(3)text_image
Diagram illustrating the step of using an electric toothbrush, showing before and after states with labeled arrows.natural_image
Illustration of two hand gestures: one holding a toothbrush, the other holding a toothbrush with a prohibition sign (no text or symbols on the objects)natural_image
Illustration of a medical device with a catheter inserted, showing internal structure and a downward arrow (no text or symbols)natural_image
Technical line drawing of a mechanical component with labeled parts (a) and b, showing no text or symbols beyond labels.natural_image
Illustration of a toothbrush applying product to a toothpaste tube (no text or symbols)▶ Hlavice kartáčku
natural_image
Line drawing of an electric toothbrush with a downward arrow indicating compression or disassembly (no text or symbols present)natural_image
Line drawing of two hands holding a small object, possibly a flower or seed pod (no text or symbols)Čištění nabíječky
natural_image
Illustration of a mechanical device with a circular component and a curved handle, showing an arrow indicating direction (no text or symbols present)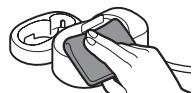
natural_image
Two hand-drawn illustrations of a container with contents and steam rising, no text or symbols present- Po umytí otřete.
natural_image
Two line drawings of a hand holding a small object, possibly a tool or device, with no visible text or symbols.text_image
Technical diagram showing a mechanical assembly with numbered components, likely illustrating a cutting or fastening process.text_image
Technical diagram showing mechanical assembly steps with numbered components and directional arrows indicating movementtext_image
Technical diagram showing labeled parts of a hairbrush and its internal structure with numbered annotations©

D

E

text_image
Diagram of a device with numbered parts, likely an electrical or mechanical component, showing connections between pins and a plug.F

natural_image
Isometric line drawing of a three-segment connector or housing (no text or symbols)G

natural_image
Line drawing of a rectangular electronic device with a flat top and side button (no text or symbols)A Hlavná jednotka
text_image
Diagram of a handheld electric shaver with labeled parts 1 and 2, showing internal components and wiring.
natural_image
Illustration of a handheld device with a circular component and a separate electric shaver (no text or symbols)
text_image
Diagram illustrating a dental procedure with labeled parts (a, b, c, d) and directional arrows indicating movement or flow.① Hlava kefky (záporná elektróda)
text_image
(1)(2)(3)text_image
Diagram illustrating the step of using an electric toothbrush, showing three stages from cleaning to cleaning and a final step labeled '1'.
natural_image
Illustration of two hand gestures: one holding a toothbrush, the other holding a toothbrush with a prohibition symbol (no text or labels)
natural_image
Illustration of a medical device with a catheter inserted, showing internal structure and a downward arrow (no text or symbols)natural_image
Diagram of a toothbrush with labeled parts (a) and b, showing tooth structure without any text or symbols.natural_image
Illustration of a toothbrush being inserted into an electric toothbrush, showing the process (no text or symbols present)▶ Hlava kefky
Hlavu kefky umyte pod tečúcou vodou.
natural_image
Line drawing of a dental orental brush tool with a downward arrow indicating compression (no text or symbols)natural_image
Line drawing of two hands holding a small object, no text or symbols presentČistenie nabíjačky
natural_image
Diagram of a mechanical device with a circular housing and a curved handle, showing an arrow indicating direction (no text or symbols present)text_image
Technical diagram showing hands operating a device with numbered components and directional arrows indicating movement or assembly.text_image
Technical diagram showing exploded view of mechanical assembly with numbered components and directional arrows indicating assembly steps.text_image
Technical diagram showing labeled parts of a hairbrush and iron, with numbered annotations for each component.©

D

E

text_image
Diagram of a device with numbered parts, likely an electrical or mechanical component, showing connections between pins 15 to 20.F

natural_image
Isometric line drawing of a three-cylinder container with four side compartments and two cylindrical pins (no text or symbols)G

natural_image
Line drawing of a rectangular electronic device with a flat top and side button (no text or symbols)A Főegység
text_image
Diagram of a handheld electric shaver with labeled parts 1 and 2, showing internal components and wiring.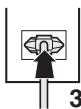
natural_image
Illustration of a hand holding an electric shaver device, showing internal components and directional arrows (no text or symbols)A lámpa
text_image
Diagram illustrating a dental procedure with labeled parts (a, b, c, d) and directional arrows indicating movement or flow.text_image
(1)(2)(3)text_image
Diagram illustrating the step of using an electric toothbrush, showing step 1 before and after assembly.natural_image
Illustration of two hand gestures: one using a toothbrush, the other holding a cigarette with a prohibition symbol (no text or labels)natural_image
Illustration of a medical device with a catheter inserted, showing internal structure and a downward arrow (no text or symbols)natural_image
Line drawing of a hairbrush with labeled parts (a) and b, no text or symbols presentnatural_image
Illustration of a toothbrush applying product to a toothpaste tube (no text or symbols)▶ Kefefej
natural_image
Line drawing of an electric toothbrush with a downward arrow indicating compression or disassembly (no text or symbols present)natural_image
Line drawing of two hands holding a small flower (no text or symbols)A töltő tisztítása
natural_image
Diagram of a mechanical device with a circular component and directional arrow (no text or symbols)

natural_image
Two line drawings of a container with internal compartments and steam rising (no text or symbols)natural_image
Two technical line drawings of a mechanical component with pins, shown from different angles (no text or symbols)text_image
Technical diagram showing a mechanical assembly with labeled parts 1 and 2, likely illustrating a component or assembly.


Magyar
text_image
Technical diagram showing exploded and assembled views of a mechanical assembly with labeled parts ① to ④text_image
Technical diagram showing labeled parts of a hairbrush and its internal structure with numbered annotations©

D

E

text_image
Diagram of a device with numbered parts, likely an electrical or mechanical component, showing connections between pins 15 to 20.F

natural_image
Isometric line drawing of a three-segment connector or housing (no text or symbols)G

natural_image
Line drawing of a rectangular electronic device with a flat top and side button (no text or symbols)text_image
Diagram of a handheld electric shaver with labeled parts 1 and 2, showing internal components and wiring.
natural_image
Illustration of a handheld electric shaver with two arrows indicating motion (no text or symbols)text_image
Diagram illustrating a dental tool application with labeled parts (a, b, c, d) and directional arrows indicating process flow.① Capul periutei (electrodul negativ)
(b) Panoul ionic (electrodul pozitiv)
© Curent electric foarte slab
text_image
(1)(2)(3)text_image
Diagram illustrating the step of using an electric toothbrush, showing three stages from cleaning to cleaning and before cleaning.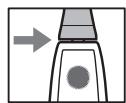


Română
natural_image
Illustration of two hand positions: one holding a toothbrush, the other holding a toothbrush with a prohibition symbol (no text or labels)natural_image
Illustration of a dental implant or dental tool inserted into a tooth (no text or symbols visible)natural_image
Technical line drawing of a mechanical component with labeled parts (a) and b, showing no text or symbols beyond labels.natural_image
Illustration of a toothbrush being inserted into an electric toothbrush (no text or symbols present)▶ Capul periutei
natural_image
Line drawing of a dental orental brush tool with a downward arrow indicating compression (no text or symbols present)natural_image
Line drawing of two hands holding a small flower, no text or symbols presentnatural_image
Diagram of a mechanical device with a circular component and directional arrow (no text or symbols)

natural_image
Two technical line drawings of a battery pack with clamps, showing internal compartments and wiring (no text or symbols)text_image
Technical diagram showing hands operating a device with numbered parts and directional arrows indicating movement or assembly.text_image
Technical diagram showing exploded view of mechanical assembly with numbered components and directional arrows indicating assembly steps.text_image
Technical diagram showing labeled parts of a hairbrush and its internal structure with numbered annotations©
D

E

text_image
Diagram of a device with numbered parts, likely an electrical or mechanical component, showing connections between pins and a plug.F

natural_image
Isometric line drawing of a three-segment connector or housing (no text or symbols)G

natural_image
Line drawing of a rectangular electronic device with a flat top and side button (no text or symbols)A Ana Ünite
text_image
Diagram of a handheld electric shaver with labeled parts 1 and 2, showing internal components and wiring.
natural_image
Illustration of a handheld device with a circular component and a base-mounted terminal, showing directional arrows (no text or symbols)Lamba hakkında
text_image
Diagram illustrating a hand holding a tool with labeled parts (a, b, c, d) and directional arrows indicating movement or flow.text_image
(1)(2)(3)text_image
Diagram illustrating the step of using an electric toothbrush, showing three stages from cleaning to cleaning.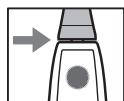
natural_image
Illustration of two hand gestures: one holding a toothbrush, the other holding a toothbrush with a prohibition symbol (no text or labels)natural_image
Illustration of a medical device with a catheter inserted, showing internal structure and a downward arrow (no text or symbols)natural_image
Diagram of a mechanical component with labeled parts (a) and b, showing internal teeth and base structure (no text or symbols beyond labels)(a) "Normal" sertlik
b "Sert" sertlik
natural_image
Illustration of a toothbrush applying product to a toothpaste tube (no text or symbols)▶ Fırça kafası
natural_image
Line drawing of an electric toothbrush with a downward arrow indicating compression or disassembly (no text or symbols present)natural_image
Line drawing of two hands holding a small object, possibly a flower or seed pod (no text or symbols)natural_image
Illustration of a mechanical device with a circular component and a curved handle, showing a directional arrow (no text or symbols)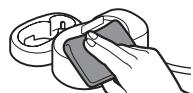
natural_image
Two line drawings of a container with internal compartments and steam rising (no text or symbols)natural_image
Two technical line drawings of a mechanical component with pins, shown from different angles (no text or symbols)Üst kapak çıkarsa
text_image
Technical diagram showing a mechanical assembly with labeled parts 1 and 2, likely illustrating a component or assembly.


text_image
Technical diagram showing mechanical assembly steps with numbered components and directional arrows indicating movement© Panasonic Corporation 2013
⑤ EN, GE, FR, IT, DU, SP, DA, PT, NW, SW, FI, PL, CZ, SK, HU, RO, TK
Printed in Japan
EW9700DE921E Y1013-0