
ER-GC20 - Electric mower PANASONIC - Free user manual and instructions
Find the device manual for free ER-GC20 PANASONIC in PDF.

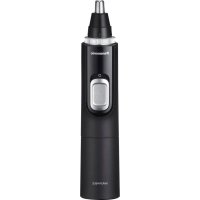
| Product Type | Electric Hair Clipper |
| Brand | Panasonic |
| Model | ER-GC20 |
| Dimensions (L x W x H) | 6.7 cm x 2.5 cm x 9.2 cm |
| Weight | 145 g |
| Power Supply | AC Adapter RE7-59 (non-rechargeable, mains cord) |
| Motor Voltage | 5.4 V |
| Noise Level | 60 dB (A) |
| Usage | Domestic use only |
| Cutting Length | From 0.5 mm (without comb) to adjustable with comb (e.g., 12 mm, 9 mm, etc.) |
| Main Functions | Hair cutting with adjustable combs, neck and ear finishing, use without comb |
| Maintenance | Oil before/after use, water or brush cleaning, removable blade |
| Water Cleaning | Possible after unplugging, do not immerse, use running water |
| Spare Parts | Replacement blade (ref. WER9605) |
| Blade Lifespan | Approximately 2 years (use 2 times/month, 20 min) |
| Safety Instructions | Do not use in shower/bath, specific adapter RE7-59, do not use on animals, turn off before changing comb |
| Operating Temperature | 0 °C to 35 °C |
| Included Accessories | Oil, cleaning brush, AC adapter, comb |
| Repairability | User-replaceable blade |
| Symbols | Washable under water (tap symbol) |
Frequently Asked Questions - ER-GC20 PANASONIC
User questions about ER-GC20 PANASONIC
0 question about this device. Answer the ones you know or ask your own.
Ask a new question about this device
Download the instructions for your Electric mower in PDF format for free! Find your manual ER-GC20 - PANASONIC and take your electronic device back in hand. On this page are published all the documents necessary for the use of your device. ER-GC20 by PANASONIC.
USER MANUAL ER-GC20 PANASONIC
English 2 Dansk 33 Cesky 63
Thank you for choosing a Panasonic Hair Clipper. Please read all instructions before use.
Important
This product is not rechargeable. Use it by connecting the AC adaptor.
Using the clipper
- Check that the blades are not damaged or deformed before use.
- Terminate the usage when there is an abnormality or failure.
- Turn off the appliance before changing the trimming length or removing the comb attachment.
- Before each use, apply oil at the places marked with arrows. (See page 6.)
- The appliance should not be used on animals.
- Do not press the blade against the skin.
- Do not use the clipper for any purpose other than trimming.
- This appliance is not intended for use by persons (including children) with reduced physical, sensory or mental capabilities, or lack of experience and knowledge, unless they have been given supervision or instruction concerning use of the appliance by a person responsible for their safety. Children should be supervised to ensure that they do not play with the appliance.
- Never use the AC adaptor in the bathroom or shower room.
- Do not use any power cord or AC adaptor other than the AC adaptor (RE7-59).
- Plug in the AC adaptor into a household outlet where there is no moisture and handle it with dry hands.
- Hold the AC adaptor when disconnecting it from the household outlet. If you tug on the power cord, you may damage it.
-
Do not damage or deform the power cord. Do not place heavy objects on the power cord or trap it between objects.
-
Do not use the clipper if the power cord or the AC adaptor is worn, or if the AC adaptor does not fit snugly in the outlet.
- The power cord cannot be replaced. If the cord is damaged, the AC adaptor should be scrapped.
Cleaning the clipper
Warning
Disconnect the power cord from the clipper before cleaning it in water to prevent electric shock.
- The housing should not be taken apart as this can affect the watertight construction of the appliance.
- If you clean the clipper with water, do not use salt water or hot water. Do not soak the clipper in water for a long period of time.
- Clean the housing only with a soft cloth slightly dampened with tap water or soapy tap water. Do not use thinner, benzine, alcohol or other chemicals.
Storing the clipper
- Store the clipper in a place with low humidity after use.
- Do not store the clipper where it will be exposed to direct sunlight or other heat sources.
- Store the AC adaptor in a dry area where it is protected from damage.
- Do not bend the power cord or wrap it around the clipper.
- Keep the oil away from children.
Parts identification


D
(For United Kingdom)

E

F
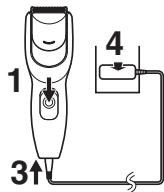
A Main body
① Sliding plate for maintenance
② Power switch [0/1]
③ Water drain hole
Blade block
④ Cleaning lever
⑤ Moving blade
(6) Stationary blade
⑦ Mounting hook
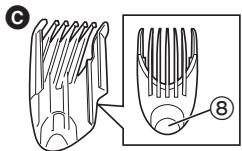
Comb attachment
(3/6/9/12/15/18/21 mm)
⑧ Trimming height adjustment button
AC adaptor (RE7-59)
⑨ Power cord
⑩ Appliance plug
E Oil
F Cleaning brush
Using
Using the clipper with the comb attachment
-
We recommend using the clipper in an ambient temperature range of 0 - 35^ . If used outside this range, the appliance may stop operating.
-
Slide the power switch on the main body to the "0" position to turn off the clipper.
- Make sure there is no damage to the blade.
- Insert the appliance plug into the clipper.
- Plug in the AC adaptor into a household outlet.
- Mount and adjust the comb attachment to the required setting.
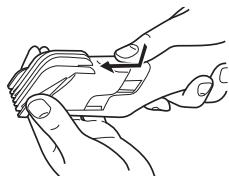
Adjusting the comb attachment
While pressing on the trimming height adjustment button, slide and adjust the comb attachment so the mark (▲) aligns with the desired trimming height.
Actual hair length will be a little longer than the height you set.
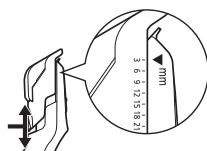
Example: For 3mm
- Slide the power switch on the main body to the "1" position to turn on the clipper.

Note
Power will not turn on while the sliding plate for maintenance is open.
- Cut hair to the correct height by moving the clipper back against the flow of the hair.
- Do not use the clipper in an inverted position. This can cut hair too deeply.

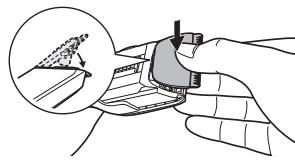
Removing the comb attachment
- While pressing on the trimming height adjustment button, slide the comb attachment until it comes off the main body.
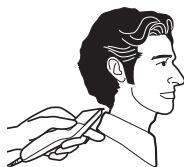
Trimming without a comb attachment
Trimming your hair without a comb attachment will trim hair length to approx.
0.5 mm.
- Cut hair by placing the clipper head directly on the scalp.
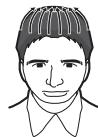
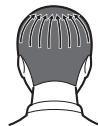
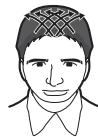
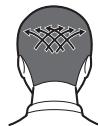
How to Cut Hair
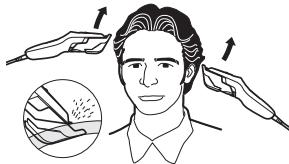
1. Trimming overall height
- Mount and adjust the comb attachment to the required setting. (See page 3.)
-
Cut slowly toward the top of your head.
-
Press the tip of the comb attachment against your scalp.
Front
Rear
Side
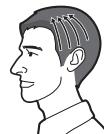
- Crisscross in various directions to trim thoroughly.
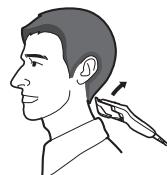
2. Finishing the neckline
- Mount and adjust the comb attachment to the required setting.
- 12 mm overall 9 mm neckline
- 9 mm overall 6 mm neckline
-
Cut a little shorter around the ears and neckline.
-
Raise the tip of the comb attachment little by little from the hairline.
- Raise with a bending of your wrist.
Cleaning
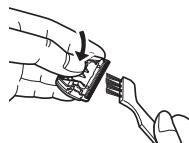
Cleaning the clipper using the sliding plate for maintenance
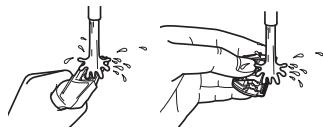
Rinsing
| The mark on the left means suitable for cleaning under an open water tap. |
Warning
Disconnect the power cord from the clipper before cleaning it in water to prevent electric shock.
-
Disconnect the AC adaptor from a household outlet.
-
Disconnect the power cord from the clipper.
-
Remove the comb attachment.
-
Slide the sliding plate for maintenance until it clicks.
-
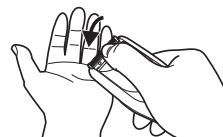
Hold the clipper upside down and shake it gently or flick off the hair trimmings with your fingers.
-
Run water down the opening of the sliding plate for maintenance and rinse off any hair trimmings.
-
Water will be discharged from the water drain hole.
- Gently shake the clipper 4 or 5 times and then wipe off any water drops from the clipper and the blade.
- Place the clipper on a towel with the power switch on the main body facing upwards.
- Keep the sliding plate for maintenance opened to let it dry fully.
Cleaning with brush
- Disconnect the AC adaptor from a household outlet.
- Disconnect the power cord from the clipper.
- Remove the comb attachment.
- Slide the sliding plate for maintenance until it clicks.
- Use the supplied cleaning brush to brush off hair trimmings.
- If you cannot remove all the hair trimmings, clean with the sliding plate for maintenance opened and blades removed.
Note
- Power will not turn on while the sliding plate for maintenance is open.
- If the power switch is turned on, the sliding plate for maintenance cannot be opened.
Cleaning the clipper with the blades removed
- Disconnect the power cord from the clipper.
- Be sure to set the switch to "0" before you remove the blade.
- Remove the comb attachment.
- Hold the main body, place your thumb against the blades and then push them away from the main body.
- Brush off any hair trimmings from the main body and from around the blade.
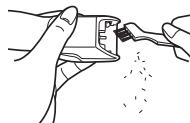
- Brush any hair trimmings out from between the stationary blade and the moving blade while pressing down the cleaning lever to raise the moving blade.
This clipper can be rinsed with the blades removed.
Warning
Disconnect the power cord from the clipper before cleaning it in water to prevent electric shock.
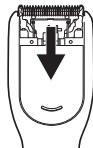
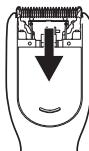
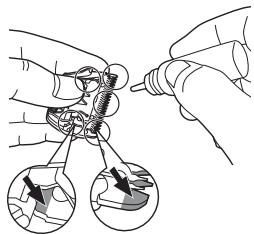
Lubrication
Apply the oil to the clipper before and after each use.
Apply a drop of the oil to the points indicated by the arrows.
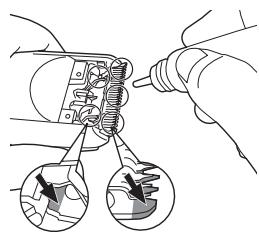
Lubricating using the sliding plate for maintenance
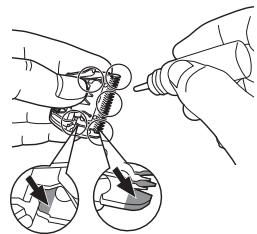
Lubricating with the blades removed
Remounting the blade
Fit the mounting hook into the blade mounting on the clipper and then push in until you hear a click.
Blade life
Blade life will vary according to the frequency and length of use. It is expected to be about 2 years when using the clipper twice a month for 20 minutes each time. If cutting efficiency is reduced despite proper maintenance, change the blades.
Replacement parts
Replacement parts are available at your dealer or Service Center.
| Replacement parts for ER-GC20 | Blade block | WER9605 |
Specifications
| Power source | See the name plate on the AC adaptor. (Automatic voltage conversion) |
| Motor voltage | 5.4 V--- |
| Airborne Acoustical Noise | 60 (dB (A) re 1 pW) |
This product is intended for household use only.
Please read "Information on Disposal for Users of Waste Electrical & Electronic Equipment (private households)" on page 90.
Wichtig
Sabot (3/6/9/12/15/18/21 mm)
Peine (3/6/9/12/15/18/21 mm)
Lubrificacao com as laminas removidas
(3/6/9/12/15/18/21 mm)
| Reservededer for ER-GC20 | Skaerehode | WER9605 |
Spesifikasjoner
| Strømkilde | Se merkeplaten på vekselstrømadapteren. (Automatisch spenningsomformer) |
| Motorspenning | 5,4 V---- |
| Luftbären akustisk støy | 60 (dB (A) re 1 pW) |
Tarak eki (3/6/9/12/15/18/21 mm)
Biçak Ömrū, kullanı sikligrina ve uzunluğuna®,®,®,®,®,®,®,®,®,®,®,®,®,®,®,®,®,®,®,®,®,®,®,®,®,®,®,®,®,®,®,®,®,®,®,®,®,®,®,®,®,®,®,®,®,®,®,®,®,®,®,®,®,®,®,®,®,®,®,®,®,®,®,®,®,®,®,®,®,®,®,®,®,®,®,®,®,®,®,®,®,®,®,®,®,®,®,®,®,®,®,®,®,®,®,®,®,®,®,®,®. biçak Ömrūn, yaklaşık 2�� olması bekleniyor. Düzenli bakima ragmen kesimdeki verim, düzgün takdirde biçaklarini degistiiriniz.
Yedek parçalar
Wanbao Base, Shiguang Road, Panyu District, Guangzhou,
Guangdong, China
YETKILI TEMSILCI
Panasonic Elektronik Satis A.S.
Maslak Mah. Bilim Sok.
Sun Plaza No:5 K:16
34398 Maslak-Sisli
Istanbul Turkey
Tel: (+90) 2123679400
Fax: (+90) 212 286 21 11
www.panasonic.com.tr
MÜSTERİ HIZMETLERİ: 444 72 62
URUNUN KULLANIM OMRU 7 YILDIR
Information on Disposal for Users of Waste Electrical & Electronic Equipment (private households)
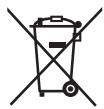

This symbol on the products and/or accompanying documents means that used electrical and electronic products should not be mixed with general household waste.
For proper treatment, recovery and recycling, please take these products to designated collection points, where they will be accepted on a free of charge basis. Alternatively, in some countries you may be able to
return your products to your local retailer upon the purchase of an equivalent new product.
Disposing of this product correctly will help to save valuable resources and prevent any potential negative effects on human health and the environment which could otherwise arise from inappropriate waste handling. Please contact your local authority for further details of your nearest designated collection point. Penalties may be applicable for incorrect disposal of this waste, in accordance with national legislation.
For business users in the European Union
If you wish to discard electrical and electronic equipment, please contact your dealer or supplier for further information.
Information on Disposal in other Countries outside the European Union
This symbol is only valid in the European Union. If you wish to discard this product, please contact your local authorities or dealer and ask for the correct method of disposal.
Deutsch

- Important
- Warning
- Parts identification
- Using
- Using the clipper with the comb attachment
- Adjusting the comb attachment
- Note
- Removing the comb attachment
- Trimming without a comb attachment
- How to Cut Hair
- Trimming overall height
- Front
- Rear
- Side
- Finishing the neckline
- Cleaning
- Cleaning the clipper using the sliding plate for maintenance
- Rinsing
- Cleaning with brush
- Cleaning the clipper with the blades removed
- Lubrication
- Remounting the blade
- Blade life
- Replacement parts
- Specifications
- Wichtig
- Spesifikasjoner
- Yedek parçalar
- YETKILI TEMSILCI
- Information on Disposal for Users of Waste Electrical & Electronic Equipment (private households)
- For business users in the European Union
- Information on Disposal in other Countries outside the European Union
- Deutsch
Brand : PANASONIC
Model : ER-GC20
Category : Electric mower