
Newcaste Medio - Range hood Thermex - Free user manual and instructions
Find the device manual for free Newcaste Medio Thermex in PDF.


| Product Type | Range Hood |
| Brand | Thermex |
| Model | Newcaste Medio |
| Width | 600 mm (estimated) |
| Depth | 500 mm (estimated) |
| Height (min-max) | 700 - 1100 mm (estimated) |
| Weight | Approx. 15 kg (estimated) |
| Power Supply | 220-240 V ~ 50 Hz |
| Motor Power | 220 W (estimated) |
| Number of Speeds | 3 + intensive |
| Maximum Airflow | 650 m³/h (estimated) |
| Noise Level (max) | 65 dB(A) (estimated) |
| Lighting | 2 x 20 W halogen or LED (estimated) |
| Grease Filter Type | Aluminum mesh, washable |
| Carbon Filter (optional) | Yes, replaceable |
| Duct Diameter | 150 mm |
| Extraction Mode | Ducted or recirculating |
| Control Type | Electronic push buttons |
| Safety Feature | Thermal cut-off protection |
| Energy Class | C (estimated) |
Frequently Asked Questions - Newcaste Medio Thermex
User questions about Newcaste Medio Thermex
0 question about this device. Answer the ones you know or ask your own.
Ask a new question about this device
Download the instructions for your Range hood in PDF format for free! Find your manual Newcaste Medio - Thermex and take your electronic device back in hand. On this page are published all the documents necessary for the use of your device. Newcaste Medio by Thermex.
USER MANUAL Newcaste Medio Thermex
natural_image
Simple geometric diagram showing a diamond shape with dashed lines and an inset image of a mechanical device (no text or symbols)natural_image
3D architectural rendering of a modern building structure with overhead ceiling and support beams (no text or symbols)natural_image
3D diagram of a structural support frame with labeled dimensions (4x) and connection points, no readable text or symbols beyond labelsnatural_image
Isometric view of a rectangular frame with a shaded interior and a small inset showing a pencil labeled 'x18' (no text or symbols on the main diagram)natural_image
3D wireframe diagram of a rectangular enclosure with directional arrows and a small inset image of a handheld device labeled 'x18' (no text or symbols on the diagram itself)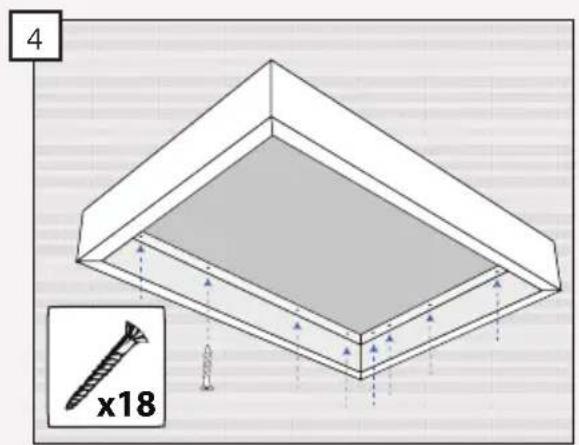
natural_image
Simple geometric diagram showing a diamond shape with dashed outline and an inset image of a mechanical device (no text or symbols)natural_image
Architectural diagram of a modern building roof structure with overhead ceiling and support beams (no text or symbols)natural_image
3D diagram of a structural support frame with labeled dimensions (4x) and no readable text or symbolsnatural_image
Isometric view of a rectangular frame with a shaded interior and a small inset showing a dimension label 'x18' (no text or symbols on the frame itself)Marker hullene fra takpodiet i taket/himlingen.
natural_image
3D diagram of a rectangular enclosure with directional arrows and a small inset image of a drill bit (no text or symbols)natural_image
Simple geometric diagram showing a diamond shape with dashed lines and an inset image of a mechanical device (no text or symbols)natural_image
3D architectural rendering of a modern building structure with overhead ceiling and support beams (no text or symbols)natural_image
3D diagram of a roof structure with support beams and a 4x vertical dimension label (no text or symbols beyond the label)natural_image
Isometric view of a rectangular frame with a shaded interior and a small inset showing a pencil labeled 'x18' (no text or symbols on the main diagram)natural_image
3D wireframe diagram of a rectangular enclosure with directional arrows and a small inset image of a drill bit (no text or symbols)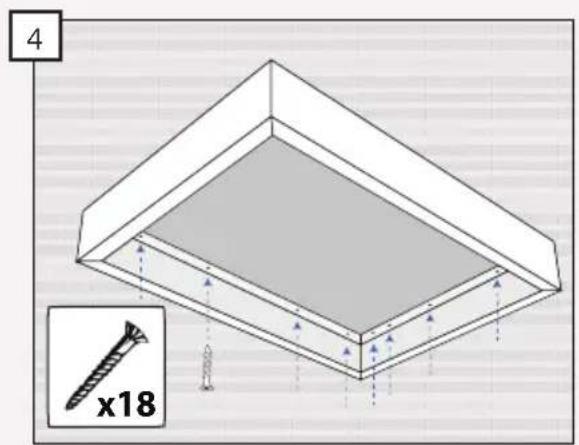
Borra hål. Skruva fast baldakinen i taket.
5
natural_image
Simple line drawing of a diamond shape with an inset image of a machine (no text or symbols)natural_image
Simple line drawing of a ceiling-mounted cabinet or enclosure with support beams (no text or symbols)natural_image
3D diagram of a structural support frame with labeled dimensions (4x) and a numbered label '4' in the top-left corner, showing no readable text or symbols.natural_image
Isometric view of a rectangular frame with a shaded interior and a small inset showing a pencil labeled 'x18' (no text or symbols on the main diagram)natural_image
3D diagram of a rectangular enclosure with directional arrows and a small inset image of a drill bit (no text or symbols)natural_image
Simple geometric diagram showing a diamond shape with dashed lines and an inset image of a mechanical device (no text or symbols)natural_image
3D architectural rendering of a modern building with overhead ceiling and support structure (no text or symbols)natural_image
3D diagram of a structural support frame with labeled dimensions (4x) and no readable text or symbolsnatural_image
Isometric view of a 3D rectangular frame with a shaded interior, labeled 'x18' and number '2' (no text or symbols on the frame itself)natural_image
3D wireframe diagram of a rectangular enclosure with directional arrows and a small inset image of a drill bit (no text or symbols)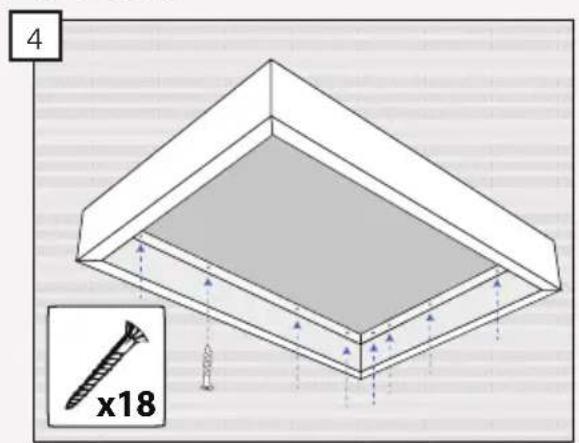
| Warnings | 55 |
| The box contains | 57 |
| Mounting | 58 |
| Mounting with mountings | 59 |
| Mounting a ceiling platform | 61 |
| Electrical installation | 62 |
WARNINGS
- The range hood is designed and manufactured according to DS/EN 60335-1.
- This range hood is only for use in private householdings, if used for other purposes the warranty will be repealed.
• Installation must be performed by a skilled electrician in accordance with the specifications given by Thermex Scandinavia A/S (Thermex) and legislation in force. - Thermex disclaims all responsibility in regards to damages caused by wrong installation, mounting or use.
BEFORE MOUNTING/COMMISSIONING
- Inspect the range hood for transport damages, flaws and defects immediately after the receipt.
- Transport damages must be filed to the haulage contractor and Thermex immediately after the receipt.
- Flaws and defects must be filed to Thermex within 8 days the receipt, and not later than mounting/commissioning.
MOUNTING
- The range hood is intended for working at 230 Volt ±10%\~50 HZ ±10% in referring to EN 50160.
• The range hood must have earth. - For models with external motor applies that NOT to use common zero by installing the hood and engine, as this
will affect the control.
- It MUST be ensured that the motor can be used with the selected range hood when using an external motor from another supplier. Otherwise the warranty no longer apply.
- Do not plug in the range hood until the mounting is complete.
- The air must not be discharged from the hood into a pipe used for extraction from devices using gas or other fuels. Such devices must have a separate vent.
- The national legislation on air emissions must be observed.
• Always use the original dimension of the vent. By reducing the dimension of the vent, the performance will be reduced and the sound level will be increased. - The vent to the open air, must be as short as possible in order to get the greatest possible capacity of the range hood.
- The number of bends on the vent ought to be minimised, to gain the greatest possible capacity of the range hood.
- Thermex recommends to always use sound and condensation insulated vent hose at the carrying through in unheated spaces.
- Thermex recommends that there is used for a muffler to minimize the noise level when using flexible hose.
• Using the flexible hose must always ensure that this is fully extended to
minimize air resistance and thereby achieve maximum absorbency.
- Different materials takes different rawlplugs and screws. Use rawlplugs and screws intended for the material the range hood is to be mounted in.
- If the instructions for the installation of screws and fittings are not followed, it may result in electrical shock.
- The minimum distance to gas stoves from the burner's edge to the underside of the hood MUST be minimum 65 cm in accordance with EN 60335-2-31.
- Thermex recommends that the space between the lower edge of the range
hood and cooker is between 50 cm and 70 cm, valid for all cabinet range hoods, islands and wall mounted range hoods.
• Always control the stated minimum distance between cooker and range hood in the manual for the cooker. If the manual for the cooker states a greater distance than what Thermex recommends the manual for the cooker MUST be followed.
- Thermex recommends that the space between cooker and range hood does not exceed 3 meters for range hoods integrated in the ceiling
THE BOX CONTAINS
- 1 range hood
- 1 remote control
• 4 plugs for the screw holes - 1 mounting kit
- 1 A23 battery
- 1 user guide
- 1 mounting instruction
MOUNTING
NOTE: When mounting a ceiling integrated range hood, it is important that the material and the construction the hood is mounted in, has a carrying capacity corresponding to the load of the chosen model.
NOTE: This product is very heavy. The range hood must be lifted and installed by at least two persons or by using an elevating work table.
MOUNTING POSSIBILITIES
There are two possible ways to mount your ceiling integrated range hood from Thermex:
- Mounting in the ceiling with mountings
- Mounting in a ceiling platform (NOTE: can only be used with when the outlet is upwards)
NOTE: The mountings on the ceiling integrated range hoods from Thermex has a clearance on 25 mm.
BUILT-IN DIMENSIONS
| WEIGHT(kg) | WIDTH(mm) | DEPTH(mm) | HEIGHT(mm) | VENT(mm) | |
| Newcastle Medio / Integrata Medio | 30 860 | 455 230 230 | x100 | ||
| Newcastle Maxi 39 1150 560 230 | 230x100 |
MOUNTING WITH MOUNTINGS
1
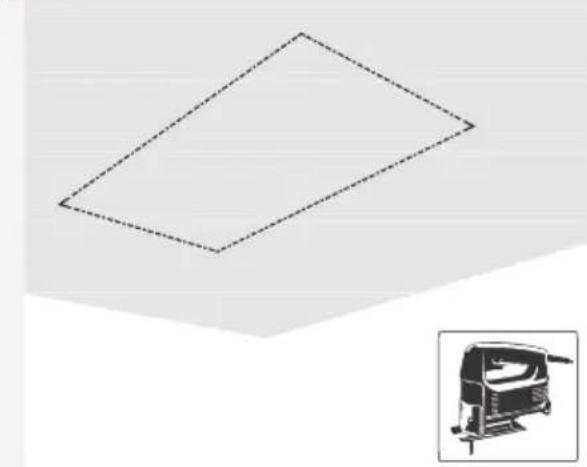
natural_image
Simple geometric diagram showing a diamond shape with dashed lines and an inset image of a mechanical device (no text or symbols)Measure and carve the hole in the ceiling according to the chosen range hoods measurements
2
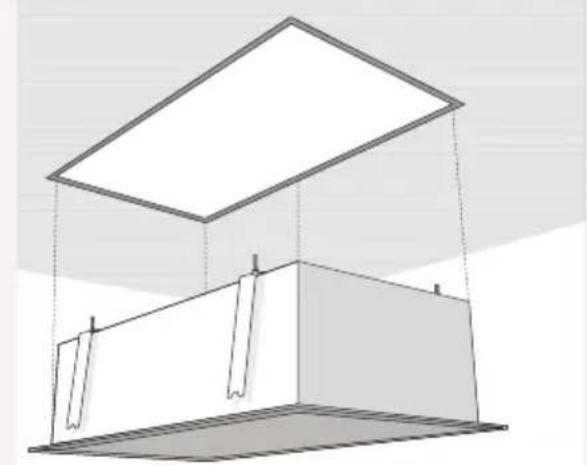
natural_image
3D architectural rendering of a modern building with overhead ceiling and support structure (no text or symbols)Push the range hood up into the carved hole in the ceiling. Note: Be aware of the way the door of the range hood is opened before the range hood is mounted in the ceiling.
3
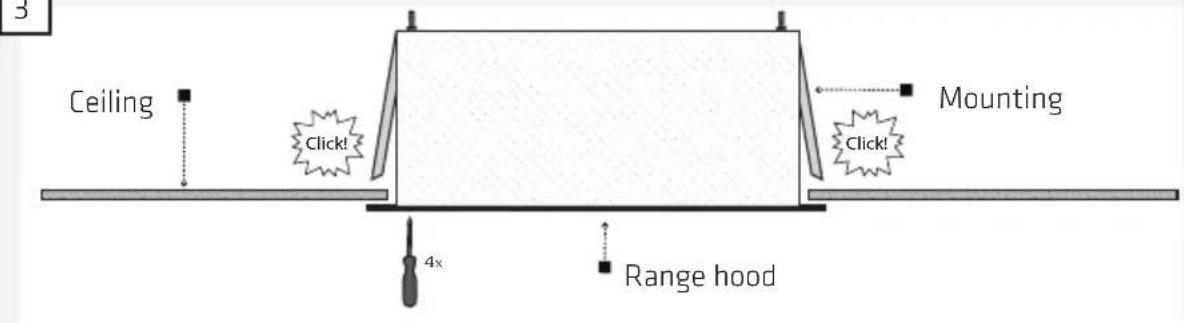
The range hood must be pushed up until the mountings "click" over the construction the range hood is to be mounted in.
If the mountings does not "click" they can be pushed in place, by pressing on the screws that holds the mountings. This is done by pushing through the four holes in the corners of the range hood with a screwdriver.
Note: when mounting in a horizontal division Thermex recommends that the range hood is insulated to avoid noise nuisance.
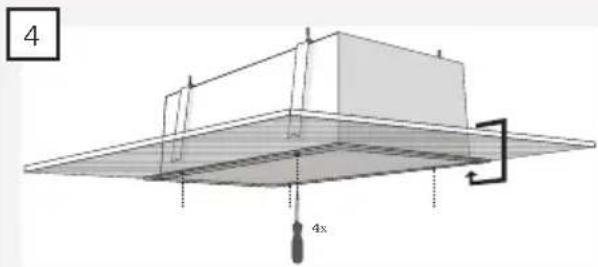
natural_image
3D diagram of a structural support frame with labeled dimensions (4x) and connection points, no readable text or symbols beyond labelsAdjust the mountings until the edge of the range hood is level to the ceiling. This is done using a Philips screwdriver through the four holes in the corners of the range hood.

NOTE: After the adjustment the enclosed plugs must be mounted in the screw holes. Otherwise noise nuisance can be experienced.

The vent pipe must be mounted after the adjustment of the range hood. Thermex recommends that a back valve is mounted on the vent installation to prevent draft through the vent.
NOTE: When mounting a back valve it must be ensured that the valve can open freely. If the valve cannot open freely, it can reduce the suction power and increase the noise from the range hood.
NOTE: If the range hood is used for recirculation of the air and there is no vent to the air it is important that the vent is not blocked as the range hood otherwise will be damaged.
MOUNTING IN A CEILING PLATFORM
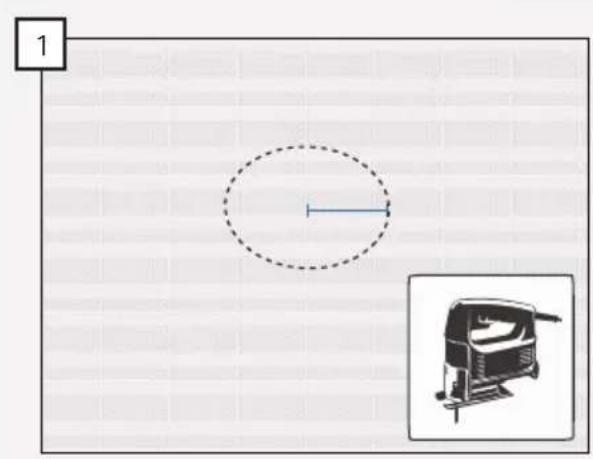
Measure and carve a hole in the ceiling for the vent.
natural_image
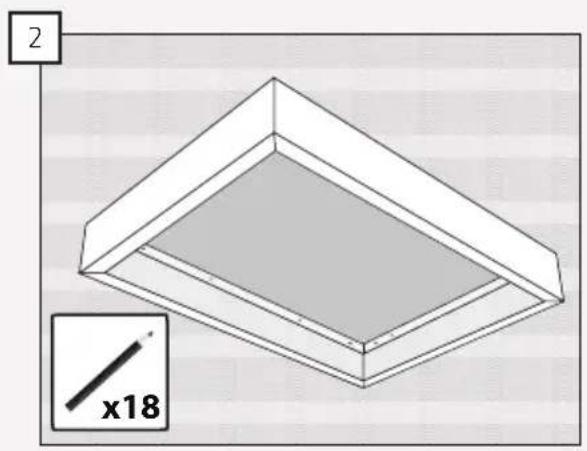
Isometric view of a rectangular frame with a shaded interior and a small inset showing a dimension label 'x18' (no text or symbols on the frame itself)Mark the holes from the ceiling platform on the ceiling.
natural_image
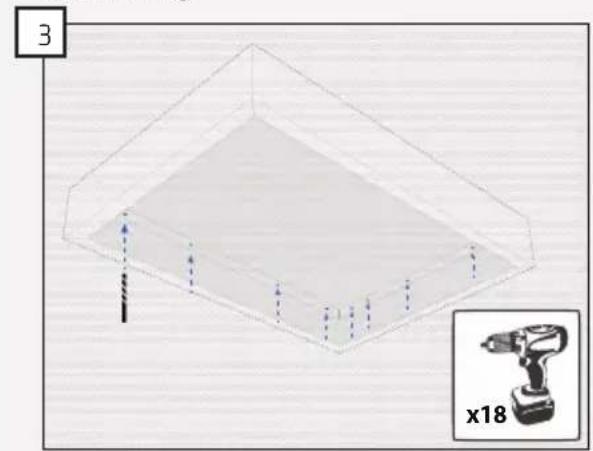
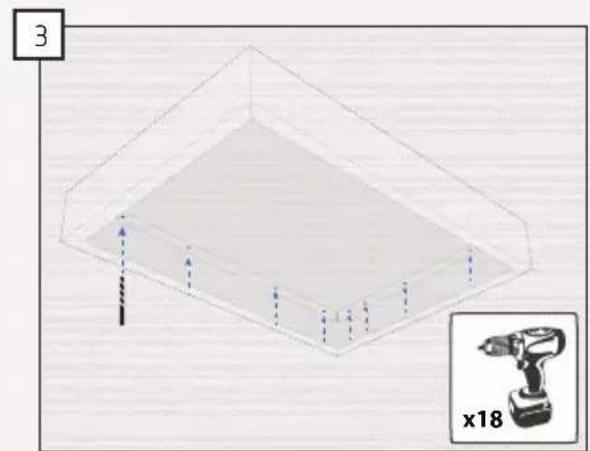
3D wireframe diagram of a rectangular enclosure with directional arrows and a small inset image of a drill bit (no text or symbols)Drill the holes in the ceiling
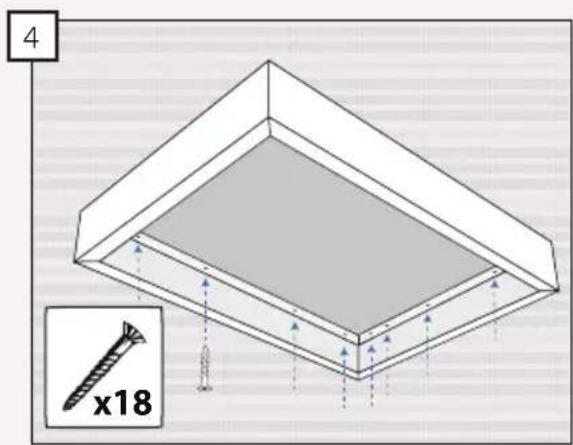
Mount the ceiling platform to the ceiling.
5
The range hood is mounted in the ceiling platform by following step 2-6 in the paragraph MOUNTING WITH MOUNTINGS.
ELECTRICAL INSTALLATION
INTERN MOTOR
A range hood with internal motor must be connected to the electricity network with the mounted Schuko-socket.
NOTE: The range hood must have earth.
EXTERNAL MOTOR
The motor and range hood CANNOT be installed with common zero, as this will affect the controls of the range hood.
NOTE: The range hood and motor must have earth.
THERMEX SCANDINAVIA A/S SERVICEAFD.
Brand : Thermex
Model : Newcaste Medio
Category : Range hood