
HKX 960 S - INSTALATION MANUAL - Appareil de cuisine TEKA - Notice d'utilisation et mode d'emploi gratuit
Retrouvez gratuitement la notice de l'appareil HKX 960 S - INSTALATION MANUAL TEKA au format PDF.

| Marque | TEKA |
| Modèle | HKX 960 S |
| Type de produit | Four vapeur encastrable |
| Dimensions extérieures (L × H × P) | 595 × 455 × 472 mm |
| Dimensions intérieures (L × H × P) | 420 × 210 × 390 mm |
| Capacité | 35 L |
| Poids | 32 kg |
| Tension d'alimentation | 220-240 V ~ 50 Hz |
| Puissance | 1500 W |
| Fonctions principales | Cuisson vapeur, Régénération & Stérilisation, Cuisson légumes, Cuisson poisson, Cuisson viande, Plats d'accompagnement, Minuterie |
| Programmes automatiques | Plus de 20 programmes prédéfinis pour légumes, poisson, viande, accompagnements, stérilisation |
| Réservoir d'eau | Capacité environ 1 L, amovible, vidange automatique en fin de cycle |
| Affichage | Écran numérique avec horloge et messages d'état |
| Matériau de la cavité | Acier inoxydable |
| Porte | Vitre amovible, charnières démontables |
| Éclairage intérieur | Ampoule E14 230-240V/15W remplaçable |
| Accessoires fournis | Plateau perforé, plateau non perforé, grille |
| Entretien et nettoyage | Nettoyage intérieur à l'eau savonneuse, grilles latérales amovibles, programmation de détartrage automatique |
| Détartrage | Automatique avec solution DURGOL® recommandée, cycle d'environ 45 minutes |
| Sécurité | Verrouillage enfant (Safety Block), arrêt automatique en cas de surchauffe, réduction de vapeur à l'ouverture, protection contre les brûlures |
| Réparabilité | Remplacement d'ampoule possible par l'utilisateur ; autres réparations par technicien agréé |
| Informations générales | Notice disponible en plusieurs langues, service client international listé |
FOIRE AUX QUESTIONS - HKX 960 S - INSTALATION MANUAL TEKA
Questions des utilisateurs sur HKX 960 S - INSTALATION MANUAL TEKA
0 question sur cet appareil. Repondez a celles que vous connaissez ou posez la votre.
Poser une nouvelle question sur cet appareil
Téléchargez la notice de votre Appareil de cuisine au format PDF gratuitement ! Retrouvez votre notice HKX 960 S - INSTALATION MANUAL - TEKA et reprennez votre appareil électronique en main. Sur cette page sont publiés tous les documents nécessaires à l'utilisation de votre appareil HKX 960 S - INSTALATION MANUAL de la marque TEKA.
MODE D'EMPLOI HKX 960 S - INSTALATION MANUAL TEKA
HKX 960 S

IeKa
We ask you to read the instructions in this booklet very carefully as this will allow you to get the best results from using your microwave oven.
KEEP THE DOCUMENTATION OF THIS PRODUCT FOR FUTURE REFERENCE.
Always keep the instruction manual handy. If you lend the microwave oven to someone else give them the manual as well!
Environmental protection
Disposal of the packaging

The packaging bears the Green Dot mark.
Dispose of all the packaging materials such as cardboard, expanded polystyrene and plastic wrapping in the appropriate bins. In this way you can be sure that the packaging materials will be re-used. Keep all packaging away from small children as it may present suffocation/choking hazard.
Disposal of equipment no longer used
According to European Directive 2002/96/EC on the management of waste electrical and electronic equipment (WEEE), home electrical appliances should not be put into the normal systems for disposal of solid urban waste.
Outdated appliances should be collected separately to optimise component material recovery and recycling rates and to prevent potential harm to human health and the environment. The symbol of a rubbish container superimposed by a diagonal cross should be put on all such products to remind people of their obligation to have such items collected separately.
Consumers should contact their local authorities or point of sale and request information on the appropriate places to leave their old home electrical appliances.
Before disposing of your appliance, render it non-usable by pulling out the power cable, cutting it off and disposing of it.
Contents
Installation instructions 3
Before installation 3
After installation 3
Safety Instructions 4
Description of your oven 6
Basic settings 7
Initial Settings 7
Setting the Clock 7
Water Hardness setting 7
Hiding/Displaying the Clock 8
Safety blocking 8
Timer 9
Basic Functions 10
Steam 10
Regenerating & Sterilising 10
Special Functions 11
Cooking Vegetables 11
Cooking Fish 12
Cooking Meat 13
Side Dishes 14
Water feeding 15
Filling the water tank. 15
Refilling the water tank 15
Emptying the water tank 15
When the oven is working. 16
Interrupting a cooking cycle 16
Altering parameters 16
Cancelling a cooking cycle 16
End of a cooking cycle. 16
Usage, Tables and Tips 17
Use of accessories 17
Care and maintenance 22
Cleaning the cooking space 22
Removing the shelf guides 22
Removing the appliance door 23
24
Suitable descending solutions 24
25
Front surface 26
Oven interior 26
Accessories 26
What should I do if the oven doesn't work? 27
Replacing the light bulb 27
Technical characteristics 28
Description of Functions 28
Display Messages 28
Specifications 28
Installation 58
EN Installation instructions
Before installation
Check that the input voltage indicated on the characteristics plate is the same as the voltage of the power outlet you are going to use.
Open the oven door and take out all the accessories and remove the packing material.
Warning! The front surface of the oven may be covered in a protective film. Before using the oven for the first time, carefully remove this film, starting on the inside.
Make sure that the oven is not damaged in any way. Check that the oven door closes correctly and that the interior of the door and the front of the oven opening are not damaged. If you find any damage contact our Customer Care Centre on the number supplied on the back cover of this handbook.
DO NOT USE THE OVEN if the power cable or the plug is damaged, if the oven does not function correctly or if it has been damaged or dropped. Contact our Customer Care Centre on the number supplied on the back cover of this handbook.
Put the oven on a flat and stable surface. The oven must not be installed close to any sources of heat, radios or televisions.
During installation, make sure that the power cable does not come into contact with any moisture or objects with sharp edges and the back of the oven. High temperatures can damage the cable.
Warning: after the oven is installed you must make sure you can access the plug.
After installation
The oven is equipped with a power cable and a plug for single phase (household) current, 230-240V ~ 50Hz.
If the oven is to be installed on a permanent basis it must be installed by a qualified technician. In such a case, the oven should be connected to a circuit with an all-pole circuit breaker with a minimum separation of 3 mm between contacts.
WARNING: THE OVEN MUST BE EARTHED.
The manufacturer and retailers do not accept responsibility for any damage that may be caused to persons, animals or property if these installation instructions are not observed.
The oven only functions when the door is closed correctly.
Before the first use, clean the inside of the oven and the accessories, following the cleaning instructions given in the "Oven cleaning" section.
During installation, follow the instructions supplied separately.
Safety Instructions

- Warning! Do not leave the oven unsupervised.
- Warning! If you see smoke or fire, keep the door closed in order to smother the flames. Switch off the oven and take the plug out of the socket or cut off the oven power supply.
- Overheated fat and oil can easily catch fire. Heating oil in the cooking space to sear meat is dangerous and should not be done. Never try to extinguish burning oil or fat with water (danger of explosion)! Smother the flames with a damp cloth and keep all doors and windows closed.
- Warning! Do not use alcohol to cook in the oven. It can cause the overheating of the food. Danger of explosion!
-
Warning! This appliance is not intended for use by persons (including children) with reduced physical, sensory or mental capabilities, or lack of experience and knowledge, unless they have been given supervision or instruction concerning use of the appliance by a person responsible for their safety. Children should be supervised to ensure that they do not play with the appliance.
-
Children must be supervised to ensure that they do not play with the appliance. Use the safety locks.
- Warning! During use the appliance becomes very hot. Care should be taken to avoid touching heating elements inside the oven. RISK OF BURNS!
- Warning! Accessible parts may become hot during use. Young children should be kept away.
- Warning! When opening the door during or upon completion of the cooking cycle, be careful of the flow of hot air and/or steam and water drops coming out of the cooking chamber. Step back or to the side to avoid burns.
- Warning! Make sure you never catch the power cables of other electrical appliances in the hot door or the oven. The cable insulation may melt. Danger of short-circuiting!
EN Safety Instructions
This oven is exclusively for domestic use!
The appliance is designed for use in the home for preparing food. No liability is assumed for any damage caused by improper or incorrect use.
Avoid damaging the oven or other dangerous situations by following these instructions:
- Do not cover or obstruct the ventilation openings.
- Do not keep any inflammable object inside the oven as it may burn if the oven is switched on.
- Do not use the oven as a pantry.
- Do not pour spirits (e.g. brandy, whisky, schnapps, etc.) over hot food. Danger of explosion!
- Accessories such as wire racks and trays, etc. get hot in the cooking space. Always wear protective gloves or use oven cloths.
- To avoid being burnt, always use oven gloves for handling dishes and containers and touching the oven.
- Do not lean or sit on the open oven door. This may damage the oven, especially in the hinge zone. The door can bear a maximum weight of 8kg .
- The racks can bear a maximum load of 8kg . To avoid damaging the oven, do not exceed this load.
Cleaning:
- The appliance will remain hot for some time after it is switched off and cool down only slowly to room temperature. Please allow sufficient time for the appliance to cool down before, for instance, cleaning it.
- Do not use harsh abrasive cleaners or sharp metal scrapers to clean the oven door glass since they can scratch the surface, which may result in shattering of the glass.
- The door contact surfaces (the front of the cooking space and the inside part of the doors) must be kept very clean in order to ensure the oven functions correctly.
- Please follow the instructions regarding cleaning in the section "Oven Cleaning and Maintenance".
Repairs:
- If the power cable is damaged it should be substituted by the manufacturer, authorised agents or technicians qualified for this task in order to avoid dangerous situations. Furthermore, special tools are required for this task.
- Repair and maintenance work, especially of current carrying parts, can only be carried out by technicians authorised by the manufacturer.
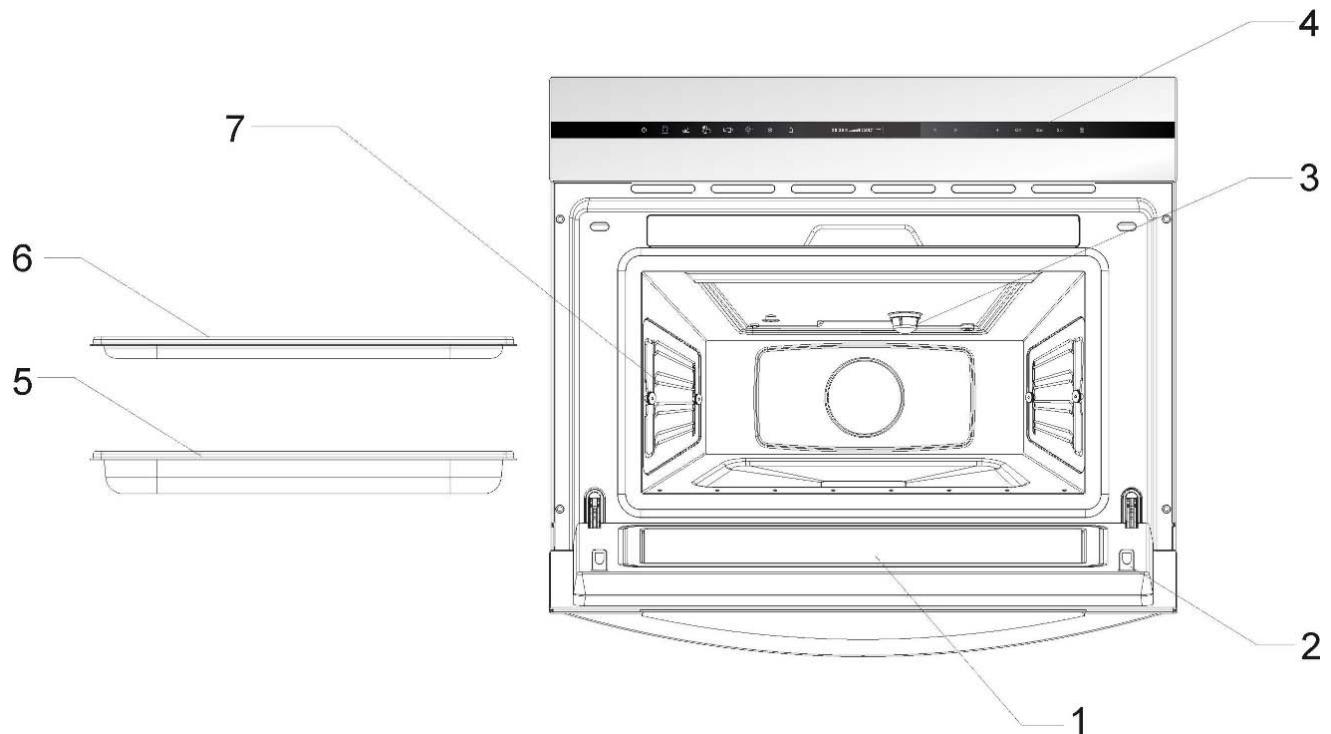
Description of your oven
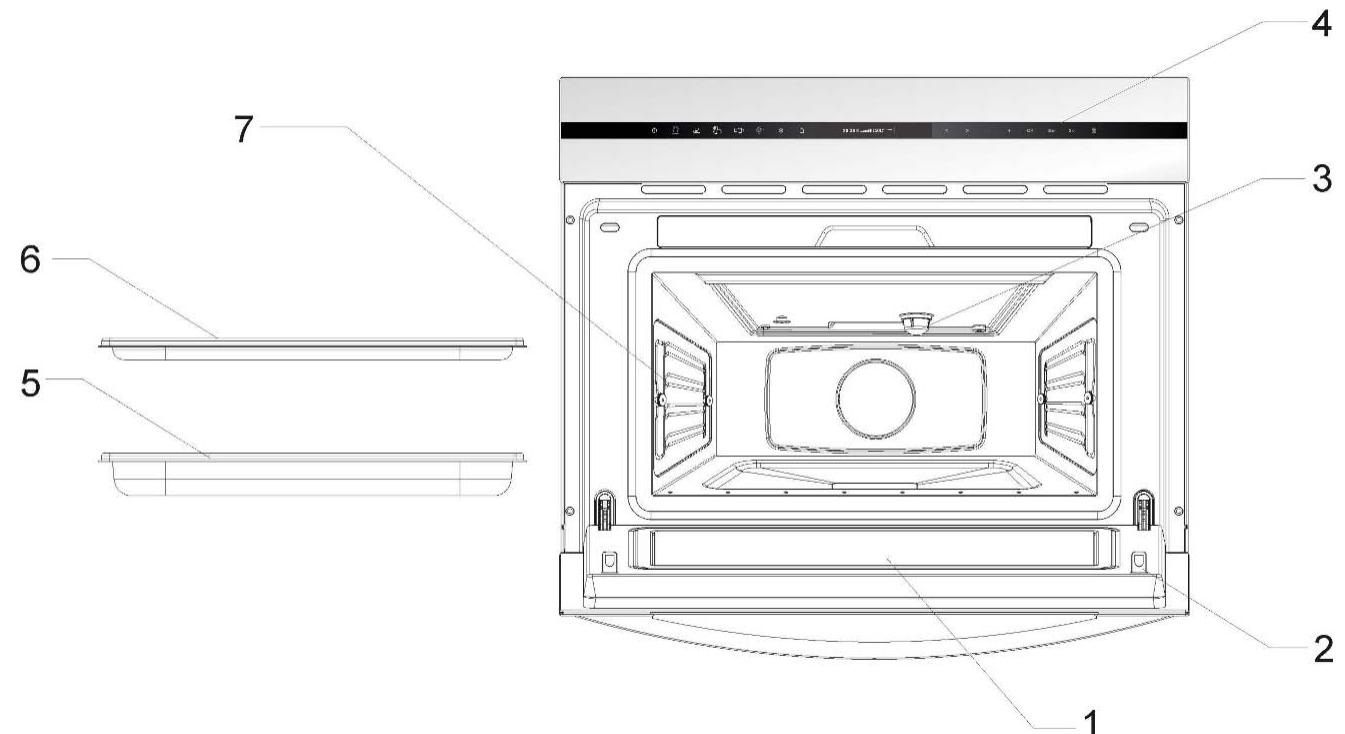
-
- Door window glass
-
- Safety catches
-
- Lamp bulb
-
– Control panel
-
– Perforated baking tray
- – Baking tray
-
- Shelf guides
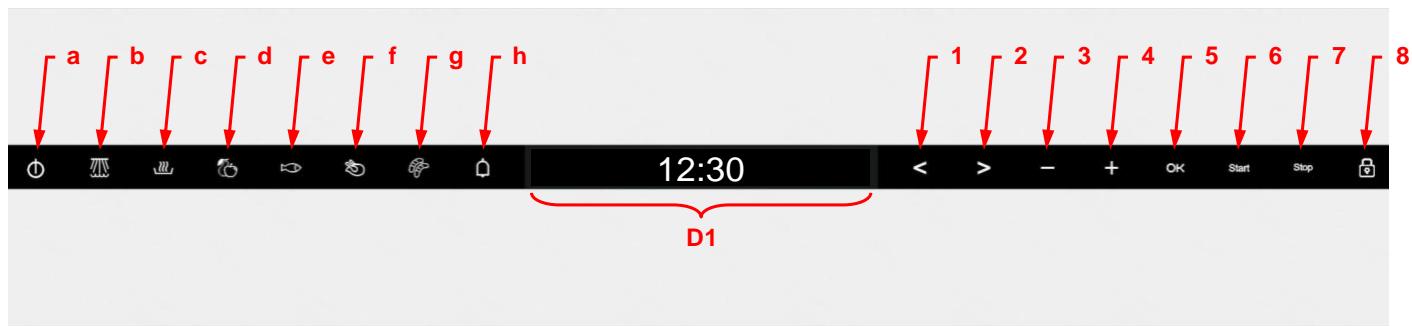
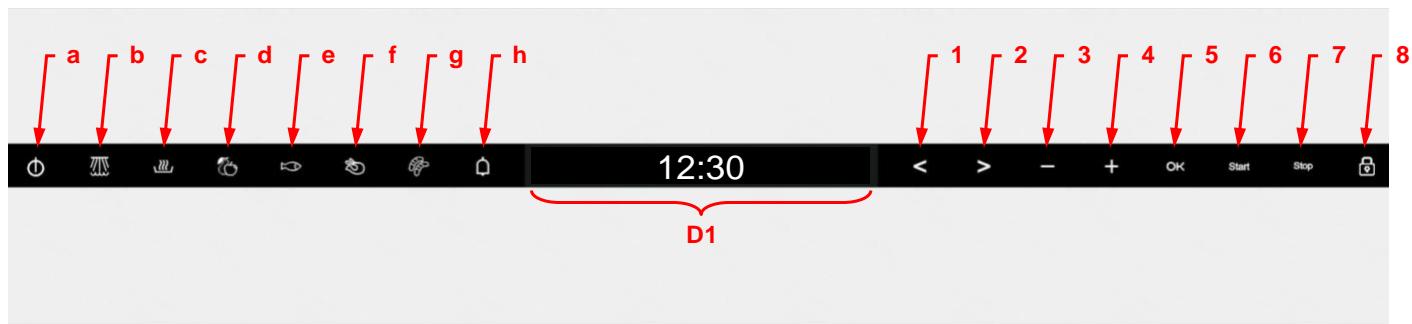
a - ON/OFF key
b - Steam function key
c - Regenerating & Sterilising function key
d - Vegetables function key
e - Fish function key
f - Meat function key
g - Side Dishes function key
h - Countdown Timer key
1 - "Left" key
2 - "Right" key
3-“-”key
4-“+”key
5 - "OK" key
6 - "Start" key
7 - "Stop" key
8 - "Safety Block" key
D1 - Display
Initial Settings
After your steam oven is first plugged in or after a power failure, the clock display will flash to indicate that the time shown is not correct.
The oven will not operate until the clock and the water hardness parameter are set.
To set the clock and the water hardness parameter value proceed as described in the following chapters.
Setting the clock
The clock display will flash if your appliance is first plugged in or after a power failure, to indicate that the time shown is not correct. To set the clock, proceed as follows:

- Press the "On/Off" key to switch the oven on.
- Hold down the “-” and “+” keys simultaneously. The hour digits will flash (steps 1 and 2 are not necessary when the oven is first plugged in or after a power failure).
- Press the “-” and “+” keys to set the hours.
Water Hardness setting
- Press the OK key to confirm the hours. The minutes digits will flash.
- Press the “-” and “+” keys to set the minutes.
- Press the OK key to confirm the minutes.

The appliance features a system that automatically indicates when it is time to descale.
The system can be optimised for households with very soft water (also through using a water softening appliance) and very hard water, by changing the user settings to the relevant range of water hardness (see table below).
To set the water hardness parameter, proceed as follows:
-
Press the "On/Off" key to switch the oven on.
-
Press the "Left" and "Right" keys at the same time. The hardness grade will start to flash on the display (steps 1 and 2 are not necessary if your microwave oven is first plugged in or after a power failure).
- Press the “-” and “+” keys to set the correct water hardness parameter value, according to the below table.
- Press the "OK" key to set the parameter. The display shows the clock.
Basic settings
The following table shows the different scales for the water hardness definition.
| Type | Water hardness | Display | |||
| Ca + Mg (ppm) | English deg. [°eH] | French deg. [°dF] | German deg. [°dH] | ||
| Soft water | 0 to 150 | 0 to 11 | 0 to 15 | 0 to 8 | SOFT |
| Medium water | 151 to 350 | 12 to 25 | 16 to 35 | 9 to 20 | MED |
| Hard water | 501 to 500 | 26 to 35 | 36 to 50 | 21 to 28 | HARD |
Hiding/Displaying the Clock

If the clock display disturbs you, you can hide it by proceeding as follows
- Press the "On/Off" key to switch the oven on.
- Press the "OK" key for 3 seconds. The display will blank.
If you want to see the clock display again repeat the above procedure.
Safety blocking
The oven functioning can be blocked (for example, to stop it being used by children).

To block the oven proceed as follows:
- Press the "On/Off" key to switch the oven on.
- Hold down the "Safety Block" key for 3 seconds. The "Safety Block" key lights up and the display shows a key symbols.
The oven will not operate until it is unblocked. To unblock the oven repeat the above procedure.
Timer
Use this function as an aid in the daily kitchen tasks.

To set the Timer proceed as follows:
- Press the "On/Off" key to switch the oven on.
- Press the "Timer" function key. The key turns red and the display shows:

- Press the “-” and “+” keys to set the desired time.
- Press the OK key. The timer will start to countdown.
When the set time has elapsed the oven will emit three beeps that will be repeated every 30 seconds and the Timer key will flash. Press the Timer key to cancel the beeps.
While the Timer is running the Timer key is red. The display and lights show the following:
- If there is no function running, the display shows the Timer counting-down and the Timer key is red.
- If there is an active function, the display and keys show the normal function parameters. To check the Timer's remaining time press the Timer key. The display will briefly show the Timer and resume the function indications after 5 seconds or once the Timer key is pressed again. While the Timer is shown the remaining time can be changed with the “-” and “+” keys as described above.
Basic Functions
Steam
Use this function to cook and heat up vegetables, potatoes, rice, fish and meat.

- Press the "On/Off" key to switch the oven on.
- Press the "Steam" function key. The key turns red and the display shows:

- Press the “-” and “+” keys to set the desired Temperature.
- Press the “>” key. The display shows:

- Press the “-” and “+” keys if you want to set the desired Operating Time. This setting is optional. Please jump to point 7 if you don’t want to set duration.
- If you want to modify any of the above parameters, press the < or > keys to select the parameter and then the - and + keys to set a different value.
- Press the Start key. The oven will start to operate.
Important note: The symbol will flash in the display meaning that the temperature inside the oven is lower than the set temperature.
Regenerating & Sterilising
Use this function to regenerate plate dishes and ready-made meals as well as to sterilise and boil down fruit.

- Press the "On/Off" key to switch the oven on.
- Press the "Regenerating & Sterilising" key. The key turns red and the display shows:

-
Press the “-” and “+” keys to select the desired Program, e.g. “R 01” (see table below).
-
Press the > key. The display shows:

- Press the “-” and “+” keys if you want to modify the preset Operating Time. This setting is optional.
- Press the Start key. The oven will start to operate.
Important note: The symbol will flash in the display meaning that the temperature inside the oven is lower than the set temperature.
| Programme | Type of Food | Temperature (℃) | Time (min) | Instructions |
| R 01 | Plate dishes | 100°C | 13 | Remove lid from container and put on Perforated baking tray. |
| R 02 | Ready-made meals / frozen | 100°C | 18 | |
| R 03 | Beans | 100°C | 35 | Sterilising: |
| R 04 | Cherries | 80°C | 35 | The times and temperatures refer to 1L preserving jars. |
| R 05 | Plums | 90°C | 35 | |
| R 06 | Baby bottles | 100°C | 12 |
Cooking Vegetables
Use this function cook the vegetables described in the table below.

- Press the "On/Off" key to switch the oven on.
- Press the "Cooking Vegetables" key. The key turns red and the display shows:

-
Press the “-” and “+” keys to select the desired Program, e.g. “A 01” (see table below).
-
Press the “>” key. The display shows:

- Press the “-” and “+” keys if you want to modify the preset Operating Time. This setting is optional.
- Press the Start key. The oven will start to operate.
Important note: The symbol will flash in the display meaning that the temperature inside the oven is lower than the set temperature.
| Programme | Type of Vegetable | Temperature (℃) | Time (min) |
| A 01 | Broccoli / florets | 100 °C | 20 |
| A 02 | Cauliflower / florets | 100 °C | 25 |
| A 03 | Potatoes / pieces | 100 °C | 25 |
| A 04 | Snow peas | 100 °C | 15 |
| A 05 | Asparagus | 100 °C | 25 |
Special Functions
Cooking Fish
Use this function cook the fish types described in the table below.

- Press the "On/Off" key to switch the oven on.
- Press the "Cooking Fish" key. The key turns red and the display shows:

-
Press the “-” and “+” keys to select the desired Program, e.g. “B 01” (see table below).
-
Press the “>” key. The display shows:

- Press the “-” and “+” keys if you want to modify the preset Operating Time. This setting is optional.
- Press the Start key. The oven will start to operate.
Important note: The symbol will flash in the display meaning that the temperature inside the oven is lower than the set temperature.
| Programme | Type of Fish | Temperature (℃) | Time (min) |
| B 01 | Trout | 80 °C | 25 |
| B 02 | Shrimp | 90 °C | 15 |
| B 03 | Fish filet | 80 °C | 18 |
| B 04 | Mussels | 100 °C | 25 |
| B 05 | Lobster | 100 °C | 30 |
Cooking Meat
Use this function cook the meat types described in the table below.

- Press the "On/Off" key to switch the oven on.
- Press the "Cooking Meat" key. The key turns red and the display shows:

-
Press the “-” and “+” keys to select the desired Program, e.g. “C 01” (see table below).
-
Press the >^ key. The display shows:
-
Press the “-” and “+” keys if you want to modify the preset Operating Time. This setting is optional.
- Press the Start key. The oven will start to operate.
Important note: The symbol will flash in the display meaning that the temperature inside the oven is lower than the set temperature.
| Programme | Type of Meat | Temperature (℃) | Time (min) |
| C 01 | Chicken breast | 100 ℃ | 30 |
| C 02 | Smoked pork loin / pieces | 100 ℃ | 45 |
| C 03 | Turkey escalope | 100 ℃ | 20 |
| C 04 | Pork filet, whole | 100 ℃ | 25 |
| C 05 | Vienna sausages | 90 ℃ | 15 |
Special Functions
Side Dishes
Use this function cook the foods described in the table below.

- Press the "On/Off" key to switch the oven on.
- Press the "Side Dishes" key. The key turns red and the display shows:

-
Press the “-” and “+” keys to select the desired Program, e.g. “D 01” (see table below).
-
Press the “>” key. The display shows:
-
Press the “-” and “+” keys if you want to modify the preset Operating Time. This setting is optional.
- Press the Start key. The oven will start to operate.
Important note: The symbol will flash in the display meaning that the temperature inside the oven is lower than the set temperature.
| Programme | Type of Food | Temperature (℃) | Time (min) |
| D 01 | Sweet yeast dumpling | 100 ℃ | 20 |
| D 02 | Yeast dumpling | 100 ℃ | 25 |
| D 03 | Napkin dumpling | 100 ℃ | 30 |
| D 04 | Rice | 100 ℃ | 35 |
| D 05 | Lentils | 100 ℃ | 40 |
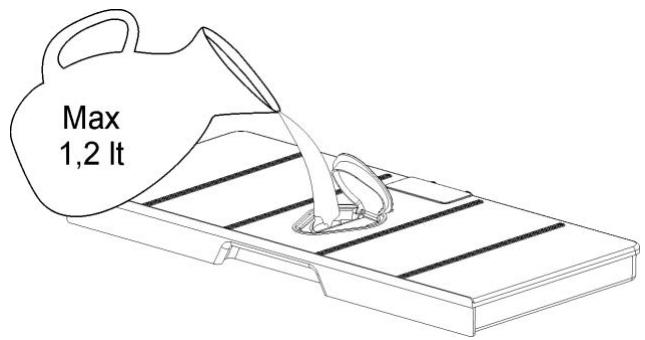
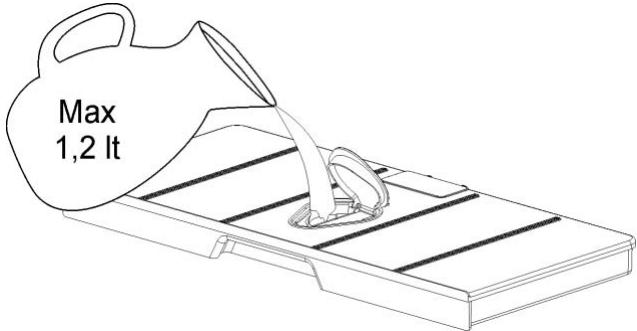
Filling the water tank
All functions require the water tank to be full.
Fill the water tank up to the “MAX” mark with cold, fresh drinking water and introduce it into the slot located above the cavity (approximately 1L).
If the symbol appears on the display, it means that the water tank is not properly inserted or has been removed.
To clear the message, correctly insert the water tank.
Refilling the water tank
The contents of the water tank normally suffice for one cooking session of 50-60 minutes.
If, however, the water tank needs to be refilled this is signalled by the symbol flashing on the display, meaning that the water tank is empty.
Warning! Only fill the water tank up to a maximum of 0,5 litres to ensure that the water does not overflow when it is pumped back to the water tank. RISK OF OVERFLOW.
Emptying the water tank
When the appliance is switched off, the residual water is pumped back into the water tank.
While the water is being pumped the display shows "PUMP".
This message stays on until the temperature of the water reaches 75^ before it can be pumped back to the water tank.
Warning: the water in the tank may be hot. Danger of burns!
After the water is pumped back to the water tank, the display will show the message "DEP" requiring the following actions:
- Remove and empty the water tank.
- Dry the water tank and introduce it back into the slot located above the cavity. Clean and dry the cooking space.
- Leave the appliance door open so that the cooking space can cool down and dry completely.
IMPORTANT NOTE: It is advisable to remove the water tank and empty it after a cooking cycle. This prevents the formation of bacteria and limestone inside the appliance.
If the water tank has not been removed from the oven and a new cooking cycle is started, the oven displays the warning "DEP".
This warning can be cleared by pressing the Stop key and proceed with the new cooking cycle without removing and emptying the water tank.
When the oven is working…
Interrupting a cooking cycle
You can stop the cooking process at any time by pressing the Stop key once.
The oven incorporates a steam-reduction function that is activated when the Stop key is pressed to gradually release the steam from the cavity, so that there is no sudden rush of steam when the appliance door is opened.
This function takes around 3 minutes and during it the display shows the word "VAP".
Warning! When opening the door during or upon completion of the cooking cycle, be careful of the flow of hot air and/or steam coming out of the cooking chamber. Step back or to the side to avoid burns.
At this point:
- The steam generation is interrupted.
- The cavity walls and the water tank are still very hot. Danger of burning!
- The timer stops and the display shows the remaining operating time (if this has been set).
If you wish, at this point you can:
- Turn or stir the food to ensure it will be evenly cooked.
- Change the cooking parameters.
To restart the process, close the door and press the Start key.
Altering parameters
The active function parameters can be altered by pressing the < or > keys to select the parameter and then the - and + keys to set a different value. Press the OK key or wait a few seconds to validate the new parameter value.
Cancelling a cooking cycle
If you wish to cancel the cooking process, press twice the Stop key.
You will then hear a beep and the clock will appear on the display.
End of a cooking cycle
At the end of the set duration or when you press the Stop key to finish the cooking cycle, you will hear three beeps and the display will show the word "End", the oven starts the steam-reduction function.
This function gradually releases the steam from the cavity, so that there is no sudden rush of steam when the appliance door is opened.
This function takes around 3 minutes and during it the display shows the word "VAP".
Warning! When opening the door during or upon completion of the cooking cycle, be careful of the flow of hot air and/or steam coming out of the cooking chamber. Step back or to the side to avoid burns.
The cooling fan can continues to run for a certain length of time after the appliance has been switched off. This is a normal function that is meant to reduce the temperature inside the oven.
The residual water in the boiler is allowed to cool down to 75^ C before it can be pumped back to the water tank. While the water is being pumped the display shows "PUMP".
Warning: the water in the tank may be hot. Danger of burns!
When the display shows the word "DEP", this means that the water was pumped and that the water tank can be removed.
Remove the water tank and dry it thoroughly. Let the cooking space cool down for a moment and then clean and dry it with a cloth. The door should be left open for some time so that the appliance can dry completely.
EN Usage, tables and tips
Use of accessories
The perforated container is suitable for cooking fresh or deep frozen vegetables, meat and poultry. In this case it is important that the non-perforated container is introduced into the first level. This way, dripping liquids are collected and the appliance does not get dirty. The perforated container with the food should be inserted into the second level.
The non-perforated container is used to steam sensitive foods, e.g. compotes and dumplings.
The rack is used when cooking with small containers, as for example, dessert bowls and to regenerate plate dishes.
For more precise information refer to the tables.
The suggested times and temperatures are guideline values. The actual cooking time can vary according to the type and quality of the foods.

Fish
| Fish | Quantity | Temperature °C | Time min. | Container | Level |
| Gilthead sea bream | 800-1200 g | 80 | 30-40 | Perforated | 2 |
| Trout | 4 x 250 g | 80 | 20-25 | Perforated | 2 |
| Salmon filet | 500-1000 g | 80 | 15-25 | Perforated | 2 |
| Salmon trout | 1000-1200 g | 80 | 25-35 | Perforated | 1/2 |
| King prawns | 500-1000 g | 80 | 15-20 | Perforated | 2 |
| Green-shell mussel | 1000-1500 g | 100 | 25-35 | Perforated | 2 |
| Halibut filet | 500-1000 g | 80 | 20-25 | Perforated | 2 |
| Cockles | 500-1000 g | 100 | 10-20 | Perforated | 2 |
| Lobster | 800-1200 g | 100 | 25-30 | Perforated | 1/2 |
| Cod filet | 1000-1200 g | 80 | 20-25 | Perforated | 2 |
| Blue mussel | 1000-1200 g | 100 | 15-25 | Perforated | 2 |
| Lake trout | 4 x 250 g | 80 | 25-30 | Perforated | 2 |
| Haddock | 1000-1200 g | 80 | 20-25 | Perforated | 2 |
| Tuna filet | 500-1000 g | 80 | 15-20 | Perforated | 2 |
| Pike perch | 4 x 250 g | 80 | 25-30 | Perforated | 2 |
Usage, tables and tips
Meat
| Meat | Quantity | Temperature °C | Time min. | Container | Level |
| Chicken leg | 4-10 | 100 | 40-45 | Perforated | 2 |
| Chicken breast | 4-6 | 100 | 25-35 | Perforated | 2 |
| Smoked pork loin | 500g – 1000 g | 100 | 40-50 | Perforated | 2 |
| Turkey escalope | 4-8 | 100 | 20-25 | Perforated | 2 |
| Pork filet, whole | 4-8 | 100 | 20-30 | Perforated | 2 |
| Sausages | 80-100 | 10-15 | Perforated | 2 |
Eggs
| Eggs | Temperature °C | Time min. | Container | Level |
| Eggs in Glass | 100 | 10-15 | Rack | 2 |
| Eggs, hard | 100 | 15 | Rack | 2 |
| Eggs, soft | 100 | 10-12 | Rack | 2 |
Side dishes
| Side dishes | Quantity | Temperature °C | Time min. | Container | Level |
| Pearl barley + Liquid | 200g + 400 ml | 100 | 30-35 | Rack, glass bowl | 2 |
| Semolina + Liquid | 200g + 300 ml | 100 | 10-20 | Rack, glass bowl | 2 |
| Lentils + Liquid | 200g + 375 ml | 100 | 20-50 | Rack, glass bowl | 2 |
| Rice + Liquid | 200g + 250 ml | 100 | 25-40 | Rack, glass bowl | 2 |
Vegetables
| Vegetables | Temperature °C | Time min. | Container | Level | |
| Eggplant/Aubergine | in slices | 100 | 15-20 | Perforated | 2 |
| Beans | 100 | 35-45 | Perforated | 2 | |
| Broccoli | florets with stalk | 100 | 25-30 | Perforated | 2 |
| Broccoli | florets without stalk | 100 | 15-20 | Perforated | 2 |
| Cauliflower | florets | 100 | 25-30 | Perforated | 2 |
| Cauliflower | whole head | 100 | 40-45 | Perforated | 1 |
| Peas | 100 | 30-35 | Perforated | 2 | |
| Fennel | in stripes | 100 | 15-20 | Perforated | 2 |
| Fennel | cut in half | 100 | 20-30 | Perforated | 2 |
| Potatoes with skin | whole, very small | 100 | 20-25 | Perforated | 2 |
| Potatoes with skin | whole, very big | 100 | 45-50 | Perforated | 2 |
| Potatoes without skin | in pieces | 100 | 20-25 | Perforated | 2 |
| Turnip | in sticks | 100 | 20-25 | Perforated | 2 |
| Snow peas | 100 | 15-20 | Perforated | 2 | |
| Carrots | in slices | 100 | 25-30 | Perforated | 2 |
| Corn cobs | 100 | 50-60 | Perforated | 2 | |
| Bell peppers | in stripes | 100 | 12-15 | Perforated | 2 |
| Hot pepper | 100 | 12-15 | Perforated | 2 | |
| Mushrooms | in quarters | 100 | 12-15 | Perforated | 2 |
| Leeks | in slices | 100 | 10-12 | Perforated | 2 |
| Brussels sprouts | 100 | 25-35 | Perforated | 2 | |
| Celery | in stripes | 100 | 15-20 | Perforated | 2 |
| Asparagus | 100 | 20-35 | Perforated | 2 | |
| Spinach | 100 | 12-15 | Perforated | 2 | |
| Celery stalks | 100 | 25-30 | Perforated | 2 | |
| Courgette | in slices | 100 | 12-18 | Perforated | 2 |
Dumplings
| Dumplings | Temperature °C | Time min. | Container | Level |
| Sweet dumpling | 100 | 20-30 | Not perforated | 2 |
| Sweet yeast dumpling | 100 | 15-20 | Not perforated | 2 |
| Yeast dumpling | 100 | 15-25 | Not perforated | 2 |
| Bread dumpling | 100 | 20-25 | Not perforated | 2 |
| Napkin dumpling | 100 | 25-30 | Not perforated | 2 |
Usage, tables and tips
Desserts
| Desserts | Quantity | Temperature °C | Time min. | Container | Level |
| Stewed apples | 500-1500 g | 100 | 15-25 | Not perforated | 2 |
| Stewed pears | 500-1500 g | 100 | 25-30 | Not perforated | 2 |
| Crème brûlée | 80 | 20-25 | Rack - bowl | 2 | |
| Crème caramel | 80 | 25-30 | Rack - bowl | 2 | |
| Yogurt | 40 | 4-6 hrs. | Rack - bowl | 2 | |
| Stewed peaches | 500-1500 g | 100 | 15-20 | Not perforated | 2 |
Fruit (Sterilising/Boiling down)
| Fruit | Quantity | Temperature °C | Time min. | Container | Level |
| Pears | 4-6 1l glasses | 100 | 30-35 | Rack | 1 |
| Cherries | 4-6 1l glasses | 80 | 30-35 | Rack | 1 |
| Peaches | 4-6 1l glasses | 80 | 30-35 | Rack | 1 |
| Plums | 4-6 1l glasses | 80 | 30-35 | Rack | 1 |
Regenerate
| Warming-up | Quantity | Temperature °C | Time min. | Container | Level |
| Plate dishes | 1-2 | 100 | 12-15 | Rack | 2 |
| Plate dishes | 3-4 | 100 | 15-20 | Rack | 2 |
| Ready-made meals | 100 | 15-20 | Rack | 2 |
Blanch
| Vegetables | Quantity | Temperature °C | Time min. | Container | Level |
| e.g. Beans, Leek | 100 | 10-12 | Perforated | 2 | |
| Curly Kale | 1000-2000 g | 100 | 12-16 | Perforated | 2 |
| Savoy cabbage | 10-20 | 100 | 12-15 | Perforated | 2 |
| White cabbage, whole | 2000-2500 g | 100 | 30-45 | Perforated | 1 |
| Tomatoes, peeled | 80 | 12 | Rack | 2 |
EN Usage, tables and tips
Defrost
| Vegetables / Side dish | Temperature °C | Time min. | Container | Level | |
| Broccoli | florets with stalk | 100 | 15-20 | Perforated | 2 |
| Mixed vegetables | 100 | 15-20 | Perforated | 2 | |
| Spinach leaves | portions | 100 | 10-15 | Not perforated | 2 |
| Cauliflower | florets | 100 | 15-20 | Perforated | 2 |
| Peas | 100 | 15-25 | Perforated | 2 | |
| Curly kale | bigger portion | 100 | 25-35 | Not perforated | 2 |
| Carrots | in slices | 100 | 15-20 | Perforated | 2 |
| Brussels sprouts | 100 | 20-25 | Perforated | 2 | |
| Asparagus | 100 | 25-30 | Perforated | 2 | |
| Ready-made meals | 100 | as required | Rack | 2 | |
| Bread | 100 | 10-25 | Rack | 2 | |
| Rice | 100 | 15-25 | Not perforated | 2 | |
| Lentils | 100 | 15-20 | Not perforated | 2 | |
| Noodles | 100 | 15-20 | Not perforated | 2 | |
Two level cooking
Some suggestions:
When cooking with two levels the rack should always be inserted in the 2nd or 3rd level from the bottom to the top.
This way the usual vessels of porcelain, Jena glass or of stainless steel can be put inside the oven.
The container of cooking perforated or not, will be inserted in the 1st level from the bottom. It can also be cooked with two racks.
Different cooking times are controlled this way:
Foods that need a longer cooking time should be placed in the upper area of the oven. Foods with a shorter cooking time should be placed on the 1^st level.
One example: Vegetables, potatoes and fish.
Place the vegetables and potatoes in any suitable container on the rack inserted in the 2^nd or 3^rd level.
Insert the fish in the 1^st level.
When using the perforated tray to cook fish, the non-perforated tray must be inserted in the bottom of the appliance to collect liquid dripping from the fish. This way the appliance is kept clean.
Time: Vegetables and potatoes 25-35 Min.
Time: Fish – depending on type – 15-25 Min.
Select the longest cooking time. Because of the different levels the food is ready at the same time, without any over cooking.
Care and maintenance
Cleaning the cooking space
Avoid using abrasive cleaners such as scouring pads, steel wool, etc. as they can damage the surface.
Wipe the cooking space clean using a damp cloth whilst the appliance is still warm. Finish off by drying the cooking space.
For ease of cleaning, the shelf guides can be removed (see the following chapter).
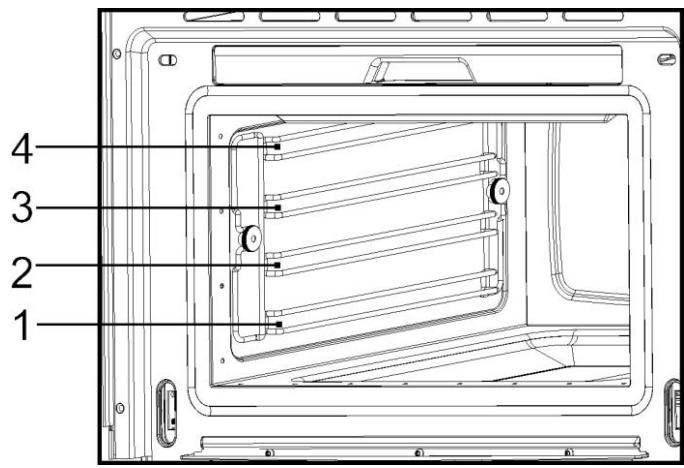
Removing the shelf guides
Unscrew and remove the knurled nuts 1 in the front of the shelf guides in an anti-clockwise direction.
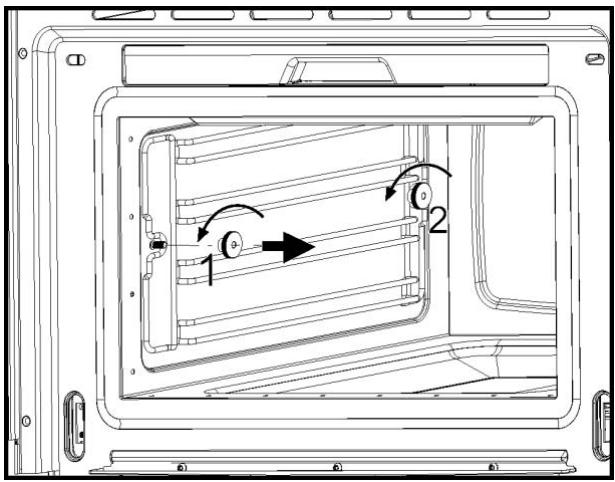
Unscrew and loosen the knurled nuts 2 in the back of the shelf guides in an anti-clockwise direction. Do not completely remove these nuts.

Pull the shelf guides to the inside of the cavity and remove from the front.

To put them back, insert the shelf guides into the knurled nuts 2 in the back and position on the screws in the front. Screw the knurled nuts 1 and 2 in a clockwise direction till tight.
Removing the appliance door
Open the appliance door as far as it will go.

Insert 2 pins inside the holes in the hinges.

Close the appliance door just enough that it can be lifted out.
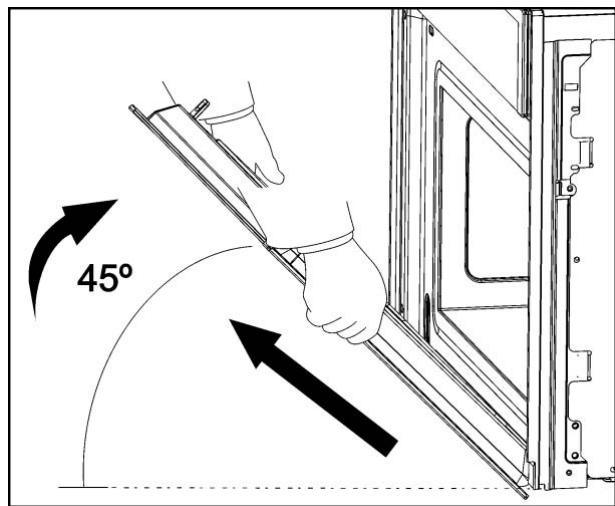
To reassemble, push the hinges into the holes from the front.
Open the appliance door as far as it will go and remove the pins.
Care and maintenance
Dscaling
Whenever steam is produced, irrespective of the hardness of the local water supply (i.e. the limescale content of the water), limescale is deposited inside the steam generator.
The time interval between descending depends on the hardness of the water and frequency of use. If steaming 4 × 30 minutes per week, the appliance must be descaled (depending on water hardness) roughly as follows:
| Water hardness | Descale after about |
| Very soft | 18 months |
| Medium | 9 months |
| Very hard | 6 months |
The appliance automatically detects when descending is necessary and when this happens the display shows:

If the Descaling procedure is not performed, some cooking cycles after the symbol displayed above starts to flash.
If once again the Descaling procedure is not performed, some cooking cycles after the oven functioning is blocked and the display shows:
CAL

IMPORTANT NOTE: Failure to descale the appliance will likely impair the functioning of or cause damage to the appliance.
Suitable descending solutions
For descending, use the descending solution "DURGOL®".
This solution allows a professional and careful.
descaling of your appliance and is available at Customer Care Centres.
Warning! Do not use vinegar or vinegar-based products as they can cause damage to the oven's internal circuit.
Traditional descending solutions are not appropriate because they can contain foaming agents.
Dscaling procedure

Warning: For safety reasons, the descending process cannot be interrupted and it takes about 45 minutes.
The appliance can be descaled with the appliance door open or closed. The appliance must be in idle state prior to starting the descending cycle.
To run a descending cycle proceed as follows:
- Press the "On/Off" key to switch the oven on.
- Press the "Left" and "Right" keys at the same time for 5 seconds. The display shows "CAL" and there is an intermittent beep. If you wish to cancel the descale process at this stage press the "Stop" key.
- Press the Start key.
- When the display shows “0.5L”, remove the water tank.
- Pour 0,5 litres of an adequate descending solution into the water tank and put the water tank back.
-
Press the "Start" key. The Descale cycle is initiated and takes about 30 minutes.
-
When the display shows "1.0L" flashing and the oven emits a beep, remove and empty the water tank.
- Fill the water tank with 1,0 litres of cold water and put the water tank back.
- Press the "Start" key. The first rinsing cycle starts.
- When the display again shows “1.0L” flashing and the oven emits a new beep, remove and empty the water tank.
- Fill the water tank with 1.0 litres of cold water and put the water tank back.
- Press the "Start" key. The second rinsing cycle starts.
- When the rinsing cycle has finished the display shows "End".
- Remove, empty and dry the water tank.
Care and maintenance
Warning! Cleaning should be done with the oven power switched off. Take the plug out of the socket or switch off the oven's power circuit.
Do not use aggressive or abrasive cleaning products, scourers that scratch surfaces or sharp objects, since stains may appear.
Do not use high pressure or steam jet cleaning appliances.
Front surface
Normally you just need to clean the oven with a damp cloth. If it is very dirty, add a few drops of dishwashing liquid to the cleaning water. Afterwards, wipe the oven with a dry cloth.
In an oven with an aluminium front, use a mild glass cleaning product and a soft cloth that does not release any fibres or threads. Wipe from side to side without exerting any pressure on the surface.
Immediately remove limescale, fat, starch or egg white stains. Corrosion can occur under these stains.
Do not let any water get inside the oven.
Oven interior
After use, remove any water on the bottom of the cooking space with a soft cloth. Leave the appliance door open so that the cooking space can cool down.
To remove dirt that is harder to shift, use a nonaggressive cleaning product. Do not use oven sprays or other aggressive or abrasive cleaning products.
Always keep the door and the oven front very clean to ensure that the door opens and closes properly.
Make sure water does not enter the oven ventilation holes.
The glass lamp cover is located on the oven ceiling and can be removed easily for cleaning. For this you just need to unscrew it and clean it with water and dishwashing liquid.
Accessories
Clean the accessories after each use. If they are very dirty, soak them first of all and then use a brush and sponge. The accessories can be washed in a dish washing machine.
EN
What should I do if the oven doesn’t work?
WARNING! Any type of repair must only be done by a specialised technician. Any repair done by a person not authorised by the manufacturer is dangerous.
You do not need to contact Technical Assistance to resolve the following questions:
- The display is not showing! Check if:
- The time indication has been switched off (see section on Basic Settings).
- Nothing happens when I press the keys! Check if:
- The Safety Block is active (see section on Basic Settings).
- The oven does not work! Check if:
- The plug is correctly fitted in the socket.
- The oven's power is switched on.
- When the oven is operating I can hear some strange noises! This is not a problem.
- It has to do with the operating noises that can occur during the cooking process, e.g., by the water pumps in the steam generator.
- The steam inside the cavity produces a pressure build-up and sometimes the cavity walls may produce noise when they react to the pressure.
- These noises are normal, there is no problem.
- The food doesn't heat up or heats very slowly! Check if:
- You have selected the correct operating times and temperature setting.
- The food you have put inside the oven is a larger amount or colder than you usually put in.
-
If the message "Err_ " appears in the display, please contact the Customer Care.
-
The appliance still makes a noise after the cooking process is finished! This is not a problem.
- The cooling fan keeps on working for some time. When the temperature has dropped sufficiently, the fan will switch itself off.
- The oven switches on but the interior light does not go on!
- If all the functions work properly it is probable that the lamp has blown. You can keep on using the oven.
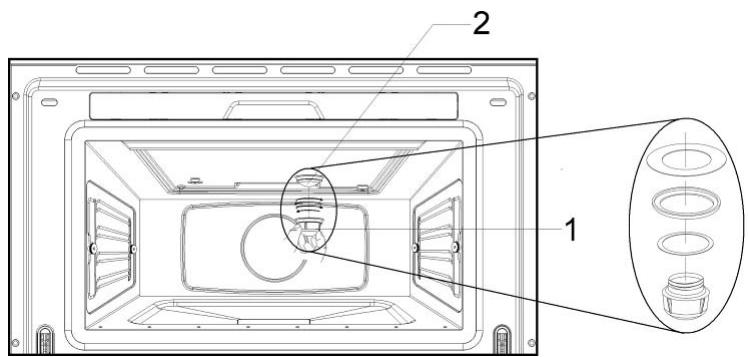
Replacing the light bulb
To replace the light bulb, proceed as follows:
- Disconnect the oven from the power supply. Take the plug out of the socket or switch off the oven's power circuit.
- Unscrew and remove the glass light cover (1).
- Remove the light bulb (2). Warning! The bulb may be very hot.
- Fit a new E14 230-240V/15W bulb. Follow the lamp manufacturer's instructions.
- Screw the glass light cover into place (1). IMPORTANT NOTE: Make sure that the sealing rings are applied in the correct sequence.
- Connect the oven again to the power supply.
Technical characteristics
Description of Functions
| Symbol | Function | Foods |
| Steam | Cooking all sorts of vegetables, rice, cereals and meat. Extracting juice from berries. Simultaneous defrosting and cooking of vegetables. | |
| Regenerating & Sterilising | Regenerating plate dishes and ready-made meals. Sterilising/boiling down fruit. | |
| Cooking Vegetables | Cooking different types of vegetables. | |
| Cooking Fish | Cooking different types of fish. | |
| Cooking Meat | Cooking different types of meat. | |
| Side Dishes | Cooking different types of side dishes. |
Display Messages
| Message | Description |
| Water tank | |
| U | Flashing – water tank is empty. Please refill. |
| M | Indication that water tank is missing. |
| DEP | The water tank must be removed, emptied and reinserted. |
| Entkalken | |
| VAP | Indication that steam reduction process is ongoing. |
| PUMP | Indication that hot water is being pumped to the water tank. |
| Descaling | |
| CAL | Appliance must be descaled. |
| Flashing – descaling starts. | |
| 0.5L | Feed 0,5 litre descaling solution into the water tank. |
| 1.0L | Feed 1,0 litre of cold water into the water tank for rinsing. |
| System warnings | |
| HOT | Temperature in the Electronic Board is too high. |
| Err_ | Call Customer Care |
Specifications
AC Voltage 220-240 V / 50 Hz
Power required 1500 W
- Exterior dimensions (W × H × D) 595 × 455 × 472 mm
- Interior dimensions (W × H × D) . 420 × 210 × 390 ~mm
Oven capacity. 351
Weight 32 kg
Wir bitten Sie, die in thisem Heft enthaltenen Anweisungen aufmerksam durchzulesen, die halten Ihnen, bei der Nutzung Ihres dampfgarers gute Ergebnisse zu erzielen.
BEWAHREN SIE DIE DOKUMENTATION DIESES GERÄTES Auf, UM KUNFTIG IN IHR NACHSCHLAGEN ZU KÖNNEN.
Halten Sie die Gebrauchsanleitung immer griffbereit. Falls Sie das Gerät Dritten überlassen, stellen Sie ihren auch die entsprechende Betriebsanleitung zur Verfügung!
Hinweise zum Umweltschutz
Entsorgung der Verpackung

Die Verpackung ist mit einem Grünen Punkt gekennzeichnet.
Benutzen Sie geeignete Behältnisse, um alle Verpackungsmaterialien, wie Pappe, Styropor und Folien, zu entsorgen. Auf diese Weise wird die Wiederverwertung der
Verpackungsmaterialien gewährleistet.

Entsorgung von stillgelegten Geräten
Die europäische Richtlinie 2002/96/EG über Elektro- und Elektronik-Altgeräte (WEEE) sieht vor, dass die elektrischen Haushaltgeräte nicht im normalen Abfallfluss des festen Stadtmülls entsorgt werden)dürfen.
Die außer Betrieb gesetzten Geräte müssen getrennt abgeholt werden, um den Anteil der Rückgewinnung und Wiederverwendung der Werkstoffe, aus denen sie bestehen, zu optimieren und um potentielle Schäden für die Gesundheit der Menschen und die Umwelt zu vermeiden. Das Symbol, welches aus einem mit einem Kreuz durchgestrichenen Müllcontainer besteht, ist auf sãmtlichen Erzeugnissen anzubringen, um so an die Verpflichtung der separates Abholung zu erinnern.
Die Verbraucher haben sich mit den lokalen Behörden bzw. den Verkaufsstellen in Verbindung zu setzen, um Informationen über den Ort einzuholen, der zur Lagerung der alten elektrischen Haushaltsgeräte geeignet ist.
Machen Sie Ihr Gerät unbrauchbar, bevor Sie es entsorgen. Ziehen Sie das Netzkabel Heraus, schneiden Sie es ab und entsorgen Sie es.
Inhaltsverzeichnis
Installationsanleitung 31
Vor der Installation 31
Nach der Installation 31
Sicherheitshinweise 32
Installationsanleitung 34
Grundeinstellungen 35
Anfangseinstellungen 35
Einstellen der Uhr 35
Einstellen der Wasserhärte 35
Einblenden/Ausblenden der Uhr 36
Sicherheitsverriegelung 36
Timer 37
Grundfunktionen 38
Dampfgarer 38
Aufwärmen & Sterilisieren 39
Sonderfunktionen 40
Zubereiten von Gemüse 40
Zubereiten von Fisch 41
Zubereiten von Fleisch 42
Beilagen 43
Wasser einfllen 44
Wassertank fullen 44
Wasser nachfüllen 44
Wassertank entleeren 44
Während des Betriebes 45
Unterbrechung eines Kochvorgangs 45
Änderung der Parameter 45
Einen Kochvorgang loschen 45
Ende eines Kochvorgangs 45
Tabellen und Tipps 46
Anwendung des Zubehörs 46
Reinigung und Wartung des Geräts 51
Reinigung des Innenraums 51
Seitengitter aushängen 51
Die Geräteur Herausnahmen 52
Entkalken 53
Geeignete Entkalker 53
Entkalkungsvorgang 54
Stirnseite 55
Garraum 55
Zubehor 55
Was ist im Falle einer Funktionstörung zu tun? 56
Lampenwechsel 56
Technische Eigenschaften 57
Funktionsbeschreibung 57
Anzeigen 57
Spezifikation 57
Einbau 58
Vor der Installation
Überprüfen Sie, dass die Versorgungsspannung, die auf dem Typenschild angegeben ist, mit Ihrer Netzspannung übereinstimmt.
Öffnen Sie die Tur und entnahmen Sie alle Zubehörteile sowie das Verpackungsmaterial.
Achtung! Die Vorderseite des Gerätes kann mit einer Schutzfolie versehen sein. Ziehen Sie diese Folie vor der ersten Benutzung des Gerätes vorsichtig ab, indem Sie an deren Unterseite beginnen.
Vergewissern Sie sich, dass das Gerät nicht beschädigt ist. Überprüfen Sie, ob die Turrichtig schließt und ob die Innenseite der Tur sowie die Stirnseite des Innenraumes nicht beschädigt sind. Benachrichtigen Sie den Kundendienst im Falle von vorhandenen Schäden. Im Falle von vorhandenen Schäden, Benachrichtigen Sie den Kundendienst. Die Telefonnummer finden Sie auf der Rückseite dieser Heftes.
BENUTZEN SIE DAS GERÄT NICT, falls das Netzkabel oder der Stecker beschädigt ist, falls das Gerät nicht richtig Funktioniert bzw. wenn es Schäden erlitten hat oder heruntergefallen ist. Setzen Sie sich gegebenenfalls mit dem Kundendienst in Verbindung. Setzen Sie sich gegebenenfalls mit dem Kundendienst in Verbindung. Telefonnummer auf der Rückseite dieseres Heftes.
Stellen Sie das Gerät auf eine ebene und stabile Fläche. Das Gerätarf nicht in der Nähe von Heizelementen, Radios und Fernsehgeräten aufgestellt werden.
Vergewissern Sie sich während der Installation, dass das Netzkabel nicht mit Feuchtigkeit, scharfkantigen Gegenständen und der Rückseite des Gerätes in Berührung kommt, Denn die hohen Temperatoren konnen das Kabel beschädigen.
Achtung: Nach der Aufstellung des Gerätes ist der Zugang zum Stecker zu gewährleisten.
Nach der Installation
Das Gerät ist mit einem Netzkabel und einem Stecker für Einphasenstrom ausgestattet, 230-240V ~ 50Hz.
Im Falle eines Daueranschlusses ist das Gerät von einem qualifizierten Techniker zu installieren. In thislem Falle hat der Anschluss an einen Stromkreis mit einem Unterbrecher fur samtliche Pole, mit einem Mindestabstand von 3 mm zwischen den Kontakten, zu erfolgen.
ACHTUNG: DAS GERÄT MULLS UNBEDINGT GEERDET WERDEN.
Der Hersteller und die Wiederverkäuer lehen jegliche Haftung für eventuelle Schäden ab, die Personen, Tieren oder Sachen zugeführst werden, falls die Nichtbeachtung der vorliegenden Installationsanleitung festgestellt wird.
Das Gerät Funktioniert nur, wenn die Tür richtig geschlossen ist.
Säubern Sie vor der ersten Benutzung das Geräteinnere und die Zubehörteile gemäß den Hinweisen zur Reinigung unter dem Punkt "Reinigung und Wartung des Gerätes".
Während der Installation sind die getrennt mitgelieferten Anleitungen zu befolgen.

- Achtung! Lassen Sie das Gerät nicht unbeaufsichtigt arbeiten.
- Achtung! Falls Sie Rauch oder Feuer bemerken, dann halten Sie die Türg geschlossen, um die Flammen zu ersticken. Schalten Sie das Gerät ab undziehen Sieden Stecker aus der Steckdose oder unterbrechen Sie die Stromversorgung des Gerätes.
- Überhützte Fette und Öle können sich leicht entzünden. Erhitzen Sie deshalb kein Öl und Fett im Garraum. Versuchen Sie niemals brennendes Fett oder Öl mit Wasser zulöschen (Explosionsgefahr)! Ersticken Sie die Flammen mit einem feuchten Tuch und halten Sie alle Türen und Fenster geschlossen.
- Achtung! Benutzen Sie keinen hochprozentigen Alkohol zum Garen im Gerät. Es kann zu einer Überhitzung der Lebensmittel führen, Explosionsgefahr!
-
Achtung! Dieses Gerät ist nicht für den Gebrauch durch Personen (einschließlich Kindern) geeignet, die nicht im vollen Besitz ihrer körperlichen, sensorischen und geistigen Fähigkeiten sind. Benutzer, denen an Erfahrung und Kenntnis des Geräts mangelt oder die nicht in die Verwendung des Geräts eingewiesen wurden, müssen durch eine Person überwacht werden, die für ihre Sicherheit verantwortlich ist. Kinder,müssen überwacht werden, um sicher zu stellen, dass sie nicht mit dem Gerät speiten.
-
Kinder,müssen überwacht werden,um sicherr zu stellen,dass sie nicht mit dem Gerat spielen.Benutzen Sie die Kindersicherung.
- Während des Gebrauches kann das Gerät sehr heißt werden.itte seien Sie vorsichtig und vermeiden Sie jeglichen Kontakt mit den Heizkörpern im Innenraum des Gerätes. VERBRENNUNGSGEFAHR!
Vorsicht! Zugängliche Teile konnen während des Gebrauches bereits werden. Kinder sind vom Gerät fernzuhalten. - Achtung! Wenn Sie die Tur während oder nach dem Kochvorgang öffnen, können heißer Dampf und Wassertropfen aus dem Gerät entweichen.itte auf die Seite gehen oder darüber treten.
- Vorsicht! Klemmen Sie nie die Netzkabel anderer elektrischer Geräte in die weiße Gerätetür ein. Die Isolierung des Kabels kann schmelzen. Kurzschlussgefahr!
DE Sicherheitshinweise
Dieses Gerät ist ledigious für den Hausgebrauch bestimmt!
Dieses Gerät ist für die Zubereitung der Lebensmittel im Haushalt geeignet. Es wird keine Haftung übernommen für Schäden, die durch ungeeigneten oder unzulässigen Gebrauch entstehen.
Wenn Sie den Hinweisen gemäß vorgehen, dann vermeiden Sie Schäden am Gerät und sonstige gefährliche Situationen:
- Verdecken oder verstopfen Sie die Belüftungslöcher und -schlitze nicht.
- Bewahren Sie keine Gegenstände im Gerät, die bei unbeabsichtigtem Einsatz einen Gefahr darstellen können.
- Nutzen Sie das Gerät nicht als Speisekammer.
- Gießen Sie keinen Branntwein (z.B. Brandy, Whisky, Schnaps, usw.) über die warmen Speisen. Explosionsgefasrt!
- Zubehör wie Roste und Backbleche usw. werden im Garraum sehr heißt. Benutzen Sie Topflappen.
- Um Verbrennungen zu vermeiden, tragen Sie immer Kuchenhandschuhe, beim Umgang mit Geschirr und Gefäßen wenn Sie das Geräteinnere berühren.
- Stützen oder setzen Sie sich nicht auf die geöffnete Gerätür. Das kann Schäden besonders im Bereich der Scharniere hervorrufen. Die Turhalt maximal 8 kg aus.
Die Roste halten einer Höchstbelastung von 8 kg stand. Überschreiben Sie diese Belastung nicht, um Schäden zu vermeiden.
Reinigung:
Nachdem das Gerät ausgeschaltet ist, bleibt es für eine Zeit frei.itte geben Sie genug Zeit zur Abkuhlung bevor Sie, z.B, mit der Reinigung beginnen.
- Keine Scharfen Abrasive Reiniger oder scharfern Metallschaber für die Reinigung des Glases der Backofentür benutzen, da Sie die Oberfläche verkratzen können. Diese kann das Glass zerstären.
Die Kontaktflächen der Tur (Stirnseite des Garraums und Innenseite der Tur) müssen sehr sauber gehalten werden, um die einwandfrei Funktionseise zu gewährleisten.
- Bitte beachten Sie die Hinweise bezüglich der Sauberkeit unter dem Punkt "Reinigung und Wartung des Gerätes".
Im Falle einer Reparatur:
- Falls das Netzkabel beschädigt wird, ist es vom Hersteller, von autorisierten Vertretern oder von für diese Aufgabe qualifizierten Technikern zuersetzen, um gefährliche Situationen zu vermeiden. Außen dem ist dazu Spezialwerkzeug notwendig.
- Reparaturen und Wartungsarbeiten, entsprechers an unter Strom stehenden Teilen, dürfen nur durch vom Hersteller autorisierte Techniker ausgeführrt werden.
Installationsanleitung
-
- Türglass
-
- Sicherheitsverriegelung
-
- Lampe
-
- Bedienblende
-
- Backblech
-
- Gelochtes Backblech
-
- Seitengitter
a - Ein/Aus-Taste
b - Funktionstaste Dampfgarer
c - Funktionstaste Aufwärmen & Sterilisieren
d - Funktionstaste Gemüse
e - Funktionstaste Fisch
f - Funktionstaste Fleisch
g - Funktionstaste Beilagen
h - Timer-Taste
1 – Navigationstaste „Links“
2 - Navigationstaste „Rechts“
3 - Taste -
4-Taste+
5 - Bestätigungsstaste
6 - Start -Taste
7 - Stopp -Taste
8 - Verriegelungstaste
D1 - Display
DE Grundeinstellungen
Anfangseinstellungen
After your steam oven is first plugged in or after a power failure, the clock display will flash to indicate that the time shown is not correct.
The oven will not operate until the clock and the water hardness parameter are set.
Einstellen der Uhr
Das Blinken der Uhrzeit beim erstmaligen Einschalten des Geräts oder nach einem Stromausfall zeigt an, dass die eingestellte Uhrzeit nicht korrekt ist. Gehen Sie folgendermaßen vor, um die Uhr einzustellen:
To set the clock and the water hardness parameter value proceed as described in the following chapters.

- Drücken Sie die Ein/Aus-Taste, um das Gerät in Betrieb zu setzen.
- Halten Sie die Tasten - und + gleichzeitig gedrück. Die Stundenanzeige blinkt (die Schritte 1 und 2 sind nicht erforderlich, wenn Sie den Mikrowellenherd zum ersten Mal anschließen oder nach einem Stromausfall).
- Stellen Sie mit den Tasten + und - die Uhrzeit (Stunde) ein.
Einstellen der Wasserhärte
- Bestätigkeiten Sie die Uhrzeit (Stunde) durch Drücken der Bestätigungstaste. Die Minutenanzeige blinkt.
- Stellen Sie mithilfe der Tasten + und - die Uhrzeit (Minutes) ein.
- Bestätigten Sie die Uhrzeit (Minutes) durch Drücken der Bestätigungstaste.

Das Gerät verfügbar über ein System, das automatisch anzeigt, wann eine Entkalkung des Gerats notwendig ist.
Dieses System kann in einem Haushalt mit sehr weichem Wasser (bzw. durch ein Gerät zur Wasserenthaltartung) optimiert werden, wenn in den Benutzereinstellungen der entsprechende Härtegrad des Wassers eingestellt wird (siehe unterstehende Tabelle).
Gehen Sie folgendermaßen vor, um die Wasserhärte einzustellen:
-
Drücken Sie die Ein/Aus-Taste, um das Gerät in Betrieb zu setzen.
-
Betätigten Sie gleichzeitig die Tasten Links und Rechts. Der Härtegrad leuchtet auf dem Display auf (die Schritte 1 und 2 können übersprungen werden, falls das Gerät zum ersten Mal angeschlossen wird, oder nach einem Stromausfall).
- Betätigten Sie die Tasten und +, um entsprechend der unterstehenden Tabelle den wichtigen Wert einzustellen.
- Bestätigten Sie den Wert durch Drücken der Bestätigungstaste. Auf dem Display erscheint die Uhr.
Grundeinstellungen
In der folgenden Tabelle sind verschiedene Richtwerte zur Bestimmung der Wasserhärte dargestellt.
| Art | Wasserhärte | Display | |||
| Ca + Mg (ppm) | Englische Grad [°eH] | Französische Grad [°dF] | Deutsche Grad [°dH] | ||
| weiches Wasser | 0-150 | 0-11 | 0-15 | 0-8 | SOFT |
| mittleres Wasser | 151-350 | 12-25 | 16-35 | 9-20 | MED |
| hartes Wasser | 351-500 | 26-35 | 36-50 | 21-28 | HARD |
Einblenden/Ausblenden der Uhr

Wenn Sie die Zeitanzeige als störend empfinden, können Sie sie wie folgt ausblenden:
-
Drücken Sie die Ein/Aus-Taste, um das Gerät in Betrieb zu setzen.
-
Halten Sie die Bestätigungstaste drei Sekunden lang gedrückt. Die Zeitanzeige erlischt.
Wenn Sie die Zeitanzeige wieder einblenden möchten, wiederholen Sie den oben beschriebenen Vorgang.
Sicherheitsverriegelung
Sie können den Betrieb des Geräts spreren (zum Beispiel, um die Benutzung durch Kinder zuverhindern).

Gehen Sie folgendermaßen vor, um den Betrieb des Geräts zu sperren:
- Drücken Sie die Ein/Aus-Taste, um das Gerät in Betrieb zu setzen.
- Halten Sie die Verriegelungstaste drei Sekunden lang gedrückt. Die
Verriegelungstaste leuchtet auf und auf dem Display erschinen die Tastensymbole.
Das Gerät ist nun gespeert, bis seine Entsperrung erfolgt. Zum Entsperren des Geräts wiederholen Sie deniben beschriebenen Vorgang.
Timer
These Funktion ist als Hilfe bei alltätiglichen Kuchenarbeiten gedacht.

Gehen Sie folgendermaßen vor, um den Timer einzustellen:
- Drücken Sie die Ein/Aus-Taste, um das Gerät in Betrieb zu setzen.
- Betätigten Sie die Funktionstaste Timer. Die Taste leuchtet rot auf und auf dem Display erscheint folgende Anzeige:

- Stellen Sie mithilfe der Tasten + und - die gewünschte Zeit ein.
- Drücken Sie die Bestätigungsstaste. Das Gerät beginnnt zu arbeiten.
Wenn die eingestellte Zeit abgelaufen ist, sendet das Gerät alle 30 Sekunden ein akustisches Signal aus, und die Timer-Taste blinkt. Betätigten Sie die Timer-Taste, um das akustische Signal abzustellen.
Wenn der Timer arbeitet, leuchtet die Timer-Taste rot. Auf dem Display erscheint folgende Anzeige:
- Falls keine Funktion aktiv ist, erscheint auf dem Display die Timer-Anzeige und die Timer-Taste leuchtet rot.
- Ist eine Funktion aktiv, erscheinen auf Display und Tasten die normalen Funktionseinstellungen. Betätigten Sie die Timer-Taste, um die verbleibende Zeit zu prufen. Auf dem Display erscheidt kurzzeitig der Timer und kehrt nach fünf Sekunden bzw. bei nochmaliger Betätigung der Timer-Taste wieder zu den normalen Funktionsanzeigen darüber. Während der Timer-Anzeige kann die verbleibende Zeit mithilfe der Tasten und + verstellt werden.
Dampfgarer
Nutzen Sie diese Funktion, um Gemüse, Kartoffeln, Reis, Fisch und Fleisch zuzubereiten und aufzuwärmen.

- Drücken Sie die Ein/Aus-Taste, um das Gerät in Betrieb zu setzen.
- Betätigen Sie die Funktionstaste Dampfgarer. Die Taste leuchtet rot auf und auf dem Display erscheint folgende Anzeige:

- Stellen Sie mithilfe der Tasten + und - die gewünschte Temperatur ein.
- Betätigten Sie die Taste > . Auf dem Display erscheint folgende Anzeige:

- Stellen Sie mithilfe der Tasten + und - die gewünschte Betriebsdauer ein. Diese Einstellung ist optional. Falls Sie die Betriebsdauer nicht einstellen möchten, fahren Sieitte mit Schritt 7 fort.
- Falls Sie eine der oben genannten Einstellungen ändern möchten, wahren Sie mit den Tasten < oder > die jeweilige Einstellung und ändern Sie den Wert mithilfe der Tasten + und -.
- Betätigen Sie die Start-Taste. Das Gerät beginnnt zu arbeiten.
Anmerkung: Das Symbol [ ] blinkt auf und zeigt an, dass die Temperatur im Inneren des Geräts niedriger ist als die eingestellte Temperatur.
Aufwärmen & Sterilisieren
Verwenden Sie diese Funktion, um Tellergerichte und Fertiggerichte aufzuwärmen oder Obst zu sterilisieren und einzukochen.

- Drücken Sie die Ein/Aus-Taste, um das Gerät in Betrieb zu setzen.
- Betätigten Sie die Taste Aufwärmen & Sterilisieren. Die Taste leuchtet rot auf und auf dem Display erscheint folgende Anzeige:

-
Wahlen Sie mithilfe der Tasten + und - das gewünschte Programm, z. B. R 01 (siehe unterstehende Tabelle).
-
Betätigten Sie die Taste >. Auf dem Display erscheint folgende Anzeige:


13:00
- Stellen Sie mithilfe der Tasten + und - die gewünschte Betriebsdauer ein. Diese Einstellung ist optional.
- Betätigen Sie die Start-Taste. Das Gerät beginnnt zu arbeiten.
Anmerkung: Das Symbol blinkt auf und zeigt an, dass die Temperatur im Inneren des Geräts niedriger ist als die eingestellte Temperatur.
| Programm | Lebensmittelart | Temperatur (°C) | Zeit (Min.) | Anweisungen |
| R 01 | Tellergerichte | 100 °C | 13 | Deckel entfernen und perforiertes Backblech verwenden. |
| R 02 | Fertiggerichte/Tiefkühlgerichte | 100 °C | 18 | |
| R 03 | Bohnen | 100 °C | 35 | Sterilisieren: |
| R 04 | Kirschen | 80°C | 35 | Zeiten und Temperatren gelten für 1I-Einmachgläser. |
| R 05 | Pflaumen | 90°C | 35 | |
| R 06 | Babyflaschen | 100°C | 12 |
Sonderfunktionen
Zubereiten von Gemüse
Verwenden Sie diese Funktion zur Zubereitung der in der unterstehenden Tabelle aufgeführten Gemüsearten.

- Drücken Sie die Ein/Aus-Taste, um das Gerät in Betrieb zu setzen.
- Betätigten Sie die Taste Gemüsezubereitung. Die Taste leuchtet rot auf und auf dem Display erscheint folgende Anzeige:

-
Wahlen Sie mithilfe der Tasten + und - das gewünschte Programm, z. B. A 01 (siehe unterstehende Tabelle).
-
Betätigen Sie die Taste >. Auf dem Display erscheint folgende Anzeige:

- Stellen Sie mithilfe der Tasten + und - die gewünschte Betriebsdauer ein. Diese Einstellung ist optional.
- Betätigen Sie die Start-Taste. Das Gerät beginnnt zu arbeiten.
Anmerkung: Das Symbol blinkt auf und zeigt an, dass die Temperatur im Inneren des Geräts niedriger ist als die eingestellte Temperatur.
| Programm | Gemüseart | Temperatur (℃) | Zeit (Min.) |
| A 01 | Brokkoli/Röschen | 100 °C | 20 |
| A 02 | Blumenkohl/Röschen | 100 °C | 25 |
| A 03 | Kartoffeln/Stückchen | 100 °C | 25 |
| A 04 | Zuckererbsen | 100 °C | 15 |
| A 05 | Spargel | 100 °C | 25 |
Zubereiten von Fisch
Verwenden Sie diese Funktion zur Zubereitung der in der unterstehenden Tabelle aufgeführten Fischarten.

- Drücken Sie die Ein/Aus-Taste, um das Gerät in Betrieb zu setzen.
- Betätigten Sie die Taste Fischzubereitung. Die Taste leuchtet rot auf und auf dem Display erscheint folgende Anzeige:

-
Wahlen Sie mithilfe der Tasten + und - das gewünschte Programm, z. B. B 01 (siehe unterstehende Tabelle).
-
Betätigen Sie die Taste >. Auf dem Display erscheint folgende Anzeige:

- Stellen Sie mithilfe der Tasten + und - die gewünschte Betriebsdauer ein. Diese Einstellung ist optional.
- Betätigen Sie die Start-Taste. Das Gerät beginnnt zu arbeiten.
Anmerkung: Das Symbol blinkt auf und zeigt an, dass die Temperatur im Inneren des Geräts niedriger ist als die eingestellte Temperatur.
| Programm | Fischart | Temperatur (℃) | Zeit (Min.) |
| B 01 | Forelle | 80 °C | 25 |
| B 02 | Garnelen | 90 °C | 15 |
| B 03 | Fischfilet | 80 °C | 18 |
| B 04 | Muscheln | 100 °C | 25 |
| B 05 | Hummer | 100 °C | 30 |
Sonderfunktionen
Zubereiten von Fleisch
Verwenden Sie diese Funktion zur Zubereitung der in der unterstehenden Tabelle aufgeführten Fleischarten.

- Drücken Sie die Ein/Aus-Taste, um das Gerät in Betrieb zu setzen.
- Betätigten Sie die Taste Fleischzubereitung. Die Taste leuchtet rot auf und auf dem Display erscheint folgende Anzeige:

-
Wahlen Sie mithilfe der Tasten + und - das gewünschte Programm, z. B. C 01 (siehe unterstehende Tabelle).
-
Betätigen Sie die Taste >. Auf dem Display erscheint folgende Anzeige:

- Stellen Sie mithilfe der Tasten + und - die gewünschte Betriebsdauer ein. Diese Einstellung ist optional.
- Betätigen Sie die Start-Taste. Das Gerät beginnnt zu arbeiten.
Anmerkung: Das Symbol blinkt auf und zeigt an, dass die Temperatur im Inneren des Geräts niedriger ist als die eingestellte Temperatur.
| Programm | Fleischart | Temperatur (℃) | Zeit (Min.) |
| C 01 | Hähnchenbrust | 100 °C | 30 |
| C 02 | Geräucherte Schweinslende/Stücke | 100 °C | 45 |
| C 03 | Putenschnitzel | 100 °C | 20 |
| C 04 | Schweinefilet, im Ganzen | 100 °C | 25 |
| C 05 | Wiener Würstchen | 90 °C | 15 |
Beilagen
Verwenden Sie diese Funktion zur Zubereitung der in der unterstehenden Tabelle aufgeführten Speisen.

- Drücken Sie die Ein/Aus-Taste, um das Gerät in Betrieb zu setzen.
- Betätigen Sie die Taste Beilagen. Die Taste leuchtet rot auf und auf dem Display erscheint folgende Anzeige:

-
Wahlen Sie mithilfe der Tasten + und - das gewünschte Programm, z. B. D 01 (siehe unterstehende Tabelle).
-
Betätigen Sie die Taste >. Auf dem Display erscheint folgende Anzeige:

- Stellen Sie mithilfe der Tasten + und - die gewünschte Betriebsdauer ein. Diese Einstellung ist optional.
- Betätigen Sie die Start-Taste. Das Gerät beginnnt zu arbeiten.
Anmerkung: Das Symbol blinkt auf und zeigt an, dass die Temperatur im Inneren des Geräts niedriger ist als die eingestellte Temperatur.
| Programm | Lebensmittelart | Temperatur (°C) | Zeit (Min.) |
| D 01 | Dampfnudeln | 100 °C | 20 |
| D 02 | Hefeklõbe | 100 °C | 25 |
| D 03 | Servietenknödel | 100 °C | 30 |
| D 04 | Reis | 100 °C | 35 |
| D 05 | Linsen | 100 °C | 40 |
Wasser einfüllen
Wassertank füllen
Bei allen Funktionen muss der Wassertank voll sein.
Wassertank mit kaltem, frischem Trinkwasser bis zu der "MAX" Markierung füssen und bis zur Rastung über den Innenaum einschieben.ca. 11
Der Hinweis bedeutet dass der Wassertank nicht richtig platziert ist.
Um den Hinweis zulöschen Wassertank komplette einschieben.
Wasser nachfüllen
Der Wasserinhalt reicht normalerweise für einen Kochvorgang von 50-60 Minuten.
Falls der Wassertank nachgewählten werden muss, leuchtet die Wassertankleuchte.
Nur maximal bis 0,5 Litern nachfüllen, um Sicher zu seien, dass das Wasser beim Zurückpumpen in den Wassertank nicht überläuft, GEFAHR DES ÜBERLAUFENS.
Wassertank entleeren
Wenn das Gerät ausgeschaltet wird, wird das restliche Wasser zurück in den Wassertank gegumpt.
Während das Wasser abgepumpt wird stehen auf der Anzeige „PUMP".
These Information wird so lange angezeigt bis das Wasser eine Temperatur von 75^ erreicht hat, bevors wieder zurück in den Wassertank gegumpt wird.
Achtung: das Wasser im Tank kann heißt sein. Gefahr von Brandverletzungen!
Nachdem das Wasser wieder zum Wassertank gespumpt wurde, steht auf der Anzeige „DEP“ Gehen Sie wie folgt vor:
- Den Wassertank aus dem Gerätziehen und entleeren.
- Den Wassertank austrocknen und wieder ins Gerät schieben. Den Innenraum des Gerätes trocken wischen.
- Lassen Sie die Gerätetür geöffnet, bis das Gerät abgekühlt und vollig trocken ist.
WICHTIGE ANMERKUNG: Nach jedem Garvorgang wird empfohlen, den Wassertank zu entfernen und zu entleeren. Es vermeidet die Entwicklung von Bakterien und Kalk im Gerät.
Wollen Sie zwei Dämpfvorgänge nacheinander starten, muss der Wassertank nicht entleert werden. Auf der Anzeige stehen „DEP".
Um diese Warnung zu löschen, drücken Sie die Stopp Taste und ein neuer Kochvorgang kann gestartet werden ohne die Entfernung und Entleerung des Wassertanks.
Unterbrechung eines Kochvorgangs
Sie können den Kochvorgang jederzeit unterbrechen, indem Sie einmal die Taste Start/Stopp drucken.
Das Gerät hat eine Dampfabbaufunktion, die durch die Taste Start/Stopp aktiviert wird. Der Dampfaustritt beim öffnen der Tür wird dadurch vermindert.
Es dauert ungebung drei Minutes und während dieser Zeit stehen „VAP" auf dem Display.
Achtung: wenn die Tur geöffnet wird, während oder nach dem Garvorgang, tritt heßer Dampf aus dem Gerätitte auf die Seite gehen oder zurücktreten.
In this moment:
Die Dampferzeugung wurde unterbrochen.
Die Garraumwände und der Wassertank sind noch sehr welt. Gefahr von Brandverletzungen!
Die Uhranzeige stoppt und die Restliche Betriebszeit wird angezeigt (falls es eingestellt wurde).
Falls Sie es wünschen, können Sie:
- die Lebensmittel wenden oder umruhren
- die Prozessparameterändern,
Schlieben Sie die Tür und drücken Sie die Taste Start/Stopp, um den Vorgang wieder aufzunehmen.
Änderung der Parameter
Die Dauer kann gerändert werden, während das Gerät in Betrieb ist oder falls der Garvorgang durch drehen des Drehknopfs unterbrochen wurde. Die neue definierte Dauer ist nur gültig, wenn die Anzeige nicht mehr blinkt.
Die Temperatur kann nur geändert werden wenn das Gerät ausgeschelt wurde. Die Temperatur wird durch drücken der Funktionswahltaste und durch drehen des Drehknopfs geändert, bis die neue Temperatur blinkt. Zur Bestätigung die Funktionswahltaste drucken.
Einen Kochvorgang Löschen
Falls Sie den Garvorganglöschen möchten, drücken Sie 3 Sekunden die Taste Start/Stopp.
Daraufhin ertönen 3 Signale, und auf der Anzeige erscheint die Uhrzeit.
Ende eines Kochvorgangs
Nach Ende des Garvorgangs oder nach drücken der Start/Stopp-Taste, fängt die Dampfabbaufunktion an.
Am Ende des Vorgangs ertönen 3 Signale, und auf der Anzeige erscheint die Angabe „End".
These Funktion stöhst schrittweise den Dampf aus dem Garraum, so dass weniger Dampf beim öffnen der Tur aus dem Gerät strömt.
Es dauert ungebung 3 Minuten und während dieser Zeit stehen in der Anzeige „VAP“
Achtung: wenn die Tur geöffnet wird, während oder nach dem Garvorgang, kommt keinher Dampf aus dem Gerät.itte auf die Seite gehen oder darüber treten.
Nachdem das Gerät ausgeschelt wurde lauft das Gebläse einige Zeit weiter. Diese Funktion soll die Temperatur des Einbaugeräts reduzieren.
Wen auf der Anzeige „DEP“ entscheid ist das Wasser zurückgepumpt und Sie können den Wassertank entnehmen.
Entnehmen sie den Wassertank und trocknen ihn grundlich ab. Den Geräteinnenraum etwas abkühlen setzen und dann mit einem Tuch trockenwischen. Die Gerätetur solle noch eine Zeit geöffnet bleiben damit das Gerät vollig austrocknet.
Tabellen und Tipps
Anwendung des Zubehörs
Der gelochte Garbehälter wird zum Dämpfen von frischen oder tiefgekehltem Gemüse, Fleisch und Geflügel benutzt.
Hierbei ist es wichtig, dass der ungelochtete Garbehälter in die ersten Leiste von unter in das Gerät eingeschoben wird. Die heruntertropfenden Flüssigkeiten werden so aufgefangen und verschmutzen nicht das Gerät. Der mit Lebensmittel belegte gelochtete Garbehälter wird in die zweite Leiste von unter eingeschoben.
Der ungelochtige Garbehälter wird zum Dämpfen von empfindlichen Lebensmitteln benutzt z.B Kompott, Klöße und Quellgerichte.
Der Rost wird zum Dämpfen von kleineren Garbehältern als Stellfläche benutzt z.B. Dessertschalen und zum Regenerien von Tellergerichten.
Genaue Angaben entnehmen Sie den Tabellen.
Die angegebenen Werte für Gardauer und Temperatur sind Richtwerte. Je nach Art und Beschaffenheit des Gargutes kann die effektiv notwendige Gardauer davon abweichen.
Fisch
| Fisch | Menge | Temperatur °C | Garzeit Min. | Behälter | Leiste v.u. |
| Dorade | 800-1200 g | 80 | 30-40 | gelocht | 2 |
| Forelle | 4 x 250 g | 80 | 20-25 | gelocht | 2 |
| Lachsfilet | 500-1000 g | 80 | 15-25 | gelocht | 2 |
| Lachsforelle | 1000-1200 g | 80 | 25-35 | gelocht | 1/2 |
| Riesengarnelen | 500-1000 g | 80 | 15-20 | gelocht | 2 |
| Grünschalmuscheln | 1000-1500 g | 100 | 25-35 | gelocht | 2 |
| Heilbuttfilet | 500-1000 g | 80 | 20-25 | gelocht | 2 |
| Herzmuscheln | 500-1000 g | 100 | 10-20 | geloch | 2 |
| Hummer, TK | 800-1200 g | 100 | 25-30 | gelocht | 1/2 |
| Kabeljaufilet | 1000-1200 g | 80 | 20-25 | gelocht | 2 |
| Miesmuscheln | 1000-1200 g | 100 | 15-25 | gelocht | 2 |
| Saibling | 4 x 250 g | 80 | 25-30 | gelocht | 2 |
| Schellfisch | 1000-1200 g | 80 | 20-25 | gelocht | 2 |
| Thunfischfilet | 500-1000 g | 80 | 15-20 | gelocht | 2 |
| Zander | 4 x 250 g | 80 | 25-30 | gelocht | 2 |
Fleisch
| Fleisch | Menge | Temperatur °C | Garzeit Min. | Behälter | Leiste v.u. |
| Hähnchenbolten | 4-10 | 100 | 40-45 | gelocht | 2 |
| Hähnchenbrust | 4-6 | 100 | 25-35 | gelocht | 2 |
| Kasseler | 500g -1000g | 100 | 40-50 | gelocht | 2 |
| Putenschnitzel | 4-8 | 100 | 20-25 | gelocht | 2 |
| Schweinefilet, ganz | 4-8 | 100 | 20-30 | gelocht | 2 |
| Würstchen | 80-100 | 10-15 | gelocht | 2 |
Eier
| Eier | Temperatur 0C | Garzeit Min. | Behälter | Leiste v.u. |
| Ei im Glas | 100 | 10-15 | Rost | 2 |
| Eier, hart | 100 | 15 | Rost | 2 |
| Eier, weich | 100 | 10-12 | Rost | 2 |
Beilagen
| Beilagen | Menge | Temperatur °C | Garzeit Min. | Behälter | Leiste v.u. |
| Graupen + Flüssigkeit | 200g + 400ml | 100 | 30-35 | Rost, Glasschale | 2 |
| Grieß + Flüssigkeit | 200g + 300ml | 100 | 10-20 | Rost, Glasschale | 2 |
| Linsen + Flüssigkeit | 200g + 375ml | 100 | 20-50 | Rost, Glasschale | 2 |
| Reis + Flüssigkeit | 200g + 250ml | 100 | 25-40 | Rost, Glasschale | 2 |
Gemüse
| Gemüse / frisch | Temperatur °C | Garzeit Min. | Behälter | Leiste v.u. | |
| Auberginen | in Scheiben | 100 | 15-20 | gelucht | 2 |
| Bohnen | 100 | 35-45 | gelucht | 2 | |
| Broccoli | Röschen mit Stiel | 100 | 25-30 | gelucht | 2 |
| Broccoli | Röschen ohne Stiel | 100 | 15-20 | gelucht | 2 |
| Blumenkohl | Röschen | 100 | 25-30 | gelucht | 2 |
| Blumenkohl | ganzer Kopf | 100 | 40-45 | gelucht | 1 |
| Erbsen | 100 | 30-35 | gelucht | 2 | |
| Fenchel | in Streifen | 100 | 15-20 | gelucht | 2 |
| Fenchel | halbiert | 100 | 20-30 | gelucht | 2 |
| Kartoffeln m. Schale | ganz, sehr Klein | 100 | 20-25 | gelucht | 2 |
| Kartoffeln m. Schale | ganz, sehr dick | 100 | 45-50 | gelucht | 2 |
| Kartoffeln o. Schale | in Stücken | 100 | 20-25 | gelucht | 2 |
| Kohlraben | in Stiftle | 100 | 20-25 | gelucht | 2 |
| Kaiserschoten | 100 | 15-20 | gelucht | 2 | |
| Karotten | in Scheiben | 100 | 25-30 | gelucht | 2 |
| Maiskolben | 100 | 50-60 | gelucht | 2 | |
| Paprikaschoten | in Streifen | 100 | 12-15 | gelucht | 2 |
| Peperoni | 100 | 12-15 | gelucht | 2 | |
| Pilze | in Viertel | 100 | 12-15 | gelucht | 2 |
| Porree | in Scheiben | 100 | 10-12 | gelucht | 2 |
| Rosenkohl | 100 | 25-35 | gelucht | 2 | |
| Sellerie | in Streifen | 100 | 15-20 | gelucht | 2 |
| Spargel | 100 | 20-35 | gelucht | 2 | |
| Spinat | 100 | 12-15 | gelucht | 2 | |
| Stangensellerie | 100 | 25-30 | gelucht | 2 | |
| Zucchiini | in Scheiben | 100 | 12-18 | gelucht | 2 |
Klöse
| Klöße | Temperatur °C | Garzeit Min. | Behälter | Leiste v.u. |
| BuchteIn | 100 | 20-30 | ungelocht | 2 |
| Dampfnudeln | 100 | 15-20 | ungelocht | 2 |
| HefeklösBe | 100 | 15-25 | ungelocht | 2 |
| Semmelknödel | 100 | 20-25 | ungelocht | 2 |
| Servietenkloß | 100 | 25-30 | ungelocht | 2 |
Desserts
| Desserts | Menge | Temperatur °C | Garzeit Min. | Behälter | Leiste v.u. |
| Apfelkompott | 500-1500 g | 100 | 15-25 | ungelocht | 2 |
| Birnenkompott | 500-1500 g | 100 | 25-30 | ungelocht | 2 |
| Crème Brûlée | 80 | 20-25 | Rost-Schälchen | 2 | |
| Crème Caramel | 80 | 25-30 | Rost-Schälchen | 2 | |
| Joghurt | 40 | 4-6 Std.. | Rost-Schälchen | 2 | |
| Pfirsichkompott | 500-1500 g | 100 | 15-20 | ungelocht | 2 |
Obst (Sterilisieren/Einkochen)
| Obst | Menge | Temperatur °C | Garzeit Min. | Behälter | Leiste v.u. |
| Birnen | 4-6 1l-Glaser | 100 | 30-35 | Rost | 1 |
| Kirschen | 4-6 1l-Glaser | 80 | 30-35 | Rost | 1 |
| Pfirsiche | 4-6 1l-Glaser | 90 | 30-35 | Rost | 1 |
| Pflaumen | 4-6 1l-Glaser | 90 | 30-35 | Rost | 1 |
Regenerieren
| Aufwärmen | Menge | Temperatur °C | Garzeit Min. | Behälter | Leiste v.u. |
| Tellergerichte | 1-2 | 100 | 12-15 | Rost | 2 |
| Tellergerichte | 3-4 | 100 | 15-20 | Rost | 2 |
| Fertiggerichte | 100 | 15-20 | Rost | 2 |
Blanchieren
| Gemüse | Menge | Temperatur °C | Garzeit Min. | Behälter | Leiste v.u. |
| z.B. Bohnen, Porree | 100 | 10-12 | gelocht. | 2 | |
| Grünkohl | 1000-2000 g | 100 | 12-16 | gelocht | 2 |
| Wirsingblätter | 10-20 | 100 | 12-15 | gelocht | 2 |
| Weißkohl, ganz | 2000-2500 g | 100 | 30-45 | gelocht | 1 |
| Tomaten, abziehen | 80 | 12 | Rost | 2 |
Tabellen und Tipps
Auftauen
| Gemüse/ Beilagen | Temperatur °C | Garzeit Min. | Behälter | Leiste v.u. | |
| Broccoli | Röschen mit Stiel | 100 | 15-20 | gelocht | 2 |
| Balkangemüse | 100 | 15-20 | gelocht | 2 | |
| Blattspinat | Portionsstücke | 100 | 10-15 | ungelocht | 2 |
| Blumenkohl | Röschen | 100 | 15-20 | gelocht | 2 |
| Erbsen | 100 | 15-25 | gelocht | 2 | |
| Grünkohl | dicker Block | 100 | 25-35 | ungelocht | 2 |
| Karotten | in Scheiben | 100 | 15-20 | gelocht | 2 |
| Rosenkohl | 100 | 20-25 | gelocht | 2 | |
| Spargel | 100 | 25-30 | gelocht | 2 | |
| Fertiggerichte | 100 | nach Bedarf | Rost | 2 | |
| Brot | 100 | 10-25 | Rost | 2 | |
| Reis | 100 | 15-25 | ungelocht | 2 | |
| Linsen | 100 | 15-20 | ungelocht | 2 | |
| Nudeln | 100 | 15-20 | ungelocht | 2 | |
Garen auf 2 Ebenen
Einige Hinweise:
Beim Garen auf zwei Ebenen gehört das Zubehör immer auf die 2. oder 3. und auf die 1. Einschubleiste von unten.
Unterschiedliche Garzeiten werden so reguliert:
Lebensmittel die eine langere Garzeit benötigen gehoren in den oberen Bereich des Dämpfers. Lebensmittel mit kürzeren Garzeiten werden dann in die 1. Leiste von unter eingeschoben.
Ein Beispiel: Gemüse, Kartoffeln und Fisch.
Gemüse und Kartoffeln in beliebigen Gefäßen auf den Rost in die 2. oder 3. Leiste von unter in das Gerät schieren.
Den Fisch auf die 1. Leiste von unter einschieben.
Wird für den Fisch der gelochte Garbehälter benutzt, muss der ungelochte Garbehälter auf den Boden des Gerätes gestellt werden um den herunter tropfenden Fischsud aufzufangen. Das Gerät bleibt so sauber.
Garzeit: Gemüse und Kartoffeln 25-35 Min.
Garzeit: Fisch - je nach Sorte - 15-25 Min.
Eingestellt wird die langste Garzeit, durch die entsprechenden Ebenen wird das Essen zur gleichen Zeit fertig, ohne dass etwas übergart ist.
DE Reinigung und Wartung des Geräts
Reinigung des Innenraums
Keinesfalls scheuernde Reinigungsmittel wie Allzweck-Scheuerschwämme, Metallwatte usw. benutzen. Dadurch wird die Oberfläche beschädigt.
Reinigen Sie das Garraum im warmen Zustand mit einem feuchteten Lappen Anschließend trocken wischen
Zur einfacheren Reinigung, können die Seitengitter herausgenommen werden. (siehe folgende Kapitel).
Seitengitter aushängen
Die Rändelmutter 1 vorne an den Auflagegittern im Gegenuhrzeigersinn losschrauben.

Die Rändelmutter 2 hinten an den Auflagegittern im Gegenuhrzeigersinn leicht losschrauben. Die Rändelmutter nicht herausnehmer
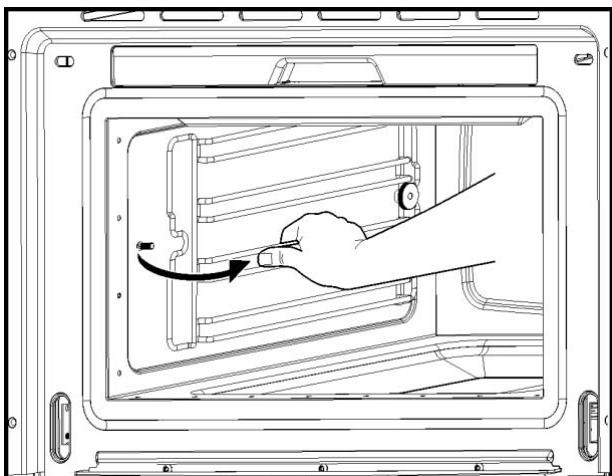
Auflagegitter etwas nach vorneziehen und herausnehmer.
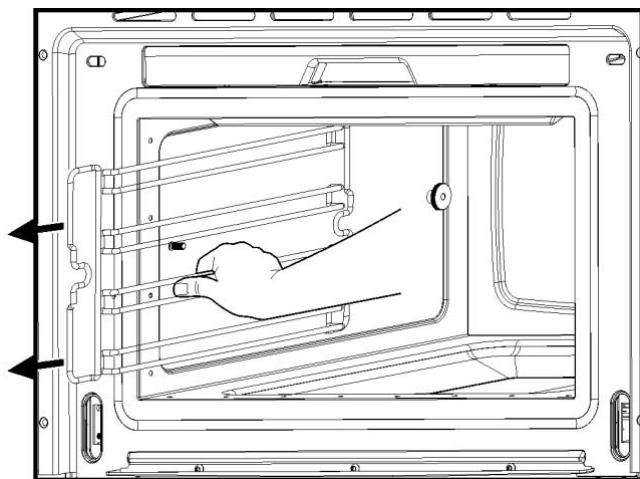
Zum Einbau Auflagegitter in die Rändelmutter 2 einschieben.
Die Rändelmuttern 1 im Uhrzeigersinn bis zum Anschlag eindreten, die Rändelmutter 2 festschrauben.
Reinigung und Wartung des Geräts
Die Gerätetur herausnahmen
Öffnen Sie die Tür so welt wie möglich.

Fügen Sie zwei Bolzen in die Löscher der Turangeln ein.
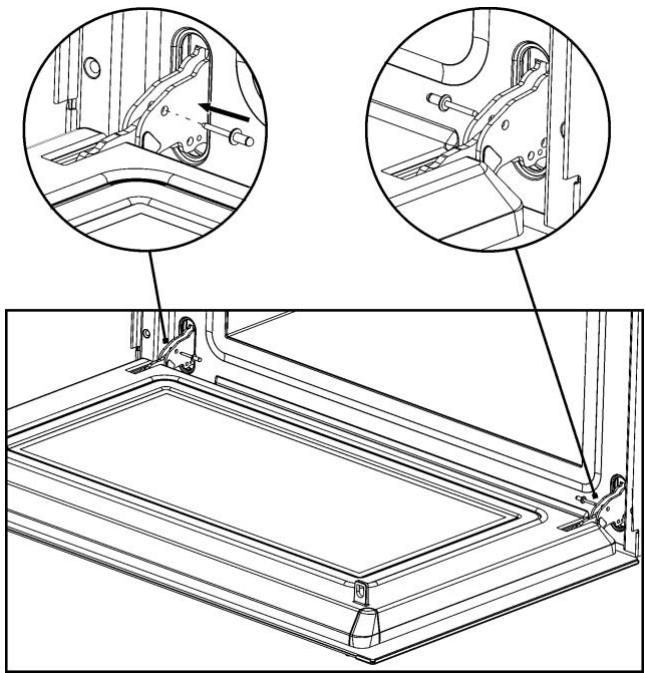
Schließen Sie die Türg gerade genug um sie hochzuheiten.

Um es wieder zusammen zubauen, führen Sie die Scharniere in die Löscher ein.
Öffnen Sie die Geräte tür so welt wie möglich undziehen Sie die Bolzen hereus.
DE Reinigung und Wartung des Geräts
Entkalken
Bei der Entstehung von Dampf lagert sich unabhängig von der Härte des Wassers (d. h. dem Kalkgehalt des Wassers) im Inneren des Dampferzeugers Kalk an.
Wie oft das Gerät entkalkt werden muss hangt von der Wasserhärte und der Häufigkeit des Gebrauchs ab. Bei 4x30 Minuten Dampfgaren proWoche muss das Gerät (in Abhängigkeit von der Wasserhärte) in folgenden Intervallen entkalkt werden:
| Wasserhärte | Entkalkung alle |
| sehr weich | 18 Monate |
| mittel | 9 Monate |
| sehr hart | 6 Monate |
Das Gerät erkennt automatisch, wenn die Entkalkung notwendig ist, in diesen Fall erscheint auf dem Display folgende Anzeige:

Wird die Entkalkung nicht durchgeführt, werden eine Garvorgänge nach Erscheinen des oberstehenden Symbols blockiert.
Wenn die Entkalkung erneut nicht durchgeführt wird, wird der Gerätebetrieb gespeit und auf dem Display erscheint folgende Anzeige:
CAL

WICHTIGER HINWEIS: Die Nichtentkalkung des Geräts kann die Funktionstüchtigkeit beeinträchtigen oder Schäden am Gerät verursachen.
Geeignete Entkalker
Verwenden Sie zur Entkalkung DURGOL®.
Dieser Entkalker ist ein professionelles und schonendes Mittel zur Entkalkung Ihres Geräts und kann über den Kundendienst bezogen werden.
Achtung! Verwenden Sie keinesfalls Essig oder essighaltige Produkte, da diese das Innere des Geräts beschädigen können.
Herkömmliche Entkalker sind ungeeignet, da sie möglicherweise Schäummittel enthalten.
Reinigung und Wartung des Geräts
Entkalkungsvorgang

Achtung! Aus Sicherheitsgründen kann der Entkalkungsvorgang, der rund 45 Minuten dauert, nicht unterbrochen werden.
Die Gerätür kann während des Entkalkungsvorgangs offen oder geschlossen bleiben. Vor Beginn des Entkalkungsvorgangs muss sich das Gerät im Ruhezustand befinden.
Gehen Sie folgendermaßen vor, um einen Entkalkungsvorgang durchzufahren:
- Drücken Sie die Ein/Aus-Taste, um das Gerät in Betrieb zu setzen.
- Halten Sie die Tasten Links und Rechts fünf Sekunden lang gedrückt. Auf dem Display erscheint CAL und es erklingt ein regelmäßiges akustisches Signal. Drücken Sie die Stop-Taste, wenn Sie den Entkalkungsvorgang beenden möchten.
- Betätigen Sie die Start-Taste.
- Sobald auf dem Display 0.5L angezeigt wird, erhmen Sie den Wassertank ab.
- Geben Sie 0,5 Liter einer geeigneten Entkalkungslösung in den Wassertank, und setzen Sie diesen wieder ein.
-
Betätigkeiten Sie die Start-Taste. Der Entkalkungsvorgang mit einer Dauer von 30 Minuten beginnnt.
-
Sobald im Display die Anzeige 1.0L blinkt und der Dampfgarer ein akustisches Signal aussendet, behmen Sie den Wassertank ab und entleeren diesen.
- Füllen Sie 1,0 Liter kaltes Wasser in den Tank, und setzen Sie diesen wieder ein.
- Betätigen Sie die Start-Taste. Der erstee Spülvorgang beginnt.
- Sobald im Display erneut die Anzeige 1.0L blinkt und der Dampfgarer wiederholt ein akustisches Signal aussenet,ephmen Sied den Wassertank ab und entleeren diesen.
- Füllen Sie 1,0 Liter kaltes Wasser in den Tank, und setzen Sie diesen wieder ein.
- Betätigen Sie die Start-Taste. Der zweite Spülvorgang beginnt.
- Nach Beendigung der Spülvorgänge wird im Display das Wort End angezeigt.
- Nehmen Sie den Wassertank ab, und entleeren und trocknen Sie diesen.
DE Reinigung und Wartung des Geräts
Achtung! Die Reinigung muss an dem von der Stromversorgung getrennten Gerät durchgeführt werden. Ziehen Sie den Stecker aus der Steckdose oder schalten Sie den Stromversorgungskreis des Gerätes ab.
Benutzen Sie keine aggressiven Reinigungsoder Scheuermittel, keine kratzenden Scheuertücher noch spitze Gegenstände, Denn es können Flecken entstehen.
Verwenden Sie keine Hochdruck- oder Dampfstrahlreinigungsgeräte.
Stirnsite
Es reicht, das Gerät mit einem feuchten Lappen zu reinigen. Geben Sie, falls er sehr verschmutzt sein sollte, eine Tropfen Geschirrspulmittel ins Waschwasser. Wischen Sie danach das Gerät mit einem trockenen Lappen ab.
Benutzen Sie bei Geräten mit einer Aluminiumvorderseite ein mildes Glasreinigungsmittel und einen weichen, fusselfreien Lappen. Wischen Sie diese in horizontaler Richtung ab, ohne Druck auf die Oberfläche auszuüben.
Entfernen Sie Kalk-, Fett-, Stärke- und Eisweißflecken umgehend. Unter diesen Flecken kann es zur Korrosion kommt.
Vermeiden Sie das Eindringen von Wasser ins Geräteinnere.
Garraum
Reinigen Sie nach jeder Nutzung die Innewände mit einem feuchten Lappen. Lassen Sie die Türg geöffnet, so dass der Garraum abkühlen und austrocknen kann.
Nutzen Sie ein nicht aggressives Reinigungsmittel, um hartnäckigere Verunreinigungen zu entfernen. Verwenden Sie weder Backofensprays noch sonstige aggressive bzw. scheuernde Reinigungsmittel.
Halten Sie die Tur und die Vorderseite des Gerätes stets sehr sauber, um dessen einwandfrei Funktionswise gewährleisten.
Verhindern Sie das Eindringen von Wasser in die Belüftungslöcher
Die Glasabdeckung der Lampe befindet sich an der Decke des Gerätes und kann zur Reinigung leicht abgenommen werden. Schrauben Sie diese dazu ab und reinigen Sie diese mit Wasser und Geschirrspulmittel.
Zubehör
Reinigen Sie das Zubehör nach jeder Benutzung. Falls es sehr verschmutzt ist, weichen Sie es zuerst ein, und benutzen Sie dann eine Bürste und einen Schwamm. Das Zubehör kann in einer Geschirrspulmaschine gereinigt werden.
Was ist im Falle einer Funktionstörung zu tun?
ACHTUNG! Jegliche Art von Reparaturarf nur von spezialisierten Fachleuten ausgeführrt werden. Jeder Eingriff, der durch nicht vom Hersteller autorisierte Personen vorgenommen wird, ist gefährlich.
Folgende Probleme können behoben werden, ohne den Kundendienst zu benachrichtigen:
Die Anzeige ist aus! Überprüfen, ob:
- die Stundenanzeige ausgeschaltet wurde (siehe Abschnitt zu den Grundeinstellungen).
- Es geschiehtchts, wenn die Tastengedrückt werden! Überprüfen, ob:
- die Sicherheitsverriegelung aktiviert ist (siehe Abschnitt zu den Grundeinstellungen).
Das Gerät Funktioniert nicht! Überprüfen, ob:
- der Stecker richtig an die Steckdose angeschlossen ist,
- der Stromversorgungskreis des Gerätes eingeschaltet ist.
- Wahlend des Betriebs sind Gerausche zu horen!
- Es handelt sich um Betriebsgeräusahe die während der gesamten Dämpfzeit auftreten konnen z.B. durch das Wasserpumpen beim Dampferzeuger.
- These Gerausche sind normal, es gibt keine Probleme.
Die Nahrungsmittel werden nicht frei oder werden sehr langsam frei! Überprüfen, ob:
- Sie die richtige Temperatur und Betriebsdauer gewählt haben,
- Sie eine größere oder kältere Nahrungsmittelmenge als gewöhnlich in das Innere des Gerätes gegeben haben.
- Falls auf der Anzeige “Err_” erscheint,itte den Kundendienst kontaktieren.
- Nach Beendigung eines Kochvorgangs ist ein Gerausch zu horen! Das ist kein Problem.
- Der Kuhlventilator lauft eine gewisse Zeit lang nach. Wenn die Temperatur genugend zurückgegangen ist, schaltet sich der Ventilator ab.
- Das Gerät Funktioniert, die Innenbeleuchtung besteht aber nicht an!
- Falls alle Funktionen richtig ablaufen, ist wahrscheinlich die Lampe durchgebrannt. Sie können das Gerät weiterhin benutzen.
Lampenwechsel
Gehen Sie folgendermaßen vor, um die Lampe auszutauschen:
- Trennen Sie das Gerät von der Stromversorgung. Ziehen Sie den Stecker aus der Steckdose bzw. unterbrechen Sie den Stromversorgungskreis des Gerätes.
- Schrauben Sie den Glasdeckel von der Lampe (1) ab.
- Nehmen Sie die Halogenlampe Heraus (2). Achtung! Die Lampe kann sehr heißt sein.
- Setzen Sie eine neue E14 230-240V / 15W Lampe. Befolgen Sie die Anweisungen des Lampenherstellers.
- Schrauben Sie den Glasdeckel der Lampe ein (1).
- Schließen Sie das Gerät wieder an die Stromversorgung an.
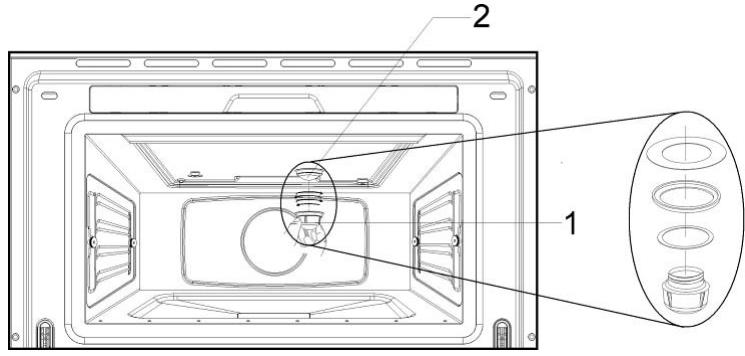
Funktionsbeschreibung
| Symbol | Funktion | Lebensmittel |
| Dampfgarer | Zubereiten von Gemüse, Reis, Getreide und Fleisch. Entsaffen von Beerenfrüchten. Gleichzeitiges Auftauen und Zubereiten von Gemüse. | |
| Aufwärmen & Sterilisieren | Aufwärmen von Teller- und Fertiggerichten. Sterilisieren/Einkochen von Obst. | |
| Gemüsezubereitung | Zubereiten verschiedener Gemüsearten. | |
| Fischzubereitung | Zubereiten verschiedener Fischarten. | |
| Fleischzubereitung | Zubereiten verschiedener Fleischarten. | |
| Beilagenzubereitung | Zubereiten verschiedener Beilagen. |
Anzeigen
| Anzeige | Beschreibung |
| Wassertank | |
| U | Blinkend – Leerer Wassertank.itte auffüllen. |
| R | Fehlender Wassertank. |
| DEP | Wassertank herausnehmen, leeren und wieder einsetzen. |
| Dampfreduzierung | |
| VAP | Dampfreduziervorgang lαuft. |
| PUMP | Der Wassertank wird mit weißem Wasser befüllt. |
| Entkalken | |
| CAL | Gerätmussentkalkt werden. |
| Blinkend – Entkalkungsvorgang beginnt. | |
| 0.5L | Geben Sie 0,5 Liter Entkalker in den Wassertank. |
| 1.0L | Füllen Sie für den Spülvorgang 1,0 Liter kaltes Wasser in den Wassertank. |
| Systemmeldungen | |
| HOT | Die Platinentemperatur ist zu hoch. |
| Err_ | Bitte rufen Sie den Kundendienst an! |
Spezifikation
Wechselspannung 220-240 V/50 Hz
Geforderte Leistung 1500 W
- Außenabmessungen (BxHxT) 595 × 455 × 472 mm
Abmessungen des Garraumes (BxHxT) 420 x 210 x 390 mm
Fassungsvermögen des Ofens 351
Gewicht 32 kg
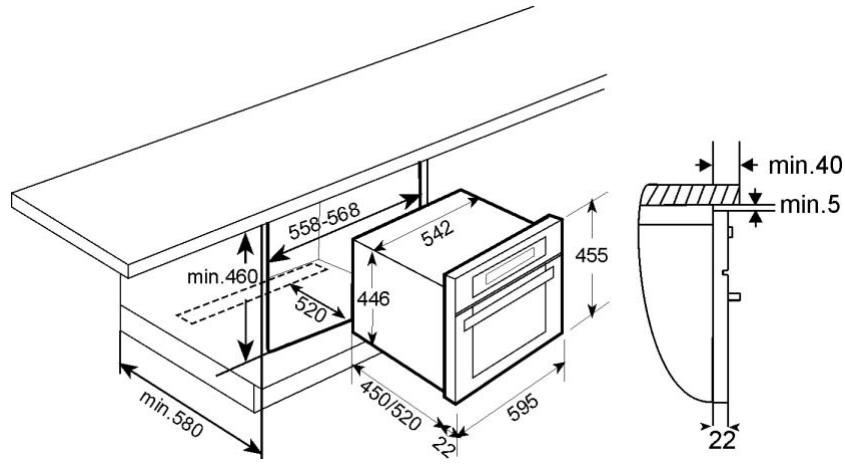

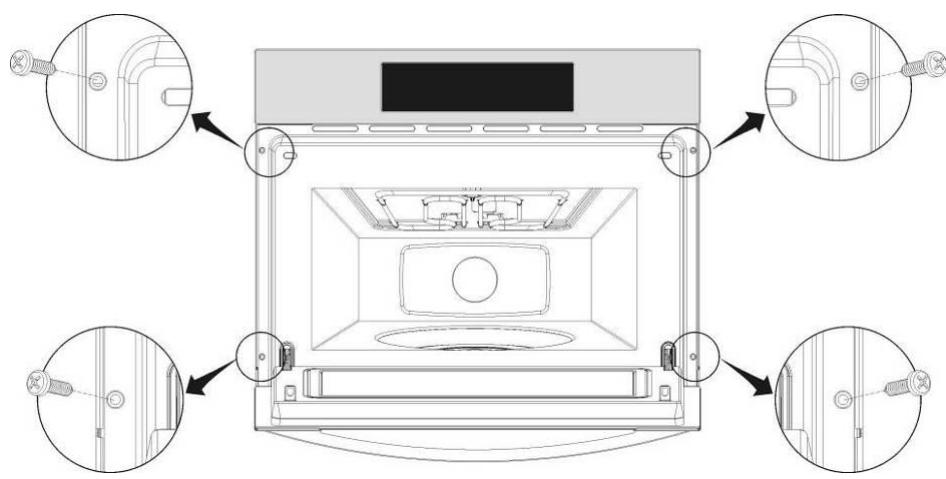
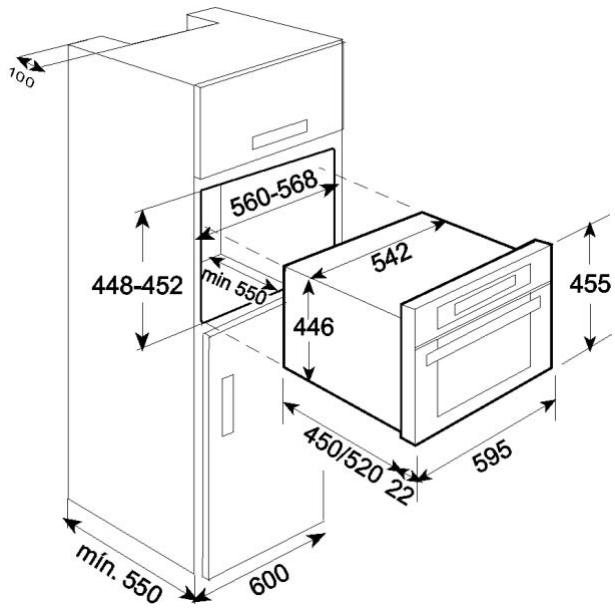
EN
- Push oven completely into the cabinet and centre it.
- Open door and fasten the appliance to the cabinet using the four screws provided. Insert the screws through the front holes.
DE
- Den Dampfgarer in die Nische einschieben und entsprechend anpassen.
- Die Tür der öffnen und das Gerät mit den vier mitgelieferten Schrauben am Kichenmöbel wie im Bild dargestellt befestigen.
| COUNTRY | COMPANY | CC | TELEPHONE | E-MAIL / FAX |
| AUSTRALIA | TEKA AUSTRALIA Pty. Ltd. | 61 | 3 9550 6100 | sales@tekaaustralia.com.au |
| AUSTRIA | KÜPPERSBUSCH GesmbH | 43 | 1 866 800 | info@kueppersbusch.at |
| BELGIUM | B.V.B.A. KÜPPERSBUSCH S.P.R.L. | 32 | 2 466 8740 | info@kuppersbusch.be |
| BulgARY | TEKA BULGARIA EOOD. | 359 | 2 9768 330 | 2 9768 332 |
| CANADA | TEKA CANADA LTD. | 1 | 866-282-5403 | info@tekacadana.com |
| CHILE | TEKA CHILE, S.A. | 56 | 2 4386 000 | info@teka.cl |
| P. R. CHINA | TEKA INTERNATIONAL TRADING (Shanghai) | 86 | 21 511 688 41 | info@teka.cn |
| CZECH REPUBLIC | TEKA CZ S.R.O. | 420 | 2 84 691940 | info@teka-cz.cz |
| ECUADOR | TEKA ECUADOR, S.A. | 593 | 4 2251174 | ventas@teka.ec |
| FRANCE | TEKA FRANCE S.A.S. | 33 | 1 343 01597 | 1 343 01598 |
| GERMANY | TEKA KÜCHENTECHNIK GmbH | 49 | 27718141-0 | info@teka-kuechentechnik.de |
| GREECE | TEKA HELLAS A.E. | 30 | 210 9760283 | info@tekahellas.gr |
| HUNGARY | TEKA HUNGARY KFT | 36 | 1 3542110 | teka@teka.hu |
| INDONESIA | PT TEKA BUANA | 62 | 21 390 5274 | teka@tekabuana.com |
| ITALY | TEKA ITALIA S.P.A. | 39 | 0775 898271 | info@tekaitalia.it |
| KOREA (SOUTH REP.) | TEKA KOREA CO. LTD. | 82 | 2 599 4444 | 222 345 668 |
| MALAYSIA | TEKA KÜCHENTECHNIK (MALAYSIA) SDN. | 60 | 3 7620 1600 | customer_svc@teka.com.my |
| MIDDLE EAST | TEKA KÜCHENTECHNIK MIDDLE EAST FZE | 971 | 4 887 2912 | teka@emirates.net.ae |
| MEXICO | TEKA MEXICANA S.A. de C.V. KÜPPERSBUSCH-TEKA | 52 | 555 133 0493 | ventas@tekamexicana.com.mx |
| PAKISTAN | PAKISTAN Pvt. Ltd. | 92 | 42 576 1656 | 42 576 1657 |
| POLAND | TEKA POLSKA SP. ZO.O. | 48 | 22 7383270 | teka@teka.com.pl |
| PORTUGAL | TEKA PORTUGAL, S.A. | 351 | 234 329 510 | sacliente@teka.pt |
| RUSSIA | TEKA RUS LLC | 7 | 495 101 31 08 | info@tekarus.ru |
| SINGAPORE | TEKA SINGAPORE PTE. LTD. | 65 | 67342415 | tekasin@pacific.net.sg |
| SPAIN | TEKA INDUSTRIAL, S.A. | 34 | 942350505 | mail@teka.com |
| THAILAND | TEKA (THAILAND) CO. LTD. | 66 | 2 652 2999 | 2 652 2740 1 |
| TURKEY | TEKA TEKNIK MUTFAK | 90 | 212 288 3134 | teka@teka.com.tr |
| UKRAINE | TEKA UA | 380 | 44 496 0680 | info@teka.ua |
| UNITED ARAB EMIRATES | TEKA KÜCHENTECHNIK U.A.E. LLC | 971 | 4 283 3047 | uaeteka@emirates.net.ae |
| UNITED KINGDOM | TEKA PRODUCTS LTD. | 44 | 1235 861916 | info@teka.co.uk |
| USA | TEKA USA, INC. | 1 | 813 2888820 | info@tekausa.com |
| VENEZUELA | TEKA ANDINA, S.A. | 58 | 2 1229 12821 | teka@teka.com.ve |

TEKA Industrial, S. A.
Cajo, 17
39011 SANTANDER (Spain)
Tel: 34 - 942 - 35 50 50
Fax: 34-942-347694
mail@teka.com

www.teka.com
TEKA Kuchentechnik GmbH
Sechsheldener Str. 122
35708 Haiger (Germany)
Tel: 49 - 2771 - 8141 - 0
Fax: 49 – 2771 – 8141 – 10
HKX 960 S
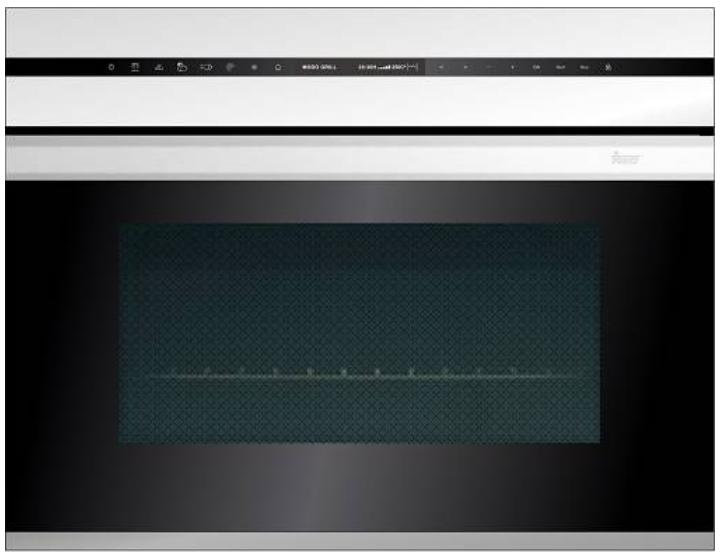

Le rogamos que lea atentamente las instrucciones contentsas en este libro, que le ayudaran a Obtener buenos resultados al utiliser su hora de coccción al vapor.
CONSERVE LA DOCUMENTACION DE ESTE APARATO PARA FUTURAS CONSULTAS.
Tenga siempre a mano las instrucciones de uso. Si entrega el aparato a terceros, entregaes también las respectivas instrucciones de uso.
Indicaciones sobre proteccion medioambiental
Eliminación del embalaje

El embalaje está marcado con un Punto Verde.
Utilice contenedores apropriados para eliminar los materiales de embalaje, tales como el cartón, el poliestireno expandido y las láminas de plástico. De este modo se garantiza el reciclaje de los materiales del embalaje.
Eliminación de aparatos abandonados
La Directiva europea 2002/96/CE sobre residuos de aparatos electricos y electrónicos estipula que los electrodométricos no se pueda eliminar en el flujo de desechos municipales solidos.
Los aparatos que ya no se utilizen deben recogerse de formaSeparateda para optimizar la tasa de recuperacion y reciclaje de los materiales que los componenten, y así evitar daños potecuales para la salute de las personas y para el medioambiente. El significo, formado por un contender de basura tachado con una cruz, debe incluirse en todos los productos como recordatorio de que es obligatorio recogerlos de forma Separada.
Los consumidos deponserse en contacto con las autoridades locales o con los centres deventa para Obtener informacion sobre el lugar indicado para la recogida de electrodomesticos.
Vuelva inutilizable su aparato antes de eliminarlo.
Extraiga el cable de red, córtelo y eliminarlo.
Instruetiones de instalacion 3
Antes de la instalacion 3
Después de la instalación 3
Indicaciones de seguridad 4
Descripción del aparato 6
Ajustes Basics 7
Ajustes iniciales 7
Configurar el reloj 7
Configuraciones de la dureza del agua 7
Ocultar / Exhibiter el reloj 8
Bloqueo de segundad 8
Temporalizador 9
Funciones básicas 10
Vapor 10
Calendar y Esterilizar 10
Funciones especialies 11
Cocinar vegetales 11
Cocinar pescado 12
Cocinar carne 13
Guarniciones 14
Carga de agua 15
Llenado del deposito de agua 15
Relleno de agua 15
Vaciado del deposito de agua 15
Durante el funciona. 16
Interruption de un proceso de cocción 16
Alteración de parámetros 16
Cancelar un ciclo de coccción 16
Fin de un ciclo de coccción 16
Tablas y consejos 17
Utilización de los accesos 17
Mantenimiento 22
Limpieza de la casa interior 22
Desenganche de las parrillas laterales 22
Extracción de la puerta del aparato 23
Eliminación del sarro 24
SolutiOnes de elimination de sarro adecuadas 24
Procedimiento de eliminacion del sarro 25
Limpieza y mantenimiento del aparato 26
Partefrontal 26
Cama de cocción 26
Accesorios 26
Qué hacer en caso una avería de funciona? 27
Cambio de Iampara 27
Characteristicasétécnicas 28
Descripción de sistemas 28
Pantallas 28
Especifica. 28
Montaje 59
Antes de la instalación
Compruebe que la tension de alimentacion indica en la placac de caracteristicas es la sama que la tension de red de su instalacion.
Abra la puerta y saque todos los accesorios y el material del embalaje.
Atencion: La parte frontal del aparato pueda tener una lámina de proteccion. Quite esta lámina con cuidado antes de utiliser el aparato por primera vez, comenzando por su parte inferior.
Cerciórese de que el aparato no está dañado. Compruebe que la puerta se cierra correctamente y que la parte interior de la puerta y la parte frontal de la-camera interior no está dañadas. En caso de daños, informe al Servicio de Atencion al Cliente. Encontrará los númeroos de téléphone en la contraportada de este libro.
NO UTILICE EL APARATO si el cable de red o el enchufe está danados, si el aparato no funciona correctamente, o si ha sufrido daños o se ha caído. En cualesera de这些东西 caseos,pongase en contacto con el Servicio de Atencion al Cliente. Los nombres estan en la contraportada de este libro.
Cologne el aparato sobre una superficie lisa y estable. No está permitido montar el aparato en las proximas de radiadores, radios o televisores.
Durante la instalación, asegúrese de que el cable de red no entre en contacto con humedad, objetos puntiagudos o con la parte trasera del aparato, ya que las altas temperatasiblesonianen dañar el cable.
Atencion: Una vez colocado el aparato, el enchufe debe estar accesible.
Después de la instalación
El aparato está equipado con un cable de red y un enchufe para corriente monofásica de 230-240V ~ 50Hz.
En caso de una conexión permanente, el aparato deben ser instalado por un先进技术rial. En este caso, la conexión deben realizarse en un circuito electrico con un disyuntor para todos los polos, con una distancia minima de 3 mm entre los contactos.
ATENCION: EL APARATO DEBE ESTAR OBLIGATORIAMENTE CONNECTADO A TIERRA.
El fabricante y los revendedores declinan toda responsabilidad por posibles daños causados a personas, animales o cosas en caso de que se demuestre que no se han seguido las presentes instrucciones de instalación.
El aparato sólo funciona cuando la puerta está correctamente cerrada.
Antes de utiliser por primera vez, limpie el interior del aparato y los accesorios de acuerdo con lasindicaciones sobre limpieza recogidas en el apartado "Limpieza y mantenimiento del aparato".
Durante la instalación deben seguirse las instrucciones suministradas por separado.

- Atencion: No deje el aparato en funcionaimiento sin supervisión.
- Atencion: Si detecta humano o fuego, mantenga la puerta cerrada para sofocar las llamas. Desconecte el aparato y extraiga el enchufe de la toma de corriente o corte el suministro de corriente del aparato.
- Las grasas y los aceites calentados excesivamente peuvent inflamarse con calidad. Por tanto, no caliente aceite o grayscale en la CAMERA de cocción. Nunca intente extinguir grasas o aceites ardiendo con agua (peligro de explosión). Sofoque las llamas con un paño humedo y mantenga todas las puertas y ventanas cerradas.
- Atencion: No utilise alcohol de alta gradacion para cocinar con este aparato. Puede provocar un sobrecalentamento de los alimentos, ¿peligro de explosión!
-
Atencion: Las personas que no se enquirytre enplena posesión de sus capacidades ficas, sensoriales o mentales (niños incluidos) no pueda usar este aparato. Los usuario que no tengan suficiente experiencia o conocimiento del aparato, o que no hayan sido instruidos en la realizacion del mesmo, deben estar bajo la supervision de una persona que vele por su seguridad. Los niños deben estar bajo supervision para garantizar que no juguen con el aparato.
-
Los niños deben estar bajo supervisión para garantizar que no juguen con el aparato. Utilice el bloqueo de seguridad para niños.
- El aparato pueda calentarse mucho durante su uso. Tenga cuidado y evite cualquier tipo de contacto con los elementos calentadores del interior del aparato.
PELIGRO DE QUEMADURA! - Precaución: Las piezas accesibles能把 calendarse mucho durante el uso. Mantenga alejados a los niños del aparato.
- Atencion: AlAbrir la puerta durante o despues del procesode coccion,puede salir vapor y gotas de agua calientes del aparato.Pongase a un lado o échese hacerastras.
- Precaución: Nunca aplisione el cable de red de otro dispositalo electrico con la puerta caliente del aparato. El aislamento del cable pueda fundirse. Peligro de cortocircuito!
Este aparato está exclusivamente disnado para el uso domestico.
Este aparato es adequado para la preparacion de alimentos en un entorno domestico. No se asume ninguna responsabilidad por aquellos daños que se produzcan a causa del uso inapropiado o no autorizzato del aparato.
Si sigue estas indicaciones, evitará provocar daños al aparato ydietasituacionespeligrosas:
- No cubra u obstruya los orificios y las ranuras de ventilación.
- No guarde dentro del aparato objetos que pueda representar un peligro en caso de que aparato se active de forma no intencionada.
- No utiliser el aparato como lugar de almacenimiento de alimentos.
- No vierta bebidas alcohólicas de alta graduación (como brandy, whisky, licores, etc.) sobre los alimentos calientes. Peligro de explosión.
- Los accesorios, como la parrilla o las bandejas, se calientan mucho en la CAMERA de coccción. Utilice manosplas para hora.
- Para evaporar quemaduras,pongase sempre guantes de cocina para Manipular platos y recipientes que seCNTren en el interior del aparato.
- No se apuye sobre la puerta abierta del aparato. Este puede provocar daños, especially en la zona de las bisagras. La puerta soporta un peso máximo de 8 kg.
- Las parrillas tienen una capacité deargas maxima de 8 kg. A fin de evaporar daños, no supere esta capacité de energia.
Limpieza:
- El aparato permanece caliente durante un tiempo cuando se desconecta afterwards de su UTILIZATION. Deje que se enfríe durante un tiempo suficientemente antes de comendar a limparlo.
- No utilise products de limpieza corrosivos, abrasivos o raspadores de metal aflados para la limpieza del cristal de la puerta, ya que pueda rayar la superficie y estropear asi el cristal.
- Las superficies de contacto de la puerta (lado frontal de la CAMERA de cocccion y lado interior de la puerta) debenmantenerse muy limpias para garantizar un funcionaamento perfecto.
- Preste atencion a lasindicaciones relativas a la limpieza del aparto "Limpieza y mantenimiento del aparato".
En caso de reparacion:
- Si el cable de red的结果dañadodebárser sustituido porel fabricante,por unrepresentante autorizzato o por un先进技术ocapacitado para realizar estaareaa fin deevitar situacionespeligrosas.Además,se necesita una herramienta especial.
- Las reparaciones y los trabajo de mantenimiento, especially en piezas conectadas a la corriente, solo puede ser realizados por los先进技术 autorizados por el fabricante.
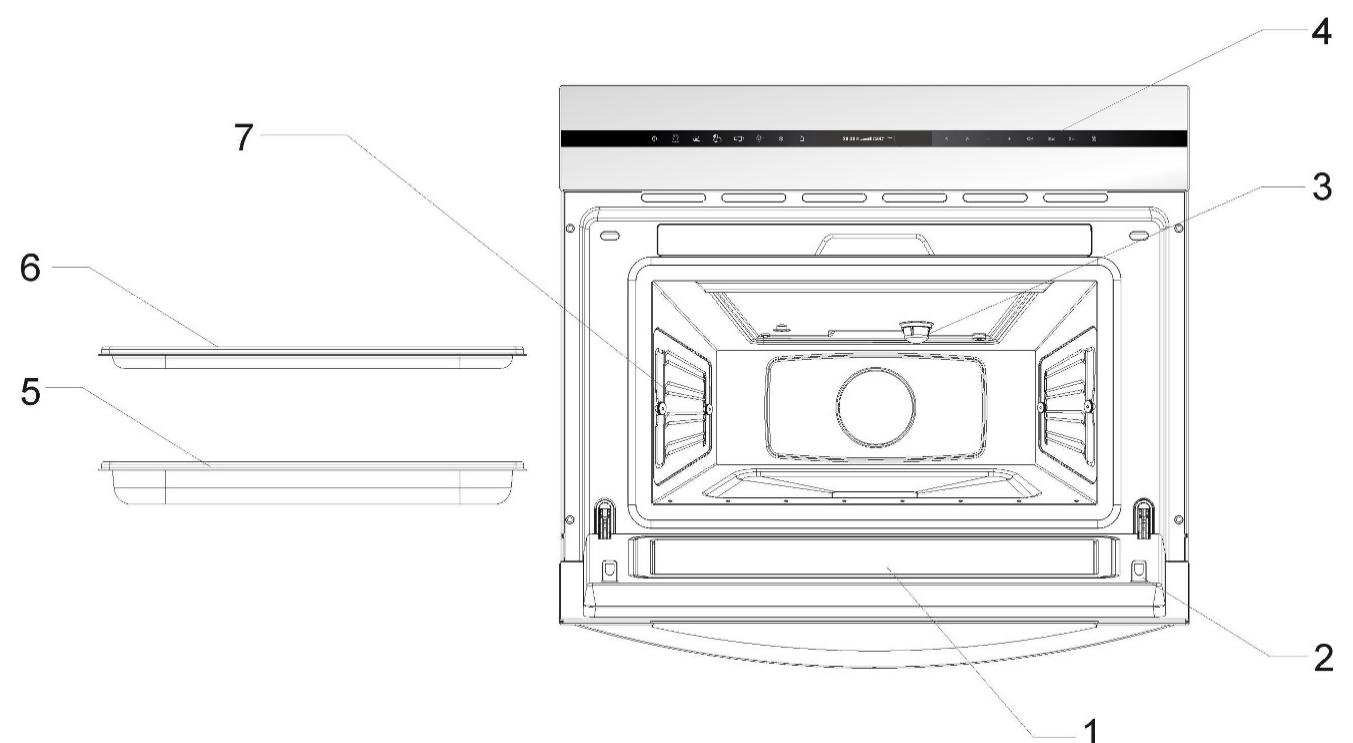
- – Cristal de la puerta
-
- Bloqueo de seguridad
-
- Lámpara
-
– Pantalla de mando
-
- Bandeja no perforada
-
- Bandeja perforada
-
- Parrilla lateral
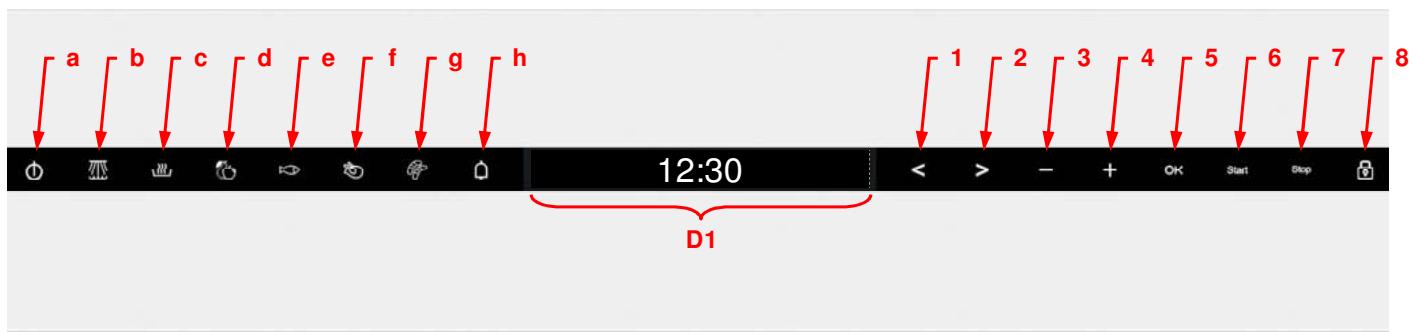
a - Tecla ON/OFF
b - Tecla de funciona de vapor
c - Tecla de funciona de regeneración y esterilización
d - Tecla de funciona de vegetales
e - Tecla de referencia de pescado
f - Tecla de funciona de carne
g - Tecla de funciona de guarniciones
h – Tecla de temporizador de cuenta asociés
1 - Tecla "Izquierda"
2 - Tecla "Derecha"
3 - Tecla “-”
4 - Tecla “+”
5 - Tecla "OK"
6 - Tecla "Inicio"
7 - Tecla "Parar"
8 - Tecla "Bloqueo de seguridad"
D1 - Display
Ajustes Basics
Ajustes iniciales
Tras conectar el aparato a la red o después de un corte de corriente, el reloj parpadeará,indicando que la hora no es correcta.
El aparato no pueda ponerse en funciona hasta que no se haya ajustado la hora y la dureza del agua. Paraaabustar la hora y la dureza del agua,proceda como se indica a continuacion.
Configurar el reloj
Después de conectar el hora del microondas por primera vez o.afterá de un fallo electrico, el display del reloj parpadeará, para indicar que las horas no están correctas. Para programar el reloj, siga las instrucciones a continuación:

- Pulse la tecla "On/Off" para conectar elorno.
-
Mantenga pulsadas las teclas “+” y “-” simultaneamente. Los númeroos de las horas empezarán a parpadear (los pasos 1 y 2 no son necessarios si el hora está conectado por primera vez o después de un fallo electrico).
-
Pulse las teclas "+" y "- para configurar la hora.
- Pulse la tecla OK para confirmar la hora. Los Minutes empezarán a parpadear.
- Pulse las teclas "+" y "- para configurar los Minutes.
- Pulse la tecla OK para confirmar los Minutes.
Configuraciones de la dureza del agua

El aparato contiene un sistema que indica automatistically el momento de eliminar el sarro.
El sistema pueda optimizarse para hogares con agua muy suave (tanmoa travs de un aparato suavizante del agua) y de agua muy dura, cambiarando las configuraciones para el rango relevante de dureza del agua (ver tabla a continuacion).
Para configurar el parámetro de dureza del agua, siga las instrucciones a continuación:
-
Pulse la tecla "On/Off" para conectar el hora.
-
Pulse las teclas "Izquierda" y "Derecha" simultaneamente. El grado de dureza empezará a parpadear en el display (los pasos 1 y 2 no son necessarios si el hora microondas está conectado o después de un fallo electrico).
- Pulse "+" y "- para configurar los values correctos del parámetro de dureza del agua, según la tabla a continuación.
- Pulse la tecla OK para selectionar el parámetro. El display exhibe el reloj.
La tabla ensña a continuación las cuales escalas para la definición de la dureza del agua.
| Tipo | Dureza del agua | Display | |||
| Ca + Mg (ppm) | Grados ingleses [°eH] | Grados franceses [°dF] | Grados alemanes [°dH] | ||
| Agua suave | De 0 a 150 | De 0 a 11 | De 0 a 15 | De 0 a 8 | SOFT (SUAVE) |
| Agua media | De 151 a 350 | De 12 a 25 | De 16 a 35 | De 9 a 20 | MED (MEDIA) |
| Agua dura | De 501 a 500 | De 26 a 35 | De 36 a 50 | De 21 a 28 | HARD (DURA) |
Ocultar / Exhibir el reloj

Si el display del reloj le molesta, pueda ocultarlo de la?siguefte manera:
- Pulse la tecla "On/Off" para conectar elorno.
- Pulse la tecla "OK" durante 3 segundos. El display quedará en blanco.
Si desea ver el display del reloj de nuevo, repita este procedimiento.
Bloqueo de seguridad
Se peutesbloquear la funcionalidad del hora (por exemple, para impedir que los niños lo usen).

Para bloquear el hora, siga las instrucciones a continuación:
- Pulse la tecla "On/Off" para conectar elorno.
- Mantenga pulsada la tecla “Bloqueo de seguridad” duranteunos 3segundos.La tecla
"Bloqueo de seguidad" se ilumina y el display exhibitsimbolos de llave.
El hora no funciona hasta que se desbloquee. Para desbloquear el hora, repita las instrucciones anteriores.
Definuciones básicas
Temporizador
Utilice esta funciona como unaapia a sus tareas diarias en la cucina.

Para configurar el Temporizador, siga las instrucciones a continuación:
- Pulse la tecla "On/Off" para conectar elorno.
- Pulse la tecla de funciona "Temporizador". La tecla se vuye roja y el display exhibe:

- Pulse las teclas “+” y “-” para selectionar el tiempo deseo.
- Pulse la tecla "OK". El temporizador empieza la cuenta asociado.
Cuando se termine el tiempo definido, el hora emittirá tres avisos sonoros repetidos durante 30segundos y parpadeará la tecla Temporizador. Pulse la tecla Temporizador para cancelar los avisos.
Mientras el Temporizador está的功能ado, su tecla está roja. El display y las luces'enseñan lo que se indica a continuación:
- Si no hay ninguna funciona en bajo, el displayenseña la cuenta atrás del Temporizador y su tecla está roja.
- Se existe una función activa, los displays y las teclas ensénan los parámetros de funciona normales. Para verficar el tiempo restante en el Temporizador, pulse la tecla Temporizador. El display ensénará brevamente el Temporizador y seguirá con lasindicaciones de funciona pasados 5segundos o hasta que se pulse la tecla Temporizador de nuevo. Mrientas se exhibe el Temporizador, el tiempo remaneciente pueda ser换成 con las teclas“-”y " + " como se indica.
Vapor
Utilice esta referencia para cocinar y calendar todo tipo de vegetales, patatas, arroz, pescado y carne.

- Pulse la tecla "On/Off" para conectar el hora.
- Pulse la tecla de funciona de "Vapor". La tecla se vuye roja y el display exhibe:

- Pulse las teclas "+" y "- para selectionar la temperatura deseada.
- Pulse la tecla “>”. El display exhibe:

- Pulse las teclas "+" y "-" para selectionar el tiempo de operación deseado.Esta configuración es optional. Avance hacer el punto 7 si no desea configurar la duración.
- Si desea cambiar algo n de los parámetros anteriores, pulse las teclas < o > para seleccionar el parámetro y después las teclas + y - para seleccionar un valordistincto.
- Pulse la tecla Inicio. El hora inicia su configuracion.
Nota importante: El símbolo [1] parpadeará en el display, lo que significía que la temperatura dentro delorno es inferior a la definida.
Calendar y Esterilizar
Utilice esta referencia para calendar platos cocinados y comidas precocinadas, como para esterilizar y hervir frutos.

- Pulse la tecla "On/Off" para conectar el hora.
- Pulse la tecla "Calendar y Esterilizar". La tecla se vuye roja y el display exhibe:

-
Pulse las teclas "+" y "- para selectionar el Programa, por ej. "R 01" (ver tabla a continuación).
-
Pulse la tecla “>”. El display exhibe:

- Pulse las teclas "+" y "- paracaebar el tiempo de operación predefinido.Esta configuración es optional.
- Pulse la tecla Inicio. El hora inicia su configuracion.
Nota importante: El símbolo parpadeará en el display, lo que significa que la temperatura dentro del hora es inferior a la definida.
| Programa | Tipo de comida | Temperatura °C | Tiempo (min) | Instrucciones |
| R 01 | Platos cocinados | 100°C | 13 | Saque la protección del envase y pángalo en la parrilla. |
| R 02 | Comida rápida / congelada | 100°C | 18 | |
| R 03 | Judías | 100°C | 35 | Esterilización: |
| R 04 | Cerezas | 80°C | 35 | El tiempo y la temperature se refieren a envases de 1L. |
| R 05 | Ciruelas | 90°C | 35 | |
| R 06 | Comida de bebé | 100°C | 12 |
Funciones especialies
Cocinar vegetales
Utilice esta referencia para cocinar los vegetales que se describe en la tabla a continuacion.

- Pulse la tecla "On/Off" para conectar elorno.
- Pulse la tecla de "Cocinar Vegetales". La tecla se vuye roja y el display exhibe:

-
Pulse las teclas “+” y “-” para selectionar el Programa, por ej. “A 01” (ver tablet a continuación).
-
Pulse la tecla “>”. El display exhibits:

120:00
- Pulse las teclas "+" y "-" para Cambiar el tiempo de operación predefinido.Esta configuración es optional.
- Pulse la tecla Inicio. El hora inicia su funciona.
Nota importante: El símbolo parpadeará en el display, lo que significía que la temperatura bajo del hora es inferior a la definida.
| Programa | Tipo de vegetal | Temperatura °C | Tiempo (min) |
| A 01 | Brócolis / flósculos | 100 °C | 20 |
| A 02 | Coliflor / flósculos | 100 °C | 25 |
| A 03 | Patatas / trozos | 100 °C | 25 |
| A 04 | Guisantes | 100 °C | 15 |
| A 05 | Espáarragos | 100 °C | 25 |
Cocinar pescado
Utilice esta referencia para cocinar los temas de pescado que se describen en la tabla a continuacion.

- Pulse la tecla "On/Off" para conectar elorno.
- Pulse la tecla de "Cocinar Pescado". La tecla se vuye roja y el display exhibe:

-
Pulse las teclas "+" y "-" para selectionar el Programa, por ej. "B 01" (ver tabla a continuación).
-
Pulse la tecla “>”. El display exhibe:

25:00
- Pulse las teclas "+" y "-" para Cambiar el tiempo de operación predefinido.Esta configuración es optional.
- Pulse la tecla Inicio. El hora inicia su funciona.
Nota importante: El símbolo parpadeará en el display, lo que significía que la temperatura bajo delorno es inferior a la definida.
| Programa | Tipo de pescado | Temperatura °C | Tiempo (min) |
| B 01 | Trucha | 80 °C | 25 |
| B 02 | Gambas | 90 °C | 15 |
| B 03 | Filete de pescado | 80 °C | 18 |
| B 04 | Mejillón | 100 °C | 25 |
| B 05 | Langosta | 100 °C | 30 |
Funciones especialies
Cocinar carne
Utilice esta funciona para cocinar los temas de carne que se describes en la tabla a continuación.

- Pulse la tecla "On/Off" para conectar elorno.
- Pulse la tecla de "Cocinar Carne". La tecla se vuye roja y el display exhibe:

-
Pulse las teclas "+" y "- para selectionar el Programa, por ej. "C 01" (ver tabla a continuación).
-
Pulse la tecla “>”. El display exhibits:

- Pulse las teclas "+" y "- paracaebar el tiempo de operación predefinido.Esta configuración es optional.
- Pulse la tecla Inicio. El hora inicia su funciona.
Nota importante: El símbolo parpadeará en el display, lo que significa que la temperatura Dentro del hora es inferior a la definida.
| Programa | Tipo de carne | Temperatura °C | Tiempo (min) |
| C 01 | Pechuga de pollo | 100 °C | 30 |
| C 02 | Lomo de cerdo ahumado / lonchas | 100 °C | 45 |
| C 03 | Escalope de pavo | 100 °C | 20 |
| C 04 | Filete de cerdo, entero | 100 °C | 25 |
| C 05 | Salchichas precocinadas | 90 °C | 15 |
Guarniciones
Utilice esta referencia para cocinar las comidas que se describen en la tabla a continuacion.

- Pulse la tecla "On/Off" para conectar elorno.
- Pulse la tecla de "Cocinar Pescado". La tecla se vuelve roja y el display exhibe:

-
Pulse las teclas "+" y "- para selectionar el Programa, por ej. "D 01" (ver tabla a continuación).
-
Pulse la tecla “>”. El display exhibits:

→20:00
- Pulse las teclas "+" y "- paracaebar el tiempo de operación predefinido.Esta configuración es optional.
- Pulse la tecla Inicio. El hora inicia su funciona.
Nota importante: El símbolo parpadeará en el display, lo que significa que la temperatura Dentro del hora es inferior a la definida.
| Programa | Tipo de comida | Temperatura °C | Tiempo (min) |
| D 01 | Bola de levadura dulce | 100 °C | 20 |
| D 02 | Bola de levadura | 100 °C | 25 |
| D 03 | Albóndigas | 100 °C | 30 |
| D 04 | Arroz | 100 °C | 35 |
| D 05 | Lentejas | 100 °C | 40 |
Carga de agua
Llenado del deposito de agua
El deposto de agua debe estar lleno para todas las functions.
Llene el deposito de agua con agua potable fresca hasta lamarca "MAX" e introduzca el deposito de agua hasta la muesca sobre la-camera interior. Aprox. 11.
Laindracion significa que el deposito de agua no estácorrectamente colocado.

Relleno de agua
El contenido de agua es normalmente suficiente para un proceso de coccción de 50-60关键时刻.
Si hay que relllenar el deposito de agua, se encenderá el piloto del deposito de agua. Vierta sólo 0,5 litres de agua como máximo para garantizar que el agua no rebose en el deposito de agua por culpa del bombeo de returno. PELIGRO DE REBOSE.
Vaciado del deposito de agua
Cuando se desconecta el aparato, el agua restante se bombea de vuelta al depuesto de agua.
Mientras el agua se está bombeando, aparece la indicación "PUMP".
Estaindración se muestra hasta que el agua alcanza una temperatura de 75^ C antes de ser bombeada de vuelta al deposito de agua.
Atencion: el agua del deposito puede estar caliente. Peligro de lesiones por quemadura!
Una vez que el agua ha sido bombeada de vuelta al deposito de agua, aparece la indicacion "DEP" en la pantalla. Proceda como se indica a continuacion:
- Extraiga del aparato y vacie el deposito de agua.
- Seque el deposito de agua y vuelva a introducirlo en el aparato. Seque el interior del aparato.
- Deje la puerta del aparato abierta hasta que el aparato se haya enfriado y está Completely seco.
NOTA IMPORTANTE: Se recomienda guitar y vinciar el depuesto de agua tras cada proceso de coccción. Esto impide que se desarrollen bacterias y cal en el aparato.
No debe vaciar el deposito de agua si DEAea起初 dos procesos de cocciudad vapor de forma sucesiva. En la pantalla aparecerá la indicación "DEP".
Para qitar esta indicación, pulse el botón Parada, asiouldrinciar un nuevo procesode coccción sin necessities de extraer y vinciar el deposito de agua.
Interruption de un processo de coccción
Puede interruptir en todo momento el proceso de coccción pulsando una vez el botón Inicio/Parada.
El aparato tiene una función de eliminación del vapor que se activa con el botón Inicio/Parada. De este modo se evita la calidad de vapor al abrir la puerta.
Dura aproximadamente tres Minutes y, durante este tiempo, aparece VAP en la pantalla.
Atencion: Si se abre la puerta, durante o despues del proceso de cocccion, sale vapor caliente del aparato. Echese a un lado o hacia aftas.
En este momento:
- La generación de vape se interrupcio.
Las paredes de la CAMERA de coccción y el deposito de agua siguen estando muy calientes. Peligro de lesiones por quemadura! - La pantalla de selección de hora y tiempo se detiene y en ella aparece el tiempo de funciona bajo su酐.
Si lo desea, puede:
- dar la vuelva o remove los alimentos
- modifierlos parámetros del proceso.
Cierre la puerta y pulse el botón Inicio/Parada para continuar el proceso.
Alteración de parámetros
Si desea cambiar algo n de los parámetros de func ion activos, pulse las teclas < < > o " > " para seleccionar el parámetro y.afteres las teclas ^ " + " y - para seleccionar un valordistincto.Pulse la tecla OK" o espere algunos segundos para validar el valor del nuevo parámetro.
Cancelar un ciclo de coccción
Si deseña cancelar el proceso de coccción, pulse la tecla Parar dos veces.
Escuchará 3 avisos sonoros y el reloj aparecerá en el display.
Fin de un ciclo de coccción
Al final de la duración de la configuración o cuando pulsa la tecla Parar para terminar el ciclo de coccción, eschuchará tres avisos sonoros y el display exhibirá la palabra “End” (“Fin”); el hora empieza la función de reducción de vape.
Esta funciona libera gradualmente el vapor de la cavidad, para que no existe una subita liberación de vapor cuando se abre la puerta del aparato.
Esta funciona tarda cerca de 3 horas, en los que el displayenseña la palabra "VAP".
Atencion! Si abre la puerta durante o.after del ciclo de cocccion, tengacuidado con el flujo de aire caliente y/o vapor que sale de la camara de cocccion. Alejese para evitar quemaduras.
El ventilador puede seguir funciona durante un lapso de tiempo antes de la desconexión del equipo. Es una función normal para reducir la temperatura bajo el hora.
El agua residual en la caldera puede bajar su temperatura hasta los 75^ C antes de bombarse de vuelta hacía el depuesto. Mientras el agua está sido bombead, el display ensña la palabra "PUMP".
Advertencia: El agua en el depuesto puede estar caliente. Peligro de quemaduras!
Cuando el displayenseña la palabra "DEP",esto significa que el agua fue bombeada y que el deposto del agua se pueda remover.
Remover el deposito de agua y secarlo bien. Dejar que el空間 de coccción se enfierte y después limpiar y secar con un trapo. Debedeojar la puerta abierta por uno horas para que el aparatoSEOse complementamente.
Tablas y consejos
Utilización de los accesorios
La bandeja perforada se utilizes para la cocccion al vapor de verduras, carnes y aves frescas o ultracongeladas.
Paraarlo,esimportante que la bandeja no perforada se introduzca en el aparato en el primer soporte lateral desde abajo.De este modo,los liquidos que goteen caeran en ella y no ensuciaran el aparato.La bandeja perforada que contiene los alimentos se introducirá en elsegundo soporte lateral desde abajo.
La bandeja no perforada se usa para la coccción al vapor de alimentos más sensibles, p. ej., compota, platos hechos con masa y platos muy elaborados.
La parrilla se utilizes para cocer alimentos enPEGueños recipientes, p. ej., cuencos de postre y para regenerar alimentos en platos.
En las tablas encontrará una información más precisa.
Los values sobre la duración de la cocción y la temperatura se indicate de manière orientativa. La duración de la cocción variará en función de la clase de producto que se quiera cocinar y del estado en el que este se ocurre.
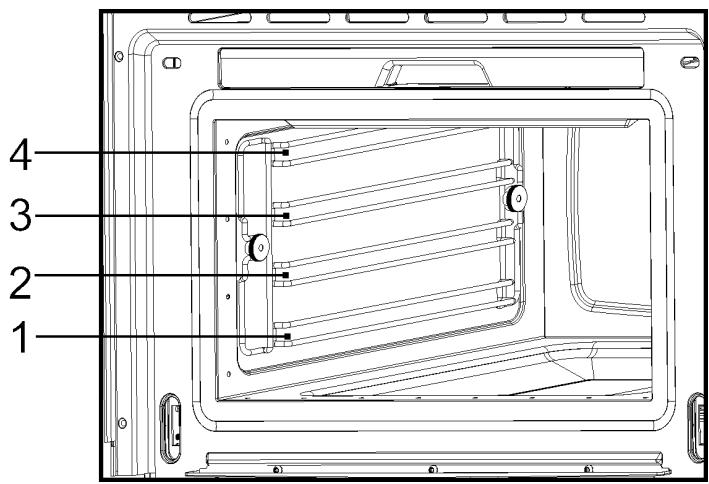
Pescado
| Pescado | Cantidad | Temperatura °C | Tiempo de coccción min. | Bandeja | Soporte (desde abajo) |
| Dorada | 800-1200 g | 80 | 30-40 | perforada | 2 |
| Trucha | 4 x 250 g | 80 | 20-25 | perforada | 2 |
| Filete de salmón | 500-1000 g | 80 | 15-25 | Perforada | 2 |
| Trucha asalmonada | 1000-1200 g | 80 | 25-35 | Perforada | 1/2 |
| Carabinero | 500-1000 g | 80 | 15-20 | Perforada | 2 |
| Mejjolones verdes | 1000-1500 g | 100 | 25-35 | Perforada | 2 |
| Filete de mero | 500-1000 g | 80 | 20-25 | Perforada | 2 |
| Berberechos | 500-1000 g | 100 | 10-20 | Perforada | 2 |
| Bogavante, ultracongelado | 800-1200 g | 100 | 25-30 | Perforada | 1/2 |
| Bacalao | 1000-1200 g | 80 | 20-25 | Perforada | 2 |
| Mejjolones | 1000-1200 g | 100 | 15-25 | Perforada | 2 |
| Trucha ártica | 4 x 250 g | 80 | 25-30 | Perforada | 2 |
| Abadejo | 1000-1200 g | 80 | 20-25 | Perforada | 2 |
| Filete de atún | 500-1000 g | 80 | 15-20 | Perforada | 2 |
| Lucioperca | 4 x 250 g | 80 | 25-30 | Perforada | 2 |
Carne
| Carne | Cantidad | Temperatura °C | Tiempo de coccción min. | Bandeja | Soporte (debesa quo) |
| Pepitos de pollo | 4-10 | 100 | 40-45 | perforada | 2 |
| Pechuga de pollo | 4-6 | 100 | 25-35 | perforada | 2 |
| Costillitas de cerdo ahumadas | 500g -1000g | 100 | 40-50 | perforada | 2 |
| Escalope de pavo | 4-8 | 100 | 20-25 | perforada | 2 |
| Filete de cerdo, completo | 4-8 | 100 | 20-30 | perforada | 2 |
| Salchichas | 80-100 | 10-15 | perforada | 2 |
Huevos
| Huevos | Temperatura °C | Tiempo de coccción min. | Bandeja | Soporte (debesaibo) |
| Huevo en vaso | 100 | 10-15 | parrilla | 2 |
| Huevos,uros | 100 | 15 | parrilla | 2 |
| Huevos,blandos | 100 | 10-12 | parrilla | 2 |
Guarniciones
| Guarniciones | Cantidad | Temperatura °C | Tiempo de coccción min. | Bandeja | Soporte (debesa bajo) |
| Cebada montada + láquido | 200g + 400ml | 100 | 30-35 | parrilla, cuenco de cristal | 2 |
| Sémola + láquido | 200g + 300ml | 100 | 10-20 | parrilla, cuenco de cristal | 2 |
| Lentejas + láquido | 200g + 375ml | 100 | 20-50 | parrilla, cuenco de cristal | 2 |
| Arroz + láquido | 200g + 250ml | 100 | 25-40 | parrilla, cuenco de cristal | 2 |
Tablas y consejos
Verduras
| Verduras/frescas | Temperatura °C | Tiempo de coccción min. | Bandeja | Sóporte (debesa quo) | |
| Berenjenas | en rodajas | 100 | 15-20 | perforada | 2 |
| Judías | 100 | 35-45 | perforada | 2 | |
| Brécol | ramitas con tallo | 100 | 25-30 | perforada | 2 |
| Brécol | ramitas sin tallo | 100 | 15-20 | perforada | 2 |
| Coliflor | ramitas | 100 | 25-30 | perforada | 2 |
| Coliflor | cabeza completa | 100 | 40-45 | perforada | 1 |
| Guisantes | 100 | 30-35 | perforada | 2 | |
| Hinojo | en tiras | 100 | 15-20 | perforada | 2 |
| Hinojo | partido por la mitad | 100 | 20-30 | perforada | 2 |
| Patatas con/piel | enteras, muykleuñas | 100 | 20-25 | perforada | 2 |
| Patatas con piel | enteras, muygruesas | 100 | 45-50 | perforada | 2 |
| Patatas sin piel | en trozos | 100 | 20-25 | perforada | 2 |
| Colinabos | troceado | 100 | 20-25 | perforada | 2 |
| Judías | 100 | 15-20 | perforada | 2 | |
| Zanahorias | en rodajas | 100 | 25-30 | perforada | 2 |
| Mazorcas | 100 | 50-60 | perforada | 2 | |
| Pimientos | en tiras | 100 | 12-15 | perforada | 2 |
| Guindillas | 100 | 12-15 | perforada | 2 | |
| Setas | en cuartos | 100 | 12-15 | perforada | 2 |
| Puerros | en rodajas | 100 | 10-12 | perforada | 2 |
| Coles de Bruselas | 100 | 25-35 | perforada | 2 | |
| Apio | en tiras | 100 | 15-20 | perforada | 2 |
| Espárragos | 100 | 20-35 | perforada | 2 | |
| Espinacas | 100 | 12-15 | perforada | 2 | |
| Apio en rama | 100 | 25-30 | perforada | 2 | |
| Calabacines | en rodajas | 100 | 12-18 | perforada | 2 |
Dumplings
| Dumplings | Temperature °C | Time min. | Container | Level |
| Sweet dumpling | 100 | 20-30 | Not perforated | 2 |
| Sweet yeast dumpling | 100 | 15-20 | Not perforated | 2 |
| Yeast dumpling | 100 | 15-25 | Not perforated | 2 |
| Bread dumpling | 100 | 20-25 | Not perforated | 2 |
| Napkin dumpling | 100 | 25-30 | Not perforated | 2 |
Postres
| Postres | Cantidad | Temperatura °C | Tiempo de coccción min. | Bandeja | Soporte (desde abajo) |
| Compota de manzana | 500-1500 g | 100 | 15-25 | no perforada | 2 |
| Compota de pera | 500-1500 g | 100 | 25-30 | no perforada | 2 |
| Crema catalana | 80 | 20-25 | parrilla-cuenquillo | 2 | |
| Crema de caramelo | 80 | 25-30 | parrilla-cuenquillo | 2 | |
| Yogur | 40 | 4-6 horas | parrilla-cuenquillo | 2 | |
| Compota de melocotón | 500-1500 g | 100 | 15-20 | no perforada | 2 |
Fruta (esterilizar/cocinar)
| Fruta | Cantidad | Temperatura °C | Tiempo de coccción min. | Bandeja | Sóporte (debes abajo) |
| Peras | 4-6 copas de 1I | 100 | 30-35 | Parrilla | 1 |
| Cerezas | 4-6 copas de 1I | 80 | 30-35 | Parrilla | 1 |
| Melocotones | 4-6 copas de 1I | 90 | 30-35 | Parrilla | 1 |
| Ciruelas | 4-6 copas de 1I | 90 | 30-35 | Parrilla | 1 |
Regenerar
| Calentimiento | Cantidad | Temperatura °C | Tiempo de coccción min. | Bandeja | Sóporte (debes abajo) |
| Platos | 1-2 | 100 | 12-15 | Parrilla | 2 |
| Platos | 3-4 | 100 | 15-20 | Parrilla | 2 |
| Platos preparados | 100 | 15-20 | Parrilla | 2 |
Escaldar
| Verduras | Cantidad | Temperatura °C | Tiempo de coccción min. | Bandeja | Sóporte (debes abajo) |
| p. ej., judías, puerto | 100 | 10-12 | perforada | 2 | |
| Col verde | 1000-2000 g | 100 | 12-16 | perforada | 2 |
| Hojas de col rizada | 10-20 | 100 | 12-15 | perforada | 2 |
| Repollo, completo | 2000-2500 g | 100 | 30-45 | perforada | 1 |
| Tomates, pelados | 80 | 12 | parrilla | 2 |
Tablas y consejos
Descongelación
| Verduras/guarniciones | Temperatura ℃ | Tiempo de coccción min. | Bandeja | Soporte (desde abajo) | |
| Brécol | ramitas con tallo | 100 | 15-20 | perforada | 2 |
| Menestra | 100 | 15-20 | perforada | 2 | |
| Hojas de espinaca | raciones | 100 | 10-15 | no perforada | 2 |
| Coliflor | ramitas | 100 | 15-20 | perforada | 2 |
| Guisantes | 100 | 15-25 | perforada | 2 | |
| Col verde | bloque grueso | 100 | 25-35 | no perforada | 2 |
| Zanahorias | en rodajas | 100 | 15-20 | perforada | 2 |
| Coles de Bruselas | 100 | 20-25 | perforada | 2 | |
| Espárragos | 100 | 25-30 | perforada | 2 | |
| Platos preparados | 100 | según se precise | parrilla | 2 | |
| Pan | 100 | 10-25 | parrilla | 2 | |
| Arroz | 100 | 15-25 | no perforada | 2 | |
| Lentejas | 100 | 15-20 | no perforada | 2 | |
| Pasta | 100 | 15-20 | no perforada | 2 | |
Cocción en 2 niveles
Indicaciones:
Para la cocción en dos niveles, los accesos deben estar siempre en el 2^ o 3^ y en el 1^ soporte desde abajo.
LosDistinctostiemposdecocciónseregulancomo seindicaacontinuación:
Los alimentos que necessitan un tiempo de coccción más prolongado deben colocarse en la parte superior del hora de coccción al vapor. Los alimentos con tiempos de coccción más cortos se introducen en el primer soporte desde abajo.
Un exemple: Verduras, patatas y carne.
Introduzca las verduras y las patatas en el aparato enequalquier recipientede sobre la parrilla enel 2^ o 3^ soporte desde abajo.
Introduzca el pescado sobre el 1^ soporte desde abajo.
Si se debe utilizes la bandeja perforada para el pescado, la bandeja no perforada deben colocarse en el fondo del aparato para capturar el caldo de pescado que gotea. De este modo, el aparato se mantiene limpio.
Tiempo de coccción: Verduras y patatas 25-35 min.
Tiempo de coccción: Pescado, según el tipo, 15-25 min.
Se fija el tiempo más largo de coccción pero, gracias a losDistinctos niveles, la comida está lista al本身就是 tiempo sin que nada se cocine excessivamente.
Limpieza de la-camera interior
Bajo ninguna circunstancia utilise products de limpieza abrasivos, como esponjas abrasivas multiuso, estropajos de metal, etc., ya que pueda darar la superficie.
Limpie la-camera de coccción en caliente con un pañó humedo. A continuación, séquela frotando.
Para una limpieza más sencilla puede extraerse las parillas laterales. (Consulte el suivienteApartado).
Desenganche de las parrillas laterales
En las parrillas de colocacion, afloje la tuerca estriada 1 hacía adelante en sentido contrario al de las agujas del reloj.
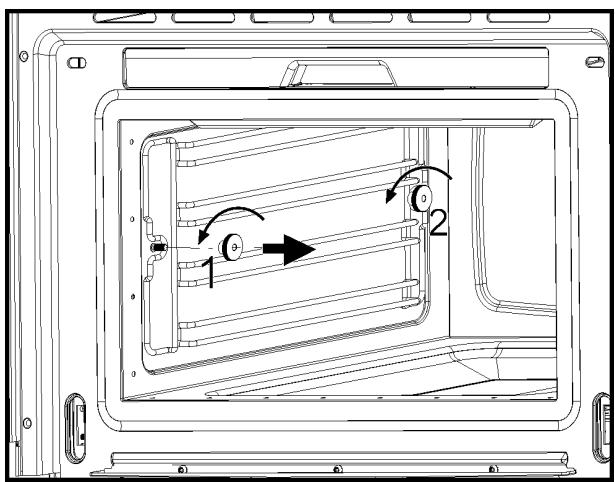
Afloje ligeramente la tuerca estriada 2 detrás en las parrillas de colocación en sentido contrario al de las agujas del reloj. No extraiga las tuercas estriadas.

Tire ligeramente hacía delante de la parrilla de colocación y extráigala.

Para el montaje, deslice la parrilla de colocacion por la tuerca estriada 2. Enrosque la tuerca estriada 1 en sentido de las aguas del reloj hasta el tope, y bajo apriete la tuerca estriada 2.
Mantenimiento
Extracción de la puerta del aparato
Open the appliance door as far as it will go.

Introduzca dos pernos en los agujeros de los quicios de la puerta.
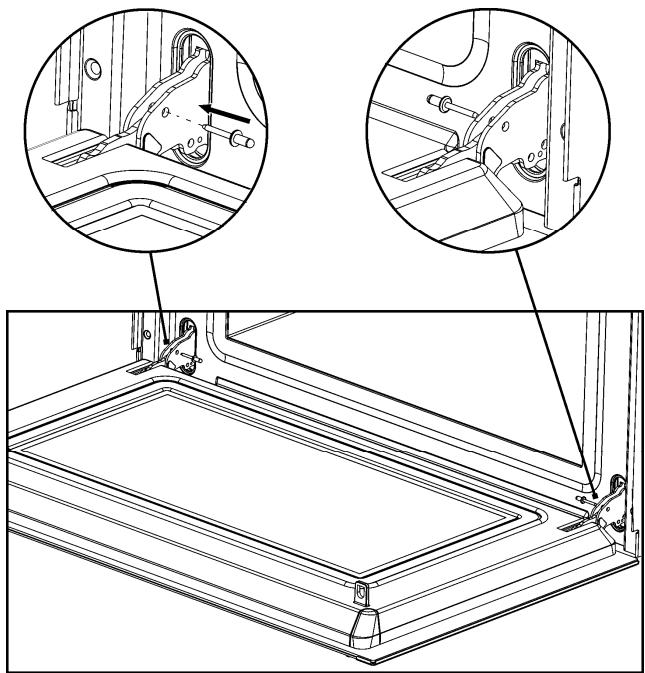
Cierre la puerta lo sufiente para elevarla.
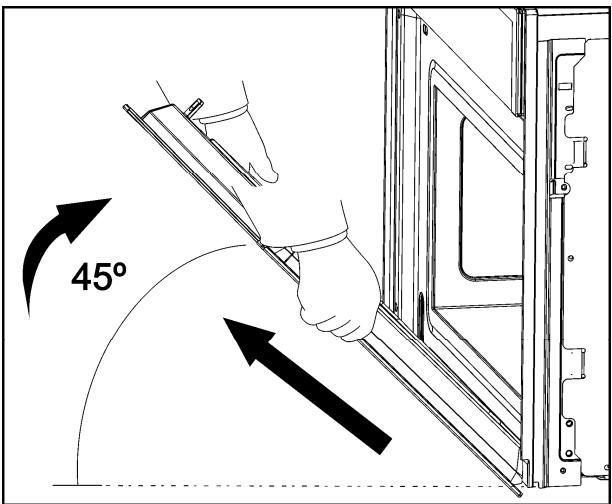
Para volver a montarla, introduzca las bisagras en los agujeros.
Abra la puerta del aparato al máximo y extraiga los permos.
Eliminación del sarro
Siempre que se produce vapor, independiente de la dureza del agua local (por exemple, el contenido de cal en el agua), se deposita la cal bajo del generator de vapor.
El lapso de tiempo entre las desincrustaciones depende de la dureza del agua y de la Frequencia de uso. Si emite vapor 4 × 30 Minutes por hora, el aparato debe ser limpio profundamente (dependiendo de la dureza del agua) como se indica a continuacion:
| Dureza del agua | Eliminación de sarro casa |
| Muy suave | 18 grasas |
| Media | 9 grasas |
| Muy dura | 6 grasas |
El aparato detecta automatistically cuando esnecessary eliminar el sarro y el display exhibe其中之一:

Si no se realiza el procedimiento de eliminación del sarro, algunos ciclos de coccción antes de que se haya exhibido el símbolo empezarán a parpadear.
Si no se realiza el procedimiento de eliminación del sarro una vez más, se bloquea el funciona del hora y el display exhibe:
CAL

NOTA IMPORTANTE: La no eliminación del sarro pueda impeder el funcionaimiento o provocar daños al aparato.
Solutuciones de eliminación de sarro adequadas
Para desincrustar, use la solución "DURGOL®".
Esta solución de desincrustacion permite una eliminacion del sarro profesional y cuidadasa en su aparato y está disponible en los Centros de Atencion al Cliente.
¡Atencion! No utilize vinagre ni productos que contengan vinagre, puis pueda darar el circuito interno del hora.
Las soluciones de desincrustación normales no son apropiadas porque contienen agentes con espuma.
Cuidados y mantenimiento
Procedimiento de eliminación del sarro

Advertencia: Por razones de seguridad, el proceso de eliminacion del sarro no pueda interruptirse y tardará uno 45关键时刻.
Se pueda hacer esta limpieza con la puerta del aparato abierta o cerrada. El aparato debe estar en estado inactivo antes de起初 este ciclo de eliminacion del sarro.
Para empezar el ciclo, siga las instrucciones a continuación:
- Pulse la tecla "On/Off" para conectar elorno.
- Pulse las teclas "Izquierda" y "Derecha" simultaneamente durante 5 segundos. El displayenha la palabra "CAL" y se escauch un avis sonoro intermitente. Si眼看 acancelar el proceso de desincrustacion en este punto, pulse la tecla "Parar".
- Pulse la tecla Inicio.
- Cuando el displayenseña "0.5L", remover el depreso de agua.
- Usar 0.5 litres de una solución de eliminación de sarro adequada en el deposito del agua y volver a posicionarlo.
-
Pulse la tecla Inicio. Se inicia el ciclo de Eliminación del sarro, que tarda cerca de 30关键时刻.
-
Cuando el display exhibe "1.0L" parpadeando y el hora emite un avis sonoro, remover y vaciar el depuesto del agua.
- Rellene el depóstito con 1,0 litres de agua fria ywhelming a posición ar el depóstito del agua.
- Pulse la tecla Inicio. Se inicia el primer ciclo de lavado.
- Cuando el display exhibe de nuevo "1.0L" parpadeando y el hora emite un avis sonoro, remove y vaciar el depuesto del agua.
- Rellene el depuesto con 1.0 litres de agua fria y vuelva a posicionar el depuesto del agua.
- Pulse la tecla Inicio. Se inicia el segundo ciclo de lavado.
- Cuando el ciclo de lavadotera, el display exibe el mensaje "End" ("Fin").
- Remover,acular y secar el deposito del agua.
Atencion: La limpieza debe realizarse con el aparato desconectado de la corriente. Desconecte el enchufe de la toma de corriente o desactive el circuito de alimentacion de corriente del aparato.
No utilise products de limpieza agresivos o abrasivos, paños abrasivos ni objetos puntiagudos, ya que peuvent aparecer manchas.
No utilise aparatos de limpieza dechorro a alta presión o de vape.
Parte frontal
Es suficiente con limpiar el aparato con un paño humedo. Si está muy sucia,añada al aguaunas gotas de lavavajillas. A continuación, limpie el aparato con un paño seco.
Para los aparatos con una parte frontal de aluminio utilise un producto de limpieza de cristal suave y un paño suave, que no suele pelusa. Límpiela en sentido horizontal sin ejercer presión sobre la superficie.
Elimine inmediamente las manchas de cal, grasa, almidón y albumina. Estas manchas能把 provocar corrosión.
Evite que penetre agua en el interior del aparato.
Cámara de coccción
Limpie las paredes interiores con un pañohúmedo después de cada uso. Deje la puerta abierta para que se enfié ySEOue la cámara interior.
No utilise un produit de limpieza agresivo para eliminar manchas persistentes. No utilise aerosoles para hornos nithers medios del limpieza agresivos o corrosivos.
Mantenga siempre limpia la puerta y la parte frontal del aparato para garantizar su perfecto funciona.
Evite la penetración de agua en los orificios de ventilación.
La cubierta de cristal de la lámpara se incluena en la tapa del aparato y pueda extraerse fácilmente para su limpieza. Paraarlo, desatornílèla y limpiela con agua y lavavajillas.
Accesorios
Limpie los accesorios después de cada uso. Si está muy sucios, ablándelos primero y utilizes a continuación un cepillo y una esponja. Los accesorios peuvent limpiarse en el lavavajillas.
¿Qué hacer en caso una avería de funciona?
iATENCION! Las reparaciones solo puede ser realizadas por技术和 especialistas. Todas las manipulaciones realizadas por personas sin autorizacion del fabricante entrada neligro.
Los siguientes problemasULDuenSolutionarse sin necessities de informar al Servicio de Atencion al Cliente:
- La pantalla está apagada. Compruebe si:
- el piloto de hora está desactivado (consulte el apartado relativo a los ajustes Basics).
- Nodea nada cuando se pulsan los botones. Compruebe si:
- el bloqueo de seguridad está activado (consulte elApartado relativ a losajustes Basics).
- El aparato no funciona. Compruebe si:
- el enchufe está conectado correctamente a la toma de corriente,
- el circuito de alimentación de corriente del aparato está activado,
- Se escuchan ruidos durante elstonacioniento
- Se tratate de ruidos de funciona que pueda producirse durante todo el tiempo de coccción al vapor, p. ej., por las bombas de agua en el generator de vapor.
- Estos ruidos son normales, no representan un problema.
- Los alimentos no se calientan o se calientan muy lentamente. Compruebe si:
- Ha seleccionado la temperatura y el tiempo de funcionacorrectos,
- Ha introducido unaULDad de alimentos superior o más fria de lo normal en el interior del aparato.
-
Si aparece en la pantalla "Err_, póngase en contacto con el Servicio de Atencion al Cliente.
-
Al finalizar un proceso de coccción se escucha un ruido. Esto no es un problema.
- El ventilador de refrigeración vigue的功能任何时候进行,因为一旦发生意外情况,它将立即停止使用。
- El aparato funciona, pero la iluminación interior no.
- Si todas las functions se executan correctamente, es possible que la lámpara se hayaFundido. Puede seguirutilizando el aparato.
Cambio de lámpara
Siga these pasos para sustituir la lampara:
- Desconecte el aparato del suministro de corriente. Desconecte el enchufe de la toma de corriente o desactive el circuito de alimentacion de corriente del aparato.
- Desatornille la tapa de cristal delante de la lámpara (1).
- Extraiga la lámpara halógena (2). Atencion: La lámpara pueda estar muy caliente.
- Coloque una nuevo lámpara E14 230-240V / 15W. Siga lasindicaciones del fabricante de la lámpara.
- Atornille la tapa de cristal delante de la lámpara (1).
- Vuelva a conectar el aparato a la toma de corriente.
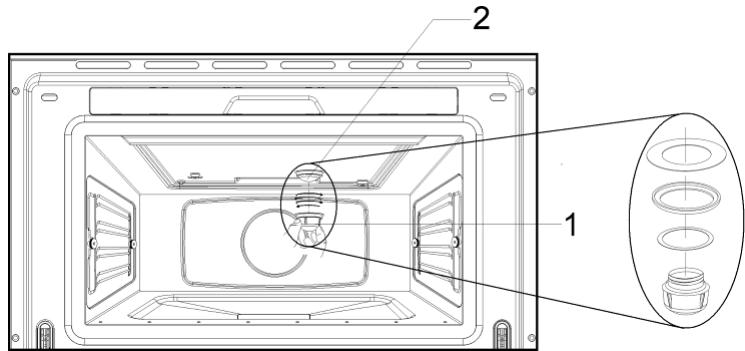
Descripción de sistemas
| Simbolo | Función | Alimentos |
| Vapor | Cocinar todo tipo de vegetales, arroz, cereales y carne. Obtener zumo de las bayas. Descongelar y cocinar simultáneamente los vegetales. | |
| Regeneración y Esterilización | Regenerar platos cocinados y comidas precocinadas. Esterilizar/hervir frutos. | |
| Cocinar vegetales | Cocinar variedostipsodes vegetales. | |
| Cocinar pescado | Cocinar variedostipsodes pescado. | |
| Cocinar carne | Cocinar variedostipsodes carne. | |
| Guarniciones | Cocinar variedostipsodes guarniciones. |
Pantallas
| Mensaje | Descripción |
| Depósito del agua | |
| Parpadeo – el depósito del agua estávacío. Debe rellenarlo. | |
| Indicación de que el depósito no está en su situó. | |
| DEP | El depósito del agua debe serremovido, vaciado y reinsertado. |
| Reducción de vape | |
| VAP | Indicación de que el procesode reducciónde vapor está en bajo. |
| PUMP | Indicación de que el agua caliente está sando bombeada hacela depósito del agua. |
| Eliminación del sarro | |
| CAL | Debe eliminarsselarro del aparato. |
| Parpadeo – se inicia laeliminación delsarro. | |
| 0.5L | Use 0.5litros de una soluciónde eliminación delsarro en el depósito del agua. |
| 1.0L | Rellene con 1.0litro de aguafría el depósito para ellavado. |
| Avisos delsystems | |
| HOT | Temperatura en el Cuadro Electrónica demasiado alta. |
| Err_ | Contacte el Servicio de Atencion al CLIENTe |
Especificaion
- Tensión alterna. (ver plac de caractéristicas)
Consumo de potencia 1500 W - Dimensiones exteriores (anch. x alt. x prof.) 595 x 455 x 472 mm
- Dimensiones de la-camera de coccción (anch. x alt. x prof.). 420 x 210 x 390 mm
- Capacidad del hora. 351
- Peso 32 kg
Leia atentamente as instruções deste folheto,驻村 nãoaabdar-lhe a obter bons resultados com o seu forno de vapor.
GUARDE A DOCUMENTação DESE APARELHO, ASSIM PODERÁ CONSULTÁ-LA TAMBÉM MAIS TARDE.
Mantenha estas instruções sempre àIELD. Caso ceda o aparecido a terreiros, entrega-lhes también as respectivas instruções.
Notas sobre a proteção do ambiente
Eliminação da embalagem

A embalagem está marcada com um Ponto Verde.
Elimine todos os materiais de embalagem, tais como o papelão, o poliestireno e os plácicos, introduzindo-os nos contentores adequados. Desta forma assegura-se a reciclagem dos materiais de embalagem.

Eliminação de aparhos inutilizados
A Directiva Europea 2002/96/CE relativa aos residuos de equipments electricos e electrónicos (REEE) estabelece que os electrodométricos não podem ser eliminados juntamente com os residuos urbanos normais.
Os apareiros colocados fora de service devem ser recolhidos separadamente, a fim de optimizar a percentagem de recuperacao e reutilização dos materiais e para fazer potenciais danos para a saude do Homem e do ambiente. O símbolo constituído por um contentor de lixo barrado com uma cruz deve ser colocado em todos os produits, a fim de recordar o dever da recolha separada.
Os consumidos devem contactar as autoridades locais ou os pontos de vend, com o objectivo de obterem informacoes sobre o local apropriadao para o armazenamento dos electrodomesticos usados.
Inutilize o seu aparelho, antes de o eliminar. Tire o cabo para fora, corte e elimine-o.
Instruções de instalação 31
Antes da instalacao 31
Depoisa da instalacao 31
Instruções de segurança 32
Descrição do aparecido 34
Definçõesbasicas 35
Regulações iniciais 35
Definir as hours 35
Configuração da Dureza da Água 35
Visualizar/esconder o relógio 36
Bloqueio de segurar 36
Temporizador 37
Funcoesbasicas 38
Vapor 38
Aquecer & Esterilizar 38
Funções especialis 39
Cozinhoar vegetais 39
Cozinhoar peixe 40
Cozinhoar carne 41
Acompanhamentos 42
Encher com agua 43
Encher o deposito de agua 43
Introduzir mais agua 43
Esvaziar o deposito de agua 43
Durante o lavoro 44
Interruption do processo de cozedura 44
Alterar parâmetros 44
Cancelar um ciclo de cozinha 44
Fim de um ciclo de cozinho 44
Tabelas edicas 45
Utilização dos acessórios 45
Manutenção 51
Limpeza do interior 51
Remover as grelhas laterais 51
Desmontar a porta 52
Descalcifica 53
Produtos de descalcifica o inadequados 53
Procedimento de descalcifica 54
Limpeza e manutenção do aparecido 55
Frente do aparecido 55
Interior 55
Acessórios 55
O que fazer em caso de avaria deestrutura? 56
Substitucao da lampada 56
Characteristicasétécnicas 57
Descrição das funções 57
Indicações 57
Specifications 58
Instalacao 59
Antes da instalacao
Verifique a tensão de alimentação indica naplaça de CHARACTERISTICAS! Tem de corresponder à tensão da sua rede.
Abra a porta do aparecido e retire todos os acessórios bem como o material de embalagem.
Atença! A parte da fronte do aparecido pode estar coberta por umaPEGUCULA de proteção. Remova estaPEGUCULA cuidadosamente antes da primeirautilizaçãodo aparecido.Comece na parte inferior.
Assegure-se que o aparecido não está danificado. Verifique se a porta fecha correctamente e se a face interior da porta e o espoço interior da fronte não aparecem danos. Se detectar algo dano, contacte o Serviço de Assistência Tecnica. O número de téléphone encontrar-se na contra-capa deste folheto.
NÃO USE O APARELHO se o cabo de alimentação ou a ficha estiverem danificados, se o aparecido não funciona correctamente, ou se o aparecido tiver ficado danIFICADO ou caido. Contacte, eventually, o Servço de Assistência Tecnica. O número de téléphone encontrar-se na contra-capa deste folheto.
Cologne o aparelho sobre uma superficie plana e resistente. O aparelho não deve ser instalado na proximidade de elementos de aquecimento, rádios ou televisores.
Aquando da instalacao assegure-se que o cabo de alimentacao não entra em contacto
com humididade, com objectos de arestas vivas ou com a parte deTRS do aparelho, uma vez que as temperatas elevadas podem danIFICAR o cabo.
Atença: O aparecido instalado não pode broquear o acesso à ficha.
Depois da instalacao
O aparecido está equipado com um cabo de alimentação e uma ficha para但现在e monofásica, 230-240V - 50Hz.
Em caso de ligação permanente, o aparecido deve ser instalado por um técnico qualificado.
Nesse caso, a ligação a um circuito eletrico deve ser feita com um disjuntor para todos os pôlos, com uma distência minima de 3 mm entre os contactos.
ATENÇA: É OBRIGATORIO LIGAR O APARELHO À TERRA.
Tanto o fabricante como os revendedores declinam qualquer responsabilitadepor danos que possam ser causados a pessoas, animais ou coisas, caso se verifique que as presentes instruções de instalacao não foram observadas.
O aparecidosolefuncionacomacapta correctamentefechada.
Antes da primeira'utilisation limpe o interior do aparelho e os acessórios de acordo com as instruções de limpeza constantes do capítulo "Limpeza e manutenção do aparelho".
A instalação deve respeitar as instruções fornecidas separadamente.
PT Instruções de segurança

- Atença! Não deixe o aparecido funcional sem vigilência.
- Atença! Se notar fumo ou fogo, mantenha a porta fechada para abafar as chamas. Desligue o aparelho e tire a ficha da tomada ou interrompa a alimentação elétrica do aparelho.
Gorduras e oleos sobreaquecidos inflamam fácilmente. Por isso, não aqueça oleo ou gordura dentro do aparelho. Em caso algo, tente apagar gordura ou oleo a arder com agua (perigo de explosão)! Abafe as chamas com um pano humido e mantenha todas as portas e janelas fechadas. - Atença! Não use alcool com elevado teor alcoílico para fazer os seu们的 cozinhados no aparecido. Poderá levar a um sobreaquecimento dos alimentos, perigo de explosão!
- Atença! Este aparecido não é apropiado para ser uso por pessoas (incluindo crianças) que não esteyam na plena posse das suas faculdades físicas, sensoriais e mentalais. Os Utilizadores que não tem nem experiência nem conheçimento do aparecido e aos quais o funcimento do aparecido
não foi explicado, devem ser vigiados por uma pessoa que está responsavel pela sua segança. As crianças devem ser vigiadas para garantir que não brincam com o aparecido.
Use a segurarca para crianças.
- O aparecido pode ficar muito quente durante a utilização. Tenha cuidado e evite qualquer contacto com os elementos de aquecimento que se encontrar no interior do aparecido. PERIGO DE QUEIMADURAS!
- Cuido! As peças acessveis podem ficar muito quentes. Mantenha as crianças afastadas do aparecido.
- Atença! SeAbrir a porta do aparelho durante ou Depois da cozedura, poder sair vapor quente e gotas de agua. Afaste-se para oazo ou para trás.
- Cuido! Em caso algo, use a porta quente do aparelho para fixar cabos de alimentacao de outros aparelhos electricos. O isolamento do cabo pode derreter. Perigo de curto-circuito!
Instruções de segurarca
Este aparelho destino-se, exclusivamente, ao uso dométrico!
Este aparecido é adequado para a confecção de produits alimentares em casa. Não se aceita qualquer responsabilité por danos provocados por um uso não apropriado ou não permitido.
Se proceder em conformidade com as instruções, evaporá danos no aparecido e outras situações perigosas:
- Não tape ou obstrua as aberturas de ventilação.
- Não guarde dentro do aparecido objectos que em caso de ligação accidental podem provocar perigo.
- Não use o aparecido como despensa.
- Não deite aguardente (por exemplo, brandy, uísque, Schnaps) por cima dos alimentos quentes. Perigo de explosão!
- Os acessórios, tais como as grelhas e os tabuleiros, aquecem muito dentro doorno. Use pegas.
- Para evaporar queimaduras, use sempre luvas de cozinha quando, ao mexer em loicas e recipientes, tem detocar no interior do aparelho.
-
Não se apoie ou sente na porta aberta do aparecido, quando possa fazerprovocar danos, sobretudo, na area das dobradiças. A porta aguenta, no máximo, 8 kg.
-
As grelhas tem uma capacidade de energia maxima de 8 kg. Para fazer danos, não ultrapasse este peso.
Limpeza:
- Mesmo(before desligar o aparelho, este a third time se mantém quando durante algo tem tempo. De-lhe tempo sufficiente para arrerefcer antes de什麽ar, por example, com a limpeza.
- Não useiros abrasivos ou raspadores metálicos cortantes para a limpeza do vidro da porta doorno, porque pode riscar a superficie e destruir o vidro.
- As superficies de contacto da porta (frente doorno e lado interior da porta) devem estar sempre impecavamente limpas, a fim de garantir o Functionamento correto.
- Consulte as instruções de limpeza no capítulo "Limpeza e manutenção do aparelho".
Em caso de reparacao:
- Caso se verifiquem danos no cabo de alimentação, este deve ser substituído pelo fabricante, por um representante autorizzato ou por um técnico qualificado para estudo工作任务, a fim de fazer situações perigosas. Além disso, é necessária uma ferramenta especial.
- As reparações e os trabalho de manutenção, sobretudo em componentes electricos sob tensão, são poder ser executados por tecnicos autorizados pelo fabricante.

- – Vidro da porta
-
- Bloqueio de seguranca
-
- Lampada
-
- Paine de commande
-
- Tabuleiro
-
- Tabuleiro com furos
-
- Grelha lateral
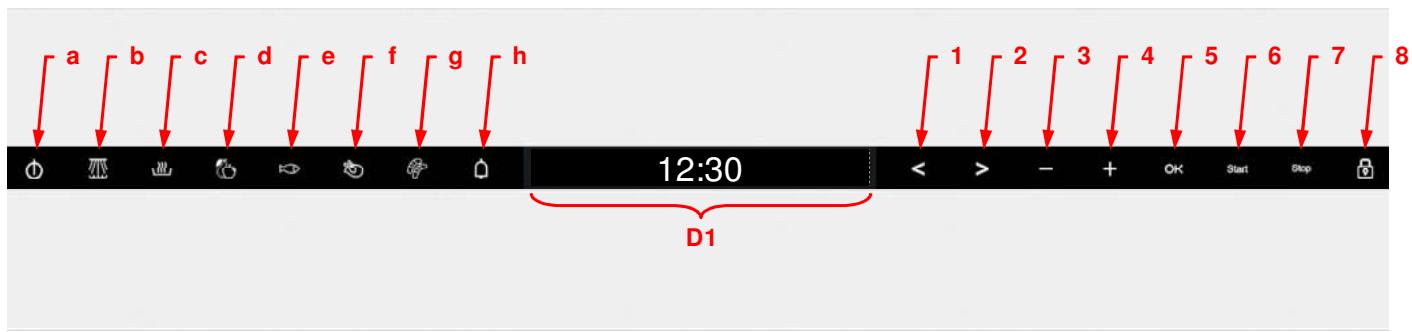
a - Botão ON/OFF
b - Botão de funcção Vapor
c - Botão de função Regeneração & Esterilização
d - Botão de funcção Cozinho Vegetais
e - Botão de funcção Cozinho Peixe
f - Botão de funcção Cozinho Carne
g - Botão de funcção Cozinho Acompanhamentos
h - Botão Temporizador Decrescente
1 - Botão "Esquerda"
2 - Botão "Direita"
3 - Botão “-”
4-Botão“+”
5 - Botão "OK"
6 - Botão "Start"
7 - Botão "Stop"
8 - Botão de "Bloqueio de segurança"
D1 - Mostrador
Definições基本情况
Regulações iniciais
Após a ligação do aparelho à rede ou après uma falha de corrente, o relógio fica a piscar, indentando desse modo que as horas não está correctas.
O aparelho não funciona antes de acertar as horas e a dureza da agua. Para acertar o relógio e a dureza da agua, proceda da segunte forma:
Definir as horas
O relógio irá pascar se o seu microondas se desligar e ligar durante uma falha de energia, para indicar que a hora não está definida. Para definir a hora, procee do segunte modo:

- Prima o botão "On/Off" para ligar oorno.
-
Mantenha os botões “-” e “+” premidos simultaneamente. Os dígitos das horasomidarão a piscar (os passos 1 e 2 não são necessários se for a primeira vez que liga o microondas, ou antes uma falha de electricidade).
-
Prima os botões “-” e “+” para definir as horas.
- Prima o botão OK para confirmar as horas. Os digitos dos números irão piscar.
- Prima os botões “-” e “+” para definir os minutos.
- Prima o botão OK para confirmar os minutos.
Configuração da Dureza da Água

O aparelho comporta umSYSTEM que indica, automaticamente, a alterations para descalcificar.
O Sistema pode ser optimazedo para residencias com agua muito macia (tambem atraves dautilização de um aparelho amaciador de água) eágua muito dura, ao alterar as configurações doutilizador para um alcance relevante de dureza daágua (ver tabela em baixo).
Para configurar o parâmetro de dureza de água, siga as següntes instruções:
-
Prima o botão "On/Off" para ligar oorno.
-
Prima os botões "Esquerda" e "Direita" ao mesmo tempo. O[nível de dureza começará a piscar (os passos 1 e 2 não são necessários se for a primarya vez que liga oorno micro-ondas, ou àsuma falha de electricidade).
- Prima os botões “-” e “+” para configurar o valor correto do parâmetro de dureza da água, de acordo com aanela abaixo.
- Prima o botão “OK” para configurar o parâmetro. O meu me responso exibe as vezes.
PT Definições tíbasas
Aabela segunte contém a definição dos diferentesnectis nares da dureza da agua.
| Tipo | Dureza da água | Mostrador | |||
| Ca + Mg (ppm) | Graus Ingleses [°eH] | Graus Franceses [°dF] | Graus Aleães [°dH] | ||
| Água macia | 0 a 150 | 0 a 11 | 0 a 15 | 0 a 8 | MACIA |
| Água media | 151 a 350 | 12 a 25 | 16 a 35 | 9 a 20 | MÉDIA |
| Água dura | 501 a 500 | 26 a 35 | 36 a 50 | 21 a 28 | DURA |
Visualizar/esconder o relógio

Se a visualização do relógio o perturba, poderá escondê-lo prosseguido da segunte forma
- Prima o botão "On/Off" para ligar oorno.
- Prima o botão "OK" durante 3 segundos. O ecra ficará vexio.
Se quiser voltar a visualizar o relógio repita o mesmo procedimento.
Bloqueio de segurarca
O funciona doorno pode ser bloqueado (por exemplo, para impedir a sua utilização por crianças).

Para bloquear oorno proceda do segunte modo:
- Prima o botão "On/Off" para ligar oorno.
- Mantenha o botão "Bloqueio de segurança" premido durante 3segundos.O botão de
"Bloqueio de seguranca" acende e visualizam-se SYMBOLOS de botões.
Oorno não funciona ase ser desbloqueado. Para desbloquear o forn o repita o mesmo procedimento.
Temporalizadora
Utilize esta funciona como um auxilio nas tarefas culinarias diarias.

Para programar o Temporizador, siga as seguiñes instruções:
- Prima o botão "On/Off" para ligar oorno.
- Prima a tecla de functao "Temporizador". O botao fica vermelho e o eça minha:

- Prima os botões “-” e “+” para definir as horaspretendidas.
- Prima o botão OK. O Temporizador inicia uma contagagem decrescente.
Quando o tempo programado terminar, o forno émitiráraxapitosque se irao repetiracada 30 segundos ou até que o botão Temporizador piseque. Prima o botão Temporizador para desactivar os apitos.
Enquanto o Temporizador estiver a funciona, o botão Temporizador está vermelho. O meu meaze e as luzes demonstram o seguito:
- Se não estiver a decorrer qualquer funcão, o公共场所 exibe a contagem decrescente do Temporizador e o botão Temporizador fica vermelho.
- Se alguma funcão se encontrar activa, o公共场所 e os botões exibem os parâmetros normais da funcção. Para consultar o tempo que restante no Temporizador, premir a tecla Temporizador. O公共场所 exibirá o Temporizador por breves instantes, continuando com as指示as de funcção passados 5 segundos ou quando o botão Temporizador for novamente premido. Enquanto o Temporizador for exibido, poderá alterar o tempo restante com os botões “-” e “+” anteriormente descriços.
Vapor
Use esta funcao para cozer e aquecer vegetais, batatas, arroz, peixe e carne.

- Prima o botão "On/Off" para ligar oorno.
- Prima o botão de funcão "Vapor". O botão fica vermelho e o érá minha:

- Prima os botões “-” e “+” para definir a temperatura pretendida.
- Prima o botão “>”. O(ECRA):

- Prima os botões “-” e “+” se quiser definir o Tempo de Funcionamento desejado. A configuração é optional. Passe para o punto 7 se não desejar programar a)duração.
- Se deseja modifier qualquer um dos parâmetros Mentionados acima, prima os botões “<” ou “>” para selección o parâmetro e em seguida os botões “-” e “+” para definir um valor diferente.
- Prima o botão Iniciar. Oorno而成á a funcional.
Nota importante: O síbolo [piscará no主義or, o que significa que a temperatura interna doorno é inferior aquelá definida.
Aquecer & Esterilizar
Utilizar esta funcao para aquecer pratos cozinhados e refeicacoes rapiadas e tambem para esterilizar e cozer fruta.

- Prima o botão "On/Off" para ligar oorno.
- Prima o botão "Aquecer & Esterilizar". O botão fica vermelho e o érá minha:

-
Prima os botões “+” e “-” para definir o Programa desejado (verabela abaixo).
-
Prima o botão “>”. O(ECRA):

- Prima os botões “-” e “+” se quiser alterar o Tempo de Funcionamento predefinido. A configuração é optional.
- Prima o botão Iniciar. Oorno começará a funcional.
Nota importante: O síbolo [piscará no主義or, o que significa que a temperatura interna doorno é inferior àquela definida.
| Programa | Tipo de Comida | Temperatura (°C) | Tempo (min.) | Instruções |
| R 01 | Pratos cozinhados | 100°C | 13 | Retirar a tampa da embalagem e coloque o prato no recipiente com furos. |
| R 02 | Refeições rápidas / congeladas | 100°C | 18 | |
| R 03 | Feijões | 100°C | 35 | Esterilização: |
| R 04 | Cerejas | 80°C | 35 | Os tempos e temperatas referem-se a boiões de conserva de 1L. |
| R 05 | Ameixas | 90°C | 35 | |
| R 06 | Biberões | 100°C | 12 |
Funções especialis
Cozinhoar vegetais
Utilizar esta funcao para cozinhoar os vegetais como descririto naanela de baixo.

- Prima o botão "On/Off" para ligar oorno.
- Prima o botão "Cozinho Vegetais". O botão fica vermelho e o écrã minha:

-
Prima os botões “+” e “-” para definir o Programa desejado (verabela abaixo).
-
Prima o botão “>”. O(ECRA).

120:00
- Prima os botões “-” e “+” se quiser alterar o Tempo de Funcionamento predefinido. A configuração é optional.
- Prima o botão Iniciar. Oorno começará a funcional.
Nota importante: O símbolo [piscará no ].
mostrador, o que significía que a temperatura interna doorno é inferior àquela definida.
| Programa | Tipo de Vegetal | Temperatura (°C) | Tempo (min.) |
| A 01 | Brócolos / flósculos | 100 °C | 20 |
| A 02 | Couve-flor / flósculos | 100 °C | 25 |
| A 03 | Batatas / pedações | 100 °C | 25 |
| A 04 | Ervilhas proteaginosas | 100 °C | 15 |
| A 05 | Espargo | 100 °C | 25 |
PT Funções especialis
Cozinhoar peixe
Utilizar esta funcao para cozhar os temas de peixe descriritos naanela de baixo.

- Prima o botão "On/Off" para ligar oorno.
- Prima o botão "Cozinhoar Peixe". O botão fica vermelho e o écrã minha:

-
Prima os botões “+” e “-” para definir o Programa desejado (verabela abaixo).
-
Prima o botão “>”. O(ECRA).

25:00
- Prima os botões “-” e “+” se quiser alterar o Tempo de Funcionamento predefinido. A configuração é optional.
- Prima o botão Iniciar. Oorno começará a funcional.
Nota importante: O símbolo [piscará no ].
mostrador, o que significía que a temperatura interna doorno é inferior àquela definida.
| Programa | Tipo de Peixe | Temperatura (°C) | Tempo (min.) |
| B 01 | Truta | 80 °C | 25 |
| B 02 | Camarão | 90 °C | 15 |
| B 03 | Filetes de peixe | 80 °C | 18 |
| B 04 | Mexilhão | 100 °C | 25 |
| B 05 | Lagosta | 100 °C | 30 |
Funções especialis
Cozinhoar carne
Utilizar esta funcao para cozhar os temas de carne descritos naanela de baixo.

- Prima o botão "On/Off" para ligar oorno.
- Prima o botão "Cozinhoar Carne". O botão fica vermelho e o érá minha:

-
Prima os botões "+" e "-" para definir o Programa desejado (verabela abaixo).
-
Prima o botão “>”. O ecra minha:

- Prima os botões “-” e “+” se quiser alterar o Tempo de Funcionamento predefinido. A configuração é optional.
- Prima o botão Iniciar. Oorno começará a funcional.
Nota importante: O síbolo [piscará no ].
mostrador, o que significía que a temperatura interna doorno é inferior àquela definida.
| Programa | Tipo de Carne | Temperatura (°C) | Tempo (min.) |
| C 01 | Peito de frango | 100 °C | 30 |
| C 02 | Lombo de porco fumado / pedações | 100 °C | 45 |
| C 03 | Escalopes de peru | 100 °C | 20 |
| C 04 | Filetes de porco,inteiro | 100 °C | 25 |
| C 05 | Salsichas pré-cozinhadas | 90 °C | 15 |
PT Funções especialis
Acompanhamentos
Utilizar esta funcao para cozinho as comidas como descririto naanela de baixo.

- Prima o botão "On/Off" para ligar oorno.
- Prima o botão "Cozinhar Peixe". O botão fica vermelho e o écrã minha:

-
Prima os botões “+” e “-” para definir o Programa desejado (verabela abaixo).
-
Prima o botão “>”. O(ECRA):

- Prima os botões “-” e “+” se quiser alterar o Tempo de Funcionamento predefinido. A configuração é optional.
- Prima o botão Iniciar. Oorno começará a funcional.
Nota importante: O símbolo [piscará no ].
mostrador, o que significía que a temperatura interna doorno é inferior àquela definida.
| Programa | Tipo de Comida | Temperatura (°C) | Tempo (min.) |
| D 01 | Pastel de levedura doce | 100 °C | 20 |
| D 02 | Pastel de levedura | 100 °C | 25 |
| D 03 | Pastéis | 100 °C | 30 |
| D 04 | Arroz | 100 °C | 35 |
| D 05 | Lentilhas | 100 °C | 40 |
Encher com agua
Encher o deposito de agua
Todas as funções exigem que o depessoito de água está jecheio.
Encha o deposito com água potável fresca fria até à marca “MAX” e coloque-o na parte superior doorno até encaixar. Aproximamente 1 |
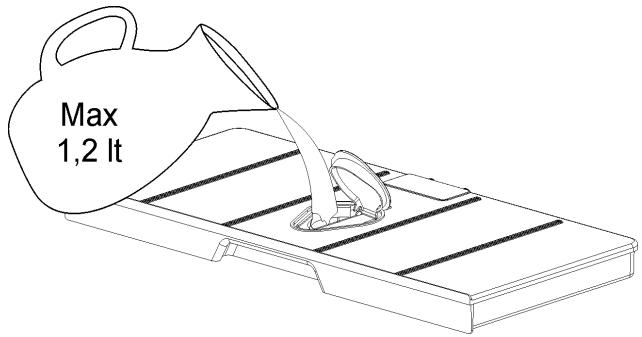
A indentação significa que o depessoito de água não está corretoamente poscionado.
Introduzir mais água
O volume de agua chega, normalmente, para umprocesso de cozedura de 50-60关键时刻.
A necessidade de introduzir maiságua, é indicaça pela lâmpada do deposito de água. Deite 0,5 litros no max., para garantir que a agua não transborda quando volta ao deposito. PERIGO DE TRANSBORDO!
Esvaziar o deposito de agua
Quando o aparelho é desligado, a agua restante é bombeada de volta ao deposito de água.
Enquanto a bomba estiver a trabajo, o visorlothastra "PUMP".
Esta informação mantém-se no visor até a água atingir uma temperatura de 75^ , antes de ser bombada de volta ao deposito de água.
Atença: A água no deposito pode estar quente. Perigo de queimaduras!
Quando toda a agua se encontrar novamente no deposto, o visor minha "DEP". Proceda da mesma forma:
- Retire o deposto de agua do aparelho e esvazie-o.
- Seque o deposto de agua e coloque-o novamente no aparelho. Com um pano seque o interior do aparelho.
- Deixe a porta do aparelho aberta até o aparelho ter arrecido e estar totalmente seco.
IMPORTANTE: Recomenda-se que retire e esvazie o deposito de agua antes cada過程 de cozedura. Evitará o desenvolvimento de bacterías e de calculario no aparho.
Se quiser realizar dois processos de cozedura a vapor successivos, não é necessário esvaziar o deposito de água. O visor minha a indicação "DEP".
Para apagar este avis, prima a tecla Stop. A seguir poderá起初 un novo processo de cozedura sem retirar e esvaziar o deposto de agua.
Interrução do processo de cozedura
O processo de cozedura pode ser interrompido a qualquer momento, premindo uma vez a tecla Start/Stop.
O aparecido tem uma funcção de reducao do vapor que é activada com a tecla Start/Stop. Desta forma, o vapor que saí aoAbrir a porta, é minimizado.
Oprocesso tem uma duração de aproximamenteTRS minutos, e durante este tempo o visor minha "VAP".
Atença: quando se abre a porta, durante ouundyosdoprocessodecozedura,sai vaporquente doaparelho.Afaste-separaolado oupara trás.
Neste momento:
- A producao de vapor FOi interrompida.
- As paredes interiores e o deposto de aguaalready estao quentes. Perigo de queimaduras!
- O relógio para, sendo主義o o tempo de funciona unico. (caso tenha sido regulado).
Se desejar, pode:
- virar ou mexer os alimentos,
- alterar os parâmetros do processo.
Fecha a porta e prima a tecla Start/Stop para continuar o processo.
Alterar parâmetros
Pode alterar os parâmetros da funcão activa premindo os botões “<” ou “>” para selecionar o parâmetro e em seguida os botões “-” e “+” para definir um valor diferente. Prima o botão “OK” ou aguarde durante algunos segundos antes de confirmar o valor do novo parâmetro.
Cancelar um ciclo de cozinha
Se desejar cancelar o processo de cozinho, prima das vezes o botão Parar.
Oorno emitirá um apito e o relógio aparecerá no主義者.
Fim de um ciclo de cozinho
No fim da duração programada ou quando premir o botão Parar para terminar o ciclo de cozinho, serao emitidosTRS apitos e o主義o demonstrador exibirá aPALAVRA "End", oorno inicia a funcao de reducao de vapor.
Esta funcao liberta, gradualmente, o vapor da cavidade, para que nao exista uma libertacao subita de vapor quando a porta do aparelho for aberta.
Esta função demoraURTCA de 3 minuto e quando estiver a decorrer, oestrador exibirá aPALavra "VAP".
Aviso! AoAbrir a porta durante ou depuis do ciclo de cozinhoar, tenha cuidado com o fluxo de ar/vapor quente a sair da-camera de cozinhoar. Afaste-se para fazer queimaduras.
A ventoinha de arrefecimento podeContinuar afuncionar por um的概率 periodo de tempo deposite de o aparelho ter sido desligado.Esta é umafuncao normal, com o proposto de reduzir atemperatura no interior doorno.
A agua residual presente na caldeira deverá atingir a temperatura de 75^ antes de ser bombeada para o deposito de agua. Enquanto a agua estiver a ser bombeada, o≧mostrador exibe a mensagem "PUMP".
Aviso: A agua no deposto pode estar quente. Perigo de queimaduras!
Quando oestrador exibe aPALAVRA "DEP", significa que a agua foi bombeada e que o deposito de agua pode ser Removedo.
Retirar o deposito de agua e secá-lo minuciosamente. Deixar a area de cozhar arrefecer por um momento, procedendo à sua limpeza e secagem com um pano. A porta deve ser deixada aberta por algo tempo, de modo a que o aparecido possaRAR por completeness.
Tabelas edicas
Utilização dos acessórios
O recipienté com furos é uso para cozhar legumes, carne e aves, frescos ou congelados.
É importante que o recipiente sem furos soit introduzido no primeiro não a conta de baixo. Desta forma, as gotas de liquido que caem são recolhidas e não sujam o aparecido. O recipiente com furos que contém os alimentos é introduzido no segundo não a conta de baixo.
O recipientete sem furos é uso para cozhar a vapor alimentos sensíveis como, por exemple,
compotas, knödel (bolas de massa à base de pão) e alimentos que augmentam de volume.
A grelha é usada como superficie de apoio para recipientes mais��enos, por exemple, taças de sobremesa, e para regenerar refeições em pratos.
Para dados mais precisos consulte as tabellas.
Os values indicados relativos à cozedura e a temperatura são values de orientação. A duração efetiva da cozedura pode variar em funcção do tipo e da qualidade dos produits.

Peixe
| Fish | Quantity | Temperature °C | Time min. | Container | Level |
| Peixe | Quantidade | Temperatura °C | Tempo de cozedura min. | Recipiente | Nível a conta de baixo |
| Dourada | 800-1200 g | 80 | 30-40 | com furos | 2 |
| Truta | 4 x 250 g | 80 | 20-25 | com furos | 2 |
| Filete de salmão | 500-1000 g | 80 | 15-25 | com furos | 2 |
| Truta salmonada | 1000-1200 g | 80 | 25-35 | com furos | 1/2 |
| Camarão | 500-1000 g | 80 | 15-20 | com furos | 2 |
| Mexilhão da Nova Zelândia | 1000-1500 g | 100 | 25-35 | com furos | 2 |
| Filete de alabote | 500-1000 g | 80 | 20-25 | com furos | 2 |
| Berbigão | 500-1000 g | 100 | 10-20 | com furos | 2 |
| Lavagante, cong. | 800-1200 g | 100 | 25-30 | com furos | 1/2 |
| Filete de bacalhau fresco | 1000-1200 g | 80 | 20-25 | com furos | 2 |
| Amêjoa | 1000-1200 g | 100 | 15-25 | com furos | 2 |
| Salvelino-árctico | 4 x 250 g | 80 | 25-30 | com furos | 2 |
| Pescada | 1000-1200 g | 80 | 20-25 | com furos | 2 |
| Filete de atum | 500-1000 g | 80 | 15-20 | com furos | 2 |
Carne
| Carne | Quantidade | Temperatura °C | Tempo de cozedura min. | Recipiente | Nível a conta de baixo |
| Coxas de frango | 4-10 | 100 | 40-45 | com furos | 2 |
| Peito de frango | 4-6 | 100 | 25-35 | com furos | 2 |
| Carne de porco salgada e fumada | 500g -1000g | 100 | 40-50 | com furos | 2 |
| Bife de peru | 4-8 | 100 | 20-25 | com furos | 2 |
| Lombo de porco | 4-8 | 100 | 20-30 | com furos | 2 |
| Salsichas | 80-100 | 10-15 | com furos | 2 |
Ovos
Acompanhamentos
| Ovos | Temperatura °C | Tempo de cozedura min. | Recipiente | Nível a conta de baixo |
| Ovos cozidos em recipiente de vidro | 100 | 10-15 | grelha | 2 |
| Ovos cozidos | 100 | 15 | grelha | 2 |
| Ovos escalfados | 100 | 10-12 | grelha | 2 |
| Acompanhamentos | Quantidade | Temperatura °C | Tempo de cozedura min. | Recipiente | Nível a conta de baixo |
| Cevadinho +liquido | 200g + 400ml | 100 | 30-35 | grelha, taça de vidro | 2 |
| Sémola +liquido | 200g + 300ml | 100 | 10-20 | grelha, taça de vidro | 2 |
| Lentilhas +liquido | 200g + 375ml | 100 | 20-50 | grelha, taça de vidro | 2 |
| Arroz +liquido | 200g + 250ml | 100 | 25-40 | grelha, taça de vidro | 2 |
Legumes
| Legumes frescos | Temperatura ℃ | Tempo de cozedura min. | Recipiente | Nivel a conta de baixo | |
| Beringelas | cortadas em rodelas | 100 | 15-20 | com furos | 2 |
| Feijão | 100 | 35-45 | com furos | 2 | |
| Brócolos | raminhos com caule | 100 | 25-30 | com furos | 2 |
| Brócolos | raminhos sem caule | 100 | 15-20 | com furos | 2 |
| Couve-flor | raminhos | 100 | 25-30 | com furos | 2 |
| Couve-flor | inteira | 100 | 40-45 | com furos | 1 |
| Ervilhas | 100 | 30-35 | com furos | 2 | |
| Funcho | cortado em tiras | 100 | 15-20 | com furos | 2 |
| Funcho | cortado em metades | 100 | 20-30 | com furos | 2 |
| Batatas com casca | inteiras, muitoriassemquenas | 100 | 20-25 | com furos | 2 |
| Batatas com casca | inteiras, muitograndes | 100 | 45-50 | com furos | 2 |
| Batatas sem casca | cortadas em pedagens | 100 | 20-25 | com furos | 2 |
| Couve-rábano | cortado em palitos | 100 | 20-25 | com furos | 2 |
| Vagens tenras de ervilhas | 100 | 15-20 | com furos | 2 | |
| Cenouras | cortadas em rodelas | 100 | 25-30 | com furos | 2 |
| Maçaroca | 100 | 50-60 | com furos | 2 | |
| Pimentos | cortados em tiras | 100 | 12-15 | com furos | 2 |
| Pimentos peperoni | 100 | 12-15 | com furos | 2 | |
| Cogumelos | cortados em quartos | 100 | 12-15 | com furos | 2 |
| Alho francês | cortado em rodelas | 100 | 10-12 | com furos | 2 |
| Couve-de-bruxelas | 100 | 25-35 | com furos | 2 | |
| Aipo | cortado em tiras | 100 | 15-20 | com furos | 2 |
| Espargos | 100 | 20-35 | com furos | 2 | |
| Espinafres | 100 | 12-15 | com furos | 2 | |
| Aipo | 100 | 25-30 | com furos | 2 | |
| Courgete | cortada em rodelas | 100 | 12-18 | com furos | 2 |
PT Tabelas e dicas
Knödel
| Knödel | Temperatura °C | Tempo de cozedura min. | Recipiente | Nivel a conta de baixo |
| Buchtein (doces) | 100 | 20-30 | sem furos | 2 |
| Dampfnudeln (bolas de massa ao vapor) | 100 | 15-20 | sem furos | 2 |
| Knödel levedadas | 100 | 15-25 | sem furos | 2 |
| Knödel de pão | 100 | 20-25 | sem furos | 2 |
| Knödel cozidas em guardanapo de pano | 100 | 25-30 | sem furos | 2 |
Sobremesas
| Sobremesas | Quantidade | Temperatura °C | Tempo de cozedura min. | Recipiente | Nível a conta de baixo |
| Compota de maça | 500-1500 g | 100 | 15-25 | sem furos | 2 |
| Compota de pêra | 500-1500 g | 100 | 25-30 | sem furos | 2 |
| Leite creme | 80 | 20-25 | taça sobre a grelha | 2 | |
| Pudim flan | 80 | 25-30 | taça sobre a grelha | 2 | |
| logurte | 40 | 4-6 h | taça sobre a grelha | 2 | |
| Compota de pêssego | 500-1500 g | 100 | 15-20 | sem furos | 2 |
Fruta (esterilizar / fazer conserva)
| Fruta | Quantidade | Temperatura °C | Tempo de cozedura min. | Recipiente | Nível a conta de baixo |
| Péras | 4-6 frascos de 1 l | 100 | 30-35 | grelha | 1 |
| Cerejas/ginjas | 4-6 frascos de 1 l | 80 | 30-35 | grelha | 1 |
| Péssegos | 4-6 frascos de 1 l | 90 | 30-35 | grelha | 1 |
| Ameixas | 4-6 frascos de 1 l | 90 | 30-35 | grelha | 1 |
Regenerar
| Aquecer | Quantidade | Temperatura °C | Tempo de cozedura min. | Recipiente | Nivel a conta de baixo |
| Comida no prato | 1-2 | 100 | 12-15 | grelha | 2 |
| Comida no prato | 3-4 | 100 | 15-20 | grelha | 2 |
| Comida pronta | 100 | 15-20 | grelha | 2 |
Tabelas edicas
Branquear
| Legumes | Quantidade | Temperatura °C | Tempo de cozedura min. | Recipiente | Nível a conta de baixo |
| p.ex., feijão, alho francês | 100 | 10-12 | com furos. | 2 | |
| Couve-galega | 1000-2000 g | 100 | 12-16 | com furos | 2 |
| Folhas de couve lombarda | 10-20 | 100 | 12-15 | com furos | 2 |
| Repolho,inteiro | 2000-2500 g | 100 | 30-45 | com furos | 1 |
| Tomate, pelar | 80 | 12 | grelha | 2 |
Desconcelar
| Legumes / acompanhamento | Temperatura °C | Tempo de cozedura min. | Recipiente | Nível a conta de baixo | |
| Brócolos | raminhos com caule | 100 | 15-20 | com furos | Brócolos |
| Legumes típicos dos Balcás | 100 | 15-20 | com furos | Legumes típicos dos Balcás | |
| Espinafres em folhas | divididos em doses individuals | 100 | 10-15 | sem furos | Espinafres em folhas |
| Couve-flor | raminhos | 100 | 15-20 | com furos | Couve-flor |
| Ervilhas | 100 | 15-25 | com furos | Ervilhas | |
| Couve-galega | barra grossa | 100 | 25-35 | sem furos | Couve-galega |
| Cenouras | cortadas em rodelas | 100 | 15-20 | com furos | Cenouras |
| Couve-de-bruxelas | 100 | 20-25 | com furos | Couve-de-bruxelas | |
| Espargos | 100 | 25-30 | com furos | Espargos | |
| Comida pronta | 100 | conforme necessidade | grelha | Comida pronta | |
| Pão | 100 | 10-25 | grelha | Pão | |
| Arroz | 100 | 15-25 | sem furos | Arroz | |
| Lentilhas | 100 | 15-20 | sem furos | Lentilhas | |
| Massa | 100 | 15-20 | sem furos | Massa | |
Tabelas edicas
Cozer em 2 niveis
Alguns conselhos:
Para cozer eminous niveis, os acessos devem ser colocados sempre no segundo ou quando é no primeiro não a conta de baixo.
Os tempos de cozedura differentes são regulados da segunte forma:
Os alimentos que necessitam de mais tempo para cozer são colocados na parte superior do aparecido. Os alimentos que necessitam de menos tempo para cozer são colocados no primeiro;nivel a conta de baixo.
Exemplo: Legumes, batatas e peixe
Cologne os legumes e as batatas em qualquer tipo de recipiente sobre a grelha no segundo ou terreiro;nivel a conta de baixo.
O peixe deve ser colocado no primeiro;nivel a;.
contar de baixo.
Se usar o recipiente com furos para o peixe, o recipiente sem furos tem de ser colocado na base do aparelho, a fim de recolher o liquido da cozedura. Assim, o aparelhotica limpo.
Tempo de cozedura: Legumes e batatas 25-35关键时刻.
Tempo de cozedura: peixe, conforme a espécie, 15-25 Minutes
É regulado o tempo de cozedura mais longo. Uma vez que os alimentos foram colocados em níveis differentes, estarão prontos à mesma alta, sem que um deles esteja demasiado cozido.
Manutenção
Limpeza do interior
Em caso algo, use produits de limpeza abrasivos como esponjas abrasivas multi-uso, palha-de-aço etc. Estes produits danificam a superficie.
Limpe o interior em quente, usingo para oefeito um pano humido. A seguir, seque.
Para poder a limpeza, poder ser removidas as grelias laterais (veja o capítulo segunte).
Remover as grelhas laterais
Desaperte aorca serrilhada 1 na parte da frente das grelhas laterais, rodando-a no sentido contrario ao dos ponteiros do relógio.
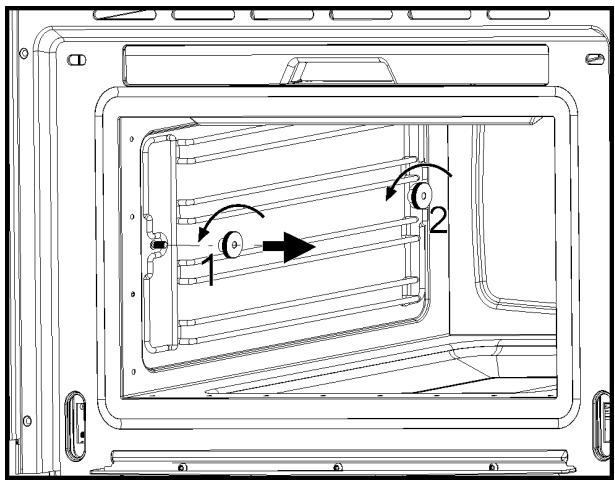
Desaperte ligeiramente a porca serrilhada 2 na parte deTRS das grelhas laterais, rodando-a no sentido contrario ao dos ponteiros do relógio. Não remove a porca serrilhada.
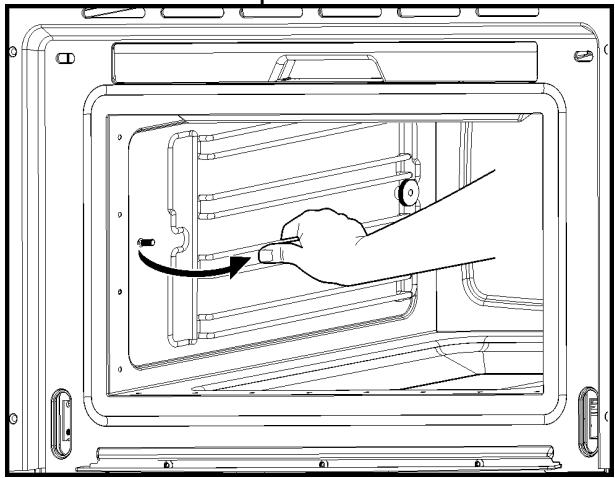
Puxe a grelha lateral um pouco para a fremte e tire-a para fora.

Para montar as grelhas laterais novamente, insira-as na porca serrilhada 2. Introduza a porca serrilhada 1 e aperte-a no sentido dos ponteiros do relógio até ao encosto e(before aperte a porca serrilhada 2.
Desmontar a porta
Abra a porta o mais possível.
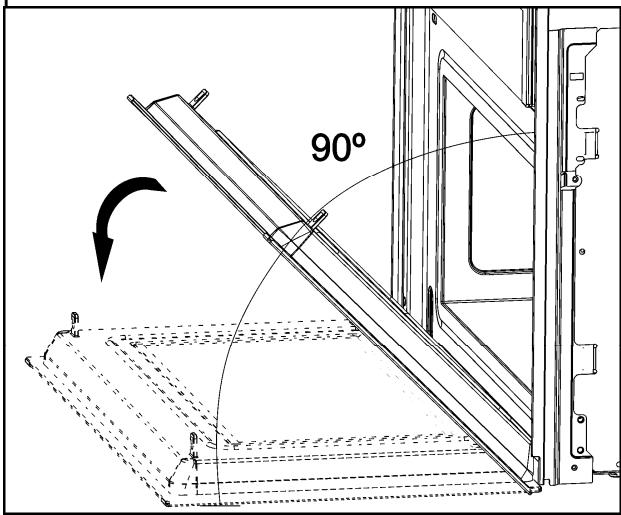
Introduzadoespernos nosfuros dos gonzos da porta.
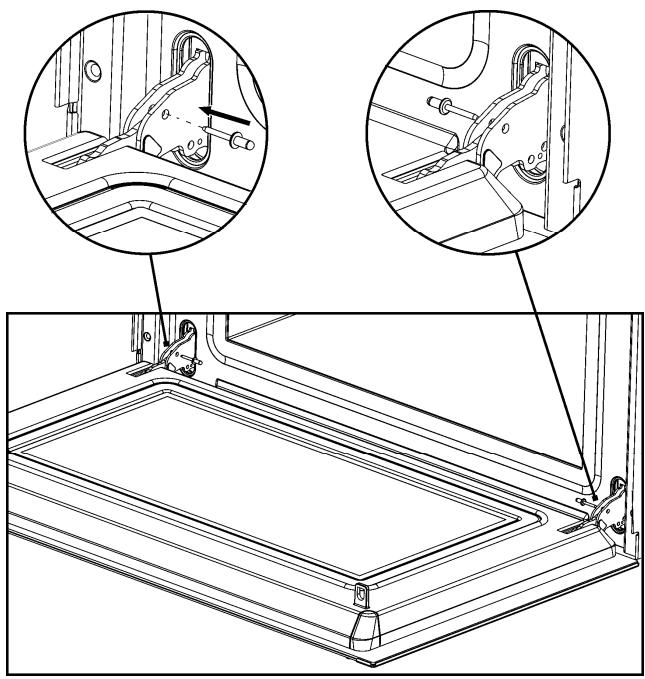
Feche a porta, mas apenas até ao punto em que consegue levanta-la.
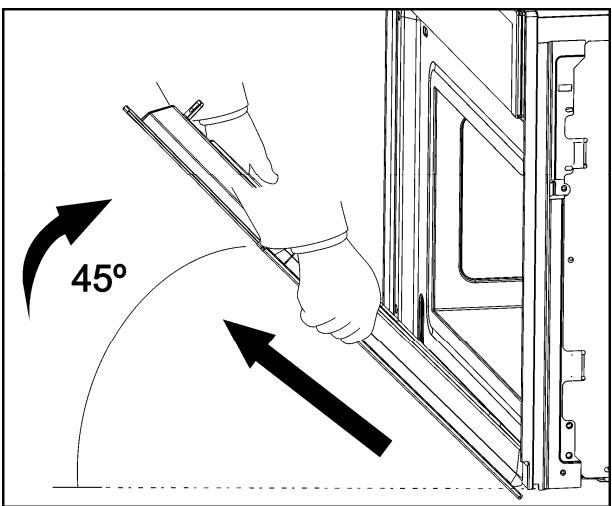
Para montá-la novamente, introduza as dobradiças nos furos.
Abra a porta o mais possível e puxe os pernos para fora.
Cuidados e manutenção
Descalcificacao
Sempre que é producido vapor, independente de dureza do abastecimento de agua local (por exemple, o tártaro contido na agua), forma-se tártaro no interior do gerador de vapor.
O intervalo de tempo entre cada descalcifica o depende da dureza da agua e da frequencia de utilizesao. Se for produzido vapor 4x30 minutos pormana, o aparelho deve ser descalcificado (consoante a dureza da agua) como se segue:
| Dureza da agua | Descalcificar(before deriba de agua |
| Muito macia | 18 grasas |
| Média | 9 grasas |
| Muito dura | 6 grasas |
O aparecido detecta automaticamente quando é necessário�� a descalcificacao. Nestes casos, o主義者 exibe:

Se o procedimento de descalcificação não for executado,CERTOS ciclos de cozinhar que se seguem ao*símbolo acima exibido quando a piscar.
Mais uma vez, se o procedimento de descalcificação não for executado,CERTOS cíclicos de cozinhoque que se seguem ao funcionaamento doorno ficarão bloqueados e oestrador exibirá:
CAL

NOTA IMPORTANTE: Umerro ao descalcificar o aparecido poderá ter repercussions no funciona do aparecido ou Cause danos no mesmo.
Produtos de descalcificação adequados
Para descalcíficar, utilizes o produits de descalcificacao "DURGOL®".
Esse produit permite uma descalcificação professional e cuidada do seu aparecido e está disponível nos Centros de Manutenção.
Aviso! Não utilize vinagre nem produits a base de vinagre uma vez que tal poderá danIFICAR o circuito interno doorno.
Os produits de descalcificação tradicionais não são adequados uma vez que podem conter agentes espumantes.
Procedimento de descalcificacao

Aviso: Por razões de segança, o procedimento de descalcificacao não pode ser interrompido e tem uma duração aproximada de 45 minutos.
O aparelho pode ser descalcificado com a porta do aparelho aberta ou fechada. O aparelho deve estar num estado inactivo antes de se.iniciar o ciclo de descalcificacao.
Para efectuar um ciclo de descalcificacao, proceeder da segunte maneira:
- Prima o botão "On/Off" para ligar oorno.
- Prima os botões "Esquerda" e "Direita" ao mesmo tempo durante 5 segundos. O meuhrador exibe a mensagem "CAL" e ocorre um apito intermitente. Sepretende cancelar o procedimento de descalcificação esta fase, prima o botão "Parar".
- Premir a tecla Iniciar.
- Como oestradiol exibir "0.5L",katirar o deposito de agua.
- Despejar 0,5 litres de um produit adequado de descalcificacao no deposito de agua e voltar a colocá-lo no sitio.
-
Prima a tecla "Iniciar". O ciclo de Descalcificação é iniciado e demora cerca de 30 Minutes.
-
Quando o做不到ar exibir a mensagem "1.0L" intermitente e o forno apitar, retire e esvazie o deposito de agua.
- Encher o depóstito de agua com 1,0 litro de agua fria e colocá-lo novamente no sítio.
- Prima a tecla "Iniciar". Começa o primeiro ciclo de lavagem.
- Quando oestrador exibir novamente a mensagem "1.0L" intermitente e oorno emitir um novo som, retire e esvazie o deposito de agua.
- Encher o deposto de agua com 1 litro de agua fria e colocá-lo novamente no=sitio.
- Prima a tecla "Iniciar". Começa o segundo ciclo de lavagem.
- Quando o ciclo de lavagem tiver terminado o主義istorador exibirá a mensagem "End".
- Retirar, esvaziare secar o deposito de agua.
Limpeza e manutenção do aparelho
Atença! A limpeza tem de ser efectuada com o aparelho desligado da alimentação eletrica. Tire a ficha da tomada ou desluge o circuito de alimentação eletrica do aparelho.
Não use Produtos de limpeza ou abrasão agressivos, nem panos grossos que riscam ou objectos pontiagudos, pouco poder provocar manchas.
Não use dispositivos de limpeza de alta pressão ou de jacto a vapor.
Frente do aparelho
Basta limpar o aparelho com um pano humido. Se estiver muito sujo, deite algumas gotas de um detergente de loça na água de lavagem. Depois, limpe o aparelho com um pano seco.
Nos apareiros com frente de alúnio, use um produit de limpeza de vidros suave e um pano macio que não largue pélos. Limpe no sentido horizontal, sem exercer qualquer pressão sobre a superficie.
As manchas de calcário, gordura,(amido e clara de ovo devem ser eliminadas de immediato. Debaixo destas manchas poderá surgir corrosão.
Evite a penetração de água no interior do aparelho.
Interior
Depois de cada uso limpe as paredes interiores com um pano humido. Deixe a porta aberta, para que o interior possa arrefecer e secar.
Não use um produit de limpeza agressivo para eliminar sujidade persistente. Não use sprays deorno ou outros produits de limpeza agressivos ou abrasivos.
Mantenha a porta e a fronte do aparelho sempre bem limpas, a fim de garantir o seu funcionacorrecto.
Evite a penetração de água nas aberturas de ventilação.
A proteção de vidro da lampada encontrar-se no tecto do aparelho e pode ser fácilmente remodelada para efeitos de limpeza. Solte os parafusos e lave-a com água e detergente de loça.
Acessórios
Limpe os acessórios antes cada uso. Se estiverem muito sujos, deixe-os primeiro algo um tempo de molho e(before use a ESCova e uma esponja. Os acessórios podem ser lavados na区内 de lavar loça.
PT O que fazer em caso de avaria de funciona?
ATENÇÃO! As reparações são poder ser efectuadas por&Tecnicos especializados. Uma intervenção por pessoas não autorizadas pelo fabricante é perigosa.
Os segunites problemas podem ser resolvidos sem chamar o Servço de Assistência Técnica:
- O visor está desligado! Verifique se
- a indentação das horas foi desligada (veja o capítilo sobre as regulações tíbasicas).
- Eu primo as teclas mas não acontece nada! Verifique se
- obloqueio de segurarcafoiactivado (veja o capitulo sobre as regulaçõesbasicas).
- O aparelho não funciona! Verifique se
- a ficha está correctamente ligada à tomada,
- o circuito de alimentação eletrica do aparecido está ligado.
- Oiço ruidos durante o funciona do aparecido!
- Trata-se de ruidos operadores que podem surgir durante todo o tempo de vaporização e que são provocados, por exemplo, pela bombagem de água no gerador de vapor.
- Estes ruídos são正当, não significam problemas.
- Os alimentos não aquecem ou aquecem apenas muito lentamente! Verifique se
- escolheu a temperatura e o tempo de duraçãoCERTOS,
- colocou no interior do aparelho uma quantidade de alimentos maior ou mais fria que o habitual.
-
Se no visor aparecer a indicação “Err_, chame o Servço de Assistência Tecnica.
-
No fim do processo de cozedura oço um ruido! Isto não significica um problema.
- O ventilador de arrefecimento ainda continua a funcional durante algo tempo. quando a temperatura tiver baixado o suficiente, o ventilador desliga.
- O aparelho funciona mas a lâmpada no interior não acende!
- Se todas as funções foram executadas correctamente, é provavel que a lampada tenha fundido. Pode continuar a usar o aparelho.
Substituição da lâmpada
Para substituir a l'lampada proceda da segunte forma:
- Desligue o aparelho da alimentacao. Tire a ficha da tomada ou deslgue o circuito de alimentacao eletrica do aparelho.
- Solte os parafusos da proteção de vidro da lâmpada (1).
- Retire a lâmpada de halogéneo (2). Atença! A lâmpada pode estar muito quente.
- Introduza uma nova lâmpada E14 230-240V / 15W. Siga as instruções do fabricante da lâmpada.
- Volte a aparafusar a proteção de vidro da lâmpada (1).
- Ligue o aparelho novamente à corrente.
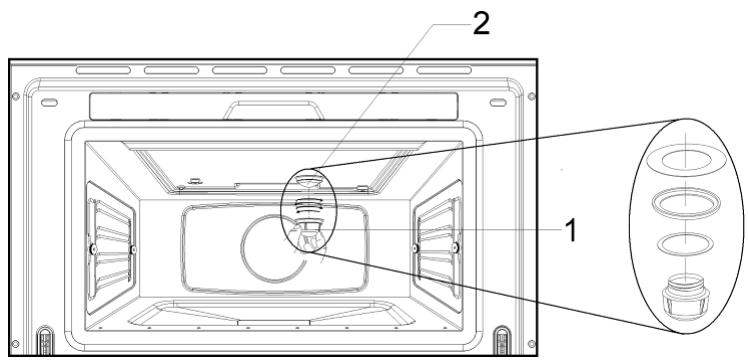
Descrição das funções
| Símbolo | Função | Comidas |
| Vapor | Cozedura de todos ostipsos de vegetais,arroz,cereais e carne.Extracçãode sumos de bagas.Descongelamentoe cozedura simultâneade vegetais. | |
| Regeneração &Esterilização | Regeneração de pratoscozinhados e de refeições instantâneas.Esterilizar/cozer fruta. | |
| Cozinhar vegetais | Cozinhardifferentestipos de vegetais. | |
| Cozinhar peixe | Cozinhar differentestipos de peixe. | |
| Cozinhar carne | Cozinhar differentestipos de carne. | |
| Acompanhamantos | Cozinhar differentestipos de companhamantos. |
Indicações
| Mensagem | Descrição |
| Depósito de água | |
| [ ] | A piscar – o depósito de água está vazio. Por favor, reabasteça-o. |
| [ ] | Indicação que o depósito de água está em falta. |
| DEP | O depósito de água tem de ser retirado, esvaziado e reinserido. |
| Redução de vapor | |
| VAP | Indicação de que o processo de redução do vapor está a decorrer. |
| PUMP | Indicação de que a água quente está a ser bombeada para o depósito de água. |
| Descalcificacao | |
| CAL | O aparecido deve ser descalcificado. |
| A piscar – inicia-se a descalcificacao. | |
| 0.5L | Despeje 0,5 litros de produits de descalcificacao no depósito de água. |
| 1.0L | Despeje 1,0 litro de água fria no depósito de agua para a lavagem. |
| Avisos doSYSTEMA | |
| HOT (QUENTE) | A temperatura é demasiado elevada na Placa Electrónica. |
| Err_ | Ligue para o Centro de Apoio ao CLIENTE |
PT CharacterísticatsYTICnicas
Specifications
AC Voltage 220-240 V/50 Hz
Power required. 1500 W
- Exterior dimensions (W × H × D) . 595 × 455 × 472 ~mm
- Interior dimensions (W × H × D) 420 × 210 × 390 mm
Oven capacity. 351
Weight 32 kg
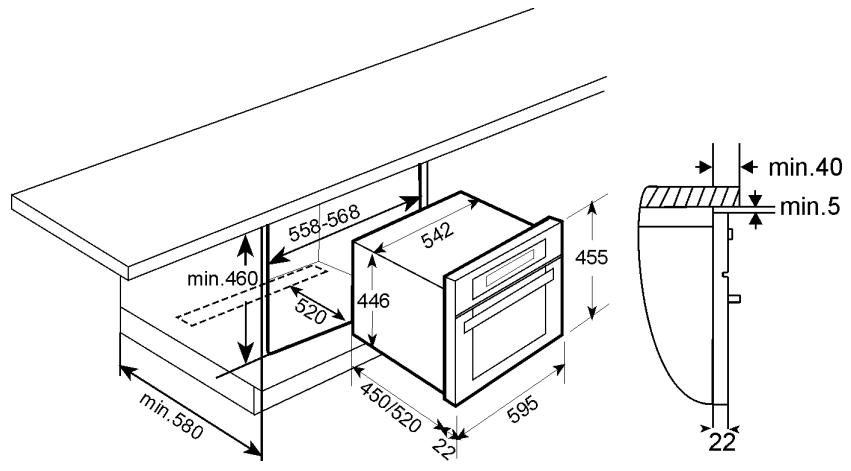
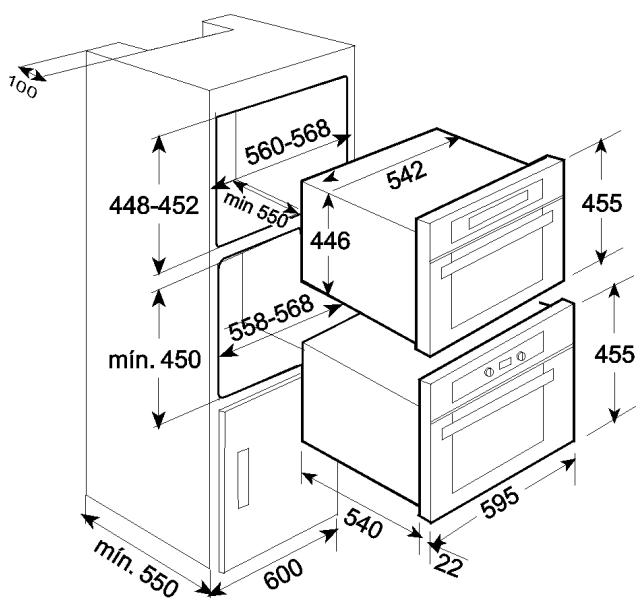
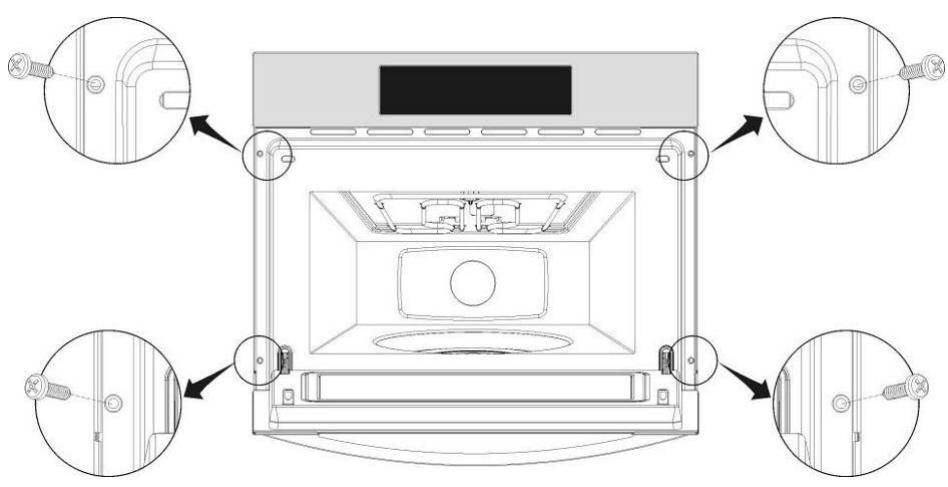
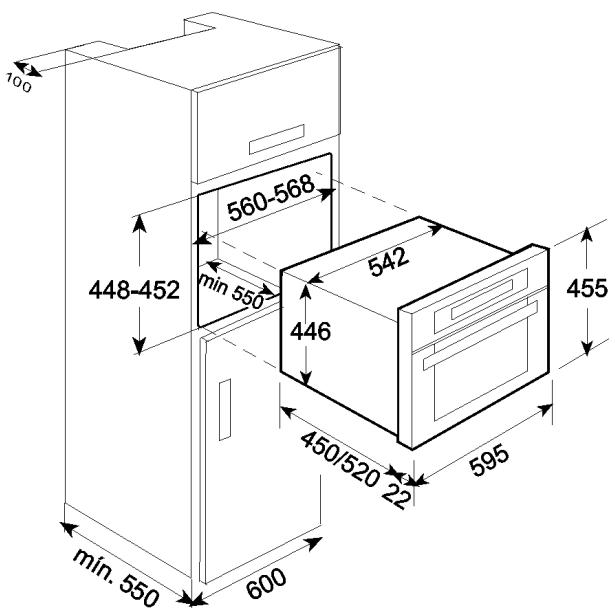
ES
- Introduzca el hora de cocción al vapor en el hueco y ajustelo.
- Abra la puerta y fije el aparato al mueble de la cucina con los quatre tornillos suministrados como se indica en la ilustracion.
PT
- Inserir oorno de vape e ajustá-lo ao espaço existente.
- Abrir a porta e fixar o aparelho no molevel usingo para oefeito os quatre parafudos fornecidos, conforme minha a imagem.
| COUNTRY | COMPANY | CC | TELEPHONE | E-MAIL / FAX |
| AUSTRALIA | TEKA AUSTRALIA Pty. Ltd. | 61 | 3 9550 6100 | sales@tekaaustralia.com.au |
| AUSTRIA | KÜPPERSBUSCH GesmbH | 43 | 1 866 800 | info@kueppersbusch.at |
| BELGIUM | B.V.B.A. KÜPPERSBUSCH S.P.R.L. | 32 | 2 466 8740 | info@kuppersbusch.be |
| BulgARY | TEKA BULGARIA EOOD. | 359 | 2 9768 330 | 2 9768 332 |
| CANADA | TEKA CANADA LTD. | 1 | 866-282-5403 | info@tekacadana.com |
| CHILE | TEKA CHILE, S.A. | 56 | 2 4386 000 | info@teka.cl |
| P. R. CHINA | TEKA INTERNATIONAL TRADING (Shanghai) | 86 | 21 511 688 41 | info@teka.cn |
| CZECH REPUBLIC | TEKA CZ S.R.O. | 420 | 2 84 691940 | info@teka-cz.cz |
| ECUADOR | TEKA ECUADOR, S.A. | 593 | 4 2251174 | ventas@teka.ec |
| FRANCE | TEKA FRANCE S.A.S. | 33 | 1 343 01597 | 1 343 01598 |
| GERMANY | TEKA KÜCHENTECHNIK GmbH | 49 | 27718141-0 | info@teka-kuechentechnik.de |
| GREECE | TEKA HELLAS A.E. | 30 | 210 9760283 | info@tekahellas.gr |
| HUNGARY | TEKA HUNGARY KFT | 36 | 1 3542110 | teka@teka.hu |
| INDONESIA | PT TEKA BUANA | 62 | 21 390 5274 | teka@tekabuana.com |
| ITALY | TEKA ITALIA S.P.A. | 39 | 0775 898271 | info@tekaitalia.it |
| KOREA (SOUTH REP.) | TEKA KOREA CO. LTD. | 82 | 2 599 4444 | 222 345 668 |
| MALAYSIA | TEKA KÜCHENTECHNIK (MALAYSIA) SDN. | 60 | 3 7620 1600 | customer_svc@teka.com.my |
| MIDDLE EAST | TEKA KÜCHENTECHNIK MIDDLE EAST FZE | 971 | 4 887 2912 | teka@emirates.net.ae |
| MEXICO | TEKA MEXICANA S.A. de C.V. | 52 | 555 133 0493 | ventas@tekamexicana.com.mx |
| PAKISTAN | KÜPPERSBUSCH-TEKA PAKISTAN Pvt. Ltd. | 92 | 42 576 1656 | 42 576 1657 |
| POLAND | TEKA POLSKA SP. ZO.O. | 48 | 22 7383270 | teka@teka.com.pl |
| PORTUGAL | TEKA PORTUGAL, S.A. | 351 | 234 329 510 | sacliente@teka.pt |
| RUSSIA | TEKA RUS LLC | 7 | 495 101 31 08 | info@tekarus.ru |
| SINGAPORE | TEKA SINGAPORE PTE. LTD. | 65 | 67342415 | tekasin@pacific.net.sg |
| SPAIN | TEKA INDUSTRIAL, S.A. | 34 | 942350505 | mail@teka.com |
| THAILAND | TEKA (THAILAND) CO. LTD. | 66 | 2 652 2999 | 2 652 2740 1 |
| TURKEY | TEKA TEKNIK MUTFAK | 90 | 212 288 3134 | teka@teka.com.tr |
| UKRAINE | TEKA UA | 380 | 44 496 0680 | info@teka.ua |
| UNITED ARAB EMIRATES | TEKA KÜCHENTECHNIK U.A.E. LLC | 971 | 4 283 3047 | uaeteka@emirates.net.ae |
| UNITED KINGDOM | TEKA PRODUCTS LTD. | 44 | 1235 861916 | info@teka.co.uk |
| USA | TEKA USA, INC. | 1 | 813 2888820 | info@tekausa.com |
| VENEZUELA | TEKA ANDINA, S.A. | 58 | 2 1229 12821 | teka@teka.com.ve |

TEKA Industrial, S. A.
Cajo, 17
39011 SANTANDER (Spain)
Tel: 34-942-355050
Fax: 34-942-347694
mail@teka.com

www.teka.com
TEKA Kuchentechnik GmbH
Sechsheldener Str. 122
35708 Haiger (Germany)
Tel: 49-2771-8141-0
Fax: 49-2771-8141-10
- Environmental protection
- Disposal of the packaging
- Disposal of equipment no longer used
- Contents
- EN Installation instructions
- Before installation
- After installation
- WARNING: THE OVEN MUST BE EARTHED.
- Safety Instructions
- EN Safety Instructions
- This oven is exclusively for domestic use!
- Avoid damaging the oven or other dangerous situations by following these instructions:
- Cleaning:
- Repairs:
- Description of your oven
- Initial Settings
- Setting the clock
- Water Hardness setting
- Basic settings
- Hiding/Displaying the Clock
- Safety blocking
- Timer
- Basic Functions
- Steam
- Regenerating & Sterilising
- Cooking Vegetables
- Special Functions
- Cooking Fish
- Cooking Meat
- Side Dishes
- Filling the water tank
- Refilling the water tank
- Emptying the water tank
- Warning: the water in the tank may be hot. Danger of burns!
- When the oven is working…
- Interrupting a cooking cycle
- Altering parameters
- Cancelling a cooking cycle
- End of a cooking cycle
- EN Usage, tables and tips
- Use of accessories
- Usage, tables and tips
- Two level cooking
- Some suggestions:
- Care and maintenance
- Cleaning the cooking space
- Removing the shelf guides
- Removing the appliance door
- Dscaling
- CAL
- Suitable descending solutions
- Dscaling procedure
- Front surface
- Oven interior
- Accessories
- EN
- What should I do if the oven doesn’t work?
- Replacing the light bulb
- Technical characteristics
- Specifications
- Hinweise zum Umweltschutz
- Entsorgung der Verpackung
- Entsorgung von stillgelegten Geräten
- Inhaltsverzeichnis
- Installationsanleitung 31
- Sicherheitshinweise 32
- Installationsanleitung 34
- Grundeinstellungen 35
- Grundfunktionen 38
- Sonderfunktionen 40
- Wasser einfllen 44
- Während des Betriebes 45
- Tabellen und Tipps 46
- Reinigung und Wartung des Geräts 51
- Was ist im Falle einer Funktionstörung zu tun? 56
- Technische Eigenschaften 57
- Einbau 58
- Vor der Installation
- Nach der Installation
- ACHTUNG: DAS GERÄT MULLS UNBEDINGT GEERDET WERDEN.
- DE Sicherheitshinweise
- Dieses Gerät ist ledigious für den Hausgebrauch bestimmt!
- Reinigung:
- Im Falle einer Reparatur:
- Installationsanleitung
- DE Grundeinstellungen
- Anfangseinstellungen
- Einstellen der Uhr
- Einstellen der Wasserhärte
- Grundeinstellungen
- Einblenden/Ausblenden der Uhr
- Sicherheitsverriegelung
- Dampfgarer
- Aufwärmen & Sterilisieren
- Sonderfunktionen
- Zubereiten von Gemüse
- Zubereiten von Fisch
- Zubereiten von Fleisch
- Beilagen
- Wasser einfüllen
- Wassertank füllen
- Wasser nachfüllen
- Wassertank entleeren
- Achtung: das Wasser im Tank kann heißt sein. Gefahr von Brandverletzungen!
- Unterbrechung eines Kochvorgangs
- Änderung der Parameter
- Einen Kochvorgang Löschen
- Ende eines Kochvorgangs
- Tabellen und Tipps
- Anwendung des Zubehörs
- Garen auf 2 Ebenen
- Einige Hinweise:
- DE Reinigung und Wartung des Geräts
- Reinigung des Innenraums
- Seitengitter aushängen
- Reinigung und Wartung des Geräts
- Die Gerätetur herausnahmen
- Entkalken
- Geeignete Entkalker
- Entkalkungsvorgang
- Stirnsite
- Garraum
- Zubehör
- Was ist im Falle einer Funktionstörung zu tun?
- Lampenwechsel
- Spezifikation
- DE
- Indicaciones sobre proteccion medioambiental
- Eliminación del embalaje
- Eliminación de aparatos abandonados
- Instruetiones de instalacion 3
- Indicaciones de seguridad 4
- Descripción del aparato 6
- Ajustes Basics 7
- Funciones básicas 10
- Funciones especialies 11
- Carga de agua 15
- Durante el funciona. 16
- Tablas y consejos 17
- Mantenimiento 22
- Limpieza y mantenimiento del aparato 26
- Qué hacer en caso una avería de funciona? 27
- Characteristicasétécnicas 28
- Montaje 59
- Antes de la instalación
- Después de la instalación
- Limpieza:
- En caso de reparacion:
- Ajustes Basics
- Ajustes iniciales
- Configurar el reloj
- Configuraciones de la dureza del agua
- Ocultar / Exhibir el reloj
- Bloqueo de seguridad
- Definuciones básicas
- Temporizador
- Vapor
- Calendar y Esterilizar
- Funciones especialies
- Cocinar vegetales
- Cocinar pescado
- Cocinar carne
- Guarniciones
- Carga de agua
- Llenado del deposito de agua
- Relleno de agua
- Vaciado del deposito de agua
- Atencion: el agua del deposito puede estar caliente. Peligro de lesiones por quemadura!
- Interruption de un processo de coccción
- Alteración de parámetros
- Cancelar un ciclo de coccción
- Fin de un ciclo de coccción
- Tablas y consejos
- Utilización de los accesorios
- Cocción en 2 niveles
- Indicaciones:
- Limpieza de la-camera interior
- Desenganche de las parrillas laterales
- Mantenimiento
- Extracción de la puerta del aparato
- Eliminación del sarro
- Solutuciones de eliminación de sarro adequadas
- Cuidados y mantenimiento
- Procedimiento de eliminación del sarro
- Parte frontal
- Cámara de coccción
- Accesorios
- ¿Qué hacer en caso una avería de funciona?
- Cambio de lámpara
- Descripción de sistemas
- Pantallas
- Especificaion
- Eliminação da embalagem
- Eliminação de aparhos inutilizados
- Instruções de instalação 31
- Instruções de segurança 32
- Descrição do aparecido 34
- Definçõesbasicas 35
- Funcoesbasicas 38
- Funções especialis 39
- Encher com agua 43
- Durante o lavoro 44
- Tabelas edicas 45
- Manutenção 51
- Limpeza e manutenção do aparecido 55
- O que fazer em caso de avaria deestrutura? 56
- Characteristicasétécnicas 57
- Instalacao 59
- Antes da instalacao
- Depois da instalacao
- ATENÇA: É OBRIGATORIO LIGAR O APARELHO À TERRA.
- PT Instruções de segurança
- Instruções de segurarca
- Limpeza:
- Em caso de reparacao:
- Definições基本情况
- Regulações iniciais
- Definir as horas
- Configuração da Dureza da Água
- PT Definições tíbasas
- Visualizar/esconder o relógio
- Bloqueio de segurarca
- Temporalizadora
- Aquecer & Esterilizar
- Funções especialis
- Cozinhoar vegetais
- PT Funções especialis
- Cozinhoar peixe
- Cozinhoar carne
- Acompanhamentos
- Encher com agua
- Encher o deposito de agua
- Introduzir mais água
- Esvaziar o deposito de agua
- Interrução do processo de cozedura
- Alterar parâmetros
- Cancelar um ciclo de cozinha
- Fim de um ciclo de cozinho
- Tabelas edicas
- Utilização dos acessórios
- PT Tabelas e dicas
- Alguns conselhos:
- Manutenção
- Limpeza do interior
- Remover as grelhas laterais
- Desmontar a porta
- Cuidados e manutenção
- Descalcificacao
- Produtos de descalcificação adequados
- Procedimento de descalcificacao
- Limpeza e manutenção do aparelho
- Frente do aparelho
- Interior
- Acessórios
- PT O que fazer em caso de avaria de funciona?
- Substituição da lâmpada
- PT CharacterísticatsYTICnicas
- ES
- PT
Marque : TEKA
Modèle : HKX 960 S - INSTALATION MANUAL
Catégorie : Appareil de cuisine