
AR 615 CD MP3 - Lecteur CD CLATRONIC - Notice d'utilisation et mode d'emploi gratuit
Retrouvez gratuitement la notice de l'appareil AR 615 CD MP3 CLATRONIC au format PDF.

| Type de produit | Autoradio avec lecteur CD et MP3 |
| Marque | CLATRONIC |
| Modèle | AR 615 CD MP3 |
| Alimentation | CC 13,8 V (véhicule) |
| Consommation électrique | 7 A max. |
| Puissance de sortie | 4 x 30 W |
| Gamme FM | 87,6 – 108,0 MHz |
| Sensibilité FM | 3 µV |
| Gamme MW | 522 – 1620 kHz |
| Gamme LW | 144 – 288 kHz |
| Formats CD pris en charge | CD, CD-R, CD-RW, MP3 |
| Dimensions (L x H x P) | 178 x 50 x 165 mm |
| Poids (estimé) | Environ 1 kg |
| Rapport signal/bruit | 50 dB (1 kHz) |
| Fonctions RDS | AF, REG, EON, TA, PTY |
| Égaliseur (DSP) | Pop, Rock, Classique, Plat, Personnalisé |
| Fonctions de lecture CD/MP3 | Répétition, Aléatoire, Intro, Pause, Recherche de plage, Recherche par fichier/mot clé, Entrée directe de titre |
| Mémoire de stations | 18 stations (6 par bande FM, MW, LW) |
| Fusible | 7 A (à remplacer par un modèle identique) |
| Entretien et nettoyage | Nettoyer le boîtier avec un chiffon sec ; nettoyer les CD avec un chiffon doux non pelucheux sans solvant |
| Sécurité | Laser classe 1 ; ne pas ouvrir le boîtier ; débrancher avant entretien |
| Pièces détachées et réparabilité | Contactez le service après-vente CLATRONIC ; fusible remplaçable par l'utilisateur |
FOIRE AUX QUESTIONS - AR 615 CD MP3 CLATRONIC
Questions des utilisateurs sur AR 615 CD MP3 CLATRONIC
0 question sur cet appareil. Repondez a celles que vous connaissez ou posez la votre.
Poser une nouvelle question sur cet appareil
Téléchargez la notice de votre Lecteur CD au format PDF gratuitement ! Retrouvez votre notice AR 615 CD MP3 - CLATRONIC et reprennez votre appareil électronique en main. Sur cette page sont publiés tous les documents nécessaires à l'utilisation de votre appareil AR 615 CD MP3 de la marque CLATRONIC.
MODE D'EMPLOI AR 615 CD MP3 CLATRONIC
C1C
C4TRONIC
Bedienungsanleitung/Garantie
Instruzioni per l'uso/Garanzia Instruction Manual/Guarantee Instrukcja obsfugi/Gwaranca
Autoradio mit CD-Player
Autoradio con lettere CD
Car radio with CD player
Radio samochodowe z odtwarzaczem CD
AR 615 CD / MP3
C E
Inhalt
Indice · Contents · Spis tresci
D Übersicht Bedienelemente .Seite 3
Bedienungsanleitung .4
Garantie . 18
Descrizione dei singoli peszzi .3
Istruzioni per l'uso . 19
Garanzia . 35
GB Control element overview.. Page 3
Instruction Manual .Page 36
Guarantee 50
PL Przeglade elementów obslugi Strona 3
Instrukcja obslugi . Strona 51
Gwarancja .67

Bedienelemente
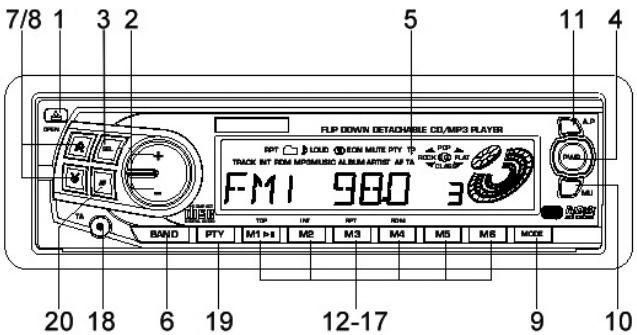
Abb.1: Bedienfeld
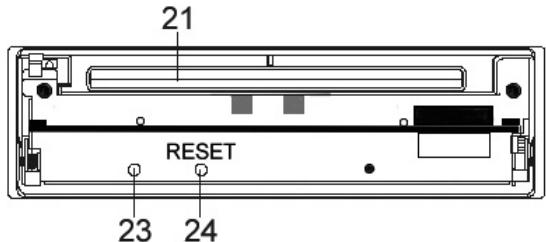
Abb. 2: Frontseite des Gerätes mit entnommenem Bedienfeld
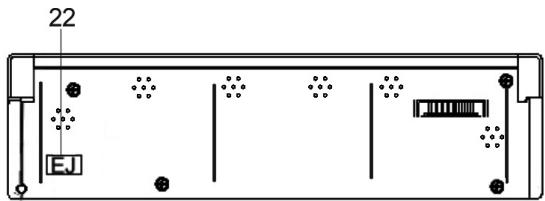
Abb. 3: Rückseite des Bedienfeldes
D
Allgemeine Sicherheitshinweise
Um das Risiko von Feuer oder einem elektrischen Schlag zu vermeiden, sollen. Sie das Gerät nicht Regen oder Feuchtigkeit aussetzen. Das Gerät nicht in unmittelbarer Höhe von Wasser betreiben (z.B. Badezimmer, Schwimmbecken, feuchte Keller).
Verwenden Sie das Gerät nur für den vorgesehenen Zweck.
Das Gerät ausschließlich an eine vorschrifsmäßig installierte Steckdose anschließen. Achten Sie darauf, dass die angegebene Spannung mit der Spannung der Steckdose übereinstimmt.
Bei Verwendung von externen Netzeiten auf die richtige Polarität und Spannung achten, Batterien stets richtigherum einlagen.
Das Gerät so aufstellen, dass vorhandene Lüftungsöffnungen nicht verdeckt werden.
Niemals das Gehäuse des Gerätes öffnen. Durch unsachgemäße Reparaturen konnen erhebliche Gefahren für den Benutzer entstehen. Bei Beschädigung des Gerätes, insbesondere des Netzkabels, das Gerät nicht mehr in Betrieb besteht, sondern von einem Fachmann reparieren lessen. Netzkabel regelmäßig auf Beschädigungen prüfen.
Ein defektes NetzkabelarfurvomHersteller,unseremKundendienstoder einerähnlich qualifizierten Person durchein gleichwertiges Kabel ersetzt werden,umGefahrtdungen zu vermeiden.
Benutzen Sie das Gerät langere Zeit nicht,ziehen Sie den Netzstecker aus der Steckdose, bzw. entnahmen Sie die Batterien.
These Symbole können sich ggfs. auf dem Gerät befinden und sollen Sie auf folgenden hinweisen:

Das Blitz-Symbol soll den Benutzer auf Teile im Inneren des Gerätes hinweisen, die gefährlich hohe Spannungen führen.

Das Symbol mit Ausrufezeichen soll den Benutzer auf wichtige Bedienungs- oder Wartungs-Hinweise in den Begleitpapieren hinweisen.

Geräte mit thisem Symbol arbeiten mit einem „Klasse 1-Laser“ zur Abtastung der CD. Die eingebauten Sicherheitsschalter sollen verhindern, dass der Benutzer gefährlichtem, für das menschliche Auge nicht sightbarrem Laserlicht ausgesetzt wird, wenn das CD-Fach geöffnet ist.
These Sicherheitsschalter sollen auf keine Fall überbrukt oder manipuliert werden, sonst besteht die Gefahr, dass Sie sich dem Laser-Licht aussetzen.
Installation
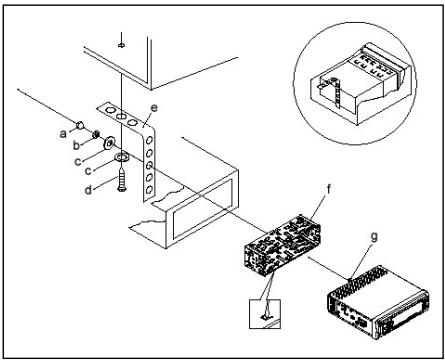
Montieren Sie das Radiogerät gemäß folgender Darstellungen

a Mutter
b Federscheibe
c Unterlegscheibe
d Schraube
e Montagewinkel
f Einschubgehause
g Gewindebolzen
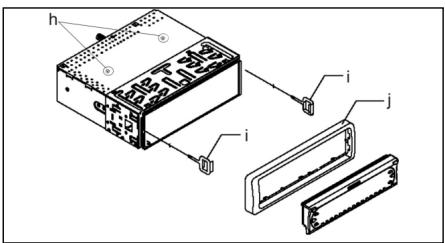
Achtung!
h Schrauben der Transportsicherung (Bitte vor der Montage entnehmer)
i Ausziehwerkzeug
(Schlüssel für die Demontage)
j Blendrahmen
Setzen Sie die
Bedienblende erst an
der linken Seite an und
rasten Sie, sie dann auf
der rechten Seite ein.
D
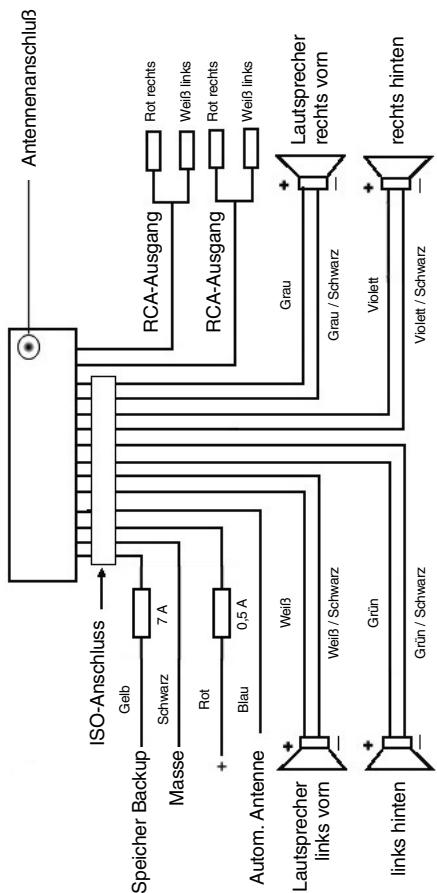
Anschluss
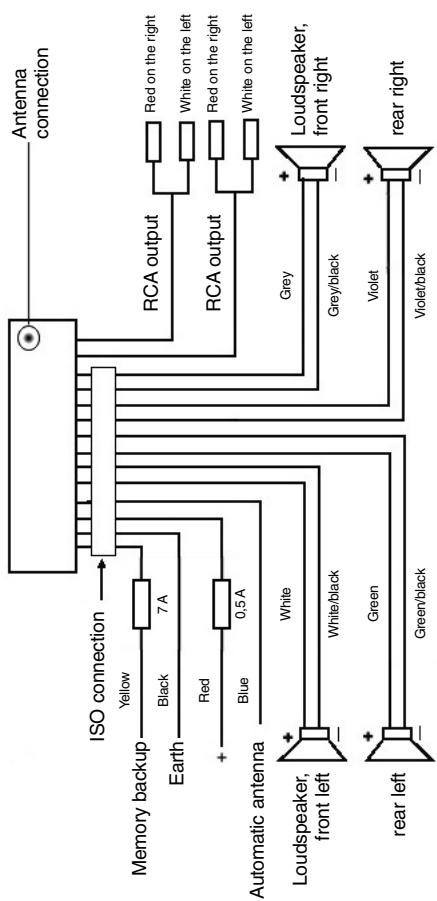
Stellen Sie die Anschlüsse gemäß des Schaubildes her.
Achtung
D
- Setzen Sie das abnehmbare Bedienfeld erst nach dem Anschluss der Kabel auf.
- Verwenden Sie Laufsprecher mit einer Impedanz von 4 Ohm.
Wichtige Zusammenformation zum Einbau Ihr's Autoradios!
- Bitte beachten Sie beim Einbau/Anschluss Ihres Gerätes, dass Ihr Auto über einen originalen "ISO ANSCHLUSS" verfügt. Diese ist das Gegenstück zu dem am Geräteausgang verhandensten Stecker (ISO ANSCHLUSS).
Bei der Belegung des "DAUER +" (Backup) kann es je nach Fahrzeugtyp zu Abweichungenkommen.
Wenden Sie sich in diesen Fällenitte an eine autorisierte KFZ Werkstatt, da eine permanente/dauerhafte Stromversorgung Ihres Radios sonst nicht gewährleistet ist. (Diese ist jedoch für die Speicherung der Senderstationen notwendig). - Je nach Fahrzeugtyp können in Ausnahmefällen Störgeräusahe im Radio/CD Betrieb auften. Diese lessen sich mit einem zusätzlichen Entstörfilter entsprechend beseitigen. Ihr Gerat AR 615 CD ist bereits serienmäßig mit einem Entstörfilter ausgerüstet. Trotzdem kann es fahrzeugbedingt zu Beeinträchtigungenkommen.
Entstörfilter erhalten Sie im Autozubehörhandel und/oder bei ihrer KFZ-Werkstatt.
Bei technische Fragen wenden Sie sichitte an unsere Hotline.
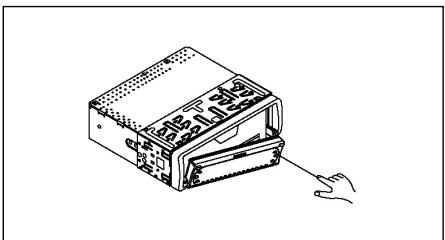
Vorsichtsmaßnahmen und Wartung
- Die Schrauben (h) der Transportsicherungitte vor der Montage entfernen, da sonst die CD nicht eingezogen werden kann.
- Das Gerät ist für den Minuspol der Batterie ausgelegt, der an die Fahrzeugkarosserie angeschlossen sein muss. Diesitte vor Installation überprüfen.
- Wenn die vordere Bedientafel während des Radio- oder CD-Betriebs abgenommen wird, wird das Gerät automatisch ausgeschaltet.
- Fehlfunktion. Nach dem Wiedereinsetzen der vorderen Bedientafel erscheid in der LCD-Anzeige eine Fehlermeldung (ERROR). Drücken Sie mit Hilfe eines Drahtes o.ä. die Taste RESET (24), um die Elektronik wieder zurückzustellen (RESETTEN).
- Wenn das Fahrzeuginnere extrem heißt ist, z. B. nach einer längeren Parkdauer in praller Sonne, den Player nicht einschalten, bis das Fahrzeug nach einer kurzen Fahrzeit im Inneren etwas abgekühlt ist.
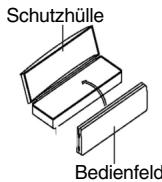
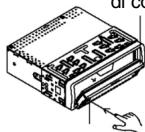
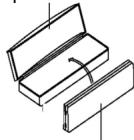
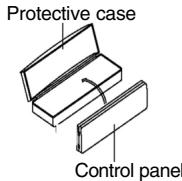
- Um das abnehmbare Bedienteil sicher aufzubewahren, stets die davon vorgesehene Schutzhülle verwenden.
D
-
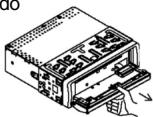
Zum Herausnehmer/Entfern/Einbauen und Aufbewahren des vorderen Bedienteils beachten Sieitte folgende Abbildungen.
-
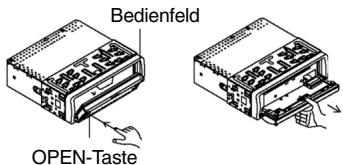
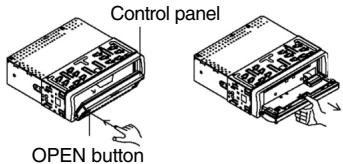
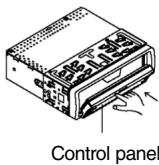
Bedienfeld Öffnen
-
Bedienfeld entnehmen
-
Bedienfeld transportieren
-
Bedienfeld anbringen
Bedienung
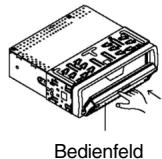
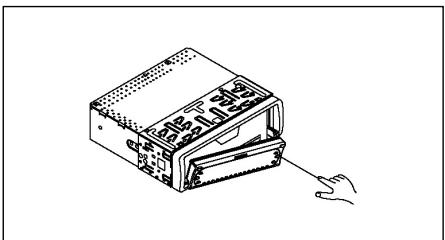
1 OPEN-Taste
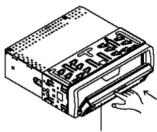
Drucken Sie die OPEN-Taste zum Herunterklappen des vorderen Bedienfeldes. Eine CD kann dann in den CD-Schlitz eingeschobenzw. durch Drucken der EJECT-Taste ausgeworfen werden.
2 +/- Tasten
Im normalen Spielbetrieb dienen die Tasten zur Einstellung der Laufstärke. In Verbindung mit der zuvor gestrückten SEL- Taste konnen Änderungen in Menus z. B. dem Schallmodus vorgenommen werden.
3 SEL-TASTE (AUSWAHL)
a) Drucken Sie die SEL- Taste kurz, um in das Auswahlen des Schallmodus zu gelangen. Im Display erscheint „VOL“ zur Einstellung der Lauststärke. Durch wiederholtes Drucken der SEL- Taste konnen Sie nun die einzelnen Menüpunkte wie VOLUME, BASS, TREBLE, BALANCE und FADER anwahlen. Sieändern die Einstellungen der einzelnen Menüpunkte mit Hilfe der „+“ oder „-“-Taste. Hinweis: Sind unter DSP Equalizeinstellungen wie z. B. POP, ROCK gewählt, konnen BASS und TREBLE nicht eingestellt werden.
b) Drücken Sie die SEL- Taste lang, um in das Auswahlmenü TA SEEK/TA ALARM, MASK DPI/MASK ALL, DSP OFF, LOUD ON/OFF, BEEP ON/OFF, SEEK1/2, STEREO/MONO; LOCAL/DX; VOL LAST/ADJ zu gelangen. Im Display erscheidt „TA SEEK“. Durch wiederholtes Drücken der SEL- Taste konnen Sie nun die einzelnen Menüpunkte anwahlen. Sieändern die Einstellungen der einzelnen Menüpunkte mit Hilfe der „+“- oder „-“-Taste.
-
TA SEEK-Menu (Verkehrsfunk-Sendersuche) Wahlen Sie TA SEEK, wenn bei der Wahl der TA- Funktion automatisch ein Verkehrsfunksender gesucht werden soll. Wahlen Sie TA ALARM, erhalten Sie eine Warnmeldung im Display, sobald Sie unter der TA Funktion einen Sender eingestellt haben, der keine Verkehrsfunkinformationen übermittelt.
-
MASK DPI/ALL
Verbergen von Alternativfrequenzen (AF) während deruche nach einer ProgrammKennung (PI).
MASK DPI: Srecht das Gerät nach der Programmkennung (PI) eines Senders bleiben die Alternativfrequenzen mit anderer Programmkennung im Verborgen.
MASK ALL: Bei der Sueche nach einer Programmkennung (PI) bleiben Alternativelyfrequenzen mit anderer Programmkennung und Sender mit starkem Signalpegel ohne RDS Signal im Verborgenen.
DSP
Im DSP konnen Sie die Equalizereinstellungen POP M; ROCK M, CLASS M und FLAT M wahlen. Wahlen Sie DSP OFF um eigene Einstellungen vorzunehmen. Siehe auch Pkt. 3a.
- LOUD ON/LOUD OFF
Ein- und Ausschalten der LOUDNESS-Funktion.
Im niedrigen Lautstärkebereich wird mit der Funktion LOUDNESS (LOUD) das Klangbild erweitert. Höhen und Basse werden angehoben.
- BEEP ON/OFF Bestätigungston
Den Bestätigungston beim Tastendruck konnen Sie in zwei Arten wahlen.
BEEP ON: Der Bestätigungston erfolgt bei jedem Tastendruck.
BEEP OFF: der Bestätigungston ist abgeschaltet.
SEEK 1, SEEK 2 (Nur im Radiobetrieb wahlbar)
Suchfunktion mit den - -Tasten im Radiobetrieb.
SEEK 1: Halten Sie die «-Tasten gedrückt und das Radio wird bei der nachsten erreichbaren Sendestation stoppen.
SEEK 2: Solange Sie die - -Tasten gedrückt halten wird der Suchlauf im Frenzband weiter geführt.
STEREO/MONO Umschaltung (Nur im Radiobetrieb wahlbar)
- LOCAL/DX (Nur im Radiobetrieb wahlbar)
Ihr Radio kann RDS EON Daten empfangen. Unter EON versteht man die Übermittlung von zusätzlichen Senderinformationen innerhalb einer Senderkette z. b. des WDR. Im Falle einer Verkehrsdurchsage (TA) wird innerhalb einer Senderkette von einem Nicht-Verkehrsfunkender auf den entsprechenden Verkehrsfunkender der Senderkette umgeschaltet.
Der Empfang dieser Sendedaten wird durch das EON Zeichen im Display angezeigt. Sie können zwischen dem EONTA LOCAL bzw. EONTA DISTANCE-Modus für den lokalen oder den Fernverkehrsfunkempfang wahren. Der Zweck dieser Funktion besteht darin, ein unerwünsches Umschalten auf eine EON-TA-Verkehrsansage zu unterträcken. Liegt ein EON Sender sehrweit entertnet, so können z. T. trotzdem EON TA-Information von dieser Station empfangen werden. Das Radio schaltete zu
D
dieser EON-Verbindungsstation um und versucht die Verkehrsinformationen zu empfangen. Der Signalpegel ist aber zu schwach und der Empfang ist schlecht, da diese EON-Verbindungsstation zuweit außerhalb lag. Deshalb schaltet das Radio dann auf den zuvor eingestellten Sender zurück. Bei der oben beschrieben Betriebsart hört der Anwender für eine kurze Zeitspanne ein falsches Programm oder überhaupt nichts.
EONTA LOCAL:
Durch diese Funktion wird ein Umschalten zu einer EON-Verbindung mit zuschwachem Signalpegel vermieden. Das Radio schaltet nicht auf diesen Sender um und der Hörer nimmt kaum Störungen wahr.
EONTA DISTANCE-Modus:
In thisem Modus versucht die EONTA Schaltung die EONTA Informationen von einem erreichen Sender zu erhalten und so die Empfangsqualität zu verbessern.
VOL LAST/VOL ADJ
VOL LAST: Das Radio schaltet sich mit der zulezt tatsächlichen eingestellungen Lautstärke ein.
VOL ADJ: Mit Hilfe der +- und -Tasten wahlen Sie eine gleichbleibende Einschaltlautstärke vor.
4 POWER-Knopf
Zum Ein- bzw. Ausschalten des Gerätes diese Taste drucken.
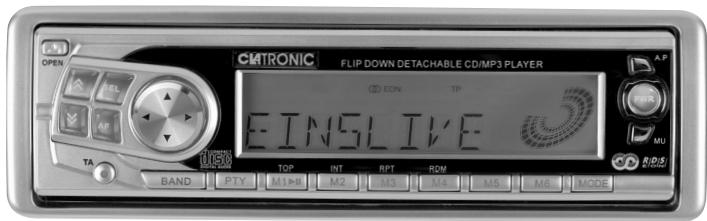
5 LCD-Display (FlüssigKristallanzeige)
6 BAND-Tasten
Drucken Sie kurz die BAND-Taste um Ihr gewünschten Freqenzbandes zu wahlen. Die Bezeichnung des entsprechend Bandes FI, F2, F3, MW1, LW wird in der LCD-Anzeige angezeigt.
7/8 A-/N-Tasten TUNE, SEEK, TRACK, SKIP UP/DOWN
a) Im Radiomodus:
Drücken Sie kurz die A- oder V-Taste, um manuell einen gewündten Radiosender einzustellen.
Halten Sie die A- oder V-Taste gedrückt, um dieSuche nach einem Radiosender zu starten.
Siehe auch die Funktion SEEK 1 / SEEK 2.
b) Im CD-Modus:
Zum Vor- bzw. Rückwartsspringen die Taste 艹 bzw. kurz drucken. Zum Spulen von Titeln die Pfeiltaste 艹 bzw. gedrückt halten.
9 Modus-Taste
Drücken Sie diese Taste zur Auswahl des CD-Player- bzw. Radio-Modus.
10 MUTE-Taste
Drücken Sie die MUTE-Taste, um die Laufsprecher für kurze Zeit stumm zu schalten. Drücken Sie diese Taste erneut, um diese Funktion wieder aufzuheben.
11 AP-Taste (Automatische Senderspeicherung) Im Radio-Modus:
a) Speicherfunktion:
Drücken Sie die AP-Taste länger als eine Sekunde um die automatische Senderspeicherung zu aktivieren. Das Gerat sicht innerhalb des aktuellen Freqenzbandes z. B. FM 1 nach den größten Signalstärkepegel bis der Suchzyklus abgeschlossen wird. Die sechs stärksten Sender werden den entsprechenden Speicherplätzen zugeordnet.
Die nun gespeicherten Sender werden jeweils ca. 5 sek. lang angespielt und danach wird der Sender des ersten Speicherplatzes eingestellt. Mocht den Sie noch weitere Sender im FM-Band suchen drucken Sie die BAND-Taste, um auf das FM 2 bzw. FM 3 Band zu wechseln. Drucken Sie die AP-Taste erneut länger als eine Sekunde, um die weitere Suche zu starten.
b) Anspielfunktion:
Nach kurzem Drucken der AP-Taste spiel das Radio alle voreingestellten Sender des aktuellen Frenzbandes (FM, MW, LW) an.
Hinweis: Die Anspielfungtion endet automatisch wieder bei dem Speicherplatz von dem aus sie gestartet wurde.
AP-Taste als Suchfunktionen im MP3 Betrieb
a) Direkteingabe der Titelnummer bei CD's im MP3-Format:
- Drucken Sie 1X die AP-Taste. Im Display erscheint „TRK SCH".
- Drücken Sie kurz die SEL-Taste. Im Display erscheint „TRK SCH 001". Die Einerstelle blinkt.
- Mit Hilfe der + / - Tasten haben Sie nun die Möglichkeit an der Einerstelle eine Titelnummer von 0 bis 9 einzugeben.
- Drücken Sie erneut kurz die SEL-Taste. Die Zehnerstelle blinkt. Verfahren Sie wie unter Pkt. 3 beschrieben.
- Drücken Sie erneut kurz die SEL-Taste, um ggf. eine Hundererstelle einzugeben.
- Schließen Sie die Eingabe der Titelnummer durch längeresücken(1 sek.) der SEL-Taste ab. Unmittelbar danach wird der gewährte Titel abgespielt.
b) Dateisuchfunktion bei CD's im MP3-Format:
- Drucken Sie 2X die AP-Taste. Im Display erscheint „FILE SCH".
- Drücken Sie kurz die SEL-Taste, um den ersten ausgewählten Ordner im Display anzuzeigen.
- Mit Hilfe der + / - Tasten haben Sie nun die Möglichkeit die verschiedene- nen Ordner auf der CD anzuwahlen.
- Drücken Sie die SEL-Taste länger (1 sek.). Der gewährte Ordner wird vom ersten Lied an abgespielt.
Drücken Sie die SEL-Taste kurz und Sie konnen mit Hilfe der +/- Tasten einen Titel im Ordner auswahlen. - Schlieben Sie die Eingabe durch längeres Drucken (1 sek.) der SEL-Taste ab. Unmittelbar danach wird der gewährte Titel abgespielt.
D
c) Stichwortsuchfunktion bei CD's im MP3-Format:
- Drücken Sie 3X die AP-Taste. Im Display erscheint „CHAR SCH".
- Drücken Sie kurz die SEL-Taste. Links im Display erscheint ein „A".
- Durch das wiederholte Drücken der +/- Tasten konnen Sie nun an der ersten Stelle des Displays einen Buchstaben von A bis Z oder eine Ziffer von 0 bis 9 eintragen.
Hinweis: Die Eintragung der weiteren Ziffern und Buchstaben erfolgt von links nach rechts.
- Drücken Sie die SEL-Taste kurz. Auf der zweiten Stelle des Displays erscheint ein „A". Verfahren Sie bei der Eintragung von Ziffern und Buchstaben wie unter Pkt. 3 beschrieben.
- Wiederholen Sie die Tätigkeiten unter Pkt. 2 und Pkt. 3 solange bis Sie ihren mehrstelligen Suchbegriff eingegeben haben.
Hinweis: Löschen Sie die letzte Eintragung durch das Drücken der AP-Taste.
6. Schlieben Sie die Eingabe durch längeres Drucken (1 sek.) der SEL-Taste ab. Unmittelbar danach wird der gewährte Titel abgespielt.
Hinweis: Beim normalen Spielbetrieb von CD's im MP3-Format kann mit den «- bzw. «- Tasten um jeweils einen Titel rauf oder runter gesprungen werden. Mit den Stationstaten 5 bzw. 6 kann um jeweils 10 Titel herunter bzw. hersauf gesprungen werden.
12-17 Stationstasten (1-6) vorgewähler Sender und als 1TOP-, 2INT-, 3 RPT-, 4 RDM- Tasten im CD Betrieb
a) Radio-Betrieb
Durch kurzes Drücken wird über diese Tasten ein voreingestellter Radiosender direkt angewählt. Werden diese Tasten länger als eine Sekunden gedrück, wird deractuall eingesestieltte Sender unter der gewählten Stationstaste gespeichert.
b) CD/MP3-Betrieb
- Drücken Sie die 1TOP-Taste, um das Abspielen der CD zu unterbrechen (Pausenfunktion). Drücken Sie diese Taste erneut, um diese Funktion wieder aufzuheiten.
- Drücken Sie die 2INT-Taste. jeder Titel der CD wird jeweils 10 Sekunden lang angespielt. Drücken Sie diese Taste erneut, um die Suche abzubrechen. Der aktuell angewählte Titel wird abgespielt.
- Drucken Sie die 3RPT-Taste. Der aktuelle geschplte Titel wird wiederholt. Drucken Sie diese Taste erneut, um diese Funktion wieder aufzuheden.
- Drucken Sie die 4RDM-Taste. Die CD Titel werden in zufälliger Reihenfolge abgeschlielt. Drucken Sie diese Taste erneut, um diese Funktion wieder aufzuheben.
18 TA Traffic Announcement (Vorrangschaftung für Verkehrsfunk)
Die TA-Funktion wird durch kurzes Drucken der TA-Taste aktiviert und durch ein TA-Zeichen im Display angezeigt. Beim Radiobetrieb in einem FM Frequenzband
beginnt automatisch die Suche nach einem Verkehrsfunksender (TA SEEK).
Wenn ein FM-Sender empfangen wird, der periodisch die neuesten Verkehrsfunkinformationen ausstrahlt, leuchtet die TP-Anzeige im Display auf.
Bei eingeschalteter TA-Funktion unterbrechen die FM
Verkehrsfuninformationen automatisch den CD Betrieb. Der Lautstärkekegel wird auf den Mindestswert für die Übertragung von Verkehrschnittlichen angehoben. Nach Beendigung der Verkehrsfuninformationen setzt das vorhereingstelle Programm wieder ein.
Unterbrechung der TA-Funktion:
Möhlen Sie die aktuelle Verkehrsnachricht unterbrechen, drücken Sie kurz die TA-Taste. Der TA-Modus wird hierdurch nicht ausgeschaltet.
19 PTY-Taste Wahl des Programmtypes
Neben dem Sendername übermitteln eine FM-Sender auch Informationen über den Programmtyp hises Programms. Diese Informationen konnen von Ihrlem Autoradio angezeigt werden.
Solche Programmtypen können z.B. sein:
SPORT
NEWS
POP
CLASSICS
Mit der PTY-Funktion konnen Sie gezielt Sender eines bestimmten Programmtypes auswahlen. Drücken Sie die PTY-Taste 1X um in die PTY Musikgruppe zu gelangen. Im Display erscheidt das Zeichen „PTY". Mit Hilfe der Stationstaten 1-6 konnen Sie nun wie folgt eine Auswalt treffen.
| 1X drucken | 2X drucken | |
| Stationstaste 1 | POP M | ROCK M |
| Stationstaste 2 | EASY M | LIGHT M |
| Stationstaste 3 | CLASSICS | OTHER M |
| Stationstaste 4 | JAZZ | COUNTRY |
| Stationstaste 5 | NATION M | OLDIES |
| Stationstaste 6 | FOLK M |
Drücken Sie die PTY-Taste 2X um in die PTY Sprachgruppe zu gelangen. Mit Hilfe der Stationstasten 1-6 konnen Sie nun wie folgt eine Auswahl treffen.
| 1X drücken | 2X drücken | 3X drücken | |
| Stationstaste 1 | NEWS | AFFAIRS | INFO |
| Stationstaste 2 | SPORT | EDUCATE | DRAMA |
| Stationstaste 3 | CULTURE | SCIENCE | VARIED |
| Stationstaste 4 | WEATHER | FINANCE | CHILDREN |
| Stationstaste 5 | SOCIAL | RELIGION | PHONEIN |
| Stationstaste 6 | TRAVEL | LEISURE | DOCUMENT |
Drücken Sie die PTY-Taste 3X um in die Funktion wieder auszuschalten.
Wenn PTY angewählt wird, startet das Radiogerät die Sueche nach entsprchenden PTY-Informationen und stoppt, wenn die gesuchte PTY-Information
D
gefunden wurde.
Wird der gesuchte Programmtyp nicht gefunden erscheid im Display „NONE PTY".
Wenn die gesuchte PTY-Information nicht mehr besteht, schaltet sich die PTY-Funktion automatisch auf normalen Modus um.
20 AF (Alternative Frenzen) REG-Funktion
a) AF ist eine Funktion die mit Hilfe des RDS (Radio Data System) arbeitet und nur bei FM Sendern genutzt werden kann. Das Gerät sicht im Hintergrund die am besten zu empfangene Freqenz des eingestellten Senders. Wenn die AF-Funktion angewählt wird, prüft das Radio laufend die Signalstärke der AF-Frequency. Das Prüfinterval für jeder AF-Frequency hängt von der Signalstärke des aktuellen Senders ab und variert von ein paar Minuten im Fall eines starken Senders bis zu ein paar Sekunden bei schwachen Sendern. Jedes Mal, wenn die neue AF-Frequency stärker ist, als die aktuell eingestellte Station, schaltet das Gerät für kurze Zeit auf diese Freqrequency um und es wird ein bis zwei Sekunden lang die Meldung „NEW FREQUENCY" angezeigt. Da die Stummzeit beim Freqenzwechsel bzw. der Prüfzeit sehr kurz ist, ist dies während des normalen Programms fast nicht hörbar. Die AF Funktion wird durch kurzes Drücken der AF-Taste aktiviert und der Status der AF Funktion wird durch ein AF-Zeichen im Display angezeigt.
- Erscheint das AF Zeichen im Display ist die AF-Funktion eingeschaltet und es werden RDS-Sendedaten empfangen.
- Blinkt das AF Zeichen im Display, ist die AF-Funktionzar angewählt, es kann jedergerade kein RDS-Sendesignal empfangen werden.
- Betätigten Sie die AF-Taste erneut, um diese Funktion wieder auszuschalten. Das AF Zeichen im Display erlischt.
b) REG-Funktion
Einige Sender teilen zu bestimmten Zeiten ihr Programm in Regionalprogramme mit entsprechlichem Inhalt auf.
- REG ON: Durch langes Drücken der AF-Taste wird der regionale Modus eingeschaltet. Im Display erscheint weniger Sekunden lang die Meldung „REG ON“.
Hinweis: Die Anzeigekapazität des Displays ist begrenzt. Es ist möglich, dass im doppelten Anzeigemodus einzelnse Segmente des Displays gelaucht sind.
Mit der Funktion REG ON wird verhindert, dass das Radio zu Alternativfrequenzen wechselt, die einen anderen regionalen Programminhalt haben.
- REG OFF: Durch erneutes langes Drücken der AF-Taste wird der regionale Modus ausgeschaltt. Im Display erscheint weniger Sekunden lang die Meldung „REG OFF".
Die Programmkennung (PI) des Regionalsendeprogramms wird bei der Sueche nach einer Alternativfrequenz (AF) oder einer Programmkennung (PI) ignorant.
21 CD-Schlitz
22 Auswurfaste (EJECT)
Zum Auswerfen der CD diese Taste drucken.
23 Blinkende LED-Anzeige
Beim Abnehmer der vorderen Bedientafel blinkt diese Anzeige.
24 RESET-Taste Zum Wiederherstellen des gestören Programms diese Tastes drucken.
Technische Daten
Allgemeines
| Netzspannung | DC 13,8 V |
| Stromverbrauch | 7A Max. |
| Leistung | 4 x 30 W |
FM-Bereich
| Frequenzbereich | 87,6 MHz bis 108,0 MHz |
| Nutzbare Empfindlichkeit | 3 μV. |
| I.F. Frequence | 10,7 MHz |
MW (AM)-Bereich
| Frequenzbereich | 522 KHz - 1620 KHz |
| I.F. Freqenz | 450 KHz |
LW-Bereich
| Frequenzbereich | 144 KHz - 288 KHz |
| I.F. Freqenz | 450 KHz. |
Ausgangsleistung
| Ausgang | bei CD max. 1200mV |
CD-Player
| System | CD-Gerät |
| Verwendbare CDs | CD/CDR/CDRW/MP3 DisksAnzahl der Quantizierungsbits 1 bit. |
| Signalformat | Musterfrequenz 44,1 KHz |
| Frequenzcharakteristika | 20 – 100Hz ≤ 5 dB10K - 20KHz ≤ 5 dB |
| Signal-Rausch-Verhältnis | 50 dB (1KHz) |
| Anzahl der Kanäle | 2 Stereo-Kanäle |
| Gehäuseabmessungen | 178 B x 50 H x 165 T |

Störungsbehebung
Bevor Sie die Checkliste durchgehen,itte zunachst den Anschluss fertig stellen. Wenn nach erfolgtem Durchprüfen der Checkliste immer noch Fragen offen sind, wenden Sie sichitten ihre nachstgelegene Kundendienstelle.
| Fehlersymptom | Grund | Lösung |
| Nach Einlagen in das Gerät lauft die CD oder Kassette nicht. | Der Lautstärkeregler ist zu leise eingestellt. Die Anschlüsse sind nicht korrekt ausgeführct. | Den Lautstärkeregler höher einstellen. Den +12V- sowie den Masseanschluss überprü-fen. |
| Der Ton des CD-Players hupft. | Die Straβenoberfläche ist rauh. Das Gerät ist nicht fest eingebaut. | Zum Abspielen der CD warten, bis die Straße glatter wird. Das Gerät fest einbauen. Sicherstellen, dass die hin-tere Befestigung verwen-det wird, wenn das Fahrzeug keine geeignete Aufnahme für den hinteren Gerästeil bietet. |
| Die CD ist defekt. | Eine andere CD auspro-bieren. Wenn diese korrekt lauft, ist die erste CD wahrscheinlich beschädigt. | |
| Die CD ist verschmutzt. | Die CD reinigen. | |
| Kein Strom. | Die Zündung ist ausgeschaltet. Die Sicherung ist durchgebranct. | Den Zündschlüssel auf „ON“ oder „ACC“ drehen. Die Sicherung durch eine andere 7 A-Sicherung ersetzen. |
| Das Gerät faktioniert nicht richtig (EJECT, LOAD, PLAY). | Der Microcomputer wurde durch elektrisches Rau-schen in Mitleidenschaft gezogen. | Die CD oder Kassette her-ausnahmen und wieder einlagen. Das Gerät aus- und dann wieder einschalten. |
| Kein Radioempfang. | Das Antennenkabel ist nicht angeschlossen. | Das Antennenkabel fest in die Antennenbuchse des Gerätes stecken. |
| Im automatischen Such-modus stoppt das Radio bei keiner Sondestation. | Die Sendesignale sind zu schwach. | Manuell eine Sondestation einstellen. |
| CD's werden nur bis zur Hälfte in den CD Schacht eingezogen. | Die Schrauben der Transportsicherung sind nicht entfrart worden. | Entfernen Sie die Schrauben der Transportsicherung. |
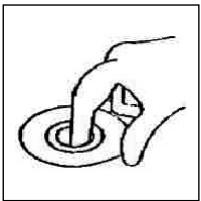
Abspielen einer CD
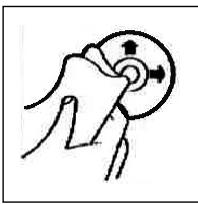
Reinigen der CD
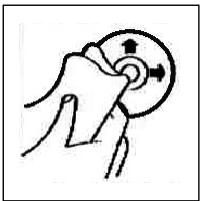
Vor dem Abspielen, die CD mit einem sauberen, staubfreien Reinigungstuch abwischen. Die CD in Pfeilrichtung abziehen.
Hinweis: Keine Lösungsmittel wie Benzin oder Verdünner verwenden. Die allgemein erhältliche Reinigungsmittel oder Anti-Statiksprays beschädigden das Gerät.
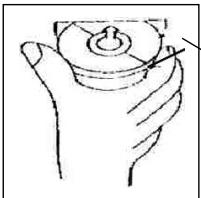
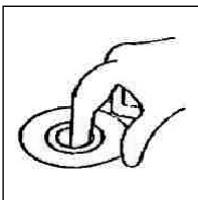
Wenn die CD mit dem Aufdruck nach unten eingelegt wird, kann das Gerät beschädigt werden.
CD immermit demLabelnachobereinlagen
Hinweis: Wenn sich bereits eine CD im CD-Schlitz befindet, nicht versuchen, eine weitere CD einzulegen. Dies kann zu Schäden am Gerat führen. Die CD stets am Rand anfassen. Um die CD sauber zu halten, nicht an der Oberfläche anfassen.
Keine Aufkleber oder Klebeband auf die CD kleben.
Die CD nicht direkter Sonneneinstrahlung oder Warmequellen wie Heizungsrohren aussetzen und sie auch nicht im Auto laden, wenn diese in praller Sonne geparkt wird, da dies zu einem betrachtlichen Temperaturanstieg führt.
Dieses Gerat wurde nach allen zuteffenden, aktuellen CE-Richtlinien geprüft, wie z.B. elektromagnetische Verträgelichkeit und Niederspannungsdirektive und wurde nach den neuesten Sicherheitstechnischen Vorschriften gebaut.
Technische Änderungen vorbehalten!
D
Garantie
Wir übernehmen für das von uns vertriebene Gerät eine Garantie von 24 Monaten ab Kaufdatum (Kassenbon).
Innerhalb der Garantiezeit beseitigen wir unentgeltlich die Mängel des Gerätes oder des Zubehörns ^* , die auf Material- oder Herstellungsehler beruhen, durch Reparatur oder, nach unseren Ermessen, durch Umtausch. Garantieleistungen bewirken weder eine Veränderung der Garantiefrist, noch beginn’t dadurch ein Anspruch auf eine neue Garantie!
Als Garantienachweis gilt der Kaufbeleg. Ohne diesen Nachweis kann ein kostenloser Austausch oder eine kostenlose Reparatur nicht erfolgen.
Im Garantiefall geben Sieitte das Grundgerät in der Originalverpackung zusammen mit dem Kassenbon an ihren Handler.
*) Schäden an Zubehörteilen führen nicht automatisch zum kostenlosen Umtausch des kompletten Gerätes. Wenden Sie sich in desem Fallitte an unsere Hotline! Glasbruchschäden bzw. Brüche von Kunststoffeilen sind grundsätzlich kostenpflichtig!
Sowohl Defekte an Verbrauchszubehör bzw. Verschleißeiten (z.B. Motorkohlen, Knethaken, Antriebsriemen, Ersatzfernbedierung, Ersatzzahnbürsten, Sägebättern usw.), als auch Reinigung, Wartung oder der Austausch von Verschleißeiten, fallen nicht unter die Garantie und sind deshalb kostenpflichtig!
Die Garantie erlischt bei Fremdeingriff.
Nach der Garantie
Nach Ablauf der Garantiezeit konnen Reparaturen kostenpflichtig vom entspruchenden Fachhandel oder Reparaturservice ausgeführten werden.
Service für unsere Haushaltsartikel und Unterhaltungselektronik
Zu technischen Fragen oder zur Bestellung von Verschleibteilen (soweit diese nicht vom Fachmann ausgewechselten werden müssen), wie z.B. Ersatzkannen, Staubsaugerfilterbeutel, Fernbedigung usw. konnen Sie sich, mit Angabe des Geräteyps, an unsere Hotline-Adresse wenden:
hotline@clatronic.de
Interessieren Sie sich für weitere Clatronic-Produkte? Besuchen Sie noch einmal unsere Homepage unter
www.clatronic.de oder www.clatronic.com
Avvertenze generali per la sicurezza
Per evitare il rischio di incendio o di scosse, non si deve mai tenere l'apprecchio除去 la pioggia o in ambienti umidi. Quindi non usare l'apprecchio nelle immeditate vicinanze di acqua, per esempio in prossimità di una vasca, di una piscina o in una cantina umida.
Utilizzato l'apparecchio solo per l'uso previsto.
Collegare l'apparecchio esclusivamente ad una presa installata a norma. Fare attenzione a che la tensione indica corrisponda alla tensione della presa. Se si impiegano alimentatori esterni, fare attenzione all'esattezza di polarità e di tensione, inseire le batterie sempre correttamente.
Collocare l'apparecchio in modo che le aperture per l'airazione esistenti non ven-gano coperte.
Non togliere mai la protezione dell'apparecchio. Riparazioni non a regola d'arte possono causare notevoli pericoli per l'utente. Se l'apparecchio presenta danni, soprattutto nella zona del cavo di collegamento, non metterlo più in funzione, ma farlo riparare prima da un esperto. Esaminare regolarmente il cavo di collegamento alla rete per verificare che non ci siano danni.
Un cavo di collegamento difettoso più essere sostituito con un cavo equivalente solo dal produttore, dal quello servizio assistenza o da personne similmente qualificale, al fine di evitare pericoli.
Se l'apparecchio non viene usato per un periodo di tempo prolongato, togliere il blocchetto alimentatore alla presa ovvero estrarre le batterie.
Questi symboli possono trovarsi eventualmente sull'apparecchio e rimandano ai seguenti elementi:

Il significato del lampo fa presente all'utente la presenza di pezzi all'interno dell'apparecchio che sono produrre alte tensioni pericolose.

Il sibilo con il punto esclamativo fa presente all'utente la presenza di importanti averventenze per l'uso e la manutenzione nei fogli di accompagnamento dell'apparechio.

Gli apparecchi dotati di quello symbolo lavorano con un „Laser classe 1" per produrre i CD. Gli interrottori di sicurezza integrati hanno lo scopo di impedire che l'utente venga esposto alla luce non visible del laser, pericolosa per l'occhio umano, aggiunto lo scomparto per i CD.
Questi interruttori di sicurezza non devono mai essere cavallottati né manipolati perché altrimenti sussiste il rischio di esposizione alla luce del laser.

Installazione
Montare la radio operando conformamente alle illustrazioni seguenti

a Dado
b Rosetta elastica
c Rondella
d Vite
e Squadra di montaggio
f Alloggiamo di inserimento
g Tirante filettato
Attenzione!
h Viti delsystemadi sicurezza per il trasporto (da rimuovere prima del montaggio)
Dispositivo de estrazione (chiave per le opera- razioni di smontaggio)
j Fissaggio
Appicare il frontalino solo sul lato sinistro e poi inserirlo fino al punto di incastro sul lato destro.
Allacciamento
Realizzare l'allacciamento conformmente a quanto indicate dal grafico.


Attenzione
- Il pannello di lavoro rimovibile deve essere montato soltanto dopo aver effetuato l'allacciamento del cavo.
- Si consiglia di utilizzato altoparlanti con un'impedenza pari a 4 ohm.
Informazioni importanti per il montaggio della vostra autoradio!
- Tenete presente che durante nella fase di montaggio/smontaggio del vosto apparecchio la sua macchina deve disporre di un „ISO ANSCHLUSS" origine. Questa è la controparte alla spina presente all'uscita dell'apparecchio (ISO ANSCHLUSS).
Nel caso di backup „DAUER+“, a seconda del tipo di veicolo possono esserci differenze.
In questo caso rivolgetevi ad un'officina autorizzata perché un'alimentazione permanente della vostra radio altrimenti non è garantita. (Questo è necessario per memorizzare le stazioni emittenti).
- A seconda del tipo di veicolo in casi eccezionali possono presentarsi disturbi nel funzionamento Radio/CD. Questi si possono eliminare con un filtro anti-disturbo supplementare. Malgrado il vostro apparecchio AR 615 CD sua ricerca do tato in series di un filtro antidisturbo, possono esserci uqualmente limiti dovuti alla vettura.
Potete ave甚么o filtero nei negozi di accessori auto e/o presso la vostra officina di fiducia.
Misure di prevenzione e manutenzione
- Le viti della sicura di trasporto (h) devono essere rimoso prima del montaggio altrimenti il CD non entra.
- L'apparecchio è configurato per il polo negativo della batteria, il quale deve essere collegato alla carrozza del veicolo. Accertarsene prima di procedere all'installazione.
- Nel caso in cui il quadro comandi anteriore venga rimioso durante il funzionamento della radio o dellettore CD, l'apparecchio si disattiva automaticamente.
- Funzione errata. Dopo ave inserto il pannello frontale appeare nel display LCD il messaggio dimostrante un erre (ERROR). Con l'aalto di un filo di ferro o simili premere il tasto RESET (24), per ripartire l'elettronica dello stato originale. (RESETTEN).
- Nel caso in cui la temperatura all'interno dell'abitacolo del veicolo sia particular-lmente elevata, per esempio quando il veicolo sua rimasto parcheggiatto a lungo al sole, si consiglia di non attivare illettore finché la temperatura dell'abitacolo non sua diminuuita in seguito a un breve periodo di marcia.
-
Affinché l pannello di dato rimovibile possa essere conservato in condizioni di sicurezza, si consiglia di utilizzare a tale scopo l'involucro protettivo appositamente previsto allo scopo.
-
Trasportare la tastatura di dato Involucro di protezione
-
In riferimento all'estrazione, rimozione, al montaggio e alla conservazione del quadro comandi anterile, si raccomanda di prestare attenzione a quando indico nelle seguenti illustrazioni.
- Apririle campodi comando
- Estrarre il campodi comando
- Montare la tastatura di lavoro
Tastatura di comando
Pulsante OPEN
Involucro di protezione
Tastatura di lavoro
Tastatura di comando
Funzionamento
1 Pulsante OPEN
Azionare il pulsante OPEN per aprire il pannello di lavoro anteriore. Sarà quando ora possibile inseire un CD nell'apposa fessura oppure estrarlo premendo il pulsante EJECT.
2 Pulsanti+/-
Durante il funzionamento dell'apparecchio, quosti pulsanti servono ai fini della regolazione del volume. Azionati in abbinamento al pulsante SEL, a sua volta premuto, è possibile effettare modifiche nei menu, per esempio per quanto concerne la modalità acustica.
3 Pulsante SEL (selezione)
a) Premere brevemente il pulsante SEL per aprire il menu di selezione della modalita acustica. Sul display viene visualizzatoo "VOL" ai fini dell'impostazione del volume. Azionando ripetutamente il pulsante SEL, è quindi possibile selezioneare le singolo opzioni di menu quali, per esempio, VOLUME, BASS, TREBLE, BALANCE e FADER. Per poter modificare le impostazioni delle varie opzioni di menu, è sufficiente servisi dei pulsanti "+" oppure "-". Nota: se sono state selezionate impostazioni dell'equalizzatore in DSP, p.e. POP, ROCK, non si sono impostare BASS e TREBLE.
b) Tenere premuto a lungo il pulsante SEL per aprire il menu di selezione TA SEEK/TA ALARM, MASK DPI/MASK ALL, DSP OFF, LOUD ON/OFF, BEEP ON/OFF, SEEK1/2, STEREO/MONO; LOCAL/DX; VOL LAST/ADJ. Sul display viene visualizzato il messaggio "TA SEEK". Azionando ripetutamente il pulsante SEL, è quindi possibile selezioneare le varie opzioni di menu. Per poter modificare le impostazioni delle varie opzioni di menu, è sufficiente serviri dei pulsanti "+" oppure "-".

- Menu TA SEEK (ricerca dell'emittente di notiziari sulle condizioni del traffico) Qualora si desideri che durante la funzione TA venga ricercata automaticamente un'emittente di notiziari sulle condizioni del traffico, è necessario selezionare TA SEEK.
Nel caso in cui se selezioni TA ALARM, il display visualità un messaggio di avventenza non appena sua stato impostata, durante la funzione TA, una stazione radio che non trasmette informazioni in materia di traffico.
- MASK DPI/ALL
Oscuramento delle frequenze alternative (AF) durante la ricerca di un codice identificativo di programma (PI).
MASK DPI: quando l'apparecchio ricerca il codice identificativo di programma (PI) relativo a una data emittente, le frequenze alternative caratterizzate da un codice identificativo di programma differente non vengono visualizzate.
MASK ALL: durante la ricerca del codice identificativo di programma (PI), le frequenze alternative caratterizzate da un codice identificativo di programma differente e le emittenti aventi un forte livello del segnale alla segnale RDS non vengono visualità.
DSP
In DSP si possono selezione re impostazioni dell'equalizzatore POP M; ROCK M, CLASS M e FLAT M. Per inseire impostazioni personali selezionare DSP OFF. V.anche il punto 3a
- LOUD ON/LOUD OFF
Accendere e spagnere della funzione LOUDNESS.
Con la funzione LOUDNESS (LOUD) si espandono le cattratteristiche del suono quando il volume è basso; si augmentanoosi gli alte e bassi.
- BEEP ON/OFF segnale acustico di conferma
Si cui selezionare il segnale di conferma in due modi premendo i tasti.
BEEP ON: il segnale acustico di conferma viene genrato igniqualvolta si azioni un pulsante.
BEEP OFF: il segnale acustico di confirma è disattivato.
SEEK 1, SEEK 2 (selezionabile solo nella modalità radio)
Funzione di ricerca con i tasti / nella modalità radio.
SEEK 1: tenendo premuti i tasti / e la radio, si raggiunge la prima stazione emittente raggiungibile.
SEEK 2: finché si tengono premuti i tasti / , la ricerca nella banda di frequenza continua.
STEREO/MONO commutazione
(seLECTIONABILE solo nel funzionamento radio)
- LOCAL/DX (selezionabile solo nel funzionamento radio)
La radio può ricevere dati RDS EON. Con l'espressione "EON" si intende la
trasmissione di ulteriori informazioni in merito all'emittente nell'ambito di una catena di stazioni radio, come nel caso di WDR. Nel caso specifico di un annuncioc sul traffico (TA) nell'ambito di una catena di stazioni radio, si passa da una emittente che non trasmette notiziari radiofonici sul traffico alla corrispondente stazione radio con trasmissione di notiziari sul traffico della catena di stazioni radio stesse.
La ricezione di quosti dati è segnalata sul display atraverso il symbolo EON. Per la ricezione delle informazioni sul traffico urbano o interurbano si può scegliere tra la modalità EONTA LOCAL overvo EONTA DISTANCE . Scopo di esta funzione è coprimare una commutazione indesiderata a un'informatazione sul traffico EON-TA indesiderata.
Nel caso in cui un'emittente EON si trovi molto distante, resta ciononostante in parte possibile ricevere informazioni EON TA da parte di esta stazione.
La radio si sintonizza su但这a stazione di trasmissione EON e tenta di ricevere le informazioni sul traffico. Tuttavia, il livello del segnale è troppo debole e la qualità della ricerca cattiva, in quanto但这a stazione di trasmissione EON è troppo distante.
Di seguenza, la radio si sintonizza nuovamente sull'emittente precedenze impostata.
Nel caso della modalità sulla descritta, l'utente sente per un dato intervallo di tempo un programma sbagliato oppure non ode nulla.
EONTA LOCAL:
Attraverso esta funzione si evita la sintonizzazione su un collegamento EON caratterizzato da un livello di segnale troppo debole.
La radio non si sintonizza su esta emittente e l'utente non avverte alcun disturbo.
Modalità EONTA DISTANCE:
in quastra modalità, la commutazione di tipo EONTA tenta di ricevere le informazioni EONTA da un'emittente raggiungibile e di ottimizzare, in quello modo, la qualità della riscizione.
VOL LAST/VOL ADJ
VOL LAST: la radio si accende con il volume impostato per ultimo.
VOL ADJ: con l'auto dei tasti +/- e - si selezione un volume d'accensione permanente.
4 Pulsante POWER
Premere quello pulsante per attivare e disattivare l'appareccchio.
5 Display LCD (display a cristalli liquidi)
6 Pulsanti BAND
Premiere breveamente il pulsante BAND per selezionare la banda di frequenza desiderata. La denominazione della banda in oggetto (F1, F2, F3, MW1, LW) viene visualizzata sul display LCD.
7/8 Pulsanti / TUNE, SEEK, TRACK, SKIP UP/DOWN
a) Nella modalità radio:
Premere per un attimo i tasti A - o per impostare manualmente una stazione emittente a scelta.
Tenere premuto il tasting 四 o per dare avvio alla ricerca di un'emittente radio.
V.anche la funzione SEEK 1/SEEK2.
b) Nella modalità CD: per avanzare o tornare indietro, premere brevamente il pulsante oppure . Per poter scorrere i titoli, tenere premuto il tasto direzionale oppure .
9 Pulsante Modus
Premere Anything pulsante per selezionare illettore CD o la modalità radio.
10 Tasto MUTE
Premere il tasting MUTE per disattivare il volume per un breve lasso di tempo. Premere di nuovo quello tasting per ripristinare il volume.
11 Pulsante AP (memorizzazione automatica dell'emittente)
Nella modalità radio:
a) Funzione di memoria:
Per attivare la funzione di memorizzazione automatica dell'emittente, è necessario premere il pulsante AP per più di un secondo.
L'apparecchio ricerca il livello di segnale con maggiore intensità all'interno della banda di frequenza corrente, per esempio FM 1, sino alla conclusione del ciclo di ricerca stesso. Le sei emittenti caratterizzate da segnale a intensità più elevata vengono abbinate alle correspondenti positioni di memoria.
Le emittenti ora memorizzate vengono avviare per ca. 5 secondi e poi viene impostata l'emittente della prima posizione di memoria.
Se si desidera cercare ancora altre emittenti nella banda FM, premere il tasto BAND per passare a FM 2 o FM 3. Tenere di nuovo premuto per più di un secondo il tasto AP per dare avvio alla successiva ricerca.
b) Funzione Intro-Scan:
Dopo aver premuto per un attimo il tasto AP, la radio da avvio alla tutte le emittenti pre-impostate della banda di frequenza attuale (FM, MW, LW).
Nota: la funzione Intro-Scan termina automaticamente alla posizione di memoria da cui si è partiti.
Pulsante AP per le funzioni di ricerca nella modalità MP3
a) Inserimento diretto del numero del titolo per i CD con formatting MP3:
- Premere 1x il tasting AP. Nel display appare "TRK SCH".
- Premere per un attimo il tastinge SEL. Nel display appara "TRK SCH 001". La posizione dell'unità lampeggia.
- Ora con l'aiuto dei tasti +/- è possible insere un numero di brano da 0 a 9.
- Premere di nuovo per un attimo il tasto SEL. La posizione delle decine lampeggia. Procedere come descririto al punto 3.
-
Premere di nuovo per un attimo il tasto SEL per inseire eventualmente una posizione per le centinaia.
-
Chidere l'insertimento del numero dei brani tenendo premuto il tasto SEL per 1 secondo. Immediamentecco ha inizio la riproduzione del brano correspondente al titolo selezionato.
b) Funzione di ricerca di file per i CD con fornato MP3:
- Premere 2x il tasting AP. Nel display appore "FILE SCH".
- Premere per un attimo il tastinge SEL per visualizzare nel display il primo raccoglitore selezionato.
- Ora con l'aiuto dei tasti +/- è possibile selezionare i vari raccoglitori sul CD.
- Tenere premuto il tasting SEL per 1 secondo. Il raccoglitore selezionato viene riprodotto a partire dal primo brano. Premere per un attimo il tasting SEL: con l'aiuto dei tasting +/- è possibile selezionare un brano nel raccoglitore.
- Conclude l'inserimento tenendo premuto il tasto SEL per 1 secondo. Immediamente后再o ha inizio la riproduzione del brano corrispondente al titolo selezionato.
c) Funzione Intro-Scan nei CD in fornato MP3:
- Premere 3x il tasting AP. Nel display appeare "CHAR SCH".
- Premere per un attimo il tasting SEL. A sinistra nel display appeare una "A".
- Ora premendo più volte i tasti +/- si può insertire nella prima posizione del display una lettera da A a Z o una cifra da 0 a 9.
Nota: l'inserimento delle altre cifre o lettere si esegue da sinistra a destra.
- Premere per un attimo il tasto SEL. Nella seconda posizione del display appara una "A". Procedure nell'inserimento di cîfre e lettere come descritto al punto 3.
- Ripetere le operazioni del punto 2 e 3 finché non avete inserto il termine di ricerca a più positioni desiderato.
Note: cancellare ora l'ultimo inserimento premendo il tasto AP.
- Conclude l'inserimento tenendo premuto il tasto SEL per 1 secondo. Immediamente后再o ha inizio la riproduzione del brano corrispondente al titolo selezionato.
Avvertenza: durante la normale modalità di riproduzione di CD con formato MP3 è possibile passare al titolo precedente o al titolo superiore mediante i pulsanti ※ e ※ . Azionando i tasti di stazione 5 e 6 si più"Invece scorrere rispettovamente a 10 titoli più in basso o più in alto.
12-17 Tasti di stazione (1-6). Emittente preselezionata e pulsanti 1top, 2int, 3 RPT, 4 rdm in modalità conlettore CD
a) Modalità radio
Azionando brevamente quosti pulsanti è possibile selezione direttamente una stazione radio precedentemente impostata. Qualora quosti pulsanti vengano premuti per più di un secondo, l'emittente correntemente impostata viene memorizzata in corrispondenza del tasto di stazione selezionato.


b) Modalità CD/MP3
- Premere il pulsante 1TOP allo scopo di interrimpere la riproduzione del CD (funzione di pausa). Per avviare nuovamente la riproduzione del CD, azionare nuovamente questo pulsante.
- Premere il pulsante 2INT. Ognuno dei brani del CD viene riprodotto per 10 secondi. Per interrompere la ricerca, azionare nuovamente quello pulsante. Viene in quello modo riprodotto il brano corrispondente al titolo currente selezionato.
- Premere il pulsante 3RPT. Il brano corrispondente al titolo presente viene ripetu. Per annullare esta funzione, premere nuovamente quello pulsante.
- Premere il pulsante 4RDM. I brani corrispondenti ai titoli del CD vengono riprodotti in una sequenza casuale. Per annullare esta funzione, premere nuovamente quello pulsante.
18 TA Traffic Announcement (commutazione prioritaria per le informazioni radiofoniche sul traffico)
La funzione TA viene attivata premendo brevamente il pulsante TA ed è segnalata sul displayattraverso il simbolo TA corrispondente. Nel caso della modalità radio in una banda di frequenza FM, ha inizio automaticamente la ricerca di un'emittente di notiziani sulle condizioni del traffico (TA SEEK).
Quando si riceve un'emittente FM che trasmette periodicamente informazioni aggiornate sulle condizioni del traffico, il symbolo TP si illumina sul display. Nel caso in cui la funzione TA sa attivata, la trasmissione delle informazioni sul traffico FM interrompe automaticamente la modalità CD. Il livello del volume viene incrementato sino al valore minimo necessario ai fini della trasmissione dei notiziari sul traffico. Una volta terminata la diffusione delle informazioni sul traffico, viene ripreso il programma impostato in precedenza.
Interruzione della funzione TA:
Qualora si desideri interrompere l'ascolto delle informazioni attuali sulle condizioni del traffico, azionare brevamente il pulsante TA. La modalità TA restsa tutta via attiva.
19 Pulsante PTY - Selezione del tipo di programma
Oltre al nome dell'emittente alcune emittenti FM trasmettono anche informazioni in merito al tipo di programma in oggetto. Queste informazioni sono essere visualizzate alla proprio autoradio.
Questi tipi di programma possono essere, per esempio, i seguenti:
SPORT
NEWS
POP
CLASSICS
Mediating the funzione PTY è possible selezionare in modo mirato delle emittenti relative a un determinato tipo di programma.
Premere il pulsante PTY 1X per visualizzare il gruppo musica PTY. Nel display apparie il carattere "PTY". Servendosi dei tasti di stazione 1-6, è possible effettuire una selezione conformmente a quello indicate di seguito.
| Premere 1X | Premere 2X | |
| Tasto di stazione 1 | POP M | ROCK M |
| Tasto di stazione 2 | EASY M | LIGHT M |
| Tasto di stazione 3 | CLASSICS | OTHER M |
| Tasto di stazione 4 | JAZZ | COUNTRY |
| Tasto di stazione 5 | NATION M | OLDIES |
| Tasto di stazione 6 | FOLK M |

Premere il pulsante PTY 2X per aprie il gruppo linguistica PTY. Servendosi dei tasti di stazione 1-6, è POSSIBLE effettuare una selezione conformmente a quanto indica di seguito.
| Premere 1X | Premere 2X | Premere 3X | |
| Tasto di stazione 1 | NEWS | AFFAIRS | INFO |
| Tasto di stazione 2 | SPORT | EDUCATE | DRAMA |
| Tasto di stazione 3 | CULTURE | SCIENCE | VARIED |
| Tasto di stazione 4 | WEATHER | FINANCE | CHILDREN |
| Tasto di stazione 5 | SOCIAL | RELIGION | PHONEIN |
| Tasto di stazione 6 | TRAVEL | LEISURE | DOCUMENT |
Premere il pulsante PTY 3X per disattivare nuovamente la funzione.
Quando si selezione PTY, la radio avvia la ricerca delle corrispondenti informazioni PTY. Questa operazioni continua finché suddette informazioni PTY non vengano effettivement trovate.
Nel caso in cui il tipo di programma ricercato non venga trovato, il display visua- lizzza il messaggio "NONE PTY".
Qualora l'informazione PTY ricercata non sia più disponibile, la funzione PTY passa automaticamente alla modalità normale.
20 AF (frequenze alternative) - Funzione REG
a) AF è una funzione che opera con l'ausilio del sistema RDS (Radio Data System) e può essere utilizzata esclusivamente per le emittenti FM.
L'apparecchio ricerca in background la frequenza dell'emittente impostanza che cui quere ricevuta nel modo migliorare.
Quando si sleziona la funzione AF, la radio controllinga costamente l'intensità del segnale della frequenza AF. L'intervaldo di prova per agli frequenza AF dipende dall'intensità del segnale stesso dell'emittente corrente e più variate tra i due minuti rilevabili nel caso di emittenti con segnale intenso e i due secondi nel caso di emittenti dal segnale debole. Ognialvolta la nuova frequenza AF abbia un segnale più forte rispetto a quello della stazione impostata, l'apparecchio si sintonizza per un breve intervaldo di tempo su esta frequenza, e sul display viene visualizzato il messaggio "NEW FREQUENCY" per uno o due secondi. Poiché il tempo della commutazione silenziosa durante il carrbo di frequenza e il tempo di controllo sono molto brevi, questa operazione non viene pressché percepita durante il normale programmà.

La funzione AF viene attivata premendo brevamente il pulsante AF, nelle istato della funzione AF è visualizzato sul displayattraverso un simbolo AF.
- Se il symbolo AF viene visualizzato sul display, la funzione AF è attiva e vengono ricevuti dati RDS.
- Se il symbolo AF lampeggia sul display, la funzione AF è selezionata, ma non è possible ricevere alcun segnale RDS.
- Per disattivare nuovamente esta funzione, azionare più una volta il pulsante AF. Il simbolo AF presente sul display si spagne.
b) Funzione REG
In determinati momenti alcune emittenti ripartiscono il programma in programmi regionali con diverso contento.
- REG ON: premendo a lungo il pulsante AF, si attiva la modalità regionala. Per alcuni secondi nel display appara la segnalazione „REG ON".
Avverenza: il display ha una capacité limitata. Puito pertanto accadere che nella modalità di visualizzazione dopbia singoli segmenti del display siano cancellati.
Attraverso la funzione REG ON si impedisce la radio si sintonizzi su frequenza alternative che abbiano un altro contento di programma regionale.
- REG OFF: premendo nuvamente a lungo il pulsante AF, si disattiva la modalità regionale. Per alcuni secondi nel display appeare la segnalazione „REG OFF".
Il codice identificativo di programma (PI) del programma regionale viene ignorato durante la ricerca di una frequenza alternatively (AF) o di un codice identificativo di programma (PI).
21 Apertura per CD
22 Pulsante di espulsione (EJECT)
Premere quello pulsante per estrarre il CD.
23 Display luminoso (LED) lampeggiante
Allorché si rimuove il quadro comandi anteriore, quello display lampeggia.
24 Pulsante RESET
Premere quello pulsante per ripristinare il programma disturbato.
Dati tecnici

Generalità
Tensione di rete DC 13,8 V
Consumo di corrente 7A Max.
Potenza 4 × 30 ~W
Ambito FM
Ambito di frequenza 87,6 MHz - 108,0 MHz
Sensibilità utile 3 V
Frequenza I.F. 10,7 MHz
Ambito OM (AM)
Ambito di frequenza 522 KHz - 1620 KHz
Frequenza I.F. 450 KHz
Ambito LW
Ambito di frequenza 144 KHz - 288 KHz
Frequenza I.F. 450 KHz
Potenza d'uscita
Uscita per CD max. 1200mV
Lettore CD
Sistema Apparecchio CD
CDutilizzabili CD/CDR/CDRW/MP3 Disk
Numero di biti quantificazione 1 bit.
Frequenza modello
Caratteristiche di frequenza 20 - 100Hz≤ 5 dB
10 K - 20KHz ≤ 5 dB
Rapporto segnale-disturbo 50 dB (1KHz)
Numero di canali 2 canali stereo
Dimensioni dell'alloggiamento 178 L x 50 H x 165 P
Eliminazione delle anomalie
Prima di esaminare la lista di risconto, completeness in primo luogo l'allacciamamento. Nel caso in cui vi siano orecar domane in seguito alla verifica sulla base della lista di risconto, si consiglia di rivolgersi al centro di assistenza tecnica più vicino.
| Anomalie | Causa | Soluzione |
| In seguito all'inserimento nell'apparecchio, il CD o la cassetta non funziona. | Il regolatore del volume è impostato su un valore troppo basso. Gli allacciamenti non sono stati effetuati in modo corretto. Controllare l'allacciamento. | Impostare un valore più elevato per il regolatore del volume. Controllare il collegamento da +12V e il collegamento di massa. |
| Il tono dellettore CD tremola. | La superficie della strada aspra. L'apparecchio non è stato montato in modo saldo. | Prima di mettere in funzione il CD attendere che la strada diventi piana. Montare l'apparecchio saldamente. Accertarsi che venga utilizzato il systemà di fis-saggio posteriori nel caso in cui il veicolo non dis-ponga di supporti appro-priati per la parte posterio-re dell'apparecchio. |
| Il CD è difettoso. | Provarare con un'alto CD. Qualora quest'ultimo non presenti anomalie, il CD precedente è probabilit-mente danneggiato. | |
| Assenza di corrente. | Il CD è sporco. | Pulire il CD. |
| Il sistemi adcessione è disattivato. | Ruotare la chiave diccessione su "ON" oppu-re "ACC". | |
| Il disposativo di sicurezza è bruciato. | Sostituire il disposativo di sicurezza con un'alto da 7A. | |
| L'apparecchio non funzio-na correttamente (EJECT, LOAD, PLAY). | Il rumore elettrico coinvolgeanche il microcompu-ter. | Estrarre il CD o la cassetta in oggetto, quando effetuare nuovamente l'inseri-mento. Disattivare l'apparecchio e riattivarlo nuovamente. |
| Non vi è alcuna ricezione radio. | Il cavo dell'antenna non è collegato. | Inserire correttamente il cavo dell'antenna nella presa correspondente dell'-apparecchio. |
| Nella modalità di ricerca automatica la radio non si arrresta su alcuna stazione radiofonica. | I segnali di emissione sono troppo deboli. | Impostare una stazione radiofonica manualmente. |
| I CD's vengono inserti solo fino a metà nel vano CD. | Le viti e la sicura per il trasporto non sono stati rimossi. | Rimuovere le viti e la sicura per il trasporto. |


Pulizia dei CD
Riproduzione di un CD
Prima di attivare illettore CD, pulire il CD con un panno pulito e privo di polvere. Tirare il CD nel senso indicate alla freccia.
Avertenza: non utilizzato solventi quali la benzina o diluenti. I comuni detergenti o gli spray antistatici danneggiano l'apparechio.

Se si inserisce il CD con le scritte rivolte versus il basso, l'apparecchio più essere danneggiato.
Inserire sempre i CD con l'etichetta rivolta verso l'alto.
Avvertenza: nel caso in cui nell'apposita aperture per CD sua giornatae un CD, si raccomanda di non territori di insertire un ulteriore CD. In caso contrario, si potrebbe danneggiare l'apparechio.
I CD devono essere afferrati sempre sul bordo. Affinché i CD possano mantenersi puliti, non afferrarli sulla superficie.
Non incollare etichette o nastri adesivi sui CD.
Non esporre i CD ai raggi solari o a fonti di calorie quali, per esempio, i tubi di riscaldamento. Non lasciarli inoltre in auto, quando quest'ultima è parcheggiate al sole, poiché si potrebbe verificare un considerevole aumento della temperatura.
Questo apparecchio è stato controllato sulla base di tutte le direttive CE attuali in vigore in quello settore, quali per esempio la normativa in materia di compatibilità elettromagnetica e la diretiva in materia di bassa tensione, ed è stato costruito conformmente alle norme di sicurezza più moderne.
Con riserva di apportare modifiche tecniche.
Garanzia
Per l'apparecchio da moiMESSO in commercio ci assumiamo una garanzia di 24 mesi alla data di acquisto (scontrino).
Durante la garanzia nei ci impegniamo ad eliminare gratuitoamente i quasti dell'apparecchio o degli accessori ^* , dovuti a difetti di materia e di fabbricazione, riparandoli o, a notre discrezione, sostuendoli. Le prestazioni in garanzia hanno luogo a una prerogha della garanzia né danno diritto ad una nuova garanzia!
Per la garanzia è sufficiente lo scontrino di acquisso. Senza quello scontrino non sussiste il diritto né ad una sostituzione né ad una riparazione gratuite.
In caso di garanzia consignare al vostro rivenditore l'apparecchio base nell'imbal-laggio originale unitamente allo scontrino.
*) Danniagliaccessori non giustificano automaticamente lo scambio Gratisio dell'apparechio completo. Si prega di mettersi in contatto con la nostra centrale Telefonica.Dann alle parti dovetro oppure fratture ai pezzi di materia plastica sono obbligatoriamente a spese del cliente.
La riparazione di pezzi d'uso ovvero soggetti a logorama (cursori, ganci impastatori, cinghe di trasmissione, telecomandi di ricambio, spazzolini di ricambio, lame di seghe ecc.) come andere operazioni di pulizia e manutenzione o la sostituzione di pezzi soggetti a logorama non rientano nella garanzia e quindi sono a pagamento!
La garanzia si annulla nel caso di intervento da parte di terzi.
Dopo la garanzia
Al termine della garanzia le riparazioni possono essere eseguite dietro lavoro dal corrispettivo negotio specializzato o servizio riparazioni.
GB
General safety instructions
To avoid the risk of fire or an electric shock, you should not expose the device to rain or moisture. Consequently, do not use the device in the immediate vicinity of water - for example near a bath tub, a swimming pool or in a damp cellar.
Use the device only for the intended purpose.
Only connect the device at a properly installed plug socket. Pay attention that the specified voltage corresponds to the voltage of the plug socket. When using external mains supply, pay attention to the correct polarity and voltage. Always place the batteries in the correct direction.
Assemble the device in such a way that the available ventilation openings are not covered.
Never open the housing of the device. Incorrect repairs can constitute a considerable risk for the user. Should the device become damaged, in particular the mains supply cable, do not operate the device any longer, but rather have it repaired by an expert. Check the mains supply cable regularly for damage.
For safety reasons a broken or damaged mains lead may only be replaced by an equivalent lead from the manufacturer, our customer service department or a similar qualified person.
If the device is not used for a longer period, remove the plug connector from the plug socket or take out the batteries.
These symbols may be found on the machine and are intended to indicate the following:

The lightning symbol should advise the user of parts in the inside of the device which carry dangerously high voltage levels.

The symbol with an exclamation mark should advise the user of important operation or maintenance instructions in the accompanying documentation.

Devices bearing this symbol work with a „class 1 laser“ for tracing the CD. The built-in safety switches should prevent the user being exposed to dangerous laser light, which is invisible to the human eye, when the CD compartment is opened.
Under no circumstances should these safety switches be bypassed or manipulated, as this could result in a danger of exposure to the laser light.
Installation
Please install the car radio as shown below
a Nut
b Spring washer
c Plain washer
d Screw
e Mounting bracket
f Slide-in housing
g Threaded bolt

Note:
h Retaining screws during transport (please remove before installation)
1 Extraction tool (spanner for dismantling)
j Frame
First insert the operating panel on the left-hand side and then lock it into place on the right.
GB
GB
Connection
Connect the device as shown in the diagram.
Note:
- Do not attach the removable control panel until after connection of the cables.
- Please use loudspeakers with an impedance of 4 ohm.
Important Information for installing your CARRADIO!
- For proper instalment of your car radio, please make sure that your car provides an original "ISO JACKET". This is prepared as the counter part of the "ISO JACKET" of your car radio.
Depending on the specific car type, different wiring connection of the Backup wire are available.
In these case please contact your authorized car dealer. (However, this is necessary for storing the radio stations).
- Depending on the specific car type, interferences can be possibly arise during radio/CD operation. These interferences can avoided easily with an additional Interferences filter. (Your car radio AR 615 CD is originally prepared with an Interference Filter already).
In these case, please contact your authorized car dealer.
Precautionary Measures and Maintenance
- The screws (h) of the transport locking device should be removed before installation, as otherwise the CD cannot be inserted.
- The device is designed for the minus pole of the battery, which must be connected to the body of the vehicle. Please check this before installation.
- If the front control panel is removed while the radio or CD is on, the device is automatically switched off.
- Error. After the front panel has been reinserted an error message (ERROR) appears in the display. Use a piece of wire or similar item to press the RESET button (24) in order to return the electronics to its original state.
- If the interior of the vehicle becomes very hot, for example after standing in direct sunlight for a prolonged period, do not switch on the player until the inside of the vehicle has cooled down a little after you have been driving for a few minutes.
- In order to keep the removable control panel in a safe place you should always use the protective case provided.
GB
-
Please see the following diagrams on how to remove, insert and store the front control panel.
-
Open the control panel
-
Remove the control panel
-
Transporting the control panel
-
Attaching the control panel
Operation
1 OPEN Button
Press the OPEN button to fold down the front control panel. A CD can then be inserted into the CD slit or ejected by pressing the EJECT button.
2 +/- Button
During normal playback these buttons are used to set the volume. If the SEL button has been pressed beforehand these buttons can be used to make changes to the menus, for example the sound mode.
3 SEL Button (Select)
a) Press the SEL button briefly to access the selection menu of the sound mode. The letters "VOL" appear in the display for setting the volume. By repeatedly pressing the SEL button you can now select the individual menu items such as VOLUME, BASS, TREBLE, BALANCE and FADER. The settings of the individual menu items are changed using the "+" or "-" button. Note: If equaliser settings such as POP and ROCK have been selected under DSP it is not possible to adjust the BASS and TREBLE.
b) Press the SEL button for a longer time to access the selection menu TA SEEK/TA ALARM, MASK DPI/MASK ALL, DSP OFF, LOUD ON/OFF, BEEP ON/OFF, SEEK1/2, STEREO/MONO; LOCAL/DX; VOL LAST/ADJ. The letters "TA SEEK" appear in the display. Repeatedly pressing of the SEL button now brings up the individual menu items. The settings of the individual menu items are changed using the "+" or "-" button.
- TA SEEK Menu (Traffic Announcement Station Search)
- Select TA SEEK if you would like the radio to automatically search for a traffic announcement station when you select the TA function.
-
Select TAALARM to bring up a warning message in the display as soon as you have set a station under the TA function which does not transmit traffic announcements.
-
MASK DPI/ALL
This hides alternative frequencies (AF) during the search for a programme identification (PI).
MASK DPI: When the device is searching for the programme identification (PI) of a station the alternative frequencies with a different programme identification remain hidden.
MASK ALL: In the search for a programme identification (PI) alternative frequencies with a different programme identification and stations with a strong signal level without an RDS signal remain hidden.
DSP
In DSP mode you can select the equaliser settings POP M, ROCK M, CLASS M and FLAT M. Select DSP OFF to carry out your own adjustments. See also section 3a.
- LOUD ON/LOUD OFF
Switching the LOUDNESS function on and off.
When the volume is low the LOUDNESS function (LOUD) expands the sound characteristics by increasing the treble and bass sounds.
- BEEP ON/OFF Confirmation Beep
You can select two types of confirmation beep when a button is pressed.
BEEP ON: The confirmation beep is heard whenever a button is pressed.
BEEP OFF: The confirmation beep is switched off.
SEEK 1, SEEK 2 (only available during radio operation)
Seek function with the / buttons during radio operation.
SEEK 1: Keep the / buttons pressed down and the radio will stop at the next station that is reached.
SEEK 2: As long as the / buttons are pressed down the search function will continue in the frequency band.
STEREO/MONO switching (only possible during radio operation)
- LOCAL/DX (only available during radio operation)
Your radio can receive RDS EON data. The term "EON" signifies the transmission of additional station information within a station chain, e.g. WDR. If a traffic announcement (TA) is made within a station chain, the radio switches from a station which does not transmit traffic announcements to one that does within the same station chain. Reception of this station data is shown in the display by the EON symbol. You can choose between the EONTA LOCAL and EONTA DISTANCE mode for local or long-distance traffic news. The purpose of this function is to prevent the radio switching unnecessarily to an EON-TA traffic news item. If an EON station is a long distance away, it may be that in some cases EON TA information can still be received from the station. The radio then switches to this EON station and tries to receive the traffic announcements. The signal is too weak,
GB
however, and reception is poor as this EON station is too far away.
Therefore the radio switches back to the station that was set previously.
During the type of operation described above the listener hears the wrong programme for a short time or nothing at all.
EONTA LOCAL:
This function prevents switching to an EON station whose signal is too weak. The radio does not switch to this station and the listener does not hear any interference.
EONTA DISTANCE Mode:
In this mode the EONTA circuitry tries to receive the EONTA information from any available transmitter and thus improve reception quality.
VOL LAST/VOL ADJ
VOL LAST: The radio switches on at the actual volume it had when it was last switched off.
VOL ADJ: Using the + and - buttons you can pre-select a constant switch-on volume.
4 POWER Button
Press this button to switch the device on and off.
5 LCD (liquid crystal display)
6 BAND button
Press the BAND button briefly to select the frequency band you would like to hear. The designation of the corresponding band F1, F2, F3, MW1, LW is shown in the LCD.
7/8 / Buttons TUNING, SEEK, TRACK, SKIP UP/DOWN
a) In radio mode:
Press the or button briefly to tune into a radio station manually.
Keep the or button pressed down in order to start searching for a radio station.
See also the function SEEK 1 / SEEK 2.
b) In CD mode: Press the 又 or 又 button briefly to jump forwards or backwards. If you would like to scroll the titles of the tracks keep the 又 or 又 arrow button pressed.
9 Mode Button
Press this button to select the CD player or radio mode.
10 MUTE Button
Press the MUTE button to switch off the loudspeakers for a short time. Press this button again to cancel this function.
11 AP Button (Autostore - Automatic Station Storage)
In radio mode:
a) Memory function :
Press the AP button for longer than one second to activate automatic
station storage. The radio searches within the current frequency band, e.g. FM 1, for the strongest signal level until the search cycle has finished. The six strongest stations are then allocated to the corresponding storage locations.
The stations that have now been stored are played for approximately 5 seconds each and then the station of the first storage location is set. If you would like to search for more stations in the FM band, press the BAND button in order to change to the FM 2 or FM 3 band. Press the AP button again for more than one second in order to start the continued search.
b) Scan Function:
After the AP button has been pressed briefly the radio plays all the pre-set stations in the current frequency band (FM, MW, LW) for a short time.
Note: The scan function ends automatically when it reaches the storage location from which it started.
AP button as a search function during MP3 playback
a) Direct input of the track number for CDs in MP3 format:
- Press the AP button once. The letters "TRK SCH" appear in the display.
- Press the SEL button once. The letters "TRK SCH 001" appear in the display. The units place flashes.
- With the help of the + / - buttons it is now possible to put in a track number from 0 to 9 in the units place.
- Press the SEL button briefly once more. The tens place flashes. Proceed as described under 3 above.
- Press the SEL button briefly once more to put in a hundreds place if necessary.
- Press the SEL button for 1 second to complete entry of the track numbers. Immediately after this the selected track is played.
b) File search function for CDs in MP3 format:
- Press the AP button twice. "FILE SCH" appears in the display.
- Press the SEL button briefly to show the first directory that has been selected in the display.
- Using the +/- buttons it is now possible to select the various directories on the CD.
- Press the SEL button for 1 second. The selected directory is played starting with the first song. Press the SEL button briefly and you can select a track in the directory using the +/- buttons.
- Complete entry of the titles by pressing the SEL button for 1 second. Immediately after this the selected track is played.
c) Keyword search function for CDs in MP3 format:
- Press the AP button three times. The letters "CHAR SCH" appear in the display.
- Press the SEL button briefly. The letter "A" appears on the left of the display.
GB
- By repeatedly pressing the + / - buttons you can now enter a letter from A to Z or a number from 0 to 9 in the first position of the display.
Note: The following letters and numbers are entered from left to right. - Press the SEL button briefly. An "A" appears in the second position of the display.
Proceed as for the entry of numbers and letters as described under 3 above. - Repeat the process described under 2 and 3 above until you have entered your search term.
Note: The last entry can be deleted by pressing the AP button. - Complete entry of the search term by pressing the SEL button for 1 second. Immediately after this the selected track is played.
Note: During the normal playback of CDs in MP3 format the and buttons can be used to move up or down one track. Station buttons 5 and 6 can be pressed to move up and down 10 tracks at a time.
12:17 Station buttons (1-6) of preselected stations and as 1 TOP, 2INT, 3RPT and 4RDM buttons during CD operation
a) Radio Operation
Pressing these buttons briefly directly selects a preset radio station. If these buttons are pressed for more than one second, the station currently being listened to is stored under the selected station button.
b) CD/MP3 Operation
- Press the 1TOP button to interrupt playback of the CD (pause function). Press this button again to continue listening to the CD/MP3.
- Press the 2INT button. Each track on the CD is played for 10 seconds. Press this button again to stop searching. The currently selected track is played.
- Press the 3RPT button. The track currently being played is repeated. Press this button again to cancel this function.
- Press the 4RDM button. The CD tracks are played at random. Press this button again to cancel this function.
18 TA Traffic Announcement (Priority for Traffic Information)
The TA function is activated by pressing the TA button briefly. The TA symbol appears in the display. During radio operation in one FM frequency band the search for a traffic announcement station is started automatically (TA SEEK). If an FM station is being received which transmits the latest traffic announcements from time to time, the TP display lights up.
When the TA function is switched on, the FM traffic announcements automatically interrupt CD operation. The volume level is increased to the minimum value for the transmission of traffic announcements. After the traffic announcement has finished, the programme that was previously running is resumed.
Interruption of the TA Function:
If you would like to interrupt the current traffic announcement, press the TA button briefly. This does not switch off the TA mode.
GB
19 PTY Button - Selection of the Programme Type
Besides the station name, some FM stations also transmit information on the type of programme. This information can be displayed by your car radio.
Examples of such types of programme are:
SPORT
NEWS
POP
CLASSICS
With the PTY function you can specifically select stations transmitting a particular type of programme.
Press the PTY button once to access the PTY music group. The symbol "PTY" appears in the display. Using the station buttons 1-6 you can now make a selection as follows:
| Press once | Press twice | |
| Station button 1 | POP M | ROCK M |
| Station button 2 | EASY M | LIGHT M |
| Station button 3 | CLASSICS | OTHER M |
| Station button 4 | JAZZ | COUNTRY |
| Station button 5 | NATION M | OLDIES |
| Station button 6 | FOLK M |
Press the PTY button twice to access the PTY language group. Using the station buttons 1-6 you can now make a selection as follows:
| Press once | Press twicen | Press four times | |
| Station button 1 | NEWS | AFFAIRS | INFO |
| Station button 2 | SPORT | EDUCATE | DRAMA |
| Station button 3 | CULTURE | SCIENCE | VARIED |
| Station button 4 | WEATHER | FINANCE | CHILDREN |
| Station button 5 | SOCIAL | RELIGION | PHONEIN |
| Station button 6 | TRAVEL | LEISURE | DOCUMENT |
Press the PTY button three times to switch this function off again.
When PTY has been selected the radio starts searching for corresponding PTY information and stops when the PTY information has been found.
If the programme type being searched for is not found, "NONE PTY" appears in the display.
If the PTY information being searched for no longer exists, the PTY function automatically switches to normal mode.
20 AF (Alternative Frequencies) REG Function
a) AF is a function that works with the help of RDS (Radio Data System) and can only be used with FM stations. The radio searches in the background for the best frequency reception of the station that has been tuned into. If the AF function has
GB
been switched on, the radio continuously tests the signal strength of the AF frequency. The test interval for each AF frequency depends on the signal strength of the current station and varies from a few minutes in the case of a strong signal to a few seconds in the case of weak signals. Whenever the new AF frequency is stronger than the station that is currently tuned in, the radio switches to this frequency for a short time and the message "NEW FREQUENCY" is displayed for one to two seconds. As the mute time during the frequency change and the test time is very short, this is almost inaudible during the normal programme.
The AF function is activated by briefly pressing the AF button and the status of the AF function is shown in the display by an AF symbol.
- If the AF symbol appears in the display, the AF function is switched on and RDS transmission data is being received.
- If the AF symbol flashes in the display, the AF function is selected but no RDS signal can be received at the moment.
- Press the AF button again to switch off this function. The AF symbol in the display goes off.
b) REG Function
At certain times some stations divide up their programmes into regional programmes with varying content.
- REG ON: If the AF button is pressed for a longer time the regional mode is switched on. The message "REG ON" appears in the display for a few seconds.
Note: The display capacity is limited. It is possible that in the double display mode some segments of the display are deleted.
The function REG ON prevents the radio from switching to alternative frequencies which have a different regional programme content.
- REG OFF: Pressing the AF button again for a longer time switches off the regional mode. The message "REG OFF" appears in the display for a few seconds.
The programme identification (PI) of the regional programme is ignored during the search for an alternative frequency (AF) or a programme identification (PI).
21 CD Slit
22 Eject Button (EJECT)
Press this button to eject the CD.
23 Flashing LED
When the front control panel is removed this display flashes.
24 RESET Button
Press this button to reset the programme on which there is interference.
Technical data
GB
General
Supply voltage
DC 13.8 V
Power consumption
max. 7 A
Power
4x30W
FM band
Frequency range
87.6 MHz to 108.0 MHz
Effective sensitivity
3 uV.
I.F. frequency
10.7 MHz
MW (AM) band
Frequency range
522 KHz - 1620 KHz
I.F. frequency
450 KHz
LW band
Frequency range
144 KHz - 288 KHz
I.F. frequency
450 KHz
Output Power
Output
at CD max. 1200 mV
CD player
System
CD device
Suitable CDs
CD/CDR/CDRW/MP3 disks
Signal format
number of quantising bits - 1 bit
Frequency characteristics
Sampling frequency 44.1 KHz
Signal-to-noise ratio
20 - 100Hz≤ 5 dB
Number of channels
10K - 20KHz≤ 5 dB
Housing dimensions
50 dB (1 KHz)
2 stereo channels
178 x 50 x 165 (W x H x D)
GB
Troubleshooting
Before going through the checklist please make all the connections first. If you still have questions after going through the checklist, please consult your local customer service representative.
| Fault Symptoms | Cause | Solution |
| After being inserted into the device the CD or cassette does not turn. | The volume control is set too low. The device has not been correctly connected. Check the connections. | Turn up the volume. Check the +12V and earth connection. |
| The sound of the CD play-er "jumps". | The surface of the road is uneven. The device is not firmly installed. The CD is damaged. The CD is dirty. | Wait until the road becomes smoother before playing the CD. Install the device firmly. Ensure that the rear attachment is used if the vehicle does not have any suitable retainer for the rear section of the device. Try another CD. If this works correctly, the first CD is probably damaged. Clean the CD. |
| There is no power. | The ignition is switched off. The fuse has blown. | Turn the ignition key to "ON" or "ACC". Replace the fuse by another 7A fuse. |
| The device does not work correctly (EJECT, LOAD, PLAY). | The microcomputer has been affected by electrical interference. | Remove the CD or cassette and reinsert it. Switch the device off and on again. |
| No radio reception. | The antenna cable is not connected. | Insert the antenna cable firmly into the antenna socket of the device. |
| In automatic search mode the radio does not stop at a transmitting station. | The transmission signals are too weak. | Tune in to a radio station manually. |
| CDs are drawn only half way into the CD tray. | The transport screws have not been removed. | Remove the transport screws. |
Playing a CD
GB
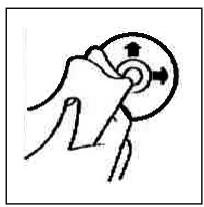
Cleaning the CD
Before playing a CD, wipe it off with a clean, dust-free cleaning cloth. Pull out the CD in the direction of the arrow.
Note: Do not use any solvents such as petrol or thinning agents. Commercially available cleaning substances or antistatic sprays will damage the device.
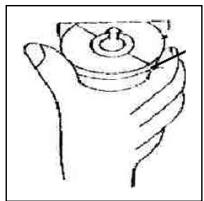
If the CD is inserted with the printed side facing downwards, the device may be damaged.
Always insert the CD with the label facing upwards.
Note: If there is already a CD in the CD slit, do not try to insert a second CD. This may damage the device.
Always hold CDs by the edge. In order to keep the CD clean do not touch the surface.
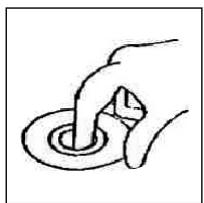
Do not attach any stickers or adhesive tape to the CD.
Do not expose the CD to direct sunlight or sources of heat such as heating pipes. Do not leave CDs in the car if it is parked in direct sunlight as this will lead to a considerable rise in the temperature inside the car.
This device has been tested according to all relevant current CE guidelines, such as electromagnetic compatibility and low voltage directives, and has been constructed in accordance with the latest safety regulations.
Subject to technical changes without prior notice!
GB
Guarantee
The device supplied by our Company is covered by a 24 month guarantee starting on the date of purchase (receipt).
During the life of the guarantee any fault of the device or its accessories *) ascribable to material or manufacturing defects will be eliminated free of charge by repairing or, at our discretion, by replacing it. The guarantee services do not entail an extension of the life of the guarantee nor do they give rise to any right to a new guarantee!
Proof of the guarantee is provided by the proof of purchase. Without proof of purchase no free replacement or repair will be carried out.
For repairs or replacement during the life of the guarantee return the device in its original packing together with the proof of purchase to your dealer.
*) Damage to accessories does not mean automatic free replacement of the whole machine. In such cases please contact our hotline. Broken glass or breakage of plastic parts are always subject to a charge.
Defects to consumables or parts subject to wearing (e.g. motor pistons, kneading blades, drive shafts, spare remote control, spare toothbrushes, saw blades, etc.) as well as cleaning, maintenance or the replacement of said parts are not covered by the guarantee and hence are to be paid!
The guarantee lapses in case of unauthorized tampering.
After the expiry of the guarantee
After the expiry of the guarantee repairs can be carried by the competent dealer or repair service against the payment of the ensuing costs.
Ogólne wskazówki związane z bezpiecznych obstuga
PL
Urzejdenie chronie danezy przy deseczem i wolgocia, aby zapobiec grozbie pozaru lub porazeniu przem. Nie daneły gowc uzywac w poplizu wody, a wiecz przyckaładowo w poplizu wanny, basenu lub w zawilgoconej piwnicy.
Urzadzenie nalezy uzywać tylko zgodnia z seinen przyznaczenia.
Urzadzenie nalezy podączyc tylko i wyȩcznie do przysepiso zamontowanego gniazdka.
Prosze zworcić uwage na to, zeby podane napięcie zgadzało są z napiȩciem wgniazdku.
W przypadku uzywania oddzielnych zasilaczyNSEZWROcUwage na biegunowo s i napiecie, baterie musza zostac wfozone do urzadzenia zgodnie z oznaczoa biegunowość.
Urzadzenia naleź w taki sposob ustawic, zęby istniejeść otwory wentylacyjne nie zostymi przykryte.
Nigdy nie wolno otwierać obudowy urzadzenia. Niefachowo przejrowadzone naprawy moga, byc goźne w skutkach dl a uzytkownika. Przy uzskodzeniu urzadzenia, w szczególnosci kabla sieciowego, urzadzenia nie要去 byc uzywane dopóki ne zostanie naprawione przy osobé z wymaganymi uprawieniami. Przewód zasilajczyNSEZy regularnie sprawdzać, czyNie jest uzskodzony.
W razine awari proszne naprawiac urzadzenia samenu lecz skorzystac z pomocy autoryzowanego spezialisty. Jezeli przewod zasilajcy niedzaczaly ulegnie uszkodzeniu, to powinien on byc wymieniony u wytworcy lub w spezialnym zakladzie naprawczym albo przyze wykwalifikowana osobe w celu unikienia zagrozenia.
Ježeli urzadzenie nie bedzie przy dłuszcy czas uzywane, naleź wyciagnoć wyczke z gniazdka lub wyjac baterie.
Ponieszne symbole moga znajdocuć sie na urzadzeniu i majorzwracć Państwa uwage na:

Symbol błyskawyca zma zwrocić uwage uzytkownika naznajdujecie sie we wétrtu urzadzenia;cęsci, kóte są pod niebeźpiecznych wysokim napieciem.

Symbol z wykrzykniem ma zwroci uwage uzytkownika na znajdujace sie w zańczonych dokumentach wazne wskazówki zwiazane z obstfug i konserwacja urzadzenia.

Urzadzenia z tym symbolism uzywaj do odczytywania dzwieku z płyty kompaktowej „Lasera klasy A". Wbudowany wytrzcznik bezpiecieznstwa za popobiec temu, zeby uzytkownik wcasie otworiania kieszeni odtwartacza płyty kompaktowych zostawi poddany niebepiecznemu dla ludzkich oczu oddziatwyaniu niewidoczneość latera.
PL
Wyćzynakiego ne sąȩzy w zadnym wypadku zmostkownik lub teź przy nim manipurłowac, poniewaź grozi to siebezpiecznychwem, ze uzytkownik poddany zostanie oddziaływniu niebezpiecznego dla ludzkich oczu niewidocznego swiatka lasera.
Instalacja
Radiooobiornik nalezy zamontowac zgodnie z ponizsza ilustraciona
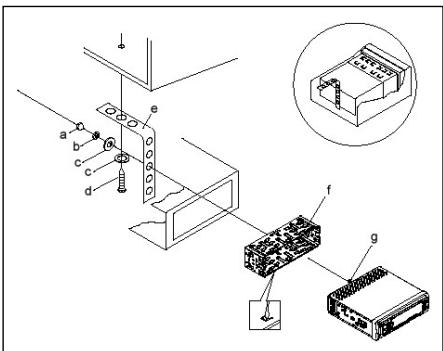
a nakretka
b podkjadka spreźysta
c podkfadka
d sruba
e katownik montażowy
f wsuwana obudowa
g kofti gwintowane
Uwaga!
h s Ruby zabeepieczaja ne na czas transpo Tu (przed montazem usunać)
i naręźdie do wysuwania sprzȩtu (klucz do demontazu)
j Ramka przesfony
Prosze przesfone elementu sterowania przytozyć napjierwo po lewej stronie a nastepnie docisnac ja po stronie prawej, az zaskoczyc.
Podłaczenia
Wykonac połaczenia zgodnie ze schematem.
PL
PL
Uwaga
- Zdejmowany panel obstugi nalezy załozyc dopiero po pod.§aczeniu kabli.
- Nalezy stosować gólsniki o impedancji 4 ohm.
Wañne informações dodatkowe, dotyczé instalacji Waszego radioodbiornika samochodowej!
- Podczas instalacji / przyłączenia urzadzenia prosze zworćic uwage na to, zeby Wasz samochod dysponowat原有inalnym połaczeniem „ISO PODŁAÇZENIE". jest on opdowiednikiem wtyczykznajdujece są wyjsciu aparatu (ISO PODŁAÇZENIE). Przyzejci „DAUER +“ (Backup), w zależnosci od typo pojadzu,MZ dochyń. W tych przypadkach prosze są zwracać do autoryzowanego warsztatu samochodowo, gdyż inaczej nie jest zagwarantowane ciagę/ state zasi-lanie przem Waszego radia (Potrzebne"Justak do zapisywania staci nadawczych do pamięci).
- Wazoleński od typo pojazdu w wyjtkowych sytuacjach moga wystapić szumy zakłocajce w trybie RADIO/CD. Można je odpowiednio usṇȩcz przyśdaków filtr przyciewczłoceniewy. Mimo togo,ź Wasz aparat AR 615 CD juz seryjnie wypyasəny jest w filtr przyciewczłoceniewy, to wazoleński od pojazdu要去 dojsć do pogorszonego odbioru. Otrzymaja je Panstwo w handlu z akcesoriami samochodwymi i/lub w Waszym warsztacie samochdowym.
Środki ostrożnosci i konserwacja
- Š Ruby (h) zabezieczajace w transporcie prosze usunac przy montazem, gdyż inaczej CD nie bedzie wciagana.
- Urzadzenie dostosowane jest do podtaczenia do ujemnego bieguna akumuladora, ktory musi byc podtaczony do karoserii pojazdu. Prosimy o sprawdzenie tego przy instalacja.
- Ježeli podczas przy w trybie radia lub CD dostanie zdjety panel przydni, nastapi automatyczne wyłączenia urzadzenia.
- Wadliwe dziatanie. Po załozeniu z powrotem przydniego panelu obsglu w wyswietlaczu ciektekraliczynm pojawia sie meldunek o będzie (ERROR). Przy pomocy drucika lub podobnégo przydmiotu prosze wcijsć przyzycisk RESET (24), by elektroniki sprawadzć do stanu wymiSciowego (ZRESETOWAC).
- Ježeli wnétrze pojazdu jest很开心AGRZANE, np. na skutek dfluszego parkovwania w moćno naslonecznonym mięsću, to nie nały wówczas wącza odtwarzacza CD, do momentu ochodzenia są wnétrzwa w trackie jazyd.
-
W celu bezpiecznego przechowywnia panela przydniego, naleź stosowej przyznaczone do tego celu etui.
-
Przy wyjmowaniu/demontazu/zabudowywaniu oraz przechowywaniu panela przygodnia sąze stosować sie do ponijszych rysunków.
- Otworzyc panel sterowania
- Odjac panel sterowania
- Prenoszenie panelu przedniego
- Zaktradanie panelu przydniego
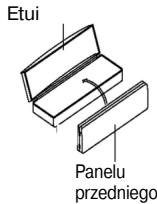
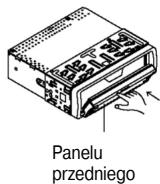
Obstuga
- Przycisk OPEN
Nacisnac przyciszek OPEN w celu opuszczenia panela przydkiego. Přte CDUNCTů wózyć tlyko w szczeline na CD wzgl. wysunac jo po naciśću przyczisku EJECT. - Przyciski +/-
Podczas normalnoe trybu odztwarzania przyciski te sfuza do ustawiania gósnosci. W połaczeniu w czsinietym przymciiskiem SELdoğan wropyramidzczmiy w menu np. w zakresie charakterystyki dzwieku.
- Przycisk SEL (wybór):
a) Aby otworzyc menu charakterystyki dzwieku, nalezy krótk nocisnac przyczisc SEL. Kiedy na wyświetlacz uCD pojawsi „VOL" mozymu ustawic głośnosć. Poinowne naciśnicie przycziscu SEL pozwala nam na wybranie jegno z punktów menu, jak: VOLUME, BASS, TREBLE BALANCE i FADER. Ustawienie poszȩgólnych punktów menu zmieia sie za pocmA przycziscu „+“ lub „-". Wskazówna: Jeźeli pod DSP wybrane zostymi ustawianie korektora czestot-lwość, takie jak np.: POP, ROCK, to nie myznaucie BASS i TREBLE.
b) Poprzej naciść i przytrzymanie przycisku SEL otwieramy menu wyboru TA SEEK/TA ALARM, MASK DPI/MASK ALL, DSP OFF, LOUD ON/OFF, BEEP ON/OFF, SEEK1/2, STEREO/MONO; LOCAL/DX; VOL LAST/ADJ. Na wyświetlaczu pojawia są „TA SEEK". Po ponownym naciśćci przycisku SEL możymi wyjbierć poszczejne punktymi. Zmiany w zakresie poszczejnych punktów menu wpradowzamy za pomoczą przycisku „+“ lub „-”.
PL
- Menu TA SEEK (wyszukwanie informaci o ruchu)
Ježeli wybr fungcjti TA ma spowodować automatyczne wyszukanie staci nadajacej informacja o ruchu,NSEK.
Jezeli wyibierzemy fungkcje TA ALARM, to wówczas, w przypadku ustawienia staci na做不到ej informaci o ruchu, na wyswietlaczu pojawi sie odpwiednie ostrzezenia.
- MASK DPI/ALL
Ukrywanie czestotliwość alternatywnych (AF) podczas wyszukiania identyfikacja programu (PI).
MASK DPI: jezeli odbiornik wyszukuje wg identifikaci programu (PI) danej staci, to woczcas czestotliwość alternatywne o innej identifikacja programu pozostaj ukrYTE.
MASK ALL: podczas wyszukiwania identyifikacji programu (PI) czestotliwosci alternatwyne z inna identyifikacja programu oraz nadajniki o silnym sygnale bez RDS-u pozostaja ukryte.
DSP
W DSP moga Paanstwo wybrać ustawenia korektora czestotiwość: POP M; ROCK M; CLASS M i FLAT M. Proszowy wybrać DSP OFF, by dokonac wąsnych ustawien. Patrz,rownej Pkt. 3a.
- LOUD ON/LOUD OFF
Węczanie i wy)—czanie funkcj LOUDNESS.
W niskim przy uzyciu Funktion LOUDNESS (LOUD) poszerza sie obr dzwieku. Tony wysokie i niskie zostaja podwyzszone.
- BEEP ON/OFF przyk potwierdenia.
Ton potwierdzajacy przy wciśnocy iu klawiszma myza wybrać w dwoch rodzajach:
BEEP ON: dzwiek potwierdenia pojawia sie przy kaźdym naciśću przyciscu.
BEEP OFF: dzwiek potwierdenia jest wyfaczony.
- SEEK 1, SEEK 2 (do wyboru tylko w trybie „radio")
Funkcja szukania przyzisckami / w trybie „radio".
SEEK1: Prosze trzyma wciński przycisk / , a radio zatrzyma są na najbliszzej odbieranej staci.
SEEK2: Póki przymaję Państwo wciȩne przyciski ∧/∨, odbywa są dalsze szukanie staci w danym pąmie czestotłowosci.
-
Przelacznie STEREO/MONO (do wyboru tylko w trybie „radio")
-
LOCAL/DX (do wyboru tylko w trybie „radio")
Wasze radioMZe obdierac dane RDS EON. Pod pojeciem EON RozumiemyMZiWiwoSz obdioru dodatkwyh informacji w ramach danej sieci staci np.WDR.W przypadyku komunikatu o ruchu (TA)w ramach danej sieci staci radiowych nastapi automatycne przyfaczenie ze staci ne
nadajęcej informaci o ruchu na odpowiednia stacie nadajȩc sątie informacja w daneji sieci staci. O odbiorze tego typu danych informuje znaczek EON na wyswietlacz uodbiornika. Moga Państwo wybierać między trybem EONTA LOACAL lub EONTA DISTANCE celem odbioru lokalnych komunikatów drogowych lub meldunkowy radiowych dlruchu dalekobieżnégo. Sens tej funkcj polega na zatrzymaniu niedoźanego przyȩczania na meldunki drogowe EON-TA. Jeźeli stacja EON jest bardzo daleko, to czȩsciowo i tak moga być odbierane informacja EON TA z tej staci. Radio przyȩczamy są na te stacie EON i próbuje odebrȩ informacja o ruchu. Jednak poziom sygnatu jest sąby a odbiör zfy, poniewź dana stacja EON półozona jest zbyt dalek. Dlatego radio ponownie przyȩczcie są uprzejnio wybrano stacie.
Przy powyyszym trybie przytkownik ustyszy przyez chwie inny program niz wybrany lub nastapi chwilowa cisza.
EONTA LOCAL:
Dzieki tej funkci unikamy przyȩczania na stacja EON o sąbym sygnale. Radio nie przyȩczama sie na te stacja a sąchacz nie zauwaź jakichkol-wiek zakfocen.
Tryb EONTA DISTANCE
W tym trybie funkacja EONTA przybine uzyskać informacja EONTA z osią-galnej staci i w ten sposob poprawic jakość odbioru.
VOL LAST/VOL ADJ
VOL LAST: Radio węcza są z ostatnio ustawioną faktyczna gólność.
VOL ADJ: Przy pomocy klawisz "+, " ustaniewaja Państwo gólność niedziemna przy wączaniu.
4 Przycisk POWER
Do węçczania/wyȩczania odiornika.
5 Wyswietlacz LCD (wyswietlacz cieklokrystaliczny)
6 Przyciski BAND
Aby wybrać wymagany zakres fal nalezy nacisnám przyczisk BAND (pasmo). Rodzaj danego zakresu F1, F2, F3, MW1, LW prezentowy jest na wyświetlączu.
7/8 Przyciski / TUNE, SEEK, TRACK, SKIP UP/DOWN
a) W trybie „radio": Prosze wciąc krótko przycisk lub , by ustawić recznie pożadano stȩcje radiowa. Prosze trzyma wciȩniety przycisk lub , by Rozpoczć szukanie stȩcji radiowych. Patrz teź fungcjja SEEK1/ SEEK 2.
b) W trybie CD: w celu przeskoczenia do przydou lub do tytu nalezy nacisnac przyczisk 空 lub .W celu przewijania utworow nalezy nacisnac i przytrzymac przyczisk ze straţka; 空 lub
PL
9 Przycisk Modus (tryb)
Nacisnac w celu dokonania wyboru pracy w trybie radia lub CD.
10 Przycisk MUTE
Prosę wciśnȩć przycisk MUTE, by wyciszć na krótko gośniki. Prosȩ ponownie wciśnȩć ten przycisk, by powyźsa fungcję z powrotem skasowej.
11 Przycisk AP (automatyczne zapamietywanie staci)
W trybie radia:
a) Funkcja pamięci:
aby aktywować automatyczny tryb zapamietywania staci, naleź ynesc)— i przytrzymać przycisk AP przyd'użej nied第一条 sekunde... Odbiornik - w ramach aktualné pasma czestotliwość np. FM 1 -wyszuka staje o najwyśzym poziomie sygnat. Szesć staci o najsilniejszym sygnale zostanie zapamietyanych w kolejność rosnącyczestotliwość i zostano im przypisane kolejne numery.'
Teraz kazda zapisana do pamieci stacja wącza są na ok. 5 sekund, a nastepnie wybrana dostaje stacja utrwalona na pierwszej poźycji w pamieci.
Ježeli chça Państwo szukać dalszych staci w zakresie FM, to prosze wcisnac przycisk BAND, by przyzejć do FM2 lub FM3. Prosze ponownie wcisnac przycisk AP na dźuzej niz sekunde, by Rozpoczć dalsze szukanie.
b) Funkcja krótkiego węczania staci:
Po krótkim wciśnocy przycisku AP radio wącza na krótko wzystkie ustawione stacjeactualnégo pasma częstotiwość (FM, MW, LW).
Wskazówka: Funkcja krótkiego wączania staci konczy sie automatyczne zchwila dojscia do pozycji wAMIci, z ktorej została wystartowana.
Przycisk APJakofunkcajwyszukiwania wtrybie MP3
a) bezposrednie wprovadzenie numero utworu na pþytach CD w formacie MP3:
- Prosze wicznęć jeder raz przycisk AP. W wyświetlaczu pojawia są „TRK SCH".
- Prosze wcisnac krto przycisk SEL. W wyswietlaczu pojawia sie TRK SCH 001". Pozycja jedernek miga.
- Przy pomocy przycisków +/-maja teraz Państwo moziwość podania numeru tytułu od 0 do 9 w poźycji jedynek.
- Prosę ponownie wciąć na krótko przycisk SEL. Pozycja dziesiatek miga. Dalej prosȩ postępowć zgodnia z opsem w pkt. 3.
- Prosę ponownie wcisć na krótko przycisk SEL, by ewentualnie dokonać wpisu w pozycji setek.
- Wpiswanie numero tytu prorosze zakonczyc przyezdhuźse wciȩść (1 sek.) przycziscy kSEL. Bezposrednio po tym zestanie odtworzony utwor o wybranyl numerze.
b) Funkcja wyszukiwania pliku na płtytach CD w formacie MP3:
- Prosze wcisnć dwa razy przycisk AP. W wyświetlaczu pojawia są „FILE SCH".
- Prosę wciśnocy krótko przycisk SEL, by w wyświetlaczu pokazaź sie pierwszy wybrany katalog.
- Przy pomocy przycisków +/-maja teraz Państwo只得 wybrania roźnych katalogów na płycie CD.
- Prosze wicznac d'huzej (1 sek.) przycisk SEL. Wybrany katalog odtwarzany jest od pierswzej piosenko. Prosze wicznac krótko przycisk SEL i przy pomocy przycisków +/- moga Pański wybrać jaksi tytuń w katalogu.
- Prozę zakończyc wispyawanie przyźchu sze wciȩcie (1 sek.) przyciscu SEL. Bezpośrednio po tym zestanie odtrworzy utwor o wybranym numerouse.
c) Funkcja szukania wg hasla, dotczy pIyt CD w formacie MP3:
- Prosze wcisnć trzy razy przycisk AP. W wyświetlaczu pojawia są „CHAR SCH".
- Prosę wcisnć krótko przycisk SEL. W wyświetlaczu z lewej strony pojawia sie „A".
- Wciskajc wielokrotnie przycisci +/- moga teraz Paanstwo wpisa c w pierwseje pozycji wyswietlacza literc od A do Z lub cyfre od 0 do 9. Wskazowa: Wpisywanie nastepnych cyfri liter odywa sie od strony lewej do sprawej.
- Prosze wcisnac krótko pryzcisk SEL. W drugiej pozycji wyswietlaca pojawia sie „A". Wpisujac cyfry i litery prosze postepowac zgodnie z opisem w pkt. 3.
- Prosę powtarzać czynnosci w pkt. 2 i 3 tak d胶囊, az wpisza Państwo poszukiwane pojecie wieloznakowej. Wskazówka: Ostatni wpis prosze kasowej przy wciȩść klawiszata AP.
- Prozę zakończy wipsywanie przy dźusze wciȩść (1 sek.) przycisku SEL. Bezpośrednio po tym zestanie odtworzony utwor o wybranym(Numbere.
Uwaga: W normalnym trybie odtwarzania p'ty CD w formacie MP3这其中 za pomocza przyczisków ◆ lub ◆ przyszekoczyc o jeder utwor w goře lub w dof. Za pomocza przyczisków staci 5 lub 6 przyka kazdorazo-wo przyszekoczyc o 10 tytuław goře lub w dof.
12-17 Przyciski (1-6) zapisanych staci oraz jako przyciski 1TOP, 2INT, 3RPT, 4RDM w trybie CD.
a) Tryb radia
Krotkie nacișniecie tych przycisków spowoduje bezpoșredni wyborwczejnie zapisanej staci radiowej. Ježeli dany przycisk zostanie przytrzymany d'huzej niș 1 sekunde, to woczas do danego przycisku zostanieprzypisanaactualnie ustawionia staça.
PL
b) Tryb CD/MP3
- W celu przerwania odtwarzania CD nacinacja przycisk 1TOP (pauza). Ponowy naciśćkiego przycisku wznowy odtwarzanie płyty.
- Nacisnac przycisk 2lNT. Káźdy tytuł Bedfordze odztwarzany przyze 10 sekund. Ponowne naciść przyciscu oznaca przyerwanie procesu wyszukiwania i odtrworzy zostanieactualnie wybramy utwor.
- Nacsinęc przycisk 3RPT. Aktualnie odṭwarzy utwör zostanie powótrzony. Ponowne naciśćtie tego przycisku spowoduje uniewaźniazenia tej funkcj.
- Nacisnac przycisk 4RDM. Utwory będa odtwarze w przypadkowej kolejnosci. Ponowne naciśćte goźńczyku spowoduje uniewañność tej funckji.
18 FunkcjE TA zaçamy poprzej krötkie nacișnieiie przycisku TA, a o jej uaktywnieniu informujme njazeck TA na wyswietlacu. W trybie radia w danym zakresie czestotliwoSci FM Rozpocznie sie automatyczne wyszukwanie staci nadajacej informaje o ruchu (TA SEEK).
Ježeli odbierana befindie stacja, która co pewien czas nadaje najswieźse informacja o ruchu, to wówczas na wyświetlacz zu zapali są wskaźnik TP. Przy załęczonej funkcj TA informacja o ruchu nadawane na FM spowoduja automatyczne przerwanie odwartzenia płyty CD. Głowosć automatycznie zȩkszy są do minimalné goziomu wąsciwogo dla transmisji informacja o ruchu. Po zakońzeniu informcj o ruchu nastapi powróć do wczȩść ustawionego programu.
Przerwanie funkcjTA:
Ježeli chcemy przerwać aktualnie nadawanie informaci o ruchu, naleź na krótko nacisnám przycisk TA. Nie spowoduje to wyłączenia trybu TA.
19 Przycisk PTY - wybor rodzaju programu
Niektoft stace FM oprocz na wyzywamy zne przeci bezinformacion na temat typu emitowanych przyze nie programów. Wasz odbiornik samochodowy要去pakzyczte informacion na swoim wyswieltaczu.
Moga to byc nastepujace typy programów np.:
SPORT
NEWS
POP
CLASSIC
Za pomocę funkcjki PTY moźem wybrać stȩść nadajacja pożadny przyez nas tym programu. Aby sągne do grupy rodzajów muzyk w trybie PTY naleź y 1X nacsiącz przyczysk PTY. W wyswietlaczu pojawia sąznak „PTY". Za pomocę przyczysków stcjji 1-6 moźem dokonac nastepujućego wyboru.
| 1 X nacisnám | 2 X nacisnám | |
| przycisk staci 1 | POP M | ROCK M |
| przycisk staci 2 | EASY M | LIGHT M |
| przycisk staci 3 | CLASSICS | OTHER M |
| przycisk staci 4 | JAZZ | COUNTRY |
| przycisk staci 5 | NATION M | OLDIES |
| przycisk staci 6 | FOLK M |
PL
W celu woescia do grupy rodzajow audycji mowionych nalezy 2X nacsnac przycisk PTY. Za pomocaj przyciskow staci 1-6 mozyme dokonać nastepuja-cego wyboru.
| 1 X nacisnác | 2 X nacisnác | 3 X nacisnác | |
| przycisk staci 1 | NEWS | AFFAIRS | INFO |
| przycisk staci 2 | SPORT | EDUCATE | DRAMA |
| przycisk staci 3 | CULTURE | SCIENCE | VARIED |
| przycisk staci 4 | WEATHER | FINANCE | CHILDREN |
| przycisk staci 5 | SOCIAL | RELIGION | PHONEIN |
| przycisk staci 6 | TRAVEL | LEISURE | DOCUMENT |
W celu ponownego wyłączenia tej funkcjni naleź 3X nacisć przycisk PTY.
Ježeli wybrny jest tryb PTY radioodbiornik Rozpoczyna wyszukwanie odpo-wiednich informacji PTY i zatrzymuje sie, ježeli znajdie poźadne przy nas informacja PTY.
Jeżeli poszukiwany typ programu nie zestanie znaleziony, to wówczas na wyświetlaczu pojawsi informacja „NONE PTY".
Ježeli poszukiwana informacja PTY juices nie istnieje, to fungkcja PTY automatycznie przyłączy sie w zwykły tryb odbioru.
20 AF (czestotliwość alternatywne) funkcja REG
a) AF jest funkacja wykorztystuacja RSS (Radio Data System) i wykorztystwa na jest tylko przyst Stage FM. Uradzionie wyszukuje w tle najeltsza czestotłowosc nastawionej staci (sledzenia sieci).
Jezeli wybierzemy fungkcje AF to radiooobiomnik bedzie na biezo kon trolowac siye sygnatu danej czestotiwosci AF. Czestotiwosc przyprowadzania tych kontrlo zalezy od siy sygnatu z aktualnej staci i miosci sie w zakresie od kiki minut w przypadku silnego sygnatu do kilku sekund przy s手法n nadajniku. Za kazdym razem, gdy nowa czestotiwosc AF jest silniejsza, niz aktualnie nastawiona stacia, to woczcas odbiornik na krtoko przycza sie na te czestotiwosc i przyez 1 do 2 sekund
PL
na wyswietlaczu pojawia sie informacja „NEW FREQUENCY". Poniewacz czas wyciszenia przy zmieianie czestotliwość wzgl. czas kontroli jest bardzo krótki, wo trakcie odbioru programu jest to sprawie niesłyszalance. Funkcja AF aktywowana jest poprzej krótkie naciść przycziscu AF, a o jej wyborze informuje znaczek AF na wyswietlaczu radia.
- Ježeli na wyświetlączu znajduje są znaczek AF oznacza to, ze zaćzona jest fungkcja AF i odzierane są dane emittowane w systeme RDS.
- Ježeli na wyświetlacz uznacek AF miga, to funkćja AF jest wprawdzie wybrana, ale w danyl momencie nie mogą być odzierane sygnaty nadawane w systemie RDS.
- Ponowne naciść przyciscu AF spowoduje wyłączenie funkcjj. Na wyświetlaczu gasnie znaczek AF.
b) Funkcja REG
Niekótre stace o okreslonych godzinach Dziela swój program na programy regionalne o zróznicowanej tresci.
- REG ON: naciśćcie i dźusze przytrzymanie przyczisku AF spowowuju wączenia trybu regionalno. W wyświetlaczu pojawia są na kilka sekund meldunek „REG ON".
Uwaga:Mozilla wskazań na wyświetlaczu jest ograniczona.
Mоžliwe, ze w podwojnym trybie wskazań poszȩgólne segmenty wyświetlacza zostanoźwygaszone.
Funkcja REG ON zapobiega przyęaczaniu są radioiodbiornika na czestotliwość alternatwyne, na kórych nadawane są programy regionalne o inney tresci.
- REG OFF: Ponowne naciść i dhuźse przytrzymanie przycisku AF wyłączta tryb regionalny. W)y战略布局a pojawia są na kilka sekund meldunek „REG OFF".
Podczas wyszukwania czestotliwosci alternatywnych (AF) lub identifikaci programów (PI) izgornaż jest identifikacja programów (PI) z programu nadawanego przy sązej regionaalna.
21 Otwr na pty CD
22 Przycisk wysuwania (EJECT)
Aby wysunac phtc CD nalezy nacisnac ten przycisk.
23 Migajaca dioda LED
Dioda ta miga przy zdejmowaniu panela przydniego.
24 Przycisk RESET
W celu przywrocenia zaktoconego programu nalezy nacisnac ten przycisk.
Dane techniczne
PL
Ogólne
napiecie zasilania
pobó pradu
moc
DC 13.8 V
7 A max.
4 x 30 W
Zakres FM
zakres czestotiwosci czufość uzywalna czestotiwość pośrednia
87,6 MHz do 108,0 MHz
3 uV
10,7 MHz
Zakres MW(AM)
zakres czestotliwośćczestotliwość posrednia
522 KHz - 1620 KHz
450 KHz
Zakres LW
zakres czestotliwośćczestotliwość posrednia
144 KHz - 288 KHz
450 KHz
Moc na wyjsciu
wyjscie
W przypadku CD maks. 1200mV
Odtwarzacz CD
system
czytane formaty
odwarzac CD
phty CD/CDR/CDRW/MP3
ilošć bitów kwantomania 1 bit.
44,1 KHz
20 - 100Hz ≤ 5 dB
10K - 20KHz ≤ 5 dB
50 dB (1 KHz)
2 kanały stereo
178 szer. x 50 wys. x 165 gę
format sygnatu
stosunek sygnatu do szumow ilosc kanałow wymiaru obów
PL
Usuwanie usterek
Przed skorzystaniem z listy kontrlnej nalezy njajpierw sprawdzić,czy urzadze-nie jest wąsćwie podśćzone. Jeźeli po sprawdzeniu calęj listy kontrlnej usterka nie zostanie w pełni usunieta, nalezy skonsultować są NZajbźyszym punktem serwisowym.
| Oznaki usterki | Powód | Sposob usuniecia usterki |
| Brak odztwarzania po wędzeniu do odztwarzacza płyty CD lub kasety. | Za mały poziom gołosnosci ustawionej na regulatorze. Nieprawidławowo wykona- ne przyłącza. Sprawdzic podȩczenie. | Zwięszyść poziom gołosnosci. Sprawdzic przyłącze +12V i masę. |
| Dźwią odztwarzacza CD przesekakuje. | Powierzchnia drogi jest nierówna. Uradzdenie nie jest zamontowane na state. | W celu odztworzenia CD zaczekość aż droga stanie są bardziej równa. Zabadowej uradzdenie na state. Upewnić są, ze w przy padku, gdy pojadź nie oferuju odpowiedniego podparcia dla tylnej;cząSci uradzdenia, zastosowano tylne mocowa-nie. Sprawdzic inną płyte CD. Jeźeli;będzie ona;dzie sączne pradów,Oto, to byc moze poprzednia CD jest uz-kodzona. Wycyscić CD. |
| Uszkodzona płyta CD. Brudna płyta CD. Wączyń zapłon. Spalony bezpiecznik. | Uzyskodzona płyta CD. Jeźeli;będzie ona;dzie sączne pradów,Oto, to byc moze poprzednia CD jest uz-kodzona. Wycyscić CD. Obrócić kluczymi zapłonu w Pozycje „ON” lub „ACC". Wymienić bezpiecznik na inny bezpiecznik 7A. Wyȩć i ponownie wȩzyć CD lub kasetę. Wyȩczyć i ponownie wȩzyć odiornik. | |
| Brak zasilania. | ||
| Urzadzenia nie dwiała pradzwowo (EJECT, LOAD, PLAY). | Na skutek szumów elektrycznych zostawi zata-kowyany mikrokomputer. | |
| Oznaki usterki | Powód | Sposob usunięcia usterki |
| Brak odbioru radiowego. | Niepodȩczony kabel antenowy. | Mocno wetakné kabel antenowy w zącze ante-nowe na urzemdeniu. |
| W trybie wyszukiwania automatycznych radio-odbiornik nie zatrzymuju sie przyźadnej staci. | Nadawane sygnaty są zbyt szabe. | Wybrać stȩje w trybie ręcznym. |
| Płyty kompaktowe wymi-gane są do otworu na CD tylko do połowy. | srbuy zabezmieczące w transporcie nie zostaść usunięte. | Prosze usunuć szuby zabezmieczące w transporcie. |
PL
Czyszczenie CD
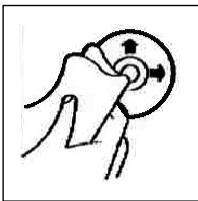
Odtwarzanie CD
Przed odtworzeniem, płyte CD nalezy przytrzec czysta, niedakurzonachusteczka do czyszczenia.
Uwaga: Nie stosować zadnych ropszczalników jak benzyny lubsubstcjie rozcieńczajace. Powszechnie dostepne sądki czyszczace lub spraye antystatyczne powoduja, uzskodzenia urzadzenia.
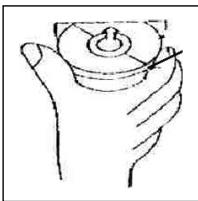
Wtozenie pfly CD zadrukowan strona do do tuo moze spowodowauc uszkodzenie urzadzenia.
CD nalezy zawsze wiktadac etykieta zwrocona do gory.
Uwaga: ježeli w kieszeni CD znajduce sie juz pfyta, nie nalezy usiłowac wkładc tam kolejnej pfyt, poniewaczne to spowodocu uszkodzenia urzadzenia. Pfyt CD nalezy zawsze chwyta za krawędzie. Aby zapewnic czystość pfyt, nie nalezy dotykać jej powierzchni.
Nie naklejac na pwytach CD zadnych naklejek, ani taśm klejacych.
Nie wystawiać płty CD na bezpos省教育nia dziażanie promieni stonecznych lub zródeł cieptań rury grzewcze oraz不禁 pozostawiać ich w samochodzie, jeźeli pojadź jest parkowywn sątopecznionym, poniewź powoduje to znaczny wrozst temperatury.
Niniejsze urzadzenie odpowa diyagamoni normy bezpieczene sta uzytkowania oraz spełnia wymagania dyrektywy niskonapięciowej i kompatybilnosci elektromagnetycznej.
Zastrzega sie prawo dozmian technicznych!
WARUNKI GWARANCJI
PL
Przyznajemy 24 mieszecy gwarancji na produkt liczac oddating zakupu.
W tym okresie bedziemy bezpłatnie uswuć w terminie 14 dni oddating dostarczenia wadliwo grezę z karta gwarancyjna dojejscza zakupu wszystkie uzskodzenia powstaře w tym urzadzeniu na skutek wady materiafów lub wadliwo wykonania, naprawiaziej oraz wymieniajac wadliwe czeci lub (jesli uznama za stosowne) wymieniajac czte urzadzenia na nowe.
Sprzet do naprawy powinien byc dostarczony w komplecie wraz z dowodem zakupu oraz z wazna karta gwarancjina do sprezedawy w miäre mözgliwość w oryginalnym opakowani lub innm odpowiednim dla zabezpieczzenia przy szko-dzeniem. W razie braku kompletné opakowska fabrycznégo, rzyko uszkodzenia spreźtu podczas Transportu do i z/DDiera zakupu ponosi reklamujancy.
Naprawa gwarancjna nie dotyczzy czynosci przywidzianych w instrukcjji oblsugi, do wykonania ktorych zobowych jest uzytkownik we wąsnym zakresie i na wąsny koszt.
Gwarancja nie obejmuye:
- mechanicznych, termicznych, chemicznych uszkodzen sprzętu i wywołyanych nimi wad,
- uszkodzen powstałych w wyniku dziatania sǐt zewétrznych takich jak wyfradowania atmosferyczne,zmiana napiecia zasilania i innych zdarzen losowych,
- nieprawidówego ustawenia wartosci napięcia elektrycznégo, zasilanie z niedopowieciegniazda zasilania,
sznurów połaczeniowych, sieciowych, zarowek, baterii, akumulatorów, - uzkodzen wyrobu powstałych wyniku niedráciwogo lub niedzgodné z instrukcja.goJe uzytkowania, przechowywania, konserwacja, samówolné zrywnania plomb oraz wszelkich przeróbek izmian konstrukcyjnych dokonanych przyez uzytkownika lub osoby niedAPOwOfane,
- roszczen z tytu parametrow technicznych wyrobu, o ile sq one zgodne z podanymi przy producenta,
- sprawidowego zuzycia iuszkidzeh, kréme maja nieistotny wþywa wartość lub dziatanie tego urzadzenia.
Karta gwarancyjna bez pieczatki sklearnpu, daty sprezazy, nie wyptniona, zle wyptniona, ze sladami poprawek, nicczytelna wskutek zniszczenia, bez moziwo ci astalenia.), sprzedazy oraz doączonego dowodu zakupu jest niewazna. Korzystanie z uslug gwarancyjny ich jest maybe zo upthywie daty waznosci gwarancji. Gwarancja na czeci lub cate urzadzenie, kotre sq wymieniane kończy sie, wraz z koncem gwarancjna zu urzadzenie.
Wszystkie innate roszczenia, wicznajc w to odszkodowania są wykluczone chyba, ze prawo przemiduje inaczej. Roszczenia wykraczajce poza ta umowej sie są uwzględniane przy tą gwarancje.
Gwarancja oraz zawarte w nied warunki obowiazuju na terenie Rzeczpospolitej Polskiej.
Bitte führen Sie das ausgediente Gerät einer umweltgerechten Entsorgung zu.

CATRONIC INTERNATIONAL GMBH
D-47906 Kempen/Germany · Industriering Ost 40 Internet: http://www.clatronic.de · email: info@clatronic.de

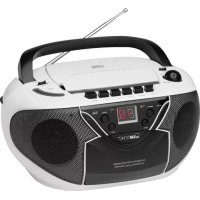
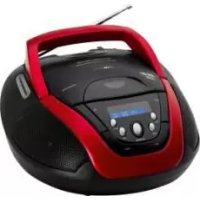
- Bedienungsanleitung/Garantie
- Autoradio mit CD-Player
- Inhalt
- Bedienelemente
- D
- Allgemeine Sicherheitshinweise
- Installation
- Anschluss
- Achtung
- Wichtige Zusammenformation zum Einbau Ihr's Autoradios!
- Vorsichtsmaßnahmen und Wartung
- Bedienung
- OPEN-Taste
- +/- Tasten
- SEL-TASTE (AUSWAHL)
- AP-Taste (Automatische Senderspeicherung) Im Radio-Modus:
- AP-Taste als Suchfunktionen im MP3 Betrieb
- 12-17 Stationstasten (1-6) vorgewähler Sender und als 1TOP-, 2INT-, 3 RPT-, 4 RDM- Tasten im CD Betrieb
- TA Traffic Announcement (Vorrangschaftung für Verkehrsfunk)
- PTY-Taste Wahl des Programmtypes
- AF (Alternative Frenzen) REG-Funktion
- b) REG-Funktion
- Technische Daten
- Allgemeines
- FM-Bereich
- MW (AM)-Bereich
- LW-Bereich
- Ausgangsleistung
- CD-Player
- Störungsbehebung
- Abspielen einer CD
- Reinigen der CD
- Garantie
- Nach der Garantie
- Service für unsere Haushaltsartikel und Unterhaltungselektronik
- Avvertenze generali per la sicurezza
- Installazione
- Allacciamento
- Attenzione
- Informazioni importanti per il montaggio della vostra autoradio!
- Misure di prevenzione e manutenzione
- Funzionamento
- Pulsante OPEN
- Pulsanti+/-
- Pulsante SEL (selezione)
- EONTA LOCAL:
- VOL LAST/VOL ADJ
- Pulsante POWER
- Display LCD (display a cristalli liquidi)
- Pulsanti BAND
- 7/8 Pulsanti / TUNE, SEEK, TRACK, SKIP UP/DOWN
- Pulsante Modus
- Tasto MUTE
- Pulsante AP (memorizzazione automatica dell'emittente)
- Nella modalità radio:
- Pulsante AP per le funzioni di ricerca nella modalità MP3
- 12-17 Tasti di stazione (1-6). Emittente preselezionata e pulsanti 1top, 2int, 3 RPT, 4 rdm in modalità conlettore CD
- TA Traffic Announcement (commutazione prioritaria per le informazioni radiofoniche sul traffico)
- Pulsante PTY - Selezione del tipo di programma
- AF (frequenze alternative) - Funzione REG
- b) Funzione REG
- Apertura per CD
- Pulsante di espulsione (EJECT)
- Display luminoso (LED) lampeggiante
- Pulsante RESET
- Dati tecnici
- Generalità
- Ambito FM
- Ambito OM (AM)
- Ambito LW
- Potenza d'uscita
- Lettore CD
- Eliminazione delle anomalie
- Riproduzione di un CD
- Garanzia
- Dopo la garanzia
- GB
- General safety instructions
- Connection
- Note:
- Important Information for installing your CARRADIO!
- Precautionary Measures and Maintenance
- Operation
- OPEN Button
- +/- Button
- SEL Button (Select)
- AP button as a search function during MP3 playback
- 12:17 Station buttons (1-6) of preselected stations and as 1 TOP, 2INT, 3RPT and 4RDM buttons during CD operation
- TA Traffic Announcement (Priority for Traffic Information)
- PTY Button - Selection of the Programme Type
- AF (Alternative Frequencies) REG Function
- b) REG Function
- CD Slit
- Eject Button (EJECT)
- Flashing LED
- RESET Button
- Technical data
- General
- FM band
- MW (AM) band
- LW band
- Output Power
- CD player
- Troubleshooting
- Playing a CD
- Guarantee
- After the expiry of the guarantee
- Ogólne wskazówki związane z bezpiecznych obstuga
- PL
- Instalacja
- Podłaczenia
- Uwaga
- Wañne informações dodatkowe, dotyczé instalacji Waszego radioodbiornika samochodowej!
- Środki ostrożnosci i konserwacja
- Obstuga
- Tryb EONTA DISTANCE
- Przycisk POWER
- Wyswietlacz LCD (wyswietlacz cieklokrystaliczny)
- Przyciski BAND
- 7/8 Przyciski / TUNE, SEEK, TRACK, SKIP UP/DOWN
- Przycisk Modus (tryb)
- Przycisk MUTE
- Przycisk AP (automatyczne zapamietywanie staci)
- W trybie radia:
- Przycisk APJakofunkcajwyszukiwania wtrybie MP3
- 12-17 Przyciski (1-6) zapisanych staci oraz jako przyciski 1TOP, 2INT, 3RPT, 4RDM w trybie CD.
- AF (czestotliwość alternatywne) funkcja REG
- b) Funkcja REG
- Otwr na pty CD
- Przycisk wysuwania (EJECT)
- Migajaca dioda LED
- Przycisk RESET
- Dane techniczne
- Ogólne
- Zakres FM
- Zakres MW(AM)
- Zakres LW
- Moc na wyjsciu
- Odtwarzacz CD
- Usuwanie usterek
- Czyszczenie CD
- Odtwarzanie CD
- WARUNKI GWARANCJI
Marque : CLATRONIC
Modèle : AR 615 CD MP3
Catégorie : Lecteur CD