
VM-MX20R - Camcorder SAMSUNG - Free user manual and instructions
Find the device manual for free VM-MX20R SAMSUNG in PDF.
| Product type | Flash memory camcorder |
| Brand | Samsung |
| Model | VM-MX20R |
| Dimensions (approx.) | 60 x 60 x 120 mm |
| Weight (approx.) | 280 g (without battery) |
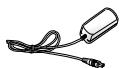
| Power source | Rechargeable battery IA-BP85ST or AC adapter AA-E9 |
| Storage media | Internal memory and memory card (SD/SDHC) |
| Optical zoom | 34x |
| LCD screen | Yes, tiltable LCD screen |
| Max video resolution | 720x576 (PAL) |
| Connectivity | USB 2.0, AV output (composite) |
| Main functions | Video recording, photo, playback, zoom, Easy Q, Scene mode |
| Care and cleaning | Clean the lens with a soft, dry cloth. Store in a dry place. |
| Safety | Do not expose to water, avoid shocks, only use AC adapter type AA-E9. |
| Spare parts and repairability | Battery, adapter, cables available from Samsung retailers. Repairs by authorized after-sales service. |
| General information | Manual included on CD. Registration on www.samsung.com possible. |
Frequently Asked Questions - VM-MX20R SAMSUNG
User questions about VM-MX20R SAMSUNG
0 question about this device. Answer the ones you know or ask your own.
Ask a new question about this device
Download the instructions for your Camcorder in PDF format for free! Find your manual VM-MX20R - SAMSUNG and take your electronic device back in hand. On this page are published all the documents necessary for the use of your device. VM-MX20R by SAMSUNG.
USER MANUAL VM-MX20R SAMSUNG
Memory Camcorder quick start guide
VP-MX20
VP-MX20H
VP-MX20L
VP-MX20R
VP-MX20C
VP-MX20CH
* Your memory camcorder comes with CD manual and Quick start guide(printed). For more detailed instructions, refer to the user manual(PDF) provided on the CD.
imagine the possibilities
Thank you for purchasing this Samsung product.
To receive more complete service, please register your product at
www.samsung.com/global/register
getting to know your memory camcorder
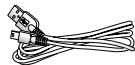
Your new memory camcorder comes with the following accessories. If any of these items is missing from your box, call Samsung's Customer Care Centre.
The exact shape of each item may vary by model.
Battery pack (IA-BP85ST)
AC power adapter (AA-E9 type)

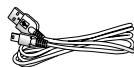
Audio/Video Cable
USB Cable

Quick start guide

User manual CD

Software CD*
Cradle*

Pouch*

Carrying Case*

- The contents can vary depending on the sales region.
- Parts and accessories are available at your local Samsung dealer and service centre.
• The memory card is not included. - You have to connect the AC power adaptor to the cradle when connecting external devices using the cradle.
- Your camcorder includes user manual CD and quick start guide(printed). For more detailed instructions, refer to the user manual (PDF) on the provided CD.
• * : This is an optional accessory. To buy one, contact your nearest Samsung dealer.
2\_English
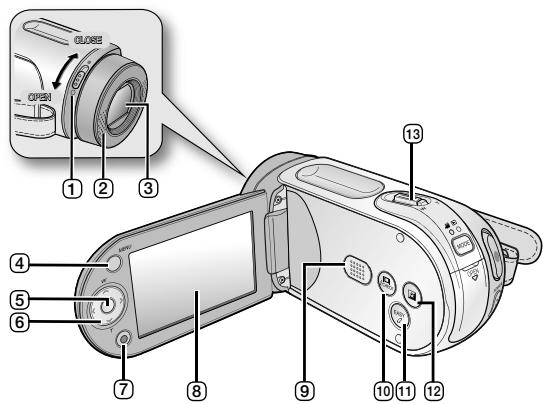
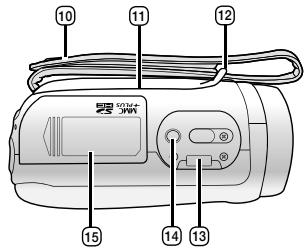
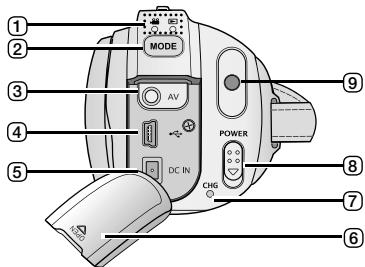
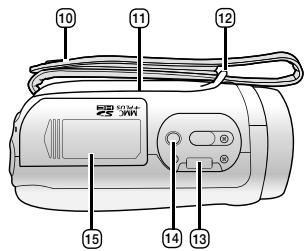
① Lens open/close switch
② Internal microphone
③ Lens
④ MENU button
⑤ OK button
⑥ Control button (^/√/〈/〉/W/T)
⑦ Recording start/stop button
⑧ LCD screen
⑨ Built-in speaker
10 □□/iCHECK button
⑪ EASY Q button
⑫ LCD ENHANCER (button)
⑬ Zoom lever (W/T)
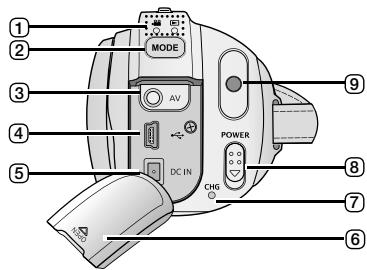
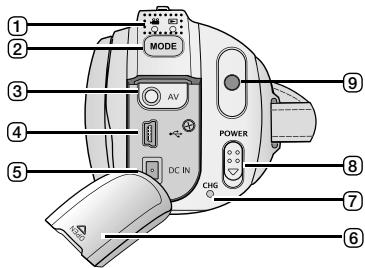
① MODE indicator
( Record ( 🎯 ) / Player ( ▶ ))
② MODE button
③ AV cable jack
④ USB jack (USB)
⑤ DC IN jack (DC IN)
6 Jack cover
⑦ Charging indicator (CHG)
⑧ POWER switch
⑨ Recording start/stop button
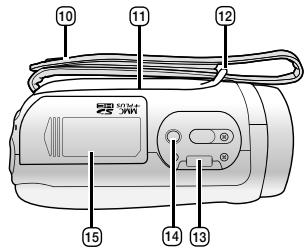
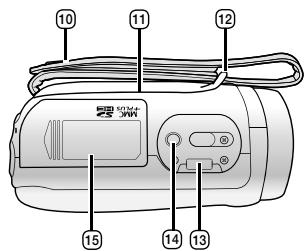
10 Grip belt
⑪ Swivel Hand-grip
12 Grip belt hook
13 Cradle receptacle
⑭ Tripod receptacle
15 Memory card/Battery slot cover
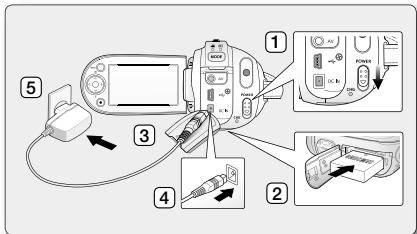
CONNECTING A POWER SOURCE
• There are two types of power source that can be connected to your memory camcorder.
- Do not use provided power supply units with other equipment.
- The battery pack: used for outdoor recording.
- The AC power adapter : used for indoor recording and playing back.
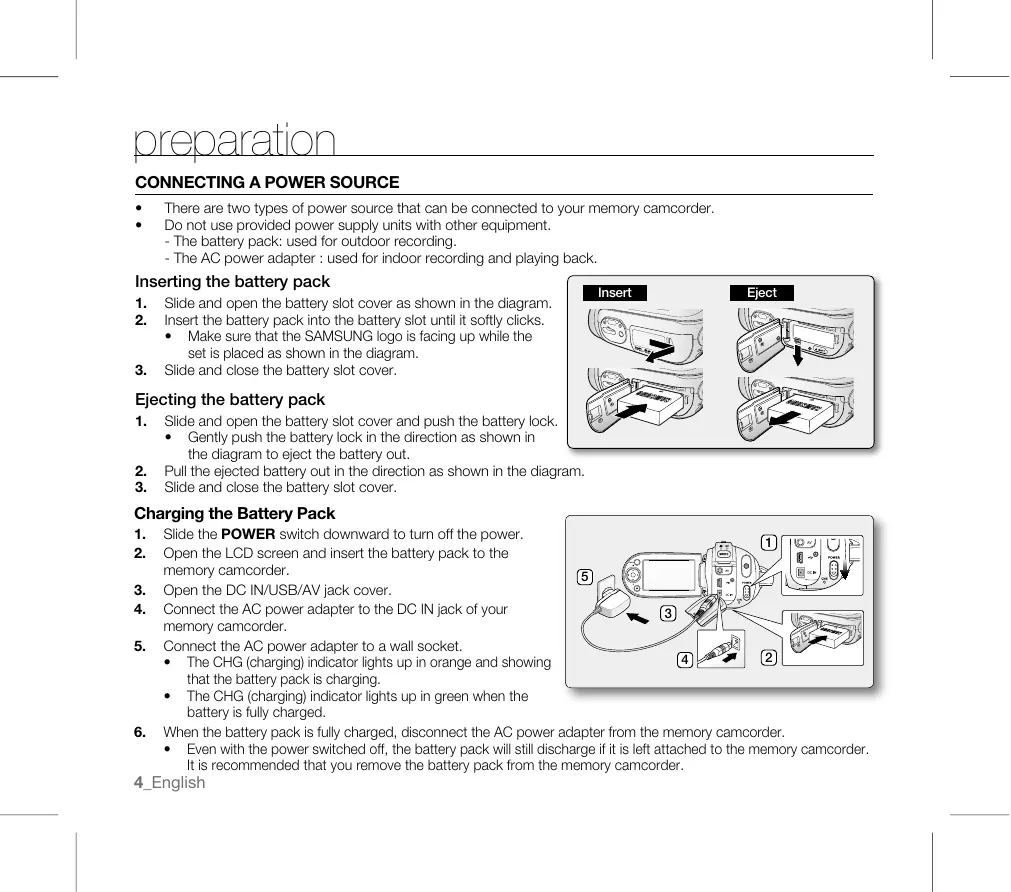
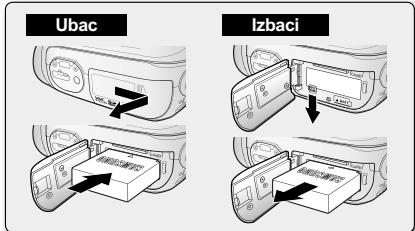
Inserting the battery pack
- Slide and open the battery slot cover as shown in the diagram.
- Insert the battery pack into the battery slot until it softly clicks.
- Make sure that the SAMSUNG logo is facing up while the set is placed as shown in the diagram.
- Slide and close the battery slot cover.
Ejecting the battery pack
- Slide and open the battery slot cover and push the battery lock.
- Gently push the battery lock in the direction as shown in the diagram to eject the battery out.
- Pull the ejected battery out in the direction as shown in the diagram.
- Slide and close the battery slot cover.
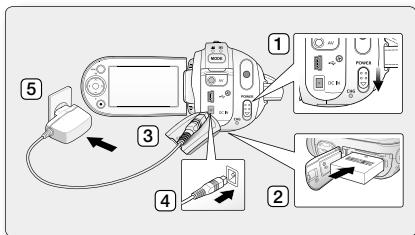
Charging the Battery Pack
- Slide the POWER switch downward to turn off the power.
- Open the LCD screen and insert the battery pack to the memory camcorder.
- Open the DC IN/USB/AV jack cover.
-
Connect the AC power adapter to the DC IN jack of your memory camcorder.
-
Connect the AC power adapter to a wall socket.
-
The CHG (charging) indicator lights up in orange and showing that the battery pack is charging.
- The CHG (charging) indicator lights up in green when the battery is fully charged.
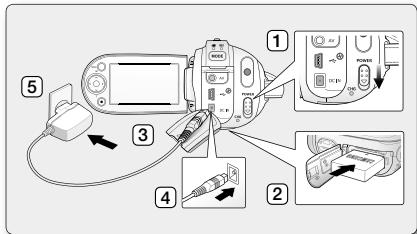
- When the battery pack is fully charged, disconnect the AC power adapter from the memory camcorder.
- Even with the power switched off, the battery pack will still discharge if it is left attached to the memory camcorder. It is recommended that you remove the battery pack from the memory camcorder.
4\_English
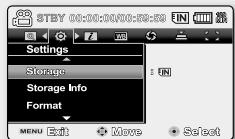
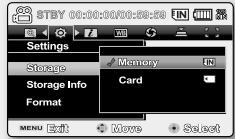
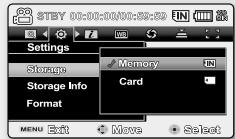
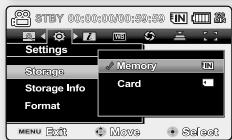
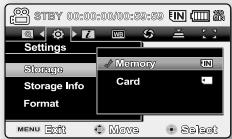
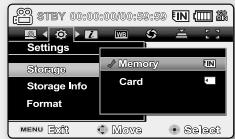
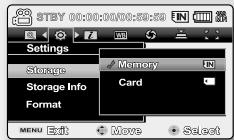
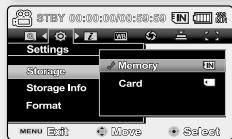
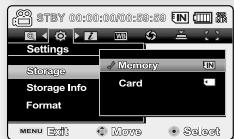
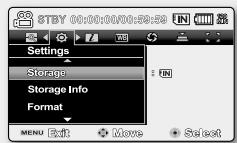
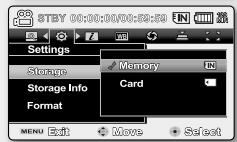
SELECTING THE STORAGE MEDIA (VP-MX20C/MX20CH ONLY)
- You can record on the built-in memory or a memory card, so you should select the desired storage media before starting recording or playback.
-
Before inserting or ejecting the memory card, turn the memory camcorder off.
-
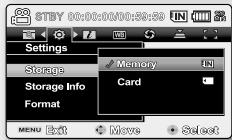
Press the MENU button.
• The menu list will appear. -
Press the Control button ( / ) to select "Settings".
-
Press the Control button ( / ) to select "Storage", then press the OK button.
-
Press the Control button ( / ) to select "Memory" or "Card", then press the OK button.
• "Memory": When using the built-in memory.
• "Card": When using the memory card.
- Press the MENU button to exit.
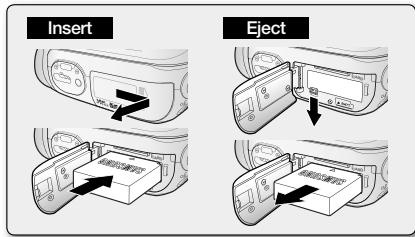
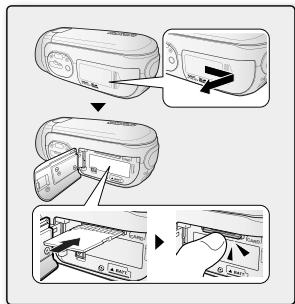
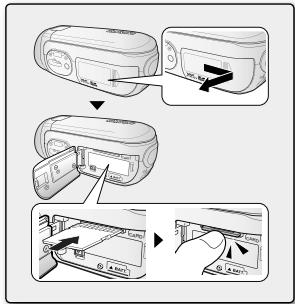
INSERTING / EJECTING THE MEMORY CARD
Inserting a memory card
- Turn the memory camcorder off.
- Slide the memory card slot cover to the right to open the cover.
- Insert the memory card into the memory card slot in the direction of the arrow shown in the diagram until it softly clicks.
- Close the cover.
Ejecting a memory card
- Turn the memory camcorder off.
- Slide the memory card slot cover to the right to open the cover.
- Slightly push the memory card inwards to pop it out.
- Pull the memory card out of the memory card slot and close the cover.

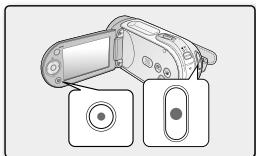
RECORDING MOVIE IMAGES
- Memory camcorder provides two Recording start/stop buttons. One is on the rear side of the camcorder and the other one is on the LCD panel. Select the Recording start/stop button according to the use.
-
Turn the memory camcorder on.
-
Connect a power source to the memory camcorder. (A battery pack or an AC power adapter)
- Slide the POWER switch downward to turn on the power.
- Set the appropriate storage media. (VP-MX20C/MX20CH only) (If you want to record on a memory card, insert the memory card.)
-
Set the Lens open/close switch to open ( ○ ). ➔ page 3
-
Check the subject on the LCD screen.
- Press the Recording start/stop button.
• The recording indicator (○) will display and recording will start.
- Pressing the Recording start/stop button again during recording will set the memory camcorder to recording pause mode.
- When recording is finished, turn the memory camcorder off.
playback
natural_image
Diagram of a digital camera with two labeled buttons (no text or symbols present)
natural_image
Black-and-white photo of a person in motion on grassy terrain, no visible text or symbolsMOVIE IMAGES PLAYBACK
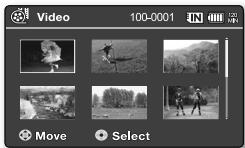
You can find a desired movie image quickly using thumbnail index view.
-
Turn the memory camcorder on.
-
Slide the POWER switch downward to turn on the power.
-
Set the appropriate storage media. (VP-MX20C/MX20CH only) (If you want to record on a memory card, insert the memory card.)
-
Open the LCD screen.
- Adjust brightness or contrast of the LCD screen.
- Press the MODE button.
• Switches to Movie Play mode (▶).
• The recorded movie images are displayed in thumbnail index view.
-
Use the Control button ( /// ) to select the desired movie images, and the press the OK button.
-
Shortcut menu for playback will be displayed for a while.
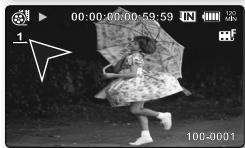
- The selected movie images are played according to Play Option setting.
• To stop playback and return to the thumbnail index view, move the zoom lever.
natural_image
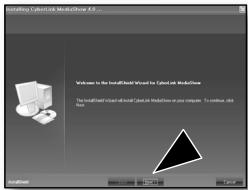
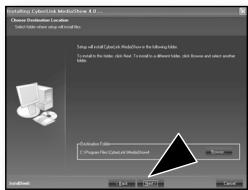
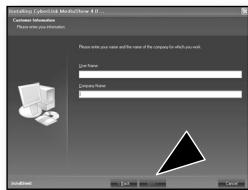
Black-and-white photo of a dancer in a dress dancing outdoors, wearing a umbrella (no visible text or symbols)INSTALLING THE CYBERLINK MEDIASHOW4
CyberLink MediaShow4 is a software for easy of editing MPEG, AVI, and other video files, still images, and other contents for creating a movie.
Before you begin:
Quit any other software you are using. (Check that there are no other application icons on the status bar.)
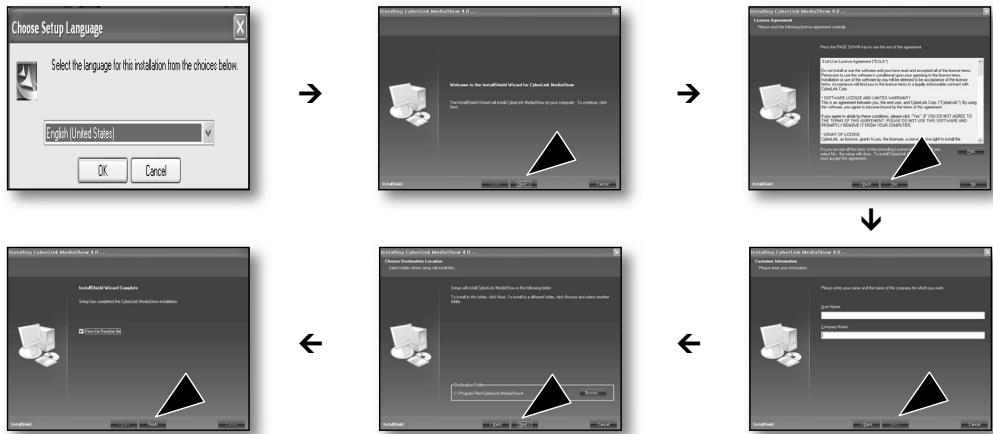

- If you perform installation of software that is already installed, uninstallation will start.
In this case, perform the installation again after uninstallation is finished.
- This manual only refers to software installation and PC connection.
For more details on software, refer to the “Online help/Read me” on the CyberLink MediaShow4 CD.
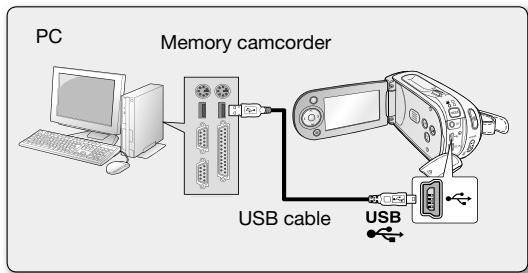
CONNECTING THE USB CABLE
Connect the USB cable to copy movie images in a recording medium to the PC and vice versa. When the USB cable is connected in Record / Play mode, the product will switch to USB mode immediately.
- Connect the memory camcorder to the PC with a USB cable.

- Don't apply excessive force when inserting or extracting a USB jack.
- Insert a USB jack after checking the direction of its insertion is correct.
- It is recommended to use the AC adapter as the power supply instead of the battery pack.
- When the USB cable is connected, turning on or off the camcorder causes malfunctions of the PC.
flowchart
graph LR
    PC["PC"] --> MemoryCamcorder["Memory camcorder"]
    MemoryCamcorder --> USBCable["USB cable"]
    MemoryCamcorder --> USBInterface["USB interface"]
connecting to other devices
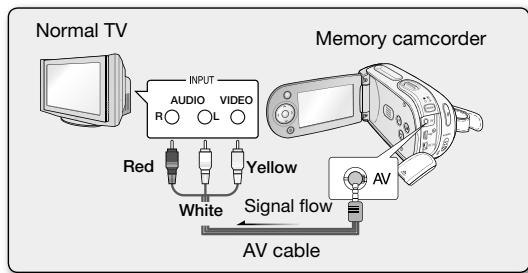
CONNECTING TO A TV
• To playback your recordings, the television must be PAL compatible.
- We recommend that you use the AC power adaptor as the power source for the memory camcorder.
Use the provided AV cable to connect the memory camcorder to a TV as follows:
- Connect the end of the AV cable with the single plug to the AV jack of the memory camcorder.
- Connect the other end with video (yellow) and left (white) / right (red) audio cables to the TV.
VIDEOAUFNAHME
natural_image
Diagram of a digital camera with two labeled components (no text or symbols present)
natural_image
Black-and-white photo of a person shooting on grass with a rocket launcher (no visible text or symbols)natural_image
Black-and-white photo of a girl in a dress holding an umbrella, outdoors with no visible text or symbolsCYBERLINK MEDIASHOW4 INSTALLIEREN
① Voyant MODE (Enregistrement (▶) / Lecture (▶))
② Touche MODE
③ Prise câble vidéo
④ Prise USB
⑤ Prise DC IN (Entrée CC)
6 Cache-prise
⑦ Voyant de charge (CHG)
INSERTION/ÉJECTION D'UNE CARTE MÉMOIRE
ENREGISTREMENT VIDEO
natural_image
Diagram of a digital camera with two labeled buttons (no text or symbols present)
natural_image
Black-and-white photo of a person flying a kite on grass, no visible text or symbolsLECTURE VIDEO
natural_image
Black-and-white photo of a girl in a dress holding an umbrella, outdoors with no visible text or symbols.natural_image
Diagram of a camera with two labeled components (no text or symbols present)
natural_image
Black-and-white photo of a soccer player mid-jump on the ground, with no visible text or symbols.natural_image
Black-and-white photo of a girl in a dress holding an umbrella, outdoors with no visible text or symbols.
natural_image
Diagram of a camera with two labeled buttons and a screen, no text or symbols present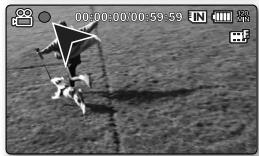
natural_image
Black-and-white photo of a person flying a soccer ball on grass, no visible text or symbolsnatural_image
Black-and-white photo of a girl dancing in a umbrella outdoors, with no visible text or symbols.INSTALLAZIONE DI CYBERLINK MEDIASHOW4
GRAVAR FILMES
natural_image
Diagram of a digital camera with two labeled buttons (no text or symbols present)
natural_image
Black-and-white photo of a person flying a kite on grass, no visible text or symbolsnatural_image
Black-and-white photo of a girl in a dress running outdoors, holding an umbrella (no visible text or symbols)INSTALAR O CYBERLINK MEDIASHOW4
① Schakelaar lens open/dicht
② Interne microfoon
③ Lens
④ Knop MENU
⑤ Knop OK
⑥ Cursorknop (^/√/〈/〉/W/T)
⑦ Knop Opname starten/stoppen

EEN GEHEUGENKAART PLAATSEN/VERWIJDEREN
FILMBEELDEN OPNEMEN
natural_image
Diagram of a digital camera with two labeled buttons and a screen, no text or symbols present.
natural_image
Black-and-white photo of a person kicking a soccer ball on grass, with no visible text or symbols.FILMBEELDEN AFSPELEN
natural_image
Black-and-white photo of a girl in a dress holding an umbrella, outdoors with no visible text or symbolsVÄLJA LAGRINGSMEDIET (ENDAST VP-MX20C/MX20CH)
SÄTTA I OCH TA UR MINNESKORTET
natural_image
Diagram of a digital camera with two labeled buttons (no text or symbols present)
natural_image
Black-and-white photo of a person in motion on grassy terrain, no visible text or symbolsFILMUPPSPELNING
natural_image
Black-and-white photo of a girl in a dress dancing outdoors, holding an umbrella (no visible text or symbols)INSTALLERA CYBERLINK MEDIASHOW4

Strømadapter (AA-E9 type)

AV-kabel
USB-kabel

Hurtigstartveiledning
om lagringsmedia
VELGE LAGRINGSMEDIA (Kun VP-MX20C/MX20CH)

SETTE INN/L∅SE UT ET MINNEKORT
Sette inn et minnekort
SPILLE INN FILM
natural_image
Diagram of a digital camera with two circular components, no text or symbols present
natural_image
Black-and-white photo of a person flying a kite on grass, no visible text or symbolsnatural_image
Black-and-white photo of a girl in a dress holding an umbrella, outdoors with no visible text or symbolsKOBLE TIL ET TV-APPARAT
10 □□/iCHECK -painike
11 EASY Q -painike
12 LCD-VAHVISTUS (图标) -painike
⑬ Zoomausvipu (W/T)

TALLENNUSVÄLINEEN VALINTA (VAIN VP-MX20C/MX20CH)
MUISTIKORTIN ASETTAMINEN JA POISTAMINEN
VIDEOIDEN KUVAAMINEN
natural_image
Diagram of a digital camera with two labeled buttons and a screen, no text or symbols present.
natural_image
Black-and-white photo of a person flying a kite on grass, no visible text or symbolsVIDEOIDEN TOISTAMINEN
natural_image
Black-and-white photo of a girl in a dress holding an umbrella, captured mid-jump (no text or symbols visible)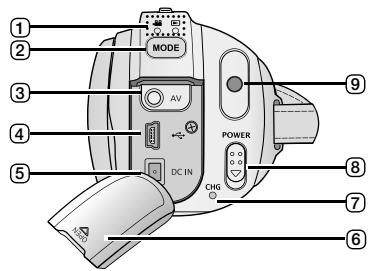
VALG AF LAGRINGSMEDIE (KUN VP-MX20C/MX20CH)
ISÆTNING/UDTAGNING AF ET HUKOMMELSESKORT
OPTAGELSE AF FILM
natural_image
Diagram of a digital camera with two labeled buttons (no text or symbols present)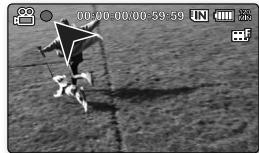
natural_image
Black-and-white photo of a soccer player kicking a star on grass, with no visible text or symbols.AFSPILNING AF FILM
natural_image
Black-and-white photo of a girl in a dress holding an umbrella, outdoors with no visible text or symbols.INSTALLATION AF CYBERLINK MEDIASHOW4

DEPOLAMA ORTAMININ SEÇİLMESİ (SADECE VP-MX20C/MX20CH)
BELLEK KARTININ TAKILMASI / ÇIKARILMASI
natural_image
Diagram of a digital camera with two labeled buttons and a screen, no text or symbols present
natural_image
Black-and-white photo of a person carrying a star-shaped object on grass, no visible text or symbolsnatural_image
Black-and-white photo of a girl in a dress holding an umbrella outdoors, with no visible text or symbols.bilgisayara bağlama
CYBERLINK ORTAM GÖSTERİSİNİ YÜKLEME

AZ ADATHORDOZÓ KIVÁLASZTÁSA (CSAK VP-MX20C/MX20CH)
A MEMÓRIAKÁRTYA BEHELYEZÉSE / KIVÉTELE
VIDEÓK FELVÉTELE
natural_image
Diagram of a digital camera with two labeled buttons and a screen (no text or symbols present)
natural_image
Black-and-white photo of a person flying a kite on a grassy field, no visible text or symbolsVIDEÓK LEJÁTSZÁSA
natural_image
Black-and-white photo of a girl in a dress holding an umbrella, outdoors with no visible text or symbols.
VLOŽENÍ / VYSUNUTÍ PAMĚTOVÉ KARTY
ZÁZNAM FILMOVÝCH SNÍMKŮ
natural_image
Diagram of a digital camera with two labeled buttons (no text or symbols present)
natural_image
Black-and-white photo of a soccer player on the field with a star symbol and motion capture overlay (no readable text or symbols)natural_image
Black-and-white photo of a girl in a dress holding an umbrella, outdoors with night sky and no visible text or symbols
Akumulator (IA-BP85ST)


POL
WKŁADANIE/WYJMOWANIE KARTY PAMIĘCI
NAGRYWANIE FILMÓW
natural_image
Diagram of a digital camera with two labeled buttons (no text or symbols present)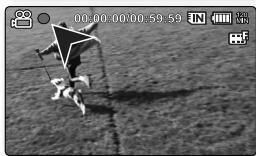
natural_image
Black-and-white photo of a person shooting on grass with a star overlay (no visible text or symbols)odtwarzanie
ODTWARZANIE FILMÓW
natural_image
Black-and-white photo of a girl in a dress holding an umbrella outdoors, with no visible text or symbols.
VÝBER PAMÄŤOVÉHO MÉDIA (IBA PRE VP-MX20C/MX20CH)

VLOŽENIE/VYSUNUTIE PAMÄTOVEJ KARTY
NAHRÁVANIE VIDEA
natural_image
Diagram of a digital camera with two labeled buttons and a screen, no text or symbols present
natural_image
Black-and-white photo of a soccer player shooting on the field, no visible text or symbolsPREHRÁVANIE VIDEA
natural_image
Black-and-white photo of a girl dancing in an umbrella, wearing a dress and white hat (no visible text or symbols)

① Prekidač za otvaranje/zatvaranje objektiva
② Unutrašnji mikrofon
③ Objektiv
④ Taster MENU
⑤ Taster OK
⑥ Komandni taster
(∧/∨/〈/〉/W/T)
⑦ Taster za pokretanje/zaustavljanje snimanja
⑧ LCD ekran
⑨ Ugrađeni zvučnik
10 Taster □□/iCHECK
11 Taster EASY Q
⑫ Taster za OPTIMIZACIJU LCD EKRANA (☐)
⑬ Taster za zumiranje (W/T)
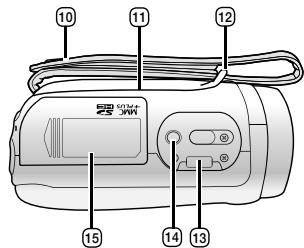
① Indikator MODE (Snimanje (☐) / Plejer (☐))
② Taster MODE
③ Konektor za AV kabl
④ USB konektor (USB)
⑤ DC IN konektor (DC IN)
⑥ Poklopac konektora
⑦ Indikator punjenja (CHG)
⑧ Prekidač POWER
⑨ Taster za pokretanje/zaustavljanje snimanja
10 Kaiš za držanje
11 Drška obrtne ručice
12 Kopča za kaiš za držanje
13 Priključak baze
14 Priključak za stalak
15 Poklopac slota za memorijsku karticu /Bateriju
POVEZIVANJE NA IZVOR NAPAJANJA
- Postoje dva tipa izvora napajanja koji se mogu povezati na vašu videokameru.
- Ne koristite uređaje za napajanje, koji su uključeni u isporuku, sa drugom opremom.
- Baterija: koristi se za snimanje na otvorenom.
- AC mrežni adapter: koristi se za snimanje i reprodukciju u zatvorenom prostoru.
Stavljanje baterije
- Gurnite i otvorite poklopac slota za bateriju kao što je pokazano na crtežu.
- Stavite bateriju u prostor za bateriju tako da čujete lagani klik.
- Proverite da li je logotip SAMSUNG okrenut prema spolja kada uređaj postavljen kao što je pokazano na crtežu.
- Gurnite i zatvorite poklopac prostora za bateriju.
Vađenje baterije
- Gurnite i otvorite poklopac slota za bateriju i pritisnite bravu za bateriju.
- Polako gurnite bravu baterije u smeru prikazanom na crtežu i izvadite bateriju.
- Izvucite bateriju u pravilnom smeru, kao što je prikazano na slici.
- Gurnite i zatvorite poklopac prostora za bateriju.
Punjenje baterije
- Pomerite prekidač POWER na dole da isključite napajanje.
- Otvorite LCD ekran i priključite bateriju na memorijsku videokameru.
- Otvorite poklopac konektora DC IN/USB/AV.
- Povežite AC mrežni adapter na konektor DC IN na vašoj memorijskoj videokameri.
-
Priključite AC mrežni adapter u zidnu utičnicu.
-
Indikator CHG (punjenje) emituje narandžasto svetlo i pokazuje da se baterija puni.
-
Indikator CHG (punjenje) emituje zeleno svetlo kada je baterija potpuno napunjena.
-
Kada je baterija napunjena do kraja, iskopčajte AC mrežni adapter iz memorijske videokamere.
- Čak i ako je napajanje isključeno, baterija će se i dalje prazniti ako se ostavi priključena na videokameru. Preporučuje se da izvadite bateriju iz memorijske videokamere.
o memorijskim medijima
IZBOR MEMORIJSKOG MEDIJA (SAMO VP-MX20C/MX20CH)
- Možete da snimate na ugrađenoj memoriji ili memorijskoj kartici i zato je potrebno da izaberete željeni memorijski medijum pre početka snimanja ili reprodukcije.
-
Pre stavljanja i vađenja memorijske kartice, isključite memorijsku videokameru.
-
Pritisnite taster MENU.
- Pojaviće se lista sa menijima.
- Pritisnite komandni taster ( / ) da biste izabrali "Settings".
- Pritisnite komandni taster ( / ) da biste izabrali "Storage", a zatim pritisnite taster OK.
- Pritisnite komandni taster ( / ) da biste izabrali "Memory" ili "Card", a zatim pritisnite taster OK.
• "Memory": Ako se koristi ugrađena memorija.
• "Card": Ako se koristi memorijska kartica. - Pritisnite taster MENU za izlaz.
STAVLJANJE / IZBACIVANJE MEMORIJSKE KARTICE
Stavljanje memorijske kartice
- Isključite memorijsku videokameru.
- Pomerite poklopac slota za memorijsku karticu da biste otvorili poklopac.
- U smeru strelice koja je prikazana na crtežu stavite memorijsku karticu u slot za memorijsku karticu tako da se začuje "klik".
- Zatvorite poklopac.
Vađenje memorijske kartice
- Isključite memorijsku videokameru.
- Pomerite poklopac slota za memorijsku karticu da biste otvorili poklopac.
- Malo gurnite memorijsku karticu nadole da bi iskočila.
- Izvucite memorijsku karticu iz slota i zatvorite poklopac.
SNIMANJE FILMOVA
- Memorijska videokamera ima dva tastera za pokretanje/zaustavljanje snimanja. Jedan se nalazi na zadnjoj strani videokamere, dok se drugi nalazi na LCD panelu. Izaberite taster za pokretanje/zaustavljanje snimanja shodno potrebnoj funkciji.
-
Uključite memorijsku videokameru.
-
Povežite videokameru na izvor napajanja.
(Baterija ili AC mrežni adapter) - Pomerite prekidač POWER na dole da uključite napajanje.
- Podesite odgovarajući memorijski medijum. (samo VP-MX20C/MX20CH) (Ukoliko želite da snimate na memorijsku karticu, umetnite memorijsku karticu.)
-
Postavite prekidač za otvaranje/zatvaranje objektiva u položaj ( ○ ). ➞ stranica 3
-
Proverite šta se nalazi na LCD ekranu.
- Pritisnite taster za pokretanje/zaustavljanje snimanja.
natural_image
Diagram of a digital camera with two labeled buttons (no text or symbols present)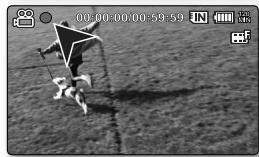
natural_image
Black-and-white photo of a person flying a kite on grass, no visible text or symbolsŽeljeni film možete brzo pronaći korišćenjem indeksnog prikaza umanjenih sličica.
-
Uključite memorijsku videokameru.
-
Pomerite prekidač POWER na dole da uključite napajanje.
-
Podesite odgovarajući memorijski medijum. (samo VP-MX20C/MX20CH) (Ukoliko želite da snimate na memorijsku karticu, umetnite memorijsku karticu.)
-
Otvorite LCD ekran.
- Prilagodite osvetljenje ili kontrast LCD ekrana.
- Pritisnite taster MODE.
natural_image
Black-and-white photo of a girl in a dress holding an umbrella, outdoors with no visible text or symbolspovezivanje na računar
INSTALACIJA PROGRAMA CYBERLINK MEDIASHOW4
CyberLink MediaShow4 je program za lako uređivanje MPEG, AVI i drugih video datoteka, fotografija i drugih sadržaja za kreiranje filmova.
① Prekidač za otvaranje/ zatvaranje leća
② Unutarnji mikrofon
③ Leće
④ Gumb MENU
⑤ Gumb OK
⑥ Gumb za Naredbu (^/√/〈/〉/W/T)
⑦ Gumb za Snimanje početak/zaustavljanje
⑧ LCD zaslon
⑨ Ugrađeni zvučnik
10 Gumb □□/iCHECK
11 Gumb EASY Q
12 Gumb za LCD
POBOLJŠANJE (☐)
13 Ručica za Zoom (W/T)


① Indikator MODE (Snimanje (☐) / Player (▶))
② Gumb MODE
③ AV džek za kabel
④ USB džek (USB)
⑤ DC IN džek (DC IN)
⑥ Poklopac džeka
⑦ Indikator punjenja (CHG)
⑧ Prekidač POWER
⑨ Gumb za Snimanje početak/zaustavljanje
10 Stezni remen
⑪ Zakretni ručni remen
12 Kukica za stezni remen
13 Mjesto za odlaganje postolja
14 Mjesto za odlaganje tronožca
⑮ Memorijska kartica / Utor baterijskog poklopca
PRIKLJUČIVANJE IZVORA NAPAJANJA
- Postoje dvije vrste izvora napajanja koji se mogu priključiti na vaš kamkorder s memorijom.
-
Nemojte koristiti isporučene jedinice za napajanje s drugom opremom.
-
Baterijsko pakiranje: korišteno za snimanje vani.
- Adapter za napajanje izmjeničnom strujom: koristi se za snimanje i reproduciranje unutar prostorije.
Umetanje baterijskog pakiranja
UMETANJE/UKLANJANJE MEMORIJSKE KARTICE
Umetanje memorijske kartice
- Isključite kamkorder s memorijom.
- Pomaknite poklopac utora za memorijsku karticu udesno da otvorite poklopac.
- Umetnite memorijsku karticu u utor za memorijsku karticu dok nježno ne klikne u smjeru strelice kao što je prikazano na shemi.
- Zatvorite poklopac.
Uklanjanje memorijske kartice
- Isključite kamkorder s memorijom.
- Pomaknite poklopac utora za memorijsku karticu udesno da otvorite poklopac.
- Nježno gurnite memorijsku karticu prema unutra da ju izvadite.
- Povucite memorijsku karticu iz utora i zatvorite poklopac.
SNIMANJE SLIKA FILMA
- Kamkorder s memorijom pruža dva gumba za Snimanje početak/zaustavljanje. Jedan je na stražnjoj strani kamkordera a drugi je na LCD ploči. Pritisnite tipku Snimanje početak/zaustavljanje ovisno o upotrebi.
-
Uključite kamkorder s memorijom.
-
Spojite izvor napajanja na kamkorder s memorijom.
(Baterijsko pakiranje ili adapter za napajanje izmjeničnom strujom) - Pomaknite prekidač POWER prema dolje kako biste uključili napajanje.
- Podesite odgovarajući medij za odlaganje. (samo VP-MX20C/MX20CH) (Ako želite snimati na memorijsku karticu, umetnite memorijsku karticu)
-
Namjestite prekidač za otvaranje/zatvaranje leća na otvoreno ( ○ ). ➞strana 3
-
Provjerite predmet na LCD zaslonu.
- Pritisnite gumb Snimanje početak/zaustavljanje.
natural_image
Diagram of a camera with two circular components, no text or symbols present
natural_image
Black-and-white photo of a person flying a kite on grass, no visible text or symbolsREPRODUKCIJ SLIKA FILMA
Možete brzo pronaći željenu sliku filma pomoću pregleda indeksa sličice.
-
Uključite kamkorder s memorijom.
-
Pomaknite prekidač POWER prema dolje kako biste uključili napajanje.
-
Podesite odgovarajući medij za odlaganje.
(samo VP-MX20C/MX20CH)
(Ako želite snimati na memorijsku karticu, umetnite memorijsku karticu). -
Otvorite LCD zaslon.
natural_image
Black-and-white photo of a girl in a dress holding an umbrella, outdoors with no visible text or symbols.→
→
↓
←
←
CRO


Accumulator (IA-BP85ST)
Adaptor de curent alternativ (tip AA-E9)

Cablu audio/video
Cablu USB
SELECTAREA SUPORTULUI DE STOCARE (NUMAI VP-MX20C/MX20CH)
INTRODUCEREA/SCOATEREA CARDULUI DE MEMORIE
Introducerea unui card de memorie
ÎNREGISTRAREA IMAGINILOR VIDEO
natural_image
Diagram of a digital camera with two labeled buttons (no text or symbols present)
natural_image
Black-and-white photo of a person flying a kite on a grassy field, no visible text or symbolsREDAREA IMAGINILOR VIDEO
natural_image
Black-and-white photo of a girl dancing in a umbrella, wearing a dress and white hat (no visible text or symbols)conectarea la un PC
INSTALAREA CYBERLINK MEDIASHOW4


ЗАСНЕМАНЕ НА ФИЛМИ
natural_image
Diagram of a digital camera with two labeled buttons and a screen, no text or symbols present
natural_image
Black-and-white photo of a person flying a kite on grass, no visible text or symbolsвъзпроизвеждане
natural_image
Black-and-white photo of a girl in a dress holding an umbrella, outdoors with no visible text or symbols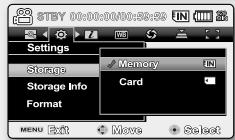
ΕΓΓΡΑΦΗ ΤΑΙΝΙΩΝ
natural_image
Diagram of a digital camera with two labeled buttons and a screen, no text or symbols present
natural_image
Black-and-white photo of a person flying a kite on grass, no visible text or symbolsΑΝΑΠΑΡΑΓΩΓΗ ΤΑΙΝΙΩΝ
natural_image
Black-and-white photo of a girl in a dress holding an umbrella outdoors (no text or symbols visible)


VSTAVLJANJE/IZMET POMNILNIŠKE KARTICE
SNEMANJE VIDEA
natural_image
Diagram of a digital camera with two labeled buttons and a screen, no text or symbols present