
Sander - Car seat Lionelo - Free user manual and instructions
Find the device manual for free Sander Lionelo in PDF.


| Product type | Child car seat |
| Brand | Lionelo |
| Model | Sander |
| Category | Universal and semi-universal |
| Weight groups | 0+ (0-13 kg), I (9-18 kg), II (15-25 kg), III (22-36 kg) |
| Mounting direction | Rear-facing (groups 0+), forward-facing (groups I, II, III) |
| Fixations | 3-point seat belt, ISOFIX with Top Tether |
| Backrest recline adjustment | 4 positions |
| Headrest adjustment | Height adjustable |
| Harness | 5-point, height adjustable |
| Dimensions (L x W x H) | Approximately 44 x 44 x 65 cm |
| Weight | Approximately 5.5 kg |
| Cover material | Synthetic fabric |
| Cover maintenance | Hand wash at 30°C maximum, do not wring |
| Chassis cleaning | Damp cloth with natural detergents |
| Safety standard | ECE R44/04 |
| Warranty | Check the Lionelo website |
| Customer service | help@lionelo.com |
Frequently Asked Questions - Sander Lionelo
User questions about Sander Lionelo
0 question about this device. Answer the ones you know or ask your own.
Ask a new question about this device
Download the instructions for your Car seat in PDF format for free! Find your manual Sander - Lionelo and take your electronic device back in hand. On this page are published all the documents necessary for the use of your device. Sander by Lionelo.
USER MANUAL Sander Lionelo
natural_image
Line drawing of a car comfort seat with lionelo branding, no text or symbols present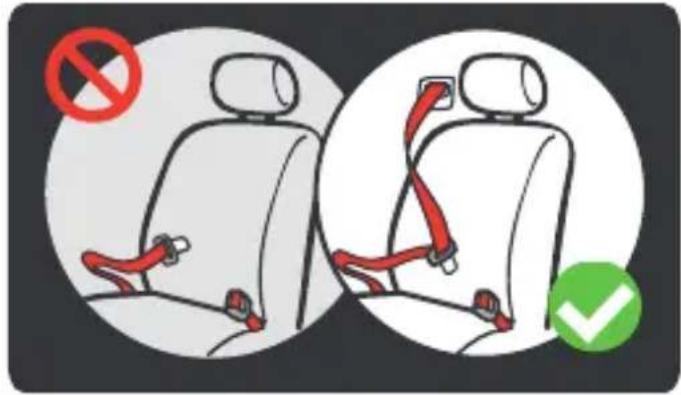
1
natural_image
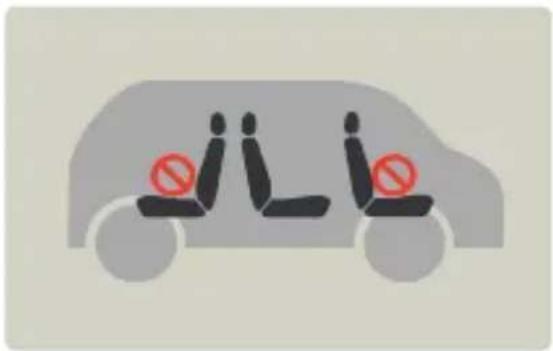
Silhouette of a car with three seated seats and two marked with red prohibition signs (no text or symbols on the car itself)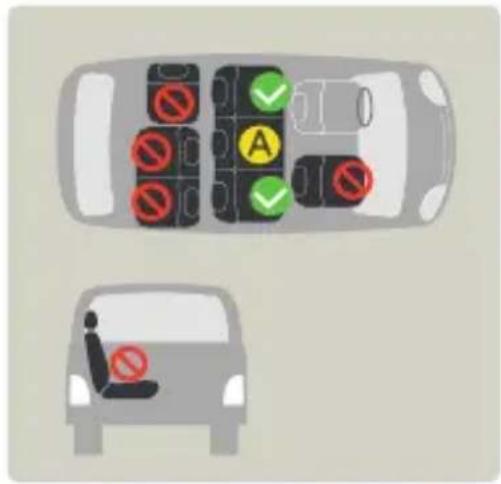
2
natural_image
Illustration of a hand holding a yellow mechanical component with red arrows indicating motion (no text or symbols)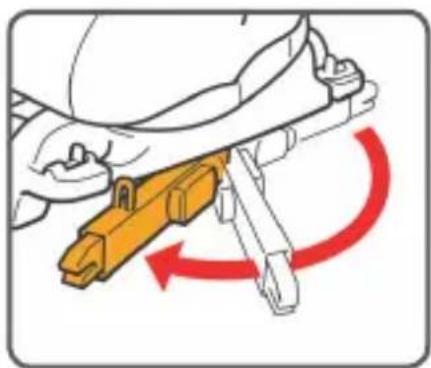
natural_image
Illustration of a hand using a tool to adjust or install a mechanical component, with red curved arrows indicating rotation (no text or symbols present)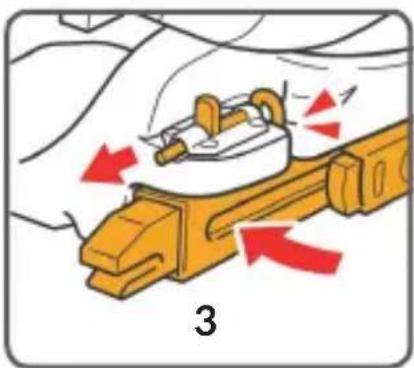
natural_image
Illustration of a hand holding a medical device with red arrows indicating motion or force (no text or symbols)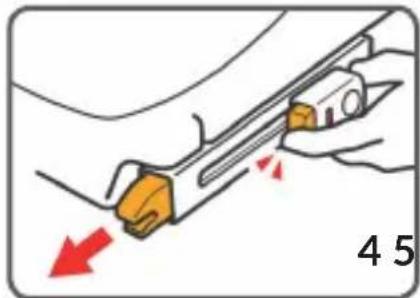
natural_image
Illustration of a hand holding a tool with red arrows indicating movement or force (no text or symbols)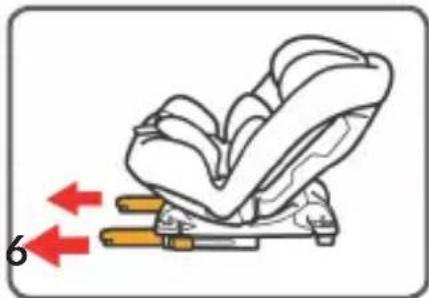
natural_image
Illustration of a car seat with two arrows indicating left and right motion (no text or symbols)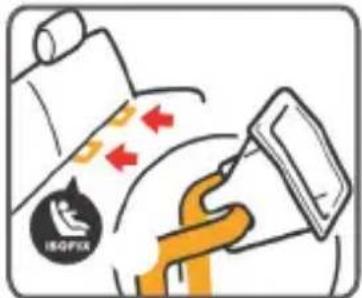
natural_image
Illustration of a person using a tool to adjust or install a component, with a red arrow indicating direction (no text or symbols present)5
natural_image
Illustration of a belt buckle with a green checkmark indicating approval (no text or symbols present)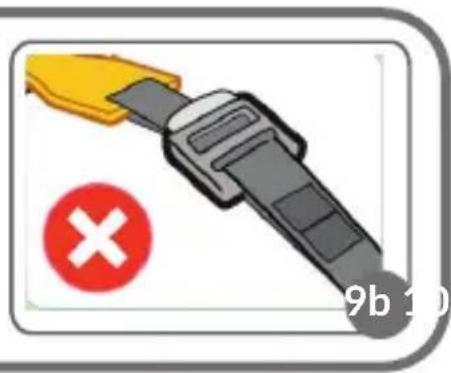
natural_image
Illustration of a hand using a yellow-handled tool to clean or store electronic devices, with a red arrow indicating the process (no text or symbols present)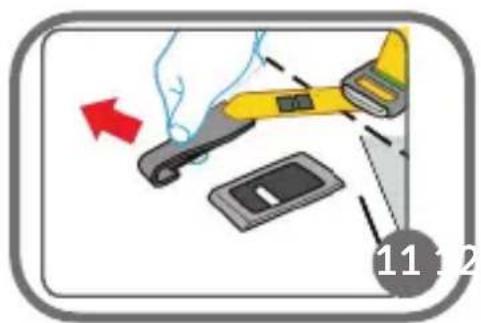
natural_image
Illustration of a person seated in a car seat, showing seatbelt and seatbelt banding (no text or symbols)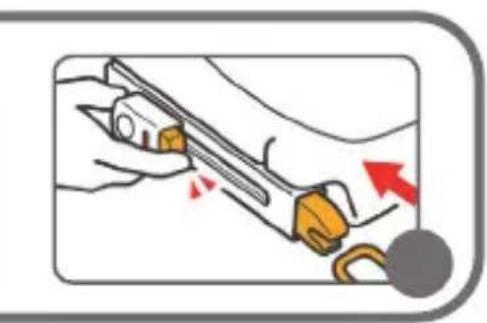
natural_image
Illustration of a hand holding a tool with orange buttons and a red arrow indicating motion (no text or symbols)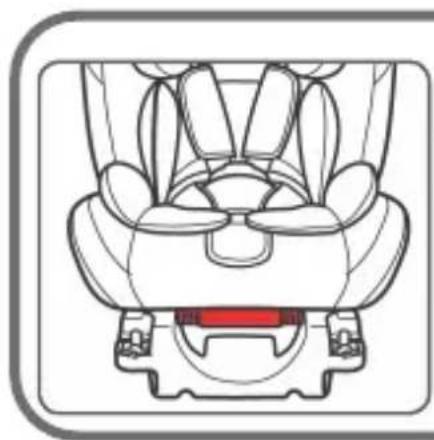
natural_image
Top-down line drawing of a car's front seat and dashboard (no text or symbols)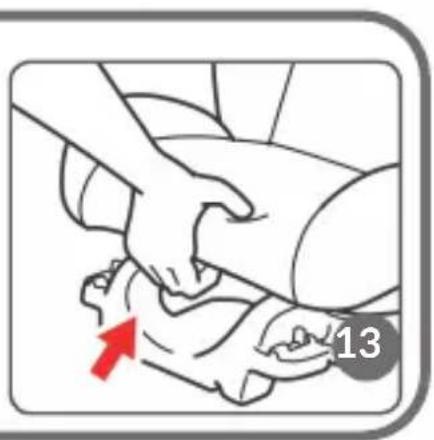
natural_image
Illustration of a person performing CPR on another person's abdomen, with a red arrow indicating pressure direction (no text or symbols)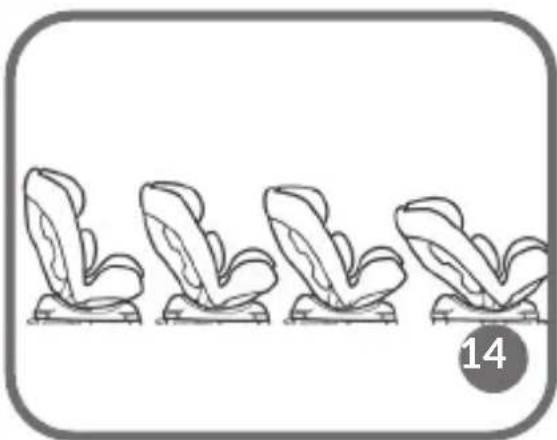
natural_image
Four identical line drawings of leaf-shaped objects arranged horizontally within rounded corners, with a circular badge showing the number 14 (no text or symbols on the figures)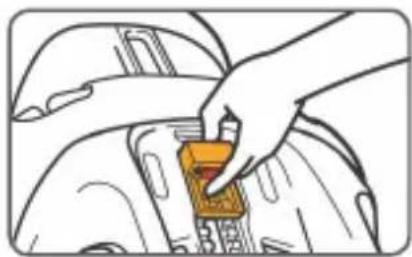
natural_image
Illustration of a hand placing a small orange object into a car's seat (no text or symbols visible)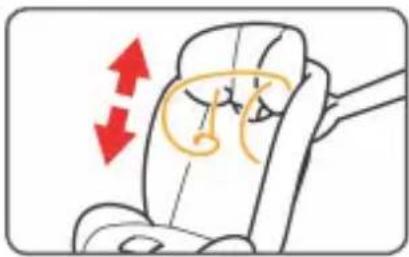
natural_image
Illustration of a car seat with a highlighted eye area and red directional arrows indicating motion (no text or symbols)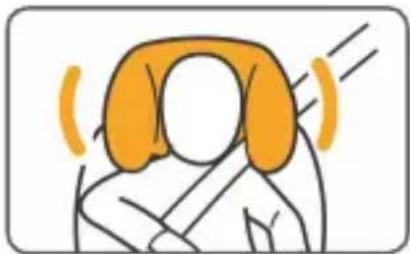
natural_image
Simple line drawing of a person with orange ears and motion lines indicating head motion (no text or symbols)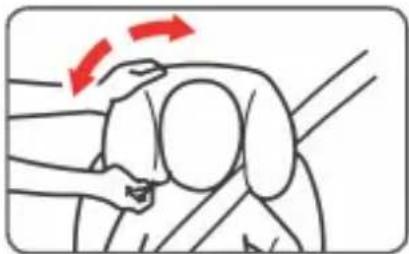
natural_image
Illustration of a person performing a seated posture with red arrows indicating motion direction (no text or symbols)15
natural_image
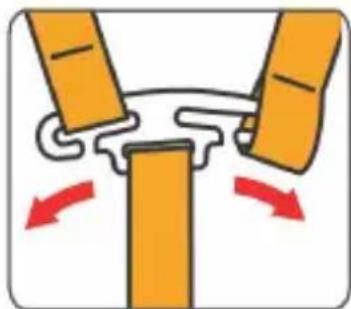
Diagram showing two orange blocks connected by a curved line with red arrows indicating motion or force direction (no text or symbols)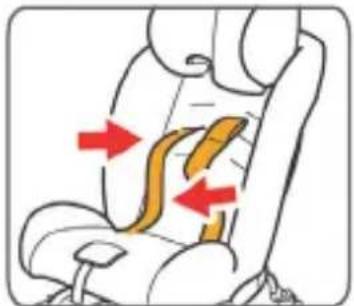
natural_image
Illustration of a car seat with red arrows indicating movement or force (no text or symbols)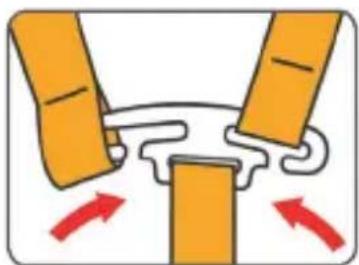
natural_image
Diagram showing two orange blocks connected by a curved line with red arrows indicating direction (no text or symbols)16
natural_image
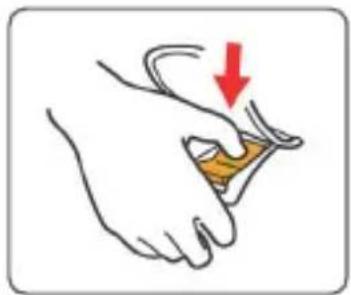
Illustration of a hand holding a small object with a red arrow indicating downward motion (no text or symbols)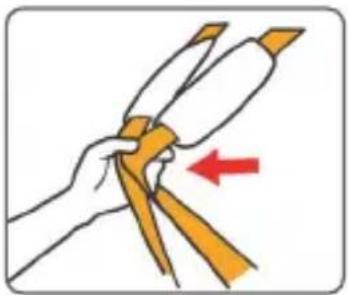
natural_image
Illustration of a hand holding a ribbon with a red arrow indicating direction (no text or symbols)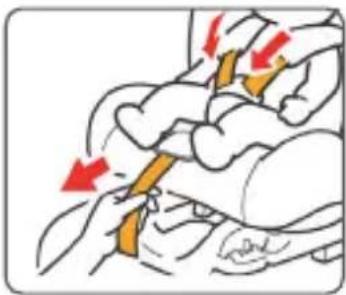
natural_image
Illustration of a medical procedure with arrows indicating movement or force direction (no text or symbols present)17
bar
| Category | Value | |---|---| | Blue Triangle | 32 | | Red Triangle | 19 |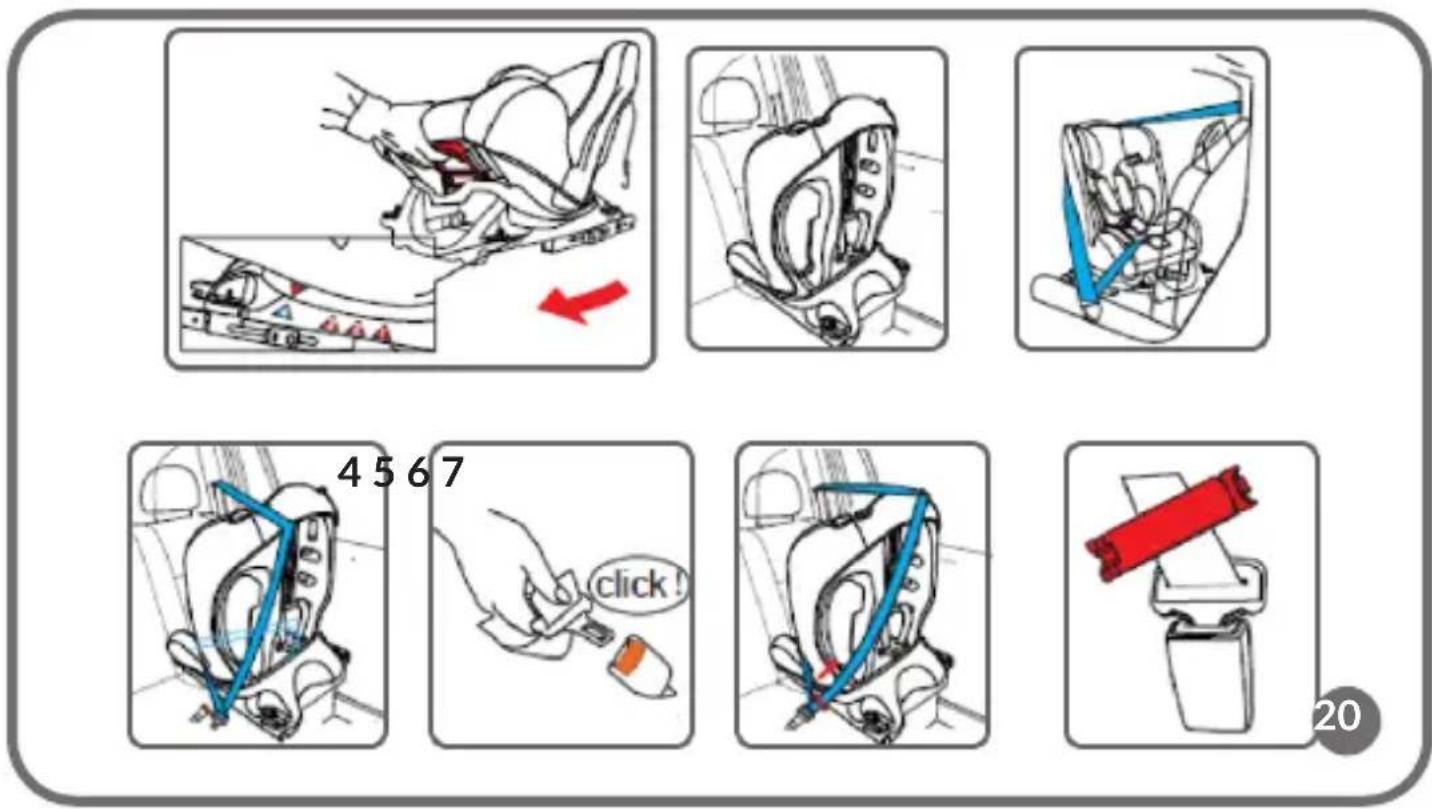
natural_image
Illustration of an orange car seat with a red arrow indicating rotation (no text or symbols)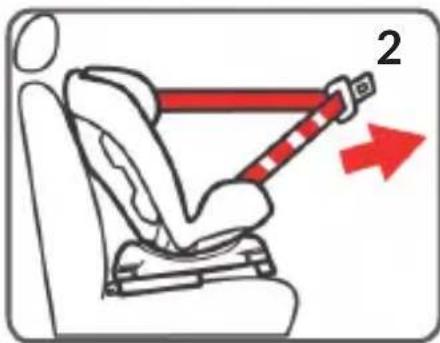
natural_image
Line drawing of a car seatbelt with red diagonal stripe (no text or symbols)21
natural_image
Diagram of a red and white object inserted into a car compartment, showing structural details (no text or symbols)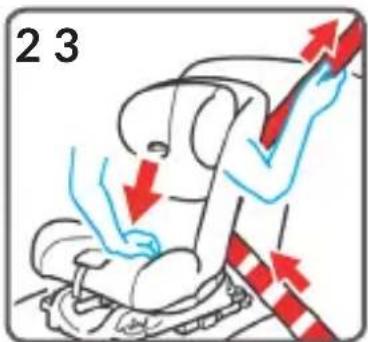
natural_image
Illustration of a person's seatbelt with red arrows indicating movement or pressure (no text or symbols)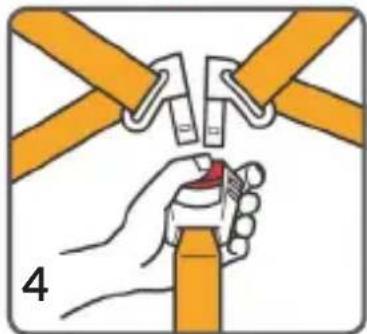
natural_image
Illustration of a hand holding a cable with orange bands and a red grip, no text or symbols present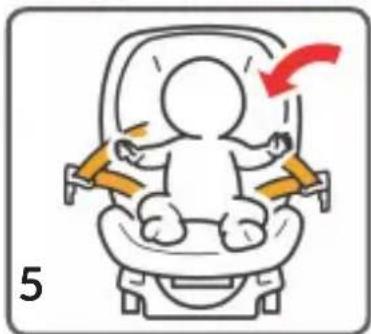
natural_image
Illustration of a baby car seat with orange straps and a red arrow indicating motion (no text or symbols)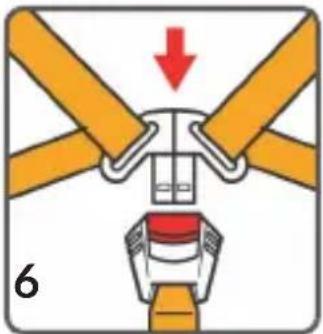
natural_image
Diagram of a mechanical assembly with orange bands and a red arrow indicating direction (no text or symbols)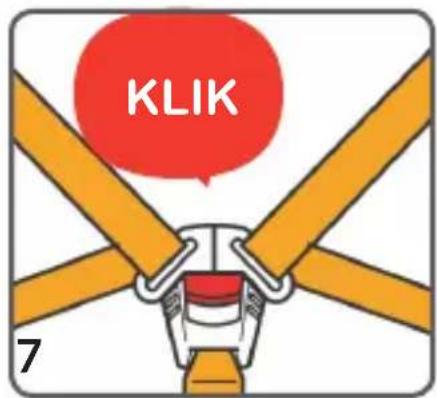
natural_image
Illustration of a medical procedure with arrows indicating direction of movement (no text or symbols present)22
23
flowchart
graph TD
    A["△"] --> B["2"]
    A --> C["1"]
Information
When used as a ‘universal’ category (groups 0+, I, II, III): ATTENTION
The child restraint belongs to the categories ‘universal’. Approved in accordance with UN Regulation No. 44, series of amendments 04, for general vehicle use and suitable for mounting on most car seats.
Correct installation is possible if the vehicle manufacturer states in the vehicle's manual that the vehicle is suitable for installing a “universal” category child restraint for this age group.
This child restraint has been classified as ‘universal’ under more demanding conditions compared to those applicable to earlier designs that do not contain this information. If in doubt, consult the device manufacturer or dealer.
When used as a “semi-universal” category (groups 0+, I, II, III):
This child restraint is classified for use in the ‘semi-universal’ category and is suitable for mounting on the seats of the following cars.
| CAR FRONT REAR | ||||
| Outer Centre | Outer Centre | |||
| (model) NO NO YES NO | ||||
A full list of models is provided at the end of the user manual.
This device can also be installed in seating positions in other car models. If in doubt, consult the device manufacturer or retailer.
Suitable for installation only if type-approved vehicles are equipped with three-point seat belts fitted with a retractor that has been approved in accordance with UN Regulation No. 16 or other equivalent standards.
Information on the ISOFIX system (for group 0+)
-
This is an ISOFIX CHILD RESTRAINT SYSTEM. It is approved in accordance with UN Regulation No. 44, 04 series of amendments for general use on vehicles equipped with ISOFIX anchorages.
-
It fits vehicles with positions approved as ISOFIX positions (according to the vehicle's instruction manual) depending on the child seat category and attachment.
- Weight group and ISOFIX size class for which the device is intended: 0+, size class E.
Dear Customer!
In case of any questions or comments on the purchased product, please contact us: help@lionelo.com
Before you start using this seat, please read the user manual carefully. Improper use may lead to a serious threat to the life of your child.
Producer:
BrandLine Group Sp. z o. o.
Proper and improper installation of the safety seat (fig 2):

Wrong position

May be used with three point belt system

Can only be mounted when three point belt system is present
Warnings:
- The hard parts and plastic parts of the child restraint must be placed and installed in such a way that, under normal conditions of use of the vehicle, they cannot be trapped by the sliding seat or door of the vehicle.
- For rear-facing installations: do not install the device on seats fitted with airbags.
- The rearward-facing restraint can only be installed if the child's weight is less than 9 kg
- All straps for securing the restraint to the vehicle must be tight, straps for restraining the child must be adapted to the body structure, the straps must not be twisted.
- Make sure the lap belts run low so that the pelvis is held firmly.
- If the device was subjected to heavy loads during an accident, it must be replaced.
-
Do not make any modifications to the seat or install any additional components without the consent of the competent authorities. Non-compliance with the instructions provided by the manufacturer may endanger the user.
-
Protect the child safety seat against sunlight. Otherwise, the seat may be too hot for your child's skin.
- Never leave your child unattended in the restraint system.
- Luggage and other objects that can cause injury in the event of a collision should be properly secured.
- Child restraints without upholstery should not be used. It is not allowed to replace the seat upholstery other than recommended by the manufacturer, because it is an integral part of the device that affects its functioning.
- Keep the seat user manual when using the device. Keep it in the car in which the product is mounted.
- Do not use load bearing points of contact other than those described in the instructions and marked on the child restraint.
- If you have doubts about the position of the adult seat belt buckle relative to the main load-bearing points, contact the child restraint system manufacturer.
- For installation with ISOFIX: refer to the vehicle manufacturer's operating instructions.
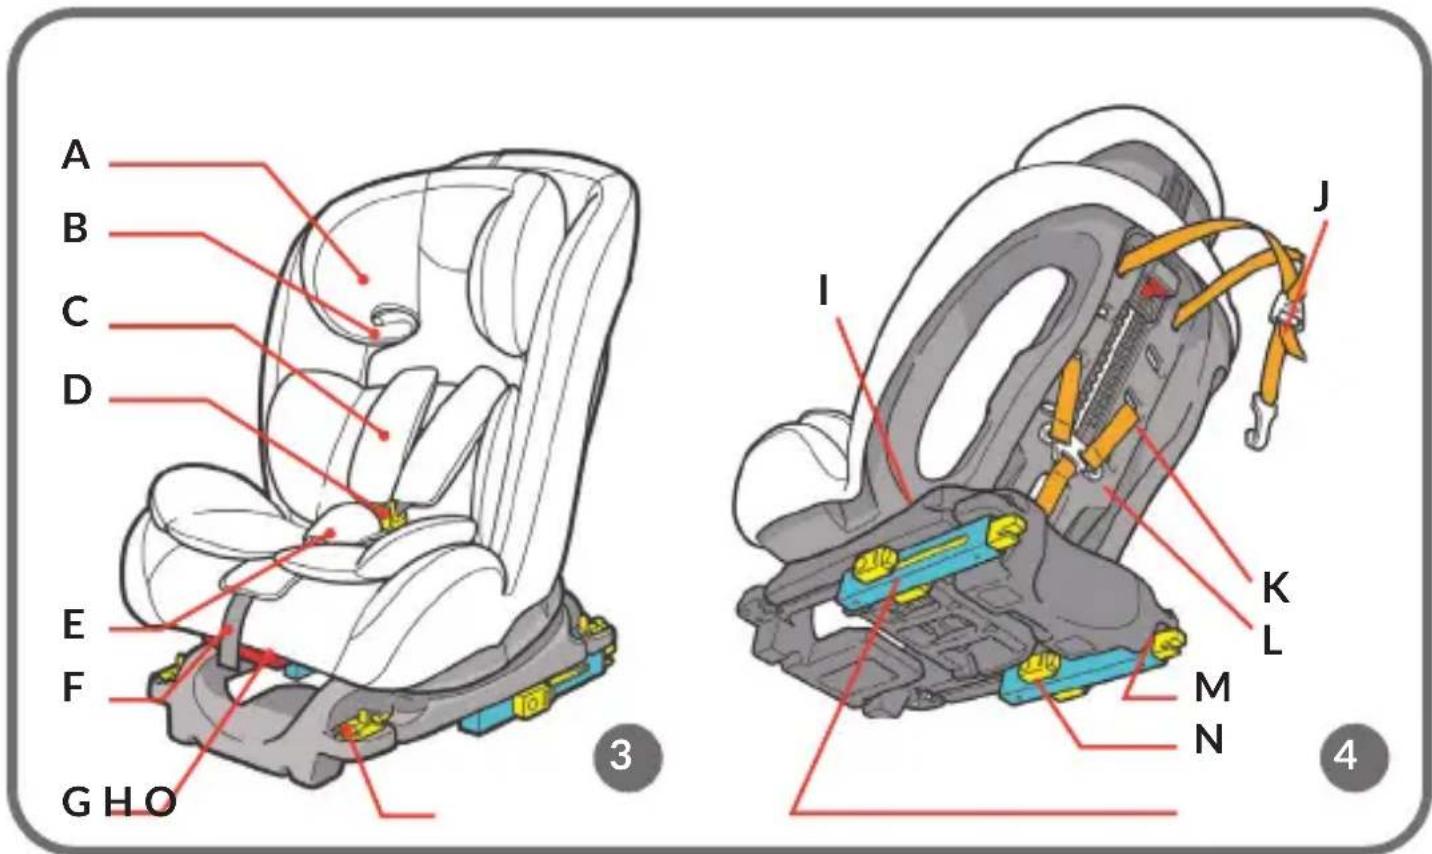
Description (fig. 3, 4)
A. Headrest
B. Belt guide
C. Belt pad
D. Safety belt
E. Buckle
F. Adjustment strap
G. Position changing lever
H. ISOFIX Fixed lock
I. Safety seat casing
J. Top tether strap
K. Five-point safety belt
L. Safety belt connector
M. ISOFIX handle
N. ISOFIX adjustment button
O. ISOFIX arms
ISOFIX fixing
ISOFIX is the system of connectors enabling the installation of safety seats in a vehicle. It is composed of two handles located between the seats and the backrest. These handles are attached directly to the structure of the vehicle. In relation to belts, ISOFIX guarantees more rigid fixing, which translates into increased safety.
The safety seat is equipped with ISOFIX fixing system (including two bottom ISOFIX connectors and upper strap – TOP TETHER).
Position ISOFIX handles in a relevant place (the safety seat can also be mounted
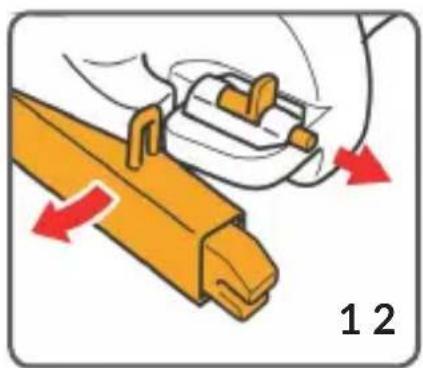
in a face-forward or rear-forward position). To do so, pull and hold the interlock button of ISOFIX handles and position them in a proper direction by sliding the entire handle horizontally outwards. Lock ISOFIX connector in the handle (fig. 5.1-5.3). Pull out guides by pressing a grey ISOFIX adjustment button. Repeat actions on the other side (fig. 5.4-5.5).
If your vehicle is not equipped with ISOFIX anchor guides, use two plastic guides supplied with the safety seat (fig. 5.6). Push the guide in the gap between the backrest and a seat, and hook its tip to ISOFIX anchor (fig. 5.7).
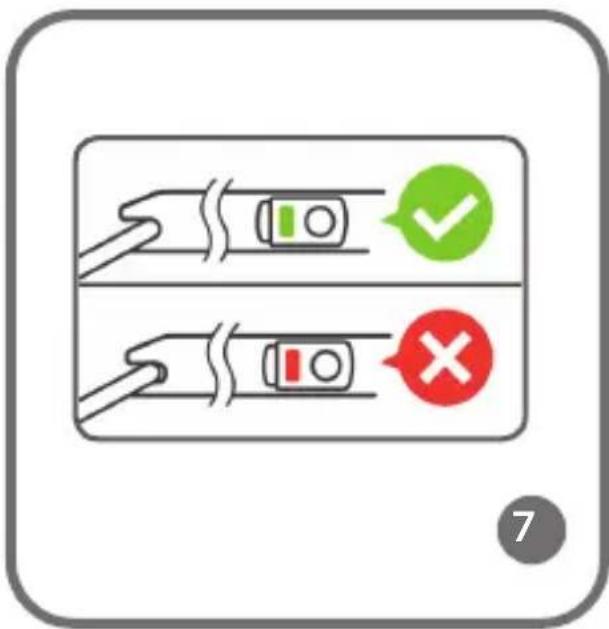
If you can hear two clicks, the safety seat has been mounted properly and ISOFIX markers will turn from red into green.
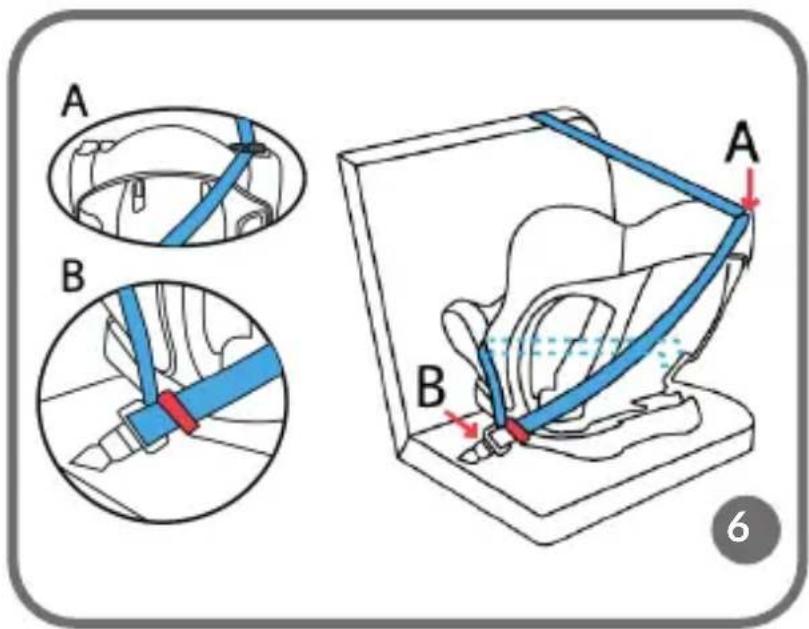
The child restraint in a rear-facing position may be secured with three-point safety belts (fig. 6).
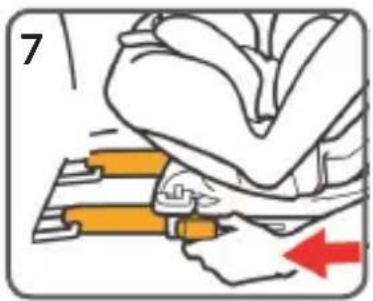
WARNING! If the indicators on the ISOFIX connector are red, it means that the seat has been badly attached. Mount the safety seat again. Pull the seat firmly to make sure that it is properly attached (fig. 7)
TOP TETHER upper strap attachment
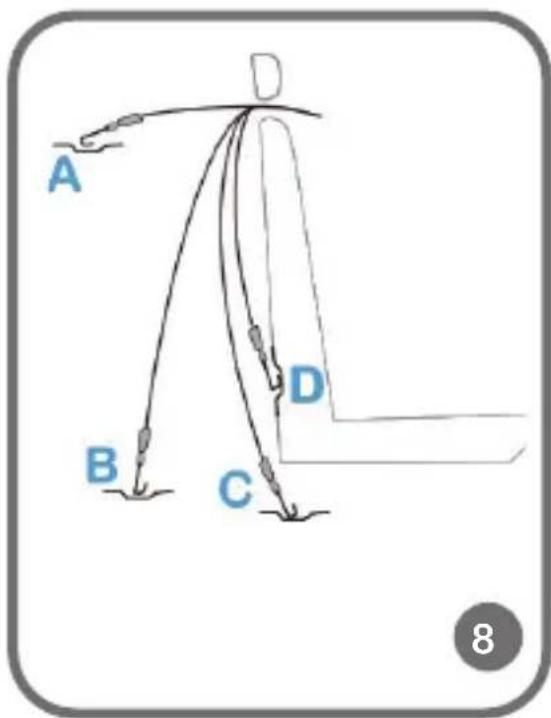
The top strap adjustment can increase the fixing strength, however it's not suitable in case of some vehicles (including those equipped with ISOFIX connectors). The position of the fixing points may vary depending on a given vehicle.
Connecting the top strap to fixing points (fig. 8)
A. Attaching to the floor of the trunk behind the rear seats.
B. Attaching to the floor of the trunk behind the rear seats.
C. Fixing just under the seat of the vehicle, you have to put the seat to find the hook
D. Attaching to the rear vehicle seats.
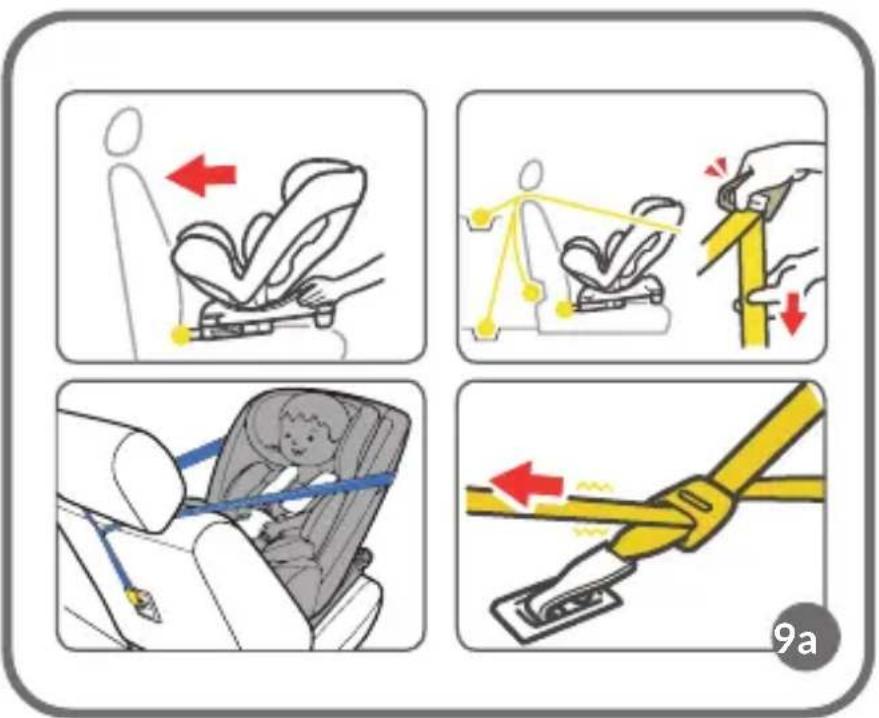
Make sure the connectors of ISOFIX fixing system have been installed properly
Press adjustment button on the upper hook, draw a sufficient amount of TOP TETHER strap so that its length is sufficient to hook on the car fixing point.
Make sure the belt has not been twisted and is well-positioned in relation to the handle in the ca
Pull the end of the upper strap to press the safety seat against the car seat.
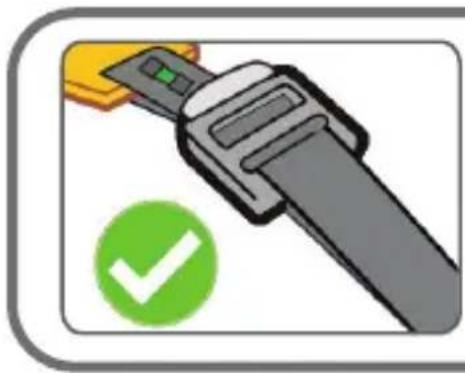
You can see a green marker on the upper adjustment – this means that the upper belt has been installed successfully (fig. 9a, 9b).
Disassembling TOP TETHER upper strap and ISOFIX connectors
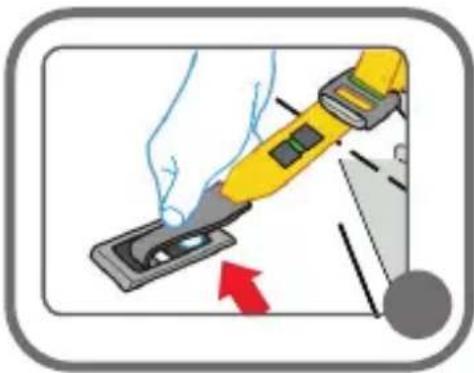
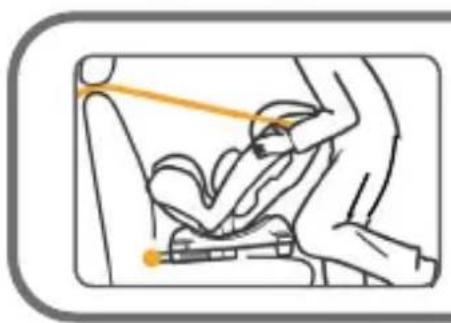
Press upper strap adjustment button and slacken the strap. Press a flexible end on the hook of the upper strap and unfasten the hook of the upper strap (fig. 10,11). Hold the base of the safety seat on both sides, press the safety seat against the car seat. Press ISOFIX handle adjustment button to unfasten fixing (fig.12).
ADJUST THE SAFETY SEAT TO YOUR CHILD
ADJUSTMENT OF BACKREST POSITION
The backrest of the safety seat can be tilted in a 4-degree mode. Use a lever located in the front of the safety seat to change the backrest position (fig.13, 14).
ADJUSTMENT OF HEADREST HEIGHT
Press a button located in the rear part of the backrest and lift or drop the headrest to a desired position. Remember that the child's head must always be in the center of the headrest (fig. 15).
ADJUSTMENT OF 5-POINT SAFETY BELTS
Ends of properly positioned 5-point safety belts must be just above the child's arms. To adjust their height, unlock the safety belt fastening. Pull out a buckle (in the back of the safety seat). Pull out belts from the safety seat. Select height you wish to mount your belts and push them into relevant holes. Slide both straps of the safety seat arms into the connector located in the back of the safety seat. Finish adjustment (fig. 16).
HOW TO TIGHTEN AND SLACKEN SAFETY SEAT BELTS
If belts fit tight the body of your child, it is highly protected. Between the belts and your child should be space (two adult fingers). Before you fasten your child in the safety seat, it is advisable to take off warm clothes (such as jackets). Belts must not be too loose or too tight. To adjust the tension of belts, a child must be
positioned in the ready safety seat. Fasten 5-point safety belts. Press belt adjustment button (in front the safety seat) with one hand, use another hand to pull adjustment strap to tighten arm belts. Make sure the belt pads remain on the child's arms. You can disassembl the belts if your child weighs more than 15 kg or its height exceeds 1 meter (fig. 17).
Installation for Group 0+ (0-13kg) with ISOFIX
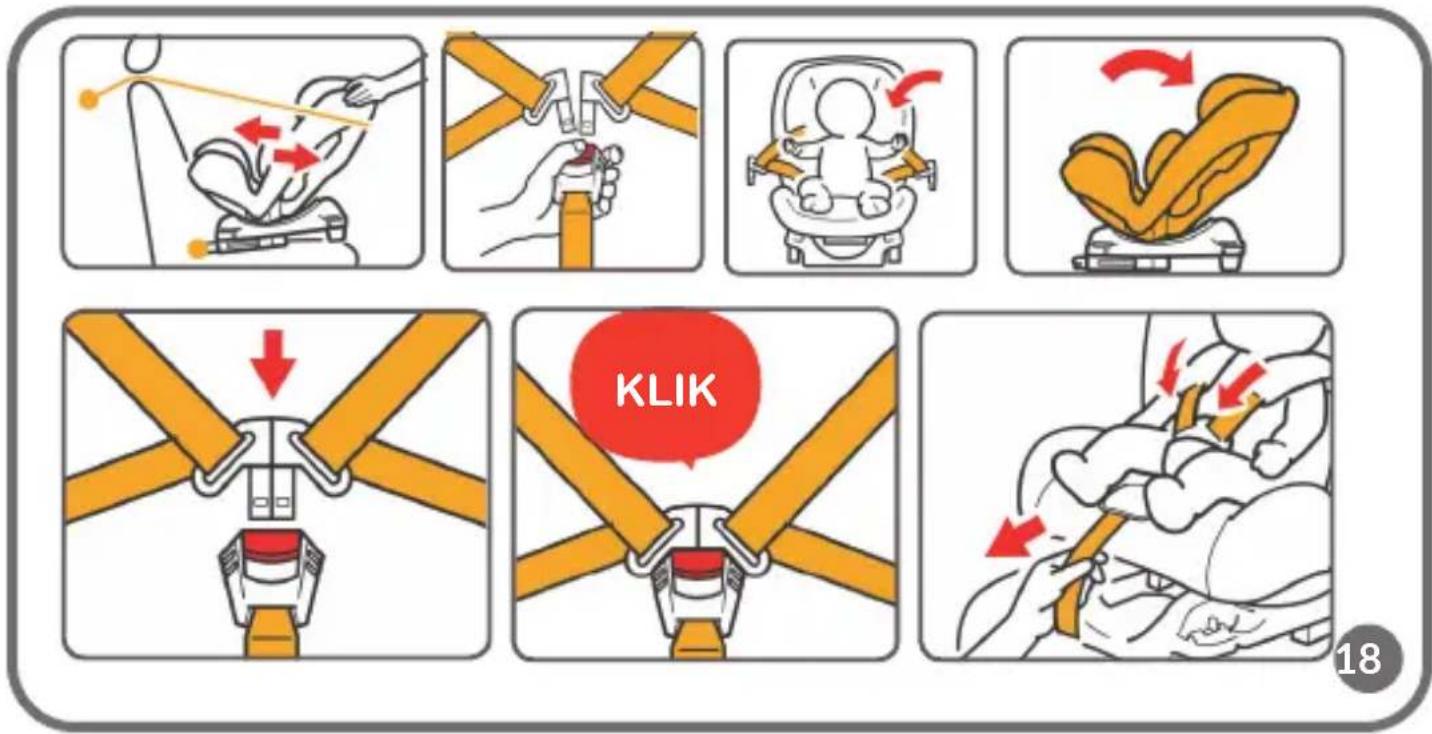
Position the backrest at maximum tilting (4-th position of adjustment). In this position the backrest must be titled as much as possible. The safety seat must be in a rear-facing position. To do so, slide ISOFIX guides to the front of the safety seat (see instructions above, fig. 18). Mount the safety seat in accordance with ISOFIX assembly instructions described above. Mount TOP TETHER upper strap as instructed above. Press a red button on the clamp of 5-point safety belts to unlock belts. Spread safety belts of the safety seat to sides, next place your child properly. Combine two metal clamps. Insert two parts of the metal clamp in the handle. If you can hear a click, the belt is locked. Make sure the belt has been locked properly. Push belt adjustment to tighten harness of the safety belts. If belts fit a child tight, the protection is fully guaranteed (fig. 18).
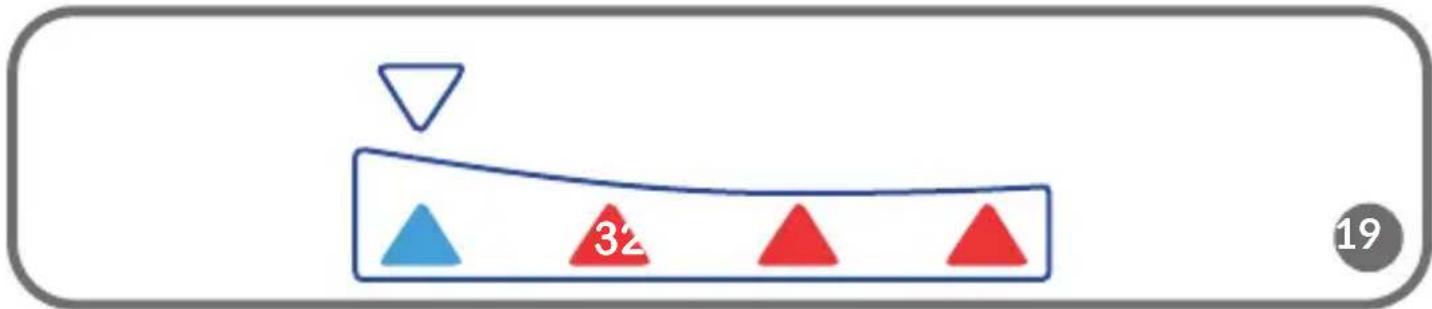
See fig. 19-The position of the safety
Installation for Group 0+ (0-13kg) with safety belts
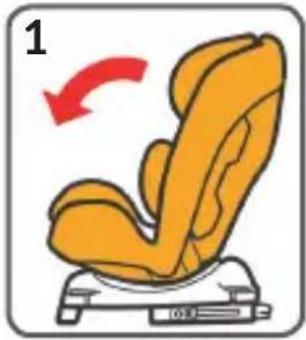
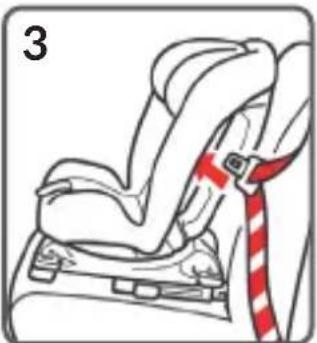
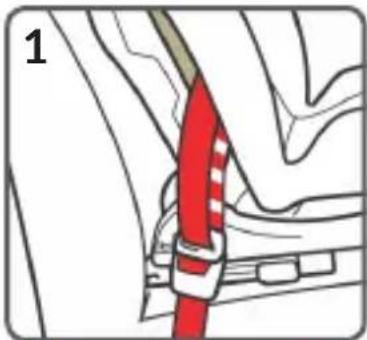
Grip the red lever at the front of the child car seat and pull the seat into its fully reclined position (fig. 20.1). The seat must be fully reclined when facing rearwards. Plaing the child car seat on passenger seat. Placethe child car seat on a passenger seat facing rearward (fig. 20.2). Routing diagonal and lap belts correctly. Put the lap belt under innercushion (fig. 20.3). In the meanwhile, bring the diagonal belt through the belt guide round the back of the seat (fig. 20.4). Tightening the child car seat. Check and make sure there is no twist of the belt. Insert the metal tongue of caberbelt into the carseat buckle until you hear a clear “click” (fig. 20.5). Tighten the seatbelt by pulling in the direction of the seatbelt reel (fig. 20.6). Pull the lap and diagonal seat belt tightly and attach the belt lock to the diagonal section of the seatbelt. Ensure it’s attached as close as possible to the seatbelt buckle without touching it (fig. 20.7).
Installation for Group I (9-18kg) with ISOFIX
The safety seat must be in forward-facing position.
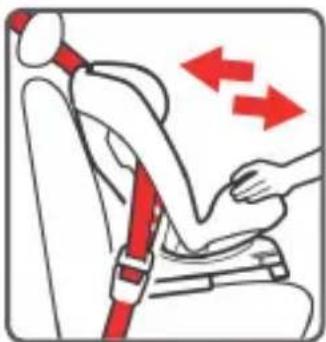
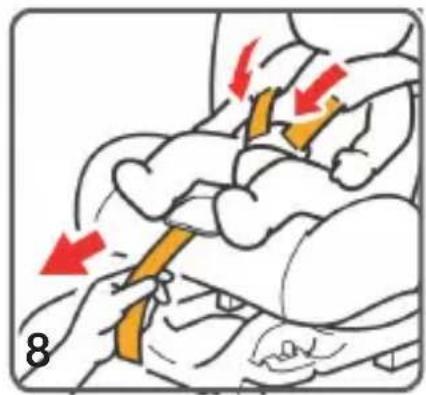
To do so, slide ISOFIX guides to the back of the safety seat. The safety seat must be in sitting position (fig. 21.1). Mount the safety seat in accordance with ISOFIX assembly instructions described above. Make sure the safety seat is fits tight the backrest of the car seat. Pull the safety belt. Pull through the safety belt in the back of the backrest with marked guides (between a frame and car seat cover), pull out a belt from the other side of the safety seat and unlock it by inserting in the car belt clamp. Tighten the belt and see if the safety seat has been mounted properly. If it is still slackened, tighten the belt again (fig. 22.1-22.3). Spread safety belts of the safety seat, next place the child in the safety seat well. Combine two parts of the metal clamp. Insert two parts of the metal clamp in the handle. If you can hear a click, the belt is locked. Make sure the belt has been locked properly. Pull belt adjustment to tighten hardness of the safety belt. If belts fit your child tight, it is fully protected (fig. 22.4-22.8).
Installation for Group I (9-18kg) with safety belts
The safety seat must be in a forward-facing position. Position the safety seat on the car seat so that its backrest fits the backrest of the seat tight. Pull the safety belt. Pull through the safety belt in the back of the backrest with marked guides (between a frame and the safety seat cover), pull out a belt on the other side of the safety seat and lock it by inserting in the car belt clamp. Tighten the belt and check if it is well mounted. If it is still slackened, tighten the belt again (fig. 21.1-21.3). Spread safety belts of the safety seat, next position your child in the safety seat well. Combine two parts of the metal clamp. Insert two parts of the metal clamp in the handle. If you can hear a click, the belt is locked. Make sure the belt has been locked properly. Pull belt adjustment to tighten harness of the safety belts. If belts fit your child tight, it is fully protected (fig. 22.4-22.8).
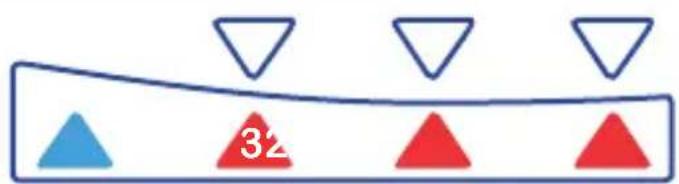
See fig. 23- The safety seat can be in position 1, 2 or 3
Installation for Group II and III (15-36kg) with ISOFIX
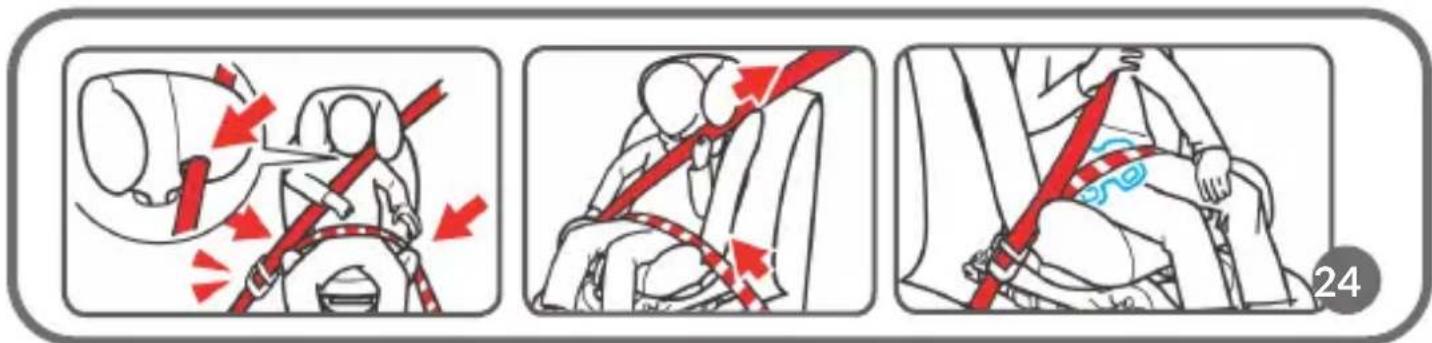
Remove the safety belts of the safety seat (see instructions below). In this position the safety seat must be in forward-facing position, position ISOFIX handles properly (in accordance with the description above). Mount the safety seat in accordance with ISOFIX assembly instructions described above. Set a relevant height of the headrest (see instructions above). Carry the car belt in front of the safety seat. Fasten the belt clamp in the buckle and position the hip belt in lower guides. Pull through
upper part of the harness belt through the guide in the headrest from the car belt retractor side. Make sure the belt is in the belt guide and is not twisted. Tighten the belt by Pulling its breast part towards the belt retractor. Make sure the hip belt goes through the center of the child's collarbone. If the belt is too close to the child's neck, adapt it to the headrest again (fig. 24).
Installation for Group II and III (15-36kg) with safety belts
Remove safety belts of the safety seat (see instructions below). In this position the safety seat must be in forward-facing position. Place the safety seat on the car seat so that its backrest fits the backrest of the car seat tight. Place the child in the safety seat. Set a relevant height of the headrest (see instructions above). Carry the car belt in front of the safety seat. Fasten the belt clamp in the buckle and position the hip belt in the lower guides. Pull through the upper part of the harness belt through the guides in the headrest from the car belt retractor side. Make sure the belt is in the belt guide and is not twisted. Fasten the belt by pulling its breast part towards the belt retractor. Make sure the harness belt goes through the center of the child's collarbone. If the belt is too close to the child's neck, adapt the headrest again (fig. 24).
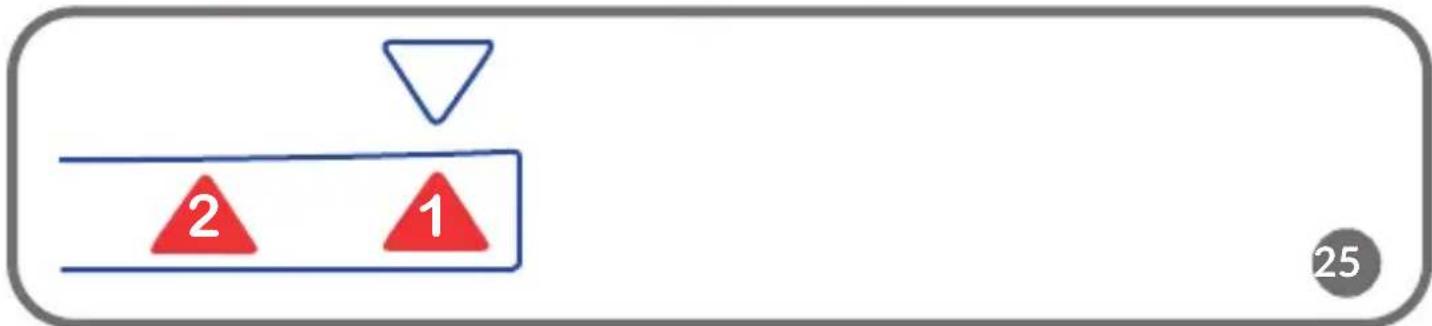
See fig. 25-The safety seat must be in position 1
Disassembly of 5-point safety belts
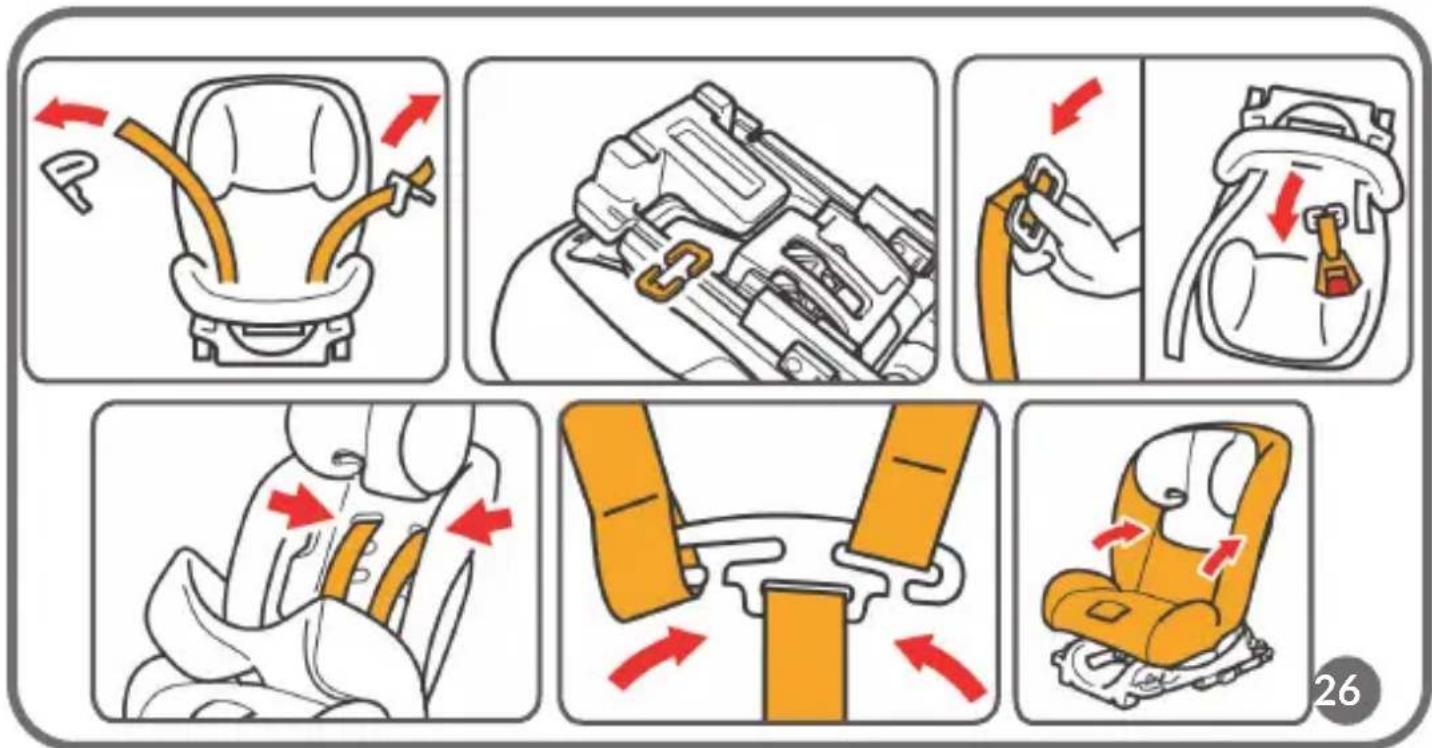
Slacken belts off and open the harness clamp. Pull out the buckle from the safety belts (in the back of the safety seat). Pull out arm belts from the safety seat. Pull out the crotch belt from the metal buckle under the base of the safety seat, and pull it by taking out the entire crotch belt along with the buckle from the hole (fig. 26). To moun five-point safety belts in the safety seat, follow the same actions in reversed order.
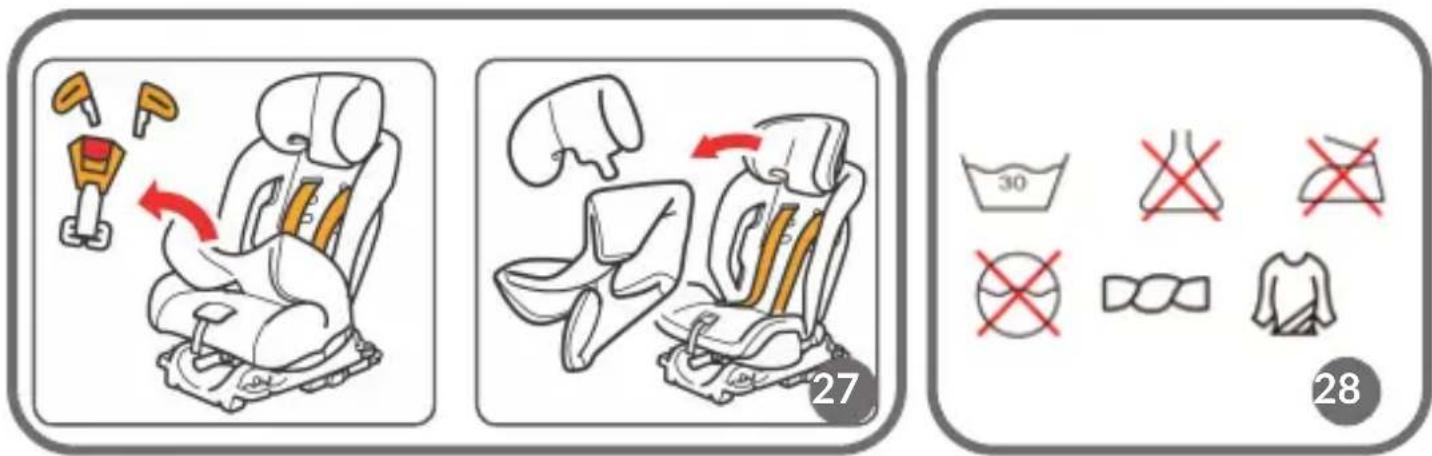
Removing a cover
Remove 5-point safety belts in accordance with the instructions above. Undo an additional headrest cushion. To remove a cover, start from the bottom of the safety seat and end up with its headrest (fig. 27).
Cleaning
Use natural detergents and warm water (below 30°C). Do not wash in the washing machine. Do not swirl and squeeze. Note: Extensive scrubbing may damage the
surface of the cover or sponge (fig. 28).
Clean the frame with a wet cloth and natural detergents.
The product meets the requirements of the ECE R44 / 04 standard.
The pictures are for reference only. The real design of the products may differ from the pictures presented.
PL
Informacja
Detailed warranty conditions are available on the website:
Thank you for purchasing our product
- Information
- When used as a ‘universal’ category (groups 0+, I, II, III): ATTENTION
- When used as a “semi-universal” category (groups 0+, I, II, III):
- Information on the ISOFIX system (for group 0+)
- Dear Customer!
- Producer:
- Proper and improper installation of the safety seat (fig 2):
- Warnings:
- Description (fig. 3, 4)
- ISOFIX fixing
- The child restraint in a rear-facing position may be secured with three-point safety belts (fig. 6).
- TOP TETHER upper strap attachment
- Disassembling TOP TETHER upper strap and ISOFIX connectors
- ADJUST THE SAFETY SEAT TO YOUR CHILD
- ADJUSTMENT OF BACKREST POSITION
- ADJUSTMENT OF HEADREST HEIGHT
- ADJUSTMENT OF 5-POINT SAFETY BELTS
- HOW TO TIGHTEN AND SLACKEN SAFETY SEAT BELTS
- Installation for Group 0+ (0-13kg) with ISOFIX
- Installation for Group 0+ (0-13kg) with safety belts
- Installation for Group I (9-18kg) with ISOFIX
- Installation for Group I (9-18kg) with safety belts
- Installation for Group II and III (15-36kg) with ISOFIX
- Installation for Group II and III (15-36kg) with safety belts
- Disassembly of 5-point safety belts
- Removing a cover
- Cleaning
- The product meets the requirements of the ECE R44 / 04 standard.
- Informacja
Brand : Lionelo
Model : Sander
Category : Car seat