
Perfect Clean CP3000 - Steam cleaner Concept - Free user manual and instructions
Find the device manual for free Perfect Clean CP3000 Concept in PDF.


| Product type | Steam cleaner |
| Brand | Concept |
| Model | Perfect Clean CP3000 |
| Power supply | Mains |
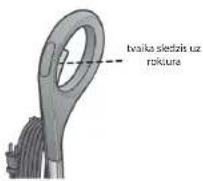
| Voltage | 220-240 V |
| Power | 1500 W |
| Tank capacity | 0.5 L |
| Steam pressure | 3 bar |
| Heat-up time | 30 seconds |
| Cable length | 4 m |
| Weight | 2 kg |
| Dimensions (W x D x H) | 25 x 20 x 25 cm |
| Included accessories | Nozzle, brush, squeegee, funnel |
| Main functions | Steam cleaning, disinfection, degreasing |
| Material | Heat-resistant plastic |
| Color | White and metal |
| Noise level | <80 dB(A) |
| Steam type | Dry steam |
| Safety | Safety thermostat, automatic shut-off in case of overheating |
| Maintenance | Periodic descaling recommended |
Frequently Asked Questions - Perfect Clean CP3000 Concept
User questions about Perfect Clean CP3000 Concept
0 question about this device. Answer the ones you know or ask your own.
Ask a new question about this device
Download the instructions for your Steam cleaner in PDF format for free! Find your manual Perfect Clean CP3000 - Concept and take your electronic device back in hand. On this page are published all the documents necessary for the use of your device. Perfect Clean CP3000 by Concept.
USER MANUAL Perfect Clean CP3000 Concept
natural_image
Exterior view of a white conceptual vacuum cleaner (no text or symbols visible on body)CP3000
concept
concept
CZ
PODĚKOVÁNÍ
NÁVOD K OBSLUZE
Sestavení
6
CP3000
CP3000
7
CZ
concept
concept
cz
natural_image
Three technical illustrations of a mechanical component, showing top, side, and side views (no text or symbols present)8
CP3000
CP3000
9
CZ
concept
concept
CZ
ŘEŠENÍ POTÍŽÍ
16
CP3000
CP3000
17
5K
concept
concept
SK
natural_image
Mechanical assembly diagram showing two steps of a component with arrows indicating direction (no text or symbols present)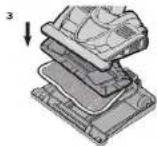
ČISTENIE A ÚDRŽBA
Údržba
NSTRUKCJA OBSŁUGI
Montaż
26
CP3000
CP3000
27
PL
concept
concept
PL
Obsługamopaparowego
HASZNÁLATI ÚTMUTATÓ
Összeállítás
36
CP3000
CP3000
37
HU
concept
concept
HU
A gözmophasználata
natural_image
Three technical illustrations of a mechanical component, showing top, side, and bottom views (no text or symbols present)38
CP3000
CP3000
39
HU
concept
concept
HU
HIBAELHÁRÍTÁS
LIETOŠANAS INSTRUKCIJA
Montāža
46
CP3000
CP3000
47
LV
concept
concept
LV
natural_image
Mechanical assembly diagram showing two steps of a component being lifted (no text or labels)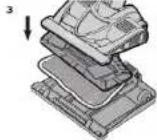
TİRİŞANA UN APKOPE
Apkope
TRAUCĚJUMU NOVĚRŠANA
Thank you for purchasing a Concept product. We hope you will be satisfied with our product throughout its servicelife.
Please study the entire Operating Manual carefully before you start using the product. Keep them manual in a safe place for future reference. Make sure that any persons handling the vacuum cleaner are also familiar with this Operating Manual.
| Technical parameters | |
| Voltage | 220-240 V ~ 50/60 Hz |
| Input power | 1600 W |
| Noise level | <80 dB (A) |
IMPORTANT SAFETY INSTRUCTIONS
Do not leave the appliance unattended when plugged into the mains. When using an electric appliance, the following precautions should always be followed:
- Do not leave the appliance unattended when plugged into the mains. Always disconnect the device from the mains before maintenance or if it is not in use.
- Do not use outdoors or on wet surfaces.
- Do not put the device in operation when in the upright or locked position.
- Do not let the device run while it is stationary. Keep the device moving when it is in use.
- Do not allow the device to be used as a toy. Close attention is necessary when the device is used near children.
- Use the device only as described in this manual. Always use only manufacturer's recommended attachments.
- CAUTION! Use only distilled water to fill the water tank!
• Always unplug the appliance when filling with distilled water, emptying or when the appliance is not in use. - Do not use the device if the cord or plug is damaged. If the device does not work as it should, it may have been dropped, damaged, left outdoors, or immersed in water, contact an authorized service centre.
- Do not pull on the power cord, do not carry the device by holding the power cord, do not use the cable as a handle, do not close the cable in the door, or rotate it around sharp edges or corners.
- Keep the cord away from heat sources.
- Do not run the device over the cord.
EN
concept
concept
EN
• To unplug the appliance, grasp the power plug and pull it out. Do not pull the power cord.
- Do not touch the plug or the device with wet hands.
- Do not use the device without the water tank cap in place.
- Do not use the steam function with an empty water tank.
• Empty the water tank when the steam cleaner is not in use.
- Do not put any object into the device's openings. Do not use the device with any opening blocked; keep it free of dust, lint, hair and anything that may reduce performance.
- Contact the manufacturer/retailer (see warranty and service terms). Incorrect installation and repair can cause electrical shock to the user.
- Keep your hair, clothing, fingers and all parts of body away from openings and moving parts of the device.
- Do not ever aim the steam cleaner on yourself or another person. Steam is very hot and can cause burns. Do not use the appliance in the presence of explosive or flammable vapours.
- Turn off all controls before unplugging.
- Do not use the device to clean hot or smoking objects, such as cigarettes, matches, or hot ash.
- Use extra care when cleaning the stairs.
- Do not use the device to clean up flammable or combustible liquids, such as gasoline or lighter fluid. Do not use the device areas where such liquids may be present.
- Do not use to pick up flammable or combustible liquids, such as gasoline or lighter fluid, or use in areas where they may be present.
- Do not use the device in an enclosed space where flammable, explosive or toxic vapours may be released from oil base paint, diluent, moth preparations, or in areas where flammable dust is present.
- Use of chemicals may damage the appliance and you will lose your warranty.
- Do not use the device to clean up toxic solutions such as chlorine bleach, drain cleaner, gasoline, etc.
- Never put additives (such as perfume, stain remover or products containing alcohol) in water as they may damage the steam cleaner or make it dangerous to you.
- Ensure that the water tank cap has been properly screwed down before use.
- Do not touch hot parts of the device. It is normal for the device to get hot during operation.
- Do not use the device to clean clothes while being worn.
- The impact of the steam may have an adverse effect on some materials. Always test the steamer on a small area to determine if the particular material is suitable for treatment with the steam cleaner.
- Never aim the device at people, animals or plants (risk of scalding!).
- Do not aim the appliance at electrical systems or wires.
- Do not repair the appliance yourself. Contact an authorized service centre.
- This appliance may be used by children 8 years of age and older and by persons with physical or mental impairments or by inexperienced persons if they are properly supervised or have been informed about how to use of the product in a safe manner and understand the potential dangers. Children must not play with the appliance. This appliance may be cleaned by children 8 years of age and older if they are properly supervised. Keep this appliance and the power cord out of reach of children younger than 8 years of age.
If you fail to follow the manufacturer's instructions, repairs cannot be recognized as a warranty.
Household use only
The steam vacuum cleaner with a mop is designed for use on hard surfaces such as ceramic, glass, stone, marble, concrete, vinyl, linoleum and sealed hardwoods and carpet. The appliance is not designed for use on fine silks, leather, velour, or other delicate steam-sensitive materials such as waxed polished furniture, very thin plastics, unsealed hardwoods, ceilings, drywall and exterior paint of automobiles, electronics or items using electricity.
NOTE: The heat and steam may not be suitable for some steam or heat-sensitive floor types. If unsure, we recommend checking the use and care instructions from the floor manufacturer and testing on an inconspicuous area prior to use.
EN
concept
concept
EN
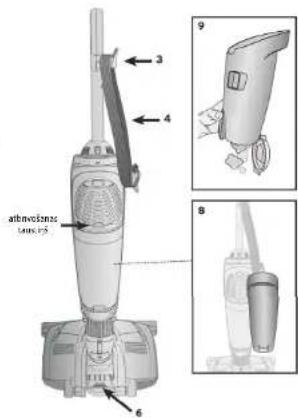
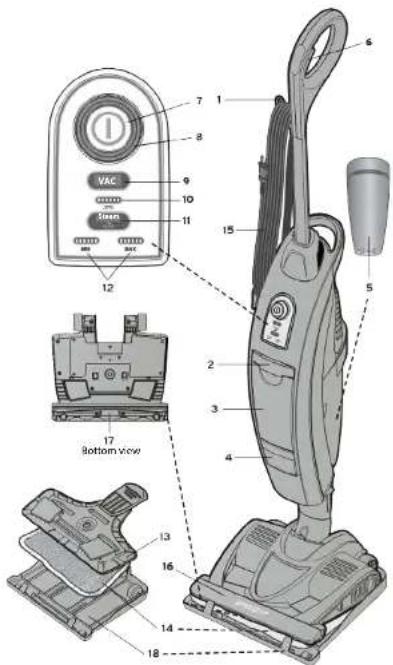
PRODUCT DESCRIPTION
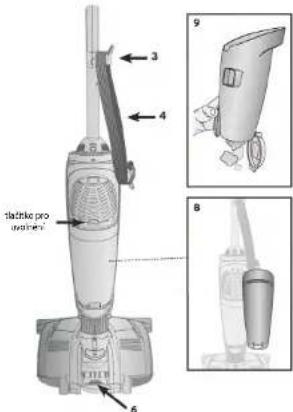
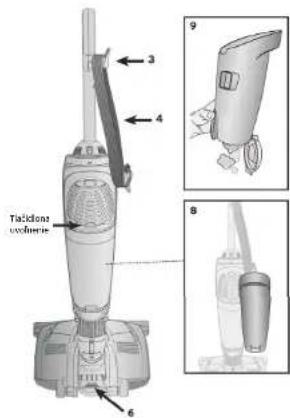
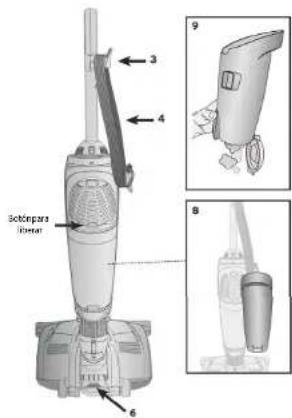
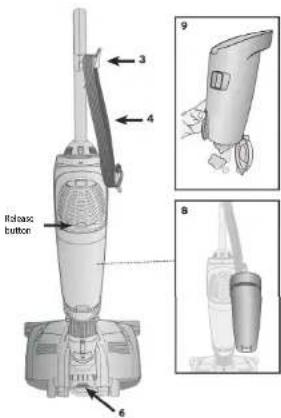
1 Hook for attaching a power cord
2 Lever for releasing the water tank
3 Water tank
4 Replaceable hard water filter
5 Dirt tank
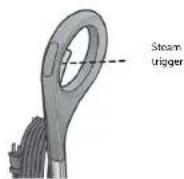
6 Steam trigger
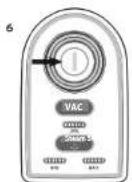
7 Power On/Off button
8 Charging indicator
9 Vacuum feature On/Off button
10Vacuum feature indicator
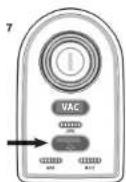
11 Steam level button (Low/High level)
12Steam ready indicator
13Mop pad holder
14Microfiber mop pad
15Power cord
16Suction head
17Suction inlet
18 Carpet glider
OPERATING INSTRUCTIONS
Assembly
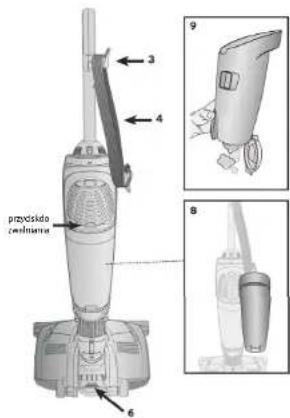
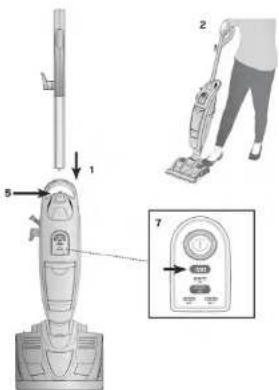
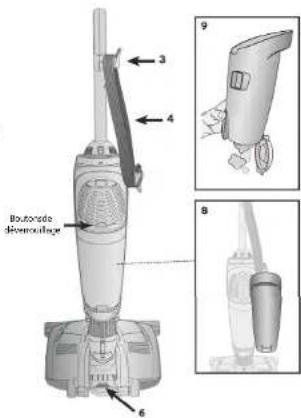
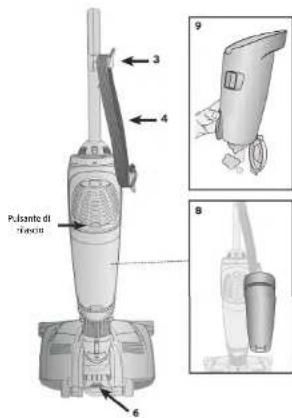
- Align the connector tab at the bottom of the handle with the receiving port on top of the unit and push until it "snaps" together.
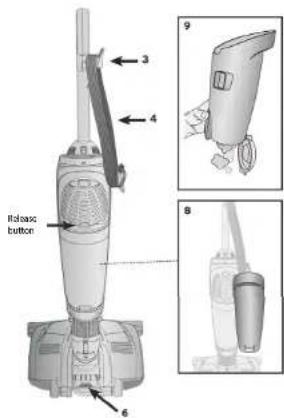
- Lock - Place foot on the head and gently lean the handle back to release it for use. Return the handle to the upright position to engage lock.
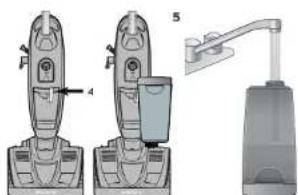
- Power Cord Release - To loosen the cable, rotate the hook by 45" and remove the cable.
- Easy Power Cord Storage - Rotate the hook to the vertical position, wrap the cable around the upper and the lower hook located under the handle.
- Carrying Handle - The handle is located on the back of the appliance body for easy lifting, carrying and use on stairs.
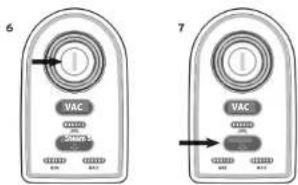
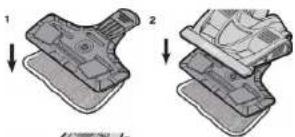
- Microfibre Mop Pad Holder AToattachthemoppadholder, place theheadonto themicrofibersteammoppadholder. BToremovethemoppadholder, placefootonthe releasepedalandlifttheappliance.
Use
NOTE: For vacuuming, donotusethesteammoppad.
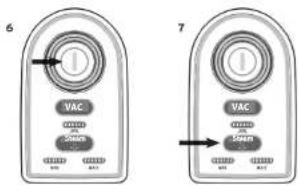
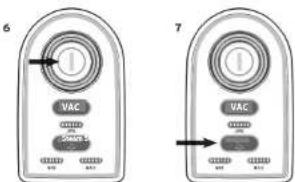
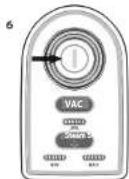
7. Press the "VAC" button to start vacuuming.
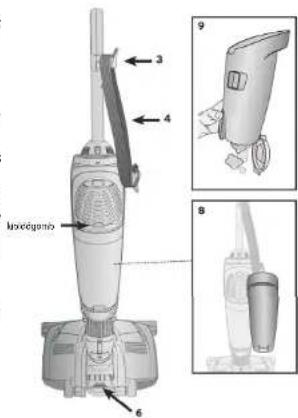
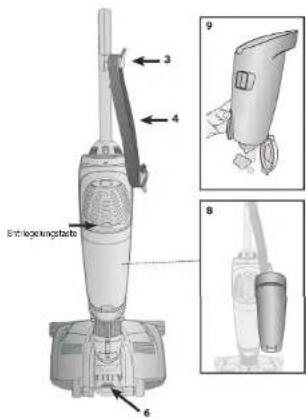
8. To empty the dirt tank, grasp the dirt tank handle, press the release button and remove the tank.
9. Press the empty button on the front of the tank, open it and empty it.
10. Put the dirt tank back.
NOTE: Do not use the device without the dirt tank.
56
CP3000
CP3000
57
EN
concept
concept
EN
SteamMop Operation
-
Attach the mop pad to the holder.
-
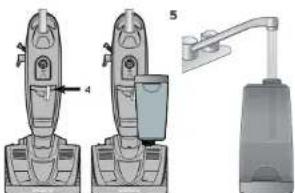
To attach the mop pad holder: place the front of the steam cleaner on the holder, align the foot pedal to the centre of the head and gently press the head to the holder until it "snaps" together.
NOTE: Never use the steam mop without the microfiber steam mop pad in place.
-
For carpet cleaning only, proceed according to step 3 and fit the carpet glider on the head. If the steam cleaner is used on hard floors, remove the carpet glider.
-
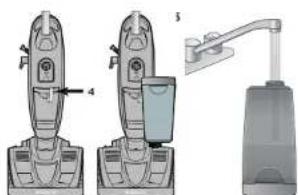
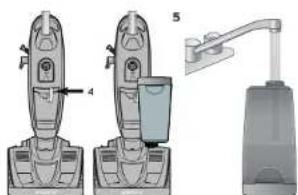
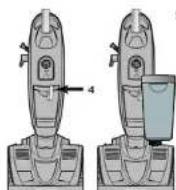
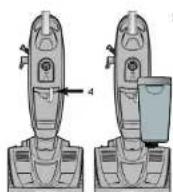
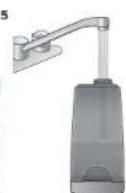
Grasp the water tank release lever and pull forward and upward to remove the water tank.
-
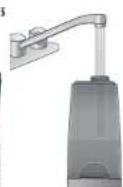
Remove the cap from the bottom of the water tank and fill it with water. Make sure the cap sealing is in its place. Screw the cap and put the water tank back. NOTE: Do not attempt to use steam mop with an empty water tank!
-
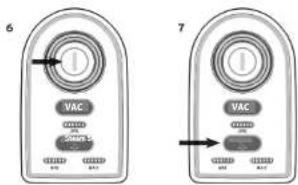
Tum the power switch on, (the power indicator will be on).
-
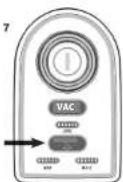
Press the steam level button, to adjust the steam level. The default is maximum, can be adjusted to minimum.
-
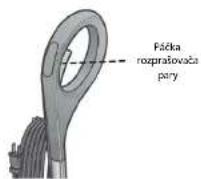
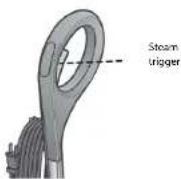
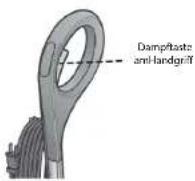
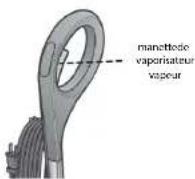
When the MIN/MAX indicator stops flashing (when it light steadily), press and hold the steam trigger (on the inner side of the handle) to start steam cleaning.
-
When the Steam Mop stops emitting steam turn the power OFF and refill the water tank.
10.Steam Settings:
Tiles/Stone - Maximum Sealed wooden floor - Minimum
NOTE: When the microfiber steam mop pad becomes too wet or dirty, replace with a clean cloth.
The microfibre cover is machine washable at 40 °C.
natural_image
Mechanical assembly diagram showing two steps of a component being folded (no text or symbols present)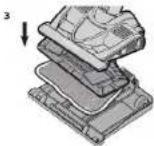
USE & MAINTENANCE
Maintenance
-
When finished steam cleaning, ensure to turn off the appliance and unplug from the mains.
-
Empty the remaining water from the water tank.
-
Remove the mop pad. Microfibre pads can be washed in a washing machine, up to 100 °C. For heavily soiled pads, soak them in warm water with detergent or a mild stain remover beforehand. Allow the pads to dry completely before storing. NOTE: DO NOT USE FABRIC SOFTENER
Replacing the water filter
The water filter helps to filter minerals contained in water that reduce the efficiency of the steam cleaner. Depending on the frequency of use of the appliance, the filter should be replaced every 80-100 hours. Use only distilled water in the steam mop. If you live in an area with hard water, this water may cause deposits on the heater, which will reduce the performance of the cleaner. Use only distilled water. This will extend the service life of the water filter and heater.
WARNING: Unplug the cord from the mains before maintenance.
Outlet Filter Maintenance
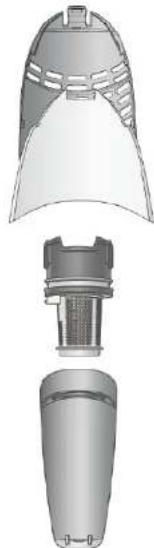
Pushthefiltercoverabdownandremoveitfromtheappliancebody. Remove the filter from the back of the cover and wash it until it is completely clean. Before returning the filter, allow it to dry thoroughly. Put the filter cover back into the appliance - align the bottom of the cover with the appliance body and rotate it to its place. It snaps when it is in the right place.
Dirt tanks
Remove the filter unit from the dirt tank. Turn the coarse outer filter counterclockwise and release it. Turn the main filter counterclockwise and release it. Remove the outer foam filter from the bottom of the main filter. Clean all the filters and let them dry properly before assembly. Place the foam filter on the bottom of the main filter. Put the main filter back into the case. Turn the main filter clockwise until it locks into place. Place the foam filter on the bottom of the main filter. Put the main filter back into the case. Turn the main filter clockwise until it locks into place. Place the coarse outer filter on the main filter and align the unlock symbol with the arrow symbol on the coarse filter. Turn the coarse outer filter clockwise until it snaps and locks into place. Return the filter unit back to the dirt tank. Place the dirt container back into the appliance body.
natural_image
Technical illustration of a mechanical component with three views: top view, side view, and bottom view (no text or symbols)58
CP3000
CP3000
59
EN
concept
concept
EN
TROUBLESHOOTING
Function problems sometimes may seem serious, but they can often be easily solved. With a help of this table, you are able to solve some of the problems that may occur. Any further maintenance should be performed by an authorized service centre.
| Problem | Cause | Solution |
| Appliance has no power. | Appliance is not properly connected to the mains or it is not switched on. | Connect the power cord into the mains and switch the appliance on. |
| The electrical socket is faulty. | Check the socket by unplugging the steam cleaner and plugging it into a different electrical socket. | |
| Vacuum feature does not function. | Dirt tank is full. Empty the dirt tank. | |
| Dirt has clogged the inlet. Remove | Dirt from the inlet. | |
| Filter needs cleaning. | See "Filter Maintenance" section. Contact the Authorised Concept Service Centre. | |
| Verylowornosteam isemittedwhenthe steamcleanerison. | Water tank is empty. Make sure that | the water tank is filled. |
| Trigger has not been pressed properly. | Press the trigger and activate the pump. | |
| Trigger has not been selected. | Make sure that the steam feature is selected. | |
| Steam ready indicator does not shine. | Wait for indicator to light up. If it does not turn on after 1 minute. Contact Authorized Concept Service Centre. | |
| Hard Water Filter needs changing. | See "Changing the Hard Water Filter". | |
| Steam cleaner still does not operate properly. | Check all the above points. | Contact Authorized Concept Service Centre. |
PURCHASABLE ACCESSORIES
All accessories and spare parts can be purchased separately.
When ordering, please provide the model number of your appliance, indicated on the nameplate on the bottom of the product.
SERVICE
Maintenance of a more extensive nature or repair, which requires interference with the internal parts of the product, must be performed by a professional service.
ENVIRONMENTAL PROTECTION
- Recycle packaging materials and old appliances rather than throwing them away.
• The appliance box may be disposed of at a sorted waste collection point.
• Deliver polyethylene (PE) plastic bags to a waste collection facility for recycling.
Recycling the product at the end of its service life
Asymbolontheproductoritspackagingindicatesthatthisproductshouldnotbedisposed of as household waste. It must be taken to a collection point authorised for recycling electric and electronic equipment. By making sure this product is disposed of properly, youwillhelppreventnegativeeffectsontheenvironmentandhumanhealth thatwould otherwise result from inappropriate disposal of this product. You can learn more about recycling this product from your local authorities, a household waste disposal service, or inthestorewhereyoupurchasedthisproduct.

This product meets all the basic EU regulation requirements that relate to it.
Changes to the text, design and technical specifications may occur without prior notice and we reserve the right to make these changes.
60
CP3000
CP3000
61
concept
concept
DANKSAGUNG
66
CP3000
CP3000
67
DE
concept
concept
DE
BedienungdesDampfreinigers
natural_image
Mechanical assembly diagram showing two steps of a component being assembled (no text or symbols present)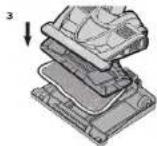
MODE D'EMPLOI
Assemblage
natural_image
Mechanical assembly diagram showing two stages of a component, one with downward arrows and the other with an upward arrow (no text or symbols)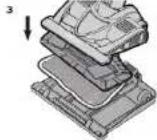
NETTOYAGE ET ENTRETIEN
Entretien
86
CP3000
CP3000
87
IT
concept
concept
it
Gestionedelpulitoreavapore
natural_image
Exploded view diagram of a mechanical component showing top, front, and side views (no text or labels)88
CP3000
CP3000
89
IT
concept
concept
IT
SOLUZIONE DEI PROBLEMI
MANUAL DE USO
ARMADO
96
CP3000
CP3000
97
ES
concept
concept
ES
Controldelafregonadevapor
INSTRUCTIUNI DE UTILIZARE
Asamblare
106
CP3000
CP3000
107
RO
concept
concept
RO
UTILIZAREA MOPULUI CU ABUR
natural_image
Mechanical assembly diagram showing two stages of a component with arrows indicating direction (no text or symbols)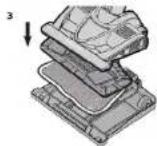
UTILIZARE ŞI ÎNTREȚINERE
Întreținerea
CONCEPT POLSKA sp. z o.o.
The manufacturer (or importer) is responsible for ensuring the product complies with the requirements of applicable legal regulations as well as those of the relevant technical standards. Moreover, they are responsible for ensuring the product has the properties the manufacturer described in documents related to the goods or those reasonably expected by the customer with regard to the nature of the goods or based on advertising produced by the manufacturer, and further they are responsible for ensuring the product is fit for the purpose proposed by the manufacturer or that a product of the same type is normally used for.
The quality warranty term is 24 months from product takeover by the customer.
The warranty does not apply to wear and tear caused by regular use. The customer shall not be entitled to any warranty claims if, prior to taking the product over, they knew the product contained a defect or if the defect is attributable to the customer.
The warranty specifically does not apply:
- if the product installation, operation and service conditions stipulated in the product operating manual have not been adhered to,
• to malfunctions caused due to mechanical, heat or chemical damage, short circuit, over voltage or incorrect installation,
• to malfunctions caused by an inexpert third-party intervention,
• to malfunctions caused by natural disaster, - to malfunctions caused by insufficient or inappropriate maintenance in violation of the operating manual, including malfunctions caused by water and other sediments,
• to changes in colour of the heating surface or to scratching of the surface caused as a result of using the products in an unusual manner,
• to appearance and functional changes caused by exposure to sunlight, thermal radiation of water and other sediments, - if the service life of certain product parts expires, e.g. for accumulators, bulbs, etc.
The warranty does not apply to any products and services provided along with the product (gifts, promotional articles, etc.).
Filing a complaint
A complaint against a product defect must be filed as soon as identified, yet no later than before the end of the warranty term.
The customer must file a product complaint with the dealer from which they have purchased the product, or with any authorised service centre, a list of which is included in the product package, or available at www.my-concept.com.
While filing a product complaint, the product must be duly cleaned and securely packed so as to prevent any damage during its transport to an authorised service centre, where relevant, unless the product is delivered in person.
The customer must submit proof of having concluded a purchase contract for the product by producing the receipt.
While filing their complaint, the customer must indicate the noted defect and identify the preferred complaint application method.
Complaints processing
As long as the noted defect may be removed, the user has the right to have the defect duly removed free of charge on a timely basis.
Where such a procedure is not reasonable with regard to the nature of the defect, the user may require to be supplied a new defect-free product (replacement), or, where the defect applies to a part of the product only, replacement of the part concerned. However, if replacement of the product or any part thereof is not proportionate with regard to the nature of the defect, especially if the defect can be removed without undue delay, the customer has the right to have the defect removed free of charge.
If the noted defect is not removable, or if the customer becomes entitled to replacement of the product or a part thereof, yet the replacement is not possible, for example due to the product having been sold out, the customer has the right to return the product (withdrawal from the contract).
The customer shall have the right to a new product (replacement) or to replacement of a part of the product even if the defect can be removed, provided they cannot properly use the product due to repeated occurrence of the defect or due to a high number of such defects. In such a case, the customer also has the right to return the product (by withdrawing from the contract).
If the product is not returned (the customer does not withdraw from the contract), or if the customer does not apply the right to a new defect-free product (replacement), to replacement of a part thereof or to repair of the product, they may request a reasonable discount. The customer also has a right to a reasonable discount if a new defect-free product cannot be supplied to them, or if a product part cannot be replaced or the product repaired unless the situation is remedied within a reasonable time limit, or if remedying the situation would create major discomfort on the part of the customer.
The seller, authorised service centre or a staff member authorised by them must decide about each complaint immediately or within three business days in complicated cases. This term does not include a reasonable period of time, depending on the type of product concerned,
required for the defect to be assessed by an expert. A complaint, including defect removal, must be dealt with without any undue delay, yet no later than within 30 calendar days of the complaint filing date, unless the seller and the customer agree on a later deadline.
On returning the product (withdrawing from the contract) the customer must return any accessories and documents supplied along with the product.
The customer does not have the right to keep the defective parts and components of the product replaced as part of a repair of the product.
This shall be without prejudice to any other rights the customer may have in relation to the purchase of the product.
Remark: Complaints against products damaged in transport are governed by the carrier's complaints procedure.
Manufacturer
Jindrich Valenta - Concept
Company ID No. 13216660
email: servis@my-concept.cz
www: www.my-concept.com
Product data
| Model: | |
| Production number: | |
| Date of purchase: Seal and signature of vendor: | |

CP3C
concept concept
DE
GARANTIEBEDINGUNGEN
Garantie
CONDITIONS DE GARANTIE
Garantie
Jindřich Valenta – Concept Czech Republic
Vysokomýtská 1800, 565 01 Choceň
Tel. +420 465 322 895, Fax: +420 465 473 304
www.my-concept.cz
SK
ELKO Valenta – Slovakia, s.r.o.
Hurbanova 1563/23, 911 01 Trenčín
Tel.: +421 326 583 465, Fax: +421 326 583 466
www.my-concept.sk
PL
CONCEPT POLSKA Sp. z o.o.
- concept
- PODĚKOVÁNÍ
- NÁVOD K OBSLUZE
- Sestavení
- ŘEŠENÍ POTÍŽÍ
- ČISTENIE A ÚDRŽBA
- Údržba
- NSTRUKCJA OBSŁUGI
- Montaż
- Obsługamopaparowego
- HASZNÁLATI ÚTMUTATÓ
- Összeállítás
- A gözmophasználata
- HIBAELHÁRÍTÁS
- LIETOŠANAS INSTRUKCIJA
- Montāža
- TİRİŞANA UN APKOPE
- Apkope
- TRAUCĚJUMU NOVĚRŠANA
- IMPORTANT SAFETY INSTRUCTIONS
- EN
- If you fail to follow the manufacturer's instructions, repairs cannot be recognized as a warranty.
- Household use only
- PRODUCT DESCRIPTION
- OPERATING INSTRUCTIONS
- Assembly
- Use
- SteamMop Operation
- USE & MAINTENANCE
- Maintenance
- Replacing the water filter
- Outlet Filter Maintenance
- Dirt tanks
- TROUBLESHOOTING
- PURCHASABLE ACCESSORIES
- SERVICE
- ENVIRONMENTAL PROTECTION
- Recycling the product at the end of its service life
- DANKSAGUNG
- BedienungdesDampfreinigers
- MODE D'EMPLOI
- Assemblage
- NETTOYAGE ET ENTRETIEN
- Entretien
- Gestionedelpulitoreavapore
- SOLUZIONE DEI PROBLEMI
- MANUAL DE USO
- ARMADO
- Controldelafregonadevapor
- INSTRUCTIUNI DE UTILIZARE
- Asamblare
- UTILIZAREA MOPULUI CU ABUR
- UTILIZARE ŞI ÎNTREȚINERE
- Întreținerea
- Filing a complaint
- Complaints processing
- Manufacturer
- concept concept
- GARANTIEBEDINGUNGEN
- Garantie
- CONDITIONS DE GARANTIE
- Jindřich Valenta – Concept Czech Republic
- SK
- ELKO Valenta – Slovakia, s.r.o.
- PL
- CONCEPT POLSKA Sp. z o.o.
Brand : Concept
Model : Perfect Clean CP3000
Category : Steam cleaner