
S500I - Integrated amplifier NAD - Free user manual and instructions
Find the device manual for free S500I NAD in PDF.
| Product type | CD player |
| Model | S500i |
| Brand | NAD |
| Unbalanced line output | RCA connectors left/right |
| Balanced line output | XLR connectors (pin 1: ground, 2: hot, 3: cold) |
| AES/EBU digital output | XLR connector |
| SPDIF digital output | 75-ohm coaxial connector (BNC) |
| NAD link (input/output) | Connectors for multi-unit remote control |
| Power supply | AC, detachable cord |
| Playback functions | Play, pause, stop, forward/backward skip, forward/backward scan, direct track selection via numeric keypad (remote) |
| Display | Track number, elapsed time, total time, remaining time |
| Remote control | Infrared, numeric keypad, Time/Display button |
| Remote control batteries | 2 AAA 1.5V batteries (UM-4 or IEC R03) |
| Disc compatibility | Audio CD, CD-3 (3 inches); not CD-V, CD-I, CD-ROM, Photo CD, DVD |
| Maintenance | Clean the drawer with a damp cloth; clean discs with a soft cloth, radial motion |
| Troubleshooting | Check power cord, disc orientation, disc cleanliness, audio connections, remote batteries |
| Dimensions | Not specified in the manual |
| Weight | Not specified in the manual |
Frequently Asked Questions - S500I NAD
User questions about S500I NAD
0 question about this device. Answer the ones you know or ask your own.
Ask a new question about this device
Download the instructions for your Integrated amplifier in PDF format for free! Find your manual S500I - NAD and take your electronic device back in hand. On this page are published all the documents necessary for the use of your device. S500I by NAD.
USER MANUAL S500I NAD
Warning: To reduce the risk of fire or electric shock, do not expose this unit to rain or moisture.
The lightning flash with an arrowhead symbol within an equilateral triangle, is intended to alert the user to the presence of uninsulated "dangerous voltage" within the product's enclosure that may be of sufficient magnitude to constitute a risk of electric shock to persons.

The exclamation point within an equilateral triangle is intended to alert the user to the presence of important operating and maintenance (servicing) instructions in the literature accompanying the product.

Do not place this unit on an unstable cart, stand or tripod, bracket or table. The unit may fall, causing serious injury to a child or adult and serious damage to the unit. Use only with a cart, stand, tripod, bracket or table recommended by the manufacturer or sold with the unit. Any mounting of the device on a wall or ceiling should follow the manufacturer's instructions and should use a mounting accessory recommended by the manufacturer.
An appliance and cart combination should be moved with care. Quick stops, excessive force and uneven surfaces may cause the appliance and cart combination to overturn.
Read and follow all the safety and operating instructions before connecting or using this unit. Retain this notice and the owner's manual for future reference.
All warnings on the unit and in its operating instructions should be adhered to.
Do not use this unit near water; for example, near a bath tub, washbowl, kitchen sink, laundry tub, in a wet basement or near a swimming pool.
The unit should be installed so that its location or position does not interfere with its proper ventilation. For example, it should not be situated on a bed, sofa, rug or similar surface that may block the ventilation openings; or placed in a built-in installation, such as a bookcase or cabinet, that may impede the flow of air through its ventilation openings.
The unit should be situated from heat sources such as radiators, heat registers, stoves or other devices (including amplifiers) that produce heat.
The unit should be connected to a power supply outlet only of the voltage and frequency marked on its rear panel.
The power supply cord should be routed so that it is not likely to be walked on or pinched, especially near the plug, convenience receptacles, or where the cord exits from the unit.
Unplug the unit from the wall outlet before cleaning. Never use benzine, thinner or other solvents for cleaning. Use only a soft damp cloth.
The power supply cord of the unit should be unplugged from the wall outlet when it is to be unused for a long period of time.
Care should be taken so that objects do not fall, and liquids are not spilled into the enclosure through any openings.
This unit should be serviced by qualified service personnel when:
A. The power cord or the plug has been damaged; or
B. Objects have fallen, or liquid has been spilled into the unit; or
C. The unit has been exposed to rain or liquids of any kind; or
D. The unit does not appear to operate normally or exhibits a marked change in performance; or
E. The device has been dropped or the enclosure damaged.
DO NOT ATTEMPT SERVICING OF THIS UNIT YOURSELF. REFER SERVICING TO QUALIFIED SERVICE PERSONNEL
Upon completion of any servicing or repairs, request the service shop's assurance that only Factory Authorized Replacement Parts with the same characteristics as the original parts have been used, and that the routine safety checks have been performed to guarantee that the equipment is in safe operating condition. REPLACEMENT WITH UNAUTHORIZED PARTS MAY RESULT IN FIRE, ELECTRIC SHOCK OR OTHER HAZARDS.
ATTENTION
POUR EVITER LES CHOC ELECTRIQUES, INTRODUIRE LA LAME LA PLUS LARGE DE LA FICHE DANS LA BORNE CORRESPONDANTE DE LA PRISE ET POUSSER JUSQU'AU FOND.
CAUTION
TO PREVENT ELECTRIC SHOCK, MATCH WIDE BLADE OF PLUG TO WIDE SLOT FULLY INSERT.
If an indoor antenna is used (either built into the set or installed separately), never allow any part of the antenna to touch the metal parts of other electrical appliances such as a lamp, TV set etc.
CAUTION
POWER LINES
Any outdoor antenna must be located away from all power lines.
OUTDOOR ANTENNA GROUNDING
If an outside antenna is connected to your tuner or tuner-preamplifier, be sure the antenna system is grounded so as to provide some protection against voltage surges and built-up static charges. Article 810 of the National Electrical Code, ANSI/NFPA No. 70-1984, provides information with respect to proper grounding of the mast and supporting structure, grounding of the lead-in wire to an antenna discharge unit, size of grounding conductors, location of antenna discharge unit, connection to grounding electrodes and requirements for the grounding electrode.
a. Use No. 10 AWG (5.3mm2) copper, No. 8 AWG (8.4mm2) aluminium, No. 17 AWG (1.0mm2) copper-clad steel or bronze wire, or larger, as a ground wire.
b. Secure antenna lead-in and ground wires to house with stand-off insulators spaced from 4-6 feet (1.22 - 1.83 m) apart.
c. Mount antenna discharge unit as close as possible to where lead-in enters house.
d. Use jumper wire not smaller than No.6 AWG (13.3mm2) copper, or the equivalent, when a separate antenna-grounding electrode is used. See NEC Section 810-21 (j).
EXAMPLE OF ANTENNA GROUNDING AS PER NATIONAL ELECTRICAL CODE INSTRUCTIONS CONTAINED IN ARTICLE 810 - RADIO AND TELEVISION EQUIPMENT.
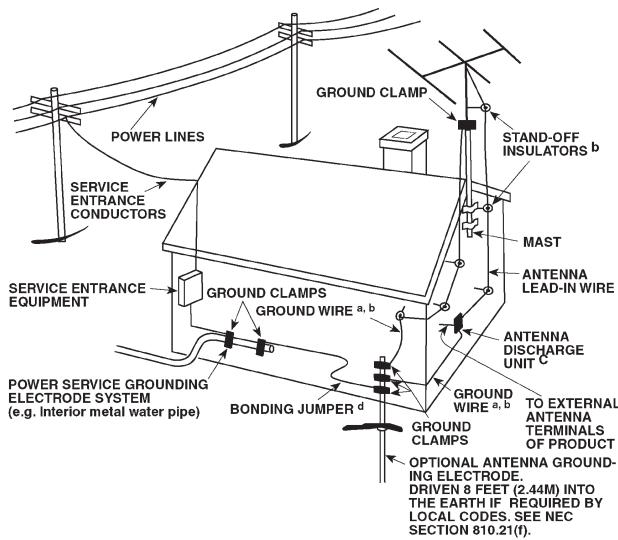
NOTE TO CATV SYSTEM INSTALLER: This reminder is provided to call the CATV system installer's attention to Article 820-40 of the National Electrical Code that provides guidelines for proper grounding and, in particular, specifies that the ground cable ground shall be connected to the grounding system of the building, as close to the point of cable entry as practical.
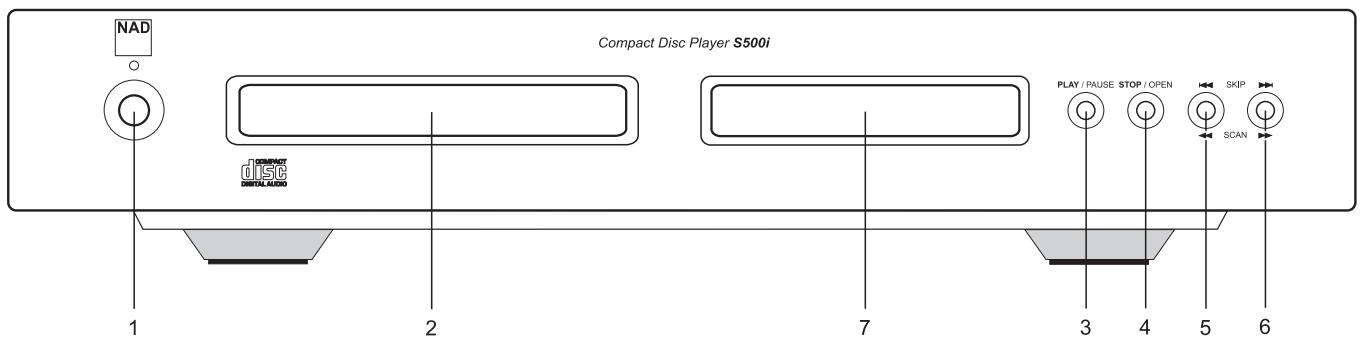
FRONT PANEL CONTROLS
THIS DIGITAL APPARATUS DOES NOT EXCEED THE CLASS B LIMITS FOR RADIO NOISE EMISSIONS FROM DIGITAL APPARATUS AS SET OUT IN THE RADIO INTERFERENCE REGULATIONS OF THE CANADIAN DEPARTMENT OF COMMUNICATIONS.
LE PRESENT APPAREIL NUMVERIQUE N'EMET PAS DE BRUIS RADIOELECTRIQUES DEPASSANT LES LIMITES APPLICABLES AUX APPAREILS NUMERIQUES DE LA CLASSE B PRESCRITES DANS LE REGLEMENT SUR LE BROUILLAGE RADIO ELECTRIQUE EDICTE PAR LE MINISTERE DES COMMUNICATIONS DU CANADA.
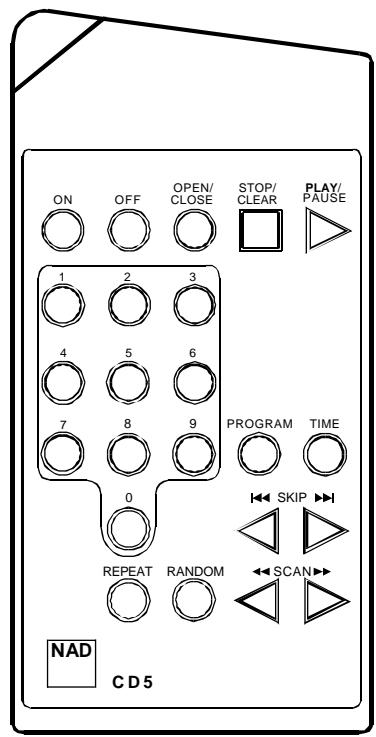
REMOTE CONTROL
A NOTE ON INSTALLATION
Install the Compact Disc player on a level, vibration-free surface. Severe vibration, or operation in a tilted position, may cause the player to mis-track. The player may be stacked with other stereo components, as long as there is adequate ventilation around it. If the player is placed in close proximity to a radio tuner (AM or FM), a VCR, or a television set, the operation of its digital circuits may produce interference that would affect reception of weak broadcast signals. If this occurs, move the CD player away from other devices or switch it off when viewing or listening to broadcasts.
PLAYING COMPACT DISCS A SIMPLE APPROACH
1 Connect a stereo cable from the L (left) and R (right) Line Output jacks to the corresponding CD inputs on your amplifier.
2 Connect the detachable AC power cord to the rear panel.
3 Plug the AC power cord into a wall outlet.
4 Press the POWER button to turn on the player.
5 Press the STOP/OPEN button to open the disc drawer.
6 Place a CD, label side up, in the tray's circular recess. Be certain that the disc is centered within the recess.
7 Press PLAY/PAUSE. The drawer closes automatically, and the disc begins to play.
8 At any time you may press SKIP or to select different tracks on the disc.
9 Press PLAY/PAUSE if you want to stop play temporarily while keeping the pickup at its current position on the disc. (Press PLAY/PAUSE again when you want to resume playback.) Press STOP/OPEN once if you want to end play and re-set the pickup to the beginning of the disc, twice to open the drawer.
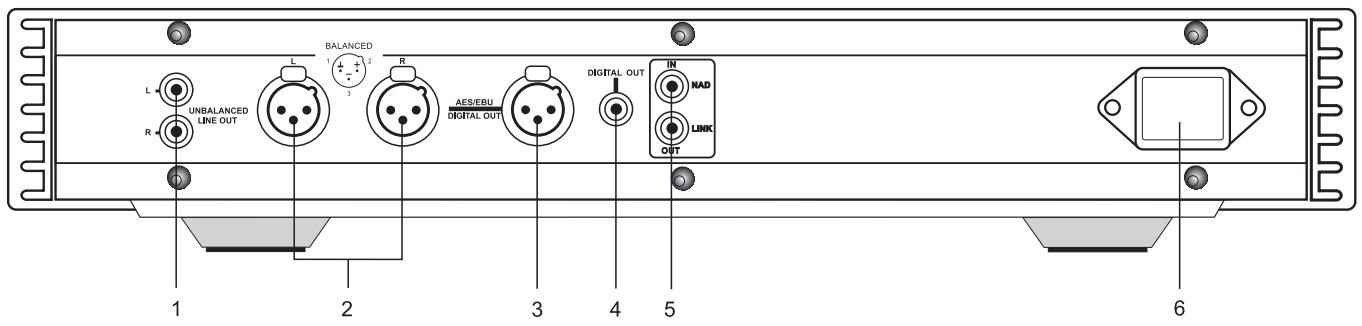
REAR PANEL CONNECTIONS
1. UNBALANCED LINE OUTPUT
Connect an RCA cable from these jacks to your amplifier. Plug one end of a stereo audio cable into the Left (upper) and Right (lower) output jacks. Connect the other end of the cable to your stereo amplifier's CD input, or to any other "line-level" input jacks (such as the AUXiliary inputs). Do NOT connect this cable to the amplifier's PHONO input jacks. Make sure that the plugs are pushed home properly.
2. BALANCED LINE OUTPUT
Connections to an amplifier or preamplifier that uses balanced XLR input connectors, such as NAD S300.
The wiring standard used for these connectors is:
Pin 1: Chassis Earth (GROUND)
Pin 2: Hot (+ OUT)
Pin 3: Signal Ground (- OUT)
THE BENEFITS OF BALANCED CONNECTIONS
With a conventional (unbalanced) connection, audio signal current flows from the CD player to the amplifier via the cable's centre conductor. To complete the circuit, audio signal current flows back to the CD player ground via the cable's outer conductor. The outer conductor also serves as the cable's shield.
When two audio components are connected together, power-supply noise and "leakage" hum may also flow on the cable shields, combining with the return audio current. The resulting distortion and noise may depend on the orientation of AC power plugs in their sockets. Designers of some audiophile cables combat this contamination by leaving the shield unconnected at one end. Since the shield is grounded at only one end, the performance of such a cable may depend on the direction of its connection, i.e. whether the shield is grounded at the CD player or at the amplifier.
A three-wire balanced connection avoids all of these uncertainties. The signal "hot" and return currents are both carried on inner conductors. The separate cable shield, connected to the amplifier chassis at both ends, protects the audio signal from all forms of interference and power-supply noise.
3. AES/EBU DIGITAL OUTPUT (BALANCED)
This is a professional standard digital output. The signal is available from the XLR/Cannon connector marked AES/EBU DIGITAL OUT, permitting the ultimate in high quality digital transmission with the best associated equipment.
The serial data output is taken after error correction but before digital-to-analog conversion and filtering. The output is transformer-isolated from the built-in D-to-A circuits.
4. DIGITAL OUTPUT
The digital playback signal is available at this output also.[BH2] It may be connected to any digital signal processor that conforms to the Sony/Philips (SPDIF) standard.
To use the digital output, connect a cable from this jack to the "CD digital" or equivalent input on a digital processor. For best results the cable should be a 75-ohm coaxial cable of the type used for video signals, with a BNC connection at each end.
5. NAD LINK IN/OUT
The NAD Link OUT connector allows remote-control commands to be relayed from this player to other products equipped with an NAD-Link (or compatible) input. To use this option, connect a cable from the NAD Link OUT socket to the NAD Link IN jack on another product.
The NAD Link IN connector allows this player to be operated by external control signals from a multi-room controller or remote relay system. Connect a cable from the controller (or from the NAD Link OUT jack on another NAD product) to the NAD Link IN jack on this CD player. Using both IN and OUT connections, remote control commands can be "daisy-chained" from one product to the next.
6. IEC AC MAINS (POWER) INPUT
The S500i comes supplied with a separate AC Mains cable. Before connecting the cable to a live wall socket ensure that it is firmly connected to the NAD S500i's AC Mains input socket first. Always disconnect the AC Mains cable plug from the live wall socket first, before disconnecting the cable from the S500i Mains input socket.
FRONT PANEL CONTROLS
1. POWER ON/OFF
Press this button to switch on the power to the disc player. Press again and release to switch the power off. The display window lights up when power is ON, and "NO DISC" is shown if there is no disc in the drawer. The blue LED above the ON/OFF button lights up briefly when ON/OFF is activated, but it goes out again immediately.
The blue LED lights up permanently only to indicate the S500i is in stand-by mode if the unit is turned off from an NAD system remote control with STANDBY button. If this option is used, the S500i may be switched on again by pressing the STANDBY button of the system remote, or by pressing and releasing the ON/OFF button on the front of the S500i to switch it off, and then press it again to switch it on. Please note that the remote control which comes with the S500i does not feature a STANDBY button.
If the unit is not going to be used for some time, disconnect the plug from the AC socket.
2.DIS C DRAWER
To play a disc, press the STOP/OPT button to open the disc drawer. Place the CD within the large circular recess in the drawer, with its transparent surface facing down. The label must face UP.
CD-3 discs (3-inch CD "singles") can be played without the aid of an adapter. Place the disc in the drawer, centered in the smaller circular recess with its label facing UP.
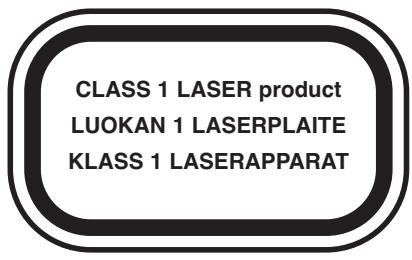
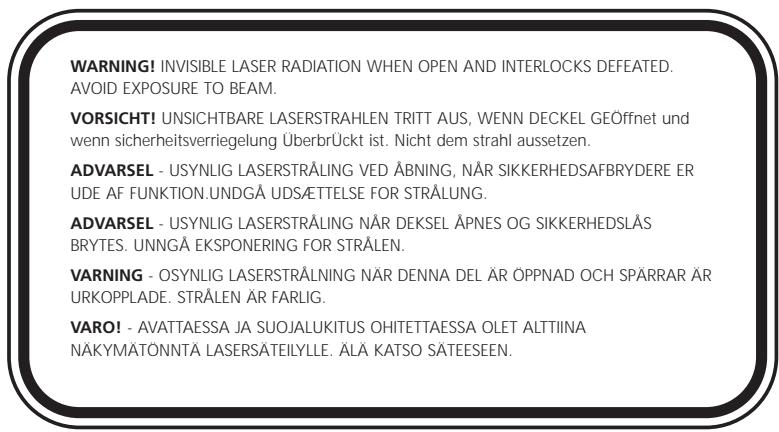
NOTE: This player was not designed to accommodate a "damping disc" placed on a CD, nor two CDs stacked together. It plays audio CDs, but not discs identified as CD-V, CD-I, CD-ROM, PHOTO CD, or DVD.
3. PLAY/PAUSE
This dual-function button alternates between starting and stopping playback. Press to start play or to resume play after pause. During play, press this button to stop playback temporarily, keeping the laser at its current position on the disc.
The play mode is identified by the word "PLAY" in the display. In the pause mode, the word "PAUSE" is displayed instead.
To resume playback at the exact point where it stopped, press PLAY/PAUSE again. If you don't want to resume play at the same point, you may use the SKIP controls to cue the pickup to a different starting point before pressing PLAY/PAUSE again.
4. STOP/OPEN
Press this button to open the disc drawer, and press it again to close the drawer. If this button is pressed once while a disc is being played, the playback will stop and the pickup will re-set to the beginning of the disc. A second press opens the drawer.
When the disc drawer is open, the drawer-closing mechanism can also be activated by pressing PLAY/PAUSE.
CAUTION: DO NOT try to close the drawer by pushing it in by hand, no matter if the player is ON or OFF. The disc drawer is opened and closed by an internal motor, which may be damaged if forced.
When the drawer closes, the player scans the disc's "table of contents" and displays the number of tracks and total playing time on the disc. If you press PLAY/PAUSE to close the drawer, this display is skipped, and play commences immediately at Track 1.
5. SKIP BACK & SCAN BACK
The and functions are combined in one SKIP/SCAN Back button. One press skips back to the beginning of the previous track. Press twice to skip back two tracks and so on.
If you try to SKIP Back past the first track on the disc, then "ERR" will appear in the display, then play the first track.
The SCAN Back function is activated by pressing the same button, but keeping it depressed for more than 2 seconds. This causes the laser to scan backwards continuously, first slowly, after a few seconds rapidly, until the button is released. This function works only while the player is in PLAY or PAUSE. After a STOP command, or after loading a new disc, you must press PLAY/PAUSE before the scan circuit will work.
If the scan is initiated while the player is in PAUSE, the scan is silent. If the scan is initiated during PLAY, the music will be heard in fragmentary form at reduced volume as the player scans through it. Use this "audible scan" to cue the player precisely to the spot where you want to resume play.
If you scan back to the beginning of the disc while playing Track 1, the player stops scanning and resumes PLAY or PAUSE when you let go of the button.
6. SKIP FORWARD & SCAN FORWARD
The and functions are combined in one SKIP/SCAN Forward button. During play, pressing SKIP Forward will jump the laser to the beginning of the next track and resume play there. Thus, to sample each song on a disc, press PLAY/PAUSE and then tap SKIP Forward after you've heard a few seconds of each track. If you try to SKIP Forward past the last track on the disc, then "ERR" will appear in the display, then play the last track.
The SCAN Forward function is activated by pressing the same button, but keeping it depressed for more than 2 seconds. This causes the laser to scan rapidly forward through the music. The behaviour of this function is similar to SCAN Back .
If you scan forward to the end of the disc while playing the final track, the scan will stop and the Time display will keep showing the final end time. (There is no "wrap-around" mode.) When you let go of the button, the player switches to STOP mode.
7. DISPLAY
The display provides information about playback status and about the laser pickup's location on the disc. The displayed track/time information is obtained by reading inaudible "sub-codes" in the disc.
TRACK NUMBER Each disc is segmented into numbered tracks when the record is made; typically each numbered track will correspond to a different song, symphonic movement, etc. These track numbers are identified on the CD package and are encoded in the disc by its manufacturer.
The letter "T" is displayed adjacent to the track number in the display. For example, Track 15 is shown "T15" in the display. In some CDs, at the manufacturer's option, tracks may be subdivided into sections identified by Index numbers. This player does not display Index numbers.
TIME Normally this display shows in minutes and seconds the time elapsed in the music since the beginning of the current track.
When you load a different disc and use the STOP/OPEN button to close the disc drawer, the display shows the number of tracks and the total playing time of all the tracks on the disc.
REMOTE RECEIVER An infrared sensor, located behind the display window, receives commands from the remote control. There must be a clear line-of-sight path from the remote control to this window. If this path is obstructed, the remote control may not work.
REMOTE CONTROL
An infrared remote control is provided with your S500i, enabling you to operate playback functions from the comfort of your chair or from virtually anywhere in the room.
For reliable operation there should be a clear line-of-sight path from the remote control to the front of the CD player. If the player does not respond to remote commands, it may be that this line-of-sight path is obstructed by clothing, paper or furnishings.
NUMERIC KEYPAD Most of the buttons on the remote control handset have the same effect as the corresponding buttons on the front panel of the disc player. In addition, the handset is equipped with a direct-entry numeric keypad, which causes the player to jump directly to the beginning of a numbered track and commence play. Thus to play Track 5, simply press 5. To play Track 15, press 1 first, then quickly press 5. To play Track 23, press 2 and 3.
TIME/DISPLAY
The TIME/DISPLAY button cycles the time display through three modes as follows:
TIME The elapsed time since the beginning of the current track, in minutes and seconds. (This is the "default" setting, selected automatically when the player is turned on.)
TOTAL TIME Total elapsed time since the beginning of the disc.
REMAIN (track number shows a blank) The total playing time that remains until the end of the disc.
Note that the TIME/DISPLAY function is available from the remote control only.
INSTALLING AND REPLACING BATTERIES
The remote control requires two 1.5-volt AAA-size (i.e. UM-4 or IEC RO3) cells. Alkaline cells are recommended to obtain maximum operating life.
To open the battery compartment, press down in the ribbed area on the back of the remote control unit. The cover of the battery compartment will slide down and off. Install fresh cells, orienting them as shown on the diagram within the compartment. The coil springs should contact the (-) end of each cell. Slide the battery compartment cover back on until it latches.
In some cases, poor operation may be caused by corrosion or fingerprint oil on the battery contacts. Remove both cells, rub the metal contacts at both ends of each cell with a clean cloth or a pencil eraser, and re-install the cells, being careful to orient them correctly.
MAINTENANCE
At periodic intervals, open the disc drawer and wipe with a damp cloth to remove any loose dust.
HANDLING COMPACT DISCS
Handle Compact Discs with care. The playback of a disc will not be impaired by small dust particles, a few light fingerprints, or slight scratches. But large scratches, or a thick layer of oily fingerprints, can prevent the player from tracking the disc. (Incidentally, although the tracking laser "plays" the disc through its clear side, the actual data surface is embedded directly beneath the label, protected only by a very thin coating of lacquer. So a scratch that cuts through the label may damage the disc more than a similar scratch on the transparent "playing" surface. You should treat both surfaces of the disc with care.)
Severe scratches or fingerprints may cause the player to mis-track (skipping ahead, or repeating the same passage). Less severe damage may produce very brief bursts of high-frequency noise. The tracking and error-correction circuits of this NAD CD player are unusually sophisticated, providing secure tracking of flawed discs that are unplayable on some other players. Nevertheless, the discs should not be abused or handled carelessly.
CLEANING DISCS
Soiled discs may be cleaned by wiping with a soft cloth, either dry or moistened with water. Do NOT use conventional LP record-cleaning products (cleaning solutions, sprays, treated cloths, or anti-static preparations), nor any kind of chemical solvent (alcohol, benzene, et al). A severely soiled disc may be washed in a warm-water spray, possibly with a small amount of a mild kitchen detergent added, and then wiped dry with a clean, soft towel.
When cleaning the disc, use only RADIAL strokes (from center to edge). Never use a circular wiping motion like that used for cleaning ordinary LP records, because in wiping the disc there is a risk of scratching it. A radial scratch will do the least harm because it affects only a small portion of each circular data track, which can be fully compensated by the player's error-correction circuits. But a circular scratch that follows a data track may damage such a long continuous segment of data that it cannot be corrected.
| TROUBLESHOOTING | ||
| Problem | Cause | Solution |
| NO POWER | • Power Mains cable unplugged or power not switched on | • Check if AC Mains cable is plugged in and power switched on |
| DISC PLAY DOES NOT START | • The disc is loaded upside down • The disc is too dirty | • Reload the disc with the label side UP • Clean the disc |
| NO SOUND | • Incorrect audio cable connections • Incorrect amplifier/receiver operation | • Connect the CD player to the amplifier/ receiver correctly • Make sure that the input selector on your amplifier or receiver is set correctly |
| SOUND SKIPS | • The CD player is subject to vibration or physical shock from external sources • Disc is dirty | • Change the installation location • Clean the disc |
| A “HUMMING “SOUND CAN BE HEARD | • Loose cable connections | • Check the cable connections, particularly the phono connecting cable |
| REMOTE CONTROL NOT WORKING | • Batteries flat, or incorrectly inserted • IR transmitter or receiver windows obstructed | • Check or replace batteries. • Remove obstruction |
1. "MARCHE/ARRÉT" [POWER ON/OFF]
NAD S500i Compact Disc Player
4. STOPP/ÖFFNEN (STOP/OPEN)
4. STOPP/ÖFFNEN (STOP/OPEN)
5. "NAD LINK IN/OUT"
6. IEC AC MAINS (POWER) INPUT INPUT (ALIMENTAZIONE) RETE C.A. IEC
1. "POWER ON/OFF" (ACCESO/SPENTO)
4. STOP/OPEN (ARRESTO/APERTURA)
FÖRDELARNA MED BALANSERAD SIGNALÖVERFÖRING
www.NADelectronics.com
©2002 NAD ELECTRONICS INTERNATIONAL A DIVISION OF LENBROOK INDUSTRIES LIMITED
- DO NOT ATTEMPT SERVICING OF THIS UNIT YOURSELF. REFER SERVICING TO QUALIFIED SERVICE PERSONNEL
- ATTENTION
- CAUTION
- POWER LINES
- OUTDOOR ANTENNA GROUNDING
- A NOTE ON INSTALLATION
- PLAYING COMPACT DISCS A SIMPLE APPROACH
- REAR PANEL CONNECTIONS
- UNBALANCED LINE OUTPUT
- BALANCED LINE OUTPUT
- THE BENEFITS OF BALANCED CONNECTIONS
- AES/EBU DIGITAL OUTPUT (BALANCED)
- DIGITAL OUTPUT
- NAD LINK IN/OUT
- IEC AC MAINS (POWER) INPUT
- FRONT PANEL CONTROLS
- POWER ON/OFF
- 2.DIS C DRAWER
- PLAY/PAUSE
- STOP/OPEN
- SKIP BACK & SCAN BACK
- SKIP FORWARD & SCAN FORWARD
- DISPLAY
- REMOTE CONTROL
- TIME/DISPLAY
- INSTALLING AND REPLACING BATTERIES
- MAINTENANCE
- HANDLING COMPACT DISCS
- CLEANING DISCS
- "MARCHE/ARRÉT" [POWER ON/OFF]
- NAD S500i Compact Disc Player
- STOPP/ÖFFNEN (STOP/OPEN)
- "NAD LINK IN/OUT"
- IEC AC MAINS (POWER) INPUT INPUT (ALIMENTAZIONE) RETE C.A. IEC
- "POWER ON/OFF" (ACCESO/SPENTO)
- STOP/OPEN (ARRESTO/APERTURA)
- FÖRDELARNA MED BALANSERAD SIGNALÖVERFÖRING
Brand : NAD
Model : S500I
Category : Integrated amplifier