
515 - Audio Amplifier NAD - Free user manual and instructions
Find the device manual for free 515 NAD in PDF.


| Product Type | Audio CD Changer |
| Brand | NAD |
| Model | 515 |
| Changer Capacity | 5 discs |
| Audio Outputs | Fixed Line Out, Digital Out |
| NAD Link | Input and output for remote control relay |
| Playback Functions | Normal, Shuffle, Repeat, Program (30 tracks) |
| EDIT Function | Optimization for cassette recording (Normal and Optimal) |
| Display | Display with time indications, disc/track number, status messages |
| Remote Control | Wired (included) with full control buttons |
| Power Supply | 230 V AC, 50 Hz (check rating plate) |
| Power Consumption | Not specified |
| Dimensions (W x H x D) | Not specified |
| Weight | Not specified |
| Maintenance | Clean with a soft, dry cloth; do not use abrasive products |
| Disc Cleaning | Wipe from center to edge with a lint-free cloth |
| Safety | Do not open the casing; refer all repairs to a professional |
| Recycling | Follow local regulations for packaging, batteries, and used appliance |
| Warranty | Voids if unauthorized opening or repair |
Frequently Asked Questions - 515 NAD
User questions about 515 NAD
0 question about this device. Answer the ones you know or ask your own.
Ask a new question about this device
Download the instructions for your Audio Amplifier in PDF format for free! Find your manual 515 - NAD and take your electronic device back in hand. On this page are published all the documents necessary for the use of your device. 515 by NAD.
USER MANUAL 515 NAD
WARNING: TO PREVENT FIRE OR ELECTRIC SHOCK, DO NOT EXPOSE THIS APPLIANCE TO RAIN OR MOISTURE
Note to CATV system installer: This reminder is provided to call the CATV installer's attention to Article 820-40 of the NEC, which provides guidelines for proper grounding and, in particular, specifies that the cable should be connected to the grounding system of the building, as close to the point of cable entry as practical.
THIS DIGITAL APPARATUS DOES NOT EXCEED THE CLASS B LIMITS FOR RADIO NOISE EMISSIONS FROM DIGITAL APPARATUS AS SET OUT IN THE RADIO INTERFERENCE REGULATIONS OF THE CANADIAN DEPARTMENT OF COMMUNICATIONS.
LE PRESENT APPAREIL NUMVERIQUE N'EMET PAS DE BRUITS RADIOELECTRIQUES DEPASSANT LES LIMITES APPLICABLES AUX APPAREILS NUMERIQUES DE LA CLASSE B PRESCRITES DANS LE REGLEMENT SUR LE BROUILLAGE RADIO ELECTRIQUE EDICTE PAR LE MINISTERE DES COMMUNICATIONS DU CANADA.
CAUTION: TO PREVENT ELECTRIC SHOCK, MATCH WIDE BLADE OF PLUG TO WIDE SLOT, FULLY INSERT.
ATTENTION: POUR EVITER LES CHOCS ELECTRIQUES INTRODUIRE LA LAME LA PLUS LARGE DE LA FICHE DANS LA BORNE CORRESPONDANTE DE LA PRISE ET POUSSER JUSQU'AU FOND.
CLASS 1 LASER PRODUCT LUOKAN 1 LASERPLAITE KLASS 1 LASERAPPARAT

WARNING! INVISIBLE LASER RADIATION WHEN OPEN AND INTERLOCKS DEFEATED. AVOID EXPOSURE TO BEAM.
The lightning flash with arrowhead, within an equilateral triangle is intended to alert the user of the presence of uninsulated "dangerous voltage" within the product's enclosure; that may be of sufficient magnitude to constitute a risk of electric shock to persons.
The exclamation point within an equilateral triangle is intended to alert the user of the presence of important operating and maintenance (servicing) instructions in the literature accompanying the appliance
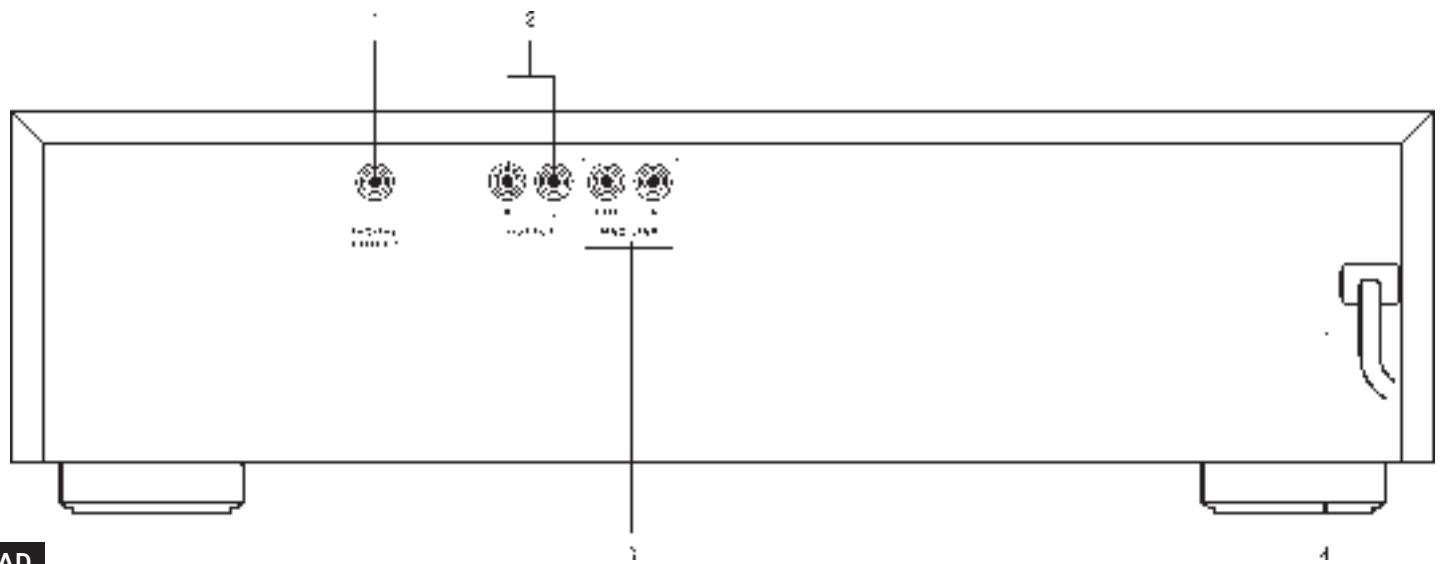
REAR PANEL CONNECTIONS (Figure 1.)
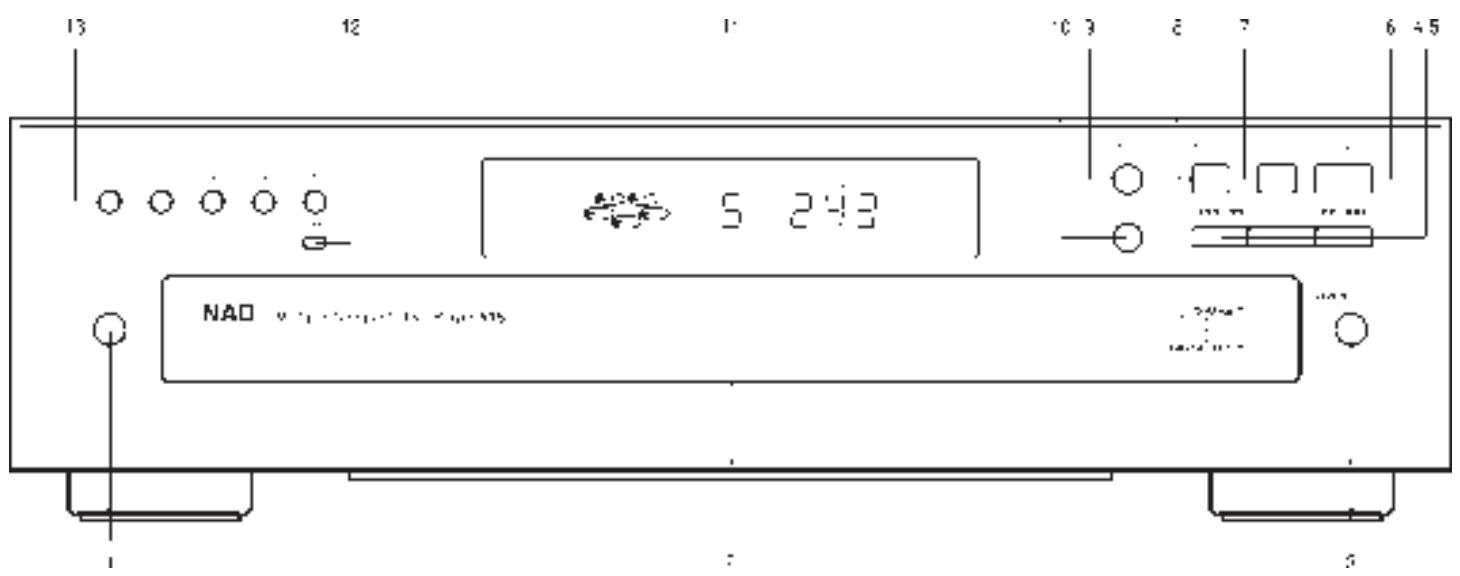
FRONT PANEL CONTROLS (Figure 2.)
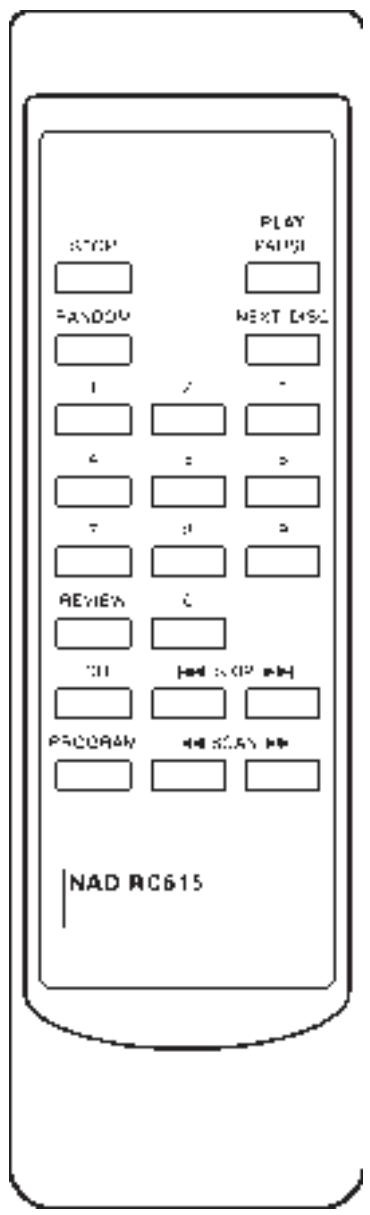
REMOTE CONTROL (Figure 3.)
Power supply setting
Siting the Compact Disc Changer
Connections
FUNCTIONAL OVERVIEW
Front of changer
Remote control
Display
PLAYBACK
Inserting CDs
Normal playback
Selecting another track during play
Selecting another CD during play
Searching for a passage during play
Starting with a particular CD
Starting with a particular track
Scanning CDs
Playing in random order
Calling up other information on the display
Repeating play
PROGRAMMING
Storing a programme
Checking the programme
Playing the programme
Erasing a programme
EDIT
Before recording
Recording
ADDITIONAL INFORMATION
Maintenance
Recycling
TROUBLESHOOTING
INTRODUCTION
Thank you for selecting the NAD 515 Compact Disc Changer.
The NAD 515 combines supreme playback quality with a high degree of user-friendliness by offering the following possibilities:
– changing CDs during play;
- quick access to a particular CD by means of QUICK PLAY;
- storing 30 tracks from different CDs in any desired order in the changer memory;
- storing the required recording time and playing time in the EDIT mode.
INSTALLATION
4 POWER SUPPLY SETTING
- Check that the type plate on the rear of your changer indicates the correct supply voltage.
- If your mains supply voltage is different, consult your dealer or our Service Organisation.
SITING THE COMPACT DISC CHANGER
Free standing
- Always position the changer horizontally on a flat, firm surface.
- Allow a free space of at least 3 cm above the changer so as not to interfere with the cooling of the changer.
Stacked
- Site the changer preferably at the bottom or at the top.
- Never position the changer directly on top of a high-power amplifier, as such an amplifier gives off a substantial amount of heat.
FITTING A MAINS PLUG (U.K. only)
This apparatus is fitted with an approved moulded 13 Amp plug.
To change a fuse in this type of plug proceed as follows:
- Remove fuse cover and fuse.
- Fix new fuse which should be a BS1362 5A, A.S.T.A. or BSI approved type.
- Refit the fuse cover.
If the fitted plug is not suitable for your socket outlets, it should be cut off and an appropriate plug fitted in its place.
If the mains plug contains a fuse, this should have a value of 5A. If a plug without a fuse is used, the fuse at the distribution board should not be greater than 5A.
NOTE The severed plug must be disposed to avoid a possible shock hazard should it be inserted into a 13A socket elsewhere.
HOW TO CONNECT A PLUG
The wires in the mains lead are coloured in accordance with the following code:
BLUE – “NEUTRAL” (“N”) and BROWN – “LIVE” (“L”).
As these colours may not correspond with the colour markings identifying the terminals in your plug, proceed as follows:
- The BLUE wire must be connected to the terminal which is marked with the letter "N" or coloured BLACK.
- The BROWN wire must be connected to the terminal which is marked with the letter “L” or coloured RED.
- Do not connect either wires to the earth terminal in the plug which is marked by the letter “E” or by the safety earth symbol or coloured green or green-and-yellow.
Before replacing the plug cover, make certain that the cordgrip is clamped over the sheath of the lead – not simply over the two wire
REAR PANEL CONNECTIONS
1. DIGITAL OUT
This output supplies a digital signal and can therefore only be connected to an input which is suitable for this signal. Use a phono lead for this connection.
Never connect this socket to a non-digital input of an amplifier, such as AUX, CD, TAPE, PHONO etc!
2. FIXED LINE OUT
For connecting a cable to the amplifier.
- Insert a red plug into the 'R' socket and the other plug into the 'L' socket.
- Insert the two other plugs into the corresponding sockets of the CD or AUX input of your amplifier.
You can also use the TUNER or TAPE IN connection, but never the PHONO input!
The NAD Link OUT connector allows remote-control commands to be relayed from this player to other products equipped with a NAD-Link (or compatible) input. To use this option, connect a cable from the NAD Link OUT socket to the NAD Link IN jack on another product.
3. NAD LINK IN/OUT
The NAD Link IN connector allows this player to be operated by external control signals from a multi-room controller or remote relay system. Connect a cable from the controller to the NAD Link IN jack. Using both IN and OUT connections, remote control commands can be “daisy-chained” from one product to the next.
4. AC LINE CORD
FRONT PANEL CONTROLS - FUNCTIONAL OVERVIEW
1. POWER ON/OFF
Switching on and off.
2. DISC CAROUSEL DRAWER
3. OPEN/CLOSE
Opening and closing the CD compartment.
4 - 5 ◀◀ ▶◀
– Selecting another track during play.
– Selecting a track to start play with.
– Selecting tracks when compiling a programme.
– Fast search to a particular passage during play.
- Selecting the recording mode when making a tape recording.
- Selecting the recording time when making a tape recording.
6. PLAY
- Starting play.
- Returning to the beginning of a track.
7. STOP
- Stopping play.
– Erasing a programme.
8. SHUFFLE
Playing in random order.
9. PAUSE
Interrupting play.
10. REPEAT
Repeating play.
11. DISPLAY
Informs you about the functioning of the player.
12. TIME
Selecting the information you want to see on the display.
13. DISC
– Selecting another CD during play.
– Selecting a CD to start play with.
- Selecting CDs when compiling a programme.
14. QUICK PLAY
Immediate playing of a particular CD.
15. LOAD
Rotating the turntable in the CD compartment when inserting CDs.
- Selecting CDs when compiling a programme.
REMOTE CONTROL
1. STOP
- Stopping play.
– Erasing a programme.
2. SHUFFLE
Playing in random order.
3. 1-10 DIGIT KEYS
– Selecting another track during play.
GB
– Selecting a track to start play with.
– Fast search to a particular passage during play.
- Selecting the recording mode when making a tape recording.
- Selecting the recording time when making a tape recording.
4. REVIEW
Checking a programme.
5. EDIT
Activates the EDIT function when making a tape recording which determines program playing time to suit selected tape length.
6. PROGRAM
Opening the memory when compiling a programme.
7. PLAY/PAUSE
- Starting play (PLAY).
- Interrupting play (PAUSE).
8. NEXT DISC
– Selecting another CD during play.
– Selecting a CD to start play with.
- Selecting CDs when compiling a programme.
9. SKIP
– Selecting another track during play.
– Selecting a track to start play with.
- Selecting tracks when compiling a programme.
- Selecting the recording mode when making a tape recording.
- Selecting the recording time when making a tape recording.
10. ◀ SCAN ▶
Fast search to a particular passage during play.
The life of the batteries of the remote control is around one year. For replacement only use batteries of the type RO3, UM4 or AAA.
FUNCTIONAL OVERVIEW
DISPLAY
(10) – Lights up when the changer receives a command from the remote control.
1 - 5 CD NUMBER INDICATOR
– Lights up when you switch the changer on.
– Indicates the number of CDs in the CD compartment.
- Indicates what CD is being played (CD number flashes).
PROGRAM
- Flashes when a programme is being compiled.
– Lights up when a programme is being played.
TRACK
- Indicates what track is being played;
- Indicates the number of tracks on a CD or in a programme.
TRACK TIME
- Indicates the elapsed playing time of the track being played.
REM(aining) TRACK TIME – Indicates the remaining playing time of the track being played.
TOT(al) REM(aining) TIME – Indicates the remaining playing time of a CD.
TOT(al) TIME – Indicates the total playing time of a CD.
SHUFFLE – Lights up when the tracks are played in random order.
PAUSE – Lights up when play is interrupted.
REPEAT 1 – Lights up when you repeat a track.
REPEAT DISC – Lights up when you repeat a CD.
REPEAT – Lights up when you repeat all CDs or a programme from them.
Display messages:
READ – Lights up when a CD's contents list is being scanned.
NO DISC– Lights up when there are no CDs in the CD compartment. NO AUDIO DISC– Lights up when insert a non audio CD (CD-ROM, CD-I or CDV).
WRONG TRACK—Lights up when you select a non-existent track number.
WRONG DISC– Lights up when you select a non-existent CD number.
SELECT DISC—Lights up when you try to activate a function for which you must first select a CD number.
INSERT DISC- Lights up when you give a play command while the CD compartment is empty.
GO TO PLAY – Lights up if you try to activate a function for which you must first start play.
GO TO STOP – Lights up if you try to activate a function for which you must first stop play.
EDIT – Lights up when the player is put into the EDIT mode.
PLAYBACK
INSERTING THE CDs
NOTE! Use only audio CDs; no CD-ROM, CD- I or CDV.
- Press POWER ON/OFF 1 to switch the changer on.
- The changer will now start CD detection to check how many CDs there are in the CD compartment. The turntable will rotate slowly until all positions (1 - 5) in the CD compartment have been checked.
- The position which is being checked is always shown on the display (DISC X).
- After CD detection the 1-5 CD number indicator will show the number of CDs in the CD compartment.
- Open the CD compartment by pressing OPEN (3).
- OPEN lights up.
- Insert the CDs, printed side up; use the LOAD button (15) to rotate the turntable in the CD compartment.
- Close the compartment by pressing OPEN (3).
- CLOSE lights up. The changer will start CD detection again.
NOTE!
- CD detection may never be interrupted. If, during detection, you press any button, then the changer will stop detection and the display will give an incorrect indication of the number of CDs in the CD compartment.
- Always remove all CDs from the CD compartment if you want to transport the changer.
NORMAL PLAYBACK (PLAY)
– The display shows the number of the current CD.
- Press PLAY (6) to start playback.
READ lights up and play starts from the first available CD.
- The CD number indicator (1-5) always shows what CD is being played (flashes).
- The track being played and its elapsed playing time are shown under TRACK and TRACK TIME.
See ‘CALLING UP INFORMATION ON THE DISPLAY’ if you wish to see other information on the display.
- Play will stop after all CDs have been played.
- Press POWER ON/OFF(1) to switch the changer off.
NOTE!
- You can also press PLAY (6) immediately after inserting the CDs; the compartment then closes automatically and play starts from the first available CD.
- Use the PREFERRED POSITION in the CD compartment if you wish to insert only one CD and then start play by pressing the QUICK PLAY button (14). Play will then start immediately with the inserted CD.
- You can interrupt playback by pressing PAUSE(9); PAUSE then lights up. Press PLAY or PAUSE to restart.
- If you press PLAY during play, the current track will start again from the beginning.
- You can stop playback by pressing STOP(7).
- If you press OPEN (3) during play, the CD compartment will open while play continues. The three CDs outside the changer may now be changed without playback being interrupted.
SELECTING ANOTHER TRACK DURING PLAY (◀◀ ▶▶)
- Press ◀◀ 4 or ▶▶ 5 for less than 0.5 seconds) until the desired track number appears under TRACK.
- The music stops and a moment later the selected track begins to play.
WRONG TRACK Lights up when you select a non-existent track number.
You can also select the number by using the 1-10 digit keys (3) on the remote control (numbers consisting of two figures must be keyed in within 2 seconds).
SELECTING ANOTHER CD DURING PLAY (DISC)
• Key in the desired CD number.
- The music stops and a moment later the selected CD begins to play.
WRONG DISC lights up if you select a non-existent number.
You can also select the number by using the NEXT DISC button 8 on the remote control.
SEARCHING FOR A PASSAGE DURING PLAY (◀◀ ▶▶)
- Hold ◀◀ (4) down to search backwards to the beginning.
- Hold ▶▶ (5) down to search forwards to the end.
The searching speed is determined by how long a key is pressed:
– the first 2 seconds fairly slowly, with sound;
– then at the maximum speed, with no sound.
If you reach the end of the last track and release
▶▶,play will resume a few seconds before the end of the CD.
STARTING WITH A PARTICULAR CD (DISC)
• Key in the required CD number.
- If the CD compartment was open, it will now close.
- Play starts from the selected CD.
WRONG DISC lights up if you select a non-existent number.
You can also select the number by using the NEXT DISC button 8 on the remote control.
STARTING WITH A PARTICULAR TRACK (DISC, ◀◀ ▶▶ and PLAY)
- First select the number of the required CD using DISC (13) or DISC (8) on the remote control.
- If the CD compartment was open, it will now close.
- Then select the (track) number by using ◀◀ (4) or ▶▶ (press less than 0.5 seconds).
- Press PLAY (6).
– Play starts from the selected track.
You can also select the track number by using the 1-10 digit keys (3) on the remote control (numbers consisting of two figures must be keyed in within 2 seconds).
WRONG TRACK Lights up when you select a non-existent track number.
WRONG DISC lights up if you select a non-existent number.
PLAYING IN RANDOM ORDER (SHUFFLE) All CDs:
- Press SHUFFLE 8 before or during play.
- If the CD compartment was open, it will now close.
- SHUFFLE lights up and all the tracks are now played in a random order.
- If you press ▶▶▶ (5), you will select any one of the following tracks.
- Press SHUFFLE again if you wish to return to normal play.
NOTE! If, during play, you open the CD compartment to change CDs (see 'NORMAL PLAYBACK') then playback in random order will be cancelled. Playback will stop as soon as the last track of the current CD has been played (in normal order).
One CD:
- The CD-player should be in position STOP.
- Select the number of the required CD using DISC (13) or NEXT DISC(8) (on the remote control).
- Press SHUFFLE (8), within the time the CD number is flashing on the display.
- DISC and SHUFFLE light up; the tracks of the selected CD will now be played in random order
- If you press ▶▶▶ (5), you will select any one of the following tracks.
If you press REPEAT (10) twice, the tracks will be repeated in a different order each time, although the first track will always be the same.
- When all tracks of the selected CD have been played, playback stops.
- Press SHUFFLE again if you wish to return to normal play.
CALLING UP INFORMATION ON THE DISPLAY (TIME)
In STOP mode:
Time display
- After loading the CDs and closing the CD compartment, the display shows the number of the CD to be played (= default display in STOP mode).
During play:
Time display
- When you start play (from STOP mode), the display shows the elapsed playing time of the current track (default display in PLAY mode).
- Press TIME (12) whenever you want to know the remaining playing time of the current track (REM TRACK TIME).
- Press TIME again if you wish to know the remaining playing time of the entire CD (TOTAL REM TIME).
Note - TOTAL REM(aining) TIME indication is not available in SHUFFLE mode.
- If you press TIME again, you will switch to text display; the display shows the number of the current CD.
- If you wish to know the total playing time of the entire CD you must go back to STOP mode first and then press TIME.
- The display now shows the number of tracks and the total playing time of the current CD (TOTAL TIME).
REPEATING PLAY (REPEAT)
Repeating a track:
- Press REPEAT (10) before or during playback of the CD.
- REPEAT (1) lights up; the track will now be repeated continuously.
- Press REPEAT three times to stop the track being repeated.
Repeating a CD:
- Press REPEAT (10) twice before or during play-back of the CD.
- REPEAT DISC lights up; the CD will now be repeated continuously.
- Press REPEAT twice to stop the CD being repeated.
Repeating all CDs:
- Press REPEAT (10) three times before or during playback.
- REPEAT lights up; all CDs will now be repeated continuously.
- Press REPEAT again to stop the CDs being repeated.
NOTES!
- Repeating a track is not possible in SHUFFLE mode or when a programme is being stored.
- When a programme has been stored (for one or more CDs), then only the programme will be repeated.
PROGRAMMING
STORING A PROGRAMME (PROGRAM)
- By programming the changer you can play up to 30 tracks in any required sequence.
- FULL lights up if you exceed the maximum of 30 tracks.
-
WRONG DISC lights up if you select a non-existent CD number.
-
In STOP mode, press PROGRAM 6 (on the remote control) to open the memory.
- SELECT DISC lights up and starts flashing.
- Select the number of the first required CD using DISC (13) or NEXT DISC (8) (on the remote control).
- Press ◀◀ (4) or ▶▶ (5) for less than 0.5 seconds) until the first track number you wish to programme appears under TRACK.
- Press PROGRAM (6) (on the remote control) again.
-
The track number has now been stored in the changers memory.
-
Select the other track numbers required and store each track by pressing PROGRAM.
- The number of tracks and the playing time of your programme will be shown under TRACK and TOT(al) TIME.
- Press STOP (7) TWICE to quit the PROGRAM mode.
CHECKING THE PROGRAMME (REVIEW)
- Press REVIEW (4) on the remote control, prior to, during or after programmed play.
- All disk and track numbers appear in the programmed sequence on the display.
PLAYING THE PROGRAMME (PLAY)
- Press PLAY (6).
- Playback starts with the first number of the programme.
The PROGRAM (6) and EDIT (5) buttons (on the remote control) cannot be used during programmed play.
Search for a particular passage is only possible within the track being played.
ERASING A PROGRAMME (STOP or OPEN)
In PLAY mode:
- Press OPEN (3) or STOP (7) (twice).
In STOP mode:
- Press OPEN (3) or STOP (7).
– The programme has now been erased.
EDIT
The EDIT function has two recording modes in which you can store the recording time of the tape in the changer memory.
EDIT NORMAL – The changer will determine which programmed tracks fit on each side of the tape and will stop after the last track. The tracks will be recorded in the order in which they appear on the CD(s).
EDIT OPTIMAL – The changer now calculates the combination of programmed tracks regardless of sequence that will optimize the use of available recording time per side.
NOTE!
The EDIT function cannot be used for CDs containing more than 30 tracks.
BEFORE RECORDING
Preparation:
- A programme to be recorded, must first be stored using the ‘PROGRAMMING’ mode.
- Press EDIT (5) (on the remote control) to activate the EDIT mode.
- EDIT lights up and SELECT DISC appears on the display.
- Select the number of the required CD using DISC (13) or NEXT DISC (8) (on the remote control).
When recording a programme there is no need to enter the CD number(s).
Selecting the recording mode:
- The display shows EDIT (= EDIT NORMAL which is the default setting).
- With ◀◀ (4) and ▶▶ (5) you can now select OPT(imal), CANCEL or EDIT (NORMAL) again.
- The display shows OPT(imal), CANCEL, or EDIT again.
- Press EDIT (5) (on the remote control) to store the required recording mode (NORMAL or OPTimal).
If you select CANCEL, the EDIT mode will be cancelled and the changer will go back to STOP mode.
- As soon as you have stored the recording mode the display shows C90 (default setting).
Selecting the recording time:
- As soon as you have stored the recording mode the display shows C90 (default setting).
- With ◀◀ (4) and ▶▶ (5) you can now select the required recording time:
C100, C105, C120, C30, C45, C60, C75 or C90.
Other recording times can be selected using the 1-10 digit buttons. In EDIT NORMAL mode the recording time must be at least equal to the playing time of the first track on the first CD or in the programme.
In EDIT OPTimal mode the recording time must be at least equal to the playing time of the shortest track on the CD(s) or in the programme.
- NOT POSSIBLE lights up if you select a ‘wrong’ time.
- Press EDIT (5)(on the remote control) to store the required recording time.
–The CD changer will now go back to STOP mode
- You can now record the CD or the programme.
RECORDING
- Press PLAY (6).
- Playback starts with the selected CD (or with the first track of the programme).
- The display shows the elapsed playing time of the current track.
- Press TIME (12) to switch to other time display information.
- The number of tracks for side A and their playing time are shown on the display.
- After the last track that fits on side A of the tape, the CD changer will go into PAUSE mode.
- PAUSE lights up.
- Under TRACK you will see the number of the first track to be recorded on side B of the tape.
-
Turn the tape over or select the tape travel direction for side B.
-
Press PLAY (6).
– The remaining tracks will now be played. - After the last track play will stop; EDIT CAN-CELLED lights up.
NOTE!
GB
- As soon as you press PLAY (6) the other changer functions will temporarily be switched off to prevent the recording being interfered with; EDIT ACTIVE lights up if you press one of the other buttons during recording.
- You can quit the EDIT mode by pressing STOP (7) or OPEN (3); EDIT CANCELLED then lights up.
- EDIT NOT POSSIBLE lights up if you try to record a CD containing more than 30 tracks.
- Should the CD or the programme be longer than the total recording time of the tape, play will stop after the last track that fits onto side B of the tape.
- Should the first track of the first CD or the programme be longer than one side of the tape (= the entered recording time divided by two), then EDIT NOT POSSIBLE will light up. You will now have to enter another recording time.
- The EDIT function will be cancelled if the CD changer (or the system) is set to STAND BY mode (see ‘ADDITIONAL INFORMATION’).
ADDITIONAL INFORMATION
MAINTENANCE
The CDs
- Never write on the printed side of a CD.
- Do not attach any stickers to the CD.
- Keep the shiny surface of the disc clean.
Use a soft lint-free cloth and always wipe the disc in a straight line from centre to edge.
- Never use cleaning agents for conventional records.
- Detergents or abrasive cleaning agents should not be used either.
The changer
- A chamois leather slightly moistened with water is sufficient for cleaning the changer.
- Do not use cleaning agents containing alcohol, spirits, ammonia or abrasives.
RECYCLING
Please observe the local regulations regarding the disposal of packing materials, exhausted batteries and old equipment.
-
All redundant packaging material has been omitted. We have done our utmost to make the packaging easy separable into three mono-materials:
-
cardboard (box)
-
expandable polystyrene (buffer)
– polythene (bags, protective foam sheet) -
Your set consists of materials which can be recycled if disassembled by a specialized company.
- Do not dispose of exhausted batteries with your household waste.
This Compact Disc changer complies with radio interference requirements as laid down in EC regulations.
TROUBLESHOOTING
If a fault occurs, run through the points listed below before taking your changer for repair.
If the fault remains, try to clear it by switching the changer off and on again. If this also fails to help, consult your dealer.
Under no circumstances should you repair the changer yourself as this will invalidate the guarantee!
| SYMPTOM | POSSIBLE CAUSE | REMEDY |
| Playback does not start or interruption of playback. | The current CD has been loaded upside down.No CDs inserted.The current CD is badly scratched or dirty.Moisture condensation on the lens. | Reload the CD, label side up.Insert the CDs, label side up.Clean the CD with a soft, lint-free cloth.Leave the CD changer in a warm environment until the moisture evaporates. |
| Sound skips (at the same part). | The current CD is dirty. | Clean the CD with a soft, lint-free cloth. |
| The current CD skips tracks. | The CD is damaged or dirty. | Replace or clean the CD. |
| Playback does not start from the (of the current CD). | PRG (programME) or SHUFFLE activated. | Switch off SHUFFLE or clear first track programme. |
| No sound or bad sound. | Loose or wrong connections.Strong magnetic fields near the CD changer. | Check connections.Find another place for the unit or change connections. |
| Remote control does not function. | Batteries are exhausted. | Replace the batteries. |
| Remote control commands are not properly received. | The distance between remote control and CD changer is longer than 10 metres. | Reduce the distance between remote control and CD changer. |
TABLE DES MATIERES
INTRODUCTION 12
MISE EN SERVICE 12
Tension secteur
LECTURE NORMALE (PLAY 2)
RECHERCHE D'UN PASSAGE ( ◀◀ ▶▶ )
CÓMO BUSCAR UN PASAJE (SQ ▶)
CÓMO MEMORIZAR UN PROGRAMA (PROGRAM)
CÓMO CONTROLAR EL PROGRAMA (REVIEW)
OPT(imal), CANCEL o EDIT (NORMAL).
RIPRODUZIONE DEL PROGRAMMA (PLAY/REPLAY)
MEMORIZAR UM PROGRAMA (PROGRAM)
REVER UM PROGRAMA (REVIEW)
| Disc capacity | Five discs, 120 or 80mm |
| Programming capacity | 30 tracks |
| Decoding | Bitstream converter |
| Laser pickup | |
| Digital filter | 8 x oversampled linear phase with 18 bit coefficients |
| Analog filter | 5 pole active |
| Frequency response 5Hz - 20kHz | ±0.5dB |
| De-emphasis error | ±0.3dB |
| THD (at 0dB, 1kHz) | 0.003% |
| Intermodulation distortion (19+20kHz) | <-96dB |
| Dynamic range | 90dB |
| Linearity | ±0.5dB; 0 to -90dB |
| Signal to Noise ratio A weighted measured with all zeroes test disc. | >90dB |
| Channel separation 1kHz | >90dB |
| 10kHz | >90dB |
| Wow and flutter | Unmeasurable (quartz crystal accuracy) |
| Output impedance | 220 |
| Output level at 0dB | 2.0V rms |
| Digital error correction | CIRC with double error correction in C1 and C2 |
| Digital code output | Sony/Philips serial data format |
| REMOTE CONTROLS | Stop, Shuffle, Review, Edit, Program, Play/Paus Next Disc, Skip, Scan. |
| PHYSICAL SPECIFICATION | |
| Dimensions in mm | 435 x 106 x 380 |
| (Width x Height x Depth) | |
| Net weight | 7.0kg |
| Shipping Weight | 7.7kg |
NAD ELECTRONICS
LONDON
© 1995 NAD ELECTRONICS LTD 515 I.M.
PRINTED IN MALAYSIA
- FUNCTIONAL OVERVIEW
- PLAYBACK
- PROGRAMMING
- EDIT
- ADDITIONAL INFORMATION
- TROUBLESHOOTING
- INTRODUCTION
- INSTALLATION
- POWER SUPPLY SETTING
- SITING THE COMPACT DISC CHANGER
- Free standing
- Stacked
- FITTING A MAINS PLUG (U.K. only)
- HOW TO CONNECT A PLUG
- REAR PANEL CONNECTIONS
- DIGITAL OUT
- FIXED LINE OUT
- NAD LINK IN/OUT
- AC LINE CORD
- FRONT PANEL CONTROLS - FUNCTIONAL OVERVIEW
- POWER ON/OFF
- DISC CAROUSEL DRAWER
- OPEN/CLOSE
- - 5 ◀◀ ▶◀
- PLAY
- STOP
- SHUFFLE
- PAUSE
- REPEAT
- DISPLAY
- TIME
- DISC
- QUICK PLAY
- LOAD
- REMOTE CONTROL
- STOP
- SHUFFLE
- 1-10 DIGIT KEYS
- GB
- REVIEW
- EDIT
- PROGRAM
- PLAY/PAUSE
- NEXT DISC
- SKIP
- ◀ SCAN ▶
- DISPLAY
- - 5 CD NUMBER INDICATOR
- PROGRAM
- TRACK
- TRACK TIME
- Display messages:
- INSERTING THE CDs
- NOTE!
- NORMAL PLAYBACK (PLAY)
- SELECTING ANOTHER TRACK DURING PLAY (◀◀ ▶▶)
- SELECTING ANOTHER CD DURING PLAY (DISC)
- SEARCHING FOR A PASSAGE DURING PLAY (◀◀ ▶▶)
- STARTING WITH A PARTICULAR CD (DISC)
- STARTING WITH A PARTICULAR TRACK (DISC, ◀◀ ▶▶ and PLAY)
- PLAYING IN RANDOM ORDER (SHUFFLE) All CDs:
- One CD:
- CALLING UP INFORMATION ON THE DISPLAY (TIME)
- In STOP mode:
- Time display
- During play:
- REPEATING PLAY (REPEAT)
- Repeating a track:
- Repeating a CD:
- Repeating all CDs:
- NOTES!
- STORING A PROGRAMME (PROGRAM)
- CHECKING THE PROGRAMME (REVIEW)
- PLAYING THE PROGRAMME (PLAY)
- ERASING A PROGRAMME (STOP or OPEN)
- In PLAY mode:
- BEFORE RECORDING
- Preparation:
- Selecting the recording mode:
- Selecting the recording time:
- RECORDING
- MAINTENANCE
- The CDs
- The changer
- RECYCLING
- TABLE DES MATIERES
- INTRODUCTION 12
- MISE EN SERVICE 12
- LECTURE NORMALE (PLAY 2)
- RECHERCHE D'UN PASSAGE ( ◀◀ ▶▶ )
- CÓMO BUSCAR UN PASAJE (SQ ▶)
- CÓMO MEMORIZAR UN PROGRAMA (PROGRAM)
- CÓMO CONTROLAR EL PROGRAMA (REVIEW)
- RIPRODUZIONE DEL PROGRAMMA (PLAY/REPLAY)
- MEMORIZAR UM PROGRAMA (PROGRAM)
- REVER UM PROGRAMA (REVIEW)
Brand : NAD
Model : 515
Category : Audio Amplifier