HMF-18GREY - Household Fan Heinner - Free user manual and instructions
Find the device manual for free HMF-18GREY Heinner in PDF.


| Product Type | Pedestal Fan |
| Brand | Heinner |
| Model | HMF-18GREY |
| Color | Grey |
| Blade Size | 18 inches (45 cm) |
| Overall Height | Approx. 130 cm |
| Base Diameter | 35 cm |
| Weight | 5 kg |
| Power Supply | 220-240V ~ 50Hz |
| Power Consumption | 60 W |
| Speed Settings | 3 speeds (Low, Medium, High) |
| Oscillation | Yes, 90° wide |
| Tilt Adjustment | Yes, manual tilt |
| Height Adjustment | Yes, telescopic pole |
| Control Type | Rotary knob on motor body |
| Safety Features | Overheat protection, stable base with anti-slip pads |
| Cleaning | Wipe with damp cloth, do not immerse in water |
| Spare Parts Availability | Replacement blades, motor, and base available from Heinner service centers |
| Repairability | Modular design for easy repair; professional service recommended |
| Intended Use | Indoor household use only |
Frequently Asked Questions - HMF-18GREY Heinner
User questions about HMF-18GREY Heinner
0 question about this device. Answer the ones you know or ask your own.
Ask a new question about this device
Download the instructions for your Household Fan in PDF format for free! Find your manual HMF-18GREY - Heinner and take your electronic device back in hand. On this page are published all the documents necessary for the use of your device. HMF-18GREY by Heinner.
USER MANUAL HMF-18GREY Heinner
natural_image
Modern outdoor fan with a black cooling tower and digital display (no visible text or symbols)- Ventilator cu umidificare
- Putere: 95W
- Culoare: argintiu
2. Montarea rotilor
natural_image
Technical line drawing of a mechanical assembly with three views: front, side, and top (no text or symbols)natural_image
Diagram showing two types of wind turbines: one with a vertical pole and the other with a fan-like structure (no text or labels)natural_image
Pure mechanical component diagrams without any text, numbers, or symbolsnatural_image
Two identical line drawings of a vertical stand-mounted device with a circular fan and handle, shown from different angles (no text or symbols)natural_image
Two line drawings of a vacuum cleaner with directional arrows indicating motion (no text or symbols)natural_image
Exterior view of a modern outdoor fan with a digital display and stand (no visible text or symbols)- Mist fan
- Power: 95W
- Color: silver
Thank you for purchasing this product!
I. INTRODUCTION
Before using the appliance, please read carefully this instruction manual and keep it for future reference.
This instruction manual is designed to provide you with all required instructions related to the installation, use and maintenance of the appliance.
In order to operate the unit correctly and safety, please read this instruction manual carefully before installation and usage.
II. CONTENT OF YOUR PACKAGE

Mist fan
User manual
Warranty card
Remote control
III. SAFETY PRECAUTIONS
- Read all instructions carefully and keep this manual for future reference.
- If the supply cord is damaged, it must be replaced by manufacturer or its service agent or a similarly qualified person in order to avoid a hazard.
- To protect against the risk of electrical shock, do not immerse the unit, cord or plug in water or other liquid.
- This appliance is not intended for use by persons (including children) with reduced physical, sensory or mental capabilities, or lack of experience and knowledge, unless they have been given supervision or instruction concerning use of the appliance by a person responsible for their safety. Young children should be supervised to ensure that they do not play with the appliance.
- When the appliance is not in use and before cleaning, unplug the appliance from the outlet.
- Keep electrical appliances out of reach from Children or infirm persons. Do not let them use the appliances without supervision.
- When the fan was assembled, the rotor blade guard shall not be taken off anymore
- Prior cleaning unplug the fan.
- The rotor guard shall not be dissembled/opened to clean the rotor blades.
- Wipe the fan enclosure and rotor blade guard with a slightly damp cloth.
- Unplug the appliance during filling and cleaning.
- Never insert fingers, pencils, or any other object through the grille when fan is running.
- Disconnect fan when moving from one location to another.
- Be sure fan is on a stable surface when operating to avoid overturning.
- DO NOT use fan in window, rain may create electrical hazard.
- Household use only.
IV. PRODUCT DESCRIPTION
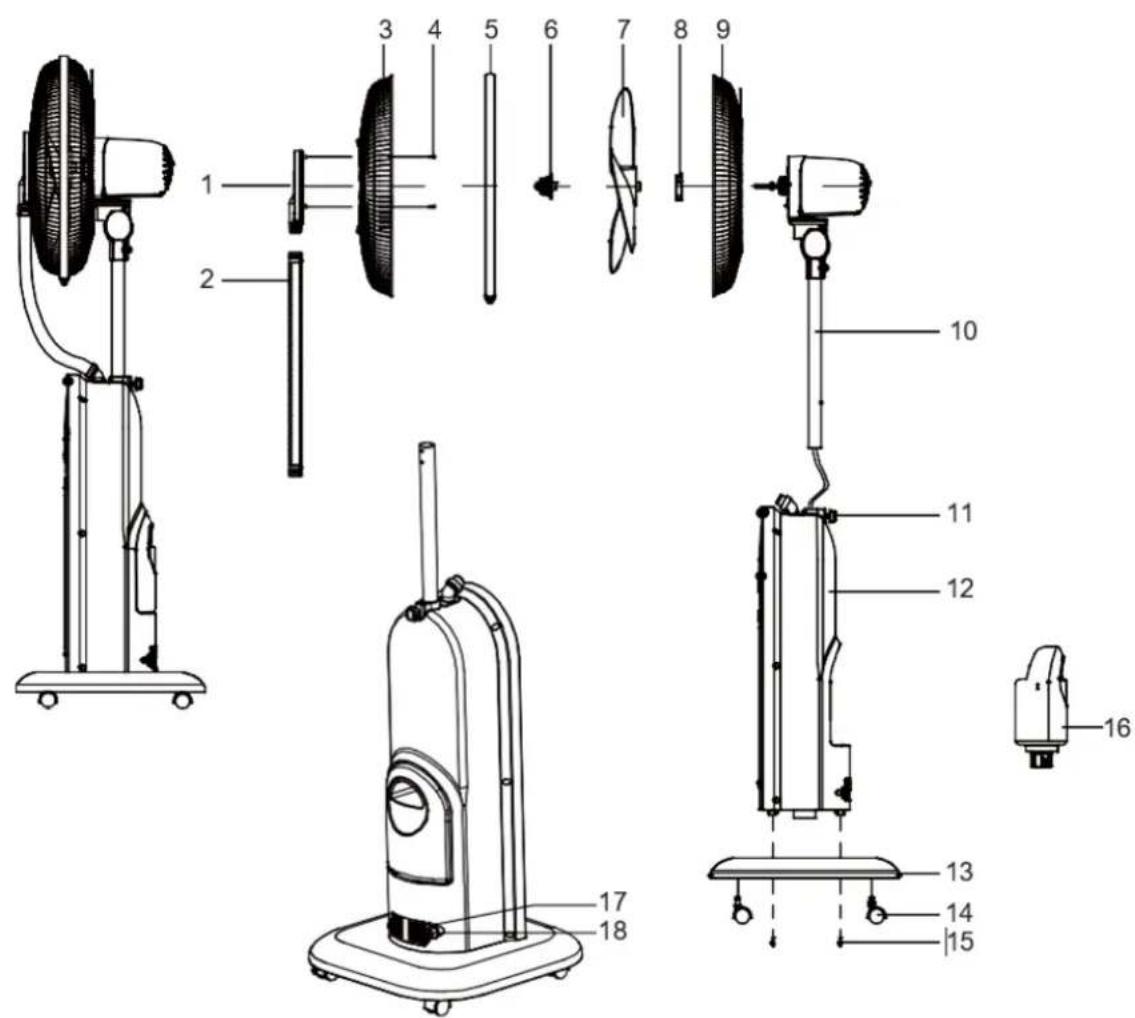
| No. | Description | No. | Description |
| 1 | Spray cap | 10 | Motor assy |
| 2 | Corrugated hose | 11 | Tightening knob |
| 3 | Front guard | 12 | Host assy |
| 4 | Screw (ST3*7.5) | 13 | Base assy |
| 5 | Net clamp | 14 | Caster (Universal wheel) |
| 6 | Blade nut | 15 | Screw (M5*20) |
| 7 | Blade | 16 | Water tank assy |
| 8 | Guard nut | 17 | Spring clamp |
| 9 | Rear guard | 18 | Drain plug |
Note: All the pictures in this manual are for explanation purpose only. Any discrepancy between the real object and the illustration in the drawing shall be subject to the real subject.
V. INSTALLATION METHOD
Fig. 1
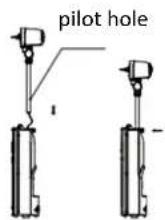
1. Assembly of host
Take out the motor assy and host assy from the package, as is shown in Figure 1, insert the connecting wire and the column into the host, then tighten the fastening knob and ensure to drive the screw into the positioning hole.
Fig. 2
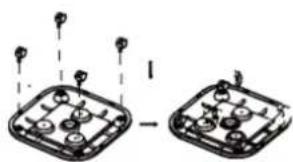
2. Mounting the casters
Take out the base and casters from the package, as is shown in Figure 2, and press the casters into the base mounting hole.
Fig. 3
natural_image
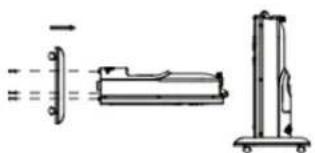
Technical line drawing of a mechanical assembly with no visible text or symbols3. Mounting the base in the host
As is shown in Figure 3, put 3 screws (M5 * 20) through the base, and fix the base host in the nuts embedded in the host bottom.
Fig. 4
natural_image
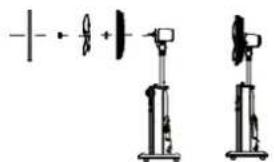
Diagram showing a fan blade and two identical mechanical devices (no text or symbols)4. Mounting the rear guard and blade
As is shown in Figure 4, in sequence, mount the rear guard, guard nut, blade, blade nut and net clamp.
Fig. 5
natural_image
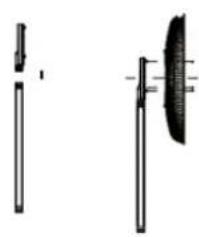
Pure mechanical component diagrams without any text, numbers, or symbols5. Assembling the chassis
As is shown in Figure 5, press the spray cap into a corrugated hose, during assembly, perform pressing while rotating, and then with screws, fix the spray cap on the front guard.
Fig. 6
natural_image
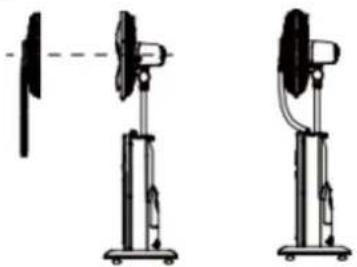
Two identical line drawings of a vertical stand-mounted device with a circular fan and handle, shown from different angles (no text or symbols)6. Mount the components of front guard into the net clamp
As is shown in Figure 6, mount the front guard into the net clamp, screw in the net clamp and then tighten the screws; then mount the corrugated hose on the top of host.
VI. USING INSTRUCTIONS
Instructions on Key Functions
After power-on, the buzzer will "beep", and the power indicator lights up.
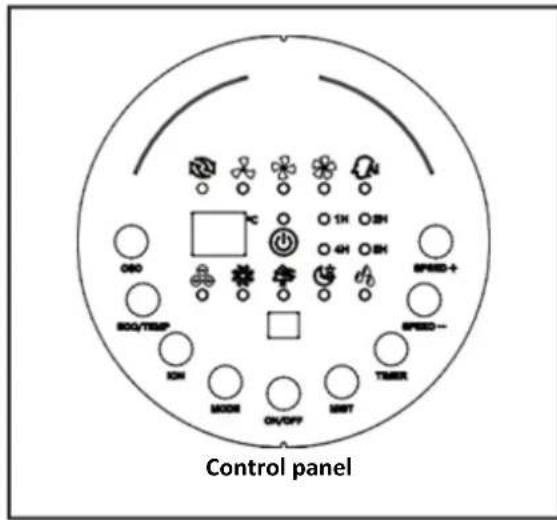
ON/OFF
Fan power switch: When the key is pressed, the wind type is in normal mode, low-level running is performed and room temperature is shown, and after the button is pressed again, the fan power supply is disconnected.
SPEED
Fan level selection control by speed+ and speed-
TIMER
Fan timer switch: it cycles in the sequence of 1H-2H-4H-8H-0-1H-.
MIST
Humidification switch: For use, see the instructions of Humidifier.
MODE
Wind class selector switch: it cycles in the sequence of Normal wind - Natural wind - Sleep wind - Normal wind.
ION
Anion switch: It works after the fan and humidifier are performed.
ECO/TEMP
Smart wind switch: It automatically selects an appropriate level according to the temperature change.
OSC
Oscillation switch: It controls the left and right swinging.
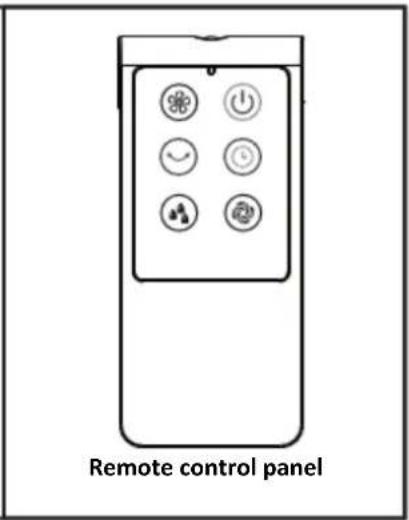
REMOTE CONTROL PANEL

ON/OFF KEY
The ON/OFF key is for switching on the fan. The fan will be started at normal wind. Press the ON/OFF key if the fan needs to switch off.

SPEED KEY
When the fan started, press this key repeated, the fan will work with „0-1-2-3 (Off-Low-Medium-High)” circulatory.

TIMER KEY
When this key is touched repeatedly or kept in pressed state, the time to be set for air delivery increased step by step.

OSC KEY
After the fan is started, press this key to oscillate the fan, and stop the oscillation at desired direction by pressing again. By rotating the fan head by hand, you can get wider oscillation angle.

MODE KEY
Press this key to select mode. The sequence is normal, natural and sleep when this key being touched repeatedly or continuously. The light can indicate mode state.

MIST KEY
Press this key could turn on or off the mist function.
natural_image
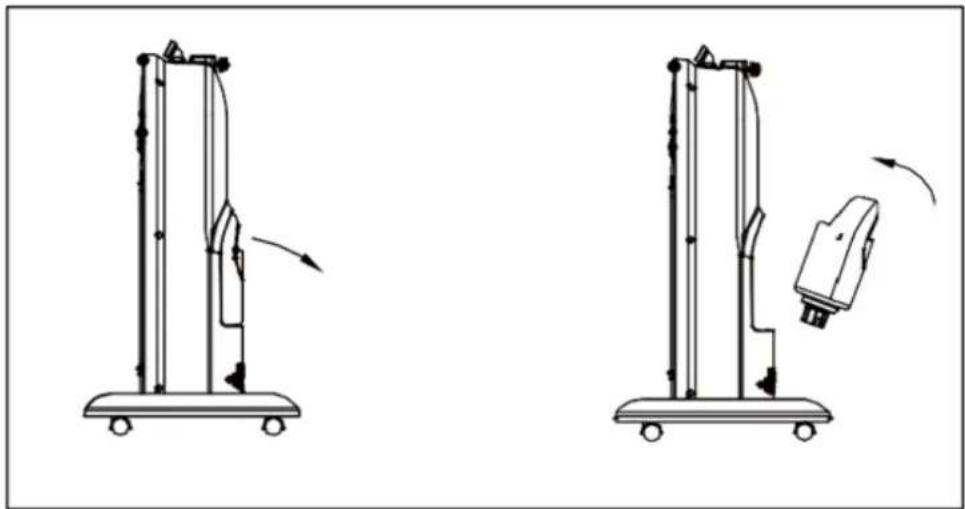
Two line drawings of a vacuum cleaner with directional arrows indicating motion (no text or symbols)Instructions on humidification function
- Remove the water tank from the host and unscrew the water tank cap counterclockwise.
• Fill the water tank with cold water, tighten the water tank cap and check for leakage.
• As is shown, put the water tank into the host according to the angle, and wait a few minutes until the host sink is filled with water.
• After the humidification button is pressed, the indicator lights up to start humidification.
Note: If the indicator flashes (off after 10 seconds), it indicates insufficient water or low water level, please check whether the float in the sink of the host has floated or the water tank is properly placed.
PRECAUTIONS
- Before use, please check that the machine has been assembled completely and fixed motor components have been mounted and fastened; before this, do not connect the power supply.
- Before turning on the power, check whether the used voltage is the same as the voltage indicated on the machine.
- When the appliance works, do not insert your fingers and sharp objects into the guard or the machine body.
• Children shall use this electric appliance under adult supervision to prevent accidents. When using an electric mosquito repellant, please ensure that it is out of reach by children, and if it is accidentally swallowed, seek medical attention immediately.
- Prior to use, check the power cord and plug for any damage, and if the power cord is damaged, in order to avoid danger, be sure to have it replaced by the manufacturer, maintenance department or professionals with the similar qualification.
- If the appliance is left unattended or is no longer in use, turn off the power and unplug the power cord to avoid failure problems and accidents.
- When the humidifier is used, the water tank shall use clean water below 40^ , and it is recommended to use demineralized water, pure water or distilled water containing less impurities.
- Do not place this appliance on sloping ground to avoid tipping over, and do not move the water tank when the humidifier is working; if the humidifier or host accidentally tips over when it contains water, please unplug the power cord and remove the water tank in the machine body, and reuse it after there is no hidden security risk in the machine and especially no water accumulates in the machine body.
- When using a humidifier, you cannot add sanitizers, vinegar, perfume or essential oils.
- When using a humidifier, never have the mist to face the furniture, appliances or walls to avoid damage due to excessive damp.
• Water is inside the water tank or sink shall not be placed for a too long time, as this may easily breed bacteria; change the water every 2 days and clean the sink once every 2-3 weeks.
VII. CLEANING AND MAINTENANCE
The fan requires little maintenance. Do not try to fix it by yourself. Refer it to qualified service personnel if service is needed.
- Before cleaning and assembling, fan must be unplugged.
- To ensure adequate air circulation to the motor, keep vents at the rear of the motor free of dust. Do not disassemble the fan to remove dust.
- Please wipe the exterior parts with a soft cloth soaking a mild detergent.
- Do not use any abrasive detergent or solvents to avoid scratching the surface. Do not use any of the following as a cleaner: gasoline, thinner.
- Do not allow water or any other liquid into the motor housing or interior parts.
CLEANING
- Be sure to unplug from the electrical supply source before cleaning.
- Plastic parts should be cleaned with a soft cloth moisten with mild soap. Thoroughly remove soap film with dry cloth.
Environment friendly disposal
You can help protect the environment!
Please remember to respect the local regulations: hand in the non-working electrical equipment's to an appropriate waste disposal center.

HEINNER is a registered trademark of Network One Distribution SRL. Other brands and product names are trademarks or registered trademarks of their respective holders.
No part of the specifications may be reproduced in any form or by any means or used to make any derivative such as translation, transformation, or adaptation without permission from NETWORK ONE DISTRIBUTION.
Copyright © 2013 Network One Distribution. All rights reserved.
www.heinner.com, http://www.nod.ro
http://www.heinner.com, http://www.nod.ro

This product is in conformity with norms and standards of European Community.
Importer: Network One Distribution
Marcel Iancu Street, no 3-5, Bucharest, Romania
Tel: +40 21 211 18 56, www.heinner.com, www.nod.ro
HEINNER
natural_image
Modern outdoor fan with a black cord and digital display, mounted on a stand (no visible text or symbols)natural_image
Two identical diagrams showing a grid-like structure with arrows pointing to the top and bottom (no text or symbols)natural_image
Technical line drawing of a mechanical assembly with no visible text or symbolsnatural_image
Diagram showing a motor and two separate motors with different arm positions (no text or symbols)natural_image
Pure mechanical component diagrams without any text, numbers, or symbolsnatural_image
Two identical line drawings of a vertical stand with a circular component, shown from different angles (no text or symbols)natural_image
Two line drawings of a vacuum cleaner with directional arrows indicating motion (no text or symbols)natural_image
Modern outdoor fan with a black mesh fan and digital display, mounted on a stand (no visible text or symbols)natural_image
Technical line drawing of a mechanical assembly with three views: front, side, and top (no text or symbols)natural_image
Diagram showing a fan blade and two identical mechanical devices (no text or symbols)natural_image
Technical line drawing of two mechanical components: a vertical rod and a circular component with a curved blade (no text or symbols)natural_image
Two identical line drawings of a vertical stand with a circular blade and a handle, shown from different angles (no text or symbols)natural_image
Two line drawings of a vacuum cleaner with directional arrows indicating motion (no text or symbols)- Montarea rotilor
- Thank you for purchasing this product!
- INTRODUCTION
- CONTENT OF YOUR PACKAGE
- SAFETY PRECAUTIONS
- PRODUCT DESCRIPTION
- INSTALLATION METHOD
- Assembly of host
- Mounting the casters
- Mounting the base in the host
- Mounting the rear guard and blade
- Assembling the chassis
- Mount the components of front guard into the net clamp
- USING INSTRUCTIONS
- Instructions on Key Functions
- ON/OFF
- SPEED
- TIMER
- MIST
- MODE
- ION
- ECO/TEMP
- OSC
- REMOTE CONTROL PANEL
- ON/OFF KEY
- SPEED KEY
- TIMER KEY
- OSC KEY
- MODE KEY
- MIST KEY
- Instructions on humidification function
- PRECAUTIONS
- CLEANING AND MAINTENANCE
- CLEANING
- Environment friendly disposal
- HEINNER
Brand : Heinner
Model : HMF-18GREY
Category : Household Fan