
HMSF-D3WH - Household Fan Heinner - Free user manual and instructions
Find the device manual for free HMSF-D3WH Heinner in PDF.


| Product Type | Domestic Fan |
| Brand | Heinner |
| Model | HMSF-D3WH |
| Color | White |
| Dimensions (H x W x D) | 35 cm x 25 cm x 25 cm |
| Weight | 2.5 kg |
| Power Supply | 220-240 V ~ 50/60 Hz |
| Power Consumption | 40 W |
| Speed Settings | 3 speeds |
| Oscillation | Yes, wide oscillation |
| Timer | No |
| Remote Control | No |
| Noise Level | ≤ 45 dB |
| Safety Features | Overheat protection, stable base |
| Maintenance & Cleaning | Clean with a damp cloth; do not immerse in water |
| Spare Parts | Not sold separately; contact Heinner service |
| Warranty | 2 years |
| Included Accessories | Fan, user manual |
| Certifications | CE |
| Usage | Indoor domestic use |
Frequently Asked Questions - HMSF-D3WH Heinner
User questions about HMSF-D3WH Heinner
0 question about this device. Answer the ones you know or ask your own.
Ask a new question about this device
Download the instructions for your Household Fan in PDF format for free! Find your manual HMSF-D3WH - Heinner and take your electronic device back in hand. On this page are published all the documents necessary for the use of your device. HMSF-D3WH by Heinner.
USER MANUAL HMSF-D3WH Heinner
- Ventilator
- Putere: 40W
- Culoare: alb
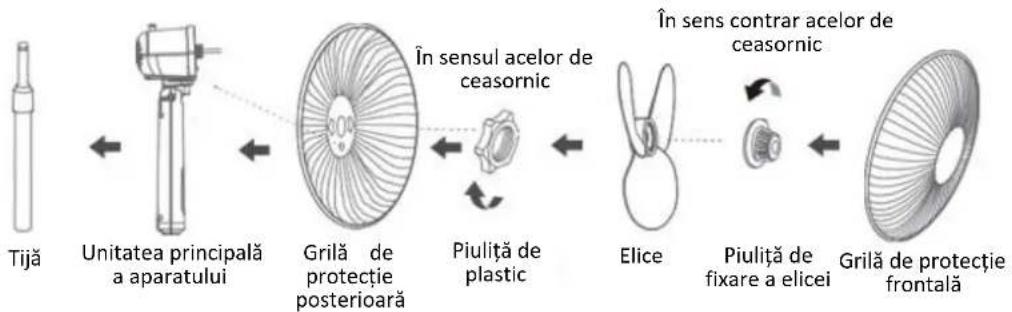
Fig. 8

BUTONUL „ON/OFF"
UTILIZAREA CORECTĂ A TELECOMENZII
- Fan
- Power: 40W
- Color: white
Thank you for purchasing this product!
I. INTRODUCTION
Before using the appliance, please read carefully this instruction manual and keep it for future reference.
This instruction manual is designed to provide you with all required instructions related to the installation, use and maintenance of the appliance.
In order to operate the unit correctly and safety, please read this instruction manual carefully before installation and usage.
II. CONTENT OF YOUR PACKAGE

Fan
User manual
Warranty card
Remote control
III. SAFETY PRECAUTIONS
Read all instructions carefully and keep this manual for future reference.
- If the supply cord is damaged, it must be replaced by manufacturer or its service agent or a similarly qualified person in order to avoid a hazard.
- To protect against the risk of electrical shock, do not immerse the unit, cord or plug in water or other liquid.
- This appliance can be used by children aged from 8 years and above and persons with reduced physical, sensory or mental capabilities or lack of experience and knowledge if they have been given supervision or instruction concerning use of the appliance in a safe way and understand the hazards involved. Children shall not play with the appliance. Cleaning and user maintenance shall not be made by children without supervision.
- When the appliance is not in use and before cleaning, unplug the appliance from the outlet.
- Keep electrical appliances out of reach from Children or infirm persons. Do not let them use the appliances without supervision.
- Indoor and household use only.
- Correct Disposal of this product

This marking indicates that this product should not be disposed with other household
wastes throughout the EU. To prevent possible harm to the environment or human health from uncontrolled waste disposal, recycle it responsibly to promote the sustainable reuse of material resources. To return your used device, please use the return and collection systems or contact the retailer where the product was purchased. They can take this product for environmentally safe recycling. The packaging material is recyclable. Dispose of the packaging in an environmentally friendly manner and make it available for the recyclable material collection-service.
-
When the fan was assembled, the rotor blade guard shall not be taken off anymore.
-
Prior cleaning unplug the fan.
- The rotor guard shall not be dissembled/opened to clean the rotor blades.
- Wipe the fan enclosure and rotor blade guard with a slightly damp cloth.
- Never insert fingers, pencils, or any other object through the grille when fan is running.
- Disconnect fan when moving from one location to another.
- Be sure fan is on a stable surface when operating to avoid overturning.
- DO NOT use fan in window, rain may create electrical hazard.
- Indoor use only.
V. PRODUCT DESCRIPTION
Notice: Pictures in the manual are for reference only, and the product depends on real objects in the packing box.
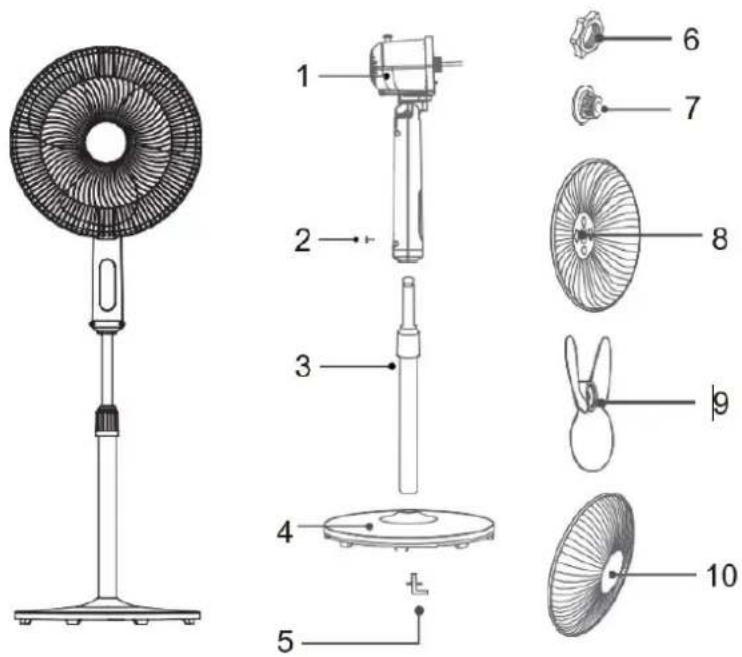
| NO. | Description | NO. | Description |
| 1 | Motor | 6 | Plastic Nut |
| 2 | Tighten Knob | 7 | Spinner |
| 3 | Pole | 8 | Rear Grill |
| 4 | Chassis | 9 | Blade |
| 5 | 7-shaped screw | 10 | Front Grill |
VI. HOW TO ASSEMBLE THE FAN
Notice: Before installation, first remove 7-shape screws from the pole, remove the Spinner and Plastic nut from the motor shaft, and then install.
1. CHASSIS INSTALLATION
Align the lower pole and the chassis, and then fasten securely with chassis screws.
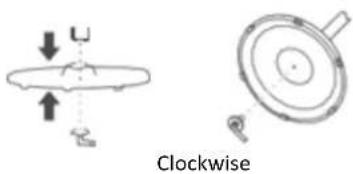
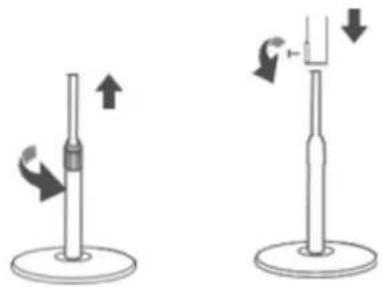
2. POLE INSTALLATION
a. Pull out and fix the internal pole (column) after adjusting the height by way of tightening or loosening the knob.
b. Install and fix the machine body by way of tightening or loosening tighten knob.
![graph LR A["Pole"] --> B["Machine body"] B --> C["Rear Grill"] C --> D["Plastic nut"] D --> E["Blade"] E --> F["Spinner"] F --> G["Front Grill"] style A fill:#f9f,stroke:#333 style G fill:#f9f,stroke:#333 subgraph Clockwise C D E F end subgraph Counterclockwise G F E F end](/content/2026/05/1057543/images/af09d3da1513afee32fb79c15e18e5d69d318c7a4b4c28e1b3aa255cb8ad70aa.jpg)
3. INSTALLATION OF REAR GRILL
Align the holes of rear grill with the protruded points on the motor housing.
4. INSATLLATION OF PLASTIC NUT
Screw clockwise the plastic nut tightly to fasten the rear grill.
5. BLADE INSTALLATION
After the installation of blade, rotate the blade with your finger to make sure the blade works normally.
6. SPINNER INSTALLATION
Screw counterclockwise the spinner tightly, and then install the front grill.
7. INSTALLATION OF FRONT GRILL
a. From top to bottom align the clips of the front grill with the uppermost mesh of the rear grill.
After the alignment is correct, look from back to front according to the diagram.
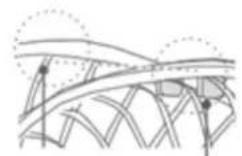
Mesh
Clip

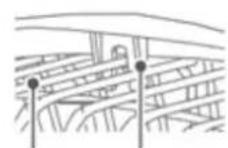
Mesh
Clip
b. Press the grills in order with both hands. A sound of "click" will be heard when installed right.
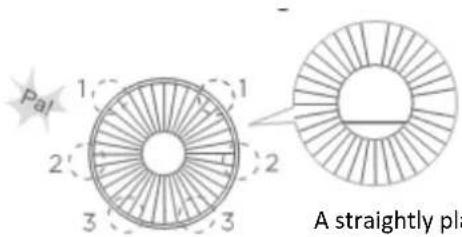
A straightly placed Logo indicates the grills have been correctly aligned.
c. Self-clipped installation.

VII. HOW TO OPERATE
- Instructions for operation of body


TIMER KEY
When the TIMER key is touched repeatedly or kept in pressed state, the time to be set for air delivery increased step by step .For instance, if the fan operation is required to be set for 7hours, this key must be touched repeatedly so that the pilot lamps for 1, 2and 4 hours lighten together. It means that the set time is 1 + 2 + 4 = 7 hours. The time setting indicated by the pilot lamp will decrease gradually by a unit of 1hour. Don't press the TIMER key when the fan is required to operate continuously. At the moment all pilot lamps don't light.
| Time (H) | lamps |
| 1 | 1h |
| 2 | 2h |
| 3 | 1h/2h |
| 4 | 4h |
| 5 | 1h/4h |
| 6 | 2h/4h |
| 7 | 1h/2h/4h |

MODE KEY
Press the M to select mode. The sequence is normal, natural and sleep when this M being touched repeatedly or continuously. The light can indicate mode state. It can also be controlled by remote control.

SPEED KEY
Press the "wind" key to select the natural wind, then press the "speed" repeatedly to choose 3 speed.

ON/OFF KEY
The key is for switching on the fan. The fan will be started at low speed. Press the key again, it will be switched off.
2. Remote controller (Fig. 8)

Fig. 8

ON/OFF KEY
The key is for switching on the fan. The fan will be started at low speed. Press the key again, it will be switched off.

TIMER KEY
When this key is touched repeatedly, the time to be set 1, 2 and 4 hours and the correspond pilot lamp will light. If the lamp don't light after you touched the key, the fan will run continuously.

SPEED KEY
After the fan has started, this key serves as a speed selector in the sequence from "low-medium-high-low" when this key being touched repeated or continuously.

MODE KEY
Press The M to select mode. The sequence is normal, natural and sleep when this M being touched repeatedly or continuously. The light can indicate mode state, It can also be controlled by remote control. Type changes in the sequence from NORMAL---NATURAL---SLEEP---NORMAL wind when this key being touched repeatedly or kept in.
3. Oscillation Control
To make the fan oscillate, press the clutch knob located on the top of the motor housing. To get the directional airflow, pull the clutch knob up to its initial position.
4. Tilt Adjustment
To adjust the air flow upward or downward, push the grilles lightly to the desired direction.
5. Height Adjustment
The height of the fan can be adjusted by loosening the height adjustment ring, carefully raising or lowering the fan and firmly re-tightening the height adjustment ring.
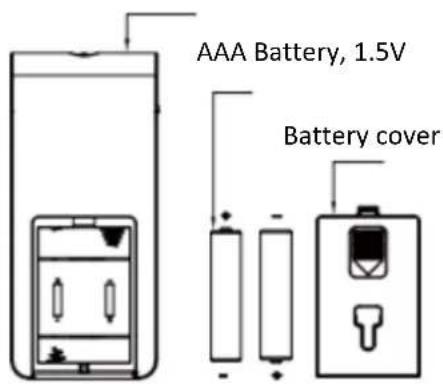
BATTERIES INSTRUCTIONS (batteries not included)
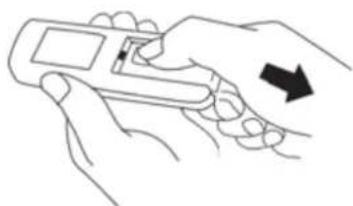
- Press down on the battery compartment cover and slide it out.
- Insert the batteries, making sure that the positive terminals are facing the proper way.
- Replace the cover.
Use manganese or alkaline batteries of type "AAA". Do not use rechargeable batteries.
Remote controller
BATTERY WARNING
- Do not dispose of batteries in fire, batteries may explode or leak.
- Do not mix old and new batteries.
- Do not mix alkaline, standard (carbon-zinc) or rechargeable (nickel-cadmium) batteries.


HOW TO USE THE REMOTE CONTROLLER CORRECTLY
Point the remote controller at the receptor on body of the fan and press the desired button. The remote controller will work at distances of up to roughly five meters and the angle of 30 degree included between right and left from the receptor. The batteries must be removed from the remote controller before it is scrapped and that they are disposed of safely.
VIII. IMPORTANT
OVERHEAT PROTECTION OF THE MOTOR
The windings of the motor have a thermal-fuse that burns out and the fan switches off and temperature of the motor is no longer going up so that plastic parts of the fan don't subject to deformation so far so to be burned by the overheat if the motor is overheat for any unexpected reason.
IX. TECHNICAL FICHE
| Power | 40W |
| Voltage | 220-240V, 50Hz |
| Color | White |

Environment friendly disposal
You can help protect the environment!
Please remember to respect the local regulations: hand in the non-working electrical equipment's to an appropriate waste disposal center.

HEINNER is a registered trademark of Network One Distribution SRL. Other brands and product names are trademarks or registered trademarks of their respective holders.
No part of the specifications may be reproduced in any form or by any means or used to make any derivative such as translation, transformation, or adaptation without permission from NETWORK ONE DISTRIBUTION.
Copyright © 2013 Network One Distribution. All rights reserved.
www.heinner.com, http://www.nod.ro
http://www.heinner.com, http://www.nod.ro

This product is in conformity with norms and standards of European Community.
Importer: Network One Distribution
Marcel Iancu Street, no 3-5, Bucharest, Romania
Tel: +40 21 211 18 56, www.heinner.com, www.nod.ro
HEINNER
По посока на часовниковите стрелки
2. МОНТАЖ НА ЛОСТА
![graph LR A["Lost"] --> B["Основен корпус на уреда"] B --> C["Задна предназна решетка"] C --> D["Пластмасова гайка"] D --> E["По посока на часовниковите стрелки"] E --> F["Витло"] F --> G["Гайка за фиксиране на витлото"] G --> H["Предна предназна решетка"] H --> I["В обратна посока на часовниковите с…](/content/2026/05/1057543/images/6a1a92bb564e8addb67413c12805a735a17bba5b48ebe7ec9925ba134502163f.jpg)
3. МОНТАЖ НА ЗАДНАТА ПРЕДПАЗНА РЕШЕТКА

- ábra



- BUTONUL „ON/OFF
- UTILIZAREA CORECTĂ A TELECOMENZII
- THANK YOU FOR PURCHASING THIS PRODUCT
- INTRODUCTION
- CONTENT OF YOUR PACKAGE
- SAFETY PRECAUTIONS
- PRODUCT DESCRIPTION
- HOW TO ASSEMBLE THE FAN
- CHASSIS INSTALLATION
- POLE INSTALLATION
- INSTALLATION OF REAR GRILL
- INSATLLATION OF PLASTIC NUT
- BLADE INSTALLATION
- SPINNER INSTALLATION
- INSTALLATION OF FRONT GRILL
- HOW TO OPERATE
- TIMER KEY
- MODE KEY
- SPEED KEY
- ON/OFF KEY
- REMOTE CONTROLLER (FIG. 8)
- OSCILLATION CONTROL
- TILT ADJUSTMENT
- HEIGHT ADJUSTMENT
- BATTERIES INSTRUCTIONS (BATTERIES NOT INCLUDED)
- BATTERY WARNING
- HOW TO USE THE REMOTE CONTROLLER CORRECTLY
- IMPORTANT
- OVERHEAT PROTECTION OF THE MOTOR
- TECHNICAL FICHE
- ENVIRONMENT FRIENDLY DISPOSAL
- HEINNER
- МОНТАЖ НА ЛОСТА
- МОНТАЖ НА ЗАДНАТА ПРЕДПАЗНА РЕШЕТКА
Brand : Heinner
Model : HMSF-D3WH
Category : Household Fan