
HSF-M50WH - Household Fan Heinner - Free user manual and instructions
Find the device manual for free HSF-M50WH Heinner in PDF.


| Product Type | Stand Fan |
| Brand | Heinner |
| Model | HSF-M50WH |
| Power Consumption | 33 W |
| Voltage / Frequency | 220-240 V ~ 50 Hz |
| Maximum Airflow | 51.20 m³/min |
| Fan Sound Power Level | 56.15 dB(A) |
| Number of Speed Settings | 3 (Low, Medium, High) |
| Oscillation | Yes (clutch knob control) |
| Tilt Adjustment | Yes (manual tilt via grilles) |
| Height Adjustment | Yes (adjustable pole with knob) |
| Number of Blades | 3 |
| Control Type | Rotary knob (0-1-2-3) |
| Safety Compliance | CE marked |
| Cleaning Method | Wipe with soft cloth and mild detergent; do not use abrasive cleaners |
| Maintenance | Minimal; keep motor vents free of dust; unplug before cleaning |
| Spare Parts | Use original spare parts from authorized service |
| Warranty | Certificate of warranty included |
| Package Contents | Fan, user manual, warranty certificate, declaration of conformity |
| Usage | Indoor household use only |
Frequently Asked Questions - HSF-M50WH Heinner
User questions about HSF-M50WH Heinner
0 question about this device. Answer the ones you know or ask your own.
Ask a new question about this device
Download the instructions for your Household Fan in PDF format for free! Find your manual HSF-M50WH - Heinner and take your electronic device back in hand. On this page are published all the documents necessary for the use of your device. HSF-M50WH by Heinner.
USER MANUAL HSF-M50WH Heinner
- Adjustable height
- 3 speeds
- Oscillation
1. INTRODUCTION
Please read the instructions carefully and keep the manual for future information.
This manual is designed to give all necessary instructions concerning installation, use and maintenance of the unit. In order to operate the unit correctly and safely, please read this instruction manual carefully before installation and use.
2. CONTENT OF YOUR PACKAGE
→ Stand fan
→ User manual
→ Certificate of warranty
→ Declaration of conformity
3. SAFETY INSTRUCTIONS
GENERAL
Read all instructions carefully and keep this manual for future reference.
- This appliance can be used by children aged from 8 years and above and persons with reduced physical, sensory, or mental capabilities or lack of experience and knowledge if they have been given supervision or instruction concerning use of the appliance in a safe way and understand the hazards involved. Children shall not play with the appliance. Cleaning and user maintenance shall not be done by children without supervision.
- Children of less than 3 years should be kept away unless continuously supervised. Children aged from 3 years and less than 8 years shall only switch on/off the appliance if it has been placed or installed in its intended normal operating position and they have been given supervision or instruction concerning use of the appliance in a safe way and understand the hazards involved.
- Never insert fingers, pencils, or any other object through the grille when the fan is running.
- Disconnect fan when moving from one location to another.
- Be sure the fan is on a stable surface when operating to avoid overturning.
- DO NOT use the fan in the window, rain may create electrical hazard.
- Indoor and household use only.
WARNING:
- If the supply cord is damaged, it must be replaced by the manufacturer or its service agent or a similarly qualified person to avoid a hazard.
- To protect against the risk of electrical shock, do not immerse the unit, cord, or plug in water or other liquid.
- When the appliance is not in use and before cleaning, unplug the appliance from the outlet.
- When the fan was assembled, the rotor blade guard shall not be taken off anymore.
- Ensure that the fan is switched off from the supply mains before removing the guard.
4. PRODUCT DESCRIPTION

5. USING THE APPLIANCE
PRODUCT INSTALLATION
NOTE:
Before installation, first remove Right-angle bolt from the pole, remove the Spinner and Plastic nut from the motor shaft, and then install.
1. Base installation
Align the lower pole and the chassis, and then fasten securely with Right-angle bolt.


2.Pole installation
Firstly, take down the tighten knob, and align and insert the slot of upper pole down- ward into the hole position; then tightly lock the tighten knob.
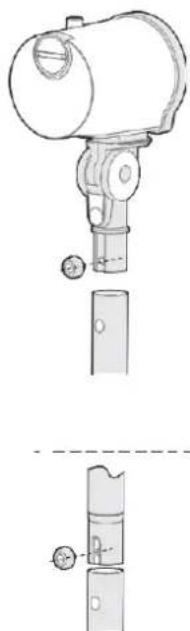
NOTE:
Remove right-angle bolt from the pole before performing installation.
3. Rear guard installation
-
Please unscrew the guard lock nut counterclockwise first.
-
Align the front cover of the motor and the rear guard, hang them and lock with the guard lock nut.
![graph LR A["Convex point aligned with round hole."] --> B["Fix rear guard."] B --> C["Fan assembly with circular head"]](/content/2026/05/1106288/images/73095f6678b35caa0086d236055a72d1d73396fd72cf08e3b811d64d290a7c2a.jpg)
4. Blade installation
Fix rear guard with convex point aligned with round hole.
![graph TD A["Convex aligned with convex of fan blade."] --> B["Tighten counterclockwise lock the blade."] B --> C["Downward arrow to fan blade"] style A fill:#f9f,stroke:#333 style B fill:#ccf,stroke:#333 style C fill:#cfc,stroke:#333](/content/2026/05/1106288/images/8023a12c0eedadff4a555ffa6fa7d0e55c8eb715b6aa492856b102e622fc32b1.jpg)
5.Front guard installation
Align catch of the front guard with the illustrated position of the rear guard.
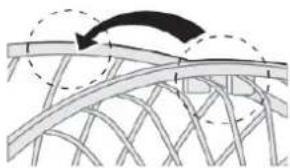
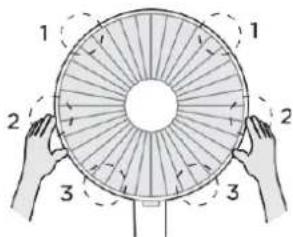
Press guards sequentially with both hands.
Self-catch installation.
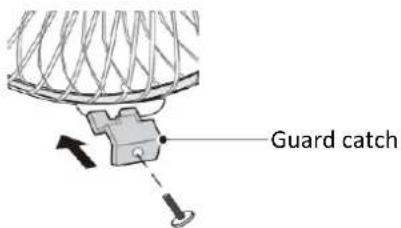
6. Tilt angle adjustment
To adjust the air flow upward or downward, push the grilles lightly to the desired direction.

7. Oscillation control
To make the fan oscillate, press the clutch knob located on the top of the motor housing. To get the directional airflow, pull the clutch knob up to its initial position.

USE INSTRUCTION
Speed Button and Knob Operations
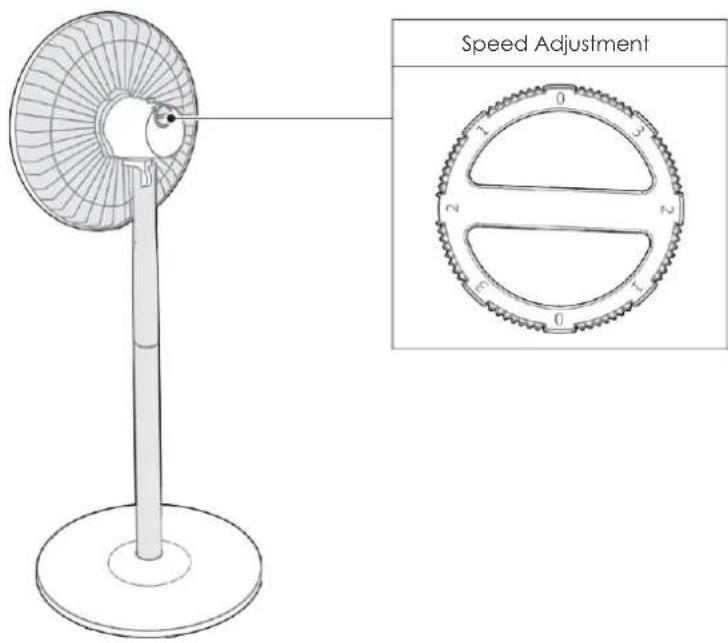
| Function description | |
| 0 | . Stop the product. |
| 1 | . Low speed. |
| 2 | . Medium speed. |
| 3 | . High speed. |
6. CLEANING AND MAINTENANCE
The fan requires minimal maintenance. Do not try to fix it by yourself. Refer to qualified service personnel if service is needed.
- Before cleaning and assembling, unplug the fan power.
- To ensure adequate air circulation to the motor, keep vents at the rear of the motor free of dust. Do not disassemble the fan to remove dust.
- Please wipe the exterior parts with a soft cloth soaking in a mild detergent.
- Do not use any abrasive detergent or solvents to avoid scratching the surface.
- Do not use any of the following as a cleaner: gasoline, thinner.
- Do not allow water or any other liquid entering into the motor housing or interior parts.
- Be sure to unplug from the electrical supply source before cleaning.
- Plastic parts should be cleaned with a soft cloth moisten with mild soap thoroughly remove soapsuds with dry cloth.
7. TROUBLESHOOTING
Operation of your appliance can lead to errors and malfunctions. The following tables contain possible causes and notes for resolving an error message or malfunction. It is recommended to read the table below carefully in order to save your time and money that may cost for calling to the service center.
| Problem | Cause | Solution |
| The machine does not work properly after installed | • The power cable is not plugged in or has poor contact. | Make sure the plug is properly inserted into the socket. |
| • The switch on the body is not turned on. | Turn on the switch on the body. |
CUSTOMER CARE AND SERVICE
Always use original spare parts.
When contacting our Authorised Service Centre, ensure that you have the following data available:
Model and Serial Number.
The information can be found on the rating plate. Subject to change without notice.
TECHNICAL DATA
| Voltage | 220-240V~50Hz |
| Power | 33 W |
| Description | Symbol | Value | Unit |
| Maximum fan flow rate | F | 51,20 | m3/min |
| Fan power input | P | 39,2 | W |
| Service value | SV | 1,31 | (m3/min)W |
| Standby power consumption | PSB | — | W |
| Off power consumption | POFF | O | W |
| Fan sound power level | LWA | 56,15 | dB(A) |
| Maximum air velocity | C | 2,75 | meters/sec |
| Seasonal electricity consumption | Q | 12,54 | kWh/a |
| Measurement standard for service value | IEC 60879:1986 (corr.1992) | ||
Thank you for purchasing this product. If you need support with your product, visit our website using the links below.
Get User manuals: https://www.heinner.ro
Get Service information: https://www.heinner.ro

Environment friendly disposal
You can help protect the environment!
Please remember to respect the local regulations: hand in the non-working electrical equipment's to an appropriate waste disposal center.

HEINNER is a registered trademark of Network One Distribution SRL. Other brands and product names are trademarks or registered trademarks of their respective holders.
No part of the specifications may be reproduced in any form or by any means or used to make any derivative such as translation, transformation, or adaptation without permission from NETWORK ONE DISTRIBUTION.
Copyright © 2013 Network One Distribution. All rights reserved.
www.heinner.com, http://www.nod.ro

This product is in conformity with norms and standards of European Community.

Importer: Network One Distribution
Marcel Iancu Street, 3-5, Bucharest, Romania
Tel: +40 21 211 18 56, www.heinner.com, www.nod.ro
NOTĂ:
ЗАБЕЛЕЖКА:
MEGJEGYZÉS:


- INTRODUCTION
- CONTENT OF YOUR PACKAGE
- SAFETY INSTRUCTIONS
- GENERAL
- WARNING
- PRODUCT DESCRIPTION
- USING THE APPLIANCE
- PRODUCT INSTALLATION
- NOTE
- BASE INSTALLATION
- 2.POLE INSTALLATION
- REAR GUARD INSTALLATION
- BLADE INSTALLATION
- 5.FRONT GUARD INSTALLATION
- TILT ANGLE ADJUSTMENT
- OSCILLATION CONTROL
- USE INSTRUCTION
- CLEANING AND MAINTENANCE
- TROUBLESHOOTING
- CUSTOMER CARE AND SERVICE
- TECHNICAL DATA
- ENVIRONMENT FRIENDLY DISPOSAL
- NOTĂ
- ЗАБЕЛЕЖКА
- MEGJEGYZÉS
Brand : Heinner
Model : HSF-M50WH
Category : Household Fan