
TSA 460 - Pregnant BLAUPUNKT - Free user manual and instructions
Find the device manual for free TSA 460 BLAUPUNKT in PDF.
User questions about TSA 460 BLAUPUNKT
0 question about this device. Answer the ones you know or ask your own.
Ask a new question about this device
Download the instructions for your Pregnant in PDF format for free! Find your manual TSA 460 - BLAUPUNKT and take your electronic device back in hand. On this page are published all the documents necessary for the use of your device. TSA 460 by BLAUPUNKT.
USER MANUAL TSA 460 BLAUPUNKT
natural_image
Exterior view of a Blaupunkt TSR 460 device with transparent casing and ventilation slots (no readable text or symbols beyond branding)http://www.blaupunkt.com
DEUTSCH 3
Abbildungen 46
ENGLISH 8
Illustrations 46
FRANÇAIS.... 13
Illustrations 46
ITALIANO 18
Illustrazioni 46
NEDERLANDS 23
Afbeeldingen 46
SVENSKA 28
Illustrationer 46
ESPAÑOL 32
Illustraciones 46
PORTUGUÊS 37
Ilustrações 46
DANSK 42
Illustrationer 46
DEUTSCH
Einführung
Class D 4/3/2 Channel Amplifier TSA 460
Congratulations on purchasing this high-quality car audio amplifier.
As innovators in the world of car hi-fi, we are pleased to introduce you to the new future-oriented technology that is integrated in our Class D amplifiers.
Class D amplifiers are considerably more efficient than standard analogue technologies. The efficiency of analogue amplifiers is around 60 % whilst our digital power amplifiers convert up to 80 % of the input energy into sound. You could describe the results as “more sound produced from less”.
Furthermore, digital amplifiers heat up so little that they can also be installed in places that are not very well ventilated, such as beneath the seats.
To ensure that the sound quality is optimised, we recommend that the installation of your new Blaupunkt amplifier be carried out by an authorised Blaupunkt dealer.
Please allow us to make a few comments on the issue of health:
When listening to music in your vehicle, remember that continuous sound pressure levels of over 100 dB can lead to permanent hearing damage and even total hearing loss. Modern high-powered systems and high-quality loudspeaker configurations are capable of producing sound pressure levels exceeding 130 dB.
We are convinced that you will very quickly appreciate the advantages of our Class D amplifiers and we would like to take this opportunity to wish you a lot of fun with this new component in your sound system.
We provide a manufacturer guarantee for our products bought within the European Union. You can view the guarantee conditions at www.blaupunkt.de or ask for them directly at:
Blaupunkt GmbH
Hotline
Robert-Bosch-Str. 200
D-31139 Hildesheim
Safety notices
Installation and connection instructions
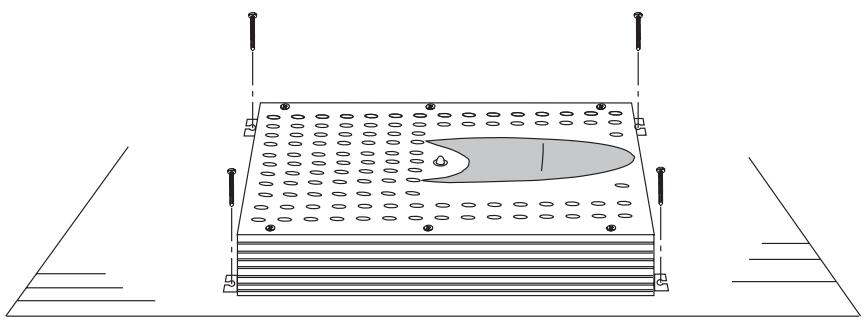
The battery's negative terminal must be disconnected for the entire time it takes to install and connect the device.
You must observe the vehicle manufacturer's safety notices (airbags, alarm systems, trip computers, immobilizers) regarding this. The Blaupunkt power amplifier must be professionally secured in position for reasons of safety in the event of an accident. The surface to which it is attached must be suitable for the screws that are included and must provide a secure hold.
When drilling holes, you must make sure that none of the vehicle components (e.g. battery, cables, fuse box) can be damaged in the process.
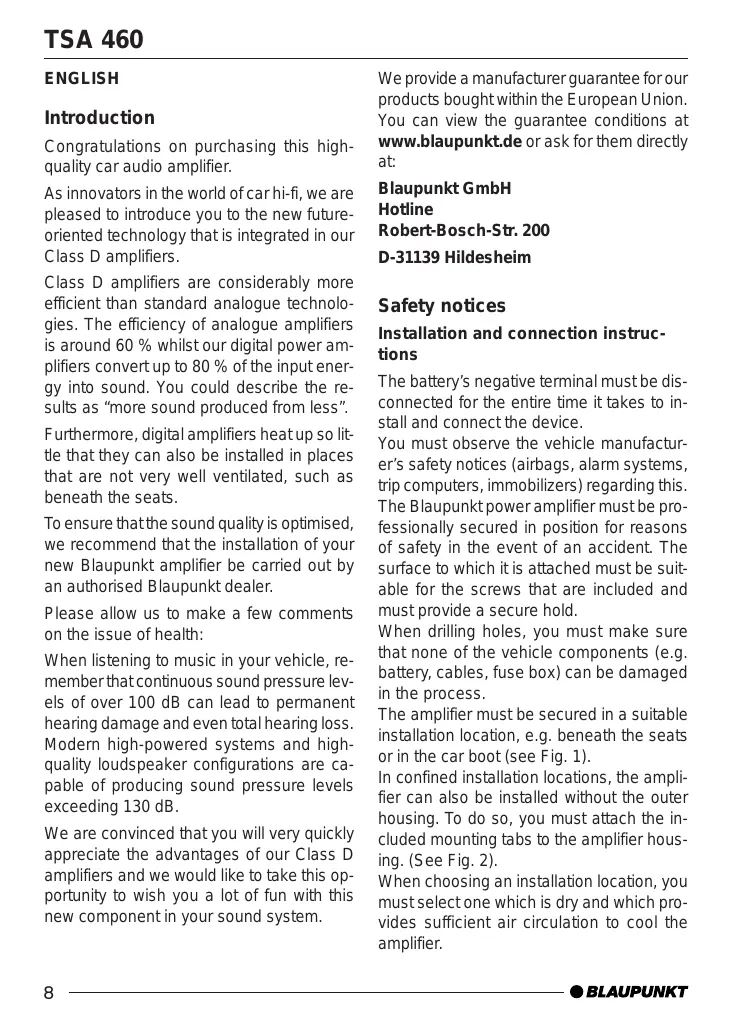
The amplifier must be secured in a suitable installation location, e.g. beneath the seats or in the car boot (see Fig. 1).
In confined installation locations, the amplifier can also be installed without the outer housing. To do so, you must attach the included mounting tabs to the amplifier housing. (See Fig. 2).
When choosing an installation location, you must select one which is dry and which provides sufficient air circulation to cool the amplifier.
Use cable grommets to protect cables against sharp-edged holes.
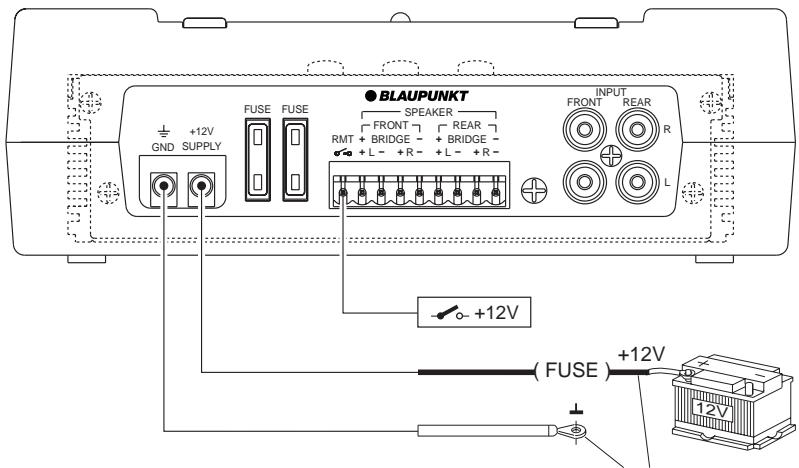
Use loudspeakers with an impedance of 2-4 Ω. Observe the maximum load rating (music power rating).
Use loudspeaker connecting cables up to 2.5 mm ^4 . Do not connect loudspeakers to earth – only use the correct terminals as indicated.
The cross section of the positive and negative cables must be at least 6 mm ^4 .
The positive cable between the battery and the amplifier must be protected directly at the battery using a fuse holder (50 amperes).
Removing the outer housing (see Fig. 3)
- Undo the cover's screw (A) that is located above the switches and controls. Afterwards, lift the cover and carefully remove it.
- Undo the four screws (B) that secure the top half of the housing shell and then remove the top half of the housing.
- Undo the six screws (C) that secure the underside of the housing and then take the amplifier out of the bottom half of the housing shell.
Class D 4/3/2 Channel Amplifier TSA 460
The amplifier is suitable for connection to car radios that are equipped with RCA connections.
If you want to connect it to car radios that are equipped with an ISO connection, please use the Blaupunkt ISO-RCA adapter.
Usage options and loudspeaker connection:
| TSA 460 | ||
| Channels | 4/3/2 | |
| Max. power4 ohms | 4 x 120 watts /2 x 300 watts | Fig. 7,8, 9 |
| Max. Power2 ohms | 4 x 180 watts | Fig. 7,9 |
| RMS power4 ohms | 4 x 60 watts /2 x 150 watts | Fig. 7,8, 9 |
| RMS power2 ohms | 4 x 90 watts | Fig. 7,9 |
| Frequencyresponse | 20 - 20000 Hz | |
| Signal-to-noiseratio | > 95 dB/A | |
| Input sensitivity | 0.3 - 8 V | |
| Stability | 2 ohms | |
| Low pass filter(Low Pass) | 50 - 250 Hz | |
| High pass filter(High Pass) | 50 - 250 Hz | |
| Subsonic filter | 20 Hz, switchable | |
| DimensionsWxHxD (mm)Inner housingOuter housing | 205 x 45 x 177253 x 67.5 x 210 |
Positive/negative connection
The cross section of the positive and negative cables must be at least 6 mm ^4 .
Use cable grommets to protect cables against sharp-edged holes. Securely screw a standard 6 mm ^2 negative cable to an interference-free earth connection point (bolt connected to the car body, car body sheet metal) – though do not connect it to the negative terminal of the battery. Scratch the surface down to the bare metal at the point at which the earth contact is made and apply graphite grease.
Connection examples
Before you can connect the cables to the amplifier, you must first detach the top half of the housing shell (see "Removing the outer housing").
Connecting the voltage supply ...... Fig. 4
Connection to car radios with
RCA output ...... Fig. 5
Connection to car radios with
loudspeaker output ...... Fig. 6
Loudspeaker connections ...... Fig. 7, 8, 9
Tri mode ...... Fig. 10
- +12V
The switching line must be connected when connection is carried out using the RCA jacks or the loudspeaker jacks of the car radio.
Tri mode
You can operate 2 loudspeakers and at the same time switch on a third loudspeaker in mono mode (bridge mode) (see Fig. 10).
GAIN control
You can use the GAIN control to adjust the input sensitivity of the Blaupunkt power amplifier to the output voltage of your car radio's preamp output.
The setting can be adjusted between 0.3 V and 8 V.
When connecting a car radio produced by another manufacturer, you must adjust the input sensitivity in accordance with the information provided by the manufacturer.
Please note that the GAIN control is not a control for adjusting the volume!
INPUT
Preamp inputs for the right and left channels. Please use high-quality Blaupunkt RCA cables for this connection.
LP / HP / FULL switch
Before installing, adjust the X-OVER switch on the power amplifier to set the low pass filter (LP), high pass filter (HP) or full-range setting (FULL). If you select the FULL position, the full frequency response will be used.
Using the integrated crossovers is particularly useful in the case of multi-channel sound systems with a separate subwoofer.
In order to obtain the best sound when a subwoofer is connected, the subwoofer must be separated as far as the frequencies it receives are concerned, i.e. it must only be fed with low frequencies (bass).
To ensure that this is the case, select LP and use the crossover frequency control to adjust the upper frequency to between 50 Hz and 250 Hz. This ensures that every subwoofer is optimally separated as far as the frequencies it receives are concerned.
If HP is selected, you can use the associated crossover frequency control to adjust the lower cut-off frequency to between 50 Hz and 250 Hz.
If you want to precisely optimise the acoustic settings of the crossover, we recommend you obtain advice from a Blaupunkt dealer.
It is very important that you take into account the specifications of the loudspeakers being used whilst you are adjusting the crossover.
Crossover frequency control (LP FREQ + HP FREQ)
If the crossover is activated (LP or HP) by adjusting the position of the X-OVER switch, you can then use the corresponding control to adjust the crossover frequency of the respective filter to anywhere between 50 Hz and 250 Hz (i.e. continuously variable setting). This control has no function in full-range mode.
Settings for a subwoofer
In order to obtain the best sound when a subwoofer is connected, the subwoofer must be separated as far as the frequencies it receives are concerned, i.e. it must only be fed with low frequencies (bass).
-
Firstly, turn down the GAIN control on the amplifier to minimum and set the LP frequency control to its centre position.
-
Now play some music on your car sound system that you are very familiar with and that contains some low bass (e.g. pop music). Now slowly increase the volume of the subwoofer by turning the GAIN control on the amplifier in a clockwise direction until you feel that the sound of the music is well balanced, i.e. the bass is neither too weak nor overpowering.
-
Now listen to the relationship between deep male voices and the upper bass and also take note of the relationship between the upper bass (kick bass) and the lower bass. The bass should ideally sound crisp and have a clear low bass component, and male voices should neither sound too weak nor should they billow out. You can stop making adjustments if you are happy with the sound. If not, move on to steps 4 and 5.
-
If male voices seem to billow out or the low bass is too weak, you should turn the LP frequency control slightly towards minimum and then continue making your adjustments as described in point 2 onwards.
-
If the bass sounds deep but dirty and booming or the male voices sound too weak, you should turn the LP frequency control slightly towards maximum. Next, continue making your adjustments as described in point 2 onwards.
If you want to precisely optimise the acoustic settings of the crossover, we recommend you obtain advice from a Blaupunkt dealer.
It is very important that you take into account the specifications of the loudspeakers being used whilst you are adjusting the crossover.
SUB SONIC
The subsonic filter is used when a subwoofer is connected to the amplifier. It can be activated in order to protect the subwoofer against mechanical overload by low frequencies that are outside our hearing range.
Integrated fuses (FUSE)
The fuses that are integrated in the amplifier protect the power amplifier and the entire electrical system in the event of a fault. If the fuse needs to be replaced, never bypass/bridge the fuse and never replace it with fuse types that are designed for higher currents.
Power-on indicator (POWER / PROTECT)
Green light: Power amplifier switched on, normal operating mode.
Red light: Power amplifier has been electronically deactivated due to a fault.
Subject to changes.
FRANÇAIS
Introduction
Class D 4/3/2 Channel Amplifier TSA 460
Interruptor LP / HP / FULL
Class D 4/3/2 Channel Amplifier TSA 460
Regulator for delefrekvens (LP FREQ + HP FREQ)
natural_image
Technical line drawing of a mechanical component with mounting feet and structural ribs (no text or symbols)Fig. 1
natural_image
Technical line drawing of a rectangular electronic device with a central slot and mounting feet (no text or symbols)Fig. 2

text_image
Technical diagram of a device assembly with labeled components and directional arrows indicating assembly steps.Fig. 3
text_image
BLAUPUNKT SPEAKER FRONT +12V RMT + BRIDGE - + L - +R - + +L - +R - +L - +R - INPUT FRONT +12V REAR R GND SUPPLY FUSE +12V (FUSE) +12V 12VFig. 4
BPC-03, 6mm ^4
7 607 603 093

Fig. 5
2x BEC-04, 6m
7 607 604 093

text_image
7 607 873 093 +12V BLAUPUNKT SPEAKER FRONT R T + BRIDGE - BRIDGE - L - +R- +L - +R- INPUT FRONT R L 2x BEC-04, 6m 7 607 604 093 GND SUPPLY FUSE FUSE +12V INPUT Fig. 6
text_image
GND +12V SUPPLY FUSE FUSE ●BLAUPUNKT SPEAKER FRONT RMT + BRIDGE - + L - + R - + L - + R - REAR + BRIDGE - + L - + R - INPUT FRONT R L 4Ω / 4 x 120 watts 2Ω / 4 x 180 wattsFig. 7
text_image
GND +12V SUPPLY FUSE FUSE ● BLAUPUNKT SPEAKER FRONT RMT + BRIDGE - + BRIDGE - + L - + R - + L - + R - INPUT FRONT R L 4Ω / 2 x 300 watts + - 4Ω + - 4ΩFig. 8
text_image
BLAUPUNKT SPEAKER FRONT RMT + BRIDGE - + L - + R - + BRIDGE - + L - + R - INPUT FRONT REAR R L 4Ω / 4 x 120 watts 2Ω / 4 x 180 wattsFig. 9
Tri mode

text_image
BLAUPUNKT SPEAKER FRONT REAR RMT + BRIDGE - + BRIDGE - + L - + R - + L - + R - INPUT FRONT REAR R L 4Ω / 2 x 120 watts 2Ω / 2 x 180 watts + - + - + - 4Ω / 1 x 300 wattsFig. 10
Service-Nummern / Service numbers / Numéros du service après-vente / Numeri del servizio di assistenza / Servicenummers / Telefonnummer för service / Números de servicio / Número de serviço / Servicenumre
| Country: | Phone: | Fax: | WWW: | |
| Germany | (D) | 0180-5000225 | 05121-49 4002 | http://www.blaupunkt.com |
| Austria | (A) | 01-610 390 | 01-610 393 91 | |
| Belgium | (B) | 02-525 5454 | 02-525 5263 | |
| Denmark | (DK) | 44 898 360 | 44-898 644 | |
| Finland | (FIN) | 09-435 991 | 09-435 99236 | |
| France | (F) | 01-4010 7007 | 01-4010 7320 | |
| Great Britain | (GB) | 01-89583 8880 | 01-89583 8394 | |
| Greece | (GR) | 0800-550 6550 | 01-576 9473 | |
| Ireland | (IRL) | 01-4149400 | 01-4598830 | |
| Italy | (I) | 02-369 6331 | 02-369 6464 | |
| Luxembourg | (L) | 40 4078 | 40 2085 | |
| Netherlands | (NL) | 023-565 6348 | 023-565 6331 | |
| Norway | (N) | 66-817 000 | 66-817 157 | |
| Portugal | (P) | 01-2185 00144 | 01-2185 11111 | |
| Spain | (E) | 902-120234 | 916-467952 | |
| Sweden | (S) | 08-7501500 | 08-7501810 | |
| Switzerland | (CH) | 01-8471644 | 01-8471650 | |
| Czech. Rep. | (CZ) | 02-6130 0441 | 02-6130 0514 | |
| Hungary | (H) | 01-333 9575 | 01-324 8756 | |
| Poland | (PL) | 0800-118922 | 022-8771260 | |
| Turkey | (TR) | 0212-3350677 | 0212-3460040 | |
| USA | (USA) | 800-2662528 | 708-6817188 | |
| Brasil(Mercosur) | (BR) | +55-19 3745 2769 | +55-19 3745 2773 | |
| Malaysia(Asia Pacific) | (MAL) | +604-6382 474 | +604-6413 640 |