
SOLO REVERSE - Stroller JANE - Free user manual and instructions
Find the device manual for free SOLO REVERSE JANE in PDF.
| Product type | Reversible stroller |
| Brand | JANE |
| Model | SOLO REVERSE |
| Maximum supported weight (child) | 15 kg |
| Recommended age | From 6 months (up to 15 kg) |
| Maximum basket weight | 4 kg |
| Attachment system | PRO-FIX (compatible with bassinet and car seats) |
| Front wheels | Swivel with directional lock |
| Brake | On both rear wheels (parking) |
| Suspension | Adjustable (soft or hard) |
| Backrest | 3 recline positions |
| Leg rest | 4 positions |
| Push handle | 5 adjustable positions |
| Folding | Compact (recommended in forward-facing direction) |
| Canopy | Adjustable with integrated sunshade |
| Safety harness | 5-point (safety belt) |
| Rain cover | Included |
| Bumper bar | Removable (do not use in reversible position) |
| Care | Clean with lukewarm water and soap; avoid prolonged sun exposure |
| Use for jogging/rollerblading | Not recommended |
| Compatible accessories | Pro Bassinet, Strata car seat, Rebel Pro car seat |
Frequently Asked Questions - SOLO REVERSE JANE
User questions about SOLO REVERSE JANE
0 question about this device. Answer the ones you know or ask your own.
Ask a new question about this device
Download the instructions for your Stroller in PDF format for free! Find your manual SOLO REVERSE - JANE and take your electronic device back in hand. On this page are published all the documents necessary for the use of your device. SOLO REVERSE by JANE.
USER MANUAL SOLO REVERSE JANE
natural_image
Illustration of a baby stroller being adjusted for a hand using a tool, with no text or symbols present.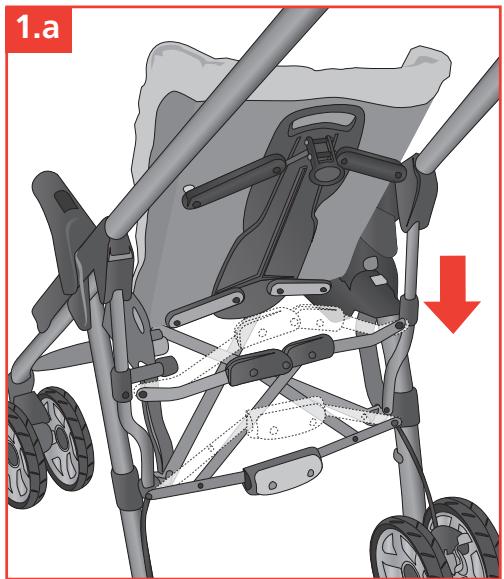
natural_image
Illustration of a baby stroller with visible frame structure and a red downward arrow indicating motion (no text or symbols)3
natural_image
Illustration of a stroller with hand operating the blade, showing red rotation arrows (no text or symbols)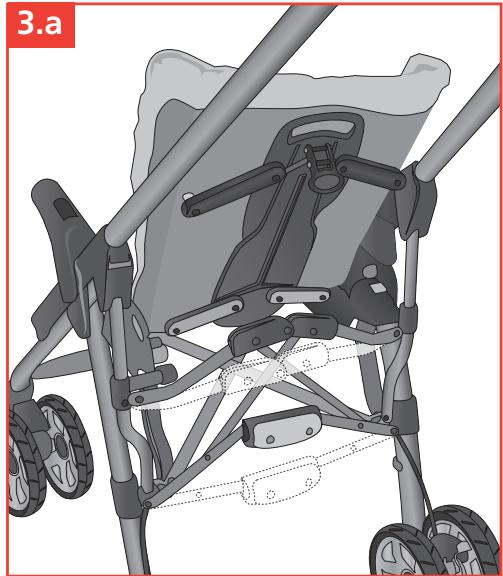
natural_image
Illustration of a baby stroller with wheels and mechanical arms (no text or symbols)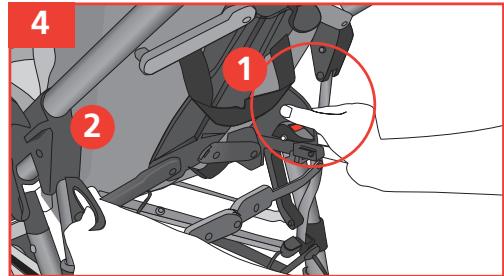

natural_image
Mechanical assembly diagram showing a hand operating a bracket with a red arrow indicating motion direction (no text or symbols present)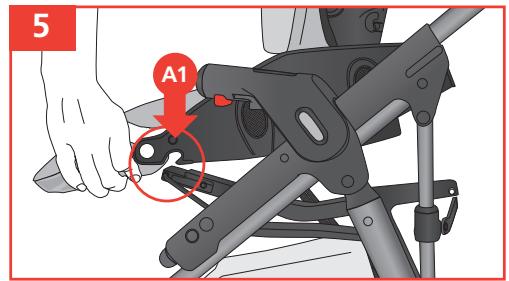
natural_image
Illustration of a hand operating a camera lift with a red circle highlighting the handle (no text or symbols present)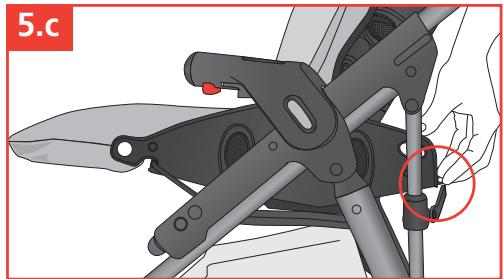
natural_image
Mechanical assembly diagram showing a folding tool with a highlighted section (no text or symbols)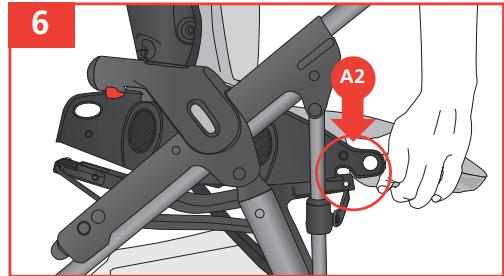
natural_image
Illustration of a hand operating a mechanical device with a red circle highlighting a component (no text or symbols present)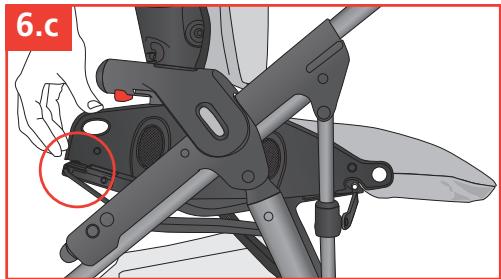
natural_image
Mechanical assembly diagram showing a hand operating a mechanical component with a red circle highlighting a specific part (no text or symbols present)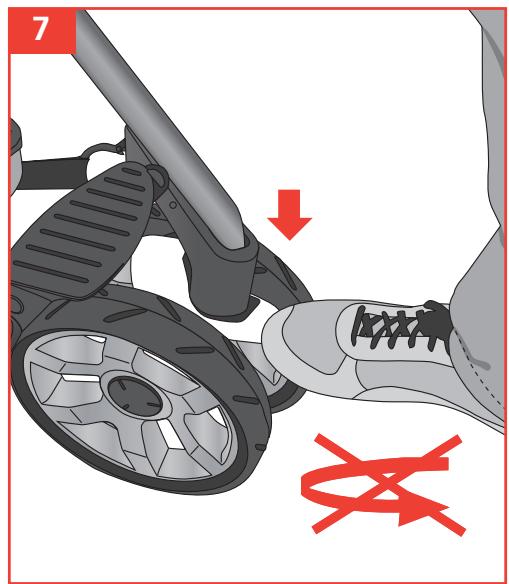
natural_image
Illustration of a stroller with a hand and foot, showing a red downward arrow and red X marks (no text or symbols)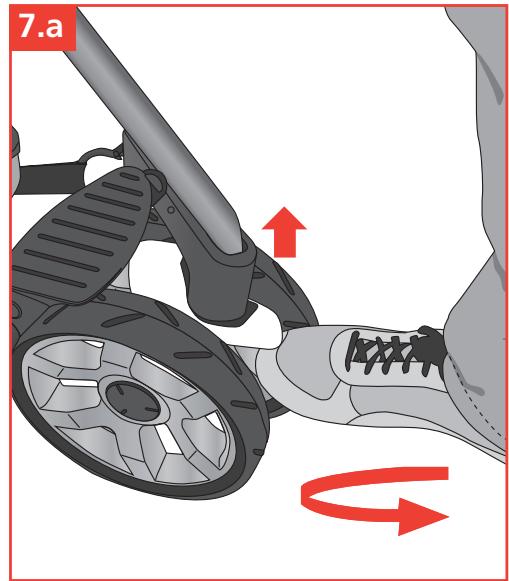

9
natural_image
Illustration of a car seatbelt device with two red circles highlighting the seat (no text or symbols present)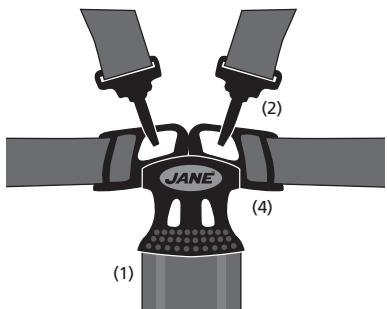
natural_image
Illustration of a hand holding a JANE-branded eyewear headset (no text or symbols on the device itself)10
natural_image
Diagram of a vehicle's suspension system showing two large tires and a red brake component (no text or labels)SUSPENSION
10.a
natural_image
Diagram of a vehicle's upper suspension system showing two large tires and a central hub with red components (no text or labels)SUSPENSION
natural_image
Close-up of a hand using a mechanical component to adjust a cylindrical part, with a red arrow indicating the process (no text or symbols present)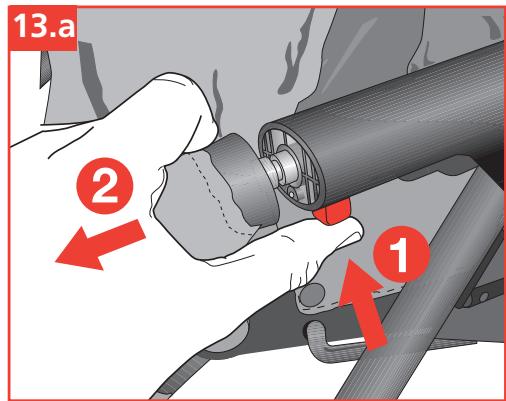
natural_image
Mechanical assembly diagram showing a lever and bracket with a red arrow indicating motion direction (no text or symbols present)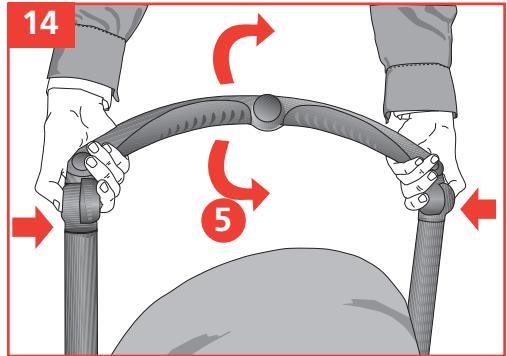
15
natural_image
Illustration of hands adjusting a car seatbelt with red arrows indicating movement (no text or symbols)15.a
natural_image
Illustration of a child in a stroller with visible legs, wheels, and a foot wearing a shoe (no text or symbols)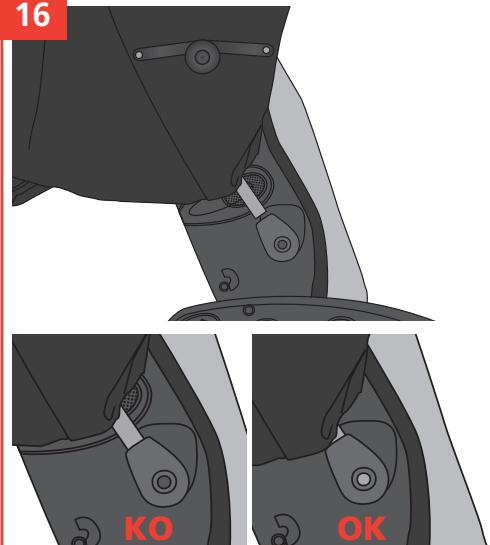
natural_image
Two transparent baby strollers with transparent cover, displayed side by side (no text or symbols visible)SOLO REVERSE
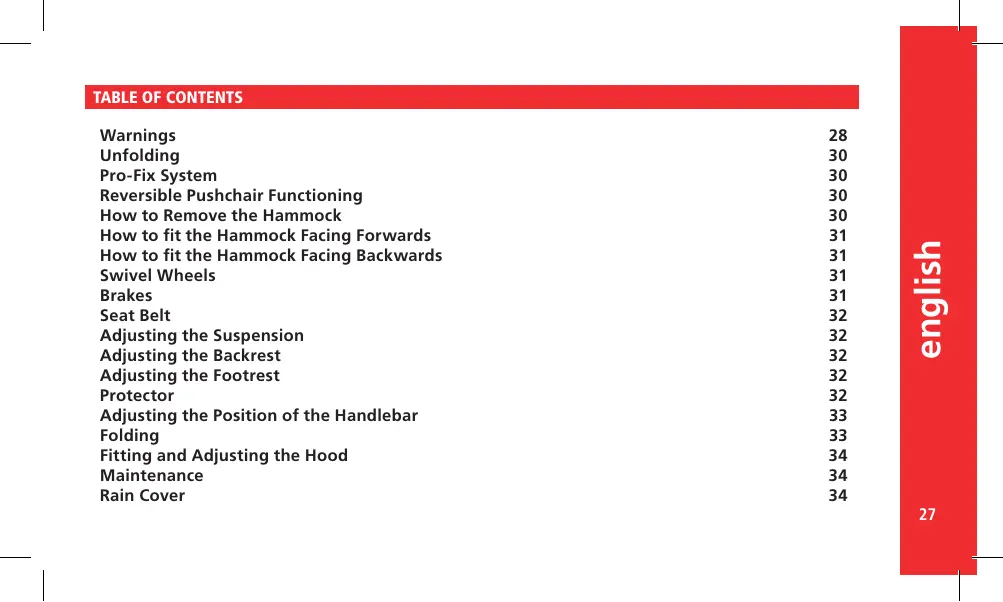
INDICE
Advertencias 20
Desplegado 22
Sistema Pro-Fix 22
Reversible Pushchair Functioning 30
How to Remove the Hammock 30
How to fit the Hammock Facing Forwards 31
How to fit the Hammock Facing Backwards 31
Swivel Wheels 31
Brakes 31
Seat Belt 32
Adjusting the Suspension 32
Adjusting the Backrest 32
Adjusting the Footrest 32
Protector 32
Adjusting the Position of the Handlebar 33
Folding 33
Fitting and Adjusting the Hood 34
Maintenance 34
Rain Cover 34
WARNING
Read these instructions carefully before use and keep them for future reference. Your child's safety may be affected if you do not follow these instructions.
This vehicle is intended for children from 6 months and up to 15 kg.
Suitable for children under 6 months old only with accessories approved by JANÉ.
Keep this instruction book for future reference.
WARNING: It may be dangerous to leave your child unattended. WARNING: Ensure that all the locking devices are engaged before use.
WARNING: Use a harness as soon as your child can sit unaided.
WARNING: This seat is not suitable for children under 6 months. WARNING: Any load hanging from the handlebar will affect the stability of the pushchair.
WARNING: Always use the crotch strap in combination with the waist belt.
WARNING: Check that the pram body or seat unit attachment devices are correctly engaged before use.
WARNING: This seat is not suitable for running or skating.
The maximum amount carried in the basket must never exceed the weight indicated on the basket (4 kg).
This pushchair may only be used by a child.
Never use accessories that have not been approved by JANÉ, S.A.
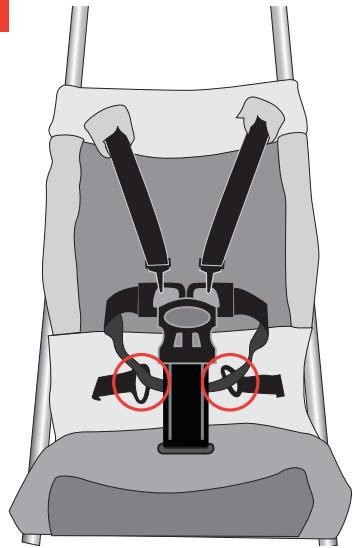
The two side fastening points of the seat can be used to fasten a supplementary harness (see section 9).
WARNING: The child should be kept away from the mobile parts when the responsible adult is handling these. The appearance of cutting, compression and pinch points are inevitable during these operations.
WARNING: It is important to make sure that the child is kept away from the pushchair while it is being folded or unfolded. The appearance of cutting, compression and pinch points are inevitable during these operations.
WARNING: Never leave the child in the pushchair when going up or down stairs or when travelling in any mode of transport. WARNING: Never allow the child to stand up on the footrest or footboard.
WARNING: Do not put weight on top of the hood.
WARNING: When the brake is on make sure that the pushchair has braked correctly. It may be necessary to push the pushchair slightly for the brake to be fully activated.
1.- UNFOLDING
To unfold your SOLO REVERSE pushchair simultaneously pull the buttons on the handlebar. 1
Once it is unfolded make sure that the cross on the back is completely taut, as this locks the pushchair so that it does not accidentally fold up. 1.a
Note: When unfolding the pushchair with the hammock in the reversible position, make sure that the footrest does not get caught on the cross on the back as it could break it.
WARNING: It is important to make sure that the child is kept away from the pushchair while it is being folded or unfolded.
WARNING: The appearance of cutting, compression and pinch points are inevitable during these operations.
2.- PRO-FIX SYSTEM
The chassis of your pushchair includes the PRO-FIX system, ready to incorporate both the Capazo Pro, as well as the baby carriers Strata, Rebel Pro. The PRO FIX system makes it easy to fasten and remove these accessories onto and off the chassis, in a quick, simple and safe way, with them securely fastened onto the chassis. To do this, follow the instructions for these accessories carefully.
To access the PRO-FIX system zone raise the two covers that cover it.
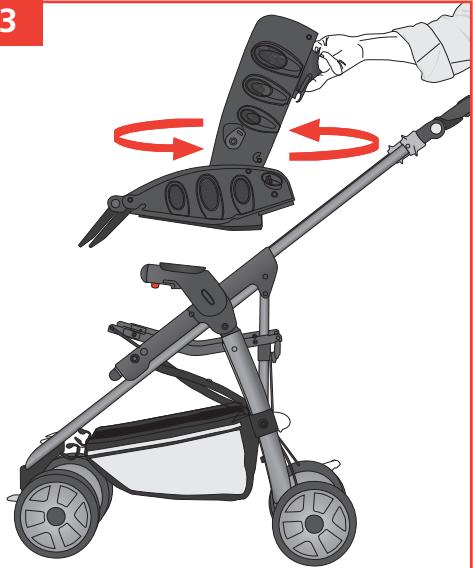
3.- REVERSIBLE PUSHCHAIR FUNCTIONING
Your SOLO REVERSE pushchair is fitted with a reversible hammock so your child can sit facing forwards or facing you. When your child is small he will like to sit facing you, and as he grows he will become more curious and want to sit facing forwards. 3
It is advisable to have the rear compass loose when you are turning the hammock. Remember to tighten it whenever you use the pushchair. 3.a
It is advisable to completely fit one side of the hammock before starting to fit the other, this makes it easier.
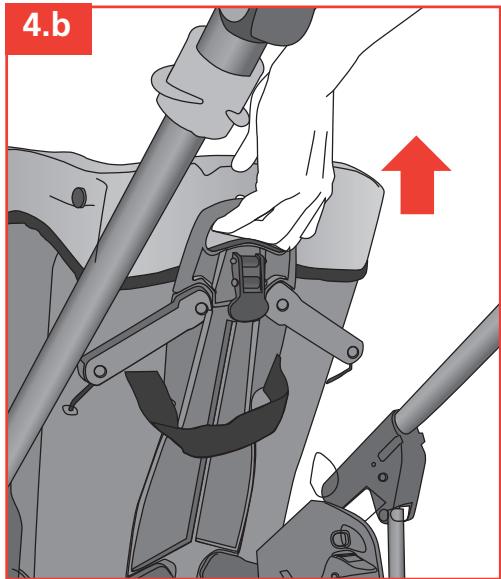
4.- HOW TO REMOVE THE HAMMOCK
Press the two grey buttons simultaneously and lift the hammock by the holes in the sides of it. 4 4.a When it is released pull the handle on the backrest upwards. 4.b
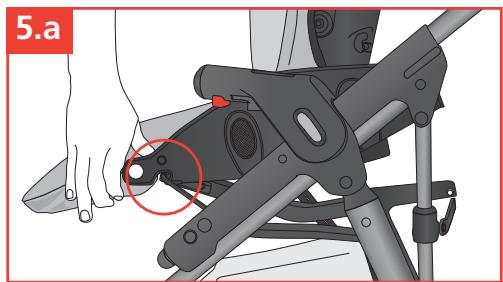
5.- HOW TO FIT THE HAMMOCK FACING FORWARDS
Fit the opening in the hammock into the A1 front fastener.
5 5.a
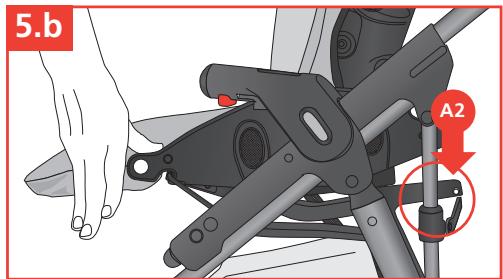
With the hammock supported in A1 lower the rear part until it fits into A2.
When one side is fitted repeat the operation with the other side. 5.b 5.c
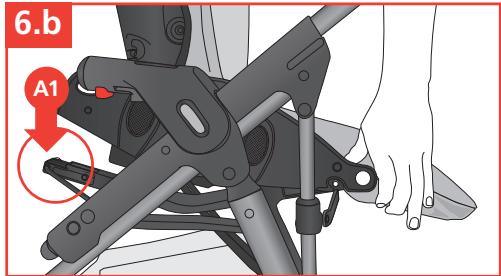
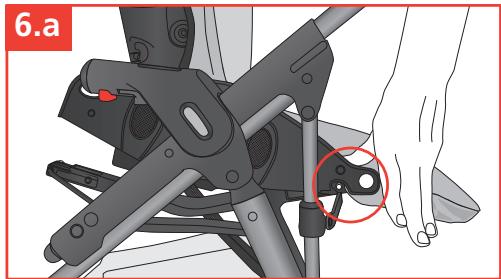
Fit the cog in the hammock into the A2 fastener. 6 6.a
With the hammock supported in A2 lower the rear part until it fits into A1. 6.b 6.c
When one side is fitted repeat the operation with the other side.
7.- SWIVEL WHEELS
Your SOLO REVERSE has front swivel wheels that can be steered or the steering can be locked.
To lock it, push the lever downwards once the wheels are aligned with the longitudinal axle of the pushchair. 7
To unlock the steering, pull the lever upwards. 7.a
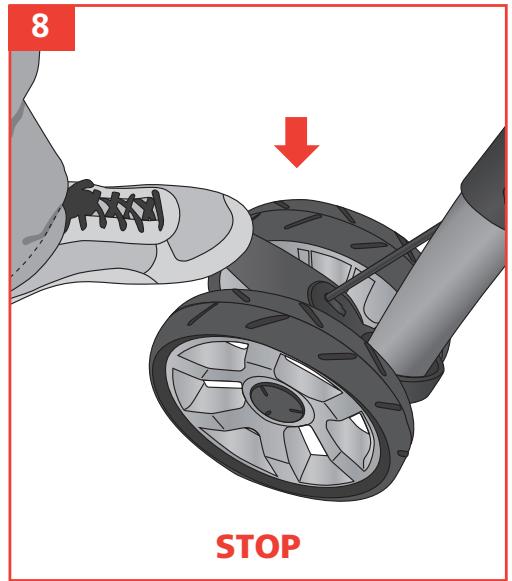
8.- BRAKE
Your SOLO REVERSE has a braking system that acts simultaneously on both rear wheels. Use it as a parking brake whenever you can, it is an important safety element.
Press the brake lever to put the brake on. 8 Push the lever upwards to release the brake. 8.a
WARNING: When the brake is on make sure that the pushchair has braked correctly. It may be necessary to push the pushchair slightly for the brake to be fully activated.
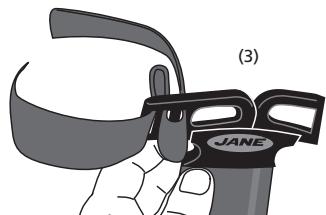
9.- SEAT BELT
Your SOLO REVERSE has a safety harness so that your child is always safe. 9
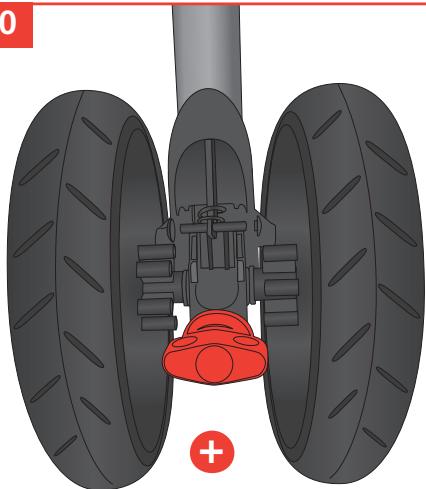
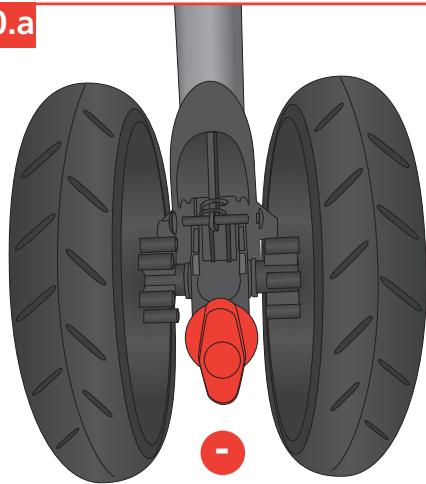
10.- ADJUSTING THE SUSPENSION
The suspension on your SOLO REVERSE is adjustable. You can choose between a softer or harder touch for the suspension. If the suspension adjuster is horizontal the suspension will be softer. 10 If the suspension adjuster is vertical the suspension will be harder. 10.a
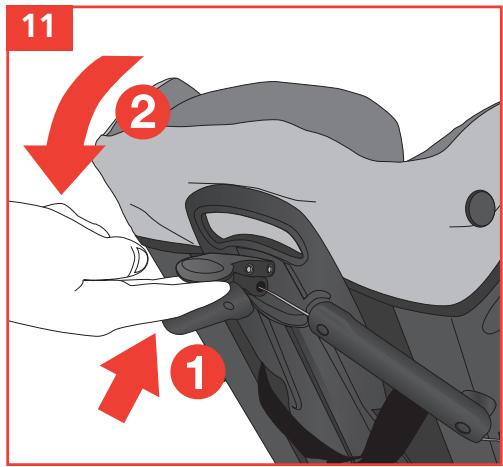
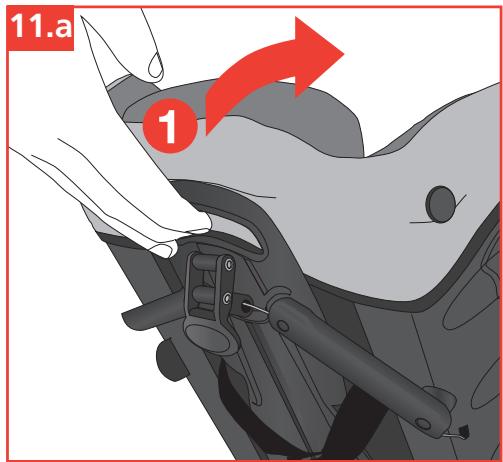
The backrest of the SOLO REVERSE can be reclined to make the child more comfortable. The reclining system has 3 positions. Pull the rear lever while you lower the backrest. 11 To raise it there is no need to press the lever, simply push the backrest as it is fitted with a free movement mechanism.
11.a
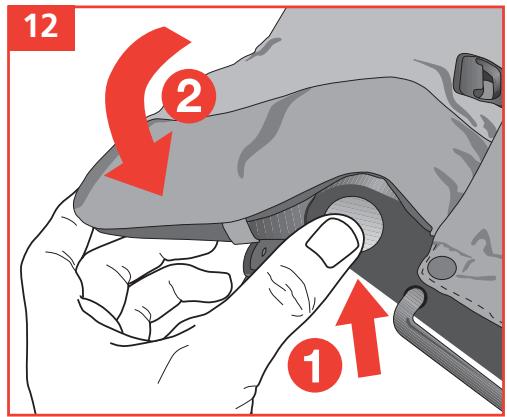
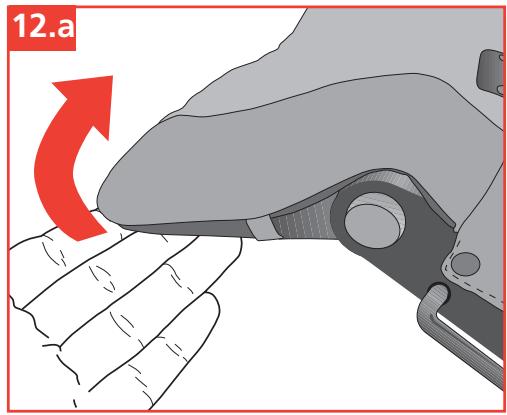
12.- ADJUSTING THE FOOTREST
The position of the footrest can also be adjusted to suit the child's position. It has 4 different positions. Press button A situated on the footboard on both sides of the pushchair while you move the footrest downwards. 12 To move it upwards you don't need to press the button as it has a free movement mechanism. 12.a
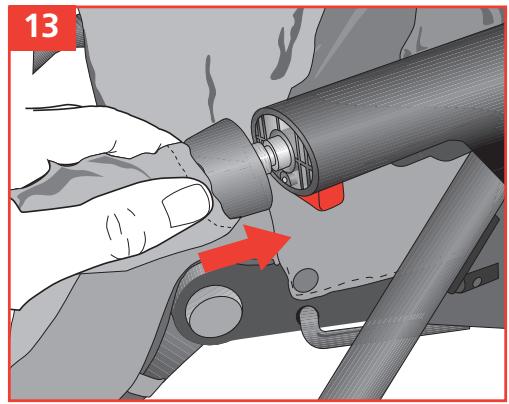
13.- PROTECTOR
To get the protector out, press the button situated on the lower part of the armrest.
Once it is out, put the covers in place designed to cover up the holes of the protector.
These covers have two functions, an aesthetic one as they hide the hole and a safety one as they prevent the child from putting his fingers in the hole.
Do not use the protector when the hammock is in the reversible position, as the pushchair can not be folded in this position with the protector on. 13 13.a
WARNING: The child should be kept away from the mobile parts when the responsible adult is handling these. The appearance of cutting, compression and pinch points are inevitable during these operations.
14.- ADJUSTING THE POSITION OF THE HANDLEBAR
Your SOLO REVERSE has a system making it possible to adjust the position of the handlebar to use it more comfortably. Press the button and keep it pressed while you adjust the position of the handlebar. It has 5 positions so you can choose the one that suits you best. 14
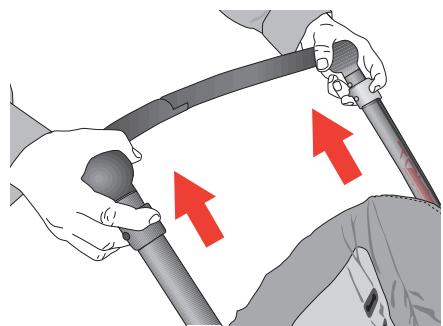
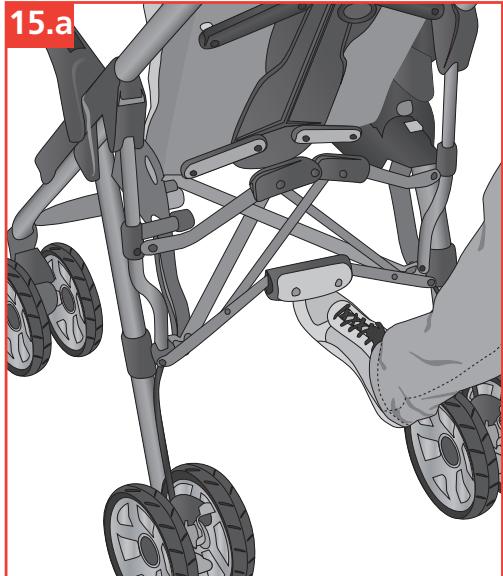
15.- FOLDING
When folding the pushchair it is advisable to fold it with the hammock facing forwards. The pushchair will be more compact like that and it will be easier to unfold. It is also possible to fold the pushchair with the hammock facing the mother, but folding it in this position is not optimal.
Simultaneously pull the 2 handles on the handlebar upwards while raising the pedal on the lower compass as shown in the diagram. 15 15.a
Then push the handlebar downwards so the pushchair folds up.
Lastly, use the backrest adjustment mechanism so that your SOLO REVERSE is left in the most compact folded position.
Note: If you fold the pushchair up with the hammock in the reclined position the hood may come loose.
When unfolding the pushchair with the hammock in the reversible position, make sure that the footrest does not get caught on the cross on the back as it could break it.
WARNING: It is important to make sure that the child is kept away from the pushchair while it is being folded or unfolded.
WARNING: The appearance of cutting, compression and pinch points are inevitable during these operations.
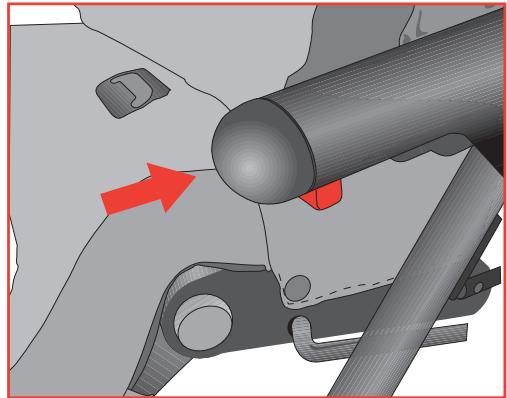
16.- FITTING AND ADJUSTING THE HOOD
Insert the end of the hood into the hole situated on the side of the pushchair. To fit it correctly insert the end until it completely covers the hole of the adjuster. When the hood has been fitted the position can be adjusted by using the part on the side of the pushchair, to fold the hood, unfold it and put on or take off the parasol. 16
WARNING: Do not put any weight on top of the hood.
17.- MAINTENANCE
Do not expose the cover to sunlight for long periods.
Wash the plastic parts with warm water and soap and carefully dry all the components after.
The cover can be removed for washing.
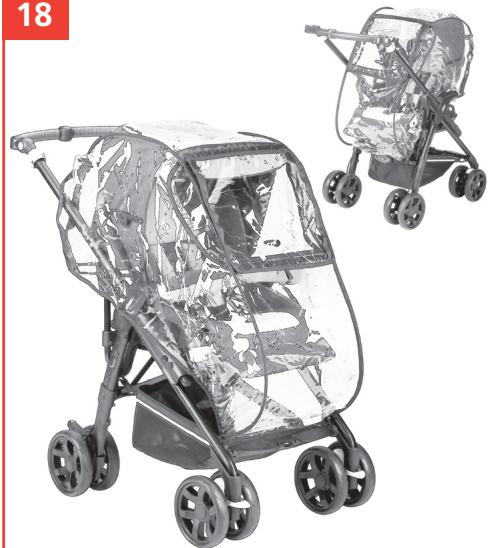
18.- RAIN COVER
The rain cover for your SOLO REVERSE is very easy to fit into place, simply cover the hammock and fit the hooks to the chassis to fasten it. It has a small window that can be rolled up and secured with Velcro strips so the child is free to investigate his surroundings. 18
INDEX
Avertissement 36
Dépliage 38
Système Pro-Fix 38
natural_image
Solid red vertical rectangle with no text, symbols, or discernible features
JANÉ, S.A. Pol. Industrial Riera de Caldes

- SOLO REVERSE
- INDICE
- WARNING
- 1.- UNFOLDING
- 2.- PRO-FIX SYSTEM
- 3.- REVERSIBLE PUSHCHAIR FUNCTIONING
- 4.- HOW TO REMOVE THE HAMMOCK
- 5.- HOW TO FIT THE HAMMOCK FACING FORWARDS
- 7.- SWIVEL WHEELS
- 8.- BRAKE
- 9.- SEAT BELT
- 10.- ADJUSTING THE SUSPENSION
- 12.- ADJUSTING THE FOOTREST
- 13.- PROTECTOR
- 14.- ADJUSTING THE POSITION OF THE HANDLEBAR
- 15.- FOLDING
- 16.- FITTING AND ADJUSTING THE HOOD
- 17.- MAINTENANCE
- 18.- RAIN COVER
- INDEX
Brand : JANE
Model : SOLO REVERSE
Category : Stroller