
SSSE 300 A1 - Slicer SILVERCREST - Free user manual and instructions
Find the device manual for free SSSE 300 A1 SILVERCREST in PDF.

| Product type | Vegetable spiralizer (spiralizer) |
| Brand | SilverCrest |
| Model | SSSE 300 A1 |
| Power supply | 220 - 240 V ~, 50/60 Hz |
| Rated power | 300 W |
| Protection class | II (double insulation) |
| Collecting container capacity | 1.3 l |
| Max. continuous operation time | 100 seconds |
| Blades included | 3 blades: 3 mm (spaghetti), 9 mm (tagliatelle), 50 mm (wide noodles) |
| Blade material | Stainless steel (cutting edge) |
| Housing material | Plastic |
| Number of speeds | 1 speed (on/off) |
| Safety | Safety switch (the chute must be properly locked to start) |
| Cleaning | Removable parts (blades, chute, container, pusher) dishwasher safe (top rack) |
| Storage | Cord wrap under the appliance; blades stackable in the container |
| Included accessories | 3 blades, pusher, chute, collecting container |
| Warranty | 3 years |
| After-sales service | France: 0800 919270, Belgium: via hotline |
Frequently Asked Questions - SSSE 300 A1 SILVERCREST
User questions about SSSE 300 A1 SILVERCREST
0 question about this device. Answer the ones you know or ask your own.
Ask a new question about this device
Download the instructions for your Slicer in PDF format for free! Find your manual SSSE 300 A1 - SILVERCREST and take your electronic device back in hand. On this page are published all the documents necessary for the use of your device. SSSE 300 A1 by SILVERCREST.
USER MANUAL SSSE 300 A1 SILVERCREST
SPIRALSCHNEIDER / ELECTRIC SPIRALIZER / COUPE-LÉGUMES EN SPIRALES SSSE 300 A1
DE AT CH
SPIRALSCHNEIDER
Bedienungsanleitung
FR BE
COUPE-LÉGUMES EN SPIRALES
Mode d'emploi
PL
KRAJALNICA SPIRALNA
Instrukcja obstugi
SK
ŠPIRÁLOVÝ KRÁJAČ
Návod na obsluhu
GB IE
ELECTRIC SPIRALIZER
Operating instructions
NL BE
SPIRAALSNIJDER
Gebruiksaanwijzing
CZ
SPIRÁLOVÝ KRÁJEČ
Návod k obsluze
IAN 309650

DE AT CH
Before reading, unfold the page containing the illustrations and familiarise yourself with all functions of the device.
FR BE
GB/IE Operating instructions Page 17
natural_image
Technical line drawing of a kitchen grater with labeled parts (no text or symbols)natural_image
Technical line drawing of a mechanical device with a cylindrical component and directional arrow (no text or symbols)KOMPERNASS HANDELS GMBH
BURGSTRASSE 21
DE-44867 BOCHUM
DEUTSCHLAND
www.kompernass.com
Contents
Introduction....18
Intended use 18
Package contents 18
Unpacking....18
Appliance description....19
Safety information....19
Preparations 22
Setting up....22
Inserting/changing the cutting insert 23
Preparing the food....25
Operation 26
Cleaning....27
Storage 28
Troubleshooting 28
Disposal....29
Disposal of the appliance 29
Disposal of the packaging....29
Appendix....29
Technical data 29
Kompernass Handels GmbH warranty 30
Service....31
Importer....31
Introduction
Congratulations on the purchase of your new appliance!
You have chosen a modern, high-quality product. These operating instructions are part of the product. They contain important information about safety, usage and disposal. Before using the product, please familiarise yourself with all operating and safety instructions. This product may only be used as described and for the purposes indicated. Please also pass these operating instructions on to any future owner.
Intended use
This appliance is designed for the decorative cutting of fruit and vegetables in household quantities.
It is intended exclusively for use in private households.
Do not use the appliance in industrial or commercial areas.
Any other use is deemed to be improper and may result in property damage or even personal injury.
Package contents
The appliance is supplied with the following components as standard:
Electric Spiralizer
• 3 cutting attachments
- Pusher
- Feed tube
- Collector
- Operating instructions
Unpacking
Remove all parts of the appliance and the operating instructions from the box.
- Remove all packaging materials from the appliance.
⚠ WARNING – RISK OF INJURY!
▶ Do not allow children to play with packaging materials. There is a risk of suffocation!
NOTE
▶ Check the package for completeness and signs of visible damage.
If the delivery is incomplete or damage has occurred as a result of defective packaging or during transport, contact the Service hotline (see section Service).
Appliance description
① Pusher
② Feed tube
③ Cutting insert 50 mm
4 Cutting insert 9 mm
⑤ Cutting insert 3 mm
6 Motor unit
⑦ Collector
8 Cable retainer
⑨ Rotary switch
Safety information

RISK OF ELECTROCUTION!
If the power cable or the appliance is damaged, have the appliance repaired by a qualified technician before using it again. Do not open the appliance. This can lead to risks and also invalidates the warranty.
- Arrange for defective power plugs and/or cables to be replaced as soon as possible by a qualified technician or by our Customer Service Department to avoid the risk of injury.
In event of operating malfunctions and before cleaning the appliance, remove the power plug from the mains power socket.
▶ Always remove the power cable from the socket by pulling on the plug, not on the power cable itself.
▶ Do not kink or crush the power cable. Route the cable so that it cannot be stepped on or tripped over.
▶ Ensure that the power cable does not become wet or moist during use. Route the cable in such a way that it cannot be crushed or damaged.
▶ Never hold the appliance, power cable or power plug with wet hands.

RISK OF ELECTROCUTION!
▶ Never subject the appliance to the effects of moisture, and do not use it outdoors. If any liquid gets into the housing, disconnect the appliance from the power socket immediately and have it repaired by a qualified technician.

Never immerse the appliance in liquids or never allow liquids to penetrate the appliance housing.

WARNING - RISK OF INJURY!
▶ Never use the appliance for purposes other than those described in these instructions. There is a risk of injury if appliance is misused.
This appliance may be used by persons with limited physical, sensory or mental capabilities or lack of experience and knowledge, provided that they are under supervision or have been told how to use the appliance safely and are aware of the potential risks.
The appliance and its connecting cable must be kept away from children.
- Cleaning and user maintenance may not be carried out by children.
This appliance may not be used by children.
▶ Do not allow children to play with the appliance.
The appliance must always be disconnected from the mains when left unsupervised and before assembly, disassembly, changing accessories or cleaning.
- Keep the cutting attachments out of the reach of children.
▶ Be careful when handling the cutting attachments. The blades are very sharp!
▶ Never leave the appliance unattended when it is connected to the mains power network.
- Do not connect the appliance to the mains until it has been completely assembled.
⚠ WARNING - RISK OF INJURY!
▶ Provide a stable location for the appliance.
▶ Use only accessories recommended by the manufacturer.
▶ Never press foodstuffs into the feed tube with your bare hands. Always use the pusher.
- Do not put any kitchen utensils or other things into the rotating inserts!
▶ Do not touch any rotating parts.
- Keep hair, loose clothing and all body parts away from moving parts of the appliance during operation.
▶ After use or before replacing accessories, switch the appliance off and remove the mains plug. Do not dismantle the appliance until the motor has come to a complete standstill.
CAUTION - PROPERTY DAMAGE!
▶ Do not process meat or hard foods with this appliance.
▶ Never fill the appliance with hot liquids! Otherwise the appliance could be damaged.
▶ Do not operate the appliance with an empty feed tube, as this may cause the motor to overheat and become damaged.
- Stop the cutting process immediately if the cutting insert does not rotate or rotates only with difficulty. Disconnect the mains plug and check whether there is an obstacle in the feed tube. Also check that the appliance is correctly assembled.
The appliance is designed for a maximum operating time of 100 seconds (CO time) without interruption. Afterwards, the appliance must be switched off until the motor has cooled down.
- Do not use an external timer switch or a separate remote control system to operate the appliance.
▶ Do not use abrasive, aggressive or chemical cleaning agents. They could irreparably damage the surface.
Preparations
Setting up

WARNING - RISK OF INJURY!
▶ Do not connect the appliance to the mains until it has been completely assembled!
Clean all parts of the appliance as described in the section Cleaning.
- Unwind the cable from around the cable retainer ⑧ and guide it through the recess on the edge.
- Set up the appliance on a level, dry and non-slip surface.
Place the collector ⑦ under the opening of the motor unit ⑥, as shown on the fold-out page.
Insert a cutting insert ③ ④ ⑤ and the feed tube ② as described in the section Inserting/changing the cutting insert.
Make sure that the rotary switch ⑨ is set to position 0.
- Insert the plug into a suitable mains power socket.
The appliance is now ready for use.
Inserting/changing the cutting insert

WARNING - RISK OF INJURY!
▶ Always switch off the appliance and disconnect the mains plug from the mains socket before fitting or changing accessories.
▶ Take care when handling the cutting inserts ③ ④ ⑤ . The blades are very sharp!
There are three different cutting inserts to choose from: choose the appropriate one. The cutting insert ③ ④ ⑤ that is best suited depends primarily on the hardness of the food. The firmness also varies depending on its ripeness and variety.
The following table is therefore only a rough guide:
| Food | Cutting insert | ||
| approx. 3 mm 5 (spaghetti) | approx. 9 mm 4 (tagliatelle) | approx. 50 mm 3 (fettucine, chips etc.) | |
| Carrots • • | • | ||
| Courgettes • | • • | ||
| Celeriac • • | • | ||
| Potato • • | • | ||
| Sweet potato • • | • • | ||
| Kohlrabi • • | • | ||
| Beetroot • • | • | ||
| Cucumber | • • | ||
| Broccoli (stems) | • | • | |
| Red/white cabbage | • | ||
| Pumpkin • • | • | ||
| Turnip | • • • | ||
| White radish | • • | ||
| Apple | • • | ||
| Pear | • • | ||
Proceed as follows to insert a cutting insert ③ ④ ⑤ :
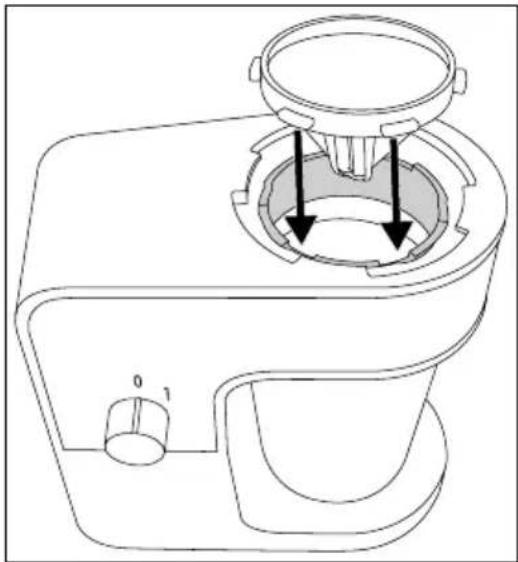
Insert the selected cutting insert ③ ④ ⑤ from above into the opening of the motor unit ⑥. Note the appropriate recesses in the drive ring.
natural_image
Technical line drawing of a kitchen mixer with handle and control knob (no text or symbols)Now, place the feed tube ② from above onto the opening of the motor unit ⑥ so that the catches on the feed tube ② lie in the recesses on the motor unit ⑥. One of the arrows ▼ on the feed tube ② must point to the symbol on the motor unit ⑥.
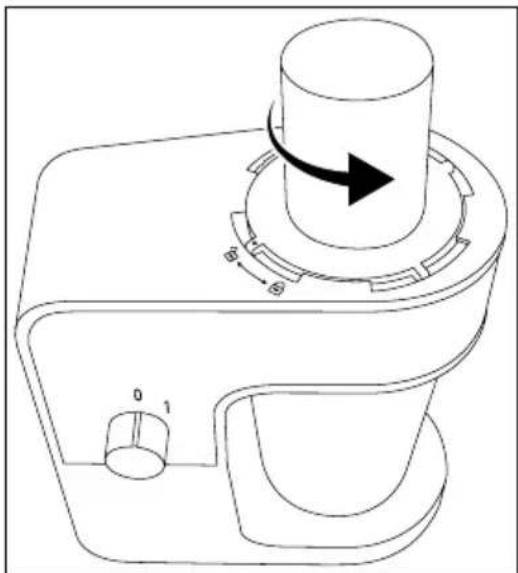
Now, turn the feed tube ② anticlockwise as far as it will go. Once the ▼ arrow on the feed tube ② points to the 🔒 symbol on the motor unit ⑥, the feed tube ② is correctly closed. The feed tube ② clicks audibly into place.
natural_image
Technical line drawing of a mechanical device with a cylindrical component and directional arrow indicating rotation (no text or symbols)Proceed as follows to remove the cutting insert ③ ④ ⑤ :
Turn the feed tube ② clockwise towards the symbol and remove it.
You can now carefully remove the cutting insert ③ ④ ⑤ from the opening of the motor unit ⑥. Do not reach into the knife, it is very sharp!
Preparing the food
Choose the right food before processing and prepare it appropriately:
■ Wash and dry the fruit or vegetables. Remove all leaves, flowers and stalks. The flatter the surface of the food, the more even the result.
■ Most types of vegetables and fruit with firm flesh are suitable. The firmer the food, the better the result.
- Foods with a very soft structure, such as avocados or bananas, are not suitable for spiral cutting.
■ Food with thick skins, such as kohlrabi or pumpkins, must be peeled before processing.
Before processing, cut the food so that it fits through the feed tube ②. The optimum diameter is 3–6 cm. This ensures that the food is small enough for the feed tube ② and big enough to be fixed correctly on the pusher ①.
Operation

WARNING - RISK OF INJURY!
▶ Switch off the appliance and unplug the mains plug from the mains socket before inserting/replacing accessories or removing the collector ⑦.
▶ Never press foods into the feed tube ② with your bare hands. Always use the pusher ①.
CAUTION - PROPERTY DAMAGE!
The appliance is designed for a maximum operating time of 100 seconds (CO time) without interruption. Afterwards, the appliance must be switched off until the motor has cooled down.
♦ Skewer the prepared food firmly on the underside of the pusher ① and position it as vertically as possible in the feed tube ②.
Press the food with the pusher ① constantly and gently downwards and switch on the appliance by turning the rotary switch ⑨ to position 1. The cutting insert ③ ④ ⑤ starts to rotate and process the food.
NOTE
The motor of the unit will not start until the feed tube ② has been correctly installed. Therefore, switch off the appliance and check the position of the feed tube ② if the motor does not start immediately.
▶ Exert light pressure only to avoid crushing the food, especially if you are processing foods with a softer structure.
Switch off the appliance by setting the rotary switch ⑨ to position 0.
- Disconnect the mains plug from the socket if you want to remove the collector ⑦, change the cutting insert ③ ④ ⑤ or clean the appliance.
Cleaning

WARNING - RISK OF INJURY!
▶ Switch off the appliance and pull the plug out of the power socket before cleaning the appliance.


Never immerse the appliance in water or hold it under running water during cleaning.

Take care when handling the cutting inserts ③ ④ ⑤ . e blades are very sharp!
CAUTION - PROPERTY DAMAGE!
▶ Do not use abrasive, aggressive or chemical cleaning agents. They could irreparably damage the surface.
NOTE
▶ Processingstrongly staining foodstuffs (e.g. carrots) can discolour the plastic parts of the appliance. This is harmless to health and does not represent a fault in the appliance. If necessary, you can rub off the discolorations with some neutral cooking oil.
If necessary, set the rotary switch ⑨ to position 0 and disconnect the mains plug from the mains socket.
Wipe the motor unit ⑥ with a moist cloth. For stubborn dirt, add mild detergent to the cloth. Afterwards, wipe off the appliance with a cloth moistened only with water to ensure that no detergent remains on the appliance.
Clean the cutting inserts ③ ④ ⑤, the feed tube ②, the collector ⑦ and the pusher ① in warm water with a mild detergent. Use a dishwashing brush or similar implement for stubborn food residues. Rinse off all the parts using fresh water.
NOTE


The cutting attachments ③ ④ ⑤, the feed tube ②, the collector ⑦ and the pusher ① are dishwasher-safe. If possible, place the parts in open basket and ensure that none of the parts can get stuck. wise, they could get deformed!
- Ensure that all parts are completely dry before reusing or storing them.
Storage
To save space when storing the appliance and its accessories:
- Clean all parts as described in the section Cleaning.
Wind the power cable around the cable retainer ⑧ on the underside of the motor unit ⑥ and guide the end of the cable through the notch on the edge.
◆ Stack the cutting inserts ③ ④ ⑤ in the collector ⑦ and place this under the opening of the motor unit ⑥.
Place the feed tube ② with the chute first into the opening of the motor unit ⑥.
Place the pusher ① into the feed tube ②.
◆ Store the appliance in a dust-free and dry location
Troubleshooting
| PROBLEM POSSIBLE CAUSE | POSSIBLE SOLU-TION | |
| The appliance is not working. | The appliance is not connected to a mains power socket. | Connect the appliance to a mains power socket. |
| The mains power socket is defective. | Try a different wall socket. | |
| The appliance is defective. | Contact the Customer Service department. | |
| The feed tube 2 is not correctly fitted. | Switch off the appliance and check whether the feed tube 2 has been turned anticlockwise as far as the stop. | |
| The cutting insert 3 4 5 rotates only with difficulty or not at all. | The cutting insert 3 4 5 is blocked by an obstacle. | Switch off the appliance, disconnect the mains plug and check whether there is an obstacle in the feed tube 2. |
| The feed tube 2 is not correctly fitted. | Switch off the appliance and check whether the feed tube 2 has been turned anticlockwise as far as the stop. | |
If the malfunction cannot be corrected using one of the suggestions above, or if you have found some other kind of malfunction, please contact our Customer Service department.
Disposal
Disposal of the appliance
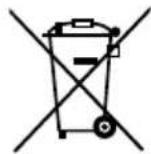
Never dispose of the appliance in your normal domestic waste. This product is subject to the provisions of European Directive 2012/19/EU.
Dispose of the appliance via an approved disposal company or your municipal waste facility. Please comply with all applicable regulations. Please contact your waste disposal facility if you are in any doubt.

Your local community or municipal authorities can provide information on how to dispose of the worn-out product.
Disposal of the packaging

Returning the packaging to the material cycle conserves raw materials and reduces the amount of waste that is generated. Dispose of packaging materials that are no longer needed in accordance with applicable local regulations.
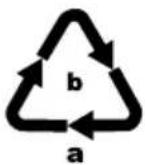
Dispose of the packaging in an environmentally friendly manner. Note the labelling on the packaging and separate the packaging material components for disposal if necessary. The packaging material is labelled with abbreviations (a) and numbers (b) with the following meanings:
1-7:plastics,
20-22: paper and cardboard,
80-98: composites.
Appendix
Technical data
| Power supply 220-240 V ~ (AC), 50/60 Hz | |
| Rated power 300 W | |
| Protection class | II/☐ (double insulation) |
| Collector capacity 1.3 l | |
| CO time 100 seconds | |
 | All of the parts of this appliance that come into contact with food are food-safe. |
NOTE
The CO time (continuous operation time) is the amount of time an appliance can be operated without the motor overheating and becoming damaged. After the appliance has been operated for the given CO time, switch it off until the motor has cooled down.
This appliance has a 3-year warranty valid from the date of purchase. If this product has any faults, you, the buyer, have certain statutory rights. Your statutory rights are not restricted in any way by the warranty described below.
Warranty conditions
The validity period of the warranty starts from the date of purchase. Please keep your original receipt in a safe place. This document will be required as proof of purchase.
If any material or production fault occurs within three years of the date of purchase of the product, we will either repair or replace the product for you at our discretion. This warranty service is dependent on you presenting the defective appliance and the proof of purchase (receipt) and a short written description of the fault and its time of occurrence.
If the defect is covered by the warranty, your product will either be repaired or replaced by us. The repair or replacement of a product does not signify the beginning of a new warranty period.
Warranty period and statutory claims for defects
The warranty period is not prolonged by repairs effected under the warranty. This also applies to replaced and repaired components. Any damage and defects present at the time of purchase must be reported immediately after unpacking. Repairs carried out after expiry of the warranty period shall be subject to a fee.
Scope of the warranty
This appliance has been manufactured in accordance with strict quality guidelines and inspected meticulously prior to delivery.
The warranty covers material faults or production faults. The warranty does not extend to product parts subject to normal wear and tear or fragile parts such as switches, batteries, baking moulds or parts made of glass.
The warranty does not apply if the product has been damaged, improperly used or improperly maintained. The directions in the operating instructions for the product regarding proper use of the product are to be strictly followed. Uses and actions that are discouraged in the operating instructions or which are warned against must be avoided.
This product is intended solely for private use and not for commercial purposes. The warranty shall be deemed void in cases of misuse or improper handling, use of force and modifications / repairs which have not been carried out by one of our authorised Service centres.
Warranty claim procedure
To ensure quick processing of your case, please observe the following instructions:
■ Please have the till receipt and the item number (e.g. IAN 12345) available as proof of purchase.
■ You will find the item number on the type plate, an engraving on the front page of the instructions (bottom left), or as a sticker on the rear or bottom of the appliance.
If functional or other defects occur, please contact the service department listed either by telephone or by e-mail.
■ You can return a defective product to us free of charge to the service address that will be provided to you. Ensure that you enclose the proof of purchase (till receipt) and information about what the defect is and when it occurred.

You can download these instructions along with many other manuals, product videos and software on www.lidl-service.com.
Service
GB Service Great Britain
Tel.: 0800 404 7657
E-Mail: kompernass@lidl.co.uk
IE Service Ireland
Tel.: 1890 930 034
(0,08 EUR/Min., (peak))
(0,06 EUR/Min., (off peak))
E-Mail: kompernass@lidl.ie
IAN 309650
Importer
Please note that the following address is not the service address. Please use the service address provided in the operating instructions.
KOMPERNASS HANDELS GMBH
BURGSTRASSE 21
DE-44867 BOCHUM
GERMANY
www.kompernass.com
Table des matières
Introduction....34
Utilisation conforme ....34
natural_image
Technical line drawing of a kitchen mixer with handle and control knob (no text or symbols)natural_image
Technical line drawing of a mechanical device with a cylindrical component and directional arrow (no text or symbols)KOMPERNASS HANDELS GMBH
BURGSTRASSE 21
DE-44867 BOCHUM
ALLEMAGNE
www.kompernass.com
Inhoud
Inleiding....50
WAARSCHUWING - LETSELGEVAAR!
WAARSCHUWING - LETSELGEVAAR!
⚠ WAARSCHUWING - LETSELGEVAAR!
⚠ WAARSCHUWING - LETSELGEVAAR!
WAARSCHUWING - LETSELGEVAAR!
natural_image
Technical line drawing of a kitchen grater with labeled parts (no text or symbols)natural_image
Technical line drawing of a mechanical device with a cylindrical component and directional arrow (no text or symbols)WAARSCHUWING - LETSELGEVAAR!
WAARSCHUWING - LETSELGEVAAR!
KOMPERNASS HANDELS GMBH
BURGSTRASSE 21
DE-44867 BOCHUM
DUITSLAND
www.kompernass.com
Spis treści
Wstep....66
natural_image
Technical line drawing of a kitchen mixer with labeled components (no text or symbols)natural_image
Technical line drawing of a mechanical device with a cylindrical component and directional arrow indicating rotation (no text or symbols)KOMPERNASS HANDELS GMBH
BURGSTRASSE 21
DE-44867 BOCHUM
NIEMCY
www.kompernass.com
Obsah
Úvod....84
POZOR – HMOTNÉ ŠKODY!
natural_image
Technical line drawing of a kitchen mixer with handle and control knob (no text or symbols)natural_image
Technical line drawing of a mechanical device with a cylindrical component and directional arrow (no text or symbols)POZOR - HMOTNÉ ŠKODY!
KOMPERNASS HANDELS GMBH
BURGSTRASSE 21
DE-44867 BOCHUM
NĚMECKO
www.kompernass.com
Obsah
Úvod....100
natural_image
Technical line drawing of a kitchen mixer with labeled parts (no text or symbols)natural_image
Technical line drawing of a mechanical device with a rotating knob and adjustment knobs (no text or symbols)KOMPERNASS HANDELS GMBH
BURGSTRASSE 21
DE-44867 BOCHUM
NEMECKO
www.kompernass.com
KOMPERNASS HANDELS GMBH
BURGSTRASSE 21
DE-44867 BOCHUM
GERMANY
www.kompernass.com
Stand der Informationen · Last Information Update · Version des informations


- SPIRALSCHNEIDER / ELECTRIC SPIRALIZER / COUPE-LÉGUMES EN SPIRALES SSSE 300 A1
- SPIRALSCHNEIDER
- COUPE-LÉGUMES EN SPIRALES
- KRAJALNICA SPIRALNA
- ŠPIRÁLOVÝ KRÁJAČ
- ELECTRIC SPIRALIZER
- SPIRAALSNIJDER
- SPIRÁLOVÝ KRÁJEČ
- DE AT CH
- FR BE
- Contents
- Introduction
- Intended use
- Package contents
- Unpacking
- ⚠ WARNING – RISK OF INJURY!
- NOTE
- Appliance description
- Safety information
- RISK OF ELECTROCUTION!
- WARNING - RISK OF INJURY!
- ⚠ WARNING - RISK OF INJURY!
- CAUTION - PROPERTY DAMAGE!
- Preparations
- Setting up
- Inserting/changing the cutting insert
- Preparing the food
- Operation
- Cleaning
- Storage
- Disposal
- Disposal of the appliance
- Disposal of the packaging
- Appendix
- Technical data
- Warranty conditions
- Warranty period and statutory claims for defects
- Scope of the warranty
- Warranty claim procedure
- Service
- Importer
- Table des matières
- Inhoud
- WAARSCHUWING - LETSELGEVAAR!
- ⚠ WAARSCHUWING - LETSELGEVAAR!
- Spis treści
- Obsah
- POZOR – HMOTNÉ ŠKODY!
- POZOR - HMOTNÉ ŠKODY!
Brand : SILVERCREST
Model : SSSE 300 A1
Category : Slicer