
SA30 - Receiver ARCAM - Free user manual and instructions
Find the device manual for free SA30 ARCAM in PDF.


| Product Type | Stereo Integrated Amplifier Receiver |
| Brand | Arcam |
| Model | SA30 |
| Dimensions (W x H x D) | 433 x 100 x 373 mm (including feet, control knob, and speaker terminals) |
| Net Weight | 10.7 kg |
| Gross Weight | 13.8 kg |
| Power Supply | 110-120 V or 220-240 V, 50/60 Hz (selectable on rear) |
| Maximum Power Consumption | 800 W |
| Standby Power Consumption | < 0.5 W (low), 7 W (network standby) |
| Output Power (8 Ω, 20 Hz-20 kHz, 0.5% THD) | 130 W per channel |
| Output Power (4 Ω, 1 kHz) | 200 W per channel |
| Harmonic Distortion | 0.002% (80% power, 8 Ω, 1 kHz) |
| Digital-to-Analog Converter (DAC) | ESS ES9038K2M (32-bit, up to 192 kHz) |
| Analog Inputs | 1 phono (MM/MC), 1 front aux (3.5 mm), 3 line (CD, PVR, STB) |
| Digital Inputs | 2 coaxial, 2 optical |
| Network Input | Ethernet, WiFi, AirPlay 2, Chromecast built-in |
| HDMI Input | ARC/eARC |
| Outputs | Speakers (bi-wiring possible), preamplifier (RCA), headphone (3.5 mm) |
| Room Correction | Dirac Live (USB microphone included, PC/Mac application) |
| Supported Audio Formats | PCM 2-channel, MQA, FLAC, MP3, WAV, AIFF, ALAC, DSD (via USB) |
| Remote Control | Backlit universal, programmable (up to 8 devices) |
| Included Accessories | Power cord, remote control, 2 AAA batteries, manual, 2 WiFi antennas, Dirac microphone, USB cable |
| Warranty | 5 years parts and labor (except players: 3 years) |
| Additional Features | Processor mode, analog direct mode, selectable digital filters, auto standby |
Frequently Asked Questions - SA30 ARCAM
User questions about SA30 ARCAM
0 question about this device. Answer the ones you know or ask your own.
Ask a new question about this device
Download the instructions for your Receiver in PDF format for free! Find your manual SA30 - ARCAM and take your electronic device back in hand. On this page are published all the documents necessary for the use of your device. SA30 by ARCAM.
USER MANUAL SA30 ARCAM
Important Safety Instructions
- Read these instructions.
- Keep these instructions
- Heed all warnings.
- Follow all instructions
- Do not use this apparatus near water.
- Clean only with dry cloth.
- Do not block any ventilation openings. Install in accordance with the manufacturer's instructions.
- Do not install near any heat sources such as radiators, heat registers, stoves, or other apparatus (including amplifiers) that produce heat.
- Do not defeat the safety purpose of the polarized or grounding-type plug.
A polarized plug has two blades with one wider than the other. A grounding type plug has two blades and a third grounding prong. The wide blade or the third prong are provided for your safety. If the provided plug does not fill into your pullet, consult an electrician for replacement of the obsolete outlet
- Protect the power cord from being walked on or pinched particularly at plugs, convenience receptacles, and the point where they exit from the apparatus.
- Only use attachments/accessories specified by the manufacturer.
- Use only with the cart, stand, tripool, bracket, or table specified by the manufacturer, or sold with the apparatus.
When a cart is used, use caution when moving the cart/apparatus combination to avoid injury from tip over.
-
Unplug this apparatus during lightning storms or when unused for long periods of time.
-
Refer all servicing to qualified service personnel.
Servicing is required when the apparatus has been damaged in any way, such as power supply cord or plug is damaged, liquid has been spilled or objects have fallen into the apparatus, the apparatus has been exposed to rain or moisture, does not operate normally, or has been dropped.
- Object or liquid entry
WARNING - Take care that objects do not fall and liquids are not spilled into the enclosure through any openings. The equipment shall not be exposed to dripping or splashing. Liquid-filled objects such as vases should not be placed on the equipment.
- Climate
The equipment has been designed for use in moderate climates and in domestic situations.
- Cleaning
Unplug the unit from the mains supply before clearing.
The case should normally only require a wipe with a soft, lint-free cloth. Do not use chemical solvents for cleaning.
We do not advise the use of furniture cleaning sprays or polishes as they can cause permanent white marks.
- Power sources
Only connect the equipment to a power supply of the type described in the operating instructions or as marked on the equipment.
The primary method of isolating the equipment from the mains supply is to remove the mains plug. The equipment must be installed in a manner that makes disconnection possible.
- Abnormal smell
If an abnormal smell or smoke is detected from the equipment, turn the power off Immediately and unplug the equipment from the wall out at. Contact your dealer and do not reconnect the equipment.
- Damage requiring service
The equipment should be serviced by qualified service personnel when:
A. The power-supply core or the plug has been damaged, or
6. Objects have fallen, or liquid has spilled into the equipment, or
C. The equipment has been exposed to rain, or
12. The equipment does not appear to operate normally or exhibits a marked change in performance, or
E. The equipment has been dropped or the enclosure damaged.

CAUTION: To reduce the risk of electric shock, do not remove cover (or back). No user serviceable parts inside. Refer servicing to qualified service personnel.
WARNING: To reduce the risk of fire or electric shock, do not expose this apparatus to rain or moisture.
The lightning flash with an arrowhead symbol within an equilateral triangle, is intended to alert the user to the presence of uninsulated 'dangerous voltage' within the product's enclosure that may be of sufficient magnitude to constitute a risk of electric shock to persons.
The exclamation point within an equilateral triangle is intended to alert the user to the presence of important operating and maintenance (servicing) instructions in the literature accompanying the product.
CAUTION: In Canada and the USA, to prevent electric shock, match the wide blade of the plug to the wide slot in the socket and insert the plug fully into the socket.
Class II product
This equipment is a Class II or double insulated electrical appliance. It has been designed in such a way that it does not require a safety connector to electrical earth ("ground" in the U.S.)
Warning
Mains plug/appliance coupler is used to disconnect device and it shall remain readily operable.
Safety Compliance
This equipment has been designed to meet the IEC/EN 62368-1 International electrical safety standard.
This device complies with Part 15 of the FCC Rules. Operation is subject to the following two conditions:
-
This device may not cause harmful interference, and
-
This device must accept any interference received, including interference that may cause undesired operation.
The building installation shall be regarded as providing protection in accordance with the rating of the wall socket outlet.
Caution on installation
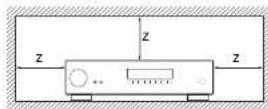
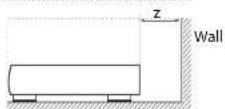
For proper heat dispersal, do not install this unit in a confined space, such as a bookcase or similar enclosure.
☐ More than 0.3m (12in) is recommended.
☐ Do not place any other equipment on this unit.
FCC Information(for US customers)
PRODUCT
This product complies with Part 15 of the FCC Rules. Operation is subject to the following two conditions:
-
This device may not cause harmful interference, and
-
This device must accept any interference received, including interference that may cause undesired operation.
IMPORTANT NOTICE: DO NOT MODIFY THIS PRODUCT
This product, when installed as indicated in the instructions contained in this manual, meets FCC requirements. Modification not expressly approved by ARCAM may void your authority, granted by the FCC, to use the product.
NOTE
This product has been tested and found to comply with the limits for a Class B digital device, pursuant to Part 15 of the FCC Rules. These limits are designed to provide reasonable protection against harmful interference in a residential installation.
This product generates, uses and can radiate radio frequency energy and, if not installed and used in accordance with the instructions, may cause harmful interference to radio communications. However, there is no guarantee that interference will not occur in a particular installation. If this product does cause harmful interference to radio or television reception, which can be determined by turning the product GH and ON, the user is encouraged to try to correct the interference by one or more of the following measures:
☐ Reorient or relocate the receiving antenna.
- Increase the separation between the equipment and receiver.
□ Connect the product into an outlet on a circuit different from that to which the receiver is connected.
□ Consult the local retailer authorized to distribute this type of product or an experienced radio/TV technician for help
Safety Information (for European customers)
- Avoid high temperatures. Allow for sufficient h dispersion when installed in a rack.
☐ Handle the power cord carefully. Hold the plug with unplugging the cord.
- Keep the unit free from moisture, water, and dust.
□ Unplug the power cord when not using the unit long periods of time.
☐ Do not obstruct the ventilation holes.
☐ Do not let foreign objects into the unit
☐ Do not let insecticides, benzene, and thinner come contact with the unit.
1 Never disassemble or modify the unit in any way.
- Ventilation should not be impeded by covering ventilation openings with items, such as newspapers, tablecloths or curtains.
- Naked fame sources such as lighted candles show not be placed on the unit.
☐ Observe and follow local regulations regarding battery disposal.
☐ Do not expose the unit to dripping or splash fluids.
☐ Do not place objects filled with liquids, such as vas on the unit.
☐ Do not handle the mains cord with wet hands.
When the switch is in the OFF position, the equipment is not completely switched off from MAINS.
The equipment shall be insulated near the power supply so that the power supply is easily accessible.
A note about recycling
This product's packaging materials are recyclable and can be reused. Please dispose of any materials in accordance with the local recycling regulations.
When discarding the unit, comply with local rules or regulations.
or Batteries should never be thrown away or incinerated but disposed of in accordance with the local regulations concerning battery disposal.
This product and the supplied accessories, excluding the batteries, constitute the applicable product according to the WHE directive.
Correct disposal of this product
These markings indicate that this product should not be disposed with other household waste throughout the
To prevent possible harm to the environment or human health from uncontrolled waste disposal and to conserve material resources, this product should be recycled responsibly.
To dispose of your product, please use your local return and collection systems or contact the retailer where the product was purchased.
Welcome
Thank you and congratulations...
...for purchasing your Arcam SA30 integrated amplifier.
Arcam has been producing specialist audio products of remarkable quality for over four decades and the new SA30 integrated amplifier is the latest in a long line of award winning Hi-Fi. The design of the HDA range draws upon all of Arcam's experience as one of the UK's most respected audio companies, to produce Arcam's best performing range of stereo amplifiers yet – designed and built to give you years of listening enjoyment.
This handbook is a guide to installing and using the SA30 and includes information on its more advanced features. Use the contents list on the next page to guide you to the section of interest.
We hope that your product will give you years of trouble-free operation. In the unlikely event of any fault, or if you simply require further information about Arcam products, our network of dealers will be happy to help you. Further information can also be found on the Arcam website at www.arcam.co.uk.
Your SA30 development team
Contents
Safety Guidelines EN-2
Welcome
Overview
Trademark Acknowledgments EN-7
Front Panel Connections and Controls EN-8
Rear Panel Connections and Controls EN-9
Connecting Loudspeakers EN-10
Operation
Digital Audio Inputs EN-12
Analogue Audio Inputs EN-12
Phono Input EN-12
USB EN-12
Network Audio Inputs EN-12
ARC/eARC input EN-13
Listening
Analogue Direct EN-13
Processor Mode EN-13
Pre-Amplifier Output EN-13
Connecting to a Network
Home Automation Control
AirPlay Setup
Chromecast built-in Setup
EN-4
EN-6
EN-12
EN-13
EN-14
EN-14
EN-14
EN-14
Dirac Live for Arcam EN-15
Remote Control
Setup Menu
System Settings EN-20
Audio Settings
System Info
Network Settings
SA30 Digital Filters
Customising the Remote Control
Code learning
Deleting the learned data
Reading stored code numbers
Locking/Unlocking a specific Device Mode
Controlling the volume of other devices
Hidden commands
Device codes
Troubleshooting
SA30 Specifications
Worldwide Guarantee EN-26
EN-16
EN-20
EN-20
EN-21
EN-21
EN-22
EN-22
EN-22
EN-23
EN-23
EN-23
EN-23
EN-24
EN-25
Overview
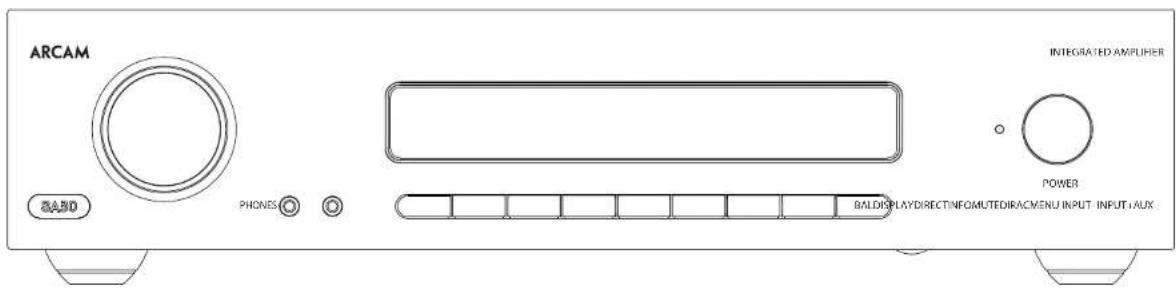
Arcam's SA30 amplifier
Arcam's SA30 integrated amplifier provides class leading sound quality for the best reproduction of your music from traditional HIFI separates and the various internet streaming services that are on offer.
The SA30 also includes the powerful Dirac Live room correction functionality that has been used to critical acclaim in our AVR range.
Drawing on the many years of amplifier design experience at Arcam, this product uses the best quality components and engineering practice to produce a product that will give many years of musical pleasure and reliable service.
The SA30 is designed to produce a level of performance that will truly bring your music to life.
Placing The Unit
Place the amplifier on a level, firm surface, avoiding direct sunlight and sources of heat or damp.
☐ Do not place the SA30 on too of a power amplifier or other source of heat.
☐ Do not place the amplifier in an enclosed space such as a bookcase or closed cabinet unless there is good provision for ventilation. The SA30 is designed to run warm during normal operation.
☐ Do not place any other component or item on the amplifier as this may obstruct airflow around the heat sink, causing the amplifier to run hot. (The unit placed on top of the amplifier would become hot, too.)
□ Make sure the remote-control receiver to the right of the front panel display's unobstructed, otherwise this will impair the use of the remote-control.
☐ Do not place your record deck on top of t unit. Record decks are very sensitive to the noise generated by mains power supplies which will be heard as a background 'hum' if the record deck is too close.
☐ The normal function of the unit may be disturbed strong electromagnetic interference. If this occurs, simply reset the unit with the power button, or move the unit to another location.
Power
The amplifier is supplied with a moulded mains plug already fitted to the lead. Check that the plug supplied fits your supply – should you require a new mains lead, please contact your Arcam dealer.
If your mains supply voltage or mains plug is different, please contact your Arcam dealer immediately
iPush the IEC plug end of the power cable into the power socket on the back of the amplifier, making sure that it is pushed in firmly. Plug the other end of the cable into your mains socket and switch the socket on.
Interconnect Cables
We recommend the use of high quality screened cables that are designed for the particular application. Other cables will have different impedance characteristics that will degrade the performance of your system (for example, do not use cabling intended for video use to carry audio signals). All cables should be kept as short as is practically possible.
It is good practice when connecting your equipment to make sure that the mains power-supply cabling is kept as far away as possible from your audio cables. Failure to do so may result in unwanted noise in the audio signals.
Trademark Acknowledgments
EN
| Apple, AirPlay and the AirPlay logo, iPod, iPhone and iPad are trademarks of Apple Inc., registered in the U.S. and other countries. Also Store is a service mark of Apple Inc. AirPlay 2 works with iPhone, iPod, and iPod touch with iOS 11.4 or later, Mac with OS X Mountain Lion or later, and PC with iTunes 10.2.2 or later. | |
| WiFi CERTIFIED | The Wi-Fi CERTIFIED Logo is certification marks of the Wi-Fi Alliance. |
| Chromebase | Google, Google Play, Chromecast built-in, and other related marks are trademarks of Google LLC. The Google Assistant requires an internet connection and is not available in certain countries and languages. Availability and react of certain features and services are device, service, and network-dependent and may not be available in all areas. Controlling certain devices in your home requires compatible smart devices. Subscriptions for services and applications may be required and additional terms, conditions and/or charges may apply. |
| MP3 | VPKG layer 3 audio decoding technology licensed from Fraunhofer IIS and Thomson multimedia. |
| FLAC FLAC Decoder Copyright © 2000, 2001,2003, 2003, 2004, 2005, 2006, 2007,2008 Josh CoalsonRedistribution and use in sourceand binary forms, with or withoutmodification, are permitted providedthat the following conditions are met:- Redistributions of source codemust retain the above copyrightnotice, this list of conditions and thefollowing disclaimer.- Redistributions in binary form mustreproduce: the above copyrightnotice, this list of conditions andthe following disclaimer in thedocumentation and/or othermaterials provided with thedistribution.- Neither the name of the XiphongFoundation nor the names of itscontributors may be used to endorseor promote products derived fromthis software without specific priornwritten permission. |
| FLAC cont. TH | S SOFTWARE IS PROVIDED BYTHE COPYRIGHT HOLDERS ANDCONTRIBUTORS AS IS AND ANYEXPRESS OR IMPLIED WARRANTIESINCLUDING, BUT NOT LIMITEDTO, THE IMPLIED WARRANTIES OHERMERCHANTABILITY AND FITNESSFOR A PARTICULAR PURPOSE AREDISCLAIMED. IN NO EVENT SHALL THEFOUNDATION OR CONTRIBUTORS BELiable FOR ANY DIRECT, INDIRECT,INCIDENTIAL, SPECIAL, EXEMPLARYOR CONSEQUENTIAL DAMAGES(INCLUDING, BUT NOT LIMITED TOPROCURMENT OF SUBSTITUIEGOODS OR SERVICES; LOSS OF USE,DATA, OR PROFITS; OR BUSINESSINTERRUPTION) HOWEVER CAUSEDAND ON ANY THEORY OF LIABILITYWHETHER IN CONTRACT, STRICTLIABILITY, OR TORT (INCLUDINGN°CIOLENCE OR OTHERMS-) ARISINGIN ANY WAY OUT OF THE USE OF THISSOFTWARE, EVEN IF ADVISED OF THEPOSSIBILITY OF SUCH DAMAGE. |

MQA and the Sound Wave Device are registered trade marks of MQA Limited© 2016
MOA (Master Quality Authenticated).
MOA is an award-winning British technology that delivers the sound of the original master recording. The master MOA file is fully authenticated and is small enough to stream or download.
Visit mqa.co.uk for more information.
The SA30 includes MQA technology, which enables you to play back MQA audio files and streams, delivering the sound of the original master recording.
MQA or MQA, indicates that the product is decoding and playing an MQA stream or file, and denotes provenance to ensure that the sound is identical to that of the source material.
MQA. Indicates it is playing an MQA Studio file, which has either been approved in the studio by the artist/producer or has been verified by the copyright owner.
Front Panel Connections and Controls
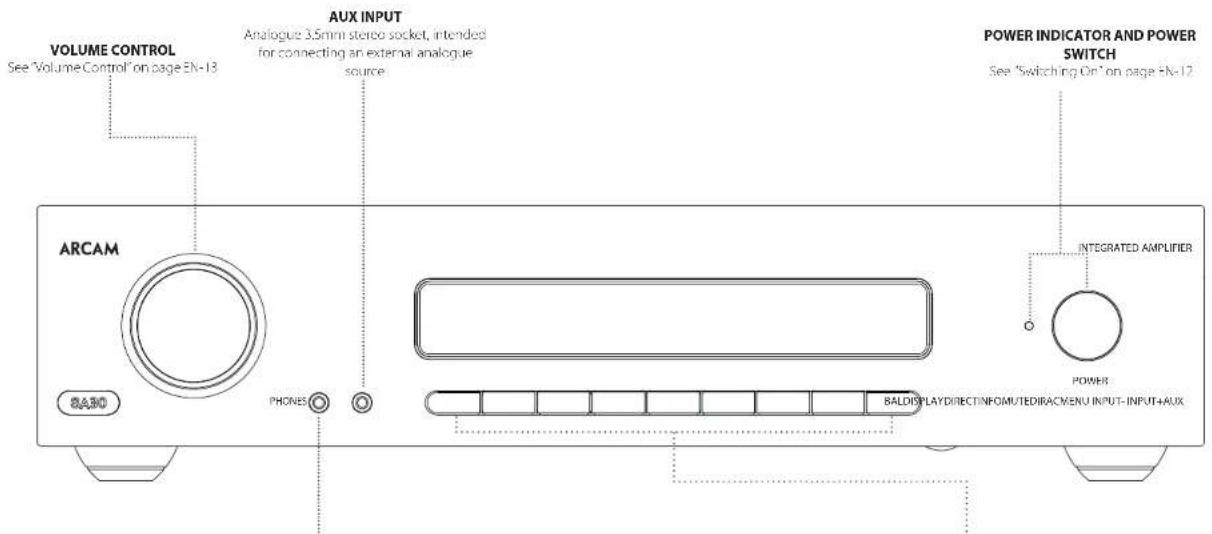
PHONES
3.5mm stereo socket, intended for use with headphones. See "Listening Using Headphones" on page EN 13
FRONT PANEL KEYS
| MENU Opens the setup menu. See "Setup Menu" on page EN-20. |
| INPUT-/ INPUT+ Select input for listening. See "Selecting An Audio Source" on page: EN 17. |
| DIRAC Selects the Dirac room EQ curve. See "Dirac Live for Arcam" on page EN-15. |
| MUTE Mutes the various audio outputs. See "Waiting The Output" on page EN-13. |
| INFO Cycles through the information displayed on the lower portion of the front panel display when or NET and USB Inputs. |
| DIRECT Enables or disables Analogue Direct, listening mode. See "Analogue Direct" on page EN-13. |
| DISPLAY Adjusts the display brightness. See "Display" on page EN-12. |
| BAL Adjusts the Left/right balance of the output. See "Balance" on page EN-70. |

The SA30 is designed to run warm in normal use, however extended use at high volume levels can result in the amplifier casework becoming hot to the touch.
Rear Panel Connections and Controls
EN
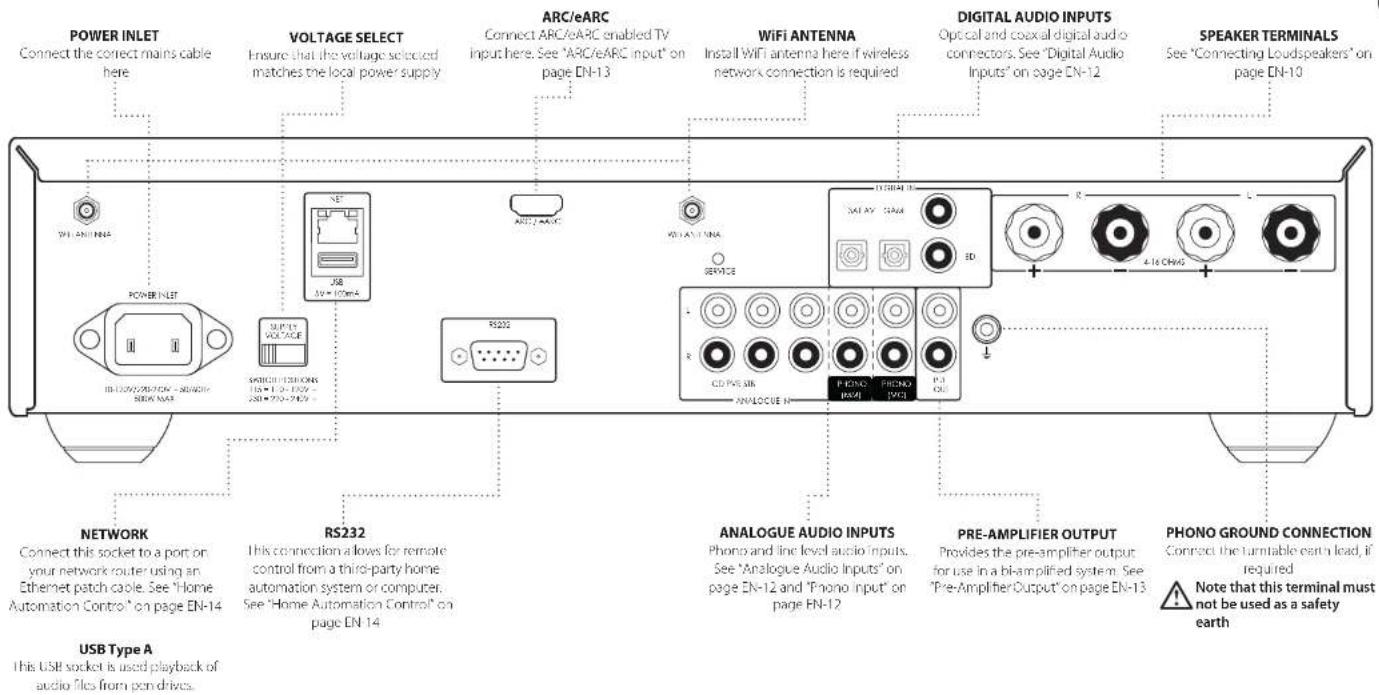

Please read the sections "Placing The Unit", "Power" and "Interconnect Cables" on page EN-6 before connecting your SA30 amplifier!
Connecting Loudspeakers
There are many different ways of connecting loudspeakers to your SA30 amplifier. The following section describes how to connect the speakers and amplifier for the most common configurations.
Single Wiring
If each speaker has more than one pair of connecting terminals, use the terminals labelled LF or 'Low Frequency' on your speakers.
Connect the red positive terminal of the right speaker connection on the amplifier (labelled R to the positive terminal of your right speaker. Similarly, connect the black negative terminal of the right speaker connection on the amplifier labelled R to the negative terminal of your speaker. Repeat the process for the left speaker, using the terminals labelled L and the amplifier.
WARNING: If your speakers support bi-wiring, there will be a strip of conductive metal connecting the low-frequency (LF) terminals to the high-frequency (HF) terminals; this MUST NOT BE REMOVED in a single-wired system.
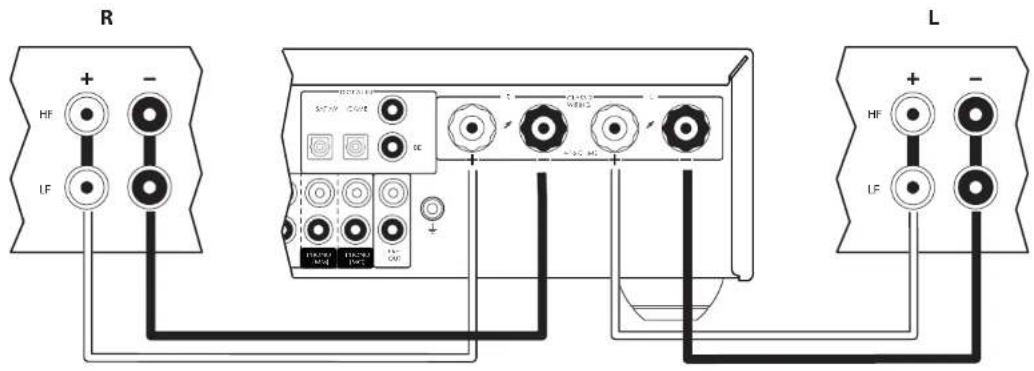
Notes On Making Speaker Connections
Do not make any connections to any amplifier while it is switched on. We recommend that your amplifier is completely disconnected from the mains supply before starting.
Before switching your amplifier on for the first time after connecting to speakers, please check all connections thoroughly. Ensure that bare wires or cables are not touching each other or the amplifier's chassis (which could cause short circuits), and that you have connected positive (+) to positive and negative (=) to negative. Be sure to check the wiring for both the amplifier and the speaker.
☐ After making connections, switch the amplifier on, select a source signal, then gradually increase the volume to the required listening level.
If you are unsure as to how your system should be connected, please contact your Arcam dealer who will be happy to help you.
Bi-Amping
Bi-amping is the separation of the amplification of low and high-frequency signals over two amplifiers.
B1amping requires the use of two amplifiers per channel. Normally, your SA30 is used to drive the high frequency (treble) speakers, while a second amplifier (such as the Arcam PA210) is used for the lower (bass) frequencies.
Connect the SA30 to the speakers as described for single wiring, with the exception that the SA30 should be connected to the speaker terminals labelled HF 'or High Frequency'. Next, connect the PA240 power amplifier to the LF or 'Low Frequency' terminals, as shown in the diagram. A pair of audio interconnect cables are also required to connect the pre-amp outputs of the SA30 to the power amplifier inputs of the second amplifier.
WARNING: The strip of metal on the speakers connecting the low frequency (LF) terminals to the high frequency (HF) terminals MUST BE REMOVED. Failure to do so will result in damage to both amplifiers, which will not normally be covered under warranty.
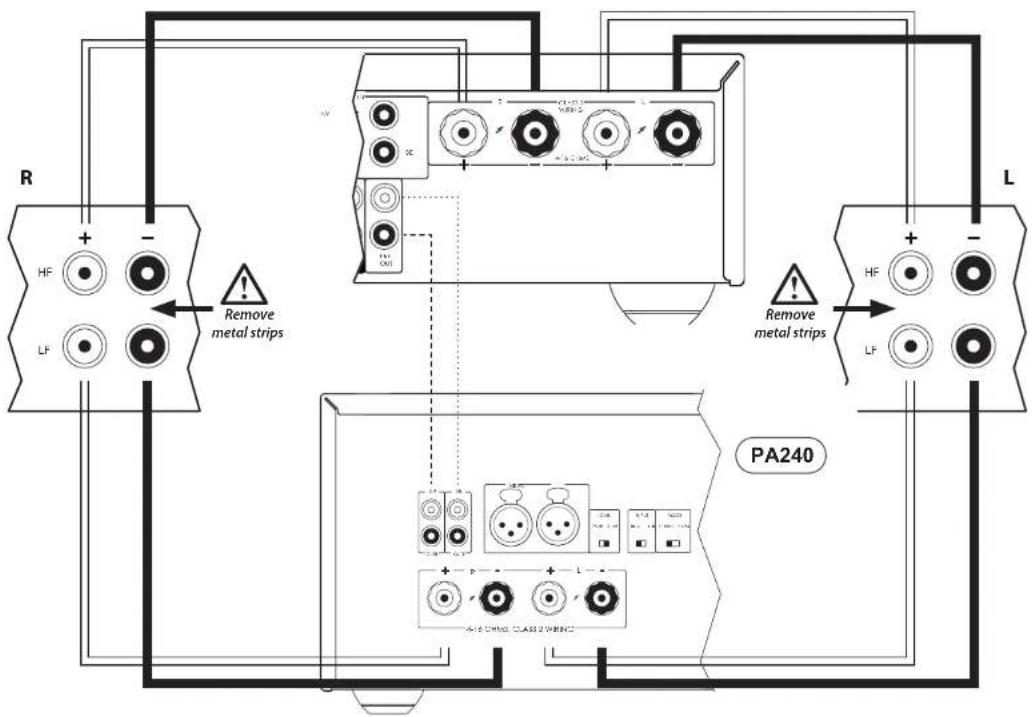
Operation
Switching On
The POWER switches the unit on and off. The status indicator I HD indicates the state of the amplifier: it changes from red to orange then white if mains power is connected and the unit is switched on.
Setup Menu
The 5A30 setup menu allows the customization of certain features of the amplifier. For details, please see "Setup Menu" on page EN-20.
Auto Standby
In order to comply with international regulations for consumer products, this unit is designed to enter a low power standby mode if no user interaction and no audio input signal are detected for an extended period of time (default time is 20 minutes). The unit can be brought out of standby by either turning the volume knob on the front panel in either direction or by pressing the POWER key on the remote control.
The amount of time before the unit enters standby is configurable in the setup menu.
Note: if the standby time out is set to Offe standby feature will be disabled.
Display
Press the DISPLAY on the front panel or remote control to adjust the brightness level of the front panel display. The brightness level can be set to FUTAR DIM 'OFF
If the SA30 is powered off with the display brightness set to QEffie display will momentarily resume to full brightness then turn off when the unit is powered back on.
Selecting An Audio Source
Audio sources can be selected either using INPUT+/- the front panel or when the remote control, by pressing the required button, labeled as PHONO AUX NET USB ,AV,SAT,PVR,GAME,BD,CD or STB. In each case, the source is selected from the input sockets with the corresponding name.
Digital Audio Inputs
The SA30 features two coaxial and two optical digital inputs, which can be connected to the respective digital audio output of your available source equipment. Although the inputs are labelled for specific devices, they can be used to connect any devices with a coaxial or optical digital output.
| BD | Intended for the coaxial digital output of a Blu ray or DVD player |
| AV | Intended for the coaxial digital output of general audiovisual equipment, such as a VCR or TV. |
| SAT | Intended for the optical digital outputs from a satellite TV receiver or cable TV box |
| GAME | Intended for the optical digital output from a games console |
WARNING: The SA30 only supports two channel PCM audio input. Do not attempt to send multichannel audio of any type as this could result in serious damage to your amplifier and speakers
Analogue Audio Inputs
Although the inputs are labelled for specific devices, all have the same characteristics and each may be used with any line level product.
| AUX | This is a 3.5mm analogue input on the front panel intended for use with devices such as MP3 players. |
| STB | Intended for the analogue outputs of a set-top box |
| PVR | Intended for the analogue outputs of a Personal Video Recorder, or similar device |
| CD | Intended for the analogue outputs from a CD player |
Phono Input
The SA30 provides a pre-amplification stage to work with the low-voltage output from either a MM (moving magnet) or MC (moving coil) cartridge.
Each cartridge type has a dedicated input on the rear panel. To choose which type is enabled is see "Phono Input" on page HN-71
The PHONO input specifications are given in "SA30 Specifications" on page EN-25.
WARNING: NEVER play a standard line-level source into this input. This would result in serious damage to both your amplifier and speakers due to the extra gain that is applied and would not be covered under warranty.
WARNING: Be sure to use the correct input for your cartridge. The requirements for the different cartridges could result in damage to both your amplifier and speakers due the extra gain that is applied if the wrong input is used and would not be covered under warranty.
USB
This input is for playback of audio files from a USB per drive or similar device. Simply plug in the USB stick and use the remote control to browse.
Network Audio Inputs
In order to use the network audio capability of the SA30 please refer to "Connecting to a Network" on page EN-14 to allow you to use AirPlay, Chromecast built-in or playback from a NAS drive using the Arcam Music Life app.

MusicLife


ARCAM

ARC/eARC input
Connect this to the HDMI video input of your display device. It is compatible with HDMI Enhanced Audio Return Channel (eARC) as well as standard Audio Return Channel (ARC). If you have a supported television then sound from the television's internal tuner (e.g. Freeview, Freesat, DVD 1) will be available using the SA30's 'ARC/eARC' input.
See "TVVolume" on page EN-21, "TVPower" on page EN-21 and "TV Audio" on page EN-21 for more information on ARC/eARC settings.
Listening
Volume Control
Use the volume control knob (or the buttons on the remote control) to change the volume. Turn the knob clockwise to increase the volume and counter-clockwise to reduce it.
Listening Using Headphones
The headphone socket (PHONES) accepts phones with an impedance rating between 16Ω and 2kΩ, fitted with a 3.5mm stereo jack.
The pre-amp outputs and speakers are muted when the headphones are plugged in.
The speakers and pre-amp outputs can be configured to remain active when headphones are connected using the Headphone Override menu.
See "Phones Over" on page FN-70 for more information. The headphone output is always active, unless the amplifier has been muted.
Muting The Output
The output of the SA30 can be silenced by pressing the MUTE button on either the front panel or the remote control. If the unit is muted, front panel power indicator will change to orange and the display will show Mute instead of the volume level.
To cancel the mute, press MUTE second time or adjust the volume (either by turning the volume control knob or by pressing the volume control keys on the remote control).
Adjusting The Balance
The balance setting allows you to increase the volume of one channel (left or right) relative to the other. Altering the balance may help restoring the stereo image for an off centre listening position.
To adjust the balance, press the BAL RCL on the remote control or front panel or via the setup menu. See "Balance" on page EN-20 for more information.
Analogue Direct
In order to apply Dirac Live room correction the SA30 converts all analogue inputs to a digital signal using a high quality Analogue to Digital Converter (ADC). Once the signal has been processed by the on board Digital Signal Processor (DSP) it is converted back to an analogue signal using a high quality Digital to Analogue Converter (DAC).
The DIRECT function bypasses the ADC, DSP and DAC to allow the analogue signal to be sent directly to the preamp stage for the purest signal path.
The icon on the display indicates if the analogue direct path is enabled for the current input.

Analogue direct is enabled. ADC, DSP and DAC are bypassed.
Note: Analogue Direct can only be applied to the CD, PVR, SIB and PHONO inputs.
When Analogue Direct is enabled DIRAC room correction cannot be applied.
Processor Mode
Processor mode can be assigned to most analogue inputs. In this mode, the SA30 is set to a fixed level. Please refer to "PM Input" on page EN-20 for details on how to specify which input is to be used in processor mode. For setting the desired fixed volume level, please refer to "PM Input" on page EN-20.
Pre-Amplifier Output
To use the SA30 as dedicated pre-amplifier, or as part of a bi-amped system, connect the PRE-OUT to the input sockets of your power amplifier.
Connecting to a Network
In order to use the AirPlay and Chromecast built-in functionality of the SA30 you will need to connect it to your home network via a wireless or wired connection. The following sections detail how to do this.
Note: Before attempting to setup a wireless connection ensure the supplied wireless antenna is fitted to the antenna socket on the rear of the SA30.
Note: When the wired connection is used the wireless connection is automatically disabled.
Home Automation Control
When connected to a network the SA30 can be controlled and monitored remotely using dedicated home automation software.
The same controls are also available via the RS232 input. Various third-party systems are available providing sophisticated control over all your entertainment devices. Contact your dealer or installer for details. The technical details of the remote control protocol are available upon request, by contacting Arcam at luxurysupport@harman.com.
For details of the available controls please refer to the control document which can be found at www.arcam.co.uk for further information.
Note: To connect the SA30 to a wireless network follow the "Wireless Connection" instructions for either "AirPlay Setup" or "Chromecast built-in Setup".
AirPlay Setup
Wired Connection
Power up and connect an ethernet cable to the SA30. To listen to audio via AirPlay on your SA30, ensure your Apple device is connected to the same network as the SA30 and simply select the SA30 as the AirPlay audio playback device.
Note: The SA30 will appear as SA30-xxxxx in the Airplay speaker menu, where xxxxx is the last 6 digits of the units wired MAC address.
Wireless Connection
Ensure your Apple device is connected to the wireless network you wish to connect the SA30 to.
Install the Wi-Fi antennas and power up the SA30
Open the Wi-Fi settings menu on the Apple device and select the SA30 from the "Set up new AirPlay speaker" menu.
Follow the instructions on screen.
To listen to audio via AirPlay on your SA30, ensure your Apple device is connected to the same network as the SA30 and simply select the SA30 as the AirPlay audio playback device.
Note: The SA30 will appear as SA30-xxxxx in the AirPlay speaker setup menu, where xxxxxx is the last 6 digits of the units wired MAC address.
Chromecast built-in Setup
Wired Connection
Power up and connect an ethernet cable to the SA30. Select the NETbut.
Download and open the Google Home application.
You should be prompted that there is a device available for setup. If not simply tap "Add" followed by "Setup a Device".
Select the SA30 and follow the instructions on screen.
To listen to cast audio from any supported application on your SA30, ensure your device is connected to the same network as the SA30. Tap the Chromecast built-in icon from within the application and select the SA30 as the playback device.
Note: The SA30 will appear as SA30-xxxxx in the setup menu, where xxxxx is the last 6 digits of the units wired MAC address.
Wireless Connection
Install the Wi-Fi antennas and power up the SA30. Select the NETput.
Download and open the Google Home application.
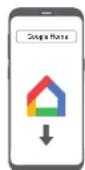

You should be prompted that there is a device available for setup. If not simply tap "Add" followed by "Setup a Device".
Select the SA30 and follow the instructions on screen.
To listen to cast audio from any supported application on your SA30, ensure your device is connected to the same network as the SA30. Tap the Chromecast built-in icon from within the application and select the SA30 as the playback device.
Note: The SA30 will appear as SA30-xxxxx in the setup menu, where xxxxx is the last 6 digits of the units wired MAC address.

Dirac Live
There is a proprietary automatic loudspeaker setup function built into your SA30 from Dirac Research. Using a PC/Mac based application, this attempts to set all the essential speaker settings for all the speakers in your system. It also calculates room equation (Room EQ) filter values to remove some of the worst effects of resonant frequencies in the listening room.
Your SA30 is supplied with a calibration microphone, which should be inserted into a USB socket on a PC or Mac connected to the same network as the SA30 and positioned as directed by the Dirac. Live for Arcam PC/Mac application. This microphone picks up the special calibration tones generated by the smokers when Dirac. Live for Arcam application is run. The SA30 then analyses the signal and will correct any resonant frequencies in the room which need control by filtering.
To help the system be as accurate as possible when performing Direct Live for Arcam setup, there are a few guidance rules that should be followed:
□ Minimise any background sounds in the listened room and other nearby rooms.
□ Close all windows and doors in the listening room
□ Turn off all fans including air-conditioning systems
□ Mount the microphone on a tripod or similar.
☐ Position the set up microphone pointing upwards roughly head height in the normal listening position.
It is not necessary to turn the microphone directly at the speaker generating the test tone. (It helps if you are able to position the microphone exactly where your head would normally be for listening, with the microphone in direct unobstructed view of all speakers.)
When activated, a calibration tone is played through each channel of the SA30. The calibration tone cycles round each of the speakers multiple times as the different parameters are calculated.
Note: By default, Room EQ is not applied to any of the source inputs.
You should enable Room EQ on inputs you think benefit from this feature, as required, by listening when playing typical source material through each input. After being calculated, this is enabled from within the setup menu or by the front panel or remote control button.
While room equalisation can help to reduce problems with listening room acoustics, it is usually far better to try to solve these problems with the room directly. Proper loudspeaker positioning, acoustic wall treatments and moving the listening position away from walls should produce far better results overall. However it may be difficult to do this in a home environment, so Room EQ is your next best choice.
Problems
The Auto Speaker Setup function is normally very accurate but occasionally false results can be generated. Problems may be as a result of:
- external sounds or rumbling/handling noises picked up by the microphone
1 sound reflections off hard surfaces (e.g. windows or walls) close to the listening position.
□ very strong acoustic resonances within the room,
□ obstacles (such as a sofa) between speakers and the microphone.
If you are still experiencing difficulties or you wish to have the most accurate results for ultimate surround performance, we recommend using the manual method of establishing speaker distances and levels.
Downloading the Dirac Live for Arcam application
To download the Dirac Live for Arcam PC/Mac application and quick start guide, please visit:
live.dirac.com
Using Dirac
You can store up to three Dirac -Q curves in the SA30. Each input can use a different curve, for example a "Movie" curve on the BD input and "Music" curve on the CD input.
This can be set on a per-input basis using the DIRAC on the front panel or AUDIO the remote.
Alternatively use the Dirac menu in the Audio settings menu to set the curve for each input. See "Dirac Curve" on page EN-20.
Note: When Dirac is run for the first time the curve will be applied to all inputs. Subsequent curves will not be automatically applied, use the methods above to choose the required curve for the input in question.
When Dirac is being used the box will be shown on the display.
Remote Control
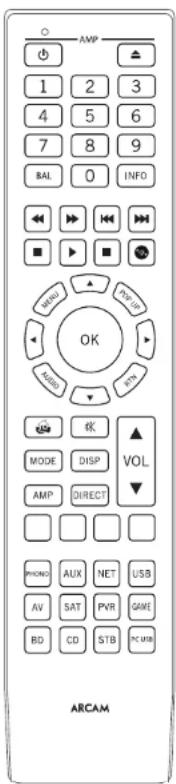
The remote control is a sophisticated 'universal' back lit remote control that can control up to 8 devices. It is pre-programmed for use with the SA30 and Arcam CD and Blu-Ray players.
With its extensive library of codes it can also be used with thousands of third party AV components. See the list of codes at the back of this manual
Make sure the two AAA batteries (supplied) are installed before attempting to use the remote control.
- Open the battery compartment on the back of the handset. To do this, press the catch on the battery cover as indicated by the arrow on the catch and remove the battery cover.
- Insert two 'AAA' batteries, as indicated in the battery compartment.
- Replace the battery cover. To do this, locate the lug on the battery cover into the corresponding hole on the short edge of the battery compartment. Now press the opposite end of the battery cover (with the catch) down so that the cover is flush with the main body of the remote and the catch clicks.
The remote control requires a clear line of sight to the front panel of the SA30 to ensure reliable operation.
Notes on batteries:
Incorrect use of batteries can result in hazards such as leakage and bursting.
Do not mix old and new batteries together.
Do not use non-identical batteries together – although they may look similar, different batteries may have different voltages.
Ensure the plus (+) and minus (−) ends of each battery match the direction indicated in the battery compartment.
Remove batteries from equipment that is not going to be used for a month or more.
When disposing of used batteries, please comply with governmental or local regulations that apply in your country or area.
Useful information
Backlight
A backlight comes on for eight seconds wherever a key is pressed. This helps you use the handset in subdued lighting conditions.
LED blinks
Short blinks indicate a valid key press.
Multiple short blinks convey information (such as a device code) or signal the beginning and successful completion of a programming sequence.
The symbol ^2 is used in the manual to indicate an LED blink.
Timeouts and unassigned keys
Time out - After 30 seconds the remote exits the programming state and returns to normal operation.
Stuck key timeout - After any key is pressed continuously for 30 seconds, the remote stops sending IR transmission to conserve battery life. The remote remains off until all keys are released.
Unassigned keys – the remote ignores any unassigned key presses for a particular Device Mode and does not transmit IR.
Low voltage indicator
When the batteries are running down, the backlight flashes briefly whenever you press a button.
If this happens, fit two new AAA alkaline batteries as soon as possible.
The remote complies with Part 15 of the FCC rules
This equipment has been tested and found to comply with the limits for a class B digital device, pursuant to part 15 of the FCC Rules. These limits are designed to provide a reasonable protection against harmful interference in a residential installation. This equipment generates, uses, and can radiated radio frequency energy and if not installed and used in accordance with the instructions, may cause harmful interference to radio communications. However, there is no guarantee that interference will not occur in a particular installation. If this equipment does cause harmful interference to radio or television reception, which can be determined by turning the equipment off and on, the user is encouraged to try to correct the interference by one or more of the following measures:
Reorient or relocate the receiving antenna.
Increase the separation between the equipment and receiver.
Connect the equipment into an outlet or a circuit different from that to which the receiver is connected.
Consult the dealer or an experienced radio/TV technician for help.
Device Mode/Source keys
As the remote can control your Receiver as well as a range of other equipment: many of the buttons have more than one function depending on the 'device mode' selected on the remote control.
The Device keys select the source on the SA30 if one of these keys is pressed briefly, a command is transmitted to change the source on the unit. Also the functionality of the remote control changes to operate the selected source device.
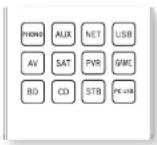
| MM or MC Phono input | |
| Auxiliary input | |
| Network input (e.g. internet radio/NAS drive) | |
| External USB device (Pen drive, etc.) | |
| Audio-visual sound input (use with TV) | |
| Satellite input | |
| Personal Video Recorder (or Digital Video Recorder) input | |
| Games console input | |
| Blu-ray Disc or DVD player | |
| Compact Disc player input | |
| Set Top Box decoder input | |
| ARC/cARC Input |
Each Device Mode changes the behaviour of many of the remote keys to control the source device appropriately. For example: in CD mode ☐ plays the
previous CD track, but in AV mode ■issues the TV 'channel down' command.
The remote remains in the last selected Device Mode so it is not necessary to press a Device Mode key before every command key if all you are doing is playing or skipping tracks on a CID, for example.
Volume control
By default, the remote is set up so that the volume control and mute buttons always control the volume of the SA30, regardless of which Device Mode the remote is currently set for. This is known as volume 'punch through'.
For example, if you are listening to a CD, you will probably have the remote in CD Device Mode to control the CD player. You can use the volume controls on the remote directly to adjust the volume of the Receiver without first having to press AMP but the remote into AMP Device Mode. The volume buttons 'punch through' the CD Device Mode on the remote to the AMP Device Mode.
Volume 'punch through' can be disabled individually for any Device Mode if desired
Customising the remote
The remote offers a Code Learning feature that allows you to copy up to 16 functions from an original remote control onto the remote keypad. For details of this, and other customisation features, "Customising the Remote Control" on page EN-22
AMP
AMP Device Mode
The AMP Device Mode button configures the remote to control the SA30. Pressing this button does not affect the currently selected input on the SA30.
The functionality of the remote is context sensitive for the internal sources and is described in the following table.
| Toggles power between standby and on. | |
| 0....9 | The number keys can be used for direct entry of numeric values. |
| BAL Adjust the left right balance of the audio output. Use the Ⓧ and Ⓧ navigation buttons to adjust the balance direction. | |
| NFO Info cycles through the information displayed on the lower portion of the front panel display when on NET and USB inputs. | |
| MENU Enters the setup menu. | |
| AUDIO OGoggles Direc Live EQ on/off. | |
| RTN Exis the current setup menu. | |
| Toggles the output mure. | |
| VOL Ajust amplifier volume. | |
| DISP Cycles through the front panel display's brightness options. | |
| AMP Resets remote to AMP mode. | |
| DIRECT Stereo direct on/off. Provides a direct analogue path from the analogue inputs to the audio outputs. Only applicable to the analogue inputs. | |
| Navigate the files and menus on the screen. OK selects the highlighted file or enters the highlighted menu on the screen - equivalent to 'Enter' or 'Select' on some remote controls. AMP + Ⓧ Power on from standby AMP + Ⓧ Standby from Power on | |
| PIONO MM or MIC Phono input | |
| AUX Aux input. | |
| NF-1 Network (NF-1) input. | |
| USB USB input. | |
| AV AV input. | |
| SAT SAT input. | |
| FVR FWR input. | |
| GAME Game console input. | |
| BD BD input. | |
| CD CD input. | |
| STB | STB input. |
| PC US3 ARC/eARC input | |
Network and USB commands
When using the network or USB input, the keys below are used to navigate music files in AMP Device Mode.
| Navigates the files on the Network or USB drive. | |
| Play, pause, stop, skip forward, skip backward, fast forward and rewind | |
| Returns navigation to the top level of the network client menus (Home') |
BD
BD/DVD Device Mode
The BD Device Mode button selects BD as the source. The button is configured to control the BD functions of Arcam BD players, this can be changed (see "Locking/Unlocking a specific Device Mode" on page EN-23).
| Toggles power between standby and on. | |
| Open/close disc tray. | |
| 0...5 Functions as original remote number key | |
| DISP Cycles through the front pane display's brightness options. | |
| MODE | Cycles through the repeat options (track, disc, etc.). |
| Fast rewing/forward. | |
| Skip back/forward | |
| Stop playback of a BD or DVD. | |
| Play the current track. | |
| Pause playback. | |
| Start recording (on products that have this feature). | |
| MENU Disc menu. | |
| POP UP Activates BD/DVD player menu, if available. | |
| Navigate setup and BD/DVD programme selection menus. OK selects the highlighted file or enters the highlighted menu on the screen - equivalent to 'Fiver' or 'Select' on some remote controls. BD = Power on from Standby BD = Standby Tom Power on BD = changes the picture resolution (for BD, only on the Home screen). | |
| Returns navigation to the top level of the menu ('Home'). | |
| AUDIO Changes a audio decode format (Dolby Digital, DTS, etc.) | |
| AMP Resets remove to AMP mode. | |
| RED RED button for BD | |
| GREEN GREEN button for BD | |
| YELLOW YELLOW button for BD | |
| BLUE UP button for B2. |
CD
CD Device Mode
The CD Device Mode button selects CD as the source. The button is configured to control the CD functions of Arcam CD players, this can be changed (see "Locking/ Unlocking a specific Device Mode" on page FN-73).
| Togg es power between standby and on. | |
| Open/close disc tray. | |
| 0..9 Functions as original remote number key. | |
| DISP Cycles through the front panel display's brightness options. | |
| MODE Cycles through the repeat options (track, disc, ctc). | |
| Fast rewind/forward. | |
| Skip back/forward | |
| Stop playback of a CD | |
| Play the current track. | |
| Pause playback. | |
| POP UP In 'normal play' (i.e. the display does not show the letter Fj, press the ◆ and ◆ keys to select the track and then MENU stores the track.In 'program play' mode, theMEyU deletes the stored track. | |
| Navigate seconds and CD programme selection menus.OK selects the highlighted file or enters. The highlighted menu on the screen - equivalent to 'Enter' or 'Select' on some remote controls.CD - Power on from StandbyCD - Standby from Power on: | |
| AMP Resets remote to AMP mode. | |
AV
AV Device Mode
The AV Device Mode button configures the remote to control the functions of a television. Pressing this button also selects AV as the source.
| Toggles power between standby and on. | |
| 0..9 Functions as original remote number key | |
| DISP Display INFO or OSD (On Screen Display) function, if available. | |
| MODE AV, this function is TV specific. | |
| Channel down/up. | |
| INFO Displays picture information; this function is TV specific. | |
| POP UP Guide. | |
| Navigate setup and programming selection minus. OK confirms a selection (equivalent to 'Enter' or 'Select' on some remotes.) | |
| Returns navigation to the top level of the menu ('I lone'). | |
| AMP Resets remote to AMP mode. | |
| RED RED key for Text TV | |
| GREEN GREEN key for Text TV | |
| YELLOW YELLOW key for Text TV | |
| BLUE BLUE key for Text TV. | |
STB
STB Device Mode
The STB Device Mode button selects STB as the source. It configured to work with your set top box decoder or similar device, the remote can subsequently control the device.
| Together power between standby and on. | |
| 0..9 Functions as original remote number key | |
| DISP Display INFO or OSD (On Screen Display) function, if available. | |
| MODE | Selects the Library/In Media |
| Fast rewind/forwards. | |
| Channel down/up. | |
| Stop playback. | |
| Start Playback. | |
| Pause playback. | |
| Record. | |
| INFO Opens the -PG (Electronic Program Guide) on some satellite and cable set top boxes. | |
| POP UP | Turns on the Menation if the set top box uses in a feature. |
| Navigate setup and programme selection menus. OK confirms a selection (equivalent to 'Enter' or 'Select' on some remots). | |
| Returns navigation to the top level of the menu (Home. | |
| AUDIO Selects the Function | |
| AMP Resets remote to AMF mode. | |
| RHO RFO button for set top box. | |
| GREEN GREEN button for set top box. | |
| YELLOW YELLOW button for set top box. | |
| BLUE BLUE button for set top box. | |
SAT
SAT Device Mode
The SAI Device Mode button selects SAI as the source. If configured to work with your satellite receiver, the remote can subsequently control the device.
| Toggles power between standby and on. | |
| 0..9 Functions as original remote number key | |
| DISP D | display INFO or OSD (On Screen Display) function, if available. |
| Channel down/up. | |
| INFO D | Displays programme information. |
| POP UP | Guide for Setup on some set top boxes). |
| Navigate setup and programme selection menus. | |
| OK confirms a selection (equivalent to 'Enter' or 'Select' on some remote). | |
| Returns navigation to the top level of the menu (Home | |
| RIN Back | |
| AMP Resets remote to AMP mode. | |
| RED RED button for Satellite. | |
| GREEN GREEN button for Satellite. | |
| YELLOW YELLOW button for Satellite. | |
| BLUE BLUE button for Satellite. | |
PVR
PVR Device Mode
The PVR Device Mode button selects PVR as the source, it configured to work with your personal (hard disc) video recorder or similar device, the remote can subsequently control the device.
| Logistics power between standby and on. | |
| 0.9 Functions as original remote number key | |
| INFO Display INFO or OSD (On Screen Display) function, it available. | |
| MODE | Selects the I data/interface/media |
| Fast rewind/forward. | |
| Channel down/up. | |
| Stop playback. | |
| Start Playback | |
| Pause playback. | |
| Record. | |
| MENU | Opens the EPG (Electronic Program Guide) on some satellite and cable set too boxes. |
| POP UP | Turns on the Menotion if the PVR uses this feature. |
| Navigate setup and programme selection menus. | |
| OK confirms a selection (equivalent to "Enter" or "Select" on some remotes). | |
| Returns navigation to the top level of the menu (Home | |
| AUDIO | Selects the Helpction. |
| AMP | Roscis remote to AMP mode. |
| RED RED | D button for PVR. |
| GREEN | GREEN button for PVR. |
| YELLOW | YELLOW button for PVR. |
| BLUE BLUE | button for PVR. |
CN-19
Setup Menu
The setup menu allows you to configure various aspects of the 5A3D integrated amplifier.
Entering Setup Menu
To enter the setup menu, press the MENU on the remote control or front panel.
Navigating The Setup Menu
The setup menu can be navigated by using the remote control or pressing the front panel keys that correspond to the function shown on the display, as shown below. To change a setting, simply turn the control knob left or right.
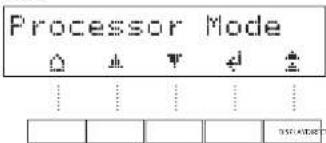
| HOME Exit the menu and return to the home display | |
| UP Navigate to the previous menu option | |
| DOWN Navigate to the next menu option | |
| LEFT Navigate left or move to the previous field | |
| RIGHT Navigate right or move to the next field | |
| OK Save the current setting and move to next option | |
| BACK Save the current setting and exit menu option |
System Settings
Display
Allows the brightness of the front panel display to be changed. The available settings are FullaDim. Off The default setting is Dim.
Dark Mode
Turns front panel display and status LED off
Enable Input
Allows unused inputs to be removed from the input selection list from the front panel. Inputs can still be selected via remote control.
Timeout
This option allows you to choose the length of idle time before the unit goes into standby. The available options are Off, 20, 30 minutes, 1, 2 and 4 hours. The default viewing is 20 minutes.
System Code
Change the IR system code that the SA30 responds to (either 16 or 19). The default code is 16.
Net Reset
Resets the network module to factory settings.
System Reset
Restores the SA30 to its factory default settings.
USB Update
Allows the SA30 to be updated via a USB stick. Refer to the software release instruction for more details available at www.arcam.co.uk.
OTA UPG
If enabled the SA30 will update automatically if left powered on overnight or in network standby. If disabled software updates need to manually installed. Refer to the software release instruction for more details available at www.arcam.co.uk.
System Info
Displays various system parameters including MCU, Network and ARC software version numbers, IP address, Friendly name, Googlecast name and serial number.
Audio Settings
Dirac Curve
Specify which Dirac calibration is applied to each input. Note: When Dirac is run for the first time the curve will be applied to all inputs.
Balance
Turn the SA30 volume control knob left and right to change the left and right channel balance, respectively.
Phones Ovr
Control whether or not the speaker outputs are muted when a pair of headphones are connected to the PHONES socket on the front panel. The default is Off so the speakers and pre-outs will be muted when headphones are connected.
PM Input
Specify which input is to be used in processor mode. It's mode can be assigned to most analogue inputs. In this case, the 5A30 output level is set to a fixed level. The default setting is None.
Note: The PHONO input cannot be selected as the processor input.
PM Volume
Specify the required volume level for the processor mode input. The default is volume is 30.
Max On Vol
Limits the maximum volume when the SA30 is switched on or comes out of Standby. The SA30 comes on at this stored volume setting if the last used (possibly very loud) volume exceeds this value. It is stored in memory and recalled each time the unit is powered up.
Setup Menu (Continued)
SA30 Digital Filters
EN
Maximum Vol
Limits the maximum volume setting the SA30 can be turned up to for external inputs. This is a useful feature to prevent accidental overdriving of low power-handling speakers. It is stored in memory and recalled each time the unit is powered up.
Max Net Vol
Limits the maximum volume setting the SA30 can be turned up to for streamed content. This is a useful feature to prevent accidental overdriving of low power-handling speakers, or to prevent volume being accidentally set to maximum using streaming app volume sliders. It is stored in memory and recalled each time the unit is powered up.
TV Volume
When set to OFF any volume commands sent by the TV via the ARC/CEC connection will be ignored by the 5A30.
TV Power
When set to OFF any power commands sent from the TV via the CEC connection will be ignored by the SA30.
TV Audio
When set to OFF the SA30 will not automatically switch to the ARC input. In this case use the PC-USB button on the remote control or the INPUT+/- buttons on the front panel.
Lip Sync
Specify the amount of audio delay to be applied to an input.
Analogue Direct
Specify which analogue inputs should operate in analogue direct mode.
Phono Input
Selects which Phono input is used, Moving Magnet (MIV) or Moving Coil (MC)
Filter
Specify which digital filter is used in the DAC. Apexizing: Linear Phase Fast Roll Off; Linear Phase Slow Roll Off; Minimum Phase Fast Roll Off; Minimum Phase Slow Roll Off; Brick Wall or Corrected Minimum Phase Fast Roll Off. See "5A30 Digital Filters" on page EN 21 for more explanation on the differences between the filters.
Network Settings
Network Info
Displays the units wired and wireless MAC address, IP address and friendly name and host name.
Net Standby
Enables or disables the network control of the SA30 while the unit is in standby. The default setting is off
Note: The unit can still be controlled via RS232 commands, even when network standby is disabled.
RS232 Standby
Enables or disables the RS232 control of the SA30 while the unit is in standby. The default setting is Off
C4 SDDP
Enables the Control 4 discovery function and enables the sending of a discovery beacon.
The SA30 allows the listener to choose between a number of digital filters for use in the audio DAC. Digital filters are required to minimise unwanted antialrasing distortion in the audio band but no digital filter is perfect, all are a compromise between various parameters. These include:
Frequency response - Audio level with respect to frequency. Ideally this should not vary significantly between 20Hz and 20kHz.
Phase The time delay introduced between reproducing different frequencies within the pass band of the filter. Ideally this would be as low as possible (linear phase).
Pre ringing – Additional audio artifacts that precede the original audio impulse. These are sometimes thought to be bad as this phenomenon does not exist in the natural world, so ideally this should be as low level and last for as short a time as possible.
Post ringing - Additional audio artefacts that follow the original audio impulse. Ideally these should be as low in level and last for as short a time as possible.
Aliasing – Additional audio artifacts introduced into the audio band from high frequency signals.
We have chosen our default filter through a combination of careful measurement and listening tests and we believe they are the best compromise to achieve the best listening experience. However, all of the filters sacrifice performance of one parameter to improve another. Therefore, dependant on your choice of listening material and personal preference, you may wish to choose one of the other options. Note that any audible differences are most likely to be heard with sample rates of 4kHz and below.
Brick Wall (B Wall)
No phase shift, but introduces both pre and post-ringing artifacts.
Corrected Minimum Phase Fast Roll Off (Corr MinP)
Low pre-ringing and the phase response varies at higher frequencies. There is more post ringing compared with linear phase and apodizing filters.
Apodizing (default)
A compromise between phase, frequency response and ringing. Its main advantage is that it removes most of the ringing that has been introduced upstream in the recording process when the original material was recorded and mastered.
Minimum Phase Slow Roll Off (MinP Slow)
No pre-ringing artefacts but can introduce phase shifts at higher frequencies. It has less post ringing than the Minimum Phase Fast Roll Off, but this is still higher than the linear phase filter options. Very high frequencies in the last half octave of the filter pass band will be slightly attenuated.
Minimum Phase Fast Roll Off (MinP Fast)
No pre-ringing and the phase response varies at higher frequencies. There are significantly higher amounts of post ringing compared with the linear phase filter options.
Linear Phase Slow Roll Off (LinP Slow)
Low and equal levels of pre and post ringing. No phase shifts but can introduce high frequency aliasing at a higher level than linear phase fast roll off. Very high frequencies will be slightly attenuated.
Linear Phase Fast Roll Off (LinP Fast)
Higher and equal levels of pre and post ringing compared with linear phase slow roll off. No phase shifts and with minimal high frequency aliasing compared with slow roll off.
Customising the Remote Control
Code learning
The supplied remote comes with a complete library of pre-programmed codes. After you have set up the remote for your device, you may find that there are one or more functions on your original remote which do not have a place on the keypad. For convenience, the remote offers a Cxide I learning feature that allows you to copy up to 16 functions from an original remote control onto the remote keypad.
Before you start, make sure that:
☐ The original remote control is working correctly.
☐ The remotes are not pointing at your device.
☐ The remotes have fresh batteries.
☐ The remotes are not in direct sunlight or unstrong fluorescent lights.
NOTE: Learned functions are more-dependent. You could assign up to eight different functions to a single key - a separate learned function for each mode.
Direct code setup (Method 1)
The first method is to program the remote with the 3-digit code number for the device you wish to control - see "device code tables". Make a note of the suggested number or numbers - the most popular code is listed first. Now power on the device.
- Press the Device key for the product you want to set up, together with the 1 key. Hold down both buttons for three seconds until the LED stays it. You are now in setup mode, and you can release the buttons.
- Enter a 3 digit code for the device. If the 3 digit code number you entered is correct for the device, it will turn off. If it doesn't turn off, enter the next code number from your list until the device does turn off.
- Once you have found the correct code, press the Device key again. The LED blinks three times to confirm that the code has been successfully stored.
Library search setup (Method 2)
Library search allows you to scan through all the codes contained in the remote's memory. It can take a lot
longer than the previous method, so only use this method is:
- Your device does not respond to the remote all you have tried all the codes listed for your brand. - Your brand is not listed at all in the Device Co tables.
Press the Device key for the product you want to set up, together with the 1 key. Fold down both buttons for three seconds until the LED stays lit
Point the remote control at the product you wish to control and press the ⚠ or ⏱ button on the navigation pad. Each time the ⚠ or ⏱ button is pressed, the code counts up (or down) one code number with a signal to power off the device.
- Continue pressing the up or down button, in approximately one second intervals, until the device turns off. (DO NOT alternate the up and down button - you need to move in only one direction.)
- To store the correct code, press the Device key again. The LED blinks three times 🐘 to confirm that the code has been successfully stored.
Learning setup (Method 3)
The third method involves 'teaching' the Arcam remote from the original remote for the device. The two remotes should be facing each other, about 10cm apart.
- Press the Device key for the product you want to set up, together with the 3 key. Hold down both buttons for three seconds until the LED stays lit.
- Press the button on the Arcam remote that you want to assign a command to. The LED blinks once indicating that the remote is ready to learn the command.
- Press and hold the appropriate key on the other remote until the LED blinks twice. This indicates the Arcam remote has learned the command from your other remote.
- Continue learning the commands from your other remote by pressing the next button on the remote and repeating steps 7 and 3.
- Once the remote has learned all the selected commands, press and hold the Device key you used
to enter learning together with the Numeric3key to store the learned commands.
NOTE: If the Arcam remote IHD blinks five times there was an error in the learning process. In this case, please start the Learning Setup from the start.
The AMP keyUSB not learn commands.
Important notes
Once you start a Code Learning session, you have approximately ten seconds to conduct each step. Any longer, and a timeout means that you'll have to start the process again.
☐ The Learning feature is mode-specific you can copy one feature per mode onto a key.
☐ The remote can learn approximately 16 functions in total.
☐ To replace a learned function, simply assign a new function to the same key.
□ Learned functions are retained when you change batteries
If Code Learning fails, try altering the distance between the two remotes; make sure that the ambient light is not too bright.
Deleting the learned data
To delete all the learned data for a device:
- Press the Device key for the product you want to set up, together with the 3 key. Hold down both buttons for three seconds until the LED stays lit.
- Press and hold down the Device key for the product that you want to erase, together with the ▶ key for three seconds until the LED blinks twice 🌐.
- If any further key press is not made for 30 seconds after the LED blinks twice, the remote leaves erase mode without, deloing the learned data.
- If you press the Device key one more time within 30 seconds after LED blinks twice, you can finish the erase mode deleting all the data learned on the Device. The LED blinks three times to confirm
To delete the learned data for a key for a device:
- Press the Device key for the product you want to set up, together with the 3 key. Hold down both buttons for three seconds until the LED stays lit.
- Press and hold down the key on which you want to delete the data for three seconds. The I HD blinks twice 🐘, if any further key press is made, the remote escapes from erase mode without deleting the learned data.
- If any further key press is not made for 30 seconds, the LED blinds twice ⚙️, the remote get out of the erase mode automatically without deleting the learned data.
- If you press the Device key together with the 3key again within 30 seconds after the LED blinks twice, all the data learned for that Device is deleted and you leave erase mode. The IHD blinks three times in confirmation.
Reading stored code numbers
- Press the Device key for the product that you want to set up together with the 4 key. Hold down both keys for three seconds until the IHD blinks.
- Press the linky and count the number of blinks ( =1,=2,=3, etc). There is a time gap between digits. (Note that '0' is represented by ten blinks:
Locking/Unlocking a specific Device Mode
When you first unpack your remote and insert the batteries, it is able to control certain Arcam components automatically (e.g. BD players, Amplifiers, Tuners and CD Players). We achieve this by programming specific Arcam device codes onto the relevant Device Mode keys, then locking the Device Modes so you don't reprogram them inadvertently.
If you want to override these locked default settings to control a third-party BD player, for example, you will first need to unlock BD mode before setting up the remote using one of the learning methods described on the previous page.
Here are the factory default settings:
| Device Mode | Default status | Default codes |
| AMP Locked 001 (Arcam code 16) | ||
| BD Locked 001 (Arcam) | ||
| AV Unlocked 108 (Philips IV) | ||
| PC USB Unlocked Code learning only | ||
| GAME Unlocked Code learning only | ||
| STB Unlocked 030 (Bush/Goodmans/Grundig, from SAT database) | ||
| SAT Unlocked 128 (Sky+ Digital, from SAT database) | ||
| PVR Unlocked 018 (Humax PVR, from SAT database) | ||
| CD Locked 001 (Arcam) | ||
Alternative codes are available for multi-room solutions, or in the case of code clashes with other manufacturer's products.
For example:
AMP (system code 19):007
Note that you need to change the system code on the product you wish to control, as well as the remote.
AMP, BD and AR The Device keys that may be locked or Unlocked. Lock and Unlock are toggles (they change from Lock to Unlock to Lock, etc.).
- Press and hold the Device and 6 keys together for three seconds. The power HD stays lit, showing that it is in lock/Unlock setup mode.
- If there is no further key input for 30 seconds, the LED goes off and the remote leaves Lock/Unlock setup mode.
- To toggle the status of a device and then verify the status of a device, press the 169s in sequence: If you have locked the device, the LED blinks three times:
If unlocked the device, the LED blinks five times: - If you press a valid Device key within 30 seconds, the LED blinks three times: 🐘 and the remote leaves Lock/Unlock setup mode.
Controlling the volume of other devices
By default, the volume keys and mute key control the amplifier volume.
You can configure these buttons so they send volume commands to another device. In the following example, the volume commands are sent to a linked AV device (your television, for instance):
Press AV + 5 for three seconds, until the LED lights and stays on.
Press VOE
PressAV again. The HD blinks three times
The volume and mute keys will now send the volume commands to the TV.
To set the volume buttons to control the amplifier once more, repeat the above steps, except press AMP in step 3.
Hidden commands
| Command | Effect |
| AMP + 📋 | Sends a Power On command |
| AMP + 📋 | Sends a Power Off command |
| CD + 📋 | Sends a Power On command |
| CD + 📋 | Sends a Power Off command |
| BD + 📋 | Sends a Power On command |
| BD + 📋 | Sends a Power Off command |
| BD + 📋 | Sends a Resolution command |
Factory default reset
You can reset your remote to the original factory default settings.
Press and hold both the (home) and MENU keys for about five seconds until the power LED blinks five times
All programming and setup codes that you have entered into the remote are erased and the remote returns to the original factory default settings.
Device codes
The tables at the end of this handbook list 3-figure codes for different manufacturers' devices.
Use these when setting your remote up to control your devices, as described in "Direct code setup (Method 1)" on page EN-22
If more than one code number is listed, try the first number, if the results are unsatisfactory, continue trying the numbers for that manufacturer to get the best fit with the functionality required.
If the manufacturer of your equipment is not listed, you can try "Library search setup (Method 2)" on page EN 22. This method allows you to scan through every code contained in the remote's memory.
Troubleshooting
| Problem Check the following | |
| No sound □ The SA30 amplifier is correctly plugged in and switched on□ Your audio source is correctly connected, the correct input is selected and it is not muted□ The SA30 is not in protection mode, as described below | |
| Sound cuts-out unexpectedly | The SA30 may enter a protection mode if a fault is detected. The front panel LED will indicate the fault type, according to the list below□ FLASHING WHITE: The internal temperature of the unit reached an unsafe level. Allow the SA30 to cool off□ FLASHING RED: The SA30 amplifier detected a speaker short circuit. Should this happen, please inspect all the speaker cables to make sure none of them are shorted together. This fault is very common when bare wires are being used to make speaker connections□ FLASHING CHANGE: The amplifier detected a DC offset..Following any of the faults described above, the amplifier will turn itself off and power to the speakers will be removed. To continue using the SA30, the fault must be removed and the unit must be turned OFF then back ON |
| The unit responds erratically or not at all to the remote control | □ There are fresh batteries in the remote control□ The front panel window is visible and you are pointing the remote control towards it□ The remote is in the correct mode to control the unit i.e by pressing the AMP button before controlling the SA30 |
| The front panel display is blank | □ The display hasn't been turned off. Press DISPLAYton on the remote control. See "Display" on page EN-12 |
| Hum on the analogue input | □ All cables are making a good connection. If necessary withdraw the cable from the connector and plug it fully in again (turn the power off before doing this)□ The connections inside the source cable connector are not broken or badly isolated□ If the hum originates only when one particular source component is connected, that an aerial cable, or dash connection to this source is ground isolated. Contact your installation contractor |
Continuous power output (0.5% THD), per channel
| Both channels, 8 ,20 Hz - 20kHz · 130 W | |
| Both channels, < ,at 1kHz > 200 W | |
| Harmonic distortion, 80% power, 8 at 1kHz · 0.002% | |
Analogue Inputs
| ADC AK5552 | ||
| Sample rate / bit depth 192kHz / 32 bit | ||
| Phono Inputs Moving Magnet (MnV) Moving Coil (NC) | ||
| Input sensitivity at 1kHz (nominal) 5mV 0.35mV | ||
| Input impedance 4/κΩ + 200pF 4/0Ω + 1nF | ||
| Signal/Noise ratio (A-wid) 80dB, ref. 5mV at 1kHz | 80dB, ref. 0.35mV at 1kHz | |
| Overload margin 21dB ref. 5mV at 1kHz | 21dB ref. 0.35mV at 1kHz | |
| Frequency response (ref. RIAA curve) | 70Hz - 70kHz - 1dB | 70Hz - 70kHz + 1dB |
| Line Inputs: | ||
| Nominal sensitivity | 1V | |
| Input impedance 10kΩ | ||
| Maximum input | 4.8Vrms | |
| Frequency response | 20Hz 20kHz ± 0.2dB | |
| Signal/Noise ratio (A-wid) 100W, ref. 2.1V input | 112dB analogue direct, 106dB ADC / DAC | |
Digital Inputs
| DAC | E5S9038K2M | |
| Frequency response | 20Hz - 20kHz ± 0.1dB | |
| Total harmonics distortion + Noise | 0,000% | |
| Signal/Noise ratio (A w.i.) ref. 0dBFS/100W | 113dB | |
| Supported sample rates | Optical | 37kHz, 42.1kHz, 48kHz, 88.7kHz, 95kHz |
| Coaxial | 32kHz, 44.1kHz, 48kHz, 88.2kHz, 95kHz, 176.4kHz, 192kHz | |
| Bit depth | 16 bit - 32 bit | |
Pre-amplifier output
| Nominal/Maximum output level | 800mV / 1.25V |
| Output impedance | 240Ω |
| Headphone output | |
| Maximum output level into 600Ω | 5Vrms |
| Output impedance | 1Ω |
| Load range | 16Ω - 2kΩ |
| General | |
| Mains voltage | 110 120V or 220 240V, 50/60Hz |
| Maximum power consumption 800W | |
| Low power standby consumption 0.5W | |
| Network standby consumption | 7W |
| BTU rating | 631 BTU |
| Dimensions W x H x D (including feel, control knob and speaker terminals) | 433x100x273mm |
| Weight (not) | 10.7kg |
| Weight (gross) | 13.8kg |
| Supplied accessories | Mains leadsRemote control2 x AAA batteriesUser Manual2 x WiFi AntennaSetup microphoneUSB cable |
All specification values are typical unless otherwise stated. Arcam has a policy of continuous improvement for its products. This means that designs and specifications are subject to change without notice. E&OE.
Worldwide Guarantee
This entcents you to have the unit repaired free of charge, during the first five years after purchase, provided that it was originally purchased from an authorised Arcam dealer. The Arcam dealer is responsible for all after-sales service. The manufacturer can take no responsibility for defects arising from accident, misuse, abuse, wear and bear, neglect or through unauthorised adjustment and/or repair, neither can they accept responsibility for damage or loss occurring during transit to or from the person claiming under the guarantee.
The warranty covers:
Parts (excluding disc drives) and labour costs for five years from the purchase date (see below for additional terms and conditions). After five years you must pay for both parts and labour costs.
Disc drives (of any type) are covered under this warranty for three years from the purchase date.
The warranty does not cover battery replacement at any time.
The warranty does not cover transportation costs at any time.
Claims under guarantee
This equipment should be packed in the original packing and returned to the dealer from whom it was purchased. It should be sent carriage prepaid by a resuitable carrier – not by post. No responsibility can be accepted for the unit whilst in transit to the dealer or distributor and customers are therefore advised to insure the unit against loss or damage whilst in transit.
For further details contact Arcam at luxurysupport@harman.com.
Problems?
If your Arcam dealer is unable to answer any query regarding this or any other Arcam product please contact Arcam Customer Support at the above address and we will do our best to help you.
On-line registration
You can register your product online at www.arcam.co.uk.
ARCAM | HDA
AMPLIFICATEUR INTÉGRÉ
SA30
Bienvenue
Configuration de Chromecast built-in
Configuration de Chromecast built-in
Connexion par fil
TV Volume - Volume TV
USB Update -USB Update
Chromecast built-in-instelling NL-12
Verborgen commando's NL-21
Toestelcodes NL-21
Probleemoplossing NL-22
SA30-specificaties NL-23
ARC/eARC-ingang
Chromecast built-in-instelling
Draadaansluiting
Verborgen commando's
luxurysupport@harman.com.
TV Volume - TV Volume
Maximum Vol - Volume massimo
TV Volume - TV Volume
Corr MinP - Corrected Minimum Phase Fast Roll Off
扬声器连接注意事项
Chromecast built-in 设置
无线连接
m = 311
广力云智慧零售收银系统
广力云智慧零售收银系统
广力云智慧零售收银系统
广力云智慧零售收银系统
m = 311
广力云智慧零售收银系统
广力云智慧零售收银系统
m = 311
广力云智慧零售收银系统
广力云智慧零售收银系统
广力云智慧零售收银系统
m = 311
[Non-Text]
m = 311
广力云智慧零售收银系统
广力云智慧零售收银系统
广力云智慧零售收银系统
锁定/解锁特定的设备模式
MQA (Master Quality Authenticated). KO-5
전면 패널 연결 및 제어
후면 패널 연결 및 제어
라우드스피커연결
작동 KO-10
디지털 오디오 입력 KO-10
아날로그 은디오 입력 KO-10
포노 입력 KO-10
네트워크으디오 입력 KO-10
ARC/eARC 입력 KO-11
듣기 KO-11
프로세서 맨드 KO-11
프리 앱프 출력 KO-11
아날로그 다이렉트 KO-11
네트워크에 연결하기 KO-12
흡 자동화 제어 KO-12
AirPlay 설정 KO-12
Chromecast built-in 설정
KO-5
KO-6
KO-7
KO-8
KO-12
Arcam용 Dirac Live KO-13
리모컨
설정 메뉴
시스템 설정
시스템 정보
오디오 설정
네트워크 설정 KO-19
SA30 디지털 필터
리모컨 사용자 정의 KO-20
코드 학습 KO-20
학습된 데이터 삭제하기
저장된 코드 번호 읽기
개별 장치 모드의 잠금/잠금 해제
기타 장치 음량 제어
숨겨진 명령
장치 코드 KO-21
문제 해결
SA30사양
전 세계 보증
KO-14
KO-18
KO-18
KO-18
KO-18
KO-19
KO-20
KO-20
KO-21
KO-21
KO-21
KO-22
KO-23
KO-24
개요
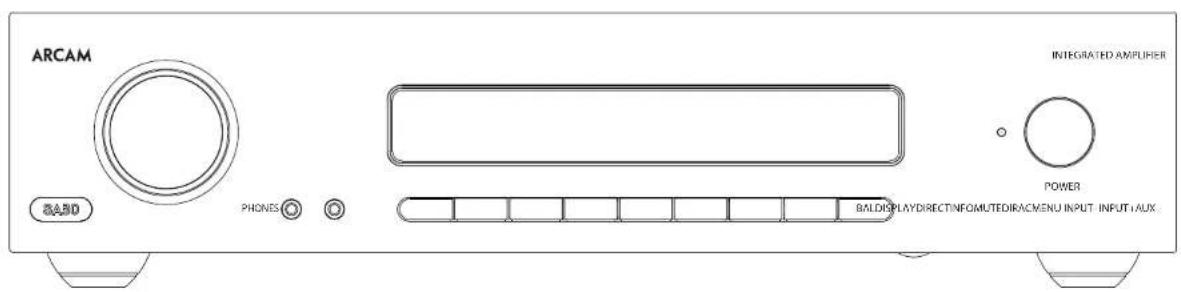
Arcam의 SA30 앱프
스피커 연결 시 주의 사항
작동
전원 켜기
Chromecast built-in 설정
유선연결
| Processor Mode | ||||
| DISCONNECTED | ||||
Note - for Arcam amps: 001 = RCS code 16 002 = RCS code19
DVD
| Alwa 76 | |
| Akai 281 | |
| Alpine 098 | |
| Apex Digital 207 282 115 | |
| Arcam 001 | |
| Brockov 132 | |
| Cambridge Audio 215 323 333 | |
| Clerware 251 | |
| Coby 260 | |
| Cycomerc 271 | |
| Daim 138 000/ 73 358 | |
| Duchard (91) | |
| Dof 300 000 17 | |
| Fremier 251 143 | |
| FSI 143 | |
| Fisher 147 | |
| Huns 142 | |
| Go | 0,7 |
| Go 2 desc | 15/09/220 201 |
| Goldster | 0,7 |
| Hermann Kordon | 0,4 40 |
| Hochi | 10 |
| Intal | 282 |
| Insights | 143 |
| Integra | 142 588 |
| JBC | 081 |
| JWC | 0 2 |
| Konzend 151 | |
| Koss | 279 |
| KI-1 135 | |
| Kiel 104 | |
| Lexicon | 1/3 |
| LS | 09 057 |
| Lins | 306 309 |
| Lithm | 314 |
| Locke | 3/9 960 |
| Magrawa 001 398 145 262 | |
| Märantz | 085 092 |
| Medikan 128 | |
| Microlux | 0,7 |
| Miltek 282 | |
| McBodin 001/ | |
| Myed | 102 34 |
| Nad 388 533 | |
| Neukink 91 | 0,5 |
| Onkyo | 076 111 1/2 338 |
| Ojoco | 347 |
| Opimus | 107 |
| Oilon | 130 |
| Panowski 012 138 111 150 | |
| Papiya 083 095 165 344 | |
| Papiya Magnesow | 14 001 |
| Pintzert | 073 099 099 107 |
| 06 127 024 054 | |
| Poland | 255 |
| Polkaudio | 14 001 |
| Primare | 198 144 |
| Piscan | 0,7 |
| USA | 0,7 |
| Hotel 350 580 | |
| Samsung | 0,6 16/1 01/16/339 275 |
| Sonsat 130 | |
| Sanyo | 1/7 |
| Sens 130 | |
| Sturp | 09" |
| Sherwood 245 245 | 245 245 |
| 245 245 | |
| Sonyo 033 118 145 126 | |
| Soyano | 191 289 242 243 343 370 |
| Supersam 142 | |
| So2000 | 1/3 |
| Syloma | 1/3 |
| Synchonic | 1/3 |
| Tag Mager 158 | |
| Taung | 107 |
| Tak | 107 |
| Tomlinix | 0/2 |
| Tomwood | 0/8 |
| Thompson | 0/7 |
| Toshiba | 130 14 164 168 275 356 |
| Vantener | 149 |
| Xbox | 0/2 |
| Yamama | 042 089 166 128 197 394 |
| Zenta | 05 051 |
DVD-TV combo
| Awa 1/8 | |
| Aka 2B1 | |
| Durchband 143 | |
| Tue | 143 |
| Tunai | 143 |
| Vagnia | 143 |
| Magnavoy 263 | |
| Mintes 2B0 | |
| Samsung | 143 |
| Wolanda | 143 |
| Sylvania | 143 |
| Synchonic | 143 |
| Sohima | 143 |
DVD-TV-VCR combo
| Emerson 142 | |
| Insignia | 143 |
| Magnacox 142 | |
| Parasitic 144 | |
| Supersson 43 | |
| Sykana | 143 |
| Toshima | 164 |
DVD-VCR combo
| Gz Video | 15/ |
| Panasonic 130 | |
| Philips 001 VCR functioners2007 | |
| Samsung | 15/120 |
| Sensal 120 |
| Sony 1/3 '9' | |
| Toshiba | 1/1 |
| Zenith | 091 (WCR solutions) (12) |
DVD-Recorder
| Cyberborne 271 | |
| GoVicero | 220.221 |
| Kim | 279 |
| Paracarica 138 | |
| Samsung | 301 |
| Sony 191 | |
| Tovisica | 109 |
Blu-ray/HD-DVD
| Dinner 25K | |
| LG | 091 |
| Nad 303 | |
| Omega | 568 |
| Panasonic 235 | |
| Pioneer | 50/534 |
| Samsung | 273 |
| Sony 256 | |
| Toshiba | 279 526 |
| Yamaha | 157 |
Satellite STB
| Acoustic Solutions | 320 003 |
| Aura | 002 900 016 570100 |
| Alba | 222 218 920 002627 520 244 05806 220 118 |
| Antifinance | 3/3 |
| Argos 044 | |
| Asia 002 009 | |
| Ameriz | 011 |
| Astro | 0,4 |
| Aucoline 007 | |
| Aurex 002 | |
| Black Diamond | 222 |
| Boca 024 | |
| Bush 002 007 009 111 | |
| 076 520 223 227629 538 212 324652 253 358 962667 525 273 078662 558 122 103113 | |
| Cerong | 074 |
| Crown | 222 |
| Curry | 052 |
| Curis | 06 202 |
| CYRK | 129 |
| Dawson | 01 125 |
| Djulfusion 229 011 | |
| Djibome | 322 020 073 |
| Djubing 392 016 |
| Digitalstream | 095 |
| Dun | 066 089 120 |
| Dreams | 119 |
| Dual | 020 |
| Duodbrand 002 020 025 | |
| Ebenidas | 062 |
| Everham | 020 |
| EZ Box | 101 |
| Terpquin | 001 012 013 030 |
| 076 062 072 071 | |
| TelchTV | 086 |
| Telchv.071 100 | |
| Tecom 045 | |
| Teca 017 | |
| Eaton | 009 0 |
| Goza | 024 |
| Goodmors | 001 017 019 023 |
| 023 025 025 030 | |
| 057 044 050 054 | |
| 069 070 071 078 | |
| 102 102 | |
| Grunting | 001 002 003 004 |
| 021 044 044 053 | |
| 029 061 065 072 | |
| 034 071 084 088 | |
| Hinchman 024 | |
| Hitachi | 001 020 022 |
| Humax | 012 018 028 035 |
| 058 019 052 051 | |
| 051 168 115 115 | |
| 112 | |
| Kan 034 | |
| Kesypit | 038 090 095 |
| Inveso | 021 |
| Kohri Fagria | 047 057 |
| Kohri Frigida 042 | |
| Langra | 076 04 |
| Lingai | 001 020 026 027 |
| 079 | |
| Lokus 002 | |
| Logix 222 313 070 036 | |
| Logix | 061 065 087 097 |
| Lakry | 014 |
| Lakor | 073 085 |
| Maharman | 070 073 076 |
| Mach 020 | 020 076 |
| Masu | 002 011 051 |
| Maslon | 024 |
| Mas | 051 081 |
| Melroni | 007 048 047 067 |
| 068 072 073 076 | |
| 077 079 | |
| Micu 016 | |
| Morgum SL | 027 |
| Muraty | 100 |
| Nikmer 023 | |
| Nikai | 085 |
| Cinn | 002 025 |
| Pace | 057 078 125 |
| Rutlu | 002 |
| Polson | 017 |
| Pancanto 006 | |
| Pains 007 | |
| Patipis 007 4 431 313 | |
| 054 080 114 | |
| Pomona 548 549 552 16 | |
| Palline | 022 019 029 026 037 |
| Sagstrom | 256 036 |
| Sagorn | 038 015 054 060 |
| Samsung | 057 028 051 111 |
| Scientific Aranca SIS 322 | 08 |
| Santana | 007 |
| Sharp | 076 079 081 088 |
| Sky | 048 054 125 |
| Sky digital 127 | |
| Sky HD | 130 |
| Sky | 138 |
| Skymatron 0.7 | |
| Sony 015 110 | |
| Strong | 003 |
| TJC 391 | |
| Schwab 002/003 | 0 0 0 |
| 0 0 0 06 06 07 | |
| Telusmonate | 059 040 041 126 |
| Telusmonite | 007 |
| Telwood | 002 020 025 122 |
| Telwest 023 | |
| Leilon | 027 017 025 194 |
| Thompson | 000 002 042 016 079 13 |
| Top-Up TV 227 | |
| Topview | 590 |
| Lodiba | 002 |
| Triax | 024 083 088 |
| TV Canada | 013 036 021 122 173 74 |
| TVF Digital | 227 |
| Virgin Media | 013 075 |
| Wake | 020 |
| Wks Andale | 002 020 075 |
| Wink | 257 |
| Xenius | 074 |
| Yamada | 026 |
| Zur 029 |
Satellite Radio
| Bra | 555 |
| Depri | 515 |
| Porkadio | 515 |
| Ginia 555 | |
| Sunny | 300 |
| XM Satellite Radio | 515 |
TV
| A2L Systema 163-178 | |
| Acl | 299 |
| Ach trial | 058 137 204 245 245 |
| Adayunt | 159 219 |
| Avg 031 153 123 249 | 203 287 266 319 401 |
| PQ | 282 |
| Aftb sions 131 | |
| Aftbay | 144 |
| A## 227/38/07/09 | |
| 153 104 106 108 | |
| 142 143 153 156 | |
| 292 293 297 298 | |
| 297 297 299 280 | |
| 297 297 299 240 | |
| Akita Bao | |
| Alisa | 064 044 259 103 |
| 171 172 707 410 | |
| 428 430 431 | |
| Aliu | 650 264 259 876 |
| 128 127 762 75 | |
| 222 239 250 264 | |
| 322 327 329 | |
| Aliu | 964 |
| Aliu | 108 261 |
| Aliu | 250 |
| Amhuet | 675 674 123 171 |
| 245 247 166 407 | |
| 403 | |
| Anan | 285 |
| Anesson | 125 |
| Antech | 108 185 219 251 |
| 267 277 401 | |
| Anson | 106 |
| Anleuny | 064 |
| Auc | 016 |
| Arc En Cel | 173 175 |
| Aracell | 085 086 255 |
| Artem 085 250 | |
| Artem 127 250 | |
| Argos 150 | |
| Artsora | 109 111 119 122 |
| 210 | |
| Asa | 087 101 105 204 |
| Asborg | 185 267 |
| Asra | 71 410 |
| Atmoscoco | 106 |
| Asura 149 | |
| Atitndic | 069 150 |
| Atadonic | 024 465 050 129 |
| 110 154 164 75 | |
| 185 218 250 763 | |
| 267 269 | |
| Arora | 130 171 219 |
| Arconix | 123 158 159 165 |
| 187 299 282 | |
| Asa | 106 |
| Avaton | 127 |
| Avaton 109 | |
| Band | 002 188 |
| Beng 35 Gluben | 204 229 |
| Bank Line 033 108 | 120 170 |
| 216 287 277 | |
| Dour | 056 047 048 374 |
| 207 208 097 06 | |
| 111 131 132 34 | |
| 158 171 211 213 | |
| 216 217 233 353 | |
| 256 266 084 414 | |
| Boysonk 415 | |
| Belo 049 085 286 390 | |
| 158 117 130 95 | |
| 275 250 253 263 | |
| 259 | |
| Bestar | 108 116 245 |
| Best 282 | |
| Bestar | 066 106 245 |
| Bacc Diamond | 120 249 |
| Bacc Partner | 765 |
| Bluepoint 051 252 358 097 | |
| 096 119 253 756 | |
| Blue Sky | 109 172 243 240 |
| 204 273 252 289 | |
| 407 | |
| Bluestar | 063 108 |
| Bumart | 262 |
| Bumartas | 163 |
| Eudford | 419 |
| Brands | 173 179 193 195 |
| 272 | |
| Brunnegra 204 765 | |
| Bronnega 765 | |
| Brookfield 765 | |
| Brother | 416 |
| Beans | 204 |
| Her | 44 747 |
| Burn 201 053 069 074 | |
| 109 115 121 125 | |
| 135 144 232 245 | |
| 246 262 292 383 | |
| 296 297 333 514 | |
| 401 407 | |
| Camper | 265 |
| Carlo | 301 812 511 512 |
| 315 318 | |
| Century | 165 204 |
| Eagle 165 243 261 267 | |
| Lign | 235 239 308 264 |
| Lie | 325 094 708 166 |
| 172 171 | |
| Lrenal | 272 |
| Chest | 531 294 297 |
| Cervix | 161 252 228 |
| Caloric | 264 574 193 110 |
| 111 116 159 165 | |
| 165 171 185 185 | |
| 246 275 295 293 | |
| 297 292 285 299 | |
| 356 457 433 410 | |
| Conifer | 109 109 143 171 |
| 272 272 250 267 | |
| 418 | |
| Coric | 219 |
| Coriac | 225 |
| Coriac | 1 71 251 |
| Corid 250 262 | |
| Continental / 2 | |
| Continental edson | 172 178 179 195 |
| Coricus | 108 |
| Crowey | 148 166 221 257 |
| Cowen | 263 085 086 090 |
| 109 144 171 185 | |
| 245 252 255 265 | |
| 291 257 257 282 | |
| 296 257 402 418 | |
| Co-Electric units | 354 155 163 |
| Carl's | 111 263 |
| Dolham | 108 407 |
| Damwick | 108 120 172 170 |
| 267 437 | |
| Danos | 219 410 |
| Darnes | 304 250 |
| Daytek | 194 |
| De Seaf | 134 |
| Dorcos | 053 056 069 108 |
| 128 128 161 184 | |
| 169 427 | |
| Deltzer 349 | |
| Dewer | 004 137 283 403 |
| Dexner | 108 |
| Daim 27 | |
| Driakston 225 | |
| Dignon 331 | |
| Dyle 197 | |
| Disney 062 | |
| Dinesch 219 286 504 206 | |
| 3.70 | |
| Dunichwald (Included) | 3.22 |
| Durnus 108 | |
| Dual 106 123 127 158 | |
| 233 243 248 249 | |
| 550 279 285 285 | |
| Dumond 087 102 105 109 | |
| 110 155 204 204 | |
| 267 | |
| Duodrland 249 280 | |
| F Max 164 | |
| bis 265 117 250 | |
| bdson 1/2 | |
| bdson Minew 1/2 | |
| Blue 036 071 109 120 | |
| 44 100 195 203 | |
| 229 242 246 249 | |
| 407 | |
| Ellin 108 276 | |
| Elu 164 | |
| Elecain | 109 |
| Elecain Co | 250 |
| Eleka | 108 111 155 171 |
| 410 | |
| Dickmania 285 108 116 274 | |
| Etrima | 03 074 262 294 |
| 407 | |
| Ellin 287 109 152 | |
| Ella 551 1-3 210 | |
| Elcain | 144 185 |
| Hea 128 171 410 | |
| Emerson 296 103 216 449 | |
| Esc | 108 |
| Eton | 242 |
| buroline 226 | |
| Burshio+ | 055 144 158 160 |
| 61 185 | |
| Ferrody | 42 407 |
| Evelux | 108 1 6 |
| Erica U089 | |
| Esquik | 108 1 0 |
| Fever | 108 171 249 251 |
| Fraguen | 032 078 165 162 |
| 19 158 155 273 | |
| 201 270 | |
| Fibels | 108 |
| Finlanda | 033 04 105 188 |
| 96 | |
| Firlix | 031 066 069 074 |
| 667 102 123 124 | |
| 96 105 128 118 | |
| 128 140 111 155 | |
| 159 161 166 226 | |
| 209 244 251 273 | |
| 276 29 295 407 | |
| Fins Line | 108 144 158 206 |
| 407 411 264 273 | |
| 294 | |
| Hoffer | 03 102 286 158 |
| 1 9 221 233 | |
| Hint 275 | |
| Force | 123 192 286 |
| Former | 108 109 110 119159 239 420 |
| Frasca | 108 343 |
| Hornachy | 106 129 116 171220 |
| Fulius Cetera | 098 159 197 247 |
| Fural | 279 264 288 293110 |
| Galaxy | 108 185 255 265 |
| Galaxy | 255 |
| Galeria | 17 |
| Gux. 137 147 168 161 | 171 198 762 769 |
| Gree | 179 147 199 180411 |
| Gezoto | 064 114 144 143184 171 |
| General | 171 |
| General Technic | 1 71 |
| Garlson 167 222 300 | 171 |
| Goldfunk | 249 264 |
| Goldberg | 159 171 |
| Golding 271 | 171 |
| Goldberg 318 074 000 000 | 110 165 144 143163 165 171 191216 237 247 250265 268 268 410 |
| Gooding | 172 |
| Goodmans | 031 063 064 068274 108 109 109110 115 120 123158 170 171 176187 194 195 214225 218 230 231251 269 269 270276 285 286 287325 305 310 311157 339 |
| Goverje | 086 090 103 118249 374 784 |
| Gram 204 410 | 172 |
| Graderm | 038 |
| Grace | 108 152 134 141145 147 149 156270 242 244 249250 263 265 414431 |
| Gran Nix | 061 127 234 407 |
| Granok 022 027 029 052 | 233 035 039 041242 043 045 049251 254 055 076279 281 082 083088 284 101 04102 128 109 111118 128 134 135140 145 156 159167 184 189 191208 218 221 251276 331 34 |
| Gurduh | 059 273 |
| Great Wall 074 108 | 231 202 034 036252 100 101 116117 130 135 152187 194 207 210242 253 258 267457 |
| Gurncig 031 063 069 073 | 231 202 034 036252 100 101 116117 130 135 152187 194 207 210242 253 258 267457 |
| Oak 407 | |
| Oak 202 | |
| Kaker 213 |
| Harateus | 269,085,100.108 |
| 110,100,127.152 | |
| 136,144,149.138 | |
| 127,151,225.225 | |
| 229,218,253.251 | |
| 269,212,235.938 | |
| 402,427.412 | |
| Hartares | 161 |
| Hanpa | 159 |
| Hanwa | 297 |
| Iliu | 282 |
| Hui huiqien | 172 |
| Hon | 108,159,171.277 |
| 410 | |
| Lithina | 173.79 |
| Imiad | 064,108.177.224 |
| 242.400 | |
| Hirova | 273 |
| Hirose | 822 |
| Hit | 294 |
| Hirachi | 322,076,414.038 |
| 309,240,355.069 | |
| 340,041,333.054 | |
| 362,296,257.194 | |
| 108,115,120.125 | |
| 127,128,129.154 | |
| 145,140,147.147 | |
| 156,159,191.176 | |
| 186,189,183.219 | |
| 210,265,293.276 | |
| 249,296,255.411 | |
| 413,415,417.221 | |
| 423 | |
| Iliu 273 | |
| III | 108,195.251 |
| Johor | 269,117,233.249 |
| 250 | |
| Hosha | 294 |
| Hyuan 159 183 171 | 428 |
| Hozumi | 263,059,077.108 |
| 118,152,269.250 | |
| 263,264,293.207 | |
| Liyunda 152 155 183.735 | |
| 317 | |
| Nomino | 44 |
| Oc | 064,108,129.177 |
| 439.400 | |
| Dea | 291.07 |
| Impala 138 135 113.12 | |
| 154,165,229.243 | |
| 202,260,267.297 | |
| Nogeli | 152,141,147.148 |
| 212,211,273.279 | |
| Ingersoll 171 | |
| Iino Hi | 127,152,161.189 |
| 237.245 | |
| Inovastum 110 | |
| Interlun | 233 |
| Interlun | 067,108,132.134 |
| 137,147,147.143 | |
| 165,176,212.247 | |
| 257,265,265.616 | |
| Irienlion | 285,085,108.133 |
| 144,166,191.410 | |
| Iporax | 171 |
| Inglil 176 174 | |
| Inglil 185 184 | |
| Irrado | 323 |
| Irrado | 024,108,163.237 |
| 249,264.409 | |
| Skita 230 | |
| Itc | 144.152 |
| U | 171 |
| Ia. | 084 159 171 094410 |
| Jr. | 041 232 117 32144 140 141 144145 147 148 156158 242 244 250266 414 419 |
| Jepolcrt 253Jme 253Jssel 069 204 282 288408 | |
| Jc. | 120 159 279 099 |
| K Corslc 107Kabu | 13613627 269 273280 410 |
| Kamomson | 564 410 |
| Kaposh | 089 141 127 48197 |
| Narcher | 041 24 108 109117 165 252 273174 282 289 407416 |
| Katharic | 181 |
| Kawir | 409 |
| Kondo | 250 108 725 737229 246 248 249270 273 285 |
| Kennedy | 118 197 |
| Kenex | 108 249 264 |
| Keyrat | 207 235 |
| Kiton | 249 264 793 |
| Kressel | 258 108 229 249364 273 |
| Kreching 386 Xia 274Kmeka 405Kemna 410Kuba-lesmonie | 114 158 255 |
| Laser | 574 |
| Lassar | 116 |
| Lonea | 108 110 170 240410 |
| Lentor | 249 264 |
| Level 426Lg | 013 214 015 068067 090 128 110167 230 265 255289 288 |
| Levenkuelier | 108 |
| Lieas | 061 074 128 118127 140 141 249264 289 410 |
| Loewe | 046 095 096 721138 142 153 151390 264 |
| Logik | 076 187 281 |
| Luna | 137 197 229 246 |
| Lunstrom | 276 245 746 749 |
| Lucor | 032 065 074 101104 105 115 128132 134 142 145133 156 159 186253 242 249 251567 275 276 278 |
| M. Electronic | 103 104 105 120127 140 278 |
| MCC | 074 |
| Macquus | 069 |
| Magnacyn | 108 148 158 161166 164 189 234 |
| Magnafion | 195 199 |
| Magnavonik | 108 |
| Magnarok | 251 |
| Magnirum | 601 674 252 25325400 |
| Manhattan | 249 254 |
| Maruti 108 | |
| Marshall | 664 |
| Marumi 231 374 779 607 | |
| Marizek | 108 |
| Maruti 275 012 051 | 660 |
| 362 063 069 072370 096 001 108116 36 154 159171 37 196 20229 250 407 405416 | |
| Mesa1 | 549 |
| Mesa 031 407 | |
| Medich | 631 674 108 110127 28 194 275269 295 254279 285 287 293407 406 |
| Megat | 225 |
| Magnores | 410 |
| Memory 286 | |
| Ment | 152 |
| Meyer 135 | |
| Meta 034 132 239 397 | |
| 100 001 108 219269 254 264 265322 525 | |
| Minerox | 574 249 793 766282 295 |
| Miconi | 286 |
| Minerva 092 097 101 122232 | |
| Mina | 110 427 |
| Minshimri 071 075 076 077 | |
| 076 29 130 204225 249 | |
| Mvar | 158 191 209 225293 367 362 |
| Miro2 | 531 323 933 |
| Mizerva | 103 152 299 418 |
| Micaic | 219 251 |
| Mi Logis 250 | |
| ML | 286 131 154 |
| Multitex 241 254 407 | |
| Multitech | 681 255 030 304159 29 471 183267 |
| Munyama 251 | |
| Nebu | 407 |
| Nekimura | 170 |
| Neuris | 137 |
| Neudemann | 037 013 258 093024 064 092 092100 00 16 119119 34 135 137159 49 564 311212 76 772 233252 29 351 205256 774 404 |
| No | 664 168 423 |
| Nebuni 125 249 250 | |
| Nebus 293 | |
| Nike 106 | |
| Nike 219 | |
| Nikei 2 9 264 |
| Nikko | 108 |
| Nissen | 268 |
| Nobiliko | 108 222 267 |
| Neogamaki | 173 179 |
| Nokia | 602 074 112 123124 105 106 52140 112 113 26158 2 274 257276 376 794 4 4 |
| Nadermierde | 665 126 1 17 173179 193 195 749251 270 282 290 |
| Nadway | 213 |
| Nann M | 108 |
| Norak 249 261 | |
| Novo | 087 |
| Novomini | 108 |
| Garcino 232 101 102 137 | |
| Okoro | 140 156 76108 755 |
| Oreza 264 108 180 409 | |
| Ope's | 410 |
| Ope's | 250 |
| Oreza | 690 008 129 150 |
| Ochiber | 986 |
| Orion | 092 058 293 392253 09 069 070374 108 116 26152 185 187 58155 205 205 79235 243 250 251259 407 409 410 |
| Orion 1H 262 041 108 116 | |
| Ormond 219 | 228 2 9 707 410 |
| Ouel | 108 |
| Oulle | 059 060 111 155 |
| Ouva | 418 |
| Oil | 390 108 204 282 |
| Otu-Versand | 076 627 036 042256 262 005 069274 181 062 083299 292 094 097122 101 108 101111 110 118 1912 119 152 59136 145 149 57139 153 156 61139 171 185 95135 202 205 215212 215 216 217259 250 252 75257 270 277 401422 427 405 406432 412 |
| Oye 250 298 108 | |
| Pacific | 663 169 738 749250 |
| Palladium | 601 106 118 122131 137 161 62171 279 242 249250 255 360 76253 307 |
| Panasonic 148 67 | 160 254401 407 405 404452 |
| Pette Linnai | 144 |
| Pette Marconi | 175 179 |
| Pitico 18 144 149 | 14135 702 243 255262 262 |
| Philips | 037 008 009 019 |
| 025 021 065 062 | |
| 065 092 138 104 | |
| 111 112 116 119 | |
| 122 232 251 406 | |
| 401 412 | |
| Phocus 117 150 22 2-9 | |
| Phoenix 090 108 115 | |
| Pioneer | 108 152 195 407 |
| Florian | 092 |
| Plasmatic | 050 750 |
| Fresenpoint | 172 |
| Frondont | 066 209 |
| Frondont Finance | 147 161 |
| Frontier | 069 |
| Pheir 213 | |
| Pheir 249 | |
| Pheir 261 | |
| Po 201 407 | |
| Papier 196 1/1 267 | |
| Papier 031 071 108 291 | |
| 407 | |
| Postronx 128 185 | |
| Postner 123 120 138 29 | |
| 200 229 245 262 | |
| 270 268 285 297 | |
| Pruniec 1 8 | |
| Pruchch 07 108 2 9 219 | |
| 264 | |
| Prinkler 056 128 103 170 | |
| 267 478 | |
| Pyc 108 100 351 | |
| Quarion 173 249 285 295 | |
| Qualls 267 270 295 291 | |
| 242 237 234 262 | |
| 229 232 216 218 | |
| 212 216 213 212 | |
| 211 205 204 157 | |
| 195 195 171 159 | |
| 166 162 159 159 | |
| 158 163 144 142 | |
| 141 140 135 131 | |
| 139 138 116 112 | |
| 131 138 125 122 | |
| 101 105 057 395 | |
| 092 090 089 387 | |
| 086 04 04 02 392 | |
| 059 012 012 293 | |
| 036 037 025 | |
| Raduela 055 367 100 251 | |
| 430 | |
| Radometer 108 61 164 | |
| Radometer 161 | |
| Radometer 374 385 08 71 | |
| 140 194 407 410 | |
| Kembutary | 252 |
| Murphy | - |
| Rocor 128 269 | |
| Rodrifusion | 112 |
| Rodstar | 397 467 |
| Rofta | 108 749 764 793 |
| Roic 219 | |
| Dovor | 131 |
| Rox 088 089 137 161 | |
| 297 456 246 247 | |
| Lift | 064 086 116 132 |
| 204 | |
| En 2000 | 008 299 261 |
| Reddishar | 063 065 092 108 |
| 177 144 245 253 | |
| 251 262 264 292 | |
| 289 | |
| Rubbraton | 201 |
| Bolita | 17 |
| Bovesa | 249 283 |
| Bread | 277 410 |
| Bread Jan. | 282 |
| Saba 071 127 1/8 76 | |
| 73 179 193 195 | |
| 49 970 | |
| Nagom | 206 272 |
| Saito 1025 060 069 970 | |
| 536 159 270 | |
| Sakio | 167 410 |
| Suisse | 022 06/09/10 |
| 104 105 116 118 | |
| 132 134 155 157 | |
| 140 145 159 159 | |
| 237 212 219 221 | |
| 237 219 229 | |
| Lumber 101 103 261 | |
| Samsung | 05 006 108 126 |
| 159 171 220 221 | |
| 257 258 259 266 | |
| 410 | |
| Samsung | 108 |
| Samsung 108 249 264 | 410 |
| Sony | 193 |
| Sony 03 033 151 352 | |
| 274 089 087 106 | |
| 123 159 189 218 | |
| 271 243 280 407 | |
| 414 420 | |
| Schulz Lorient | 02 018 1 6 117 |
| 132 161 167 428 | |
| 156 171 147 749 | |
| 250 254 255 277 | |
| 259 270 | |
| Schneider | 069 069 069 288 |
| 108 116 137 431 | |
| 152 158 159 766 | |
| 233 242 255 219 | |
| 250 251 267 269 | |
| 282 294 309 | |
| Schneider I 255 327 251 | |
| Seeker 259 | |
| Seg | 06 108 1 5 123 |
| 141 158 162 173 | |
| 185 219 219 261 | |
| 267 269 286 293 | |
| 410 | |
| Schott | 78 407 |
| Schott 288 089 309 | 110 |
| 137 195 197 226 | |
| 239 265 269 747 | |
| 249 251 420 | |
| Select | 264 |
| Selector | 117 |
| Smiths 04 054 742 | |
| Smiths 773 | |
| Soc | 074 |
| Sharp 072 081 282 989 | |
| 231 1/1 224 724 | |
| 410 | |
| System 106 749 | |
| Synthost | 98 |
| Synthost | 106 44 249 264 |
| Sunera 1/8 161 185 201 | |
| Sentinel | 07 092 666 557 |
| 103 101 218 219 | |
| 221 256 294 | |
| Stee | 069 |
| Silke | 213 407 |
| Silke Schneider | 031 07 282 286 |
| 294 407 | |
| Silver | 064 074 171 204 |
| 277 410 | |
| Sing 226 | |
| Singr 009 108 154 | 185 |
| 204 201 | |
| Sindustre | 929 062 063 369 |
| 274 118 148 358 | |
| 167 195 196 304 | |
| 212 249 251 282 | |
| 407 | |
| Sky | 187 197 207 |
| Six | 204 407 |
| Smunders | 172 |
| Sino | 418 |
| Solekar 2/2 | |
| Sonitron 139-407 | |
| Sonix | 194 |
| Sonito 2/9 | |
| Sunvion 140-156 | |
| Sunarc | 108 |
| Sany 072.2 1:212 213 | |
| Sunderolor | 274 215 216 217 |
| Sundera | 374 108 349 364 |
| Sundera 170 | 107 |
| Standard 108 | |
| Stefler 128 171 264 | |
| Stefler 171 | |
| Stare | 251 |
| Sten | 298 089 154 197 |
| Stress | 229 245 246 267 |
| Stress | 410 |
| Strong | 115 125 286 |
| Surfahr 2/3 | |
| Sursar | 074 108 171 |
| Superlar | 285 |
| Superlach 071 108 171 213 | |
| Supreme 2/3 | (49) |
| Swissat | 18 104 207 309 |
| Taduian 108 | |
| Tundring | 773 246 354 |
| Tashiro | 159 218 226 |
| Torung | 063 066 565 572 |
| 079 108 118 128 | |
| 159 121 184 189 | |
| 267 286 407 | |
| Torran 20 418 | |
| Tr | 152 |
| Irm | 127 |
| Tel Domain | 131 140 |
| Trz | 108 144 159 165 |
| 166 170 171 245 | |
| 241 248 254 | |
| Techine | 308 121 185 249 |
| 264 263 | |
| Itchaco | 249 287 286 427 |
| Itschott | 108 118 245 |
| Itschwod | 175 123 249 |
| Technagen 099 251 407 | |
| Iterspark | 308 159 171 248 |
| Iterspark 1249 | |
| Ituron | 171 268 |
| Iterski | 1 213 1/8 1/9 |
| Itelbaren 1/2 1/2 195 192 | |
| 225 261 270 | |
| Templeta 171 | |
| Templeta | 137 233 |
| Templeta 331 074 108 227 | |
| 202 261 437 | |
| Templeta | 108 125 171 2-9 |
| 264 | |
| Templeta | 668 180 134 193 |
| 197 247 | |
| Templeta | 531 407 |
| Templeta | 531 0/4 109 294 |
| 247 | |
| Templeta 064 108 113 270 | |
| 12 144 149 159 | |
| 17 151 259 264 | |
| Tension 1/3 |
| Tesla 095 214 091 708 | |
| 309 116 127 144 | |
| 1 0 160 204 229 | |
| 249 260 269 264 | |
| 275 282 407 | |
| Textron 127 225 269 252 | |
| 264 282 264 402 | |
| 408 | |
| Ikena | 409 |
| Thomson | 134 1/3 129 196 |
| 395 282 292 | |
| Thomson 12000 | 301 235 308 |
| Thomson Fas. 80 | 310 211 312 |
| Thom | 226 328 332 333 |
| 636 643 645 248 | |
| 92 765 926 767 272 | |
| 975 976 975 267 | |
| 697 162 165 126 | |
| 102 138 112 116 | |
| 120 128 123 128 | |
| 141 145 150 156 | |
| 160 160 169 169 | |
| 1 301 1 315 1 319 | |
| 189 165 168 169 | |
| 200 202 211 214 | |
| 216 224 232 242 | |
| 247 252 270 471 | |
| 414 415 416 | |
| Thorn-Houghton | 168 188 195 268 |
| 200 | |
| Tuba | 1 71 470 |
| Loyes 268 | |
| Lopine | 249 264 |
| Lopiston | 586 |
| Takahua 026 027 739 737 | |
| 042 043 045 047 | |
| 068 049 050 053 | |
| 991 100 073 203 | |
| 208 232 215 250 | |
| 268 284 415 | |
| Torumi 250 | |
| Towata | 144 185 |
| Trans Companos | 269 |
| Telus | 120 364 793 |
| TriStar | 664 410 |
| Triumpa 075 219 734 | |
| TWF | 349 |
| TWF | 328 |
| Uber 089 108 15 | 149 |
| 786 139 238 249 | |
| Ultrasus | 108 148 164 182 |
| 209 | |
| Ummor 085 086 | |
| United 083 082 108 170 | |
| 250 263 262 288 | |
| Umsenium 005 074 074 | |
| 097 100 102 108 | |
| 109 163 108 126 | |
| 116 131 118 117 | |
| 118 119 122 129 | |
| 232 237 243 245 | |
| 269 260 263 270 | |
| 274 275 276 278 | |
| 389 393 | |
| Lincoln | 204 |
| Beste | 128 110 124 125 |
| 243 249 254 265 | |
| 293 303 | |
| West | 414 |
| Alstom 42: | |
| Alstomn | 410 |
| Alstomn 165 | |
| Alstomnwn | 18 174 |
| Videuton 141/45 173/95 | |
| 2014/10 | |
| Wixton | 108 149 249 |
| Videmaraga | 167 |
| Yog | 069 |
| Wixton 137 231 | |
| Wixton 286 | |
| Wixton 134 165 159 171 | |
| 1/8 | |
| Wixton 2910/91 108 127 | |
| 179 71 194 216 | |
| 264 293 410 | |
| Wixton Westale 148 158 36 | |
| Wigueson 243 249 264 282 | |
| 408 | |
| Wixton | 330 |
| Wixtbrink 108 110 | |
| Wixton 4 3 | |
| Wharfssale | 113 419 |
| White | 108 170 149 260 |
| Westnahouse | |
| Wierola 28 | |
| Wixton | 249 |
| Wixton 250 | |
| Wixton | 110 120 225 279 |
| 207 | |
| Xeniu | 298 |
| Xyon | 313 |
| Yamco 254 | |
| Yoko | 064 108 136 144 |
| 159 69 170 171 | |
| 227 410 | |
| Zanek | 221 |
| Zanjola 137 197 | |
ARCAM
WWW.ARCAM.CO.UK
THE WEST WING, STIRLING HOUSE
WATERBEACH, CAMBRIDGESHIRE, CB25 9PB
+44 (0) 1223 203200SH304 ISSUE G
- Important Safety Instructions
- Class II product
- Warning
- Safety Compliance
- Caution on installation
- FCC Information(for US customers)
- PRODUCT
- IMPORTANT NOTICE: DO NOT MODIFY THIS PRODUCT
- NOTE
- Safety Information (for European customers)
- A note about recycling
- Correct disposal of this product
- Welcome
- Thank you and congratulations...
- Your SA30 development team
- Contents
- Overview
- Arcam's SA30 amplifier
- Placing The Unit
- Power
- Interconnect Cables
- Trademark Acknowledgments
- Front Panel Connections and Controls
- Rear Panel Connections and Controls
- Connecting Loudspeakers
- Single Wiring
- Notes On Making Speaker Connections
- Bi-Amping
- Operation
- Switching On
- Setup Menu
- Auto Standby
- Display
- Selecting An Audio Source
- Digital Audio Inputs
- Analogue Audio Inputs
- Phono Input
- USB
- Network Audio Inputs
- ARC/eARC input
- Listening
- Volume Control
- Listening Using Headphones
- Muting The Output
- Adjusting The Balance
- Analogue Direct
- Processor Mode
- Pre-Amplifier Output
- Connecting to a Network
- Home Automation Control
- AirPlay Setup
- Wired Connection
- Wireless Connection
- Chromecast built-in Setup
- Dirac Live
- Problems
- Downloading the Dirac Live for Arcam application
- Using Dirac
- Remote Control
- Notes on batteries:
- Useful information
- Backlight
- LED blinks
- Timeouts and unassigned keys
- Low voltage indicator
- The remote complies with Part 15 of the FCC rules
- Device Mode/Source keys
- Customising the remote
- AMP
- AMP Device Mode
- Network and USB commands
- BD/DVD Device Mode
- CD Device Mode
- AV Device Mode
- STB Device Mode
- SAT Device Mode
- PVR Device Mode
- Entering Setup Menu
- Navigating The Setup Menu
- System Settings
- Dark Mode
- Enable Input
- Timeout
- System Code
- Net Reset
- System Reset
- USB Update
- OTA UPG
- System Info
- Audio Settings
- Dirac Curve
- Balance
- Phones Ovr
- PM Input
- PM Volume
- Max On Vol
- Setup Menu (Continued)
- SA30 Digital Filters
- Maximum Vol
- Max Net Vol
- TV Volume
- TV Power
- TV Audio
- Lip Sync
- Filter
- Network Settings
- Network Info
- Net Standby
- RS232 Standby
- C4 SDDP
- Brick Wall (B Wall)
- Corrected Minimum Phase Fast Roll Off (Corr MinP)
- Apodizing (default)
- Minimum Phase Slow Roll Off (MinP Slow)
- Minimum Phase Fast Roll Off (MinP Fast)
- Linear Phase Slow Roll Off (LinP Slow)
- Linear Phase Fast Roll Off (LinP Fast)
- Customising the Remote Control
- Code learning
- Direct code setup (Method 1)
- Library search setup (Method 2)
- Learning setup (Method 3)
- Important notes
- Deleting the learned data
- To delete all the learned data for a device:
- To delete the learned data for a key for a device:
- Reading stored code numbers
- Locking/Unlocking a specific Device Mode
- Controlling the volume of other devices
- Press VOE
- Factory default reset
- Device codes
- Troubleshooting
- Worldwide Guarantee
- The warranty covers:
- Claims under guarantee
- Problems?
- On-line registration
- ARCAM | HDA
- Bienvenue
- Configuration de Chromecast built-in
- Connexion par fil
- TV Volume - Volume TV
- USB Update -USB Update
- ARC/eARC-ingang
- Chromecast built-in-instelling
- Draadaansluiting
- luxurysupport@harman.com.
- TV Volume - TV Volume
- Maximum Vol - Volume massimo
- Corr MinP - Corrected Minimum Phase Fast Roll Off
- 扬声器连接注意事项
- Chromecast built-in 设置
- 无线连接
- 锁定/解锁特定的设备模式
- Arcam의 SA30 앱프
- 스피커 연결 시 주의 사항
- 작동
- 전원 켜기
- Chromecast built-in 설정
- 유선연결
Brand : ARCAM
Model : SA30
Category : Receiver