
MRP-161 - Hi-Fi System DENVER - Free user manual and instructions
Find the device manual for free MRP-161 DENVER in PDF.


| Product Type | Hi-Fi System |
| Brand | DENVER |
| Model | MRP-161 |
| Dimensions (L x H x D) | 300 x 150 x 250 mm |
| Weight | 3 kg |
| Power supply | 230 V AC, 50 Hz |
| Output power | 2 x 20 W RMS |
| Main functions | FM radio, CD player, Bluetooth, USB, auxiliary input |
| Maintenance and cleaning | Clean with a soft, dry cloth. Do not use abrasive products. |
| Safety | Do not expose to moisture or extreme temperatures. Disconnect before cleaning. |
| Spare parts and repairability | Remote control included, FM antenna. Repair by authorized service. |
| General information | Compact Hi-Fi system with CD player and FM radio. Ideal for home use. |
Frequently Asked Questions - MRP-161 DENVER
User questions about MRP-161 DENVER
0 question about this device. Answer the ones you know or ask your own.
Ask a new question about this device
Download the instructions for your Hi-Fi System in PDF format for free! Find your manual MRP-161 - DENVER and take your electronic device back in hand. On this page are published all the documents necessary for the use of your device. MRP-161 by DENVER.
USER MANUAL MRP-161 DENVER
natural_image
Black and white photo of a multi-band vinyl record driver with two speakers and a CD-ROM (no visible text or symbols)INSTRUCTION MANUAL
www.denver-electronics.com
17) CD-skuffe
1) Pladespillerens stø vlå g
2) LCD display
3) Knappen Volumen op/ ned
4) Knappen Sleep (autosluk)
5) Standby LED indikator
6) Knappen dubbing (hurtig overspilning)
7) Knappen On/Standby
8) Knappen Stop ■/St-Mo
9) Knappen Random (vilkårlig)
10) Funktionsvælger
11) Knappen Repeat (gentag)
12) Knappen Spring tilbage/ Kanal ned
13) Knappen Pre-dn (fast station ned)
14) Knappen Memory/Clk-adj (hukommelse/ ur)
15) Kassetterum (1)
16) Kassetteafspiller (1) betjeningsknapper
Knappen Optag
Knappen Afspil
Knappen REW tilbagespoling
1) Pö lysuojus
2) LCD-näyttö
▶▶ Eteenpä inkelaus-painike
1) Dammlucka
2) LCD-skä rm
3) Knappen volym upp/ned
4) Sleepfunktionsknapp
5) Standby LED-indikering
6) High speed dubbing-knapp
7) On/standby-knapp
8) Stopp-/St-Mo-knapp
9) Random-knapp
10) Funktionsknapp
11) Repeat-knapp
12) Skip/Tuning down Knapp
13) Preset down-knapp
14) Memory/Clk-adj-knapp
15) Kassettlucka (1)
16) Däckkontrollknappar (1)
Knappen Record
Knappen Playback
Knappen Rewind
Knappen Fast forward
■ ▲ Stopp-/utmatningsknapp
Knappen Pause
FÖRSIKTIGHET:
(1) Repeat 1 → (2) Repeat all track → (3) off mode
1) Dust cover
2) LCD display
3) Volume up/down button
4) Sleep button
5) Standby LED indicator
6) High speed dubbing button
7) On/standby button
8) Stop ■/St-Mo button
9) Random button
10) Functions button
11) Repeat button
12) Skip/Tuning down ◀ button
18) 3.5mm stereo headphone jack
20) EQ button
21) Play/Pause ▶|| button
22) Timer button
23) Mute button
24) CD tray open/close ▲ button
25) Skip/Tuning up ▶ button
Usage of controls or adjustments or performance of procedures other than those specified herein may result in hazardous radiation exposure.
This unit should not be adjusted or repaired by anyone except qualified service personnel.
Important:
Since movement of the cd mechanism and the sensitive circuitry may cause interference to the radio tuner nearby, switch this unit off while operating other radio devices.
Due to the complexity of the system, please un-plug the main power supply of the unit if found the unit hang up during operation!
This is not a malfunction of the system!
Precautions for use
Installation
• Unpack all parts and remove protective material.
• Do not connect the unit to the mains before checking the main voltage and before all other connections have been made.
• Do not cover any vents and make sure that there is a space of several centimeters around the unit for ventilation.
Connection
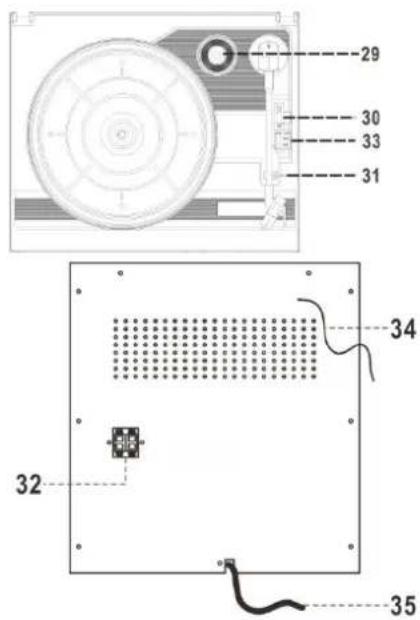
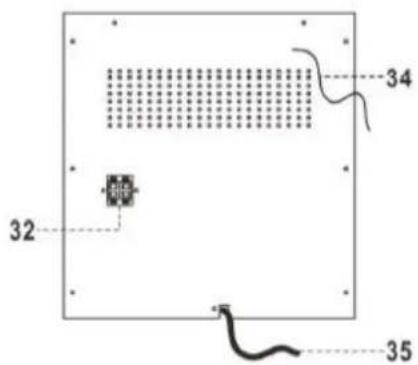
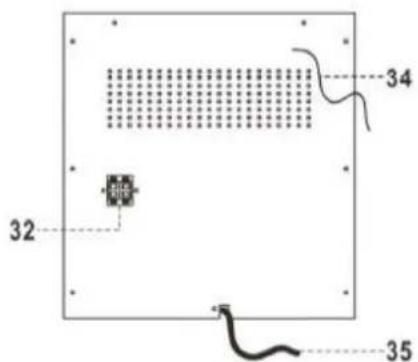
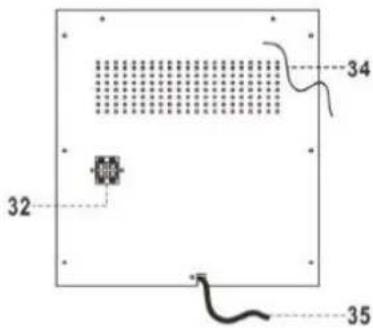
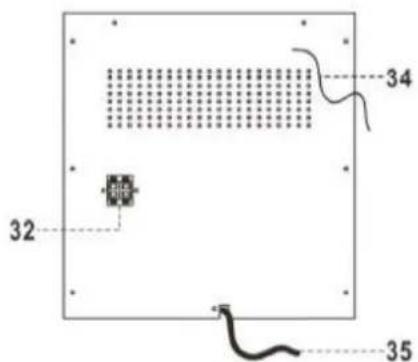
- Connect the AC line cord (35) to AC outlet and connect the speaker wire to the speaker terminal (32) located on the rear side of unit.
- Turn on the unit by On/Standby button (7) and switch the function button (10) to "Tuner" function. If the LCD display (2) light up with blue backlight, it's mean the power supply is normal. Now your system is ready to play the music.
Setting the clock
- Set unit in standby mode.
-
Press & hold the "Mem/Clk-adj" button (14), the LCD display (2) will show "12H" and flashing. Press skip up ▶ or skip down ◀◀ button (25,12) to select the appropriate area hour format(12hr/24hr). Press "Mem/Clk-adj" button (14) again to confirm.
-
The LCD display (2) will display the first & second digit of "00" is flashing. Press skip up ▶▶ or skip down ◀◀ button (25,12) to set the correct hour. Press "Mem/Clk-adj" button (14) to store the correct hour.
- The third & fourth digit of "00" is flashing, press the skip up ▶ or skip down ◀ button (25,12) to set the correct minutes. Then press "Mem/Clk-adj" button (14) to store the correct minute.
Listening to radio
Manual tuning
- Tune on the unit by press power On/Standby button (7)
- Press Function button (10) to select "Tuner" mode.
- Tune to the required station by pressing the skip up ▶ or skip down ◀ button (25,12).
- Adjust volume up/down button (14) to the desired volume level.
Auto tuning
- Press Function button (10) to select "Tuner" mode.
- Press and hold the skip up/down button (25,12) for 1-2 seconds and then release.
- The unit will start seeking automatically and stop until a radio station is reached.
- Repeat step 2 until the desired radio station is being reached.
- Adjust volume up/down button (3) to the desired volume level.
Preset stations
You can store up to 10 radio stations in the memory (10 FM).
-
Set to tuner mode.
-
Turn to the desired radio station by "manual" or "auto" tuning method.
- Press "Mem/Clk-adj" button (14) to enable program function & "MEM" icon and preset station nr will flash on LCD display (2)
- Press "Pre-up ▲ or Pre-dn ▼" button (26,13) to select the desired station memory for storage.
- Press "Mem/Clk-adj" button (14) again to confirm the setting.
- Repeat step 2 to 5 to store other stations.
- Now you can select the presets stations in order by pressing the "Pre-up ▲" button (26) or Pre-dn ▼ button (13).
The pre-set memories will be cancelled completely if dis-connecting the main power supply. You are recommended to switch the system into standby mode for convenience usage.
There are 10 seconds for program state, after 10 sec. This state would resume to normal tuner mode automatically.
➢ You can overwrite a present station by storing another frequency in its place.
FM & FM-stereo reception
- Press the “St/Mono” button (8) repeatedly, the FM programs are receiving in mono and stereo mode repeatedly. In particular when stereo signals are weak. It is preferable to receive the program in mono.
- If stereo signal is being received, the stereo indicator “(ST)” will appear on LCD display (2) to show FM stereo program is now receiving.
Hints for best reception:-
- FM : the receiver has a build-in FM wire antenna (34) hanging at the back of the unit. This wire should be totally unraveled and extended for the best reception.
Phono
noted:
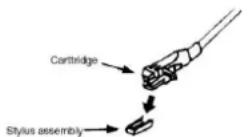
- Remove the stylus protector.
- Be sure that the tone arm is being detached from the tone arm rest before operating and re-secured again afterwards.
Press Function button (10) to select "Phono" mode.
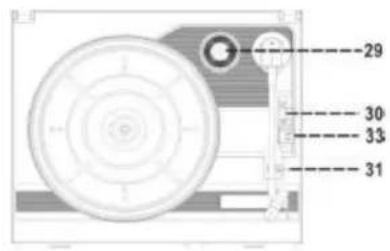
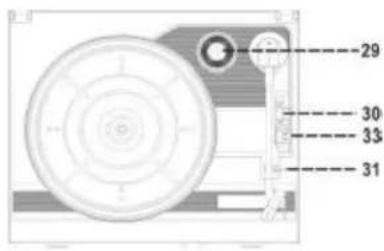
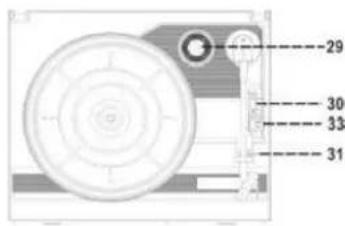
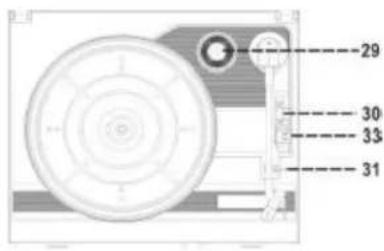
- Set the speed selector (30) to the proper position depending on the type of record to be played.
- Place the record on the platter (use the spindle adaptor (29) if required).
- Lift the tone arm from the pick up holder (31) and slowly move it to the record side. The platter will start to rotate.
- Place the tone arm to the desired position of the record.
- Adjust the Volume up/down button (3) to the desired level.
- At the end of record, the platter will automatically stop rotating. Lift the tone arm from the record and return it to the rest position (31).
- To stop intermediate, lift up the tone arm from the record and return it to the rest (31).
Remark : As some kind of record the auto-stop area was out of the unit setting, so it will stop before the last track finish. In this case, select the auto-stop switch (33) to "off" position, then it will run to the end of the record but will not stop automatically (turn off the unit by power button or switch back the auto-stop switch (33) to "on" position to stop the platter rotate). Then put back the tone arm to the rest position (31).
Playing compact disc
- Getting start
- Press Function button (10) to select "CD" mode.
- Press "Open/Close" button (24) to open the CD tray (17).
- Place a CD with the printed side facing up inside the tray & then close the CD tray.
- Focus search is performing, then will start the playback automatically.
- Play / pause mode

- Press the "Play/Pause ▶" button (21) to pause playback, the current track number will flash on display.
- Press the "Play/Pause ▶" button (21) again to resume normal playback.
- Stop mode
- If "Stop ■" button (8) is pressed during play or pause mode, system will go to stop mode.
- Skip mode (skip up /skip down)
- During play or pause mode, if "skip up ▶▶" button (25) is pressed it will go to next track and display the track no. and then remain the play or pause mode.
- During play or pause mode, if "skip down" button (12) is pressed. It will go back to the beginning of the track, original track no. is display and remain the play or pause mode.
- After step 2, press "skip down" button (12) again, it will go to the previous track and remain the play or pause mode.
- Search mode (search up /search down)
- During play mode, if "skip up ▶▶" button (25) is pressed & hold for few seconds, it will start searching forward.
- During play mode, if "skip down ◀◀" button (12) is pressed & hold for few seconds. It will star searching backwards.
- Repeat mode
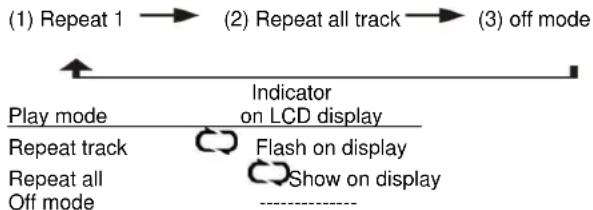
Press the Repeat button before or during playback, a single track or all the tracks can be played in difference mode as follow:-
For CD
flowchart
graph LR
    A["(1) Repeat 1"] --> B["(2) Repeat all track"]
    B --> C["(3) off mode"]
    D["Play mode"] --> E["Indicator on LCD display"]
    F["Repeat track"] --> G["Flash on display"]
    H["Repeat all Off mode"] --> I["Show on display"]
- Random mode
- Press Random button (9), you can listen all the tracks in random order by this function
CD disc programming
Up to 20 tracks can be programmed for CD and play in any order. Before use, be sure the system is at stop mode before programming :-
1. Set in CD mode & stop the CD playback.
2. Press the "Mem/Clk-adj" button, "MEM" icon and track no. will flash on LCD display (2). Moreover, it will indicate program no. to be programmed.
3. Select a desired track by pressing skip up ▶▶| or down ◀◀ buttons (25,12).
4. Press the "Program" button to store the trace into memory.
5. Repeat steps 3 and 4 to enter additional tracks into the memory if necessary.
6. When all the desired tracks have been programmed, press CD "Play/Pause ▶" button (21) to play the disc in assigned order.
7. To cancel the programmed file, press "stop ■" button (8) until "MEM" is disappear on LCD display (2)
Listing to tape
General operation
| Stop / eject key | Press to stop all deck operation. Press again to open the cassette door. |
| Fast forward key & Fast rewind key | Press to start rapid tape winding in either forward or revers direction. Press stop / fast rewind key eject keys when the cassette spools stop turning. |
| Play key | Press to start playing tape. |
| Pause key | Press to stop tape operation temporarily. Press again to resume play. |
| Record key (deck 1 only) | Press together with play key to start tape recording. |
Playback
- Press Function button (10) to select "Tape" mode.
- Put in the cassette tape.
- Press Play key to active playback
- Adjust the Volume up/down control (3) to the desired level.
- Use Pause key when you want to stop playback temporarily.
- Press Stop / Eject key when finished.
Notes:
It is possible to play a cassette in both cassette players, one after the other. If you press the "Pause" and "Play" buttons together at deck 1 and then the "play" button at deck 2, the tape in deck 1 will start player automatically after the tape in deck 2 has finished playing.
Recording
A. Recording from tape (deck 2 to deck 1)
This unit enables you to duplicate a pre-recorded tape to another tape. It is performed only one way from deck 2 ( playback) to deck 1 (recording).
Dubbing at normal speed
- Select "Tape" mode from function button (10) and then set the High speed dubbing button (6) at ┌ nor. "position
- Inset a pre-recorded cassette into deck 2 and a blank cassette tape into deck 1.
- Press the "Pause" key || and then press the "Record ●" and "Play ►" key at deck 1.
- Press the "Play ▶" key to start playback at deck 2 & then release "Pause ||" key at deck 1 to start dubbing.
- Press “Pause ” key at deck 1 & “stop ” key at deck 2 when finish dubbing.
Dubbing at high speed
This unit is quipped with a high speed dubbing system which can save the time for dubbing by 2/3 when compare to normal speed.
- Press the dubbing button (6) to "hi ■" position and then follow the same procedures as stipulated in "dubbing at normal speed".
- When dubbing a pre-recorded cassette tape at high speed, a chattering sound is being heard. To avoid this, set the volume control to a minimum level.
- Do no press the "High speed dubbing" button (6) to hi or nor. position during dubbing, this will vary the speed of recording and may be damage the cassette tape.
B. Recording from radio
- Select "Tuner" mode from function button (10)
- Tune to the desired station and insert a blank cassette tape in deck 1.
- Press "Record" & "Play" key to start recording.
- Press “Pause” keys and then “Stop/Eject” key when finish.
C. Recording from CD
- Select "CD" mode from function button (10).
- Insert a black cassette tape in deck 1 which suitable for recording.
- Press “Pause” key first and then “record” & “play” key at cassette. Recording function is now on standby.
- Start playback CD, and then press "Pause key " at cassette to start recording.
- To stop recording, press “Stop ■” button (8) on CD mode first, then press the “Pause■” key and then “Stop/Eject▲” key on cassette tape deck.
D. Recording from turntable
Select "Phono" mode from function button (10).
insert a blank cassette tape in deck 1.
Press "Record●" & "Play ▶" key to start recording.
Select the desire record and start playback
Press "Pause" keys and then "Stop/Eject" key when finish.
More features
A. Sleep function
- Press "Sleep" button (4) and sleep indicator "ZZZ will" shown on the LCD display (2).
- Keep pressing the button to adjust the sleep timer in the order from 10>20>30....90 minutes respectively.
- System will stop and go to standby mode automatically after the selected timing.
- To cancel the sleep mode, press "Sleep" button until the display show "OFF" and "ZZZ" indicator disappear on LCD display (2).
Remark:-
If press the sleep button once and the “zzz” indicator appear on the LCD display (2), the system will go to standby mode automatically after selected minutes.
B. Timer on setting
This function allows the system to turn on automatically and wake you up by CD or Radio mode respectively.
1) Wake up time : First, set the unit at standby mode and then press & hold the "Timer" button (22) to enter the timer setting mode, the first two digits of clock will flashing. Press skip up ▶▶/ down ◀◀◀ "button (25,12) to set the hour & then press "Timer" button (22) again to confirm. Then press skip up ▶▶/ down ◀◀◀ "button (25,12) to set the minutes & press "Timer" button (22) to confirm.
2) Wake up source : Press the "skip up ▶/ down ▶" button (25,12) to select the source from "CD" - "FM" repeatedly. Press "Timer" button (22) again to confirm selected the source.
3) Wake up volume : Press skip up ▶▶/ down ◀◀◀ " button (15,21) to set the wake up volume level from 1 to max. And then press "Timer" button(22) to confirm
The system will turn on automatically from standby mode once it reaches the selected time and the timer indicator "☐" will flash on the display and unit will switch off automatically after running 60 minutes. Press "Timer"(22) or "On/Standby" (7) button can switch off the timer function at any time.
Remark:-
If there is no music source being detected (such cd) when the preset time is reached, system will default to "radio" function for wake up mode automatically. The system will preset at the latest radio frequency being listened before switching off
For tuner wake up, the system will preset at the latest radio frequency being listened before switching off.
● Active/de-active timer function
- To active the timer function, press the "Timer" button (22) repeatedly until the timer indicator "💡" is shown on LCD display (2).
- To cancel timer function by press again "Timer" button (22) until the timer indicator "💡" disappear.
C. Mute function
Press Mute button (23) to terminate the sound output from speaker temporarily and press again to resume normal sound output.
D. Preset EQ function
This unit provides 4 differences sound mode to chance your listening experience. You can select the desired effect by pressing the "preset EQ" button (20) repeatedly at following sequence:-

flowchart
graph LR
    A["Flat"] --> B["rock"]
    B --> C["classic"]
    C --> D["jazz"]
    D --> E["pop"]
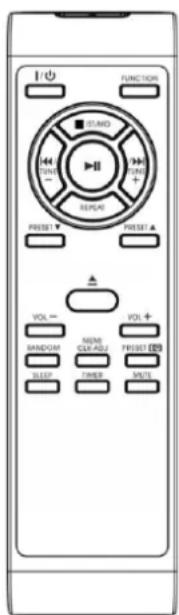
Remote control transmitter
Battery installation (battery not provided)
The infra-red transmitter requires 2 pc AAA size battery for operation
Button description
1) On/Standby Press to power on / standby the system
2) Function Press to select the functions
3) Open/Close Press to open/close the CD tray
4) Sleep Press to active sleep function
5) Mute Press to active mute function
6) Timer Press to adjust timer clock or active/de-active timer function
7) Repeat Press to select CD repeat playback mode
8) Mem / Clk-adj In standby mode : press & hold to adjust clock In CD/radio mode : press to preset memory
9) Random Press to active CD random play function
10) Pre-down Press to re-call the radio preset backward
11) Preset EQ Press to select difference EQ mode for enjoyment
12) Pre-up Press to re-call the radio preset upward
13) Volume -/+ Press to adjust volume level up/down
14) Skip/search backward In radio mode : press to step down of radio frequency In CD mode : press to skip to previous track, press & hold for search forward
15) Play/Pause▶II in CD mode, press once to start playback. Press again to enter pause mode.
16) Skip/search forward▶▶ In radio mode : press to step up of radio frequency In CD mode : press to skip to next track, press & hold for search forward
17) Stop ■/St/Mono In CD mode, press to stop playback or cancel the stored program. In radio mode : press to select FM Mono/Stereo
ALL RIGHTS RESERVED, COPYRIGHT DENVER ELECTRONICS A/S
DENVER®
www.denver-electronics.com
Electric and electronic equipment contains materials, components and substances that can be hazardous to your health and the environment, if the waste material (discarded electric and electronic equipment) is not handled correctly.
Electric and electronic equipment is marked with the crossed out trash can symbol, seen below. This symbol signifies that electric and electronic equipment should not be disposed of with other household waste, but should be disposed of separately.
All cities have established collection points, where electric and electronic equipment can either be submitted free of charge at recycling stations and other collection sites, or be collected from the households. Additional information is available at the technical department of your city.
Imported by:
DENVER ELECTRONICS A/S
Stavneagervej 22
DK-8250 Egaa
Denmark
www.facebook.com/denverelectronics
- Modo bú squeda (search up /search down)
Dubbing at high speed
natural_image
Illustration of a hand holding a thin bundle of fibers with an arrow indicating force or movement (no text or symbols)DENVER®
www.denver-electronics.com
natural_image
Illustration of a hand holding a thin bundle with an arrow indicating direction (no text or symbols)Lecture de disques compacts
- Mise en route
- Mode Lecture/pause

Installation des piles (piles non fournies)
natural_image
Illustration of a hand holding a thin bundle of wires with an arrow indicating direction (no text or symbols)Riproduzione di CD
natural_image
Illustration of a hand holding a thin bundle with an arrow indicating direction (no text or symbols)DENVER®
www.denver-electronics.com
natural_image
Illustration of a hand holding a thin bundle of wires with an arrow indicating direction (no text or symbols)Reproduzir CDs
- Começ ar
Transmissor controlo
DENVER®
www.denver-electronics.com
- FÖRSIKTIGHET:
- Important:
- Precautions for use
- Installation
- Connection
- Setting the clock
- Listening to radio
- Manual tuning
- Auto tuning
- Preset stations
- FM & FM-stereo reception
- Hints for best reception:-
- Phono
- noted:
- Playing compact disc
- - Getting start
- - Stop mode
- - Skip mode (skip up /skip down)
- - Search mode (search up /search down)
- - Repeat mode
- For CD
- - Random mode
- CD disc programming
- Listing to tape
- Playback
- Notes:
- Recording
- Recording from tape (deck 2 to deck 1)
- Dubbing at normal speed
- Dubbing at high speed
- Recording from radio
- Recording from CD
- Recording from turntable
- More features
- Sleep function
- Remark:-
- Timer on setting
- Mute function
- Preset EQ function
- Remote control transmitter
- Battery installation (battery not provided)
- Button description
- DENVER®
- - Modo bú squeda (search up /search down)
- Lecture de disques compacts
- - Mise en route
- - Mode Lecture/pause
- Riproduzione di CD
- Reproduzir CDs
- - Começ ar
- Transmissor controlo
Brand : DENVER
Model : MRP-161
Category : Hi-Fi System