
MC-5010 MK3 - Hi-Fi System DENVER - Free user manual and instructions
Find the device manual for free MC-5010 MK3 DENVER in PDF.

| Product Type | Hi-Fi System |
| Brand | Denver |
| Model | MC-5010 MK3 |
| Power Supply | AC/DC adaptor (230V~50Hz) |
| Battery Backup | 2 x 1.5V AA batteries (not included) |
| Radio Band | FM |
| Preset Stations | 20 |
| CD Playback | Yes (CD, CD-R/RW) |
| AUX Input | Yes (3.5mm jack) |
| Headphone Jack | Yes (3.5mm) |
| Alarm Clock | Dual alarm with wake to buzzer, radio, or CD |
| Sleep Timer | Yes (10-90 minutes) |
| Snooze | Yes (9 minutes) |
| Program Play | Up to 20 tracks |
| Repeat Play | Single or all tracks |
| Random Play | Yes |
| Remote Control | Included |
| Display | LCD with backlight |
| Speaker | Built-in stereo (left and right) |
| Cleaning | Use a damp cloth; unplug before cleaning |
| Safety | Polarized plug; do not expose to rain or moisture |
| Accessories | Remote control, AC/DC adaptor |
Frequently Asked Questions - MC-5010 MK3 DENVER
User questions about MC-5010 MK3 DENVER
0 question about this device. Answer the ones you know or ask your own.
Ask a new question about this device
Download the instructions for your Hi-Fi System in PDF format for free! Find your manual MC-5010 MK3 - DENVER and take your electronic device back in hand. On this page are published all the documents necessary for the use of your device. MC-5010 MK3 by DENVER.
USER MANUAL MC-5010 MK3 DENVER
natural_image
Diagram of a three-panel electronic device with front panel, control panel, and display unit (no text or symbols)SAFETY INSTRUCTIONS

The lighting flash with arrowhead symbol, with an equilateral triangle is intended to alert the user of the presence of uninsulated dangerous voltage within the product's enclosure that may be of sufficient magnitude to constitute a risk of electric shock to persons.
CAUTION
RISK OF ELECTRIC SHOCK DO NOT OPEN
CAUTION: TO REDUCE THE RISK OF ELECTRIC SHOCK, DO NOT REMOVE COVER (OR BACK). NO USER SERVICEABLE PARTS INSIDE. REFER SERVICING TO QUALIFIED SERVICE PERSONNEL.

The exclamation point within an equilateral triangle to intended to alert the user of presence of important operating and maintenance (servicing) instruction. In the literature accompanying the appliance.
CAUTION: TO PREVENT ELECTRIC SHOCK, MATCH WIDE BLADE OF PLUG TO WIDE SLOT, FULLY INSERT.
WARNING : TO REDUCE THE RISK OF FIRE OR ELECTRIC SHOCK, DO NOT EXPOSE THE APPLIANCE TO RAIN OR MOISTURE.
SAFETY INSTRUCTIONS
THESE IMPORTANT SAFETY INSTRUCTIONS ARE INCLUDED, AS APPLICABLE TO THE APPLIANCE, CONVEYING TO THE USER THE INFORMATION ITEMIZED BELOW
- Read instructions-All the safety and operating instructions should be read before the appliance is operated.
- Retain instructions-The safety and operating instructions should be retained for future reference.
- Head Warnings-All warnings and cautions on the appliance and in the operating instructions should be adhered to.
- Follow instructions-All operating and use instructions should be followed.
- Water and Moisture-The appliance should not be used near water, e.g. near a bathtub, washbowl, kitchen sink, laundry tub, in a wet basement, or near a swimming pool or the like.
- Wall or Ceiling Mounting-The appliance should not be mounted to a wall or ceiling.
- Ventilation-The appliance should be situated so that its location or position does not interfere with its proper ventilation. For example, the appliance should not be situated on a bed, sofa, rug or similar surface that may block the ventilation openings, or placed in a built-in installation, such as a bookcase or cabinet, that may impede the flow of air through the ventilation openings.
- heat-The appliance should be situated away from neat sources such as radiators, heat registers, stoves, or other appliances (including amplifiers) that produce heat..
- Power Sources-The product should be operated only with the type of power supply indicated on the marking label. If you are not sure of the type of power supply to your home, consult your product dealer or local power company. For products intended to operate from battery power, or other sources, refer to the operation instructions.
- Grounding Polarization-This product may be equipped with a polarized alternating current line plug (a plug having one blade wider than the other). This plug will fit into the power outlet only one way this is a safety feature. If you are unable to insert the plug fully into the outlet, try reversing the plug. If the plug should still fail to fit, contact your electrician to replace your obsolete outlet. Do not defeat the safety purpose of the polarized plug.
- Power-Cord Protection-Power supply cords should be routed so that they are not likely to be walked on or pinched by items placed upon or against them, paying particular attention to cords at plugs, convenience receptacles, and the point where they exit from the appliance.
- Cleaning-The appliance should be cleaned only as recommended by the manufacturer.
- Nonuse periods-The power cord of the appliance should be unplugged from the outlet when left when left unused for a long period of time.
-
Object and Liquid Entry-Care should be taken so that objects do not fall and liquids are not spilled into the product case through product openings.
-
Damage Requiring Service-Unplug this product from the wall outlet and take it to qualified service personnel under the following conditions.
a) When the power-supply cord or plug is damaged.
b) If liquid has been spilled into, or objects have fallen into the product.
c) If the product has been exposed to rain or water.
d) If the product does not operate when used according to the operating instructions.
Adjust only those controls that are covered by the operating instructions as an improper adjustment of other controls may interfere with the product's normal operation.
e) If the product has been dropped or damaged in any way.
f) When the product exhibits a distinct change in performance—this indicates a need for service.
- Servicing-The user should not attempt to service the product beyond that described in the operating instruction. All servicing should be referred to qualified service personnel.
- Power Lines-An outside antenna system should not be located in the vicinity of overhead power lines, or other electric light or power circuits, or where it can fall into such power lines or circuits. When installing an outside antenna system, extreme care should be taken to keep from touching power lines or circuits as contact with them might be fatal.
- If an outside antenna is connected to the receiver, be sure the antenna system is grounded so as to provide some protection against voltage surges and built up static. Section 810 of the National Electrical Code ANSI/NEFA 70 provides information with respect to proper grounding of the mast and supporting structure, grounding conductress, location of antenna-discharge unit, size of grounding electrodes, and requirements for the grounding electrode (see figure).
- Cleaning-Unplug this product from the wall outlet before cleaning. Do not use liquid cleaners or aerosol cleaners. Use a damp cloth for cleaning.
- Lightning-For added protection for this product during a lightning storm, or when it is left unattended and unused for long periods of time, unplug it from the wall outlet and disconnect the antenna or cable system. This will prevent damage to the product due to lightning and power-line surges.
- Safety Check-Upon completion of any service or repairs to this product, ask the service technician to perform safety checks to determine that the product is in proper operation condition.
- Overloading-Do not overload wall outlets, extension cords, or integral convenience receptacles as this can result in a risk of fir or electric shock.
EXAMPLE OF ANTENNA GROUNDING AS PER
NATIONAL ELECTRICAL CODE
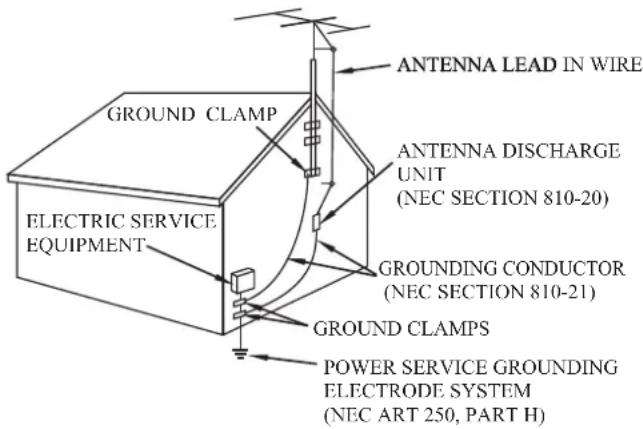
NEC NATIONAL ELECTRICAL CODE
Do not apply oil or petroleum products to this product.
CAUTION
Invisible laser radiation will be emitted when the product is open and interlocks are defeated. Do not defeat the safety interlocks.
GRAPHIC SYMBOLS WITH SUPPLEMENTARY MARKINGS ARE LOCATED ON THE BOTTOM OF THE UNIT.
USE OF CONTROLS, ADJUSTMENTS, OR PERFORMANCE PROCEDURE HEREIN MAY RESULT IN HAZARDOUS RADIATION EXPOSURE.
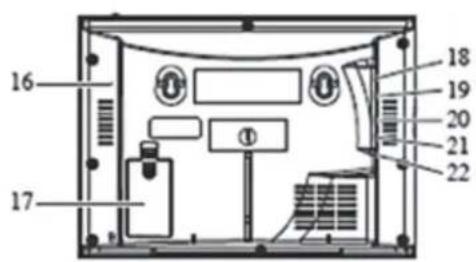
LOCATION OF CONTROLS
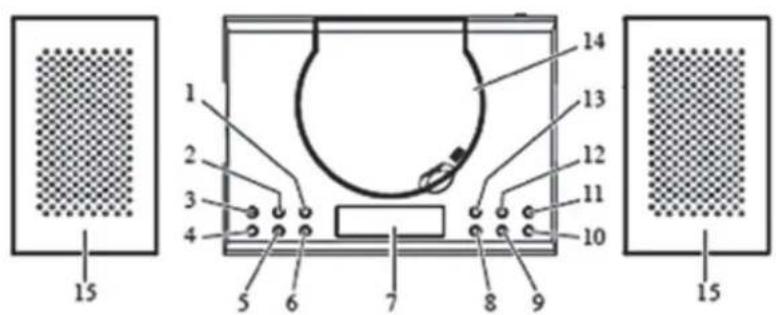
- TIME SET BUTTON
- VOL+ BUTTON
- MEM/PROG BUTTON
- SNOOZE/SLEEP BUTTON
- VOL-BUTTON
- ALARM SET BUTTON
- LCD DISPLAY
- SKIP-BUTTON
- STOP/M-DN BUTTON
- PLAY/PAUSE/M-UP BUTTON
-
STANDBY/FUNCTION BUTTON
-
P-MODE BUTTON
- SKIP+ BUTTON
- CD DOOR
- SPEAKER
- FM ANTENNA
- BACKUP BATTERY COMPARTMENT
- AUX JACK
- PHONE JACK
- RIGHT SPEAKER JACK
- LEFT SPEAKER JACK
- DC JACK
REMOTE CONTROL
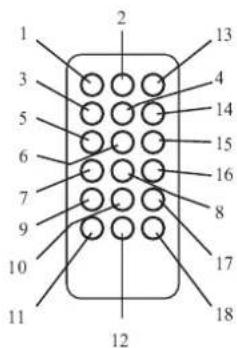
- Standby button
- Function button
- Stop button
- Volume increase (+) button
- SKIP-button
- Play/ Pause button
- M-DN button
- Volume decrease (-) button
-
Alarm Set button
-
Memory button
- Time set button
- Snooze button
- Mute button
- Mode button
- SKIP+ button
- M-UP button
- PROG button
- SLEEP button
Unit Power Supply
This unit is designed to operate on wither AC/DC adaptor.
Operation with AC/DC Adaptor.
Insert the small plug of adaptor into the DC Jack.
Insert the AC/DC adaptor in to any convenient having AC\~230V 50Hz household outlet in vertical or horizontal direction.
BATTERY SAFETY PRECAUTIONS
- Keep batteries away f
cause personal injury and/or property damage.
be used for extended periods of time to prevent damage due to rusted or corroded batteries
compliance with all applicable laws. For detailed information, contact your local country solid waste authority.
BATTERY BACKUP
Two 1.5V “AA” batteries (not included) may be installed as a backup option to maintain the time if electrical power fails. In the event of a power outage, the time will not appear on the clock LCD Display, however the clock will continue to operate and the actual time will be maintained. The Clock LCD Display and other functions will resume once electrical power is restored if used the backup battery. The backup battery should be replaced as needed; Remove the battery if the clock is not used or stored for long periods of time.
TO SET THE CLOCK TIME
- In STANDBY OFF mode, press and hold the TIME SET Button, then press SKIP+ / SKIP- to desired 24H/12H. And press TIME SET button again.
- Then press SKIP+ / SKIP- button to set the desired Hour Time.
- Then press SKIP+ / SKIP- button to set the desired Min Time.
- After the desired time has set, press TIME SET button to confirm.
TO SET ALARM FUNCTION
In Standby off mode
- Press and hold the ALARM SET button, the alarm1 icon and HOUR time will blink.
- Then press SKIP+ / SKIP- button to set the desired Hour Time.
- Press the ALARM SET button, The MIN time will blink.
- Then press SKIP+ / SKIP- button to set the desired Min Time.
- After setting the alarm time as your desired, to press AL.SET button again. You can now select whether the alarm should go on to Buzzer, Radio or CD. (The alarm 1 icon still blink in display).
Wake to buzzer
This is the default setting (no indication on the display above the time)
Wake to Radio
Press the SKIP+ / SKIP- button until "FM" is shown in the display(above the time). At the \set \time the alarm will go on at the radio station you last listened to.
Wake to CD
Press the SKIP+ / SKIP- button until the CD icon is shown in the display(above the time). This feature only works when you have a CD inserted in the CD drive. This CD will be played at the set alarm time.
- Press the AL. SET button again to confirm your settings for Alarm 1.
- The alarm icon (Alarm 2) appears and the HOUR time is blinking.
- Repeat step 2-6 in order to set Alarm 2.
To select which of the 2 alarms should be active, press the ALARM SET button repeatedly while the unit is in standby mode (clock display). The display will show consecutively the Alarm 1 icon, the Alarm 2 icon, the both Alarm icons. Press the ALARM SET button once again to deactivate the alarms (no alarm icon will be displayed).
Turning Off the Alarm:
To switch off an alarm while active, press the STANDBY button. The alarm will reset for next day.
SNOOZE FUNCTION
If you want to snooze a few more minutes, press the SNOOZE button, it will deactivate the sound for 9 minutes and will shown "SNOOZE" on the LCD Display. To turn off the snooze function, press the Standby button.
ADJUST VOLUME
- Press VOL+ button to increase the volume.
- Press VOL—button to decrease the volume.
RADIO OPERATION
- Press the STANDBY/FUNCTION button on the unit repeatedly, until the frequency shown on the display OR, press the STANDBY button on the remote to turn on the unit, then press the FUNCTION button on the remote until the frequency shown on the display.
How to use the buttons for radio:
i) Press and hold the SKIP+/SKIP- button until the display frequency starts run.
ii) When a station of sufficient strength has been found Tuning will stop or you can stop the automatic tuning by pressing SKIP+/SKIP- button.
- To switch off the radio, press the STANDBY button on the remote once OR press and hold the STANDBY/FUNCTION button on the unit, until the normal time shown on the display.
PRESET TUNING
- Select your desired station according to the normal tuning procedure.
- Press the MEM/PROG button on the unit or MEMORY button on the remote, "P01" will appear and flash in the LCD, Then use M-UP or M-DN button to change the number where the station will be stored. (P01 to P20).
- Store the current frequency by pressing MEM/PROG button on the unit, or MEMORY button on the remote again when you get the desired number.
- Repeat the same procedure to set other desired frequencies into Memory No.1 to NO. 20.
Note: The unit can be preset up to 20 stations.
MEMORY RECALL
Recall the stored frequencies by pressing M-UP or M-DN button select 1 to 20 stations as desired.
NOTE: As stored frequencies can only be stored for long time with the power supplying. The station you stored will be lost and can not be recalled in case that you cut off the power.
PLAYING A COMPACT DISC (CD)
Note: Never touch the laser lens inside of the CD compartment. Clean the laser lens with a CD cleaner disc if it becomes dirty.
- Press the STANDBY/FUNCTION button on the unit repeatedly, until the CD icon shown on the display.
- OR, press the STANDBY button on the remote to turn on the unit, then press the FUNCTION button on the remote until the CD icon shown on the display.
- Open the CD DOOR and insert a CD into the tray with printed label side facing up.
- Close the CD DOOR and the disc will rotate for a few seconds and then stop.
- Use the SKIP+ / SKIP- button to choose a track.
- Press the PLAY/PAUSE BUTTON to start play.
- Press the PLAY/PAUSE BUTTON again to PAUSE play.
- To stop the album temporarily, press PAUSE button, to resume, press again.
- Press the STOP BUTTON to STOP play.
- To turn off the unit, press the STANDBY button on the remote once OR press and hold the STANDBY/FUNCTION button on the unit, until the normal time shown on the display.
REPEAT FUNCTION
- Press the MODE button once during playback, the sign will show on LCD Display.
- Press the MODE button a second time to repeat all tracks. The "ALL →" sign will show on the LCD display.
- To cancel REPEAT PLAY, Press the MODE button repeatedly until the all sign disappeared.
RANDOM PLAY
- IN CD Play mode, press the MODE button until "RAND" will appear on LCD Display.
- Then it will enable random tracks play.
- To cancel RANDOM PLAY, press the MODE button again, "RAND" will disappear on the display.
REVERSE/FORWARD Skip & Search
- The SKIP- / SKIP+ buttons can be used to jump to a different track number or to scan disc tracks.
- Press the SKIP- button once to listen the beginning of the current track. Press it two or more times to hear previous tracks on the disc.
- Press the SKIP+ button to move to the next track on the disc.
- Press and hold the SKIP-button, the current track will be scanned and move backwards to the previous track(s); when the desired track section is found, release the button and normal play will resume.
- Press and hold the SKIP+ button, the current track will be scanned and move forward to the next track(s); When the desired track section is found, release the selected button and normal play will resume.
PROGRAM FUNCTION
The Program feature can be used to program up to 20 tracks to play in a selected order.
- While in the stop mode only (CD is not playing), press the PROG Button, LCD Display will show the wording "PROGRAM 01" and "PROGRAM 01" starts to flash.
- Press the SKIP+ / SKIP- button to allocate the desired track.
- Press the PROG button to select and store the track into memory.
-
Repeat step 2 to 3 to select up to 20 tracks
-
To play the selected tracks (in the program mode), press the PLAY/PAUSE button. The track number and the "PROGRAM" appear on LCD Display.
- Press the SKIP- button to hear the previous or press the SKIP+ button to hear next program track.
- Note: After all of the programmed tracks have played, the CD player will return to the stop mode.
- To clear the programmed tracks from memory, press STOP two times.
AUX INPUT JACK
- Press the STANDBY/FUNCTION button on the unit repeatedly, until the AUX icon shown on display.
- OR, press the STANDBY button on the remote to turn on the unit, then press the FUNCTION button on the remote until the AUX icon shown on the display.
- Connect the AUX connect wire from the out jack of your Personal Player such as portable MP3 player to the AUX input jack.
- Play Start from your Personal Player.
HEADPHONE JACK
Your radio is equipped with a HEAPHONE JACK for private listening. Simply plug any 3.5 mm plug type stereo headphone into the HEADPHONE JACK. With the headphone connected the speaker in the radio will be automatically disconnected.
Handle a disc only by its edges. Do not touch the surface or rainbow-colored side of the disc.
SLEEP FUNCTION IN STANDBY ON MODE
- Press the FUNCTION to the desired source.
- Tune in the desired radio station or CD play or AUX mode and adjust the volume control.
- Press the SLEEP Button. The "90" will appear on the display.
- Repeatedly press the SLEEP Button for desired sleep time between 90, 80, 70, 60, 50, 40, 30, 20, 10 minutes.
- The unit will automatically switch off when the SLEEP time expires.
ALL RIGHTS RESERVED, COPYRIGHT DENVER ELECTRONICS A/S
DENVER®
www.denver-electronics.com


Electric and electronic equipment and included batteries contains materials, components and substances that can be hazardous to your health and the environment, if the waste material (discarded electric and electronic equipment and batteries) is not handled correctly.
Electric and electronic equipment and batteries is marked with the crossed out trash can symbol, seen below. This symbol signifies that electric and electronic equipment and batteries should not be disposed of with other household waste, but should be disposed of separately.
As the end user it is important that you submit your used batteries to the appropriate and designated facility. In this manner you make sure that the batteries are recycled in accordance with legislature and will not harm the environment.
All cities have established collection points, where electric and electronic equipment and batteries can either be submitted free of charge at recycling stations and other collection sites, or be collected from the households. Additional information is available at the technical department of your city.
Imported by:
DENVER ELECTRONICS A/S
Stavneagervej 22
DK-8250 Egaa
Denmark
www.facebook.com/denverelectronics


- SAFETY INSTRUCTIONS
- CAUTION
- RISK OF ELECTRIC SHOCK DO NOT OPEN
- EXAMPLE OF ANTENNA GROUNDING AS PER
- NATIONAL ELECTRICAL CODE
- LOCATION OF CONTROLS
- REMOTE CONTROL
- Unit Power Supply
- BATTERY SAFETY PRECAUTIONS
- BATTERY BACKUP
- TO SET THE CLOCK TIME
- TO SET ALARM FUNCTION
- Wake to buzzer
- Wake to Radio
- Wake to CD
- Turning Off the Alarm:
- SNOOZE FUNCTION
- ADJUST VOLUME
- RADIO OPERATION
- PRESET TUNING
- MEMORY RECALL
- PLAYING A COMPACT DISC (CD)
- REPEAT FUNCTION
- RANDOM PLAY
- REVERSE/FORWARD Skip & Search
- PROGRAM FUNCTION
- AUX INPUT JACK
- HEADPHONE JACK
- SLEEP FUNCTION IN STANDBY ON MODE
- ALL RIGHTS RESERVED, COPYRIGHT DENVER ELECTRONICS A/S
- DENVER®
Brand : DENVER
Model : MC-5010 MK3
Category : Hi-Fi System