
TCU-206 - Hi-Fi System DENVER - Free user manual and instructions
Find the device manual for free TCU-206 DENVER in PDF.


| Product Type | Compact Hi-Fi System |
| Brand | Denver |
| Model | TCU-206 |
| Dimensions (W x H x D) | 200 x 120 x 250 mm |
| Weight | 1.5 kg |
| Power Supply | 100-240 V AC, 50/60 Hz |
| Output Power | 2 x 10 W RMS |
| Main Functions | CD Player, FM Radio, Bluetooth, USB, AUX Input |
| Maintenance and Cleaning | Clean with a soft, dry cloth. Do not use abrasive products. |
| Safety | Do not expose to moisture. Use only the supplied adapter. |
| Spare Parts and Repairability | Remote control, FM antenna available from the manufacturer. |
| General Information | 2-year warranty. Operating temperature: 5°C to 35°C. |
Frequently Asked Questions - TCU-206 DENVER
User questions about TCU-206 DENVER
0 question about this device. Answer the ones you know or ask your own.
Ask a new question about this device
Download the instructions for your Hi-Fi System in PDF format for free! Find your manual TCU-206 - DENVER and take your electronic device back in hand. On this page are published all the documents necessary for the use of your device. TCU-206 by DENVER.
USER MANUAL TCU-206 DENVER
The lighting flash and arrow head within the triangle is warning sign alerting you of dangerous voltage inside the product
CAUTION
RISK OF ELECTRIC SHOCK DO NOT OPEN
CAUTION : TO REDUCE THE RISK OF ELECTRIC SHOCK DO NOT REMOVE COVER (OR BACK). NO USER SERVICIABLE PARTS INSIDE. REFER SERVICING TO QUALIFIED SERVICE PERSONNEL.

The exclamation point within the triangle is a warning sign alerting you of important instructions accompanying the product
IMPORTANT SAFETY INSTRUCTIONS:
- Read the instructions. All uses guidelines must be read before start device.
- Keep the instructions for future use.
- Attention, use and security guidelines must be respected.
- The device must not be used near water or be put in contact with moisture.
- Make sure has no liquid is spilled on device and device openings.
- Move device carefully, avoid shocks.
- Do not block the breakdown of the device outputs.
- Do not place the device near from a heat source (e.g. radiator). Do not expose it to the Sun.
- Plug the device as indicate on this information form.
- This device has a connection with overload protection (security device) decision-making. If the replacement of decision-making is required, please you send has an experienced or the device manufacturer technician.
- For cleaning the device, please follow the recommendations of the notice.
- The sector cord should be unplugged a long period of use.
- Device shall be repaired by a qualified person when:
a. the taken or the power cord is damaged,
b. objects have fallen into the apparatus or a liquid has been spilled into device,
C. device was exposes to the rain,
d. device does not work correctly without notable exterior change,
e. device fell and the subwoofer is broken.
- The user shall not try to maintain device beyond that which is described in this information form. The guarantee would negate.
CLASS I LASER PRODUCT
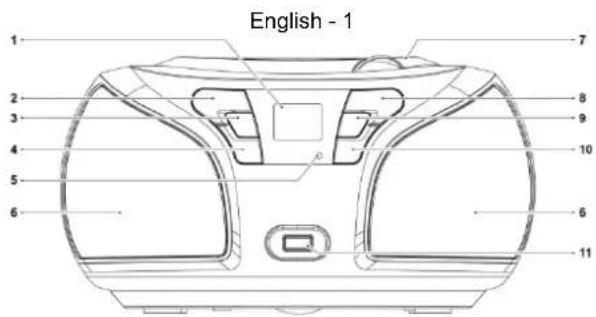
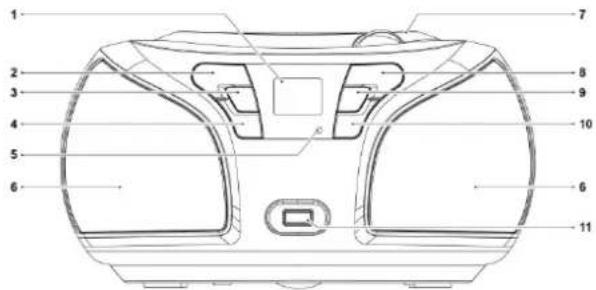
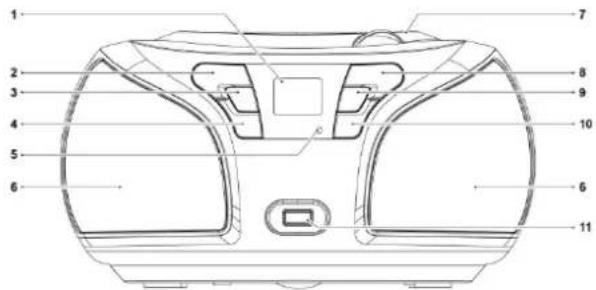
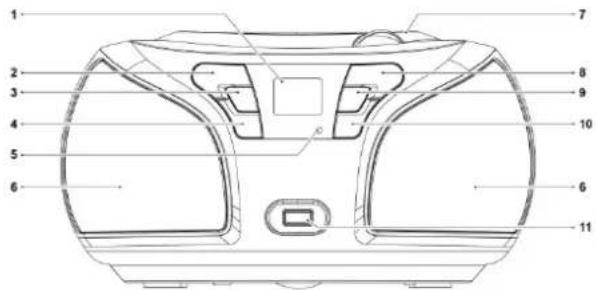
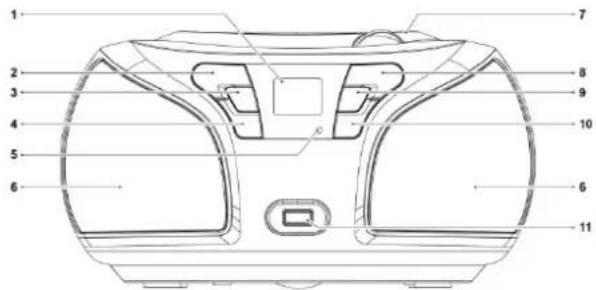
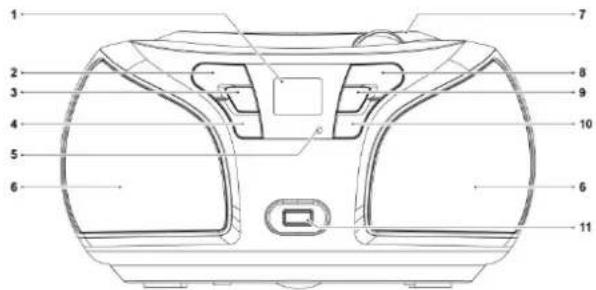
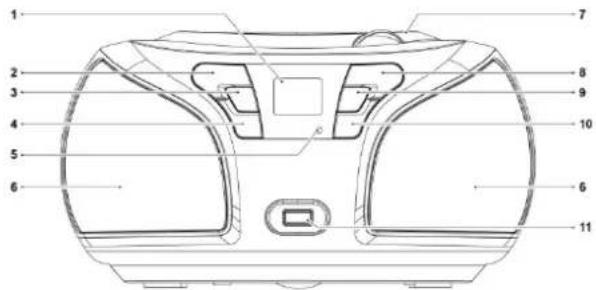
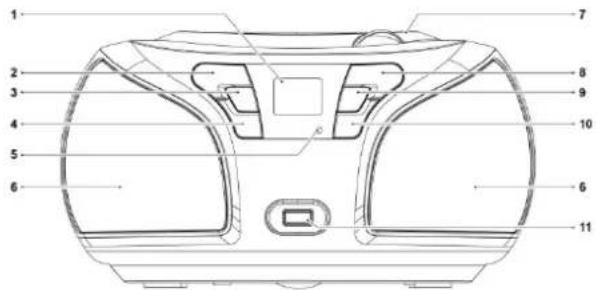
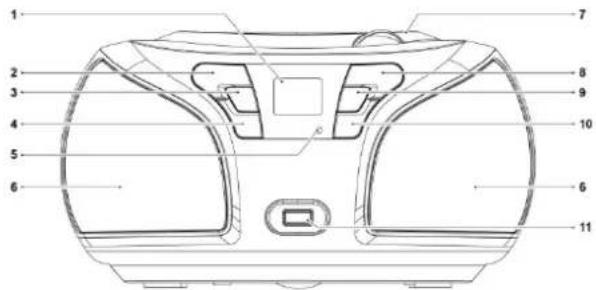
Location of controls
1) LCD display
2) Stop button
3) Skip down button
4) Repeat button
5) USB playback LED indicator
6) Speaker
7) CD component
8) On-off/Playback button
9) Skip up button
Usage of controls or adjustments or performance of procedures other than those specified herein may result in hazardous radiation exposure. This unit should not be adjusted or repaired by anyone except qualified service personnel.
Precautions for use
Installation
- Unpack all parts and remove protective material.
- Do not connect the unit to the mains before checking the main voltage and before all other connections have been made.
- Do not cover any vents and make sure that there is a space of several centimeters at the back of the unit for ventilation.
AC connection
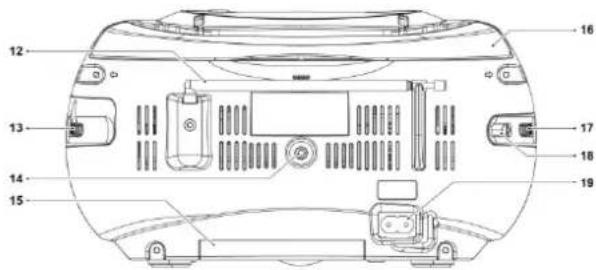
- Connect the one end of the detachable power cord to the AC socket (19) and the other end to the ac outlet.
- Turn on the unit by press and hold On-Off/Play button (8).
DC connection
flowchart
graph TD
    A["Component 1"] --> B["Component 2"]
    B --> C["Component 3"]
    C --> D["Component 4"]
    D --> E["Component 5"]
    E --> F["Component 6"]
    F --> G["Component 7"]
    G --> H["Component 8"]
    H --> I["Component 9"]
    I --> J["Component 10"]
    J --> K["Component 11"]
    K --> L["Component 12"]
    L --> M["Component 13"]
    M --> N["Component 14"]
    N --> O["Component 15"]
    O --> P["Component 16"]
    P --> Q["Component 17"]
    Q --> R["Component 18"]
    R --> S["Component 19"]
    S --> T["Component 20"]
    T --> U["Component 21"]
    U --> V["Component 22"]
    V --> W["Component 23"]
    W --> X["Component 24"]
    X --> Y["Component 25"]
    Y --> Z["Component 26"]
    Z --> AA["Component 27"]
    AA --> AB["Component 28"]
    AB --> AC["Component 29"]
    AC --> AD["Component 30"]
    AD --> AE["Component 31"]
    AE --> AF["Component 32"]
    AF --> AG["Component 33"]
    AG --> AH["Component 34"]
    AH --> AI["Component 35"]
    AI --> AJ["Component 36"]
    AJ --> AK["Component 37"]
    AK --> AL["Component 38"]
    AL --> AM["Component 39"]
    AM --> AN["Component 40"]
    AN --> AO["Component 41"]
    AO --> AP["Component 42"]
    AP --> AQ["Component 43"]
    AQ --> AR["Component 44"]
    AR --> AS["Component 45"]
    AS --> AT["Component 46"]
    AT --> AU["Component 47"]
    AU --> AV["Component 48"]
    AV --> AW["Component 49"]
    AW --> AX["Component 50"]
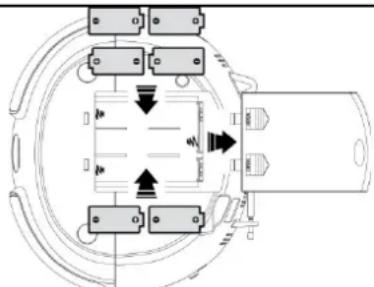
For DC operation, please insert 6 pcs size c (UM-2) battery at batter compartment (15) as below direction and please unplug the AC socket (19) during operate with battery:-
Listening to radio
Operation
- Turn on the unit (8) and slide function selector (18) to select Radio mode.
- Turn the tuning knob (13) to set the station frequency as desired.
- Adjust volume knob (17) to the desired volume level.
Hints for best reception:-
- FM : the receiver has rod antenna (12) hanging at the rear cabinet. This antenna should be totally and extended for best reception.
Playing compact disc
- Getting start
- Slide function selector (18) to select "CD/AUX" mode,
- Open the CD door (7).
- Place a CD with the printed side facing up inside the tray & then close the CD door.
- Focus search is performing, the LCD display (1) will show the total number of tracks & total playing time.
●Play / pause mode ▶II
- Press the " play/pause ▶" button (8) to start playback, the first track will start playback.
- To interrupt, press the "play/pause ▶II" button (8) once, and the playing time will be freeze on the LCD display (1). Press again to resume normal playback.
- Stop mode
- If "stop ■" button (2) is pressed during play or pause mode, system will go to stop mode.
English - 2
- Skip mode (skip up / skip down)
- During play or pause mode, if "skip up▶▶I" button (9) is pressed. It will go to next track and display the track no. and then remain the play or pause mode.
- During play or pause mode, if "skip down◀◀" button (3) is pressed. It will go back to the beginning of the track, original track no. Is display and remain the play or pause mode.
- After step 2, press "skip down◀◀" button (3) again will go to the previous track and remain the play or pause mode.
- Repeat mode
Press the "repeat" button (4) during playback to select repeat function, single or all the tracks can be played as follow:-
(1) repeat 1
(2) repeat all track
(3) off mode


Play mode Indicator on LCD display
Repeat 1 track RPT 1
Repeat all RPT ALL
Off mode ----
CD programming
Up to 20 tacks can be programmed for disc play in any order. Before use, be sure to press the "stop ■" button (2).
- Set in CD mode & stop the CD playback.
- Press the "Program" button (10), "PROG" will appear & flashing on LCD display (1).
- Select a desired track by pressing skip up▶▶ or down ◀◀ buttons (9/3).
- Press the "Program" button (10) to store the track into memory.
- Repeat steps 3 and 4 to enter additional tracks into the memory if necessary.
- When all the desired tracks have been programmed, press "play/pause ▶II" button (8) to play the song in assigned order.
- Press the "stop ■" button (2) to terminate program play.
After program complete, press "Program" button (10) to review the tracks being programmed.
Press "stop ■" button (2) at CD stop mode to cancel all programmed memory until the "PROG" indicator disappear on LCD display (1).
Remark:
Due to Aux and CD were designed at the same position of this system. When Aux-in jack(14) plugged by 3.5mm stereo plug. The channel will change to Aux automatically and CD will stop to play. Please ensure the Aux-in jack(14) without plugged by anything before playing CD.
Playback of MP3 song via USB storage media
Connecting
The system is able to decode and playback all MP3 file which stored in the memory media with USB connecting port. (PS: due to circuit limitation, the LCD does not display anything during USB playback).
- Set the system at standby mode first or other function except USB mode.
- Plug-in the USB pen-drive with the face up & make sure it going into completely.
- Connecting the USB upside down or backwards could damage the audio system or the storage media (USB thumb driver). Check to be sure the direction is correct before connection.
- Slide the functions selector (18) to USB mode. The USB indicator (5) will light up
- The system will start reading and playback the storage media automatically after connecting, the USB indicator will change to flash mode during playback.
- Press "skip up▶▶I" button (9) or ◀◀ button (3) to skip the track. Press play/pause button (8) to change to stop mode.
Remark
- The system can detect and read the file under MP3 format only at USB mode but not other music file format.
- If connect the system to MP3 player via the USB socket, due to variances in MP3 encoding format, some MP3 player may not be able to play via the USB socket. This is not a malfunction of the system.
- USB port does not support connection with USB extension cable and is not designed for communication with computer directly.
Removing of USB
To remove the USB, turn off the power then un-plug it by pulling out the USB socket directly.
Aux-in connection
Connect the unit to any auxiliary device (i.e. MP3 player, or iPod ® (not included) by connecting the Aux-in jack (14) at the rear cabinet with one end of 3.5mm stereo cable (not provided) and the other end connect to the auxiliary device to perform the music.
- Slide function selector (18) to select "CD/AUX" mode.
- Plugged the Aux in jack. The channel will switch to Aux automatically.
- Adjust Volume Knob (17) to the desire volume level. If the distortion was too high, reduce the volume level of your auxiliary device. Start to playback your device.
English - 3
ALL RIGHTS RESERVED, COPYRIGHT D ENVER ELECTRONICS A/S
DENVER®
www.denver-electronics.com
Electric and electronic equipment contains materials, components and substances that can be hazardous to your health and the environment, if the waste material (discarded electric and electronic equipment) is not handled correctly.
Electric and electronic equipment is marked with the crossed out trash can symbol, seen below. This symbol signifies that electric and electronic equipment should not be disposed of with other household waste, but should be disposed of separately.
All cities have established collection points, where electric and electronic equipment can either be submitted free of charge at recycling stations and other collection sites, or be collected from the households. Additional information is available at the technical department of your city.
Imported by:
DENVER ELECTRONICS A/S
Stavneagervej 22
DK-8250 Egaa
Denmark
www.facebook.com/denverelectronics
English - 4
natural_image
Technical diagram of a mechanical or electrical component with directional arrows and components (no text or symbols)KLASSE I LASERPRODUC T
natural_image
Pure electrical circuit lines without any symbolsOhjaimien sijainti
natural_image
Completely black image with no visible content or text.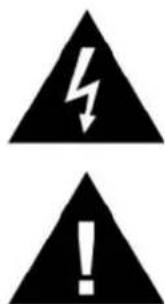
PRODUIT LASER DE CLASSE I
flowchart
graph TD
    A["Port 1"] --> B["Directional Arrow"]
    B --> C["Port 2"]
    C --> D["Directional Arrow"]
    D --> E["Port 3"]
    E --> F["Directional Arrow"]
    F --> G["Port 4"]
    G --> H["Directional Arrow"]
    H --> I["Port 5"]
    I --> J["Directional Arrow"]
    J --> K["Port 6"]
    K --> L["Directional Arrow"]
    L --> M["Port 7"]
    M --> N["Directional Arrow"]
    N --> O["Port 8"]
    O --> P["Directional Arrow"]
● Mode Lecture/pause ▶
CLASS I LASER PRODUCT
PRODOTTO LASER DI CLASSE I
natural_image
Pure electrical circuit lines without any symbolsnatural_image
Top-down schematic of a mechanical or electrical component with no visible text, numbers, or symbols.PRODUTO LASER CLASSE I
natural_image
Pure electrical circuit lines without any symbolsPRODUCTO LÁSER CLASE I
Spanish - 1
10)Botón Programa
11) Puerto USB
KLASS I LASERPRODUK T
Kontrollernas placering
- CAUTION
- RISK OF ELECTRIC SHOCK DO NOT OPEN
- IMPORTANT SAFETY INSTRUCTIONS:
- CLASS I LASER PRODUCT
- Location of controls
- Precautions for use
- Installation
- AC connection
- DC connection
- Listening to radio
- Operation
- Hints for best reception:-
- Playing compact disc
- - Getting start
- ●Play / pause mode ▶II
- - Stop mode
- - Skip mode (skip up / skip down)
- - Repeat mode
- CD programming
- Remark:
- Playback of MP3 song via USB storage media
- Connecting
- Remark
- Removing of USB
- Aux-in connection
- DENVER®
- KLASSE I LASERPRODUC T
- Ohjaimien sijainti
- ● Mode Lecture/pause ▶
- PRODUCTO LÁSER CLASE I
- Kontrollernas placering
Brand : DENVER
Model : TCU-206
Category : Hi-Fi System