
TOGETHER - Double stroller CHICCO - Free user manual and instructions
Find the device manual for free TOGETHER CHICCO in PDF.
| Product type | Double stroller |
| Brand | Chicco |
| Model | Together |
| Weight capacity per seat | Up to 15 kg |
| Age range | Rear seat: 0-36 months; Front seat: 6-36 months |
| Materials | Plastic, metal, fabric |
| Safety harness | 5-point, adjustable |
| Brakes | Linked brakes on rear wheels (pedal) |
| Front wheels | Swiveling with lock |
| Storage basket | Max capacity 5 kg, with rear zipper opening |
| Handle | Adjustable height (2 side buttons) |
| Canopies | Two canopies with side hinges |
| Safety bar | Removable, button lock |
| Car seat compatibility | Chicco Keyfit (front and rear) |
| Optional accessories | Rain cover, leg cover |
| Maintenance | Hand wash with cold water, mild soap; lubricate moving parts with silicone oil |
| Repairability | Spare parts available from manufacturer |
Frequently Asked Questions - TOGETHER CHICCO
User questions about TOGETHER CHICCO
0 question about this device. Answer the ones you know or ask your own.
Ask a new question about this device
Download the instructions for your Double stroller in PDF format for free! Find your manual TOGETHER - CHICCO and take your electronic device back in hand. On this page are published all the documents necessary for the use of your device. TOGETHER by CHICCO.
USER MANUAL TOGETHER CHICCO
natural_image
Illustration of a two-tier baby stroller with mesh backrests and wheels (no text or symbols)• ISTRUZIONI D'USO
• MODE D'EMPLOI
• GEBRAUCHSANLEITUNG
• INSTRUCTIONS FOR USE
• INSTRUCCIONES DE USO
• INSTRUÇÕES PARA A UTILIZAÇÃO
• GEBRUIKSAANWIJZINGEN
• ANVÄNDNINGSINSTRUKTIONER
• NÁVOD K POUŽITÍ
• INSTRUKCJE SPOSOBU UŻYCIA
• ΟΔΗΓΙΕΣ ΧΡΗΣΗΣ
• KULLANIM BİLGİLERİ
• ИНСТРУКЦИЯ ПО ЭКСПЛУАТАЦИИ
• РЪКОВОДСТВО ЗА ЕКСПЛОАТАЦИЯ
• تعليمات الاستعمال

IMPORTANTE: CONSERVARLO PER OGNI RIFERIMENTO FUTURO – LEGGERE ATTENTAMENTE
F IMPORTANT: LE CONSERVER EN VUE D'UNE EVENTUELLE CONSULTATION FUTURE – LIRE ATTENTIVEMENT
D WICHTIG: FÜR ZUKÜNFTIGES NACHSCHLAGEN AUFBEWAHREN-BITTE DIESE GEBRAUCHSANLEITUNG SORGFÄLTIG LESEN
GB IMPORTANT: KEEP FOR FUTURE REFERENCE - READ CAREFULLY
E IMPORTANTE: CONSERVELO PARA FUTURAS CONSULTAS. – LEA ATENTAMENTE
IMPORTANTE: CONSERVE-O PARA CONSULTAS FUTURAS – LEIA ATENTAMENTE
BELANGRIJK: VOOR LATERE
NL RAADPLEGING BEWAREN – LEES DEZE
GEBRUIKSAANWIJZINGEN
s VIKTIGT: SPARA FÖR FRAMTIDA BRUK – LÄS NOGGRANT
DÜLEŽITÉ: USCHOVESTE PRO PŘÍPADNÉ DALŠÍ POUŽITÍ – POZORNĚ SI PŘEČTĚTE!
PL WAŻNE: ZACHOWAĆ NA PRZYSZL·OŚĆ - PRZECZYTAĆ UWAŻNIE
GR ΣΗΜΑΝΤΙΚΟ: ΚΡΑΤΗΣΤΕ ΤΙΣ ΟΔΗΓΙΕΣ ΓΙΑ ΝΑ ΤΙΣ ΣΥΜΒΟΥΛΕΥΕΣΤΕ ΣΤΟ ΜΕΛΛΟΝ - ΠΡΟΥΤΙΤΕ ΒΝΙΜΑΤΕЛЬНО
TR ÖNEMLİ: ILERDE REFERANS OLMAK ÜZERE SAKLAYINIZ - DIKKATLICE OKUYUNUZ
RUS ОЧЕНЬ ВАЖНО: СОХРАНИТЕ ДЛЯ ПОСЛЕДУЮЩИХ КОНСУЛЬТАЦИЙ - ДІАВ'AЗТЕ ПРОЗЕХТИКА
BG ВАЖНО: СЪХРАНЯВАЙТЕ НА УДОБНО МЯСТО И ПРЕПРОЧИТАЙТЕ ПРИ НЕОБХОДИМОСТ.
natural_image
Medical illustration showing a surgical procedure with a red arrow indicating a specific anatomical feature (no text or symbols present)

natural_image
Diagram of a car interior showing a hand holding a tool, with a red arrow indicating direction (no text or symbols present)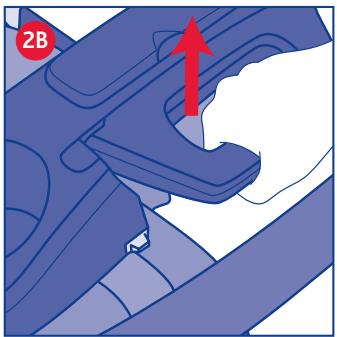
natural_image
Close-up of a hand holding a blue mechanical component with a red upward arrow, no visible text or symbols
natural_image
Diagram of a mechanical component with a red arrow indicating a downward motion, no text or symbols present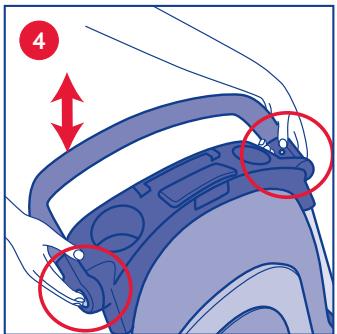
natural_image
Illustration of a seatbelt with a red arrow indicating movement or change (no text or symbols present)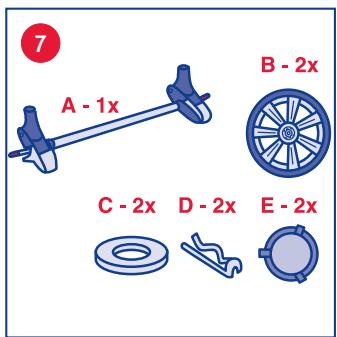
flowchart
graph LR
    A["Component A"] --> B["Component B"]
    B --> C["Component C"]
    C --> D["Component D"]
    D --> E["Component E"]
    style A fill:#4CAF50,stroke:#333
    style B fill:#4CAF50,stroke:#333
    style C fill:#2196F3,stroke:#333
    style D fill:#2196F3,stroke:#333
    style E fill:#2196F3,stroke:#333
natural_image
Close-up of a car wheel rim with blue and white segments, no visible text or symbols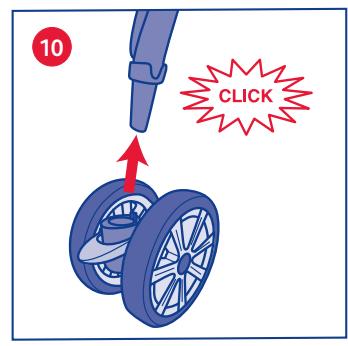

natural_image
Mechanical assembly diagram showing a bracket with a red arrow pointing to a circular component (no text or symbols present)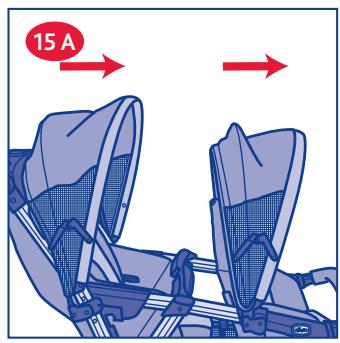

natural_image
Top-down diagram of a vehicle's seat frame with no text or symbols, showing structural components and a red circular label indicating 16°C (no readable text or symbols beyond the label)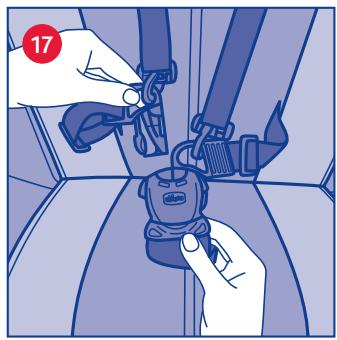
natural_image
Illustration of hands adjusting a car seatbelt switch (no text or symbols visible)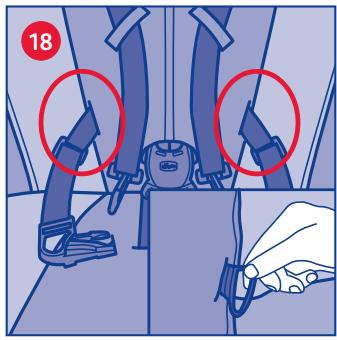
natural_image
Illustration of a car seatbelt with two red circles highlighting the seat (no text or symbols present)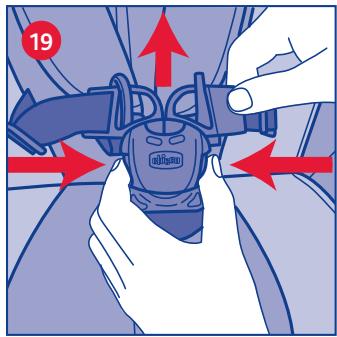

natural_image
Illustration of a car wheel with a red arrow indicating clockwise motion (no text or symbols)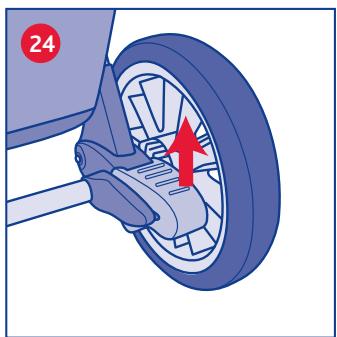
natural_image
Mechanical diagram showing a wheel and foot assembly with red arrows indicating motion direction (no text or symbols)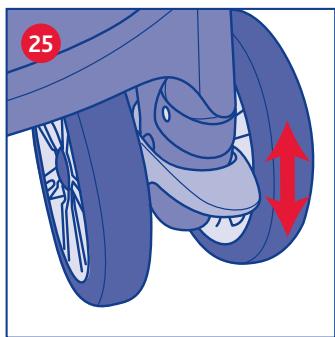
natural_image
Illustration of a car wheel and foot with a red directional arrow indicating motion (no text or symbols)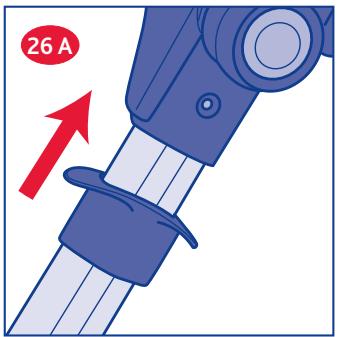
natural_image
Illustration of a blue and white stroller with wheels and handle (no text or symbols)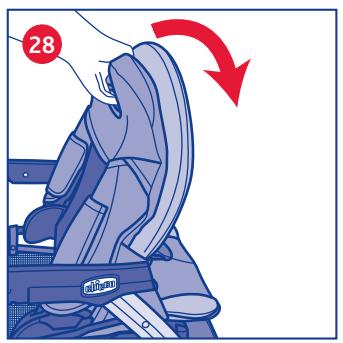
natural_image
Top-down view of a car interior frame with red arrows indicating movement or force points (no text or symbols)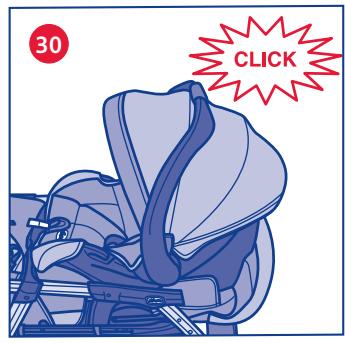

natural_image
Technical line drawing of a mechanical assembly with no visible text or symbols① TOGETHER
AVVISO IMPORTANTE
IMPORTANTE: PRIMA DELL'USO LEGGERE ATTENTAMENTE QUESTO LIBRETTO D'ISTRUZIONI PER EVITARE PERICOLI NELL'UTILIZZO E CONSERVARLO PER OGNI FUTURO RIFERIMENTO. ATTENZIONE: PRIMA DELL'USO RIMUOVERE ED ELIMINARE EVENTUALI SACCHETTI DI PLASTICA E TUTTI GLI ELEMENTI FACENTI PARTE DELLA CONFEZIONE DEL PRODOTTO O COMUNQUE TENERLI LONTANI DALLA PORTATA DEI BAMBINI.
AVVERTENZE
WARNING: BEFORE USE, REMOVE AND DISPOSE OF ALL PLASTIC BAGS AND PACKING MATERIALS AND KEEP THEM OUT OF REACH OF CHILDREN.
WARNINGS
- WARNING: YOUR CHILD'S SAFETY IS YOUR RESPONSIBILITY! Your child's safety may be affect if you do not follow these instructions.
- WARNING: children must always be strapped in their seats with their safety harness and must never be left unattended.
- WARNING: keep children away from all moving parts whilst you adjust the stroller.
- WARNING: This stroller requires periodic maintenance by the user. Overloading the stroller, closing it incorrectly or using unapproved accessories could damage or even break it.
- WARNING: It may be dangerous to leave your child unattended.
- WARNING: before assembly, check that neither the product nor any of its components have been damaged during transportation; if this is the case, do not use the product and keep it out of the reach of children.
- WARNING: The rear seat on this stroller is intended for use by children aged between 0 and 36 months, weighing up to a maximum of 15kg .
- WARNING: When used for children from 0 to 6 months of age, the backrest must be reclined as flat as possible.
- WARNING: The front seat on this stroller is intended for use by children aged between 6 and 36 months, weighing up to a maximum of 15 kg. WARNING This seat unit is not suitable for children under 6 months.
- WARNING: Ensure that all locking devices are engaged before use. In particular, make sure that the stroller is locked in the open
position, checking that the two side bars are locked in place.
- WARNING: Do not overload the basket with weights of over 5 kg.
- WARNING: Do not carry more than two children at a time.
- WARNING: Do not fit any accessories, spare parts or components on the stroller which have not been supplied and approved by the manufacturer.
- WARNING Any load attached on the handle affects the stability of the pushchair.
- WARNING: the use of the crotch strap and safety harness is necessary to guarantee the safety of your child. WARNING Always use the crotch strap in combination with the waist belt.
- WARNING: Ensure that the persons using the stroller know how to use it safely and how it works.
- WARNING: when opening, adjusting or closing the stroller, ensure that your child is at a safe distance: do not attempt to open or close the stroller with a child sitting in it. When adjusting the stroller, make sure that no moving parts come into contact with your child.
- WARNING: Always apply the brakes whenever the stroller is stationary.
- WARNING: Always apply the brakes when placing a child in, or removing a child from, the stroller.
- WARNING: never leave the stroller on a sloping surface with a child inside, even with the brakes applied.
- WARNING: Do not allow children to play unsupervised near the stroller, and make sure they do not climb onto it.
- WARNING: To avoid all risks of strangulation, never give children objects with cords or strings attached, or leave them within their reach.
- WARNING: never use the stroller on staircases or escalators: you could suddenly lose control of it.
- WARNING: Always pay attention when going up and down steps or pavements.
- WARNING: If the stroller is left exposed to direct sun light for a long time, allow it to cool down before placing your child inside.
- WARNING: Prolonged exposure to direct sun light may cause the colour of the
materials and fabric to fade.
- WARNING: Do not use the product if any parts are broken, torn or missing.
- WARNING: when it is not being used, the stroller should be kept out of children's reach.
- WARNING This product is not suitable for running or skating.
- WARNING: Prevent the stroller from coming into contact with salt water. It may cause the formation of rust.
- WARNING: Do not use the stroller on the beach.
- WARNING: this product must only be used by an adult.
- WARNING Check that the pram body or seat unit attachment devices are correctly engaged before use.
CLEANING AND MAINTENANCE
The cleaning and maintenance of this product must be carried out on a regular basis by the user. The cleaning and maintenance of the stroller must only be carried out by an adult.
CLEANING
The cover cannot be removed. Clean all fabric parts with a damp sponge and neutral detergent. Please refer to the care labels for instructions on how to clean the fabric parts. Below are the cleaning symbols and their meanings:

Wash by hand in cold water

Do not bleach

Do not tumble dry

Do not iron

Do not dry clean
Periodically wipe clean plastic parts with a soft damp cloth. Always dry the metal parts to prevent the formation of rust if the stroller has come into contact with water.
MAINTENANCE
Lubricate the moving parts only if necessary, with the light application of a silicone based lubricant. Regularly check the condition of the wheels and, keep them clean of dust and sand. To avoid friction that may prevent the correct operation of the stroller, ensure that all the movable plastic parts placed along the metal frame are clean of dust, dirt or sand. Keep the stroller in a dry place.
GENERAL INSTRUCTIONS
ASSEMBLING AND OPENING THE STROLLER
CARRY-ALL TRAY
- The mechanism which opens and closes the stroller is fitted inside the carry-all tray. The 2 tabs on the end of the carry-all tray are used to fasten it to the stroller frame: slide the 2 tabs along the slots inside the handlebar (diag. 1A) and push the
tray towards the handlebar until you hear it click into place (diag. 1B).
Check that the closing mechanism wire does not interfere with the carry-all tray fasteners.
WARNING: before you start, check that your children are at a safe distance.
Ensure that during these operations the moving parts of the stroller do not come into contact with your child.
- Once the carry-all tray has been fastened to the frame, move the sliding button on the tray (diag. 2A) to the left whilst pressing the centre button and raising the handle (diag. 2B); now open the stroller by using your other hand to push the front section of the frame downwards, until you hear it click into place (diag. 2C).
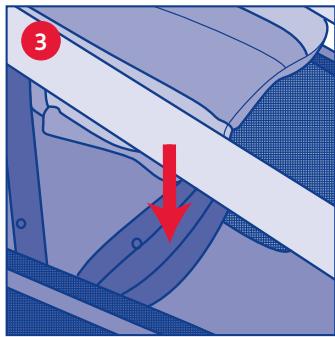
Make sure the stroller is open properly before proceeding any further. - The rear seat on the stroller is fitted with a footrest. Once the stroller is open, lower the footrest (diag. 3).
- To adjust the height of the handlebar, press the two side buttons (diag. 4) at the same time and move the handlebar to the required position.
BASKET
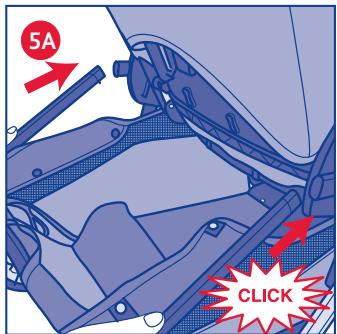
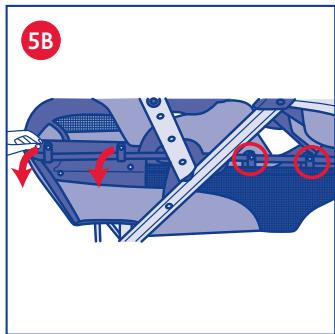
- The stroller comes with a practical carry-all basket. To assemble the basket, slide the U-shaped tube into the tube ends on the back of the stroller, as seen in diag. 5A. The U-shaped tube is fitted correctly when you see the 2 grey rods on the bottom, protruding from the holes below the stroller frame tubes and you hear them click into place.
To finish, fasten the fabric to the tube using the press studs (diag. 5B). Never use the carry-all basket without the supports inserted properly. Always remove all contents from the basket before you close the stroller.
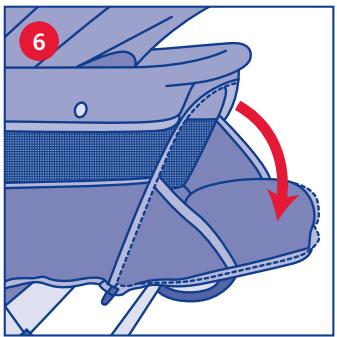
- You can also open the zip (diag. 6) on the back of the basket to access it more easily.
FITTING THE BACK WHEELS
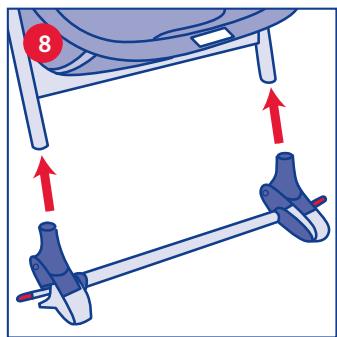
- Parts needed to fit the back wheels: see diag. 7.
- Remove the caps from the ends of the rear axle, then slot the rear axle onto the frame, until you hear it click into place (diag. 8).
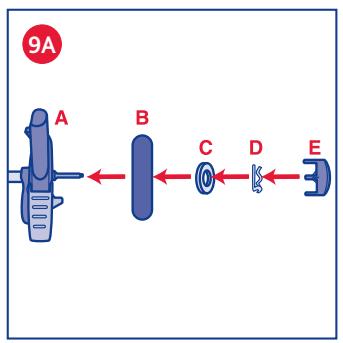
WARNING: always check the rear axle is fitted properly before using the stroller. - To assemble the wheels on the rear axle A) follow the instructions in the correct order (see diag. 9A):
- the wheel B)
- the washer C)
- the spring pin D)
- the cap E)
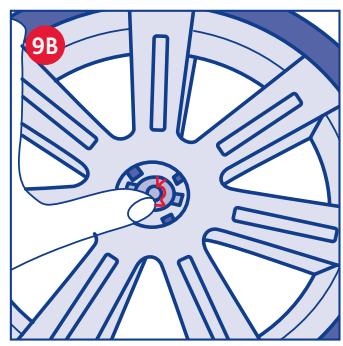
Make sure you insert the fastening spring pin as indicated in the diagram: the flat side must be inserted in the whole on the axle, whilst the closed end of the spring pin must be facing outwards (diag. 9B). Repeat the operation to assemble the other wheel, following the instructions in the same order.
FITTING THE FRONT WHEELS
- Slot the front wheel block onto the stroller frame as seen in diag. 10, until you hear it click into place. Repeat this procedure for the other wheel block.
WARNING: check that the wheels are fitted correctly.
BUMPER BAR
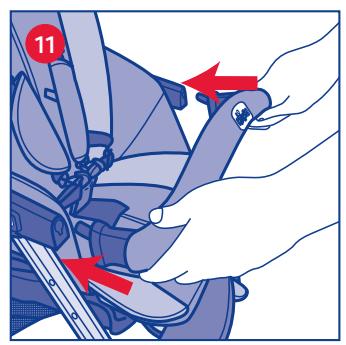
- To assemble the bumper bar, simply slot it into the two holes on the ends of the front armrests, as seen in diag. 11.
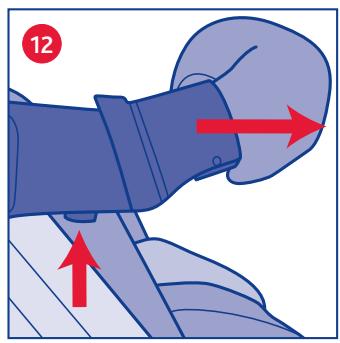
- To remove the bumper bar, press the two buttons found under the armrests, and pull the bar towards you (diag. 12).
HOOD
The stroller comes with two hoods.
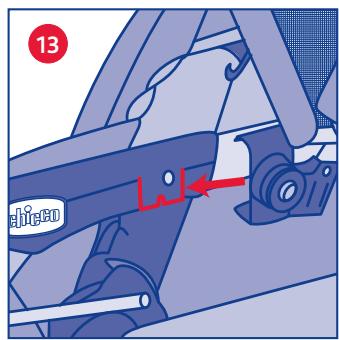
- To assemble the front hood, connect the hood fastener to the guides on the armrests (diag. 13). Repeat the operation to fasten it to the other side of the stroller.
- To assemble the rear hood, connect the hood fastener to the round stopper on the rear stroller tube (diag. 14). Repeat the operation to fasten it to the other side of the stroller.
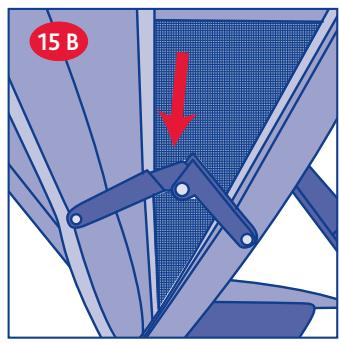
- How to open the hoods: open the hood as illustrated in fig. 15A and press the two side snap-bars down to lock it in place (diag. 15B). Warning: always release these two snap-bars before trying to close the hood.
USING THE SAFETY HARNESS
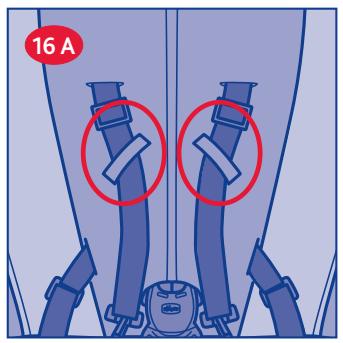
Each seat is fitted with a five-point safety harness which consists of two shoulder straps, a lap belt and a crotch strap with a buckle. WARNING: when carrying children from 0 to 6 months of age, the shoulder straps must be threaded through the adjuster slots before being fastened.
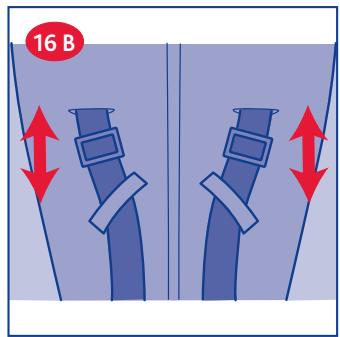
- Thread the safety clasps through the fabric loops (diag. 16A) and check that the shoulder straps are fitted at the right height for the child: if this is not the case, adjust the height as necessary (diag. 16B). You can also use the padded strap covers by sliding them onto the straps (diag. 16C).
- Place the child inside the seat, connect the safety clasps to the 2 toothed ends, and insert the 2 toothed ends into the buckle (diag. 17). Now use the clasps to adjust the length of the lap belt.
- For extra safety, the stroller is fitted with D-rings which can be used to fit a separate safety harness, compliant with BS 6684 Standards. The rings are fitted internally on the right and left side of the stroller seat, as seen in diagram 18.
- To release the lap belt, press the two toothed ends together at the same time (diagram 19).
WARNING: the safety harness must always be fastened to guarantee safety for your child.
WARNING: the safety harness must always be used with the crotch strap to guarantee safety for your child.
ADJUSTING THE FRONT SEAT BACKREST
-
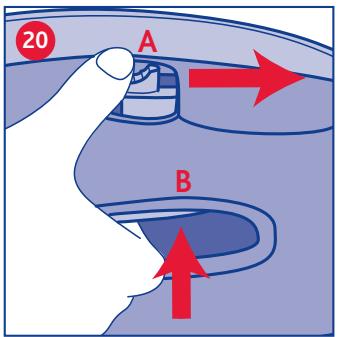
To release the recliner mechanism on the front seat backrest: use your thumb to press button A and then slide it to the left whilst pulling the handle upwards (diag.20).
-
Now push the backrest backwards (Diag. 21). To raise the backrest, simply lift it to the desired position, without pressing on the handle.
The front seat backrest can also be adjusted forwards, so the stroller can be used with the child car seat (see the “USING THE CHILD CAR SEAT” section).
ADJUSTING THE REAR SEAT BACKREST
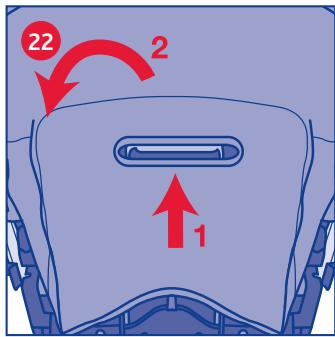
- To recline the rear seat backrest, lift the adjuster handle on the back of the backrest and pull it downwards (diag. 22). To raise the backrest, simply lift it to the desired position, without pressing on the handle.
WARNING: these operations can become more difficult when the child is sat in the seat.
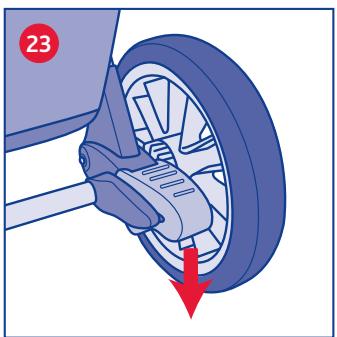
REAR BRAKES
The rear wheels are fitted with a twin-braking system which allows you to use just one foot pedal to control both the rear wheels.
-
To apply the brakes, press one of the two levers on the rear wheels downwards, as illustrated in diagram 23.
-
. To release the brakes, press one of the two levers on the rear wheels upwards, as illustrated in diagram 24.
WARNING: Always apply the brakes whenever the stroller is stationary.
WARNING: Never leave the stroller on a sloping surface with a child inside, even with the brakes applied.
WARNING: after applying the brake lever, check that the brakes are locked in place on both rear wheels.
SWIVEL WHEELS
The front wheels on this stroller can be used in fixed or swivel mode. 25. To use the wheels in swivel mode, lift the lever fitted between the two wheels. Use the swivel wheels on smooth surfaces. To use the wheels in fixed mode, press the lever downwards again (diag. 25).
WARNING: the swivel wheels make the stroller easier to manoeuvre; it is however recommended to use the wheels in fixed mode on uneven ground to guarantee better stability (on gravel, unpaved roads etc.)
WARNING: Both wheels must be switched to swivel or fixed mode at the same time.
WARNING: when closing the stroller, make sure that your child and all other children are at a safe distance.
Ensure that during these operations the moving parts of the stroller do not come into contact with your child.
-
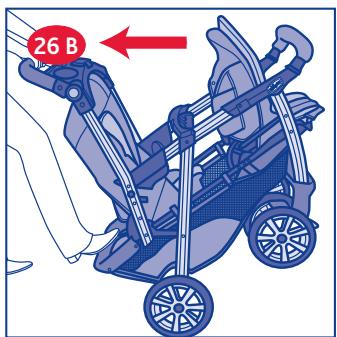
To close the stroller, start by switching the swivel wheels to the fixed wheel position. Move the sliding bar on the tray to the left (diag. 2A) whilst pressing the centre button and raising the handlebar (diag. 2B). If you are using the version which conforms to BS 7409:1996 Standards, pull the snap-clasp on the left side of the stroller upwards at the same time (diag. 26A). Now close the stroller by pressing the centre of the carry-all basket downwards with one foot (diag. 26B).
-
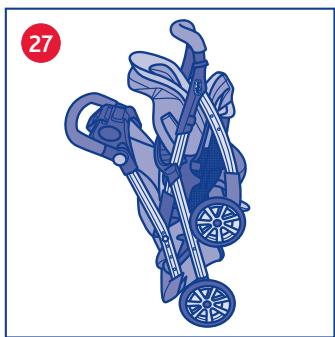
When the stroller is closed and locked in place, it will stand up on its own (diag. 27).
USING THE CHILD CAR SEAT
The stroller is fitted with clasps so you can use two KEYFIT child car seats without the need for additional fastening devices.
WARNING: When using the child car seat, please read the relative instruction manual carefully.
WARNING: only CHICCO KEYFIT child car seats can be hooked onto the stroller.
Improper use of this stroller with an incompatible child car seat can cause serious injuries to children. Before using the stroller in combination with the child car seat, always check that the hook-on system is correctly closed and locked in place.
WARNING: Children must always be strapped into the child car seat using the safety harness.
INSTALLING THE CHILD CAR SEAT ON THE FRONT SEAT OF THE STROLLER
-
Remove the bumper bar and adjust the front seat backrest forwards, following the instructions provided in paragraph 20 to release the backrest recliner mechanism and push it forwards (diag.28).
-
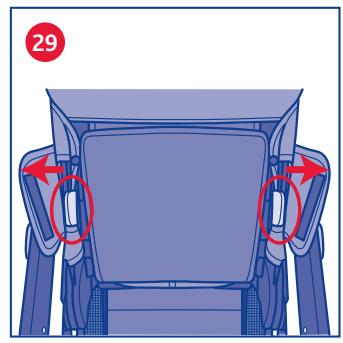
Open the Velcro on the flaps so that the side anchor points are visible (diag. 29).
- Now position the child car seat inside the stroller seat aligned with the side anchor points. The child car seat will then automatically click into place (diag 30). Try pulling the child car seat upwards to check that it is fitted correctly.
WARNING: When you remove the child car seat, remember to close the velcro flaps before using the stroller.
INSTALLING THE CHILD CAR SEAT ON THE REAR SEAT OF THE STROLLER
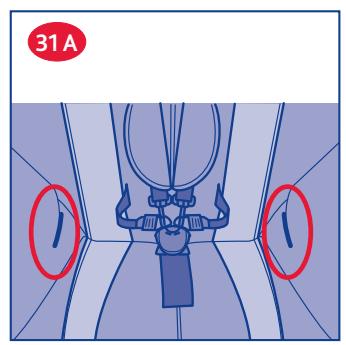
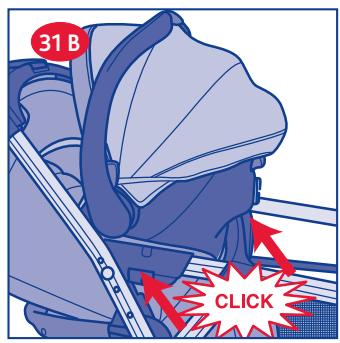
- Recline the rear seat as far as possible following the instructions provided in paragraph 22, now position the child car seat inside the rear seat of the stroller, aligned with the side anchor points (diag. 31A). The child car seat will then automatically click into place (diag 31B). Try pulling the child car seat upwards to check that it is fitted correctly.
HOW TO REMOVE THE CHILD CAR SEAT
- To remove the child car seat from the stroller, press the handle on the back of the car seat and lift it out of the stroller (diag. 32).
ACCESSORIES
WARNING: The accessories described below are not necessarily available on some versions of the product. Please read the instructions relative to the accessories fitted on the type of stroller you purchased carefully.
FULL-COVER RAIN HOOD
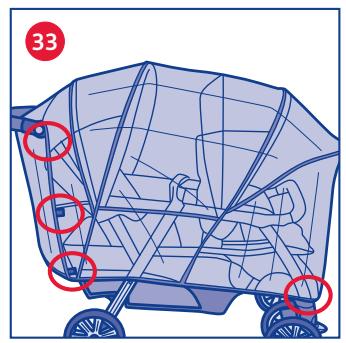
WARNING: Pay particular attention when using the rain hood. 33. To assemble the full-cover rain hood, thread the ties around the stroller tubes and close the ties and velcro fasteners in the positions indicated in diagram 33.
When you have finished using the rain hood, allow it to dry properly if it is wet.
WARNING: the full-cover rain hood can not be used on a stroller which has no hood or sun-hood as it could suffocate the child.
WARNING: when the full-cover rain hood is fitted on the stroller, never leave it exposed to direct sunlight with the child inside, as the temperature will rise considerably.
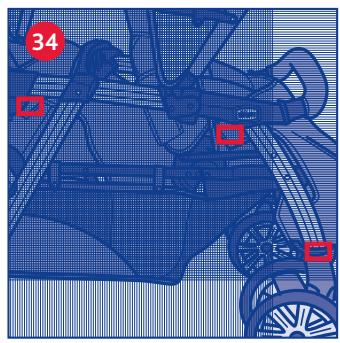
LEG COVER
- To use the leg cover on your stroller, close the velcro fasteners on both sides after threading the leg cover under the bumper bar, as illustrated in diagram 34.
Important Note: The pictures and instructions contained in the booklet refer to the complete stroller model. Some of the components and functions described here may vary according to the model purchased.
FOR FURTHER INFORMATION:
Artsana S. P. A. - Customer Service
Via Saldarini Catelli, 1
22070 GRANDATE – Como – Italia
Telephone: 800-188 898
www.chicco.com
Chicco UK Ltd - Customer Service
Prospect Close - Lowmoor road Business Park
Kirkby in Ashfield - Notts NG17 7LF
Tel: 01623 750870 (Office hours)
E TOGETHER
AVISO IMPORTANTE
IMPORTANTE: ANTES DEL USO LEA ATENTA- MENTE ESTE MANUAL DE INSTRUCCIONES PARA EVITAR PELIGROS EN SU USO Y GUAR- DARLO PARA FUTURAS CONSULTAS. ATEN- CIÓN: ANTES DEL USO QUITAR Y ELIMINAR LAS BOLSAS PLÁSTICAS Y TODOS LOS ELE- MENTOS QUE FORMEN PARTE DE LA CAJA DEL PRODUCTO O, DE TODOS MODOS, MANTENERLOS ALEJADOS DEL ALCANCE DE LOS NIÑOS.
ADVERTENCIAS
VOOR MEER INFORMATIE
Pharsana N.V. - Temselaan 5
RÅD FÖR RENGÖRING OCH SKÖTSEL
- ① TOGETHER
- AVVISO IMPORTANTE
- AVVERTENZE
- WARNINGS
- CLEANING AND MAINTENANCE
- CLEANING
- MAINTENANCE
- GENERAL INSTRUCTIONS
- ASSEMBLING AND OPENING THE STROLLER
- CARRY-ALL TRAY
- BASKET
- FITTING THE BACK WHEELS
- FITTING THE FRONT WHEELS
- BUMPER BAR
- HOOD
- USING THE SAFETY HARNESS
- ADJUSTING THE FRONT SEAT BACKREST
- ADJUSTING THE REAR SEAT BACKREST
- REAR BRAKES
- SWIVEL WHEELS
- USING THE CHILD CAR SEAT
- INSTALLING THE CHILD CAR SEAT ON THE FRONT SEAT OF THE STROLLER
- INSTALLING THE CHILD CAR SEAT ON THE REAR SEAT OF THE STROLLER
- HOW TO REMOVE THE CHILD CAR SEAT
- ACCESSORIES
- FULL-COVER RAIN HOOD
- LEG COVER
- FOR FURTHER INFORMATION:
- E TOGETHER
- AVISO IMPORTANTE
- ADVERTENCIAS
- VOOR MEER INFORMATIE
- RÅD FÖR RENGÖRING OCH SKÖTSEL
Brand : CHICCO
Model : TOGETHER
Category : Double stroller