
SCOOP - Baby stroller CHICCO - Free user manual and instructions
Find the device manual for free SCOOP CHICCO in PDF.

| Product type | Baby stroller with carrycot (pram) |
| Brand | CHICCO |
| Model | SCOOP |
| Maximum child weight | 9 kg |
| Recommended age | From birth to 5/6 months |
| Dimensions (L × W × H) | Approximately 80 × 40 × 30 cm (estimated) |
| Item weight | Approximately 6 kg (estimated) |
| Main materials | Plastic, metal, fabric (polystyrene in the carrycot) |
| Canopy | Yes, with adjustable sun visor and rear opening |
| Adjustable backrest | Yes, via wheel under the carrycot |
| Carrying handle | Yes, 3 positions (transport, intermediate, rest) |
| Attachment system to stroller | CLIK CLAK (hooks on the armrests) |
| Inner cover and mattress | Removable and washable (see label) |
| Included accessories | Removable cover (zipper), toy ring |
| Washing | Hand wash cold; do not bleach, tumble dry, iron, or dry clean |
| Maintenance | Lubrication with silicone oil; clean plastic parts with damp cloth |
| Use in car | Possible only with KIT TRIO CAR (not included) |
| Safety | Do not leave child unattended; use on stable surface; check integrity regularly |
| Spare parts | Use only original CHICCO parts |
| Consumer service | 0 820 87 00 41 (France) / www.chicco.com |
| Warranty | Consult seller or manufacturer |
| Country of origin | France (address: Saint Denis La Plaine) |
Frequently Asked Questions - SCOOP CHICCO
User questions about SCOOP CHICCO
0 question about this device. Answer the ones you know or ask your own.
Ask a new question about this device
Download the instructions for your Baby stroller in PDF format for free! Find your manual SCOOP - CHICCO and take your electronic device back in hand. On this page are published all the documents necessary for the use of your device. SCOOP by CHICCO.
USER MANUAL SCOOP CHICCO
natural_image
Illustration of a blue-colored children's backpack with a logo on the front (no text or symbols)• ISTRUZIONI D'USO
• MODE D'EMPLOI
• GEBRAUCHSANLEITUNG
• INSTRUCTIONS FOR USE
• INSTRUCCIONES DE USO
• INSTRUÇÕES PARA A UTILIZAÇÃO
• GEBRUIKSAANWIJZINGEN
• ANVÄNDNINGSINSTRUKTIONER
• NÁVOD K POUŽITÍ
• INSTRUKCJE SPOSOBU UŻYCIA
• ΟΔΗΓΙΕΣ ΧΡΗΣΗΣ
• KULLANIM BİLGİLERİ
• ИНСТРУКЦИЯ ПО ЭКСПЛУАТАЦИИ
• تعليمات الاستعمال
natural_image
Illustration of a medical or surgical device with two red circles highlighting specific points on the lid (no text or symbols present)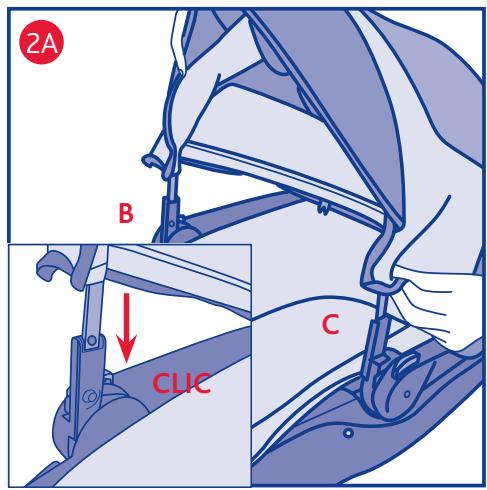

natural_image
Illustration of a hand operating a mechanical component with a red arrow indicating direction (no text or symbols)
natural_image
Illustration of a person wearing a helmet and glasses, with no visible text or symbols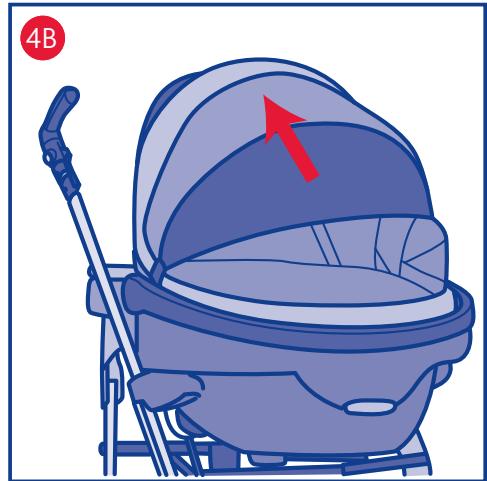
natural_image
Illustration of a baby stroller with a red arrow pointing upward (no text or symbols)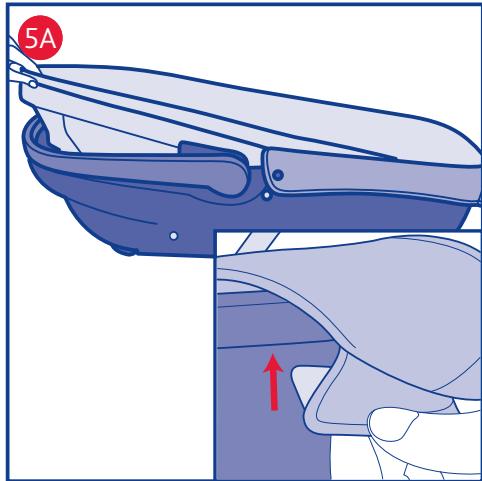
natural_image
Illustration of a baby stroller with a hand adjusting the seat area (no text or symbols)
natural_image
Illustration of a blue and gray baby seat with a red arrow pointing to the seat (no text or symbols)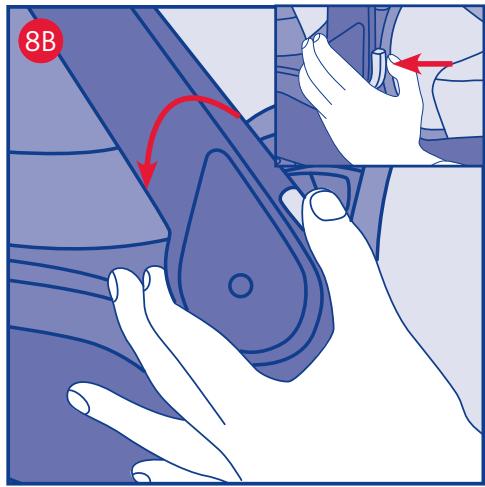

natural_image
Illustration of a person performing a medical or therapeutic procedure on a patient's abdomen (no text or symbols present)
natural_image
Illustration of a blue and gray car seat with red arrows indicating motion or movement (no text or symbols)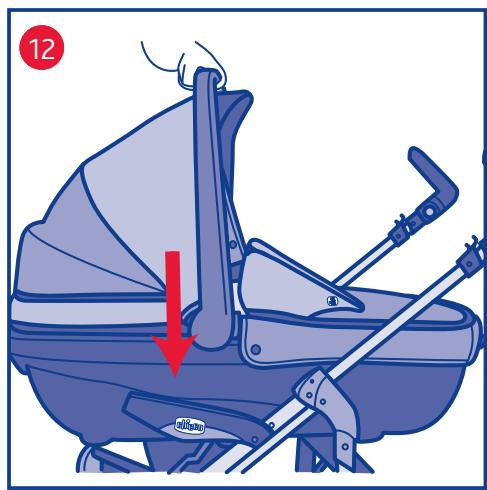

natural_image
Illustration of a mechanical component with blue outline and red circular label (13A), no readable text or symbols present.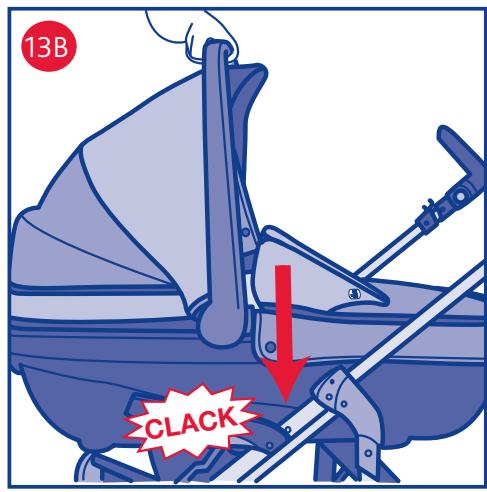

natural_image
Illustration of a person seated on a chair with a red arrow indicating upward motion (no text or symbols)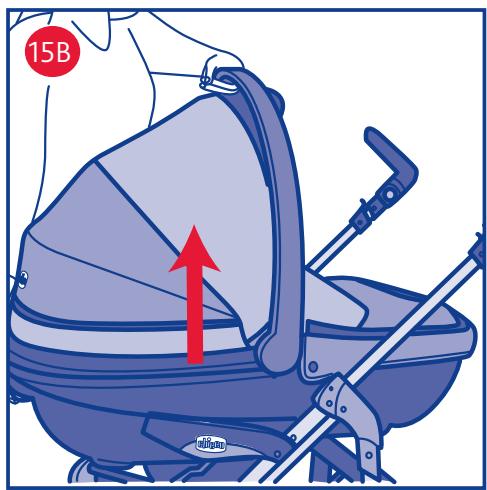
ISTRUZIONI D'USO
AVVISO IMPORTANTE
IMPORTANTE: PRIMA DELL'USO LEGGE- RE ATTENTAMENTE QUESTO LIBRETTO D'ISTRUZIONI PER EVITARE PERICOLI NELL'UTILIZZO E CONSERVARLO PER OGNI FUTURO RIFERIMENTO.
PER NON COMPROMETTERE LA SICUREZZA DEL VOSTRO BAMBINO SEGUITE ATTENTAMENTE QUESTE ISTRUZIONI.
ATTENZIONE: PRIMA DELL'USO RIMUOVE- RE ED ELIMINARE EVENTUALI SACCHETTI DI PLASTICA E TUTTI GLI ELEMENTI FACEN- TI PARTE DELLA CONFEZIONE DEL PRO- DOTTO O COMUNQUE TENERLI LONTANI DALLA PORTATA DI NEONATI E BAMBINI.
AVVERTENZE
IMPORTANT: PLEASE READ THESE INSTRUCTIONS CAREFULLY BEFORE USE AND KEEP THEM FOR FUTURE REFERENCE. YOUR CHILD'S SAFETY MAY BE AFFECTED IF YOU DO NOT FOLLOW THESE INSTRUCTIONS CAREFULLY.
CAUTION: BEFORE USE, REMOVE AND DISPOSE OF ALL PLASTIC BAGS AND PACKAGING MATERIALS AND KEEP THEM OUT OF REACH OF NEWBORN BABIES AND CHILDREN.
WARNING
- Please refer to the instructions booklet before using the stroller.
- WARNING: The carycot can be used for car transportation only if it is fitted with the “TRIO CAR KIT”. Please refer to the “TRIO CAR KIT” instructions booklet for all the information on how to fit the “TRIO CAR KIT” to the car-cycot or the carycot into the car, and on how to use the carycot during the journey.
- WARNING: before assembly, check that the product and all of its components have not been damaged during transportation. Should any part be damaged, torn or missing, do not use and keep out of reach of children.
- WARNING: This product is only suitable for a child who cannot sit up unaided or to turn and stand up helping themselves with their hands and knees.
- Child's maximum weight: 9 Kg. Age: between 0 and 5/6 months.
- WARNING: Only use the carrycot on a flat, horizontal, dry surface.
- WARNING: Do not let other children play unattended close to the carrycot.
- WARNING: Periodically check the car-cycot and its frame for signs of damage or wear, in particular, the carry handle and the bottom. If the product is damaged or worn, do not use it and keep
out of reach of children.
- WARNING: Do not use the carrycot if any of its parts are damaged, torn or missing.
- WARNING: Only use spare parts supplied or approved by Artsana S.p.A.
- WARNING: Do not fit to the carrycot any accessories, spare parts or components not supplied or approved by the manufacturer. Artsana S.p.A. declines all responsibility with regard to any changes made to the product.
- WARNING: Always be aware of the risks posed by flames or other sources of heat, such as electric or gas heaters, etc. Do not leave the carrycot near similar sources of heat.
- WARNING: If you purchase a mattress separately, ensure that it can be fitted correctly to the carrycot. Do not use mattresses higher than 10 mm.
- WARNING: Do not leave in the carry-cot objects that may reduce its depth.
- WARNING: This carrycot can only be used with the CHICCO strollers fitted with the CLIK CLAK system. Ensure that the carrycot is fitted correctly onto the stroller before placing the child into it.
- WARNING: Keep all plastic bags out of children's reach to avoid the risk of suffocation.
- WARNING: Products left in the sun may become very hot. Let the carrycot cool down before sitting your child in it.
- WARNING: Never leave your child unattended.
- WARNING: Never use the carrycot with a trestle.
- WARNING: Do not let your baby sleep in the carrycot for long periods of time: this product is not intended to replace a cot.
WARNING: When used as a pram body, remember that:
- The depth of the pram body measured from the top of the mattress to the top of the side of the body at, or at any position within 300mm from, the harness attachment points, should not be
reduced to less than 140mm when the mattress is in position;
- The matress purchased separately should conform to BS 1877 : Part 10.
CLEANING AND MAINTENANCE
Cleaning
Clean the fabric parts with a damp sponge and neutral detergent. Please refer to the product's care label.
Routinely wipe clean plastic parts with a soft damp cloth.
Always dry the metal parts to prevent the formation of rust if the carrycot has come into contact with water.
Maintenance
Lubricate the moving parts only if necessary, with a light application of a silicone based lubricant. Always dry the metal parts to prevent the formation of rust. Do not submerge the carrycot in water. Routinely wipe clean plastic parts with a soft damp cloth. To avoid friction, ensure that the locking devices of the carrycot and pram are free from dust or sand. Do not leave the product exposed to the sun for a long period of time; it may cause the fabric to fade.
CARRYCOT FEATURES
HOOD
The carrycot is equipped with a sun canopy and windbreaker that can be adjusted to various positions.
MOUNTING AND REMOVAL
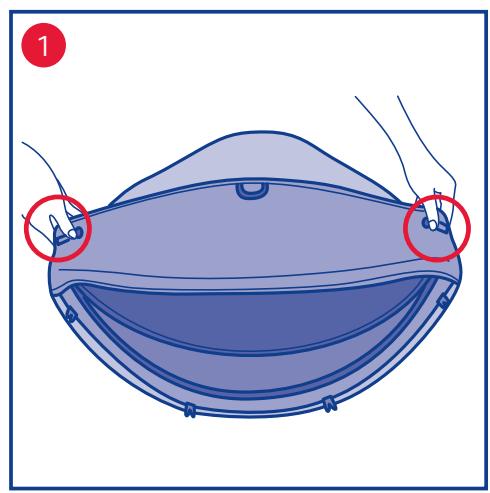
1- Check that the clips located on the end of the metal arch are properly fastened to the buttons located on the fabric part. The buttons are properly fastened if the two ends of the metal arch (fig 1) are easily visible.
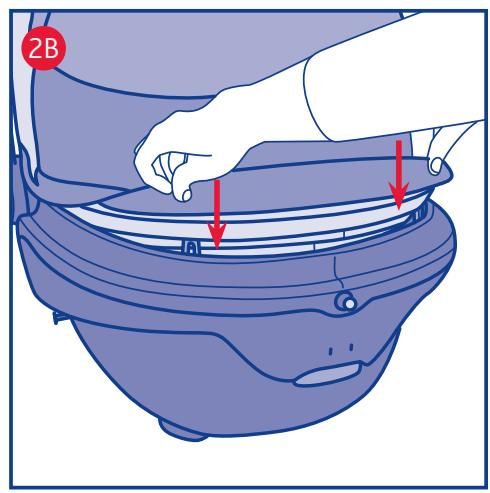
2- Insert the two metal ends in the B and C supports located in the central part of the carrycot until you hear a click (figure 2A); fasten the four tabs of the rear arch (figure 2 B).
NB: The coupling system is located inside the plastic B and C supports, the round button on the supports serve only for removing the hood (see point 3).
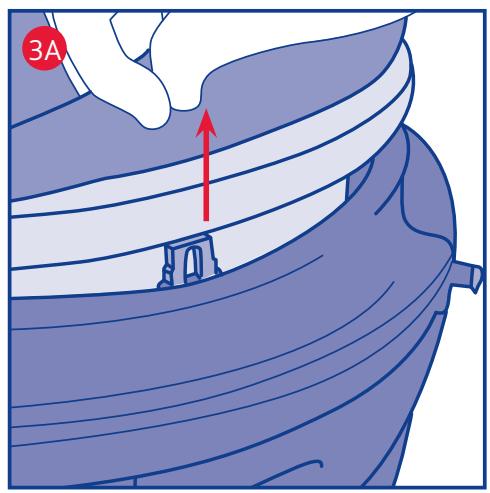
3- To remove the hood, first pull out the 4 tabs of the rear arch (figure 3A) and then remove the front arch by pushing the two buttons located
on the base of the locking device (fig. 3B).
WARNING: Improper removal of the hood could result in the tabs breaking.
HOW TO USE THE HOOD
4- Inside the hood, between the visor and the first segment, is a fabric ring that can be used for hanging soft toys. It comes with handy hooks (figure 4 A).
Warning-only use toys that have the following Chicco codes: 71328, 71329, 71330.
There is an adjustable rear opening flap to guarantee proper ventilation: Unzip it to open, and fold the fabric panel on the upper part of the hood. (Figure 4B).
INTERNAL COVERING AND COVER
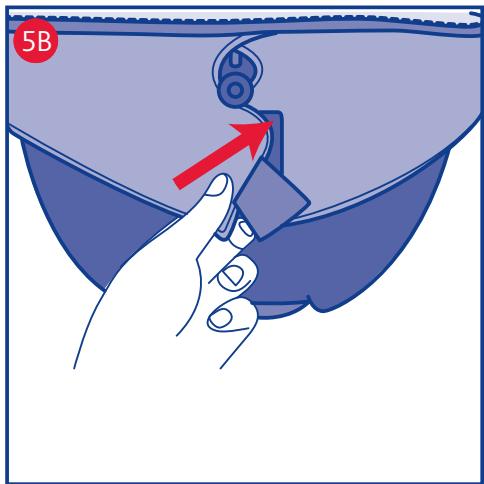
5- To fasten the internal covering to the carrycot: Slip the plastic band located in the baby's head zone between the styrofoam support and the body of the carrycot; then fasten the two tabs in the baby's foot area under the edge of the carrycot, as shown in figure 5A. Then fasten the two lateral press studs and fasten the two fabric strips with velcro in the centre of the area where the baby's feet are (figure 5 B).
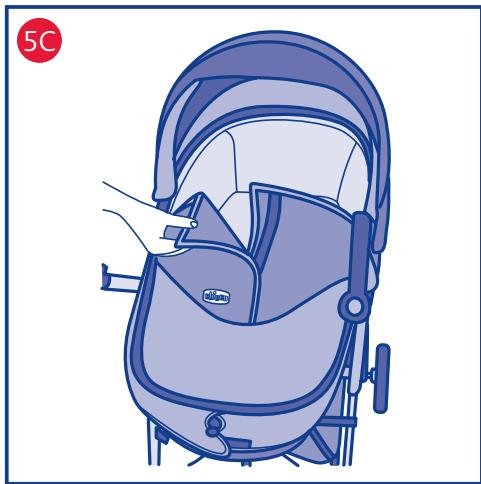
The covering fastens by simply using the zi per. Once mounted, both sides may be opened, or on the top using the velcro opening (figure 5 C).
ADJUSTABLE BACKREST - COMFORT SYSTEM
6- The backrest of the carrycot can be adjusted gradually. To lift or lower the backrest use the wheel located on the outer part of the carrycot near the baby's feet (figure 6).
WARNING: It is advisable to ventilate the carrycot after prolonged use.
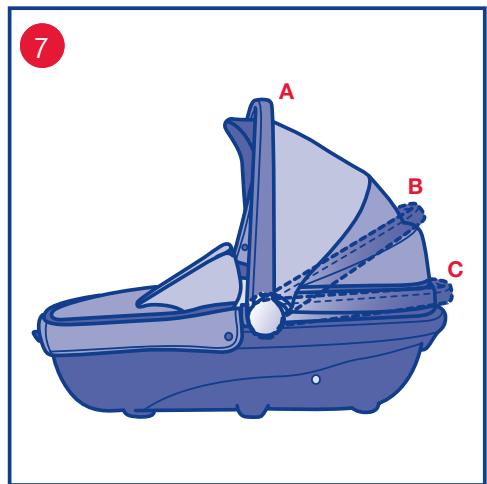
CARRYING HANDLE
7- The carrycot comes with a comfortable carrying handle that can be adjusted in three positions (fig. 7):
A) Transport
B) Middle
C) Rest
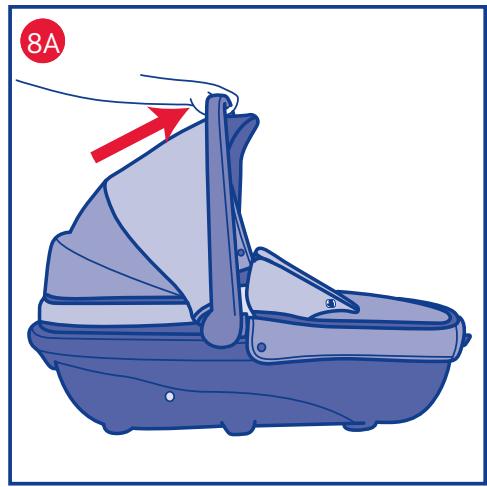
8- To put the handle in the vertical position, grasp it in the centre and pull it upwards until you hear a click (figure 8 A); to put the handle back in the rest position press both buttons at the
base of the handle at the same time and then turn it downwards (figure 8 B).
WARNING: Do not transport the carrycot with the handle in the middle or rest position, but only with the handle in carrying position.
WASHING
The hood, internal lining of the carrycot, and mattress are removable and may be washed; it is advised to carefully follow the washing instructions shown on the item's label.
9- Remove the hood of the carrycot following the instructions in point 3; then release the two press studs that fasten the metal arch to the fabric, and only pull out the metal arch by pulling it from one of the two ends (figure 9); do not pull out the rear arch with the 4 tabs for washing.
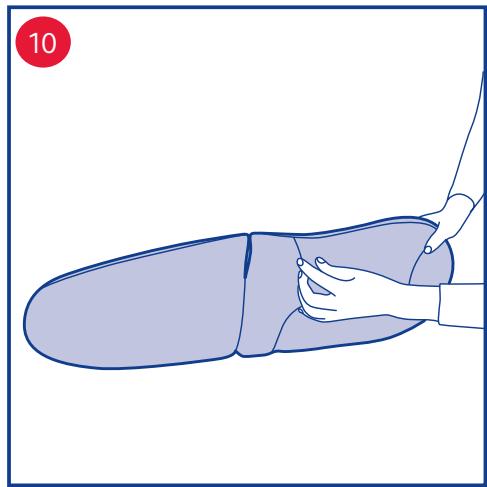
10- Remove the mattress padding through the opening located on the back of the cover (figure 10).
11- To remove the internal lining of the carrycot, slip the plastic band located in the baby's head zone, releasing the lateral press studs, velcro, and the two tabs in the feet area (figure 11).
The washing symbols and their significance are as follows:
Wash by hand in cold water
Do not bleach
Do not tumble dry
Do not iron
Do not dry clean
USING THE CARRYCOT AS A BABY CARRIAGE
This carrycot can be used as a baby carriage mounted on Chicco strollers that have the “Click Clak” system.
HOW TO ATTACH THE CARRYCOT TO THE STROLLER
Prepare the stroller, equipped with the Clik Clak system, to mount the carrycot as shown in the instructions of the specific stroller.
NB: For strollers equipped with a backrest or removable seat, it is advisable to unhook the backrest or seat as shown in the specific stroller instructions sheet.
12- Grip the carrying handle in the transport position and place the carrycot on the arms. The baby's feet end of the carrycot should be clos-
est to the stroller's handle (figure 12).
13- Align the pins on the two sides of the carrycot with the openings located on the arms of the stroller (figure 13 A), then carefully set down the carrycot until you hear the lock click (figure 13 B).
WARNING: Before using, make sure that the carrycot is properly locked on by pulling on it upwards.
REMOVING THE CARRYCOT
14- Bring the handle to its vertical position (transport mode) until you hear a click which means it is locked in place (figure 14).
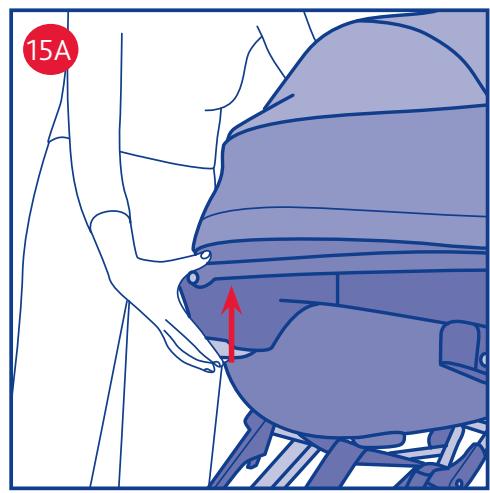
15- Push the button located on the front part of the baby carriage (figure 15 A), therefore, keeping the button pressed; lift the carrycot off of the structure (figure 15 B).
WARNING: The carrycot can be attached or removed with the baby in it; the said operations may be harder to perform due to the weight of the baby. Pay careful attention when performing the operations stated above.
WARNING: Incorrect attachment of the carrycot to the frame (e.g. mounting backwards) could result in malfunction of the locking system, making it impossible to remove: In this case, refer to the stroller instructions or contact Artsana Customer Service.
PARA MAIS INFORMAÇÕES:
INTERNE BEKLEDING EN BEDEKKING
RÅD FÖR RENGÖRING OCH SKÖTSEL
- ISTRUZIONI D'USO
- AVVISO IMPORTANTE
- AVVERTENZE
- WARNING
- CLEANING AND MAINTENANCE
- Cleaning
- Maintenance
- CARRYCOT FEATURES
- HOOD
- MOUNTING AND REMOVAL
- HOW TO USE THE HOOD
- INTERNAL COVERING AND COVER
- ADJUSTABLE BACKREST - COMFORT SYSTEM
- CARRYING HANDLE
- WASHING
- USING THE CARRYCOT AS A BABY CARRIAGE
- HOW TO ATTACH THE CARRYCOT TO THE STROLLER
- REMOVING THE CARRYCOT
- PARA MAIS INFORMAÇÕES:
- INTERNE BEKLEDING EN BEDEKKING
- RÅD FÖR RENGÖRING OCH SKÖTSEL
Brand : CHICCO
Model : SCOOP
Category : Baby stroller