
ENJOY FUN - Baby stroller CHICCO - Free user manual and instructions
Find the device manual for free ENJOY FUN CHICCO in PDF.

| Product type | Baby stroller with convertible carrycot |
| Brand | CHICCO |
| Model | ENJOY FUN |
| Maximum child weight (carrycot) | 9 kg |
| Recommended age (carrycot) | From birth to 5/6 months |
| Use as pram | Yes, on CHICCO strollers with Clik Clak system |
| Attachment system | Clik Clak (attachment and detachment via side buttons) |
| Canopy | Integrated with adjustable sun visor on multiple positions |
| Adjustable backrest | Yes, multiple levels by knob under carrycot |
| Removable cover | Yes, with snap buttons and side attachment |
| Carrying handles | Two fabric handles on sides, foldable with velcro |
| Reversible fabric | Yes (canopy and cover) |
| Washable | Canopy, inner lining and mattress washable (follow label) |
| Routine cleaning | Damp sponge and mild soap for fabric parts |
| Maintenance | Lubricate with silicone oil if necessary; avoid prolonged moisture |
| Usage precautions | Do not leave child unattended; avoid heat sources |
| Compatible accessories | Chicco toys references 71328, 71329, 71330 (fabric ring) |
| Spare parts | Use exclusively original CHICCO parts |
| Customer service | Chicco, Puériculture de France S.A.S - Phone +33(0)155932640 |
Frequently Asked Questions - ENJOY FUN CHICCO
User questions about ENJOY FUN CHICCO
0 question about this device. Answer the ones you know or ask your own.
Ask a new question about this device
Download the instructions for your Baby stroller in PDF format for free! Find your manual ENJOY FUN - CHICCO and take your electronic device back in hand. On this page are published all the documents necessary for the use of your device. ENJOY FUN by CHICCO.
USER MANUAL ENJOY FUN CHICCO
natural_image
Line drawing of a baseball cap with visible ribs and seat (no text or symbols)• ISTRUZIONI D'USO
• MODE D'EMPLOI
• GEBRAUCHSANLEITUNG
• INSTRUCTIONS FOR USE
• INSTRUCCIONES DE USO
• INSTRUÇÕES PARA A UTILIZAÇÃO
• GEBRUIKSAANWIJZINGEN
• ANVÄNDNINGSINSTRUKTIONER
• NÁVOD K POUŽITÍ
• INSTRUKCJE SPOSOBU UŻYCIA
• ΟΔΗΓΙΕΣ ΧΡΗΣΗΣ
• KULLANIM BİLGİLERİ
• ИНСТРУКЦИЯ ПО ЭКСПЛУАТАЦИИ
• РЪКОВОДСТВО ЗА ЕКСПЛОАТАЦИЯ
• تعليمات الاستعمال


natural_image
Illustration of a baby car with a side view showing front and back views (no text or symbols)
natural_image
Illustration of a hand washing a small blue appliance with control buttons (no text or symbols)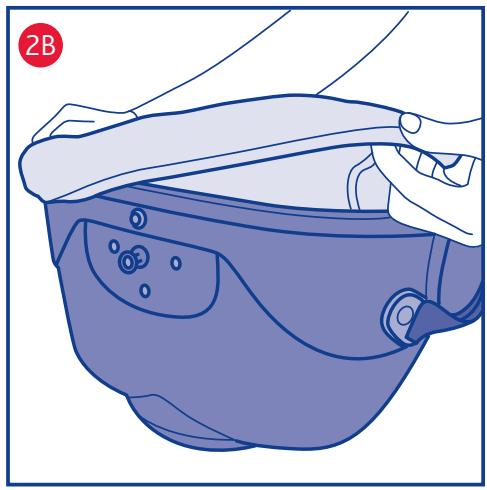
natural_image
Illustration of a person adjusting a blue helmet with a bandage, no text or symbols present
natural_image
Illustration of a blue-colored cap with a red circle highlighting a small point, labeled with number 3 (no text or symbols on the cap itself)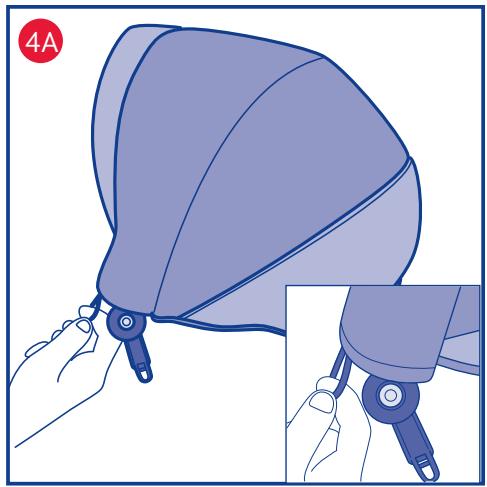
natural_image
Illustration of a hand holding a blue cap with a small inset showing the same grip (no text or symbols present)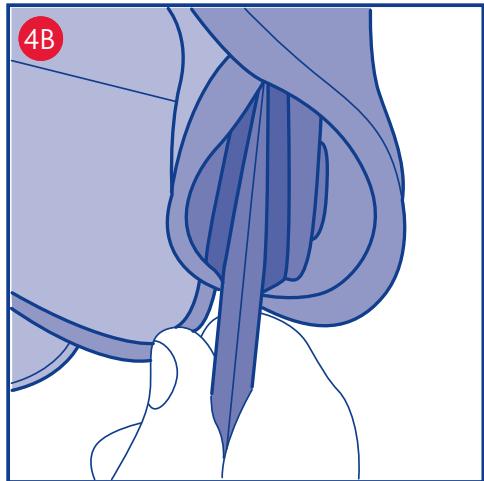
natural_image
Illustration of a surgical procedure on a human head, showing needle insertion and suturing (no text or symbols)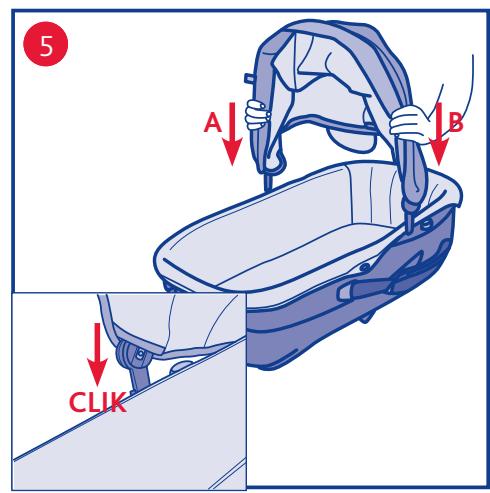

natural_image
Abstract blue line drawing of a stylized human head with a red dot on the shoulder area (no text or symbols)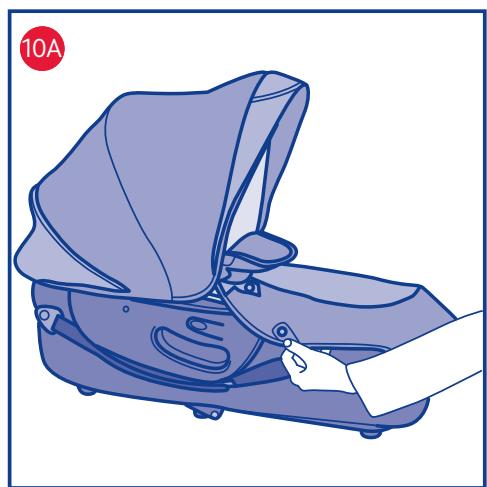
natural_image
Illustration of a hand holding a blue-colored suitcase with a red circular badge labeled '10A' (no text or symbols on the device itself)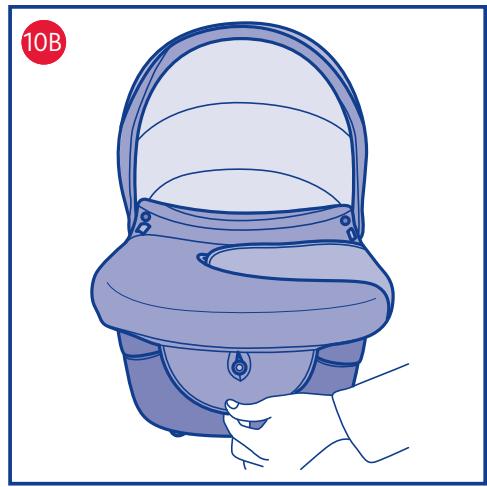
natural_image
Illustration of a hand holding a baby seat with a red circular label '10B' in the corner (no text or symbols on the diagram itself)
natural_image
Illustration of a person installing or adjusting a car interior panel (no text or symbols)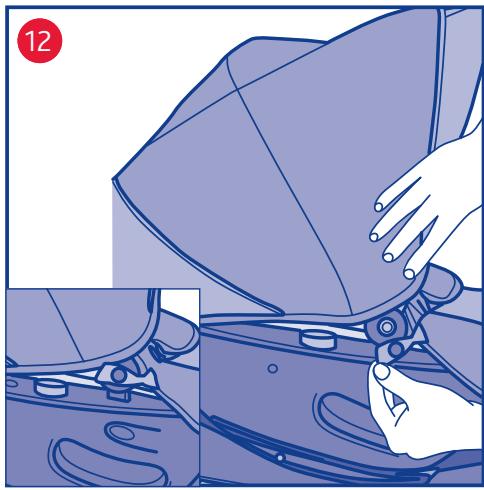
natural_image
Illustration of a hand adjusting a car seatbelt, showing mechanical components and a close-up view (no text or symbols)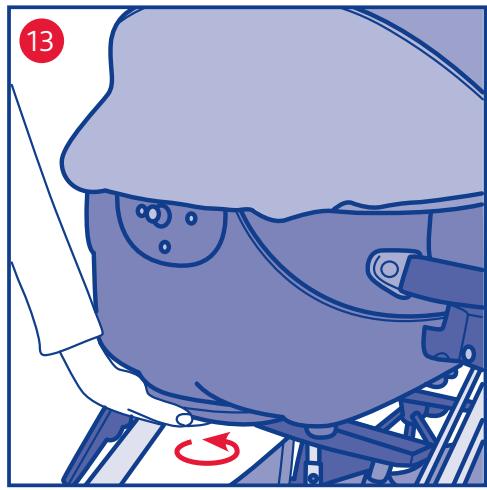
natural_image
Illustration of a person wearing a helmet and gear, with a red circular arrow indicating rotation (no text or symbols)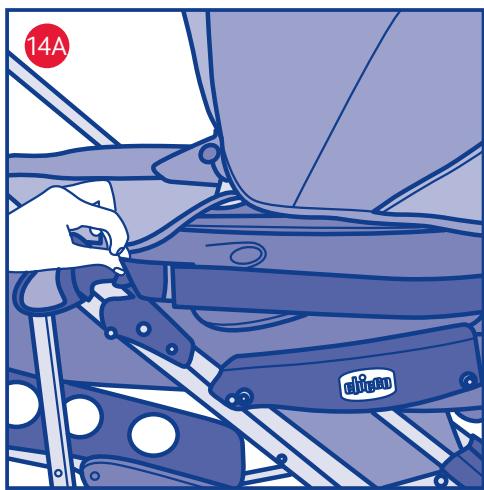
natural_image
Illustration of a person adjusting a seatbelt device (no text or symbols visible)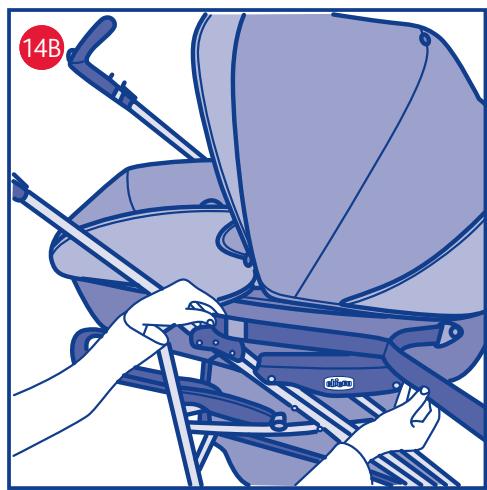
natural_image
Illustration of hands assembling a bicycle seat with tools, no text or symbols present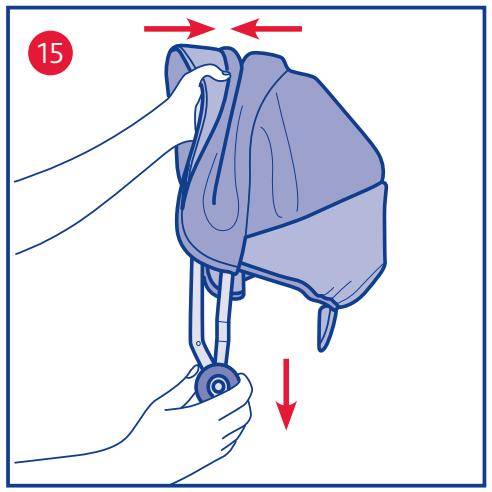


ISTRUZIONI D'USO
AVVISO IMPORTANTE
IMPORTANTE: PRIMA DELL'USO LEGGE- RE ATTENTAMENTE QUESTO LIBRETTO D'ISTRUZIONI PER EVITARE PERICOLI NELL'UTILIZZO E CONSERVARLO PER OGNI FUTURO RIFERIMENTO.
PER NON COMPROMETTERE LA SICUREZZA DEL VOSTRO BAMBINO SEGUITE ATTENTAMENTE QUESTE ISTRUZIONI.
ATTENZIONE: PRIMA DELL'USO RIMUOVE- RE ED ELIMINARE EVENTUALI SACCHETTI DI PLASTICA E TUTTI GLI ELEMENTI FACEN- TI PARTE DELLA CONFEZIONE DEL PRO- DOTTO O COMUNQUE TENERLI LONTANI DALLA PORTATA DI NEONATI E BAMBINI.
AVVERTENZE
IMPORTANT: PLEASE READ THESE INSTRUCTIONS CAREFULLY BEFORE USE AND KEEP THEM FOR FUTURE REFERENCE. YOUR CHILD'S SAFETY MAY BE AFFECTED IF YOU DO NOT FOLLOW THESE INSTRUCTIONS CAREFULLY.
CAUTION: BEFORE USE, REMOVE AND DISPOSE OF ALL PLASTIC BAGS AND PACKAGING MATERIALS AND KEEP THEM OUT OF REACH OF NEWBORN BABIES AND CHILDREN.
WARNING
- Please refer to the instructions booklet before using the stroller.
- WARNING: The carycot can be used for car transportation only if it is fitted with the “TRIO CAR KIT”. Please refer to the “TRIO CAR KIT” instructions booklet for all the information on how to fit the “TRIO CAR KIT” to the carycot or the carycot into the car, and on how to use the carycot during the journey.
- WARNING: before assembly, check that the product and all of its components have not been damaged during transportation. Should any part be damaged, torn or missing, do not use and keep out of reach of children.
- WARNING: This product is only suitable for a child who cannot sit up unaided or to
turn and stand up helping themselves with their hands and knees.
- Child's maximum weight: 9 Kg. Age: between 0 and 5/6 months.
- WARNING: Only use the car-cycot on a flat, horizontal, dry surface.
- WARNING: Do not let other children play unattended close to the carrycot.
- WARNING: Periodically check the carrycot and its frame for signs of damage or wear, in particular, the carry handle and the bottom. If the product is damaged or worn, do not use it and keep out of reach of children.
- WARNING: Do not use the carrycot if any of its parts are damaged, torn or missing.
- WARNING: Only use spare parts supplied or approved by Artsana S.p.A.
- WARNING: Do not fit to the carrycot any accessories, spare parts or components not supplied or approved by the manufacturer. Artsana S.p.A. declines all responsibility with regard to any changes made to the product.
- WARNING: Always be aware of the risks posed by flames or other sources of heat, such as electric or gas heaters, etc. Do not leave the carrycot near
similar sources of heat.
- WARNING: If you purchase a mattress separately, ensure that it can be fitted correctly to the carrycot. Do not use mattresses higher than 10 mm.
- WARNING: Do not leave in the carrycot objects that may reduce its depth.
- WARNING: This carrycot can only be used with the CHIC-CO strollers fitted with the CLIK CLAK system. Ensure that the carrycot is fitted correctly onto the stroller before placing the child into it.
- WARNING: Keep all plastic bags out of children's reach to avoid the risk of suffocation.
- WARNING: Products left in the sun may become very hot. Let the carrycot cool down before sitting your child in it.
- WARNING: Never leave your child unattended.
- WARNING: Never use the carrycot with a trestle.
- WARNING: Do not let your baby sleep in the carrycot for long periods of time: this product is not intended to replace a cot.
WARNING: When used as a pram body, remember that:
- The depth of the pram body measured from the top of the mattress to the top of the side of the body at, or at any posi-
tion within 300mm from, the harness attachment points, should not be reduced to less than 140mm when the mattress is in position;
- The matress purchased separately should conform to BS 1877 : Part 10.
TIPS FOR CLEANING AND MAINTENANCE
This product requires periodic maintenance. The cleaning and maintenance operations must only be carried out by an adult.
CLÉANING
Clean all the fabric parts with a damp sponge and neutral detergent, complying with the indications on the label. Use a soft cloth to clean the plastic parts on a regular basis. Always dry any metal parts that come into contact with water to prevent the formation of rust.
MAINTENANCE
Lubricate only if necessary, with a light application of a silicone based lubricant between the components. Always dry the metal parts to prevent the formation of rust. Do not soak in water. Use a soft cloth to clean the plastic parts on a regular basis. Remove all dust and sand from the parts that attach the carrycot to the pram, to avoid all friction. Never leave the product exposed to direct sunlight for long periods of time; this could discolour the fabrics.
CARRYCOT CHARACTERISTICS
INTERNAL LINING
1 – To fit the internal lining inside the carrycot: fasten the eyelets in the fabric to the side hooks (diagram 1).
2 – Then fit the fabric where the baby's head (diagram 2A) and feet (diagram 2B) will lie.
SUNHOOD
The carrycot is fitted with its own sun and wind hood that can be adjusted to various positions.
FITTING AND REMOVING THE SUN-HOOD
3 – Check that the clip at the centre of the metal arch is fastened to the button on the fabric part (diagram 3).
4 – There is a piece of elastic at each end of the arch, inside the fabric (diagram 4A). Fasten the elastic to each end of the arch to guarantee a more secure hold for the hood, as seen in Diagram 4B.
5 - Insert the two ends into slots A and B in the middle of the carrycot until they click into place (diagram 5).
6 – Slide the eyelet over hook to fasten the back of the sunhood in place (diagram 6).
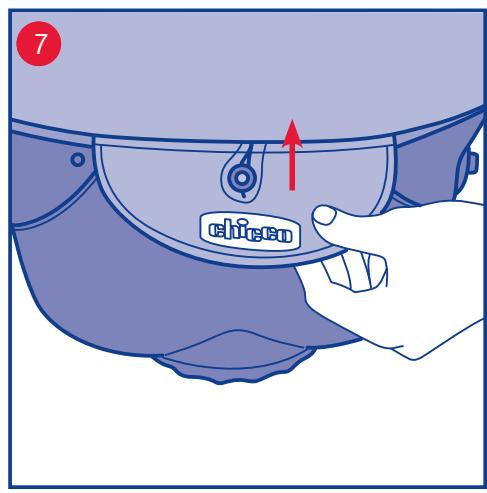
7 – To remove the sunhood, unfasten the eyelet from the hook at the back (diagram 7).
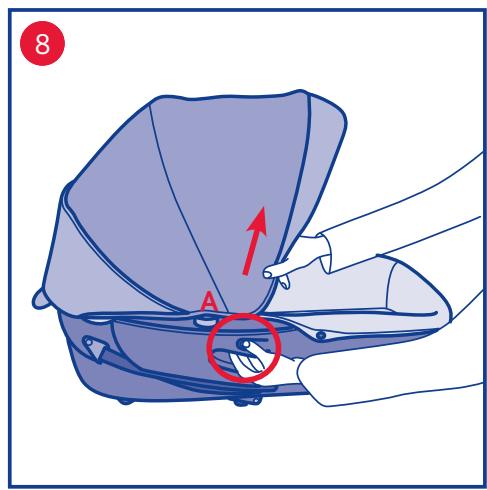
8 – Then press button A (diagram 8) whilst pulling the arch upwards.
VISOR
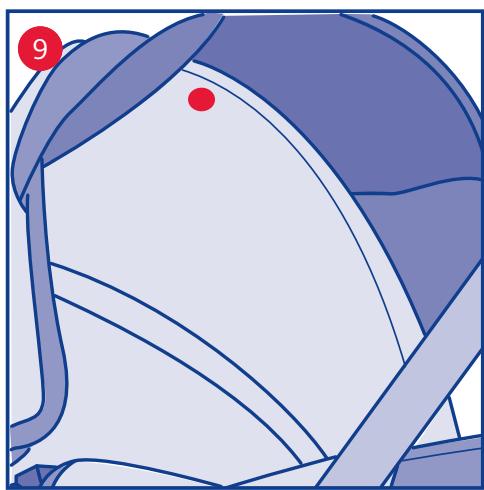
9 – Inside the sunhood, there is a fabric ring between the visor and the first section, which can be used to hang the soft toys fitted with practical clips (diagram 9).
WARNING – only use Chicco toys with the following codes: 71328, 71329, 71330
FITTING THE COVER
10 – Slide the eyelets over the side hooks (diagram 10A) and the hook at the bottom (diagram 10B) where the baby's feet will lie.
11 – Then fasten the side flaps using the buttons (diagram 11).
12 – To guarantee best draught-proof coverage, fasten the side clips to the sunhood (diagram 12).
COMFORT SYSTEM – ADJUSTABLE BACKREST
The backrest of the carrycot can be adjusted to various positions.
13 – To raise and lower the backrest, turn the knob on the outside of the carrycot where the baby's head will lie (diagram 13).
WARNING: It is recommended to air the carry-cot when it has been used for a long time.
CARRYCOT HANDLES
14 – The carrycot has fabric carrying handles fitted on both sides (diagram 14A). The handles can be opened and closed together using the Velcro fasteners (diagram 14B).
WASHING
The sunhood, the internal lining and the mattress are all washable. Remove the slipcovers from the sunhood and the internal lining to wash them. Please carefully follow the washing instructions indicated on the labels.
15 – Remove the sunhood from the carrycot following the instructions in the “Fitting and removing the sunhood” section, then unbutton the metal arch from the fabric (diagram 3) and pull the metal arch to remove it; use the other hand to press the arches together which will make it easier to remove them (diagram 15).
Please find below the washing symbols and relative meanings:

Hand wash in cold water

Do not bleach

Do not use a dryer

Do not iron

Do not dry clean
REVERSIBLE FABRIC
The carrycot fabric lining is reversible. Both the sunhood and the cover can be fitted either side up, using the colours you prefer.
USING THE CARRYCOT AS A PRAM
This carrycot can be used as a pram when assembled on a Chicco stroller frame fitted with the “Clik Clak” system.
Prepare the stroller frame, fitted with the “Clik Clak” system, to fit the carrycot as indicated in
the stroller instructions.
NB: for strollers which have removable backrests or seats, it is recommended to remove the backrest or seat following the instructions provided in the stroller user manual.
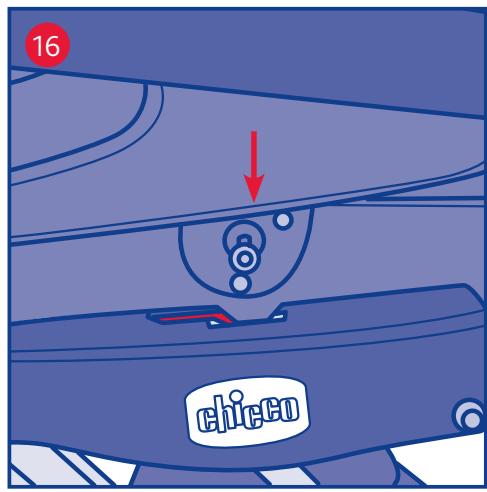
16 - Align the rods on both sides of the carrycot with the slots on the stroller armrests (diagram 16).
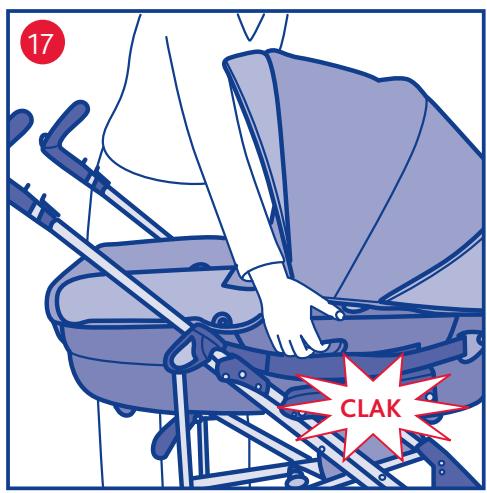
17 - Then lower the carrycot until it clicks into place (diagram 17).
WARNING: pull the carrycot upwards to check it is firmly fastened in place before using it.
UNFASTENING THE CARRYCOT
18 – Press the release buttons on the side of the carrycot (diagram 18), and then lift the carrycot up whilst pressing the buttons.
WARNING: the carrycot can be fastened and unfastened with the baby inside; these procedures could prove more difficult due to the weight of the baby. Be very careful when performing the above indicated procedures.
WARNING: incorrect fastening of the carrycot to the stroller frame (for instance back to front) can cause the "Clik Clak" system to malfunction, making it impossible to remove the carrycot: In such cases, follow the instructions in the stroller manual or contact the Artsana Customer Care Service.
For further information:
Artsana S. P. A.
Servizio Clienti
RÅD FÖR RENGÖRING OCH SKÖTSEL
MONTÁŽ A DEMONTÁŽ STŘÍŠKY
- ISTRUZIONI D'USO
- AVVISO IMPORTANTE
- AVVERTENZE
- WARNING
- TIPS FOR CLEANING AND MAINTENANCE
- CLÉANING
- MAINTENANCE
- CARRYCOT CHARACTERISTICS
- INTERNAL LINING
- SUNHOOD
- FITTING AND REMOVING THE SUN-HOOD
- VISOR
- FITTING THE COVER
- COMFORT SYSTEM – ADJUSTABLE BACKREST
- CARRYCOT HANDLES
- WASHING
- REVERSIBLE FABRIC
- USING THE CARRYCOT AS A PRAM
- UNFASTENING THE CARRYCOT
- RÅD FÖR RENGÖRING OCH SKÖTSEL
- MONTÁŽ A DEMONTÁŽ STŘÍŠKY
Brand : CHICCO
Model : ENJOY FUN
Category : Baby stroller