42500 - Jigsaw Power Craft - Free user manual and instructions
Find the device manual for free 42500 Power Craft in PDF.


| Product Type | Jigsaw |
| Brand | Power Craft |
| Model | 42500 |
| Power Rating | 710 W |
| Voltage | 230 V ~ 50 Hz |
| No-Load Speed | 0 – 3000 RPM |
| Max Cutting Depth | 80 mm |
| Bevel Capacity | 0° to 45° |
| Pendulum Action Settings | 3 settings (off, low, high) |
| Dust Extraction Port | Yes |
| Parallel Guide | Included, adjustable |
| Blade Change Mechanism | Screw clamping with Allen key |
| Lock-On Button | Yes |
| Variable Speed Control | Yes |
| Blade Guard | Yes |
| Suitable Materials | Wood, metal, plastic, masonry (with precautions) |
| Carbon Brushes | Replaceable |
| Included Accessories | Parallel guide, Allen key, dust extraction adapter |
| Certifications | CE, EN standards |
| Country of Origin | China (P.R.C.) |
| Importer | HP Værktøj A/S, Denmark |
Frequently Asked Questions - 42500 Power Craft
User questions about 42500 Power Craft
0 question about this device. Answer the ones you know or ask your own.
Ask a new question about this device
Download the instructions for your Jigsaw in PDF format for free! Find your manual 42500 - Power Craft and take your electronic device back in hand. On this page are published all the documents necessary for the use of your device. 42500 by Power Craft.
USER MANUAL 42500 Power Craft
natural_image
Power TJG craft manual with 710 watt power, no visible text or symbols on the device itself
Fremstillet i P.R.C.
6001 - Jiangsu JinDing, Jiangsu
EU-Importør:
HP Værktøj A/S
7080 Børkop
Danmark
Manufactured in P.R.C.
6001 - Jiangsu JinDing, Jiangsu
EU importer:
HP Værktøj A/S
7080 Børkop
Denmark
All rights reserved. The content of this user guide may not be reproduced in part or whole in any way, electronically or mechanically (e.g. photocopying or scanning), translated or stored in a database and retrieval system without the prior written consent of HP Værktøj A/S.

Produsert i P.R.C.
6001 - Jiangsu JinDing, Jiangsu
EU-importør
HP Værktøj A/S
7080 Børkop
Danmark
To get the most out of your new jig saw, please read through these instructions and the attached safety instructions before use. Please also save the instructions in case you need to refer to them at a later date.
Technical data
Voltage: 230 V \~ 50 Hz
Power rating: 710 W
Motor speed (free-running): 0 -3000 RPM
Max. depth/item thickness: 80 mm
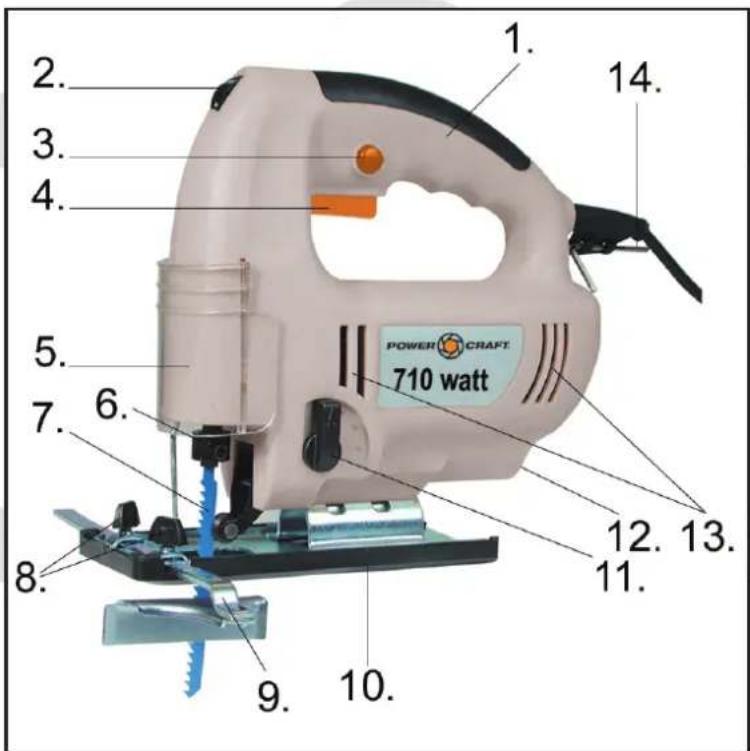
Main components
- Handle
- Speed selector
- Lock button
- On/off button
-
Blade guard
-
Blade holder
- Saw blade
- Adjustment screws for parallel guide
- Parallel guide
- Soleplate
- Pendulum regulation knob
- Dust exhaust
- Ventilation slots
- Allen key
Special safety precautions
Do not use for cutting pipes or cables.
Do not use cracked, blunt or damaged blades.
Do not start the saw if no blade is fitted.
Check there are no obstructions in/on the surface under the item to be cut.
Do not attempt to cut items thicker than the maximum cutting depth of the blade, or where there is insufficient space for the blade under the item.
INSTRUCTION MANUAL
The saw's metal parts may become conductive if the saw comes into contact with a live wire. Therefore only hold the saw by its insulated handle.
Check that the ventilation slots are not blocked.
Always use a face mask if excessive amounts of dust are generated or cutting harmful materials.
Never remove dust, obstructions or the like from the work area while the blade is operating.
Never stop the saw blade by applying pressure to the saw or to the side of the blade.
Do not lift the saw from the item being cut if the blade is still running.
Never place the saw on a table or workbench if it has not stopped completely. The saw blade will continue to run a short time after the machine has been switched off.
Do not touch the blade or metal filings until they have cooled.
Replacing saw blades
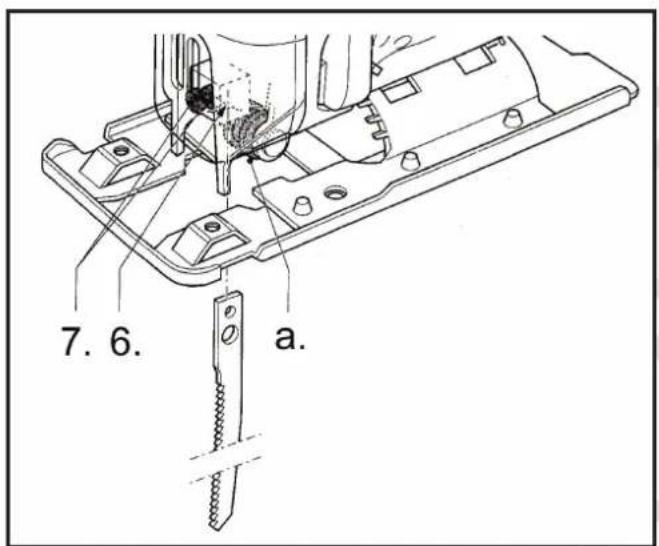
Disconnect the saw from the mains.
Lift blade guard (5), and slacken the two blade screws using the Allen key (13).
Remove the blade from the holder (6), insert a replacement and retighten the screws. The teeth should point upwards and the back of the blade must fit in the groove of the wheel (a) at the back of the blade holder.
Lower blade guard.
Pull the saw blade to check that it is correctly positioned and locked in place.
Connect to mains electricity.
Retain Allen key in holder on saw to avoid losing it.
Use
Adjusting the soleplate
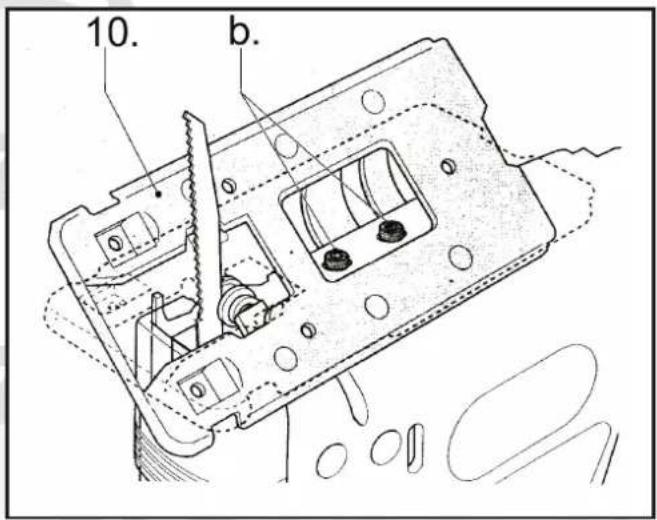
The soleplate (10) can be adjusted 45^ in relation to the saw direction to facilitate contour sawing. Loosen the two Allen bolts under the soleplate, adjust the plate to the desired angle and retighten the screws.
Angle set can be seen on scale on top of soleplate. Setting the parallel guide
Fit parallel guide (9) to soleplate. Fasten at distance required from sole by tightening the two adjustment screws (8).
INSTRUCTION MANUAL
Dust extraction
Connect dust exhaust (12) to extraction system (if available) using adapter supplied.
Start, stop and speed control
Adjust the saw's maximum speed by turning the speed selector switch (2) to the desired position. Speed can also be adjusted whilst saw is in use.
Check blade guard is lowered.
Start the machine by depressing the on/off button (4).
The blade will move up and down.
The saw can be kept running for long periods by pressing the lock button (3). The lock button can be released by pressing the on/off button in as far as it will go.
Switch off by releasing the on/off button.
Adjusting the pendulum regulator
The saw blade pendulum (counterweight) has three settings which can be selected using the pendulum regulation knob (11). The settings can be used to adjust cutting speed to the type of material to be cut.
- Use a low pendulum speed or switch the function off if a very fine cut is required.
- Switch the function off if working on very thin materials, such as sheet metal.
- Use a low setting if working on hard materials, such as steel.
- Use the maximum setting when working on soft materials and when sawing with the grain.
General
Never use a blade unsuitable for the task and item to be cut.
Hold the saw in front of you with a firm grip on the handle (1).
Ensure that the saw blade is not touching anything and that the power cable is not in the way when starting the saw.
Make sure that the material is clamped tight, and that the saw line is clearly marked.
Start the saw. Place the soleplate on the item, and let the saw blade touch the saw line.
Saw, but do not place more pressure on the blade than is necessary. Avoid lateral pressure on the blade.
Special notes on jig sawing
Place the soleplate on the item so the saw blade is vertical and correctly positioned in relation to the saw line without touching it.
Start the saw and tilt it carefully while supporting it using the soleplate until the blade touches the item at the saw line.
Let the blade work through the item, continuing to tip the saw downwards until the sole is flush to the item and the blade is perpendicular to it. If necessary, drill a hole of suitable diameter in the item for use as starting point.
Sawing wood
Check that the item does not contain nails or other metal objects.
Sawing metal
We recommend lubricating the material and saw blade with cutting oil to protect the tool and avoid overheating. Support the item with wooden blocks on either side.
Sawing plastic
Never cut using maximum speed.
Make a test cut first to check if the material can tolerate the heat generated by sawing.
Sawing masonry
Harmful dust can be caused by cutting certain materials. Always wear a mask.
Maintenance
Check all screws on the saw regularly, particularly those that hold the blade. Tighten if required.
Check regularly that the carbon brushes are in a good condition. If the carbon brushes are worn down, they should be replaced.
INSTRUCTION MANUAL
Cleaning
Wipe the saw using a well-wrung cloth after use, and always keep the surface and ventilation holes (12) free of dirt. Keep the soleplate free of dirt to avoid the saw cutting incorrectly.
Never use corrosive or abrasive cleaning agents, as they may attack the plastic parts of the saw.
Environmental information
You can help protect the environment! Follow local environmental regulations: Dispose of unwanted electrical equipment at an approved refuse disposal centre.

GEBRAUCHSANWEISUNG
Einführung
PART LIST
| Number | Name | Quantity |
| 1 | Label | 1 |
| 2 | Screw | 2 |
| 3 | Screw | 9 |
| 4 | Right housing | 1 |
| 5 | Screw | 2 |
| 6 | Baseplate anchorage | 1 |
| 7 | Screw | 6 |
| 8 | Baseplate | 1 |
| 9 | Screw | 2 |
| 10 | Al baseplate | 1 |
| 11 | Nut | 2 |
| 12 | Limiter | 1 |
| 13 | Soft grip | 1 |
| 14 | Stator | 1 |
| 15 | Bearing | 1 |
| 16 | Carbon brush | 2 |
| 17 | Armature | 1 |
| 18 | Bearing | 1 |
| 19 | Rubber pole | 1 |
| 20 | Washer | 1 |
| 21 | Middle support | 1 |
| 22 | Blade lifting support | 1 |
| 23 | Blade lifting balance | 1 |
| 24 | Needle column | 4 |
| 25 | Needle bearing | 2 |
| 26 | Eccentricity gear | 1 |
| 27 | Gear washer | 1 |
| 28 | Spring washer | 1 |
| 29 | Needle bearing | 1 |
| 30 | Needle cover | 1 |
| 31 | Slide guide | 1 |
| 32 | Reciprocating pole | 1 |
| 33 | Spring | 1 |
| 34 | Cable and plug | 1 |
| 35 | Hex spanner | 1 |
| 36 | Cable sheath | 1 |
| 37 | Cord anchorage | 1 |
| 38 | Switch | 1 |
| 39 | Trigger | 1 |
| 40 | Left housing | 1 |
| 41 | Speed controller PCB | 1 |
| 42 | Capacitor | 1 |
| 43 | PCB | 1 |
| 44 | Shaft | 1 |
| 45 | Dustproof block | 1 |
| 46 | Bracket | 1 |
| 47 | Fixing pin | 1 |
| 48 | Sensor | 1 |
| 49 | Flashboard | 1 |
| 50 | LBD | 1 |
| 51 | Backup ring | 1 |
| 52 | Guide wheel | 1 |
| 53 | Pin | 1 |
| 54 | Pole | 1 |
CE-ERKLÆRING
CE mark placed: 2007
EC-DECLARATION OF CONFORMITY
Hereby, on our own responsibility declare that:
Is manufactured in compliance with the following:
98/37/EC: Safety of machinery with amendments.
06/95/EEC: Low voltage directive.
89/336/EEC: EMC- directive + (amendments 93/68/EEC)
STANDARDER, NORMER, NORMER, NORMIT, STANDARDS, NORMEN:
EN 50144-2-10:1996+prA1:1996+prAB:1998 - EN 50144-1:1998 - EN 61000-3-3:1995
EN 50144-2-10:2001 - EN 55014-1:1993/A1:1997 - EN 61000-3-2:1995/A2:1998 -
EN 55014-2:1997
- Technical data
- Main components
- Special safety precautions
- INSTRUCTION MANUAL
- Use
- Dust extraction
- Adjusting the pendulum regulator
- General
- Special notes on jig sawing
- Sawing wood
- Sawing metal
- Sawing plastic
- Sawing masonry
- Maintenance
- Cleaning
- Environmental information
- GEBRAUCHSANWEISUNG
- Einführung
- PART LIST
- CE-ERKLÆRING
- STANDARDER, NORMER, NORMER, NORMIT, STANDARDS, NORMEN:
Brand : Power Craft
Model : 42500
Category : Jigsaw