68052 - Jigsaw Power Craft - Free user manual and instructions
Find the device manual for free 68052 Power Craft in PDF.


| Product Type | Jigsaw |
| Brand | Power Craft |
| Model | 68052 |
| Power Source | Corded Electric |
| Power Rating | 500 W |
| Speed Settings | Variable speed (800-3000 SPM) |
| Orbital Action | 4 positions adjustable |
| Blade Change System | Tool-less keyless chuck |
| Cutting Capacity (Wood) | 90 mm |
| Cutting Capacity (Steel) | 10 mm |
| Cutting Capacity (Aluminum) | 20 mm |
| Bevel Cuts | 45° left and right |
| Dust Blower | Integrated with on/off control |
| Dust Extraction | Compatible with external vacuum (port) |
| Weight | 2.1 kg |
| Dimensions (L x W x H) | 240 x 80 x 200 mm |
| Power Cord Length | 2.5 m |
| Safety Features | Lock-off switch, blade guard |
| Maintenance | Clean dust, lubricate occasionally; check carbon brushes |
| Spare Parts Available | Blades, carbon brushes, base plate, dust nozzle |
Frequently Asked Questions - 68052 Power Craft
User questions about 68052 Power Craft
0 question about this device. Answer the ones you know or ask your own.
Ask a new question about this device
Download the instructions for your Jigsaw in PDF format for free! Find your manual 68052 - Power Craft and take your electronic device back in hand. On this page are published all the documents necessary for the use of your device. 68052 by Power Craft.
USER MANUAL 68052 Power Craft
Instruction manual 27
D
MOTORSÄGE
natural_image
Red chain-link electric saw with black handle and silver blade, isolated on white background (no text or symbols visible)
Fremstillet i P.R.C.
6001 - Zhejiang Yongkang, Zhejiang
EU-Importør:
HP Værktøj A/S
7080 Børkop
Danmark
Manufactured in P.R.C.
6001 - Zhejiang Yongkang, Zhejiang
EU importer:
HP Værktøj A/S
7080 Børkop
Denmark
All rights reserved. The content of this user guide may not be reproduced in part or whole in any way, electronically or mechanically (e.g. photocopying or scanning), translated or stored in a database and retrieval system without the prior written consent of HP Værktøj A/S.

Produsert i P.R.C.
6001 - Zhejiang Yongkang, Zhejiang
EU-importør
HP Værktøj A/S
7080 Børkop
Danmark
natural_image
Hand using a tool to adjust or install components on a mechanical component (no visible text or symbols)To get the most out of your new chain saw, please read this manual and safety instructions before use. Please also save the instructions in case you need to refer to them at a later date.
Technical specifications
Stroke volume: 38 cm3
Engine power output: 1.2 kW
Blade length: 405 mm
Speed: 2600 RPM
Fuel tank capacity: 0.31 l
Fuel: Oil/petrol mixture 4 %
Chain oil tank capacity: 0.21 l
Chain oil: SAE 10W-30
Adjustable chain lubrication
Main components
-
Blade
-
Chain
-
Protective shield
-
Front handle
-
Antifrost function (behind engine compartment)
-
Finger screw for air filter cover
-
Choke lever (to right of handle)
-
Start switch
-
Starter handle
-
Safety switch
-
Rear handle
-
Throttle lever
-
Petrol filler cap
-
Oil filler cap
-
Ventilation slots
-
Chain tension screw
A blade sleeve is also included (not illustrated)

Special safety instructions
Handling petrol:
Engine uses two stroke fuel. Never use pure leaded petrol, diesel or other fuels.
Ensure there is sufficient ventilation when mixing and filling fuel.
Store fuel out of the reach of children and in a clearly marked, approved container.
Ensure the petrol and oil are well mixed before filling.
Remove any spilt fuel with a dry cloth after fuelling.
Smoking and use of naked flame during fuelling is forbidden.
Never fill up with fuel or engine oil when the engine is running.
Never fill up with fuel or engine oil in a closed room.
Do not overfill fuel or oil, as this can cause a risk of fire.
Check that the fuel cap is tightly closed as fuel leaks can cause a risk of fire.
Use
Store inflammable materials at a safe distance from the engine as exhaust gases are very hot.
The engine becomes very hot when in use. Avoid touching it and beware of the saw setting light to inflammable materials (dry grass, dry leaves etc) whilst the engine is hot.
For outdoor use only. Exhaust gases contain carbon monoxide and hydrocarbons that are highly dangerous for humans and animals if inhaled.
Never use in high winds or heavy rain or in poor visibility.
Never use when standing on a ladder or the like and do not climb trees whilst carrying the saw, unless you are specially trained to do so. Always ensure you are standing firmly and safely on the ground.
Watch your footing when using the saw. Sawn branches on the ground represent a safety risk if you trip over them while sawing.
Plan what you are going to do before starting work. Check that you and others will not be hit by falling branches or the like.
Check that there are no nails, screws or other objects that could damage the blade in the item to be cut, and that the surface under the item will not hinder cutting.
Using the saw
Never allow children to use the saw.
For sawing wood only.
Ensure there is sufficient chain oil in the tank and that the chain is well lubricated.
Always use ear-protectors, protective glasses, overalls and safety footwear when using the saw.
Never use the saw if the throttle lever, safety switch and protective shield do not function correctly. Do not obstruct or in any way prevent the function of the protective shield. Switch saw off before activating chain brake.
Never start the engine if the air filter is not fitted or if the silencer is defective.
Always follow the engine maintenance instructions under Cleaning and Maintenance.
Always use protective gloves when handling the chain. Keep the chain well away from your body, hands and fingers whilst it is running.
Ensure the chain is not in contact with anything before starting the engine.
Hold the saw with a hand on each handle when in use.
Never leave the saw unattended while it is running.
Do not allow other personnel or animals to come within a radius of 3 metres of the saw while it is running.
Always saw using the underside of the blade whenever possible.
INSTRUCTION MANUAL
Caution: the saw can vibrate very heavily, or kick back when cutting with the end of the blade.
Ensure that you do not accidentally cut power or telephone cables, and always make sure there are no other people or animals in the vicinity when starting or using the saw.
Remember that the engine noise can prevent you from hearing other noises. Be aware of your surroundings while using the saw.
Do not lift the saw from the item being cut if the chain is still running. Caution: If the saw stops with the blade in the item, it can pull the operator forward.
Stop the engine immediately if engine problems occur.
Stop the engine and remove the cable from the spark plug before removing any trapped items from the blade and before cleaning or maintenance.
Never put the saw down before it has completely stopped running. The chain will continue to run a short time after you release the throttle lever.
A thick pair of work gloves can reduce vibrations in your hands. Take a break of 10-20 minutes for every 50 minutes work with the saw.
Always replace the protective sleeve on the blade when transporting or storing the saw. Check for fuel leaks during transport or storage.
Assembly and preparation
Fitting blade and chain
Push the protective shield (3) forward to activate the chain lock.
Remove the lock nuts from the chain guard (a). Remove guard.
Fit chain (2) on blade (1). Check that the chain will run in the right direction. Check that the chain tensioner (b) fits into its hole on the blade. Turn the screw (16) if required until it does so.

Fit chain around the sprocket, and check it is fitted properly. Fit blade on guide bolt and chain tensioner bolt.
Replace the chain guard and lock nuts.
Tightening the chain
Adjust chain tension by turning the chain tensioner screw with a screwdriver. Turn the screw clockwise to tighten the chain, and anticlockwise to slacken. There should be 5 mm of play in the chain when lifted from the blade.
Filling petrol
Remove the petrol filler cap (13) and fill tank with petrol (unleaded petrol and two stroke oil at a ratio of 25:1). Replace the cap and screw tightly.
Filling chain oil
Remove the oil filler cap (14) and fill tank with chain oil. Replace the cap and screw tightly.
Automatic chain lubrication
Start the saw, and check that the automatic chain lubrication is working (fresh oil appears on the chain). If it is not, remove the chain and blade (see above) and clean the oil feed hole (above the chain tensioner). If this does not help, take the saw to an authorised repair shop.
Starting and stopping engine
Cold engine start:
Push the start button (8) to position I. Pull choke lever (7) fully out.
INSTRUCTION MANUAL


Place the saw on the ground, hold securely and pull the starter handle (9) sharply.
When the engine has started, push the choke halfway in.
Press the throttle lever (12) lightly and allow engine to warm up at low revs. Push choke fully in.
Warm engine start
Warm engine start procedure is the same as for cold, except that you do not need to pull the choke out fully. Pull halfway out and start engine using the starter handle.
Stopping the engine
Release throttle and allow the engine to idle for a couple of minutes.
Push the start button to position 0.
Sawing
Check that the saw is correctly set up and that all handles and bolts are correctly tightened before starting to saw.
Start the engine.
Hold the saw with both hands by the handles (4 and 11). Raise blade up to working area.
Press safety switch and throttle lever simultaneously. If you release either of them, the saw will stop.
Begin sawing when the chain has reached the desired speed.
Thin branches can be sawn with one cut. To prevent shredding and breaking, cut branches in several sections.
When sawing thicker branches, cut the underside first to prevent it breaking off, and then the upper side. Continue until your final cut is closest to the trunk. It may be necessary to seal the raw stump to prevent sap seepage.
Use a stable saw horse when sawing logs or the like.
Release the throttle immediately if the chain gets stuck. If the chain catches, causing the blade to kick back, the chain brake will activate by the protective shield flipping forwards. Release the brake by pushing the shield upright once more. Switch saw off before activating chain brake.
The chain can expand when hot. Check regularly to see if the chain needs tightening, to avoid it coming off the blade. If the chain is tightened whilst it is hot, it must be loosened again when cool.
Replacing the chain
Remove the chain and blade as described under Assembly and Preparation.
Take the chain off the blade, clean the blade, plastic guard and engine housing thoroughly with compressed air or a brush. Take special care to clean the oil feed to the blade.
Check for blade wear and replace if necessary.
Note! Do not dispose of used chains in your domestic refuse. Dispose of them correctly in accordance with local legislation.
Fit the new chain onto the blade.
Cleaning and maintenance
The saw can be cleaned by wiping its exterior parts with a damp cloth. Ensure the ventilation slots (15) are kept free of dust and dirt.
Never use corrosive or abrasive cleaning agents, as they may attack the plastic parts of the saw.
Always make sure the chain guide on the blade is free of sawdust and bark splinters to ensure correct lubrication. Use compressed air to keep the guide clear. Remove the chain to clean the guide if it cannot be cleaned satisfactorily with the chain on.
INSTRUCTION MANUAL
Sharpen the teeth using a chainsaw file or grinder. Be very careful when sharpening the teeth! Replace the chain when the teeth are worn down to the mark.
Fill the chain oil tank as required.
Check for blade and sprocket wear and replace if necessary.
Cleaning the air filter
Remove the filter by slackening the finger screw (6) and removing the filter cover. Clean the filter cover and element using compressed air and reinstall. If the filter element cannot be cleaned properly, replace it.
Cleaning fuel and chain oil filters
Use a length of wire or the like to remove the filter from the fuel or oil tank (procedure for fuel tank illustrated (c)). Rinse thoroughly with petrol or replace. Do not allow dust or dirt to get into the tanks when cleaning.

natural_image
Hand using a tool to adjust or install components on a mechanical component (no visible text or symbols)Cleaning the spark plug
Remove spark plug with a spark plug socket. Remove carbon deposits with a wire brush. Check electrode gap is 0.6 to 0.7 mm, and adjust if necessary.

Carburetor adjustment
If the saw is not running smoothly, engine speed can be fine-tuned at the carburetor. Clean air, fuel and chain oil filters first and check that petrol and chain oil tanks are filled correctly.
Stop engine, and screw L- and H- screws (d and e) in as far as they will go. Unscrew them a little as follows:
L-screw 1½ turns +/- 1/4
H-screw 3/4 turn +/- 3/8
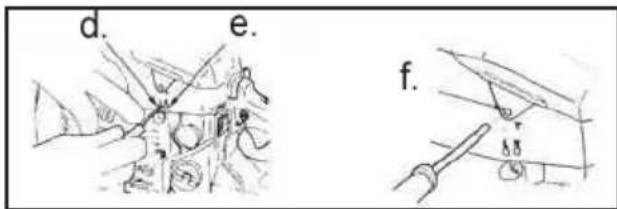
Start the engine and allow to warm up.
Turn the L-screw clockwise to find the point at which idling speed is highest, and then turn a quarter turn back.
Turn the T-screw (f) anticlockwise until the chain stops.
If idling speed is too low, turn the screw clockwise.
Perform a test cut with the saw and adjust the H-screw until performance (not RPM) is satisfactory.
INSTRUCTION MANUAL
Activating antifrost mechanism
If using the saw in sub-zero temperatures, activate the antifrost mechanism to optimise performance.
Stop the engine.
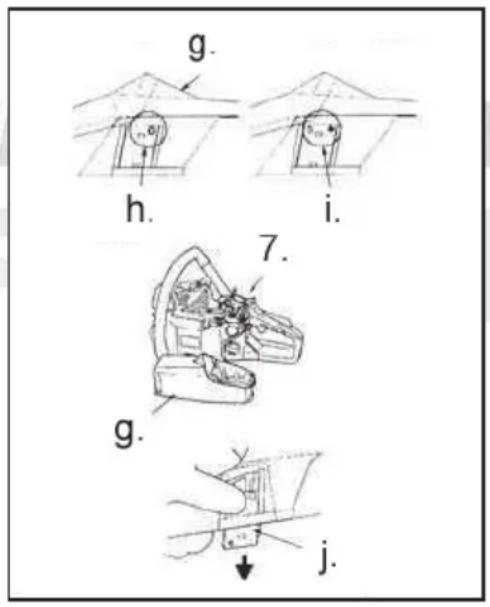
Remove air filter cover and filter. Remove choke lever from cylinder cover (g).
Slacken cylinder cover screws and remove cover.
Press the antifrost button (j) on the right side of the cylinder cover.
Check the snowflake symbol on the (i) button faces upwards and replace the cylinder cover.
Replace all other parts.
When using the saw under normal conditions, adjust the antifrost button so that the sun symbol (h) faces upwards. Failure to do so can cause engine damage.
GEBRAUCHSANWEISUNG
Einführung
CE mark placed: 2005
EC-DECLARATION OF CONFORMITY
Hereby, on our own responsibility declare that:
Is manufactured in compliance with the following:
98/37/EC: Safety of machinery with amendments.
73/23/EEC: Low tension directive.
89/336/EEC: EMC- directive + ( amendments 93/68/EEC )
STANDARDER, NORMER, NORMER, NORMIT, STANDARDS, NORMEN:
EN ISO 11681-1:2004 - EN 55012:2002 - EN 61000-6-1:2001
- MOTORSÄGE
- Technical specifications
- Main components
- Special safety instructions
- INSTRUCTION MANUAL
- Assembly and preparation
- Tightening the chain
- Filling petrol
- Filling chain oil
- Automatic chain lubrication
- Starting and stopping engine
- Cold engine start:
- Sawing
- Replacing the chain
- Cleaning and maintenance
- Activating antifrost mechanism
- GEBRAUCHSANWEISUNG
- Einführung
Brand : Power Craft
Model : 68052
Category : Jigsaw