
SPO 910 A1 - Uncategorized SILVERCREST - Free user manual and instructions
Find the device manual for free SPO 910 A1 SILVERCREST in PDF.

| Product type | Household appliance |
| Model | SPO 910 A1 |
| Brand | SilverCrest |
| Dimensions (approx.) | 30 x 25 x 20 cm |
| Weight (approx.) | 1.2 kg |
| Power supply | 220-240 V, 50 Hz |
| Power consumption | 500 W |
| Main functions | On/Off, variable speed |
| Material | Plastic housing, metal components |
| Safety features | Automatic shut-off, safety lock |
| Cleaning | Wipe with damp cloth, do not immerse |
| Spare parts | Available via customer service |
| Repairability | Repairable by authorized service |
| Warranty | 2 years |
Frequently Asked Questions - SPO 910 A1 SILVERCREST
User questions about SPO 910 A1 SILVERCREST
0 question about this device. Answer the ones you know or ask your own.
Ask a new question about this device
Download the instructions for your Uncategorized in PDF format for free! Find your manual SPO 910 A1 - SILVERCREST and take your electronic device back in hand. On this page are published all the documents necessary for the use of your device. SPO 910 A1 by SILVERCREST.
USER MANUAL SPO 910 A1 SILVERCREST
HORNO PARA PIZZA / FORNO PER PIZZA SPO 910 A1
ES
HORNO PARA PIZZA
Operating instructions
IAN 388914_2107
ES
Before reading, unfold the page containing the illustrations and familiarise yourself with all functions of the device.
DE AT CH
GB/MT Operating instructions Page 55
natural_image
Diagram of a mechanical component with a circular base and a ring, showing internal structure and an arrow indicating direction (no text or symbols)KOMPERNASS HANDELS GMBH
BURGSTRASSE 21
44867 BOCHUM
ALEMANIA
www.kompernass.com
Recetas
natural_image
Diagram of a lid with a ring and arrow indicating direction (no text or symbols)KOMPERNASS HANDELS GMBH
BURGSTRASSE 21
44867 BOCHUM
GERMANIA
www.kompernass.com
Ricette
Cozer as mini pizzas 45
natural_image
Diagram of a mechanical component with a circular base and a ring, showing directional arrows (no text or symbols)Cozer as mini pizzas
AVISO! PERIGO DE FERIMENTOS!
KOMPERNASS HANDELS GMBH
BURGSTRASSE 21
44867 BOCHUM
ALEMANHA
www.kompernass.com
Receitas
Nos exemplos de receitas encontrará dois tipos diferentes de bases de pizza.
Package contents and transport inspection....56
Unpacking 57
Disposal of the packaging 57
Appliance description 57
Technical specifications 58
Safety information 58
Before first use 60
Setting up and assembly 61
Handling and operation....62
Preparing mini-pizzas 62
Baking mini-pizzas 62
Cleaning and maintenance 64
Storage 65
Troubleshooting 65
Disposal 66
Kompernass Handels GmbH warranty 66
Service 68
Importer 68
Recipes 68
Salami pizza with wheat flour base 68
Vegetarian pizza with wholemeal spelt base 70
Introduction
Congratulations on the purchase of your new appliance.

You have selected a high-quality product. The operating instructions are part of this product. They contain important information about safety, usage and disposal. Before using the product, please familiarise yourself with all operating and safety instructions. Use the product only as described and for the specified range of applications. Please also pass these operating instructions on to any future owner.
Intended use
This appliance is intended exclusively for baking mini-pizzas inside. Any other use or use beyond that specified is considered improper use. The appliance is not intended for use in commercial or industrial environments.
Claims of any kind for damage resulting from misuse, incompetent repairs, unauthorised modification or the use of unauthorised replacement parts will not be accepted. The operator bears sole liability.
Package contents and transport inspection
The appliance is supplied with the following components as standard:
- Pizza oven (basic appliance, baking tray and terracotta dome)
- 6 pizza peels
- Dough cutter
- Operating instructions
NOTE
▶ Check the package for completeness and signs of visible damage.
The terracotta dome is handmade and consists of natural materials.
Consequently, there may be small imperfections in the product. These do not affect the quality of the product. This does not affect the stability of the terracotta dome!
▶ If any items are missing or damaged as a result of defective packaging or transportation, contact the service hotline (see section "Service").
Unpacking

WARNING! RISK OF INJURY!
▶ Do not allow children to play with packaging materials. Risk of suffocation!
1) Remove all parts of the appliance and the operating instructions from the box.
2) Remove all packaging materials as well as any protective films and labels from the appliance.
Disposal of the packaging


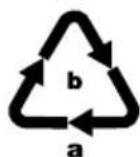
The packaging materials have been selected for their environmental friendliness and ease of disposal, and are therefore recyclable. Dispose of packaging materials that are no longer needed in accordance with applicable local regulations. Dispose of the packaging in an environmentally friendly manner. Note the labeling on the packaging and separate the packaging material components for disposal if necessary. The packaging material is labelled with abbreviations (a) and numbers (b) with the following meanings:
1-7: plastics,
20-22: paper and cardboard,
80-98: composites.
NOTE
If possible, keep the original packaging during the warranty period so that the appliance can be properly packed for returning in the event of a warranty claim.
Appliance description
Figure A:
① Warming plate
② Terracotta dome
③ Opening
④ Baking tray
⑤ Control lamp (red, lights up during operation)
6 Basic appliance
⑦ Heating elements (top and bottom)
Figure B:
⑧ Pizza peel
⑨ Dough cutter
Technical specifications
| Power supply 220-240 V ~ (AC), 50-60 Hz |
| Power consumption 910 W |
Safety information

▶ Prior to use, check the appliance for visible external damage. Do not use an appliance that has been damaged or dropped.
- Do not expose the appliance to rain, and never use it in a humid or wet environment. Ensure that the power cable never becomes wet or moist during operation.
The appliance must be connected to a mains socket with a protective earth.
▶ Protect the power cable from contact with hot appliance parts. Never use the appliance near naked flames, a hotplate or a heated oven.
The power cable must be checked for signs of damage at regular intervals. If the power cable is damaged, the appliance may no longer be used.
To avoid potential risks, if the appliance power cable is damaged, it must be replaced by the manufacturer, its customer service or by a qualified technician.
- Do not allow the appliance to come into contact with moisture such as rain or water.

Never immerse the appliance in water or any other liquids! There is a risk of fatal electric shock if residual liquids come into contact with live components during operation.

WARNING! RISK OF INJURY!
This appliance may be used by children over the age of 8 and by persons with reduced physical, sensory or mental abilities or by those without experience and/or knowledge, if they are supervised or have been instructed in the safe use of the appliance and have understood the potential risks.
▶ Do not allow children to play with the appliance.
- Cleaning and user maintenance must not be performed by children unless they are older than 8 years of age and are supervised.
▶ Children younger than eight years of age must be kept away from the appliance and the power cable.
▶ After use, allow the appliance to cool down completely before cleaning it! Risk of burns!
▶ If possible, set up the appliance close to a power socket. Ensure that the power plug is quickly reachable in case of danger and that the cable poses no risk of tripping.
▶ Provide a stable location for the appliance.
▶ Always operate the pizza oven with the terracotta dome in place.
Caution! Hot surface!
The appliance and the accessories in use become very hot during operation. Do not move the appliance and only touch the handles of the pizza peels.
CAUTION! PROPERTY DAMAGE!
- Do not use an external timer switch or a separate remote control system to operate the appliance.
▶ Never leave the appliance unattended during operation. - Ensure that the appliance, the power cable and the plug do not come into contact with heat sources such as hotplates or naked flames.
- Do not use charcoal or similar fuels to operate the appliance!
▶ Never cover the pizza oven with cloths or other items during operation. They could catch fire!
▶ Treat the terracotta dome carefully. It is fragile!
▶ Operate the appliance only with the original accessories supplied.
Before first use
1) Clean all parts as described in the section "Cleaning and care" to remove any production residues. Make sure that all parts are completely dry before operating the appliance.
WARNING! RISK OF FIRE!
▶ Never set up the appliance underneath wall cupboards or next to curtains, cupboard walls or other flammable objects.
▶ Always place the appliance on a heat-resistant surface.
2) Set up the appliance as described in the section "Setting up and assembly".
3) Insert the plug into the mains power socket. The control lamp ⑤ lights up red to indicate that the appliance is in operation. The heating elements ⑦ start to heat up.
4) Preheat the appliance for 10 minutes.
NOTE
The first time the appliance heats up, a small amount of smoke and odour may result from production-related residues. This is normal and is completely harmless. Ensure sufficient ventilation; for example, by opening a window.
5) Remove the plug from the mains power socket.
6) Allow the appliance to cool down for 30 minutes before dismantling and cleaning it.
7) After heating the appliance for the first time, clean it again as described in the section "Cleaning and care".
Setting up and assembly

WARNING! RISK OF FIRE!
▶ Never set up the appliance underneath wall cupboards or next to curtains, cupboard walls or other fl ammable objects.
▶ Always place the appliance on a heat-resistant surface.
1) Place the basic appliance ⑥ on a level surface. This must be heat-resistant, splash-resistant and dry. Make sure that you do not place the appliance right next to a wall or a cupboard.
natural_image
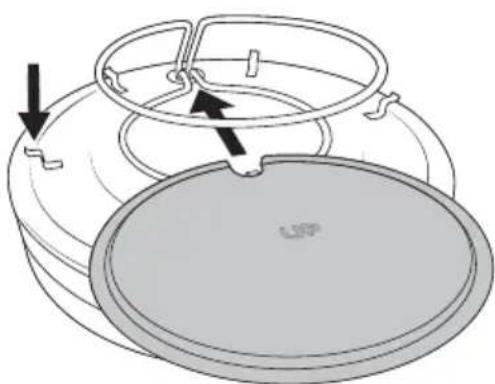
Diagram of a mechanical component with a circular base and a ring, showing internal structure and an arrow indicating direction (no text or symbols)2) Put the baking tray ④ onto the basic appliance ⑥: Turn the baking tray ④ around so that the embossed "UP" is readable on the upper side. Then push the baking tray ④ between the two heating elements ⑦. The semi-circular cut-out on the baking tray ④ encloses the vertical part of the heating element ⑦. Then place the baking tray ④ onto the six supports provided. These supports fix the baking tray ④ in place so that it cannot slip during operation.
3) Place the terracotta dome ② carefully onto the basic appliance ⑥. The two heating elements ⑦ and the baking tray ④ are now located in the baking chamber of the pizza oven. Make sure that you place the terracotta dome ② on the appliance so that none of the openings ③ are blocked by the vertical part of the heating element ⑦. Otherwise, you will not be able to fit a pizza peel ⑧ through the opening ③.
Handling and operation
You can bake up to six mini-pizzas simultaneously in the baking chamber. There are six openings ③ for this in the terracotta dome ②. Use the supplied pizza peels ⑧ to push the mini-pizzas through the openings ③ and onto the baking tray ④. Once the mini-pizzas are fully cooked, use the pizza peels ⑧ to remove them from the baking tray ④.
Preparing mini-pizzas
1) Prepare the pizza dough and the toppings. Cut the food into small pieces (1-2 cm).
2) Lightly grease the pizza peels ⑧. This is will make it easier to remove the ready-baked mini-pizzas from the metal tray.
3) Roll out the pizza dough to a thickness of 2-4 mm and then use the dough cutter ⑨ to cut out pieces of dough. These pieces of dough form the bases for the mini-pizzas and fit onto the pizza peels ⑧.
4) Place the pizza bases on the pizza peels ⑧. Shape the edge of the mini-pizza by pushing the slightly overhanging dough up a little. This creates a small raised edge which prevents the toppings from sliding off the pizza base.

WARNING! RISK OF FIRE!
▶ Place the ingredients only on the pizza base! Do not place any meat or other ingredients directly onto the pizza peels ⑧. Escaping fat can splash. Fat dripping onto the heating elements ⑦ can catch fire!
5) Top the pizzas according to your taste. Make sure that the pizza peel ⑧ is not loaded too high. Otherwise, the mini-pizzas will not pass through the openings ③ in the terracotta dome ②.
Baking mini-pizzas

WARNING! RISK OF INJURY!
The appliance and the accessories in use become very hot during operation. Do not move the appliance and only touch the handles of the pizza peels 8.
NOTE
Do not bake large pizzas or other ingredients directly on the baking tray ④. Always place the mini-pizzas onto pre-greased pizza peels ⑧. Then place the loaded pizza peels ⑧ onto the baking tray ④. Do not grease the baking tray ④.
Set up the appliance as described in the section "Setting up and assembly".
1) Prepare the mini-pizzas.
2) Insert the plug into the mains power socket. The control lamp ⑤ lights up red to indicate that the appliance is in operation. The heating elements ⑦ start to heat up.
3) Preheat the appliance for 10 minutes.
4) Push the pizza peels ⑧ through the openings ③ in the terracotta dome ② and place them onto the baking tray ④. When doing so, make sure that the ingredients do not come into contact with the upper heating element ⑦.

WARNING! RISK OF INJURY!
The pizza peels ⑧ get very hot! Therefore, always hold them using the plastic handles!
ATTENTION! PROPERTY DAMAGE!
▶ Make sure that no ingredients fall from the mini-pizzas onto the baking tray ④. Any food residues left in the baking chamber will burn!
5) Bake the mini-pizzas for around 7–12 minutes. The actual baking time depends on the thickness of the dough and the quantity of ingredients and can therefore vary.
6) Pull the pizza peels ⑧ carefully by the handles out of the appliance as soon as the ingredients are cooked and pizzas have reached the desired degree of browning.
NOTE
▶ You can place the mini-pizzas on the warming plate ①. Place only ready-baked mini-pizzas on there and not any other ingredients.
▶ Bear in mind that the mini-pizzas will continue cooking. They can dry out if left on the warming plate ① for too long.
7) After use, place the individual pizza peels ⑧ on a stable and heat-resistant surface. After the pizza peels ⑧ have cooled down a little, they can be used again. You may need to re-grease them lightly before use.
8) Once you have finished using the appliance, pull the plug out of the socket. The red control lamp ⑤ goes out.
9) Allow the appliance to cool down for 30 minutes before dismantling and cleaning it.
Cleaning and maintenance

▶ Before cleaning the appliance, disconnect the power plug from the mains power socket! There is a risk of electric shock!

Never immerse the appliance in water or other liquids!

WARNING! RISK OF INJURY!
▶ Always allow the appliance to cool down before cleaning it. There is a risk of burns!
ATTENTION! PROPERTY DAMAGE!
▶ Do not use abrasive or aggressive cleaning materials. They can irreparably damage the surfaces!
Do not expose the terracotta dome ② to extreme cold to cool it down, the material can crack! Allow it to cool down at room temperature.
Do not heat up the terracotta dome ② again until it has completely dried out. The damp material can crack!
▶ Never clean the terracotta dome ② or the basic appliance ⑥ in the dish-washer!
NOTE
The terracotta dome ② is made from natural materials. Do not use any chemical cleaning agents to clean it. After repeated use, a patina will form. This discolouration of the material is normal and does not impair the function. It also has no impact on hygiene.
A permanent discolouration of the baking tray ④ may also occur as it lies very close to the heating elements ⑦. If necessary, soak the baking tray ④ in water and add a little washing-up liquid.
- Clean the terracotta dome ② carefully with warm water and a washing-up cloth. You can also use a soft brush. Do not immerse the terracotta dome ② in washing-up water as the material soaks up water. Allow it to air dry afterwards. Make sure that the terracotta dome ② is completely dry before heating it again.
Wipe the basic appliance ⑥ including the completely cooled heating elements ⑦ with a damp cloth. If necessary, apply a mild detergent to the cloth and wipe with a cloth moistened only with water. Dry everything properly.
- Clean the baking tray ④, the pizza peels ⑧ and the dough cutter ⑨ in warm soapy water. If the parts are heavily soiled, you can soak them a little. Dry all the parts thoroughly after cleaning.
NOTE

For gentle cleaning, we recommend hand washing. However, the pizza peels ⑧, baking tray ④ and dough cutter ⑨ are also dishwasher-safe. Place them in the top compartment of the dishwasher, taking care not to trap any parts.
Storage
■ After it has cooled down, store the cleaned appliance and accessories in a dust-free and dry location. Do not store the terracotta dome ② in an enclosed space, but rather somewhere where the air can circulate freely.
Troubleshooting
| Fault Cause | Solution | |
| The appli-ance is not working. | The plug is not connected to the mains power. | Insert the plug into a mains power socket. |
| The mains power socket is defective. | Use a different mains power socket. | |
| The appliance is defective. | Contact the Customer Service department. | |
| The thermal cut-out has been triggered. | Disconnect the plug from the mains power socket and wait until the appliance has cooled down. If the appliance still does not function after cooling down, contact the Customer Service department. |
If the malfunction cannot be corrected using one of the suggestions above, or if you have found some other kind of malfunction, please contact our Customer Service department.
Disposal

The symbol showing a crossed-out dustbin means that this appliance is subject to Directive 2012/19/EU. This directive states that this appliance may not be disposed of in the normal household waste at the end of its useful life, but must be taken to specially set-up collection locations, recycling depots or disposal companies. This disposal is free of charge for the user. Protect the environment and dispose of this appliance properly.

Your local community or municipal authorities can provide information on how to dispose of the worn-out product.
This appliance has a 3-year warranty valid from the date of purchase. If this product has any faults, you, the buyer, have certain statutory rights. Your statutory rights are not restricted in any way by the warranty described below.
Warranty conditions
The warranty period starts on the date of purchase. Please keep your receipt in a safe place. This will be required as proof of purchase.
If any material or manufacturing fault occurs within three years of the date of purchase of the product, we will either repair or replace the product for you or refund the purchase price (at our discretion). This warranty service requires that you present the defective appliance and the proof of purchase (receipt) within the three-year warranty period, along with a brief written description of the fault and of when it occurred.
If the defect is covered by the warranty, your product will either be repaired or replaced by us. The repair or replacement of a product does not signify the beginning of a new warranty period.
Warranty period and statutory claims for defects
The warranty period is not prolonged by repairs effected under the warranty. This also applies to replaced and repaired components. Any damage and defects present at the time of purchase must be reported immediately after unpacking. Repairs carried out after expiry of the warranty period shall be subject to a fee.
Scope of the warranty
This appliance has been manufactured in accordance with strict quality guidelines and inspected meticulously prior to delivery.
The warranty covers material faults or production faults. The warranty does not extend to product parts subject to normal wear and tear or to fragile parts which could be considered as consumable parts such as switches, batteries or parts made of glass.
The warranty does not apply if the product has been damaged, improperly used or improperly maintained. The directions in the operating instructions for the product regarding proper use of the product are to be strictly followed. Uses and actions that are discouraged in the operating instructions or which are warned against must be avoided.
This product is intended solely for private use and not for commercial purposes. The warranty shall be deemed void in cases of misuse or improper handling, use of force and modifications / repairs which have not been carried out by one of our authorised Service centres.
Warranty claim procedure
To ensure quick processing of your case, please observe the following instructions:
■ Please have the till receipt and the item number (IAN) 388914_2107 available as proof of purchase.
■ You will find the item number on the type plate on the product, an engraving on the product, on the front page of the operating instructions (below left) or on the sticker on the rear or bottom of the product.
If functional or other defects occur, please contact the service department listed either by telephone or by e-mail.
■ You can return a defective product to us free of charge to the service address that will be provided to you. Ensure that you enclose the proof of purchase (till receipt) and information about what the defect is and when it occurred.

You can download these instructions along with many other manuals, product videos and installation software at www.lidl-service.com.
This QR code will take you directly to the Lidl service page (www.lidl-service.com) where you can open your operating instructions by entering the item number (IAN) 388914_2107.
Service
GB Service Great Britain
Tel.: 0800 404 7657
E-Mail: kompernass@lidl.co.uk
MT ServiceMalta
Tel.: 80062230
E-Mail: kompernass@lidl.com.mt
IAN 388914_2107
Importer
Please note that the following address is not the service address. Please use the service address provided in the operating instructions.
KOMPERNASS HANDELS GMBH
BURGSTRASSE 21
44867 BOCHUM
GERMANY
www.kompernass.com
Recipes
These recipe examples feature two different types of pizza bases.
The toppings can be changed in many ways. Top the pizza according to your personal taste and preferences. However, bear in mind that the baking time varies depending on the topping and quantity.
Salami pizza with wheat flour base
Ingredients (for around 8-12 mini pizzas)
For the dough:
■ 250 g wheat flour
■ 150 ml lukewarm water
■ 7 g fresh yeast or 1/2 sachet of dry yeast (3-4 g)
■ 10 ml olive oil
1/2 tsp. sugar
■ 1/2 tsp. salt
For the tomato sauce:
■ 100 g tomato passata
■ 1 clove of garlic
■ 1/2 tsp. dried oregano
■ Add a pinch of salt and pepper to taste
For the topping:
■ 100 g salami slices
■ 150 g grated cheese (e.g. Gouda or gratin cheese)
Preparation:
1) Dissolve the yeast and sugar in 3 tbsp. of lukewarm water.
2) Mix the flour with the salt, oil and yeast-sugar solution in a bowl.
3) Gradually add the remaining water and work it into the dough.
4) Knead the dough until it has a smooth surface.
5) Cover the dough with a clean cloth and leave to rise in a warm place for 1 hour.
6) Prepare the sauce and the other ingredients: Cut the garlic into small pieces or press the cloves through a garlic press. Mix the strained tomatoes with the garlic and oregano, and then season with salt and pepper. Cut the salami slices into small pieces.
7) After the rising time, place the dough on a floured work surface. You can divide the dough into two pieces and work each piece separately.
8) Roll out the dough to a thickness of 2-4 mm and cut out the pizza bases with the dough cutter ⑨. Place the pizza bases on the lightly greased pizza peels ⑧. Shape the edge of the mini-pizza by pushing the slightly overhanging dough up a little. This creates a small raised edge which prevents the toppings from sliding off the pizza base.
9) Spread on a little tomato sauce, then top with salami and cheese.
10) Push the pizza peels ⑧ through the openings ③ onto the baking tray ④. Bake the mini-pizzas for around 7-12 minutes. The actual baking time depends on the thickness of the dough and the quantity of ingredients and can therefore vary.
TIP: As a quick alternative, you can also use ready-made pizza dough. Top with tomato sauce and other ingredients as desired.
Vegetarian pizza with wholemeal spelt base
Ingredients (for around 8-12 mini pizzas)
For the dough:
■ 150 g spelt flour
■ 50 g wholemeal spelt flour
■ 150 ml lukewarm water
■ 7 g fresh yeast or 1/2 sachet of dry yeast (3–4 g)
■ 1 tsp. honey
■ 1 tbsp. olive oil
1/2 tsp. salt
For the tomato sauce:
■ 100 g tomato passata
■ 1/2 tsp. dried oregano
■ Add a pinch of salt and pepper to taste
For the topping:
■ 100 g tinned sweetcorn
■ 100 g red pepper
■ 1 medium-sized onion
■ 150 g grated cheese (e.g. Gouda or gratin cheese)
Preparation:
1) Put the wholemeal spelt flour and spelt flour in a bowl and mix. Remove 100 g from the flour mixture.
2) Pour the 100 g flour mixture into another bowl and add the lukewarm water, dry yeast and honey. Knead everything well into a pre-dough.
3) Place the pre-dough in a bowl, cover with a clean cloth or cling film. Leave to rise for 30 minutes.
4) Then add the remaining ingredients to the pre-dough. Mix everything together and knead until a dough with a smooth surface is formed.
5) Place the dough in a bowl, cover it again with a clean cloth or cling film. Leave the dough to stand for a second, this time for 3-4 hours.
NOTE
▶ You can also leave the yeast dough to stand overnight in the fridge. Place it in a bowl, cover with a cloth or cling film and leave it to stand for a period of 18–24 hours. The dough will continue to rise, albeit a little slower than at room temperature. Make sure that there is enough room for this in the container.
6) Prepare the sauce and the other ingredients: Mix the strained tomatoes with the garlic and oregano, and then season with salt and pepper. Finely dice the pepper, peel and halve the onions and cut them into strips.
7) After the rising time, place the dough on a floured work surface. You can divide the dough into two pieces and then work each piece separately.
8) Roll out the dough to a thickness of 2-4 mm and cut out the pizza bases with the dough cutter ⑨. Sprinkle a little flour onto the dough if it is still sticky and then press it flat with your fingers and the palms of your hands. Add a little flour to your hands if necessary.
9) Place the pizza bases on the lightly greased pizza peels ⑧. Shape the edge of the mini-pizza by pushing the slightly overhanging dough up a little. This creates a small raised edge which prevents the toppings from sliding off the pizza base.
10) Spread on a little tomato sauce, then top with the sweetcorn, diced peppers and onion strips. Afterwards, sprinkle with cheese.
11) Push the pizza peels ⑧ through the openings ③ onto the baking tray ④. Bake the mini-pizzas for around 7–12 minutes. The actual baking time depends on the thickness of the dough and the quantity of ingredients and can therefore vary.
TIP: Sprinkle some washed and finely chopped rocket salad on the pizza after baking. This gives the mini-pizza a fresh, spicy taste!
Inhaltsverzeichnis
Einleitung 74
natural_image
Diagram of a mechanical component with a circular base and a ring, showing internal structure and an arrow indicating direction (no text or symbols)KOMPERNASS HANDELS GMBH
BURGSTRASSE 21
44867 BOCHUM
DEUTSCHLAND
www.kompernass.com
Rezepte
KOMPERNASS HANDELS GMBH
BURGSTRASSE 21
44867 BOCHUM
GERMANY
www.kompernass.com


- HORNO PARA PIZZA / FORNO PER PIZZA SPO 910 A1
- HORNO PARA PIZZA
- ES
- DE AT CH
- Recetas
- Ricette
- Cozer as mini pizzas
- AVISO! PERIGO DE FERIMENTOS!
- Receitas
- Introduction
- Intended use
- Package contents and transport inspection
- NOTE
- Unpacking
- WARNING! RISK OF INJURY!
- Disposal of the packaging
- Appliance description
- Technical specifications
- Safety information
- CAUTION! PROPERTY DAMAGE!
- Before first use
- WARNING! RISK OF FIRE!
- Setting up and assembly
- Handling and operation
- Preparing mini-pizzas
- Baking mini-pizzas
- ATTENTION! PROPERTY DAMAGE!
- Cleaning and maintenance
- Storage
- Disposal
- Warranty conditions
- Warranty period and statutory claims for defects
- Scope of the warranty
- Warranty claim procedure
- Service
- Importer
- Recipes
- Salami pizza with wheat flour base
- Preparation:
- Vegetarian pizza with wholemeal spelt base
- Inhaltsverzeichnis
- Rezepte
Brand : SILVERCREST
Model : SPO 910 A1
Category : Uncategorized