MMC1500SCX - Food processor GORENJE - Free user manual and instructions
Find the device manual for free MMC1500SCX GORENJE in PDF.

| Product Type | Food Processor with Mixer, Blender, Meat Grinder, and Food Processor Attachments |
| Model | MMC1500SCX |
| Brand | Gorenje |
| Power Supply | 220-240V, 50/60Hz (earthed plug required) |
| Speed Settings | 12 variable speeds (01 to 12) plus pulse (P) |
| Bowl Capacity | Stainless steel bowl, 4.5L (approx.) |
| Maximum Running Time | 30 minutes continuous; rest 15 minutes between uses |
| Noise Level | 78 dB(A) |
| Weight | Approximately 6.5 kg |
| Dimensions (WxDxH) | Estimated 25 x 35 x 38 cm |
| Main Functions | Mixing, whisking, kneading, blending, chopping, slicing, shredding, mincing, sausage making |
| Included Attachments | Dough hook, whisk, mixer blade, blender jar, food processor bowl with discs, meat grinder with plates, sausage horn, pusher |
| Display | Digital touch display with speed and time indicators, scale function |
| Scale Function | Built-in scale with Tare and ON/OFF, up to 2 kg capacity |
| Overheat Protection | Automatic shutdown if motor overheats, restarts after cooling |
| Safety Features | Head-up button automatically stops motor; child safety lock; non-slip feet |
| Materials | Stainless steel bowl, glass blender jar, plastic housing with die-cast metal base |
| Care and Cleaning | Detachable parts dishwasher safe (top rack); motor unit wipe with damp cloth only |
| Warranty | 2 years (EU), subject to terms |
| Repairability | Spare parts available via Gorenje service centers; user replaceable accessories |
Frequently Asked Questions - MMC1500SCX GORENJE
User questions about MMC1500SCX GORENJE
0 question about this device. Answer the ones you know or ask your own.
Ask a new question about this device
Download the instructions for your Food processor in PDF format for free! Find your manual MMC1500SCX - GORENJE and take your electronic device back in hand. On this page are published all the documents necessary for the use of your device. MMC1500SCX by GORENJE.
USER MANUAL MMC1500SCX GORENJE
natural_image
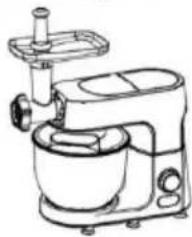
Exterior view of a modern stainless steel gorenje kitchen mixer with digital display (no text or symbols on the device itself)MMC1500SCX
SL Navodila za uporabo ....4
HR; BIH Upute za uporabu 11
SRB MNE BIH Uputstvo za upotrebu 18
natural_image
Line drawing of a kitchen mixer with a rotating handle and bowl (no text or symbols)
natural_image
Line drawing of a kitchen mixer with a bowl and stirring rod (no text or symbols)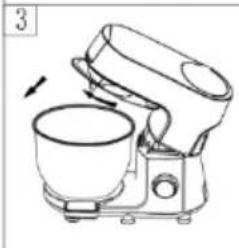
natural_image
Line drawing of a kitchen mixer with a side bowl and fan (no text or symbols)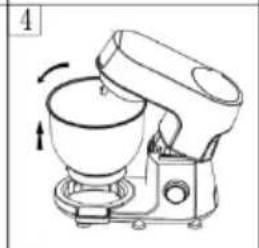
natural_image
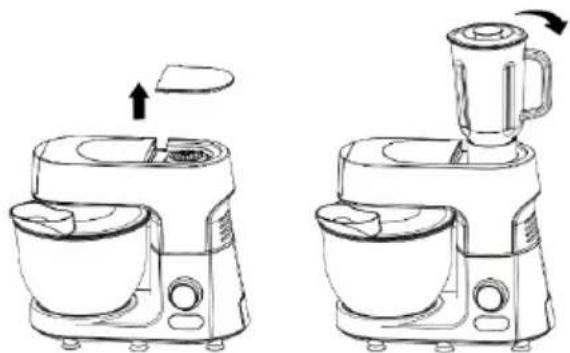
Line drawing of a kitchen mixer with rotating fan (no text or symbols)- Pritisnite gumb za dvig glave. Glava se bo samodejno dvignila, kot je prikazano na sliki 1. Nato potisnite mešalno palico navzgor in jo
flowchart
graph TD
    A["1. Initial mixing setup"] --> B["2. Pressing step"]
    B --> C["3. Drying process"]
Mešalnik

natural_image
Line drawings of a kitchen mixer and blender with directional arrows indicating motion (no text or symbols)Namestitev:
natural_image
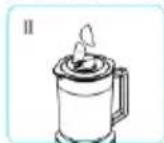
Three-step illustration showing a blender being placed on top, with steps 4 and 5 showing the process (no text or symbols)Pritisnite pokrov na svoje mesto. Namestite posodo v napravo.
natural_image
Two-step illustration of a blender with a lit candle, showing the process from opening to opening (no text or symbols)I. Obrnite notranji pokrov nasprotni smeri urinega kazalca.
natural_image
Three technical line drawings of a mechanical device with arrows indicating motion or assembly (no text or symbols present)natural_image
Technical line drawing of a mechanical device with two views (left and right) showing internal components and motion indicators (no text or symbols)natural_image
Line drawing of a kitchen mixer with a bowl and fan (no text or symbols)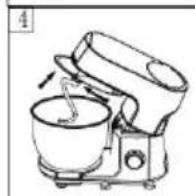
natural_image
Line drawing of a kitchen mixer with a bowl and side panel (no text or symbols)Postavljanje (pogledajte sliku A):
natural_image
Line drawing of a kitchen mixer with rotating fan (no text or symbols)flowchart
graph TD
    A["1. Top mixing bowl"] --> B["2. Stamped mixing bowl"]
    B --> C["3. Covering bowl with brush and lid"]
natural_image
Line drawing of a kitchen mixer with two views showing the process (no text or symbols)Blender
natural_image
Line drawings of a kitchen appliance with a blender and lid, shown from front and side views (no text or symbols)Postavljanje:
Postavljanje sjeckalice za hranu:
natural_image
Three technical line drawings of a mechanical device with arrows indicating motion or assembly (no text or symbols present)natural_image
Technical line drawing of a mechanical device with two views (top and side), showing internal components and motion indicators (no text or symbols)natural_image
Line drawing of a kitchen mixer with a bowl and fan (no text or symbols)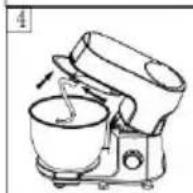
natural_image
Line drawing of a kitchen mixer with a bowl and side panel (no text or symbols)Sklapanje (pogledajte sliku A):
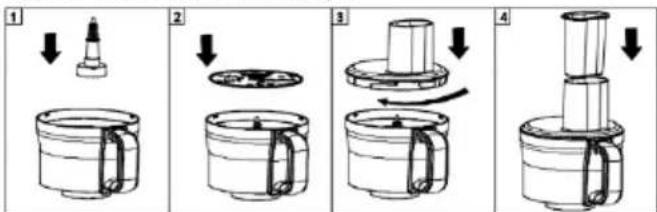
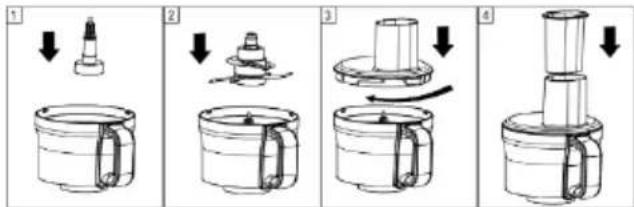
- Pritisnite dugme za podizanje glave, glava će se automatski podići, ovaj put uređaj je u stanju bez struje kao što je prikazano na slici 1.
- Stavite dno posude od nerđajućeg čelika na proizvod ispod otvora, spustite je, a zatim okrećite u smeru kazaljke na satu dok se ne bude mogla više okretati, kao što je prikazano na slici 2.
- Stavite providni poklopac posude na glavu, a zatim ga okrećite u smeru kazaljke na satu dok se ne bude mogao više okretati, kao što je prikazano na slici 3.
- Umetnite zarez na gornjem kraju nastavka za mešanje u pogonsku osovinu, a zatim potisnite nastavak za mešanje prema gore i okrenite ga u smeru suprotnom od kazaljke na satu dok se ne bude mogao više okretati, kao što je prikazano na slici 4.
- Nakon postavljanja gornjih delova ponovo pritisnite dugme glave.
natural_image
Line drawing of a kitchen mixer with a bowl and fan (no text or symbols)
natural_image
Line drawing of a kitchen mixer with a bowl and mixing bowl (no text or symbols)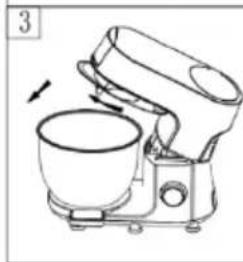
natural_image
Line drawing of a kitchen mixer with a bowl and fan (no text or symbols)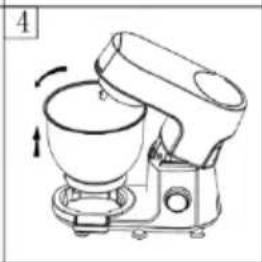
natural_image
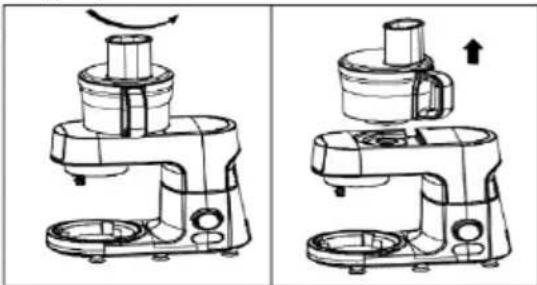
Line drawing of a kitchen mixer with a rotating fan (no text or symbols)- Pritisnite dugme za podizanje glave, glava će se automatski podići, kao na slici 1, zatim čvrsto pritisnite nastavak za mešanje prema gore i okrenite ga u smeru kazaljke na satu do izbočine pogonske osovine, a zatim možete direktno ukloniti nastavak za mešanje. Kao na slici 2
- Okrećite providni poklopac u smeru suprotnom od kazaljke na satu dok se ne bude mogao više okretati, poklopac se može ukloniti kao što je prikazano na slici 3.
FUNKCIJA PRIKAZA DUGMETA PREKIDAČA
natural_image
Line drawing of a kitchen mixer with two views showing the process (no text or symbols)Blender

natural_image
Line drawings of a kitchen mixer and blender with directional arrows indicating motion (no text or symbols)Instalacija:
- Spustite glavu uređaja u horizontalni položaj, dugme za podizanje glave automatski se diže i zaključava glavu. Otvorite gornji poklopac.
- Držite ručku staklene posude u izlaznom priključku na uređaju i okrećite je u smeru kazaljke na satu dok se ne bude mogla više okretati. Usmerite kobasicu koja izlazi iz uređaja na pleh za pečenje. Zatim isecite kobasicu na delove/trake i rasporedite ih preko pleha za pečenje. Isecite voće na male komadiće, stavite ga u posudu za mešanje, dodajte odgovarajuću količinu vode ili mleka i drugih tečnosti i pokrijte poklopac.
natural_image
Two-step illustration showing a hand pouring liquid into a container, labeled 4 and 5 (no text or symbols on the diagram itself)Pritisnite poklopac na mesto. Postavite posudu na bazu.
natural_image
Line drawings of a blender and its side view showing the lid and handle (no text or symbols)Saveti: Dok motor radi, ako želite da dodate sastojke, možete:
I. Okrenite unutrašnji poklopac poklopca u smeru suprotnom od kazaljke na satu.
II. Dodajte sastojke u posudu kroz otvor u poklopcu.
Postavite gornji priključak u posudu, a zatim umetnite deo sa noževima (prednja i zadnja strana su za usitnjavanje i sečenje; noževi su oštri, pazite da ne povredite ruke), zatim postavite poklopac posude prema uputstvima za okretanje u smeru kazaljke na satu kako biste zaključali poklopac, stavite deo za potiskivanje.
Instalacija seckalice za hranu:
natural_image
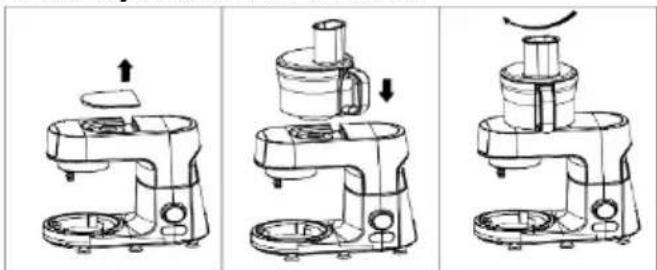
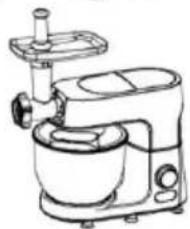
Three technical line drawings of a mechanical device with arrows indicating motion, no text or symbols present.- Stavite uređaj na glatku radnu površinu, održavajte površinu čistom i urednom i postavite kontrolnu površinu uređaja okrenutu prema korisniku.2. Uklonite gornji poklopac sa leve strane uređaja da biste došli do donjeg priključka spojnice seckalice za hranu.
- Instalirajte seckalicu za hranu na priključak donje spojnice i zategnite ga u smeru kazaljke na satu (slika sastavljanja gore)
- Isecite sastojke na komadiće i ravnomerno ih stavite u posudu.
- Uključite uređaj i izaberite odgovarajuću brzinu, koristite deo za potiskivanje da biste potisnuli
hranu po potrebi.
- Kada sastojci dostignu željeni rezultat, pritisnite prekidač za zaustavljanje. Isključite napajanje.
Rastavljanje seckalice za hranu
natural_image
Technical line drawing of a mechanical device showing two views (top and side), with no visible text or symbols.- Pre upotrebe seckalice za hranu pažljivo pročitajte uputstva i sačuvajte ih za buduću upotrebu.
- Sečivo noža je oštro, budite pažljivi kada uzimate nož i pločicu za sečenje kako biste izbegli posekotine. (Prilikom rastavljanja i čišćenja, obavezno držite gornju ručku rukom, ne dodirujte sečivo direktno rukom.)
- Obavezno uklonite sečivo pre izlivanja hrane iz posude.
- Budite oprezni prilikom uklanjanja sečiva ili prilikom čišćenja hrane sa sečiva.
- Strogo je zabranjeno koristiti seckalicu za mlevenje mesa sa T-cevi za mlevenje mesa ili istovremeno mešati testo kukom za mešanje.
- Nikada ne gurajte prstima hranu direktno u seckalicu. Koristite veliki ili mali potiskivač.
-
Obavezno isključite napajanje u sledećim situacijama
-
Prilikom instalacije ili uklanjanja seckalice za hranu ili drugih nastavaka.
•Nakon upotrebe - Nemojte uklanjati gornji poklopac seckalice pre nego što se glava potpuno zaustavi.
- Kad koristite glavu blendera, u posudi za mešanje ne sme da bude previše sastojaka. Izlijte ih na vreme i ponovo izmešajte da biste postigli bolji efekat.
- Kada koristite glavu blendera, pazite da sastojci ne prelaze oznaku MAX u posudi blendera kako biste postigli bolji efekat mešanja.
- Nikada ne dodirujte pokretne delove uređaja rukama.
- Nemojte na silu da gurate hranu u seckalicu.
- Ova seckalica za hranu ne sme da se koristi za drobljenje leda (tvrdih predmeta), kako se ne bi oštetila (ako treba da drobite led, možete da koristite staklenu posudu za sok za drobljenje leda).
- Nemojte naglo da otvarate gornji poklopac seckalice za hranu tokom upotrebe (ako treba da otvorite gornji poklopac, pritisnite prekidač za zaustavljanje ili isključite napajanje kako bi uređaj prestao da radi)
- Ne dozvolite deci ili osobama sa invaliditetom
da rukuju uređajem.
flowchart
graph TD
    A["1. Initial mixing setup"] --> B["2. Pressing step"]
    B --> C["3. Drying step"]
Блендер
natural_image
Line drawings of two kitchen appliances: one with a lid, the other with a blender and fan (no text or symbols)Инсталација:
natural_image
Two-step illustration showing a steamer being filled with liquid, labeled 4 and 5 (no text or symbols on the diagram itself)natural_image
Line drawings of a blender with two views: one showing front view and one showing side view (no text or symbols)natural_image
Three technical line drawings of a mechanical device with arrows indicating motion, no text or symbols present.natural_image
Technical line drawing of a mechanical device with two views (top and side), showing internal components and motion indicators (no text or symbols)- Top cower (food processor)
- Top cower (blender)
- Food processor connector
- Blender connector
- Body housing
- Speed control switch (rotating)
- START STOP button
- Release button for multifunction head
- Scale display
- Release button for grinder
- Removable cover for mincer power outlet
- Food doser on transparent cower
- Stainless steel bowl
- Whisk
- Mixer blade
- Dough hook
ACESSORIES:
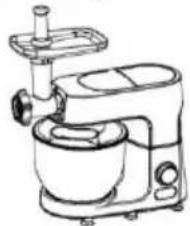
Meat grinder:
- Fixing ring
- Cutting knife (fine)
- Cutting knife (medium)
- Knife
- Snake
- Cutter housing
- Food tray
- Pusher
- Stuffing tube
- Kubbe kit
- Blender
Food processor:
- Pusher of chopper
- Chopper lid
- Shredding / slicing blade
- Cutting fries blade
- Chopping blade
- Motor shaft (axle)
- Chopper bowl
Danger
Do not immerse the motor unit in water nor rinse it under the tap.
Warning
- Carefully read the instructions before using your appliance.
-
Switch off the appliance before fitting and removing the attachment.
-
Keep your fingers away from moving parts and the opening on the attachment.
- Only use the appliance for its intended domestic use. The manufacture will not accept any liability if the appliance is subject to improper use or failure to comply with these instructions.
- Check that the voltage rating of the appliance matches that of your electrical system.
- Any connection error will nullify the guarantee.
- The appliance must be plugged into an earthed electrical socket.
- If you have to use an electrical extension lead, it must be earthed and you should make sure that noone can trip over it.
- Unplug the appliance as soon as you have finished using it and before cleaning it.
- Don't use your attachment and/or appliance if it has been damaged. Contact an approved service centre.
- Any work on the appliance other than normal care and cleaning by the customer must be carried out by an approved service centre.
- Do not immerse the appliance, the power cord or the plug in water or in any other liquid.
- Do not allow the power cord to hang within the reach of children,
to come close to or into contact with hot parts of your appliance, any other source of heat or any sharp edge.
- Switch off the appliance and disconnect it from power supply before changing accessories or approaching any moving parts.
- Do not touch the whisk, mixer blade or kneading hook while the appliance is in operation.
- Only use one attachment at a time.
- Do not operate the appliance continuously for more than 24 minutes at a time. Allow 15 minutes rest before next use.
- Appliances can be used by persons with reduced physical, sensory or mental capabilities or lack of experience and knowledge if they have been given supervision or instruction concerning use of the appliance in a safe way and if they understand the hazards involved.
- Children should be supervised to ensure that they do not play with the appliance.
- If the supply cord is damaged, it must be replaced by the manufacturer, service agent or a similarly qualified person, in order to avoid a hazard.
-
This appliance may not be used by children. Keep the appliance and its cord out of reach of children.
• Children may not play with the appliance. -
Children may not clean the appliance or perform user maintenance tasks on it without supervision.
- This appliance is intended to be used in household and similar applications.
- There is a potential injury from misuse. Please handle it with care.
- Care should be taken when handling the sharp cutting blades, emptying the bowl and during cleaning.
- WARNING: AFTER DETACHING THE ACCESSORY, DO NOT TOUCH THE MOVING SHAFT.
- Be careful if hot liquid is poured into the blender as it can be ejected out of the appliance due to a sudden steaming.
- Always disconnect the appliance from the supply if it is left unattended and before assembling, disassembling or cleaning.
- The appliance should be cool down to the room temperature after each process.
- Noise level: 78 dB(A)
- During mixing, please don't use the scraper or other tools to concentrate the material in the mixing container, it may cause involvement or injury.
-
Be sure to press the display to make sure the product is turned off and unplugged before installing, removing, or cleaning accessories, or injury may result.
-
The machine motor comes with overheating protection, when the machine overheats, it will automatically stop running until it cools down before running again.
- When one of the output ports is operating, please make sure to remove the parts or components that are connected to the other output ports and be installed a protective cover.
- Do not use the product unsupervised, if you do have to leave, turn off the switch or unplug it first.
- Do not plug the machine into the power supply without installing the required accessories.
- Danger of overloading! Do not use the accessories and the mixing function at the same time.
This appliance is marked according to the European directive 2012/19/EU on Waste Electrical and Electronic Equipment (WEEE). This guideline is the frame of a European-wide validity of return and recycling on Waste Electrical and Electronic Equipment.
Caution
Always place the appliance on a flat, stable surface.
Do not use the citrus press longer than 24 minutes without interruption.
This appliance is intended for household use only.
Never use any accessories or parts from other manufacturers unless they are authorized by Gorenje. In case you use these accessories, the warranty will be canceled.
Before use
Clean all detachable parts before using the appliance for the first time (see chapter 'Cleaning').
Make sure the appliance is assembled properly (see chapter 'General description') before you plug it in the wall socket.
Put the plug in the wall socket.
Using the appliance
The standard parts of this machine are composed of dough hook, whisk, beater and stainless steel bowl, totaling four parts.
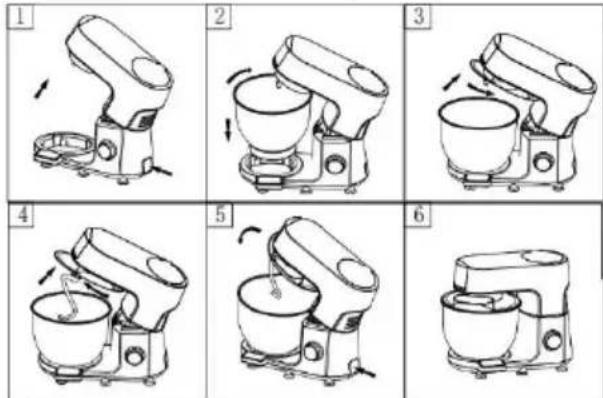
Installation (refer to figure A):
- Press the head-up button, the head will automatically pop up, this time the machine is in a state of power failure as shown in Figure 1.
- Put the bottom of the stainless steel pot pot nail against the product below the gap, put down, and then turn clockwise clockwise until it can not be rotated, as shown in Figure 2.
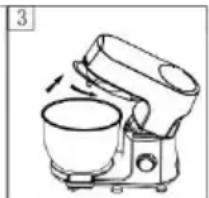
- Put the transparent pot cover on the head, and then turn clockwise until it can not be rotated as shown in Figure 3.
- Insert the notch at the top end of the stirring rod into the drive shaft and then force the stirring rod upwards and turn it counterclockwise until it cannot turn as shown in Fig. 4.
- After installing the above parts, press the head button again.
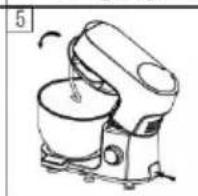
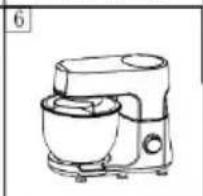
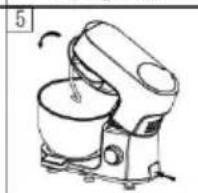
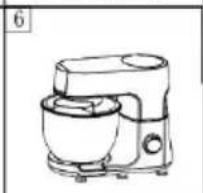
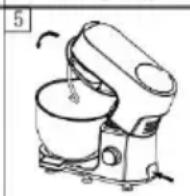
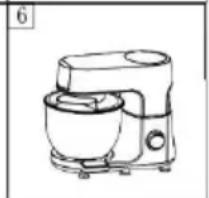
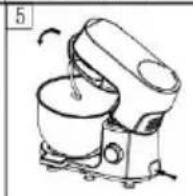
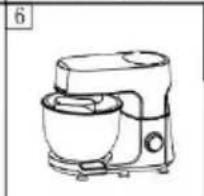
Press the head gently back to the original position, so that the product can start to work as shown in Figure 5-6.
Disassembly (refer to Figure B)
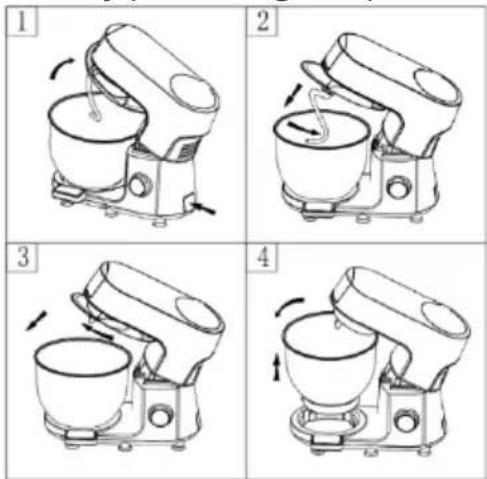
- Press the head up button, the head will pop up automatically, as in Fig. 1, then press the stirring stick firmly upward and rotate it clockwise to the drive shaft bump, then you can directly remove the stirring stick. As Figure 2
- Turn the transparent lid counterclockwise until it can not be turned, the lid can be removed as shown in Figure 3.
SWITCH KNOB DISPLAY FUNCTION
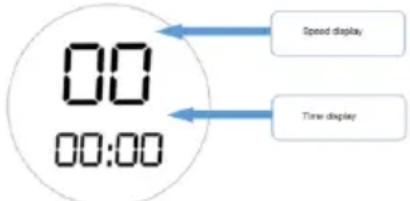
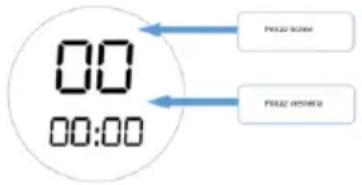
- When the power is turned on, the speed position is displayed as "00", and the time is displayed as "PUSH". The speed and time display lights flashes.
- Press the display, the product starts, default speed 1 start. At the same time, the time will start to time, rotate the speed control knob, you can choose the speed. During the use of the product, even if the speed is changed, the time will continue until the display is pressed again, or the speed is switched back to "00", the product will stop working.
- Rotate the speed control knob, select the desired speed, then press the display, the product will start according to the speed.
- The speed control knob can rotate 360 degrees, with "01", "02", "03", "04", "05", "06", "07", "08", "09", "10", "11", "12", "12" is the largest speed, "01" is the smallest speed.
- When the product is running, suddenly press the head-up button, which causes the product to raise its head automatically, the display will show "E1". At this time, you only need to press the head up button again, press the head down, long press the display, the product can start normally.
Or product operation, due to put too much material to cause motor blockage, the display will also show "E1". At this time, you need to take out some ingredients, and then long press the display, the product can start normally.
The maximum running time of the product is 30 minutes, 30 minutes after the product automatically stop.
SCALE DISPLAY FUNCTION

- After turning on the power, touch the "ON/OFF" button, the weighing display will light up, and the weighing function will start.
- Place the pan directly on the base, and then touch the "Tare" button, at this time the weight is zeroed, and then place the desired material directly on the base to be weighed.
MIXER BLADE/ WISK/ DOUGH HOOK
- Place the product in a safe, stable, neat and dry location.
- Hold the head of the machine with one hand and press the head up button with the other hand, the head of the product will be lifted automatically, you can use your hand to assist the head of the product to lift to the maximum position and install the transparent lid.
- Follow the above stirring bar installation method to install the required stirring bars to the designated position.
- Place the stainless steel pan in the designated position and lock it clockwise.
- Load up the items to be stirred - do not overload, please refer to the attached table for the maximum load capacity of the machine.
- When ready, press the product head down to lock (the head-up button pops up automatically) to bring the product head back to the horizontal position.
- Rotate rotation knob, set the desired speed and pres START / STOP button.
- Adjust the speed knob as required.
- When the mixture has reached the desired level of mixing, press the display to turn off the product and unplug it from the power supply.
- Turn the stainless steel pan counterclockwise and remove it from the machine.
- Remove the mixture from the pot.
- For cleaning of parts, refer to the method described in "Cleaning and Maintenance".
| Accessory | Food | Maximum amount | Operation time | Speeds | Preparation |
| Whisk | Cream (38% fat) | 500 ml | 10 minutes | 5-6 | / |
| Egg white | 12 pcs | 3 minutes | 5-6 | / | |
| Dough hook | Flour | 1500 g | Operation 1 minute and 30 seconds at MIN speed, and then 3 minutes and 30 seconds at I speed. Don't operate the appliance for more than 5 minutes. | / | |
| Salt | 10 g | ||||
| Yeast | 20 g | ||||
| Sugar | 10 g | ||||
| Water(43°C) | 750 ml | ||||
| Lard | 30 g | ||||
| Mixer blade | Flour | 200 g | 5 minutes | 3-4 | / |
| Caster sugar | 200 g | ||||
| Margarine | 200 g | ||||
| Eggs | 4 pcs | ||||
| Slicing/shredding discs | Ccarrots | 400 g | 15 seconds | 4 | / |
| Potatoes | 400 g | 15 seconds | 4 | / | |
| Onions | 400 g | 15 seconds | 4 | / | |
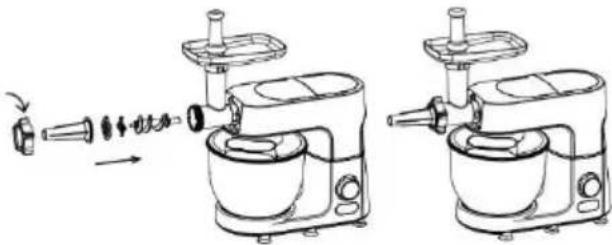
Mincing meat - tips and warnings
- Make sure the cutting edges of the cutter unit are pointing outwards.
- Make sure the notch of the grinding disc fits onto the projection of the cutter housing.
- Never use frozen meat!
- Do not overload the appliance during use by pushing too much meat into the cutter housing.
- Cut the meat into 10cm-long, 2cm-thick strips.
- Remove bones, gristles and sinews as much as possible.
- Put the prepared meat on the feeding tray.
- Press the on/off button to switch the appliance on.
- Use the pusher to gently push the meat into the cutter housing.
- For steak tartare, mince the meat with the medium grinding disc twice.

flowchart
graph TD
    A["1. Top mixing bowl with ① head"] --> B["2. Stacking cup with lid"]
    B --> C["3. Packaging with brush and bulb"]
    C --> D["End"]
Making sausages - tips and warnings
Always mince the meat first.
- Let the sausage skin soak in lukewarm water for 10 minutes. Then slide the wet skin onto the sausage horn. Do not block the air outlet grooves of the horn.
- Put the minced meat of the feeding tray. Press Speed control switch to the appliance on.
- If the skin gets stuck on the sausage horn, wet it with some later.
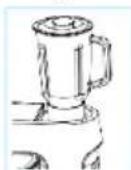
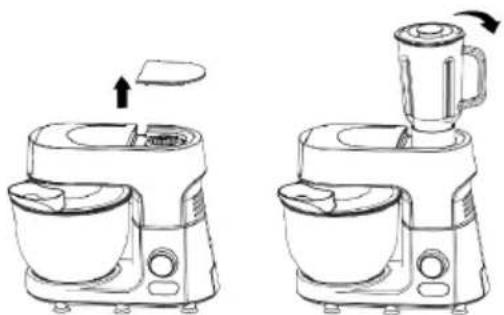
Blender

natural_image
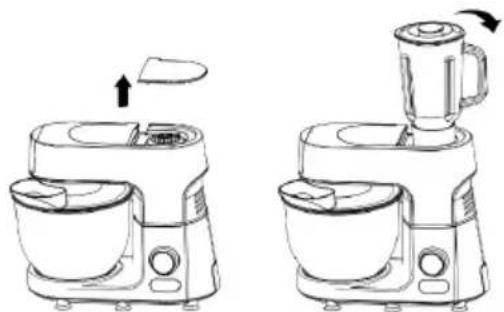
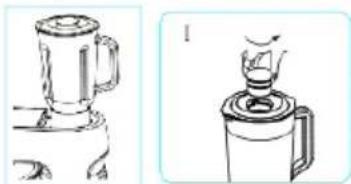
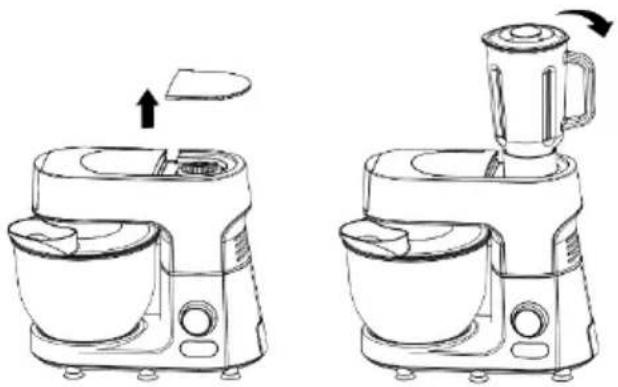
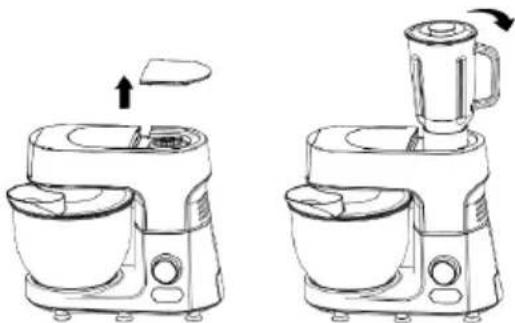
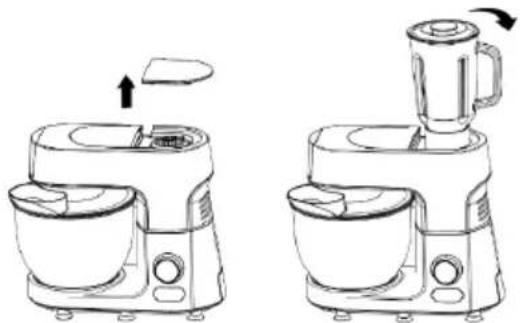
Line drawings of a kitchen mixer and blender with directional arrows indicating motion (no text or symbols)Installation:
- Lower the machine head to a horizontal position, is the head-up knob automatically pops up and locks the head. Open the top cover.
- Hold the glass jar handle into the output port on the machine and turn clockwise until it can not be turned.
Guide the dough sausage coming out of the appliance onto a baking plate. Then cut the sausage into slices of strips and distribute them over the baking plate.
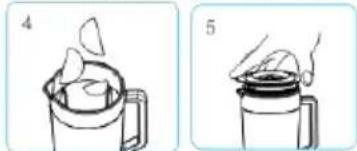
Cut the fruits into small pieces, put them into the mixing cup, add the right amount of water or milk and other liquids, and cover the lid.
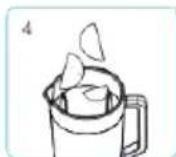
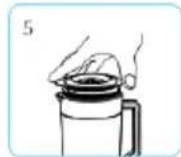
Press the lid into place.
Install the jar onto the base.
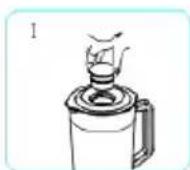
Tips: While the motor is running, if you want to add ingredients you can:
I: Turn the inner lid off the lid in the direction of anticlockwise
II. Add the ingredients into the jar through the opening in the lid
After you have done you work, push "START / STOP button", unplug the appliance, and pour out the content.
Attention:
- Before installing the juice cup, please make sure the product is disconnected from the power supply.
- P-speed operation can not stay for a long time, you can repeat the operation many times.
- Please do not idle the glass for more than 30 seconds.
- Please do not add more than the capacity of the ingredients.
- The juice cup is made of glass, do not use more than 40 °C water scalding.
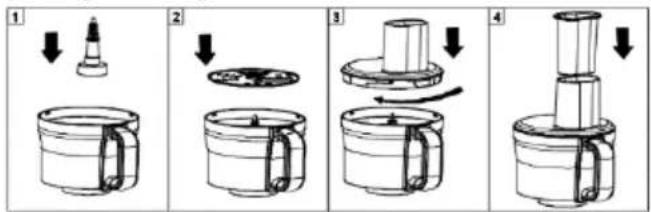
Food processor
The upper connector into the cup, and then loaded with a knife plate (front and back are respectively shredding, slicing function, slicing knife sharp, be careful to hurt your hands), then the lid of the cup to the right point of the instructions to rotate clockwise to lock the lid, put on the pusher cup.

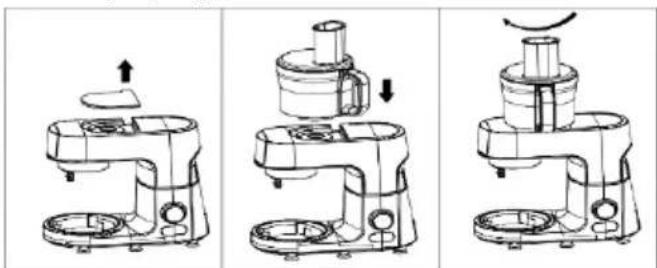
Installation food processor

natural_image
Three technical line drawings of a mechanical device with arrows indicating motion or assembly (no text or symbols present)- Place the machine on a smooth operating surface, keep the surface clean and tidy, and place the control surface of the machine facing the user.
- Remove the top cover on the left side of the machine to expose the food processor lower clutch connector.
- Install the food processor in the lower clutch connector position and tighten clockwise (assembly illustration above).
- Cut ingredients into chunks and place evenly
into the mixing cup.
- Turn on the machine and select the appropriate speed, use the push cup to advance the food when needed.
- When the ingredients have reached the desired result, press the switch to stop. Turn off the power.
Disasamble food processor

natural_image
Technical line drawing of a mechanical device with two views showing internal components and directional arrows (no text or symbols)- Before using our food processor, please read it carefully and keep it for future reference.
- The knife blade is sharp, please be careful when picking up the chopping blade and disk to avoid cuts. (When disassembling and cleaning, please make sure to hold the top handle with your hand, do not touch the blade directly with your hand.)
- Be sure to remove the blade before pouring out the food from the mixing cup.
- Be careful when removing the blade or when cleaning food from the blade.
- It is strictly prohibited to use the food processor to grind meat with the meat grinder T-tube or to mix dough with the mixing hook at the same time.
- Never push food directly into the food processor with your fingers. Use the large or small pusher.
-
Be sure to turn off the power in the following situations
-
When installing or removing the food processor or other accessories.
- After use
- Do not remove the top cover of the food processor before the cutter head has completely stopped.
- When using the blender head, the food in the blending cup should not be too full, please pour it out time and re-blend it in order to achieve a better blending effect.
- When using the blender head, please make sure the food in the blender cup is not higher than the maximum scale MAX in the blender cup to achieve better blending effect.
- Never touch the running parts of the machine with your hands.
- Do not use brute force to forcefully push food in the food processor.
- This food processor should not be used to beat ice (hard objects), so as not to damage the food processor (if you need to beat ice, you can choose the Division of the glass juice cup to beat ice).
- Do not suddenly open the top cover of the food processor during use (if you need to open the top cover
of the food processor, please press the switch of the machine to stop, or cut off the power, so that the machine stops working)
- Do not allow children or incapacitated persons to operate the machine.
- Improper use of the food processor may result in damage to the machine or processor.
- When the food processor is damaged, do not continue to use it, please repair or replace it at the appropriate location.
Cleaning
Unplug the appliance.
Never immerse the motor unit in water or put it under running water. Wipe it with a soft dry or slightly damp cloth.
For easier cleaning, quickly rinse the accessories after use. Completely dismantle the mixer attachment. Handle the blades with care, as some have sharp cutting edges.
If your accessories are discoloured by food (carrots, oranges etc.), rub them gently with a kitchen towel dipped in cooking oil and then clean in the usual way.
Environment
This marking indicates that this product should not be disposed of with other household waste throughout the EU. To prevent possible harm to the environment or human health from uncontrolled waste disposal, recycle it responsibly to promote the sustainable reuse of material resources. To return your used device, please use the return and collection systems or contact the retailer where the product was purchased. They can take this product for environmentally safe recycling.
Guarantee & service
If you need information or if you have a problem, please contact the Gorenje Customer Care Centre in your country (you find its phone number in the worldwide guarantee leaflet). If there is no Customer Care Centre in your country, go to your local Gorenje dealer or contact the Service department of Gorenje domestic appliances.
For personal use only!
GORENJE
WISHES YOU A LOT OF PLEASURE WHEN USING YOUR APPLIANCE
We reserve the right to any modifications!
natural_image
Line drawing of a kitchen mixer with a side-mounted bowl and handle (no text or symbols)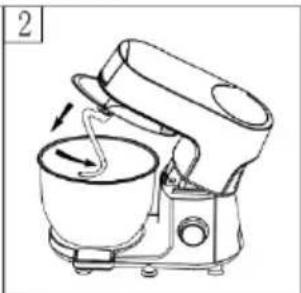
natural_image
Line drawing of a kitchen mixer with a bowl and side arm, no text or symbols present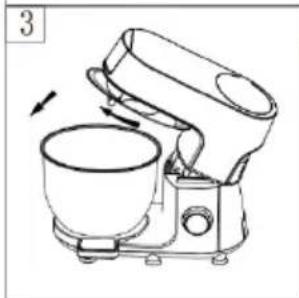
natural_image
Line drawing of a kitchen mixer with a bowl and fan, showing motion direction (no text or symbols)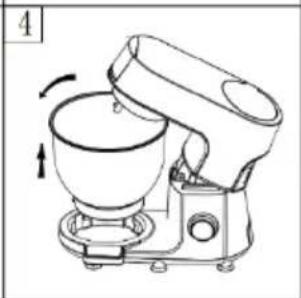
natural_image
Line drawing of a kitchen mixer with a side-mounted dish and rotating knob (no text or symbols)natural_image
Line drawing of a kitchen mixer with handle and bowl (no text or symbols)Блендер
natural_image
Line drawings of a kitchen appliance showing a blender and blender being added to a microwave oven (no text or symbols present)Инсталиране:
natural_image
Three technical line drawings of a mechanical device with no visible text or symbolsnatural_image
Technical line drawing of a mechanical device with two views showing internal components and motion indicators (no text or symbols)natural_image
Line drawing of a kitchen mixer with a bowl and fan (no text or symbols)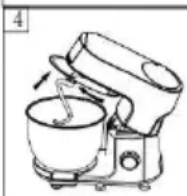

natural_image
Line drawing of a kitchen mixer with a bowl and side panel (no text or symbols)Blender

natural_image
Line drawings of a kitchen appliance with a lid and side view, showing front and side views (no text or symbols)Instalare:
natural_image
Two-step cooking process showing a steamer being placed on a cup (labeled 4) and a lid being placed on a stand (labeled 5), with no text or symbols present.natural_image
Line drawings of a blender with two views: one showing front view and the other showing side view (no text or symbols)natural_image
Three technical line drawings of a mechanical device with arrows indicating motion or assembly (no text or symbols)natural_image
Technical line drawing of a mechanical device with two views (left and right) showing internal components and motion indicators (no text or symbols)natural_image
Technical line drawing of a mechanical device with no visible text or symbols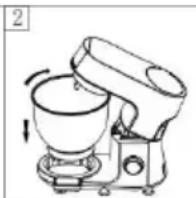
natural_image
Line drawing of a kitchen mixer with a bowl and fan (no text or symbols)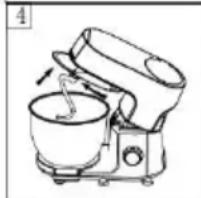
natural_image
Line drawing of a kitchen mixer with mixing bowl and fan (no text or symbols)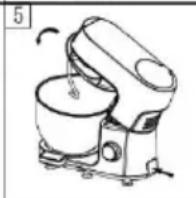
natural_image
Line drawing of a kitchen mixer with a bowl (no text or symbols)Turmixgép
natural_image
Line drawings of a kitchen appliance showing a lid being removed from the side and a blender being inserted (no text or symbols)Összeállítás:
natural_image
Two-step line drawings of a blender being filled with a lid, showing the process (no text or symbols)Tegye rá a tetejét.
natural_image
Two line drawings of a blender with handles and a side view showing the lid (no text or symbols)natural_image
Three technical line drawings of a mechanical device with arrows indicating motion or assembly (no text or symbols present)natural_image
Technical line drawing of a mechanical device with two views (top and side), showing internal components and motion indicators (no text or symbols)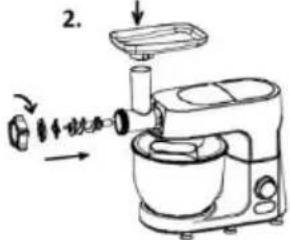
natural_image
Line drawing of a kitchen mixer with a bowl and side arm (no text or symbols)Blender

natural_image
Line drawings of two kitchen appliances, one with a lid and arrow indicator, the other with a handle and arrow indicator (no text or symbols)Instalacja:
natural_image
Illustration of two-step cooking process: adding a lid to a steamer with a handle (no text or symbols)natural_image
Line drawings of a blender with handle and lid, shown from two different angles (no text or symbols)The upper connector into the cup, and then loaded with a knife plate (front and back are respectively shredding, slicing function, slicing knife sharp, be careful to hurt your hands), then the lid of the cup to the right point of the instructions to rotate clockwise to lock the lid, put on the pusher cup.
natural_image
Three technical line drawings of a mechanical device with arrows indicating motion or assembly (no text or symbols present)natural_image
Technical line drawing of a mechanical device with two views (left and right) showing internal components and motion indicators (no text or symbols)Mixér

natural_image
Line drawings of two kitchen appliances, one with a lid and arrow indicating rotation (no text or symbols)Inštalácia:
natural_image
Three technical line drawings of a mechanical device with arrows indicating motion or assembly (no text or symbols)natural_image
Technical line drawing of a mechanical device with two views (top and side), showing internal components and motion indicators (no text or symbols)flowchart
graph TD
    A["1. Initial mixing setup"] --> B["2. Covering device"]
    B --> C["3. Packaging step with cleaning and packaging"]
Mixér
natural_image
Line drawings of a kitchen appliance showing front and side views (no text or symbols)Instalace:
natural_image
Two-step illustration showing a steamer being filled with liquid, labeled 4 and 5 (no text or symbols on the images)natural_image
Two line drawings of a blender with a side view showing the lid and handle (no text or symbols)natural_image
Three technical line drawings of a mechanical device with arrows indicating motion or assembly (no text or symbols)natural_image
Technical line drawing of a mechanical device showing front and side views (no text or symbols)natural_image
Line drawing of a kitchen mixer with rotating fan (no text or symbols)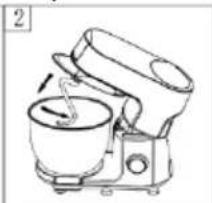
natural_image
Line drawing of a kitchen mixer with a bowl and mixing bowl (no text or symbols)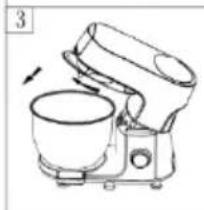
natural_image
Line drawing of a kitchen mixer with a side bowl and fan (no text or symbols)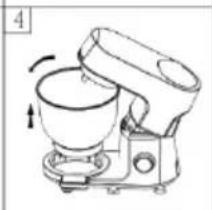
natural_image
Line drawing of a kitchen mixer with a cup and fan (no text or symbols)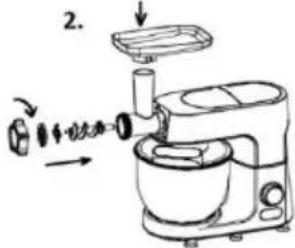
natural_image
Line drawing of a kitchen mixer with a bowl and stand (no text or symbols)natural_image
Technical line drawing of a kitchen mixer with two views showing internal components and tool path (no text or labels)Mixer

natural_image
Line drawings of a kitchen appliance with a blender and lid, shown from front and side views (no text or symbols)Aufstellung:
natural_image
Three technical line drawings of a mechanical device with arrows indicating motion or assembly (no text or symbols present)natural_image
Technical line drawing of a mechanical device with two views (left and right) showing internal components and motion indicators (no text or symbols)natural_image
Line drawing of a kitchen mixer with a bowl and fan (no text or symbols)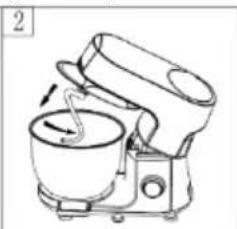
natural_image
Line drawing of a kitchen mixer with a bowl and fan (no text or symbols)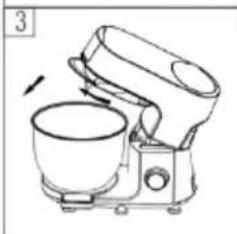
natural_image
Line drawing of a kitchen mixer with a bowl and fan (no text or symbols)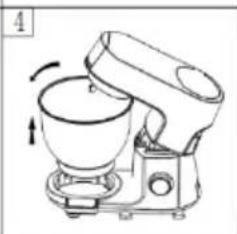
natural_image
Line drawing of a kitchen mixer with a side-mounted dish and fan (no text or symbols)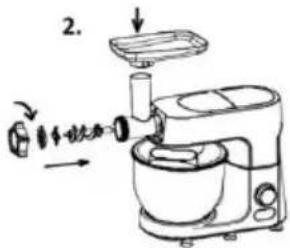
natural_image
Line drawing of a kitchen mixer with handle and bowl (no text or symbols)Блендер

natural_image
Line drawings of a kitchen mixer with a lid and side view showing the handle (no text or symbols)Встановлення:
natural_image
Three technical line drawings of a mechanical device with arrows indicating motion or assembly (no text or symbols present)natural_image
Technical line drawing of a mechanical device with two views (left and right) showing internal components and motion indicators (no text or symbols)natural_image
Line drawing of a kitchen mixer with a bowl and fan (no text or symbols)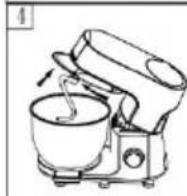
natural_image
Line drawing of a kitchen mixer with a bowl (no text or symbols)natural_image
Line drawing of a kitchen mixer with a side fan and handle (no text or symbols)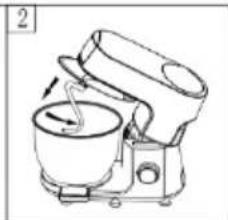
natural_image
Line drawing of a kitchen mixer with a bowl and fan (no text or symbols)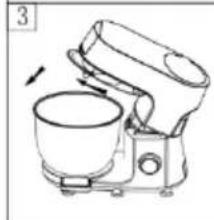
natural_image
Line drawing of a kitchen mixer with a bowl and handle (no text or symbols)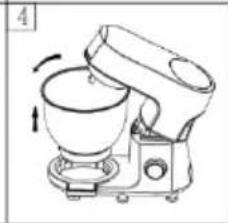
natural_image
Line drawing of a kitchen mixer with a side-mounted dish and rotating knob (no text or symbols)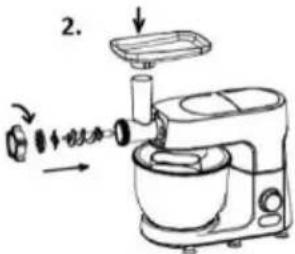

natural_image
Line drawing of a kitchen mixer with a side-mounted stand and control panel (no text or symbols)Блендер

natural_image
Line drawings of a kitchen mixer and blender with directional arrows indicating motion (no text or symbols)Установка
natural_image
Two-step illustration showing a container being filled with food, labeled 4 and 5 (no text or symbols on the objects)natural_image
Two line drawings of a blender with handles and lid, shown from different angles (no text or symbols)natural_image
Three technical line drawings of a mechanical device with arrows indicating motion, no text or symbols present.natural_image
Technical line drawing of a mechanical device with two views (left and right) showing internal components and motion indicators (no text or symbols)natural_image
Line drawing of a kitchen mixer with a bowl and fan (no text or symbols)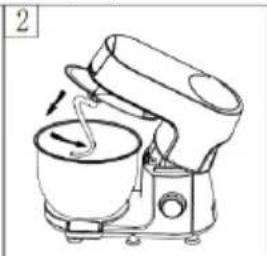
natural_image
Line drawing of a kitchen mixer with a side arm and handle (no text or symbols)
natural_image
Line drawing of a kitchen mixer with a side bowl and handle (no text or symbols)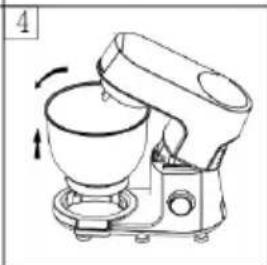
natural_image
Line drawing of a kitchen mixer with rotating fan (no text or symbols)Блендер

natural_image
Line drawings of two kitchen appliances, one with a lid and arrow indicating rotation, the other with a handle and arrow indicating rotation (no text or symbols)Курастыру:
natural_image
Simple line drawing of a blender with a lid and handle (no text or symbols)natural_image
Line drawing of a coffee maker with an upward arrow indicating motion (no text or symbols)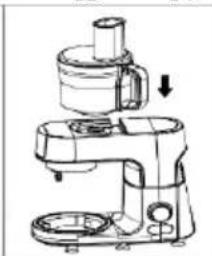
natural_image
Technical line drawing of a mechanical device with no visible text or symbols
natural_image
Technical line drawing of a mechanical device with no visible text or symbolsnatural_image
Technical line drawing of a mechanical device with two views (left and right) showing internal components and assembly (no text or symbols)flowchart
graph TD
    A["1. Roundener with handles"] --> B["2. Stamped mixing bowl"]
    B --> C["3. Covering bowl with brush and handle"]
Blenderi