
CT5010 - Outillage à main BLAUPUNKT - Free user manual and instructions
Find the device manual for free CT5010 BLAUPUNKT in PDF.

| Product Type | Cordless Grass Trimmer |
| Brand | Blaupunkt |
| Model | CT5010 |
| Voltage | 18 V |
| Cutting Width | 230 mm (2 sides) |
| String Diameter | 1.2 mm |
| No-Load Speed | 10,000 rpm |
| Battery Type | 18V Li-Ion (BP1820 2.0Ah, BP1840 4.0Ah recommended, BP1850 5.0Ah) |
| Battery Included | No |
| Telescopic Pole | Yes, adjustable length |
| Trimming Wheel | Yes |
| Edge Trimming Function | Yes |
| Rotatable Cutting Head | Yes, adjustable angle |
| Rotatable Auxiliary Handle | Yes |
| Flower Guard | Yes, steel wire |
| Dimensions (L x W x H) | 17.8 x 16.3 x 91.5 cm |
| Weight | 1.9 kg |
| Sound Pressure Level (LpA) | 76.5 dB(A) (K=3 dB) |
| Noise Level During Operation | Up to 86.6 dB(A) (K=3 dB) |
| Vibration Emission (ah) | 92 dB(A) (Km=1.5 m/s²) |
| Permissible Operating Time | 35 minutes |
| Manual Thread Length Adjustment | Yes, via spool button |
| Automatic Thread Feeding | Yes, by tapping trimmer on ground |
| Plastic Blade Head Compatible | Yes, replaceable |
| Cleaning | Wipe with clean cloth, brush, or compressed air; no solvents |
| Safety Features | Switch-off lock, protective cover, guard, ear/eye protection recommended |
Frequently Asked Questions - CT5010 BLAUPUNKT
User questions about CT5010 BLAUPUNKT
0 question about this device. Answer the ones you know or ask your own.
Ask a new question about this device
Download the instructions for your Outillage à main in PDF format for free! Find your manual CT5010 - BLAUPUNKT and take your electronic device back in hand. On this page are published all the documents necessary for the use of your device. CT5010 by BLAUPUNKT.
USER MANUAL CT5010 BLAUPUNKT
natural_image
Blue and black handheld metal detector tool with handle and grip (no visible text or symbols)Enjoy it.
| штчя | тюч | я | т | |
| yr | vp | n n | ||
| ó | óхó | х | ||
| yr | vyv | r z | vz z r | |
| yr | v v vz r | |||
| yr | v | nv | yr | vz z r v |
| n | n | n | ryr | p | n | |
| T | n | vz | z r | |||
| yr | v | n | vy | vpn | n | v |
| yr | v | yvn | ||||
| yr | vp | r | n n | |||
| yr | z | rt | y |
a vz z r ryr p vp
IMPORTANT INFORMATION
In order to achieve the highest satisfaction, enjoy the performance of the product and learn all its features and functions, please read this manual before using this product. Before using the device, read the manual and follow the instructions contained therein. The manufacturer is not liable for damage caused by the use of the device not in accordance with its intended use or improper handling. Retain the operating instructions so that they can also be used when using the product at a later date.
- The appliance must only be connected to a grounded socket outlet with characteristics in accordance with the values on the rating plate.
- Check that the total current consumption of all appliances connected to the wall socket does not exceed the maximum load of the fuse.
- If an extension cable is used, check that the total power consumption of the equipment connected to the extension cable does not exceed the load parameters of the extension cable. Arrange the extension cable in such a way as to avoid accidental pulling and tripping over it.
- The appliance is not intended to be controlled by an external timer, separate remote control or other equipment that can switch the appliance on automatically.
- Always disconnect the appliance from the power supply before maintenance work. When disconnecting the power cord, always pull it out of the socket by holding the plug. Never pull out the power cord by pulling on the cable, as the plug or cable may be damaged, in extreme cases even a fatal electric shock may occur.
• Do not leave the unit switched on. - Do not immerse the appliance in water or any other liquid.
- The appliance should be cleaned regularly as described in the section on Cleaning and maintenance of the appliance.
- Do not place the appliance near heat sources, flames, an electric heating element or on a hot oven. Do not place on top of any other appliance. - Take special care when using the appliance when children or pets are around.
• Do not allow children to play with the appliance.
- Do not use the appliance near flammable materials.
- Periodically check the condition of the power cord. If the non-removable power cord becomes damaged, it should be replaced by the manufacturer or a specialised repair facility or by a qualified person to avoid danger.
- Do not use the appliance with a damaged power cord or plug or if it has been dropped or damaged in any other way or is not working properly. Do not repair the appliance yourself, as there is a risk of shock. Take the damaged appliance to a competent service centre for inspection or repair. Any repairs may only be carried out by authorised service centres. Improper repair may pose a serious risk to the user.
- Use only original accessories and spare parts for the appliance or those recommended by the manufacturer. The use of accessories or parts not recommended by the manufacturer may damage the appliance and endanger your safety.
• A moment's inattention risks losing control of the tool.
- Avoid starting the power tool unintentionally. Make sure the power switch is in the OFF position before connecting the power tool to the mains. Carrying the power tool with your finger on the trigger or connecting the power tool to the mains after it has already been switched on can lead to accidents.
- Wear appropriate clothing. Do not work in loose clothing or wear jewellery while working. Keep hair, clothing and gloves away from moving parts. Moving parts of the power tool can catch and pull in loose clothing, jewellery or long hair.
- Remove any spanners or tools from the power tool before starting it. A tool or spanner still connected to the rotating part of the power tool can cause injury.
- Use caution when working with power tools, concentrate on your work and use common sense. Do not use a power tool when tired or under the influence of drugs, alcohol or medication. Even a moment's inattention when working with a power tool risks a serious accident.
- Keep children away from the work area and DO NOT allow children to pull on the power cord - this can cause serious injury.
- Before making any adjustments, changing accessories or putting the power tool away for storage, flip the switch to the off position to disconnect the power tool from the power supply. Such precautions reduce the risk of accidentally starting the power tool.
• Ensure that the vents are free of debris. - This tool should not be used by anyone under 16 years of age.
 | Read the user manual. |  | Use ear protection |
 |  | Wear protective glovesGeneral warning | |
 | Fire hazard |  | Wear protective clothing |
 | Electric shock hazard |  | Wear a protective mask |
 | Wear safety glasses |  | Wear respiratory protection |
- Warning of danger. Use extreme caution.
- Important, read the instructions and heed the warnings.
- Wear safety goggles.
- Use protective earmuffs.
- Always disconnect from the power source before repair or maintenance. If the cable is damaged, immediately remove the plug from the electrical outlet.
- Do not use the trimmer in the rain or in wet conditions.
- Hold the trimmer securely and operate with both hands.
Workplace safety
- Keep the work area neat and well lit. Disorder and poor lighting contribute to accidents.
- Before starting work, prepare and clear the area, remove all protruding stones, branches, wires, and other foreign objects from the ground that are a risk of tripping over.
• Take special care if working on sloping terrain or slopes. Do not use an electrically powered machine in explosive environments created by flammable liquids, gases or dust. - Do not use the trimmer in extreme fire or explosion hazards. The trimmer is not protected against water. Working in the rain or in a damp environment risks electric shock.
- Do not allow children or observers in areas where an electrically powered appliance is in use. Leave electrically powered garden equipment away from bystanders.
- The operator or user is responsible for accidents or hazards occurring to other persons or the environment.
Electrical safety
- Only connect the appliance to an outlet with characteristics consistent with the values on the rating plate. Do not expose electrically powered equipment to rain or wet
conditions. If water enters the power tool, the risk of electric shock increases.
• Do not stress the connection cables.
- Never use the connection cable to carry, pull electrically powered equipment or pull the plug from the socket.
- Keep the connection cable away from heat sources, oils, sharp edges or moving parts. Damaged or entangled connection cords increase the risk of electric shock.
• Safety rules for electrical machines and equipment
- ATTENTION: Before installing or using the appliance, it is essential to read the operating instructions and especially the safety instructions for use.
- Keep the instructions for reference and pass them on to future users of the unit. Failure to observe the stated safety instructions and warnings may result in electric shock, fire or serious injury.
- Do not allow children or young people to operate the appliance.
- Persons not familiar with the operating instructions should not install, maintain or use the appliance. This appliance is not intended for use by persons with reduced physical, sensory or mental capabilities or lack of experience or knowledge of the appliance, unless supervised or in accordance with the instructions for use given by those responsible for their safety.
Human safety
- Do not operate the trimmer if you are feeling tired or under the influence of alcohol, drugs or medication. Full concentration is required when using the machine and caution must be exercised. A moment's inattention while using the power tool can lead to an accident and
consequent serious injury or property damage.
- It is essential to wear personal protective equipment. Always wear close-fitting safety goggles (according to EN 166 or other national regulations). Wear ear protection due to the loudness of the equipment. The use of protective equipment such as a dust mask, non-slip safety shoes with uppers, protective gloves is also recommended.
- Wear close fitting clothing. Loose clothing, jewellery, scarves can get caught by the moving parts of the trimmer, which can lead to dangerous accidents. If the user has long hair, it should be secured and bundled.
- During operation, the appliance may eject various objects, sawdust, pieces of wood at high speed. There is a danger of injury. The use of suitable clothing is recommended.
- Before starting the power tool, remove all spanners and other tools used to adjust the unit. Leaving a spanner in a rotating part of the power tool may cause injury.
- Avoid working in an unnatural body position. Assume a correct and stable posture to avoid the possibility of losing balance. This will allow better control of the power tool in unpredictable situations.
- Avoid unintentional starting. Make sure the power cord is unplugged and the switch is in the off position before picking up or carrying the equipment. Carrying electrically powered equipment with your finger on the switch or connecting to the mains with the switch on may lead to an accident. Keep hands and feet away from moving (rotating) parts of the trimmer.
- Keep a safe distance from bystanders In spite of the inherently safe design, the use of protective measures and additional protective measures, there is always a risk of residual injury during operation.
- Do not use detergents or alcohol to clean the trimmer.
- Do not use attachments that are not specifically designed for the machine and recommended by the manufacturer. The fact that an accessory can be fitted to a power tool is no guarantee of safe use.
- The attachment system of the power tool must correspond to the dimensions of the power tool. Improperly dimensioned work tools cannot be sufficiently guarded or controlled.
- Personal protective equipment must be used. Depending on the type of work, wear a protective mask covering the entire face, eye protection such as safety goggles. Protect the eyes from airborne foreign bodies generated during work. Protect the respiratory tract against airborne dust and vapours with a dust mask. Exposure to noise over a prolonged period can lead to hearing loss.
- Keep bystanders at a safe distance from the range of the trimmer. Anyone in the vicinity of a working power tool must use personal protective equipment. Workpiece splinters or broken work tools can splinter and cause injury even outside the immediate range zone.
- Clean the ventilation slots of the equipment regularly.
- When holding the trimmer by the base handle, guide it with the auxiliary handle.
- Always switch off the trimmer when: - it is left unattended, - before adjustment and maintenance work, - after being struck by a foreign object, - abnormal vibration of the equipment is felt.
General information
- The appliance is intended exclusively for use in the domestic garden in accordance with the description and safety rules
contained in these instructions for use. When the trimmer is switched off, the line/blade continues to rotate for some time. Wait until the motor and the line/blade have come to a complete stop before restarting the machine. Do not switch the trimmer on and off at short intervals.
- The trimmer operator should wear decent footwear with non-slip soles and long trousers to protect the legs. Do not work barefoot or in flip-flops or sandals. Always use the trimmer with both hands. Only use the machine during daylight or in good artificial lighting.
Before starting the machine
- Check the condition of the trimmer and ensure that none of the components are damaged and that the line spool or blade is correctly attached and fastened. Before using the trimmer, check it for signs of wear or damage and return it to an authorised service centre if necessary. Check that bystanders and animals are at a safe distance from the trimmer (at least 15 metres). Disconnect the trimmer from the mains supply when not in use, before moving it to another work area, and before any work is carried out on the power tool (e.g. adjusting or cleaning).
USE PERSONAL PROTECTIVE EQUIPMENT
Wear safety goggles according to standard En166
Use protective masks according to En149
Use other precise personal protective equipment, depending on the type of work to be carried out.
Safety instructions for charger and battery
To connect the battery for charging, insert it into the charger and then connect the charger to the power source.
Protect the charger from rain and moisture. The charger may
only be used indoors.
Keep the charger clean.
Do not use the charger on flammable objects and substrates (e.g. paper) or in environments with explosive and/or flammable atmospheres.
Always provide adequate ventilation when charging, as fumes or electrolyte may leak from the battery if the battery is damaged due to improper handling/damage.
Unplug the charger from the wall socket when charging is complete. Do not leave it connected to a power source for longer than necessary.
Store and charge the battery in a dry place and make sure no water gets into it.
Keep the battery connectors clean and free from dirt.
Protect the battery from shocks, moisture and never open or mechanically damage the battery pack.
To check the charge level of the battery, do the following press the button on the battery pack and, if necessary charge the battery pack according to the number of LEDs and the expected operating time of the cordless tool.
Storage
Store cordless tools in a dry place out of the reach of children. For safety reasons, remove the battery pack before storing the cordless tool. When the battery pack is inserted in the cordless tool, it discharges faster. Protect the battery pack and tool from frost, high temperatures, moisture and water. Do not repair a damaged battery pack. Repairs to the battery pack may be carried out at the manufacturer or at an authorised service centre. Only charge the battery in chargers with the parameters specified by the manufacturer Storing or using the battery in unsuitable conditions may cause electrolyte
leakage. Damaged or modified batteries must not be used. Damaged or modified batteries may behave in an unpredictable manner, causing dangerous consequences.
Keep the battery away from fire and protect it from heat. The battery may explode if exposed to fire or temperatures exceeding 130^ C.
Inserting the battery
Note: The use of an unsuitable battery for the device may lead to malfunction or damage to the device. To insert the battery pack into the handle, push it in until you hear the locking mechanism lock (the battery pack should be positioned flush with the edge of the device)
When this crossed-out wheeled bin symbol is attached to a product it means that the product is covered by the European Directive 2012/19/EU. Please inform yourself about the local separate collection system for electrical and electronic products. Used appliance should be delivered to the dedicated collecting points due to hazardous components, which may affect the environment. Do not dispose this appliance in the common waste bin.

Your products is designed a manufactured with high quality materials and components, which can be recycled and reused.
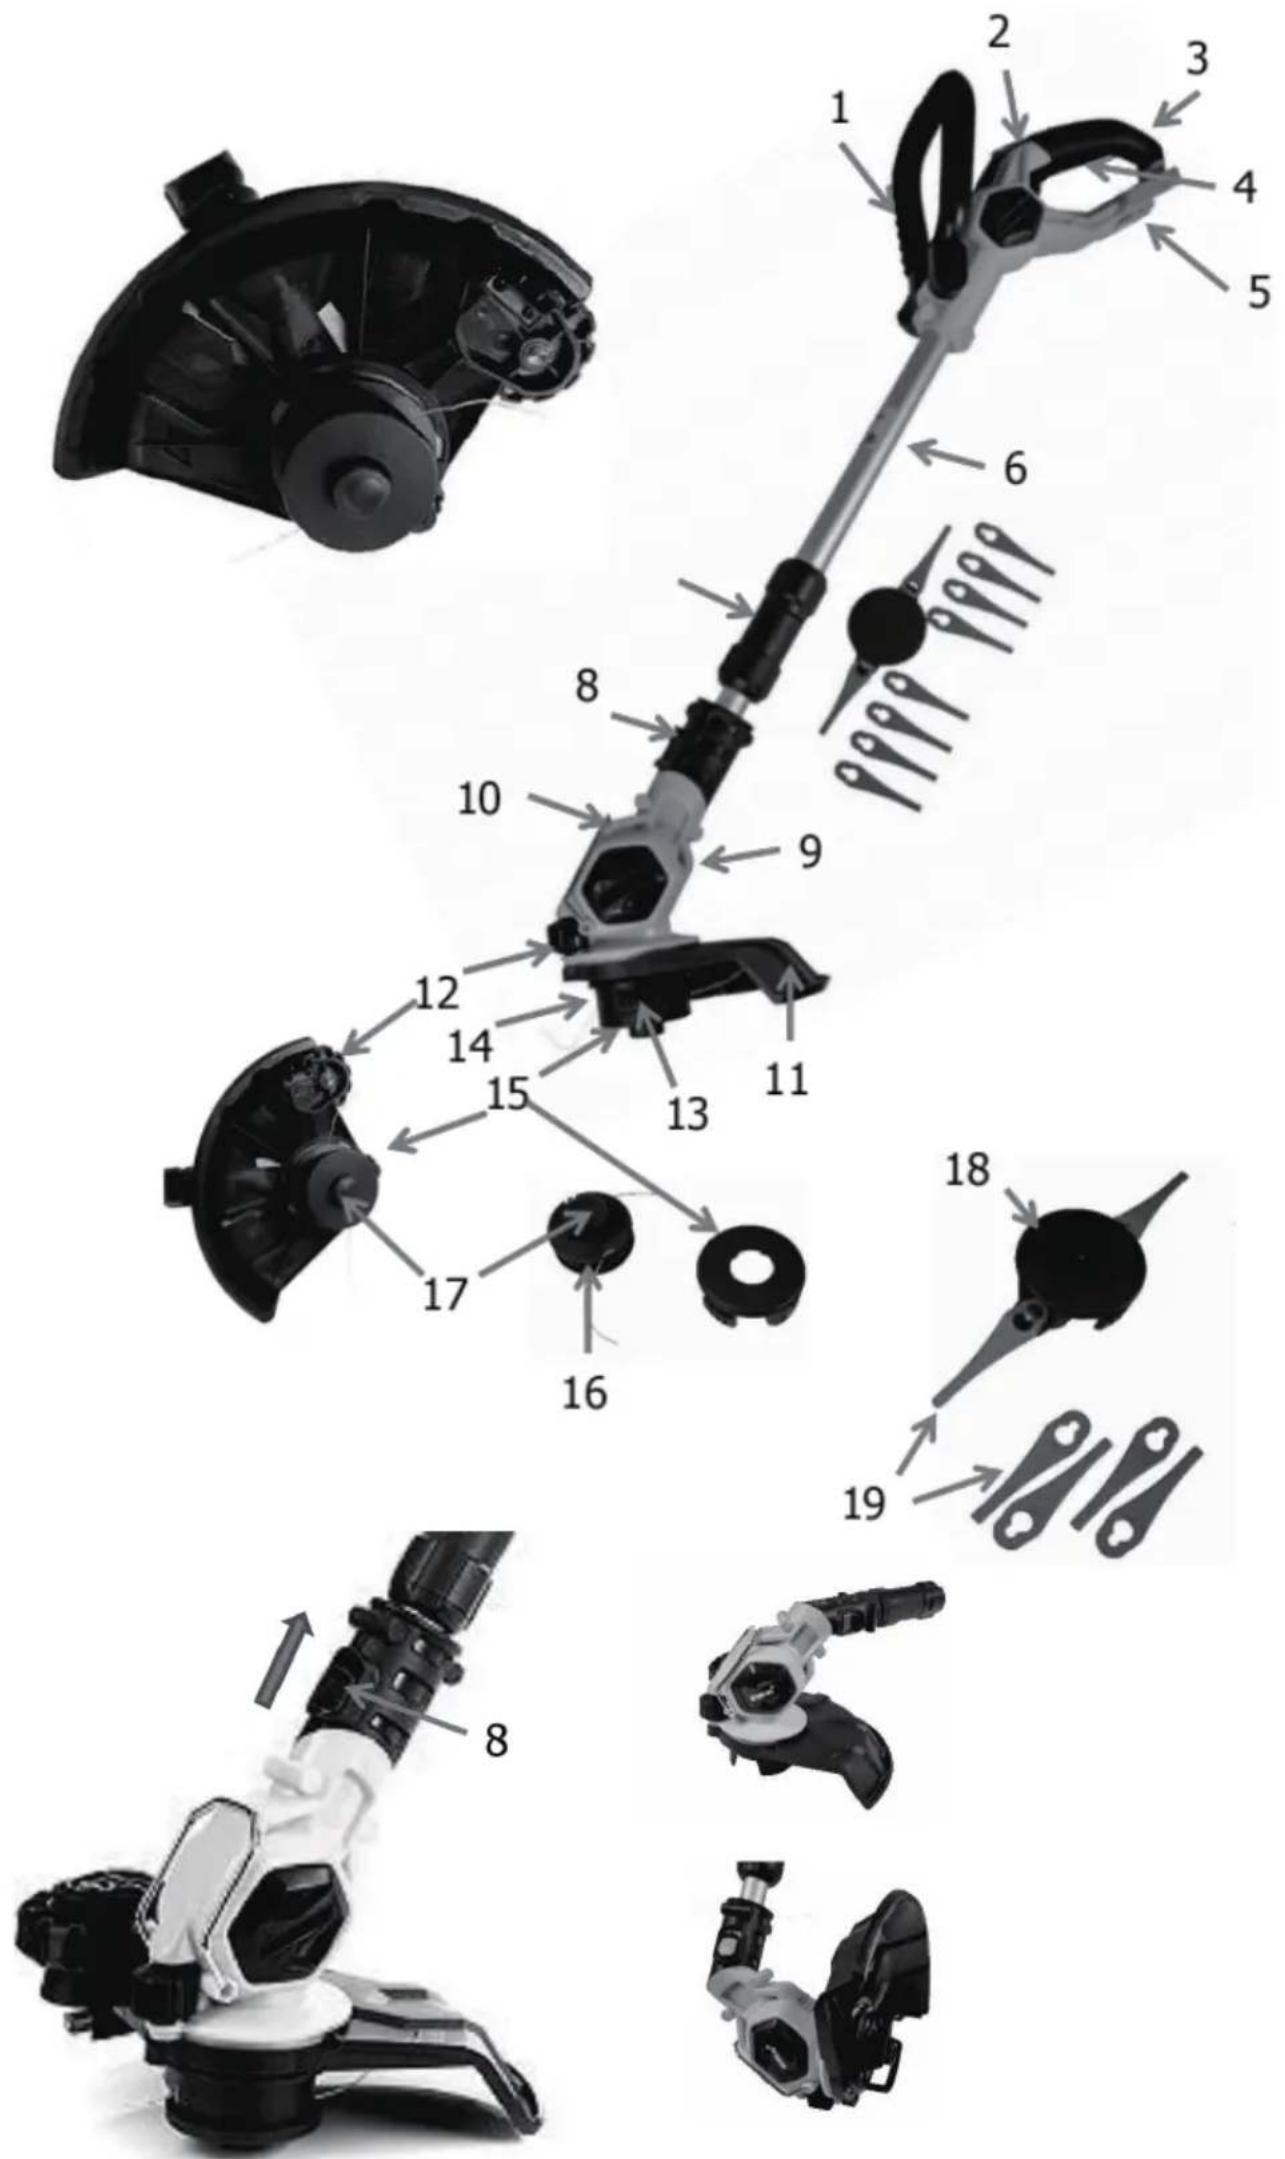
Device description
-
Top handle
-
Switch-on lock
-
Auxiliary handle
4 On/off switch
5 Battery holder
6 Telescopic pole extension
7 Length adjustment lock button
-
Angle adjustment lock button
-
Trimmer head
-
Fold-out protective handle
11 Protective cover
12 Guide wheel
13. Spring slot (not visible on photo) 14. spool holder permanently mounted
14. Permanently mounted spool holder 14.
15. Spool cover
16. Spool
17. Spool button (thread length change)
18. Head with plastic blades
19. Plastic blades
natural_image
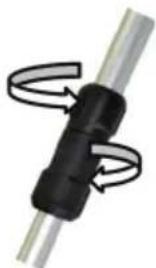
Close-up of a black cylindrical object with curved arrows indicating rotational motion (no text or symbols)Adjusting the telescopic pole (6 and 7)
To set the desired length of the telescopic pole to suit your height, turn the locking device (7) clockwise, then pull the telescopic pole
(6) and fix it by moving the locking mechanism (7) in the opposite direction.
Then tighten again clockwise.
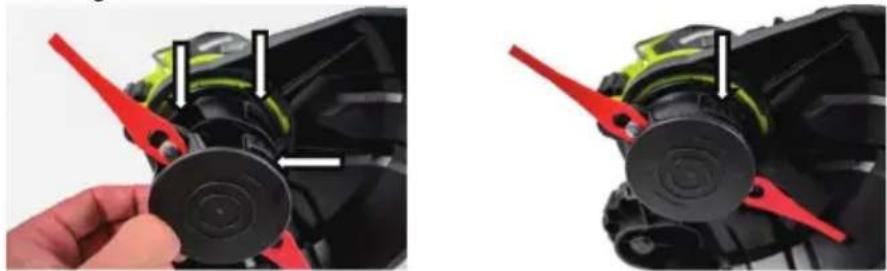
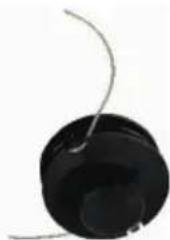
Replacing the spool:
To replace the bobbin with a replacement head with plastic blades, proceed as follows:
-
There are two marked points on the bobbin cover (15) which are opposite each other. Push in both points at the same time and pull the bobbin cover. (15) from the fixed bobbin holder (14) in the direction indicated by the arrow.
-
Then pull the bobbins (16) out of the bobbin cover (15).
-
If you are just replacing the bobbin (16) with a new one, make sure that you first push both ends of the thread through the metal eyelets on the bobbin cover.
(15) thread through.
- Before attaching the new spool(16) together with the spool cover (15) to the grass trimmer, ensure that the spring is correctly inserted into the spring slot (13). Insert the slightly wider end of the spring into the slot (13), which is located on the spring holder (14).
5.Now insert the new spool (16) together with the spool cover
(15) with the "marked points" into the recesses of the spool holder (14). Once these have been fitted and the bobbin cover snapped into place, you can start working.

The thread length can be changed manually or automatically.
Manual:
For your own safety, remove the battery!
Press the bobbin button (17) with one hand and successively pull the corresponding thread tip to the desired length. When you have finished adjusting the thread length, release the button. If the thread length is too long, the thread will be automatically shortened to the correct length by the blade at the guide wheel (12) when the trimmer is started.
Automatic:
The length of the thread can be automatically increased at any time while the trimmer is running by pressing the trimmer briefly against the ground. The thread automatically unrolls from the spool via the spool button (17)
NOTE: Pressing the grass trimmer to the ground for too long will empty the line spool very quickly.

natural_image
Close-up of a mechanical component with labeled parts, showing assembly steps and a red arrow indicating a specific step (no text or symbols present)Replacing the monofilament spool with plastic blades
1 Remove the monofilament spool(16) and insert the replacement head with plastic blades(18) (remember to remove the battery):
2. Remove the spool(16) together with the spool cover(15) as described for spool replacement.
3. Then replace the plastic blade head (18) with the two plastic blades (19).
4 Check that both plastic blades (19) are well seated.
5. Make sure that the spring is correctly seated in the slot (13) If the spring is no longer inserted or has slipped out, correct it.
6. Then insert the replacement head (18).
7. Place" into the recesses of the spool holder(14).
Once these are correctly assembled and the interchangeable head is locked in place, you can start working.
natural_image
Close-up of a hand holding a black mechanical component with red lever arms, showing assembly steps (no text or symbols visible)The plastic inserts (19) can be easily replaced. There is no need to remove the interchangeable head (18).
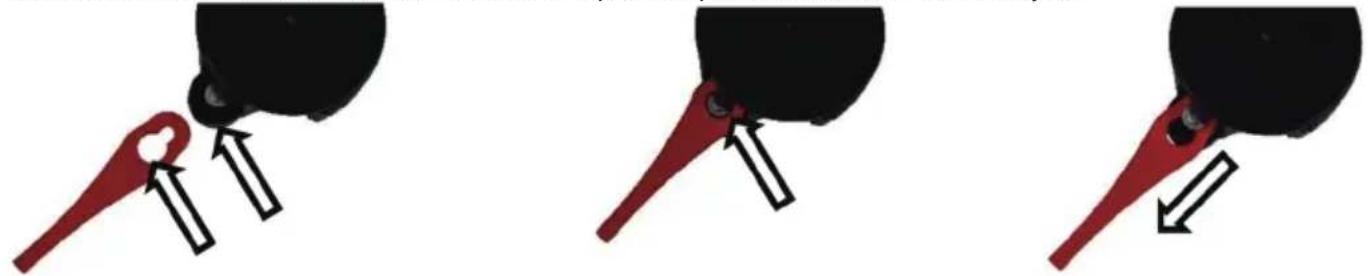
Grasp the plastic blade and push it towards the interchangeable head. Then simply pull the plastic blade(19) upwards.
To attach the new plastic blades (19) to the replacement head (18), simply place them in the head catches as shown in the illustrations below and pull the plastic blades (19) towards you.
natural_image
Three-step illustration of a red tool tip interacting with a black object, showing motion direction (no text or symbols)
natural_image
Person using a metal detector to clean vegetation, no text or symbols visible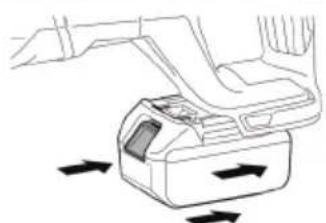
natural_image
Line drawing of a mechanical device with directional arrows indicating movement or force (no text or symbols)Grass mowing:
Do not mow wet grass. Best mowing results are obtained when the grass is dry. Feed the extension cable through the frame to the rear, ensuring that it is always behind the user when cutting. Hold the unit at an angle of 20 degrees to the grass to be cut, moving it in a swinging motion, left and right. Take care to hold the unit away from you - see illustration On the outside of the cutting head (9) there is a safety lock button for adjusting the angle (8). Move it in the direction indicated by the arrow to adjust the angle of the grass cutting head (9) to the working area.
Inserting the battery pack
Note: Using a battery that is not suitable for the unit may lead to incorrect operation or damage to the unit. To insert the battery into the handle, push it in until you hear the locking mechanism lock (the battery should be positioned flush with the edge of the unit)
Cleaning, maintenance:
- After each use of the unit, clean the entire unit of plant debris and the bottom cover of the collected compacted mass.
- Keep the ventilation slots and the motor housing free of dust and dirt at all times if possible. Wipe the unit with a clean cloth, brush or blow with compressed air.
- Cleaning is recommended immediately after each use.
- Do not use any cleaning agents or solvents to clean the appliance; these may damage the plastic parts of the appliance. Care should be taken to ensure that water does not get inside the unit.
- Regularly check the condition of the cutting line and also the tightness of the screws. With new machines, the first check of screw tightness should be carried out after the trimmer has been in operation for about 2 hours. If necessary, retighten loose bolts.
Ensure that all parts of the power tool are in good condition and that the machine is not overloaded or doing work for which it was not designed.
Take a 15 minute break after every 15 minutes of operation.
BLAUPUNT Cordless grass trimmer CT5010
Voltage: 18 V
Cutting width : 230 mm (2 Sides)
String diameter: 1.2 mm
No load speed: 10.000 rpm
Telescopic tube
With trimming wheel
With edge trimming function
With rotatable cutting head
With rotatable auxiliary handle
With flower protect guard steel wire
Battery: 18VLi-Ion, BP1820 2.0Ah (not included); BP1840 4.0 Ah-recommended (not included); BP1850 5.0 Ah (not included).
Dimensions: 17.8 x 16.3 x 91.5 mm
Weight: 1.9 kg
Noise
Typical A-weighted noise level measured in accordance with ISO/TR 11688-1:
Sound pressure level (LpA): 76.5 dB (A)
Measurement uncertainty (K): 3 dB (A)
Noise level during operation may exceed: 86.6 dB (A), (K) 3 dB
Vibrations
Total vibration value measured in accordance with En3774:
Vibration emission: ah = 92 dB(A)
Measurement uncertainty (K): Km = 1.5 m/s
Permissible Operating Time: 35 minutes of operation.
WAŻNE INFORMACJE
natural_image
Close-up of a black cylindrical object with curved arrows indicating rotation or movement, connected to a metallic rod (no text or symbols visible)natural_image
Close-up of a hand holding a black plastic component with green wires, next to a mechanical part (no visible text or symbols)
natural_image
Close-up of a mechanical component with a black cylindrical body and green clamped ring, no visible text or symbols.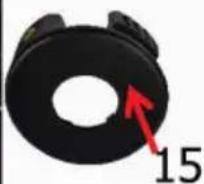
natural_image
Black circular object with a curved wire extending from its top, resembling a mechanical component or sensor (no text or symbols visible)natural_image
Close-up of a mechanical component with labeled parts, showing internal components and assembly steps (no readable text or symbols)natural_image
Close-up of a hand holding a black mechanical component with red tool tips, showing a close-up view (no text or symbols visible)natural_image
Close-up of a black cylindrical object with coiled loops, attached to a metallic rod (no text or symbols visible)natural_image
Close-up of a mechanical component with labeled parts, showing internal components and assembly steps (no readable text or symbols)natural_image
Close-up of a hand holding a black mechanical component with red tool, no visible text or symbols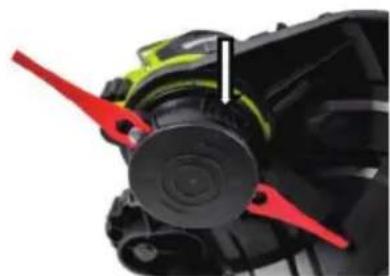
natural_image
Close-up of a mechanical component with red and green blades, no visible text or symbolsnatural_image
Illustration of a person using a handheld tool to clean vegetation, with no visible text or symbolsSekání trávy:
natural_image
Line drawing of a car interior with directional arrows indicating movement or flow (no text or symbols)Vložení akumulátoru
POUŽÍVAJTE OSOBNÉ OCHRANNÉ PROSTRIEDKY
natural_image
Close-up of a black cylindrical object with coiled arms, attached to a metallic rod (no text or symbols visible)natural_image
Close-up of a hand holding a black mechanical component with red tool, no visible text or symbols
natural_image
Close-up of a mechanical component with red and green blades, no visible text or symbolsnatural_image
Close-up of a black cylindrical object with curved arrows indicating rotation or movement (no text or symbols)natural_image
Close-up of a hand holding a black plastic device with green wires, no visible text or symbols
natural_image
Close-up of a mechanical component with a black cylindrical body and green ring, no visible text or symbols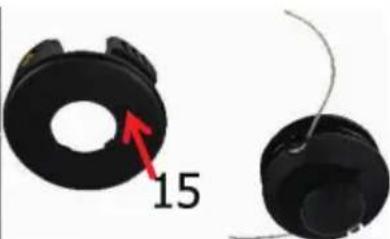
natural_image
Two black mechanical components with a red arrow and number 15, shown from different angles (no text or symbols on the parts themselves)natural_image
Close-up of a mechanical component with visible springs and a numbered part (13), showing internal assembly and mounting details (no text or symbols)natural_image
Close-up of a hand holding a black mechanical component with red tool tips, shown from two different angles (no text or symbols visible)natural_image
Close-up of a black cylindrical object with coiled arms, resembling a mechanical or electrical component (no text or symbols visible)Če želite nastaviti želeno dolžino teleskopske palice glede na svojo višino, zavrtite zapornico (7) v smeri urinega kazalca, nato potegnite teleskopsko palico
(6) in ga pritrdite tako, da blokirno napravo (7) premaknete v nasprotni smeri.
Nato ponovno zategnite v smeri urinega kazalca.
Zamenjava tuljave:
natural_image
Close-up of mechanical components with visible springs and a numbered component (13), no text or symbols present.natural_image
Close-up of a hand holding a black mechanical component with red lever tips, shown from two different angles (no text or symbols visible)natural_image
Close-up of a black cylindrical mechanical component with curved arrows indicating rotation or force (no text or symbols)Podešavanje teleskopske motke (6 i 7)
Kako biste podesili željenu duljinu teleskopskog štapa prema vašoj visini, okrenite uređaj za zaključavanje (7) u smjeru kazaljke na satu, zatim povucite teleskopski štap
natural_image
Four-panel photo sequence showing mechanical assembly steps: spring, valve, and housing (no text or symbols)Zamjena kalema od monofilamenta plastičnim oštricama
1 Uklonite kalem od monofilamenta (16) i umetnite zamjensku glavu s plastičnim oštricama (18) (ne zaboravite ukloniti bateriju):
2. Uklonite kalem (16) zajedno s poklopcem kalema (15) kao što je opisano za zamjenu kalema.
3. Zatim zamijenite plastičnu glavu oštrice (18) s dvije plastične oštrice (19).
4 Provjerite jesu li obje plastične oštrice (19) dobro namještene.
5. Provjerite je li opruga ispravno namještena u utor (13). Ako opruga više nije umetnuta ili je iskliznula, ispravite je.
natural_image
Close-up of a hand holding a black mechanical component with red tool tips, shown from two different angles (no text or symbols visible)Plastični umeci (19) mogu se jednostavno zamijeniti. Nema potrebe za uklanjanjem izmjenjive glave (18).
Uhvatite plastičnu oštricu i gurnite je prema izmjenjivoj glavi. Zatim jednostavno povucite plastičnu oštricu (19) prema gore.
natural_image
Three-step illustration of a red tool interacting with a black object, showing motion direction (no text or symbols)
natural_image
Person using a handheld metal tool to clean vegetation, no text or symbols visible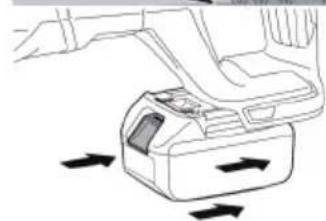
natural_image
Line drawing of a car interior showing airflow or fluid flow direction (no text or symbols)Košnja trave:
natural_image
Close-up of a black cylindrical mechanical component with curved arrows indicating rotation or motion (no text or symbols)natural_image
Close-up of a mechanical component with labeled parts, showing assembly steps and a red arrow indicating a specific step (no text or symbols present)natural_image
Close-up of a hand holding a black mechanical component with red lever arms, showing assembly steps (no text or symbols visible)natural_image
Three-step illustration of a red tool interacting with a black object, showing motion direction (no text or symbols)
natural_image
Illustration of a person using a digital metal detector to clean vegetation, with a close-up of the device's motion arrows (no text or symbols)Κούρεμα γρασιδιού:
natural_image
Close-up of a black cylindrical object with curved arrows indicating rotation or movement (no text or symbols)natural_image
Close-up of a hand holding a black plastic component with green wires, next to an open car (no visible text or symbols)
natural_image
Close-up of a mechanical component with a green and black assembly, no visible text or symbols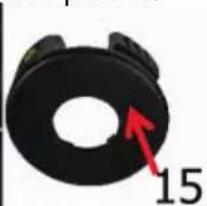
natural_image
Close-up of a black plastic ring with a red arrow pointing to the number 15 (no text or symbols on the ring itself)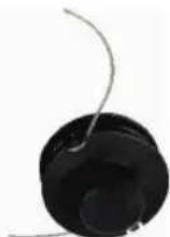
natural_image
Black circular object with a curved wire extending from its top, resembling a stylized lamp or device (no text or symbols visible)natural_image
Close-up of mechanical components with numbered callouts and arrows indicating assembly steps (no readable text or symbols)natural_image
Close-up of a hand holding a black mechanical component with red tool tips, showing a close-up view (no text or symbols visible)
natural_image
Close-up of a red-handled tool tip with a black handle and arrow indicating direction (no text or symbols)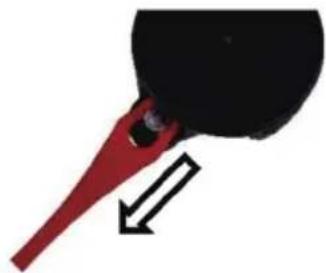
natural_image
Close-up of a red tool tip with a black handle and arrow indicating direction (no text or symbols)Косене на трева:
natural_image
Close-up of a black cylindrical object with curved arrows indicating rotation or movement, attached to a metallic rod (no text or symbols visible)natural_image
Close-up of a mechanical component with labeled parts, showing internal components and assembly steps (no readable text or symbols)natural_image
Close-up of a hand holding a black mechanical component with red and green parts, no visible text or symbols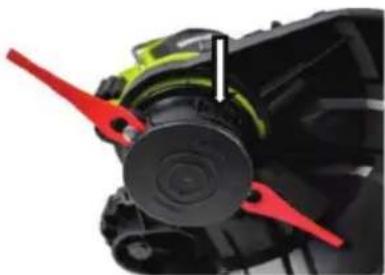
natural_image
Close-up of a mechanical component with red and black blades, no visible text or symbolsnatural_image
Three-step illustration of a red tool tip interacting with a black object, showing motion direction (no text or symbols)
natural_image
Illustration of a person using a metal detector to clean grass, with a close-up of the device showing airflow direction (no text or symbols)Tăierea ierbii:
natural_image
Close-up of a black cylindrical object with curved arrows indicating rotation or movement (no text or symbols)natural_image
Close-up of a mechanical component with labeled parts, showing internal threading and assembly (no text or symbols)natural_image
Close-up of a hand holding a black mechanical component with red tool, no visible text or symbols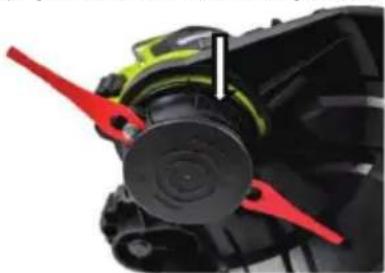
natural_image
Close-up of a mechanical component with red and green blades, no visible text or symbolsnatural_image
Illustration of a red tool interacting with a black object, showing directional arrows (no text or symbols)
natural_image
Close-up of a red tool tip interacting with a black curved object (no text or symbols visible)
natural_image
Close-up of a red tool tip with a black handle and arrow indicating direction (no text or symbols)
natural_image
Person using a metal detector to clean vegetation, no text or symbols visibleŽolės pjovimas:
natural_image
Line drawing of a car interior with directional arrows indicating movement or flow (no text or symbols)natural_image
Close-up of a black cylindrical object with curved arrows indicating rotation or assembly (no text or symbols visible)natural_image
Close-up of a hand holding a black mechanical component with red tool, no visible text or symbols
natural_image
Close-up of a mechanical component with red and green tool tips (no visible text or symbols)natural_image
Close-up of a black cylindrical mechanical component with curved arrows indicating rotation or motion (no text or symbols)natural_image
Four-panel photo showing a mechanical assembly with labeled parts and arrows indicating motion (no readable text or symbols)Monoškiedras auklas spoles nomaina ar plastmasas asmeņiem
1 Iznemiet monopavediena spole(16) un ievietojiet rezerves galvinu ar plastmasas asmeniem(18) (atcerieties iznemt akumulatoru):
natural_image
Close-up of a hand holding a black mechanical component with red tool tips, shown from two different angles (no text or symbols visible)natural_image
Three-step illustration of a red tool tip interacting with a black object, showing motion direction (no text or symbols)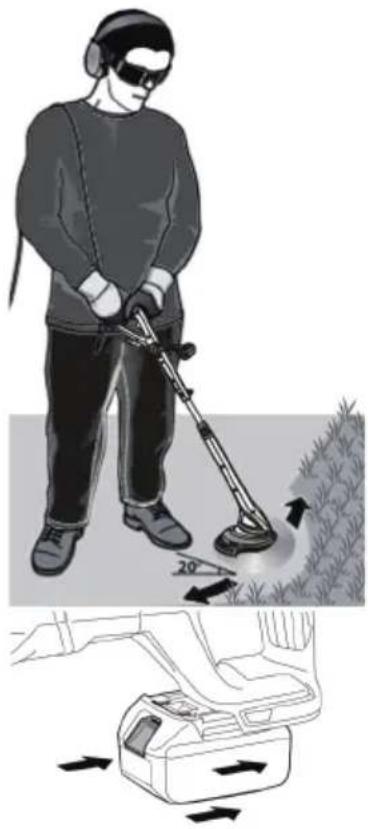
natural_image
Illustration of a person using a digital metal detector to clean vegetation, with a close-up of the device's motion arrows (no text or symbols)Zāles plaušana:
02-801 Warsaw, Poland
phone:+48226880800
e-mail: info@everpol.pl
www.blaupunkt.com
In case of questions or problems please contact our service.
Tel. 00 48 22 688 08 33
Email:tools@blaupunkt.pl
Enjoy it.
All rights reserved. All brand names are registered trademarks of their respective owners. Specifications are subject to change without prior notice.


- Enjoy it.
- IMPORTANT INFORMATION
- Workplace safety
- Electrical safety
- Human safety
- General information
- Before starting the machine
- USE PERSONAL PROTECTIVE EQUIPMENT
- Safety instructions for charger and battery
- Storage
- Inserting the battery
- Device description
- Replacing the spool:
- Manual:
- Automatic:
- Replacing the monofilament spool with plastic blades
- Grass mowing:
- Inserting the battery pack
- Cleaning, maintenance:
- BLAUPUNT Cordless grass trimmer CT5010
- Noise
- Vibrations
- WAŻNE INFORMACJE
- Sekání trávy:
- Vložení akumulátoru
- POUŽÍVAJTE OSOBNÉ OCHRANNÉ PROSTRIEDKY
- Zamenjava tuljave:
- Zamjena kalema od monofilamenta plastičnim oštricama
- Košnja trave:
- Κούρεμα γρασιδιού:
- Косене на трева:
- Tăierea ierbii:
- Žolės pjovimas:
- Zāles plaušana:
Brand : BLAUPUNKT
Model : CT5010
Category : Outillage à main