
EDF 6023 WE - Dishwasher ECG - Free user manual and instructions
Find the device manual for free EDF 6023 WE ECG in PDF.


| Product Type | Built-in Dishwasher |
| Brand | ECG |
| Model | EDF 6023 WE |
| Dimensions (H x W x D) | 81.5 cm x 59.8 cm x 55.0 cm |
| Weight | 45 kg |
| Energy Efficiency Class | E |
| Water Consumption per Cycle | 11.5 L |
| Noise Level | 48 dB(A) |
| Number of Place Settings | 13 |
| Programs | Eco, Auto, Intensive, Quick 30 min, Glass, Rinse |
| Drying System | Condensation drying |
| Water Protection | AquaStop |
| Control Type | Electronic push buttons + LED display |
| Installation Type | Built-in under counter |
| Door Colour | White |
| Energy Consumption per Cycle | 0.92 kWh |
| Annual Energy Consumption | 265 kWh |
| Annual Water Consumption | 2800 L |
| Power Supply | 230 V, 50 Hz, 10 A |
| Filter Type | Self-cleaning triple filter |
Frequently Asked Questions - EDF 6023 WE ECG
User questions about EDF 6023 WE ECG
0 question about this device. Answer the ones you know or ask your own.
Ask a new question about this device
Download the instructions for your Dishwasher in PDF format for free! Find your manual EDF 6023 WE - ECG and take your electronic device back in hand. On this page are published all the documents necessary for the use of your device. EDF 6023 WE by ECG.
USER MANUAL EDF 6023 WE ECG
Read carefully and save for future use!
Warning: The safety measures and instructions, contained in this manual, do not include all conditions and situations possible. The user must understand that common sense, caution and care are factors that cannot be integrated into any product. These factors must therefore be provided by the user(s) using and operating this appliance. We are not liable for damages caused during shipping, by incorrect use, voltage fluctuation or the modification or adjustment of any part of the appliance.
Follow the instructions in this manual. Before using for the first time, read the entire written instructions carefully and keep them for future reference.
To protect against the risk of fire or electric shock, basic precautions must be taken while using electrical appliances, including the following:
- This appliance is intended for use by children over 8 years of age and persons with reduced physical, sensory or mental capabilities, or lack of experience and knowledge, provided they have been given supervision or instruction concerning use of the appliance in a proper and safe manner. Children must not play with this appliance. Cleaning and maintenance must not be carried out by children without the supervision of a responsible person.
- Do not place unsuitable and heavy objects in the basket. Do not overfill the basket. The manufacturer is not liable for any damage to the internal parts of the appliance caused by improper use of the appliance.
- Do not open the appliance door during the washing cycle. If you still open the door during the wash cycle, the safety device will stop the appliance from operating.
- To prevent an accident, do not leave the door open.
-
Put knives and other sharp objects in the cutlery basket with the blade down.
-
A damaged power cord may only be replaced by the manufacturer, its service technician, or another similarly qualified person.
- If the EnergySave function is active, the appliance door will open at the end of the program. Do not apply pressure to the closed door to avoid damaging the door mechanism. To ensure efficient drying, the door must be opened after 30 minutes (models with automatic door opening system).
Warning: When the acoustic signal sounds to open the door automatically, you must not stand directly in front of the door.
- Keep packaging material out of the reach of children.
- Do not allow children to play with the appliance or start it.
- Keep cleaning supplies away from children.
- Children must be kept away from the appliance when the door is opened after the washing cycle, as detergent residues may be present in the appliance.
- Make sure that the used appliance does not pose a threat to your children. There are known cases where children have been trapped in an old used appliance. To prevent this situation, break the door lock of the old appliance and cut off the power cord.
- Repair of the appliance by a person other than an authorized service employee will void the warranty.
- Before repairing the appliance, make sure that the appliance is disconnected from the power supply. Switch off the fuse or disconnect the appliance from the power supply by pulling the plug of the power cord out of the socket. When disconnecting the appliance from power, pull on the plug, not on the cable. Check if you closed the water supply.
Other recommendations concerning safety and use
After the delivery of the appliance
- If you see any damage to the appliance packaging, please contact your vendor or customer service.
Points to pay attention to during installation
- Select a suitable and firm surface to install the appliance.
• Install and connect the appliance according to the instructions. - Only an authorized service center may install and repair the appliance.
- Use only original spare parts.
-
Prior to installation, make sure that the appliance is disconnected from the power supply.
-
Check that the electrical system in the household is connected in accordance with the applicable regulations and that the socket is properly grounded.
- The parameters of the electrical network to which the appliance is connected must correspond to the data on the rating plate of the appliance.
- Make sure that the appliance is not placed on the power cord.
- Never use an extension cord or splitter. The plug must remain easily accessible after installation.
- Start the appliance without dishes after installation.
In everyday use
- This appliance is for household use; do not use it for any other purpose. Commercial use of the dishwasher will void the warranty.
- Do not sit on the open door or place any objects on it.
- Use only detergents and rinse aids suitable for dishwashers. Our company is not liable for damages caused by the use of unsuitable detergents and rinse aids.
- The water from the dishwasher is no longer potable, so do not drink it.
- Due to the risk of explosion, do not add any chemicals, such as solvents, to the dishwasher.
- Before washing, make sure that plastic objects are heat-resistant.
Recommendations during operation
- To save energy and water, remove coarse dirt from the dishes before putting them in the dishwasher. Do not start the dishwasher until it is completely full.
- Use the pre-wash program only when absolutely necessary.
- Put dishes such as bowls, glasses and pots upside down in the dishwasher.
• We recommend that you put the dishes in the dishwasher according to the instructions below and not overload the baskets.
Objects that are not dishwasher safe:
- Dishes soiled with ash, candle residue, paints, chemicals or foil dishes.
- Forks, spoons and knives with ivory or wooden handles, glued objects, objects that can dissolve, objects contaminated with acidic or basic chemicals.
- Non -heat resistant plastic objects which are made of copper or aluminium.
- Aluminium objects can stain other metal utensils, silver objects can lose their lustre.
- Glass and porcelain tableware decorated with ornamental patterns, since they can be washed off. Crystal glassware may become "cloudy" during the process. Knives that are not heat resistant, lead glassware, cutting boards, articles made of synthetic fibre.
- Absorbing objects, e.g. sponges or scrubbers.
Warning: We recommend using only dishes suitable for a dishwasher. This information is provided by the kitchenware manufacturer on the packaging or directly on the product.
APPLIANCE DESCRIPTION
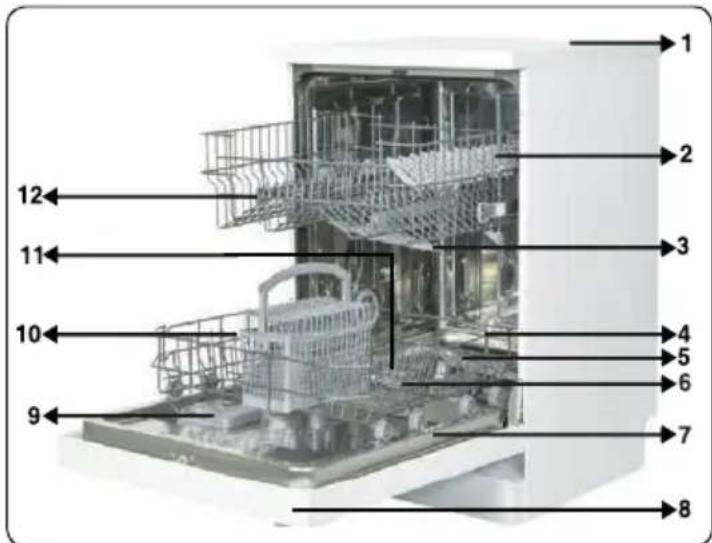
- Top plate
- Upper basket with compartments
- Upper spray arm
- Bottom basket
- Lower spray arm
-
Filters
-
Rating plate
- Control panel
- Detergent and rinse aid dispenser
- Cutlery basket
- Water softener
- The running rail of the upper basket
APPLIANCE INSTALLATION
Placing the appliance
The place where the appliance will be located must be easily accessible. It must be possible to easily put in and remove the dishes from the dishwasher after installation. Place the appliance in a room with a room temperature higher than 0^ C.
Place the appliance close to the water inlet and outlet. Please note that it will not be possible to change its location after connecting the appliance to the water supply / drain. Do not hold the appliance by the door or panel.
There must be enough space around the appliance to allow the appliance to be handled comfortably during cleaning.
Check that the water supply and drain hoses are not caught on something during the installation of the appliance. Also make sure that the appliance does not stand on the power cord. Adjust the levelling feet of the appliance so that it is balanced and level. Proper placement and balancing of the appliance ensures trouble-free door opening and closing. If the appliance door does not close properly, check that the appliance is on a level surface. If necessary, adjust the balance using the adjustable feet.
Water connection
The water distribution system must be suitable for the installation of the dishwasher. We also recommend that you install a filter at the water inlet to prevent damage to the appliance due to contamination by dirt (sand, clay, rust, etc.) that may be in the plumbing or domestic water mains. This will prevent the dishes from yellowing and dirt from accumulating in the appliance.
Water supply hose
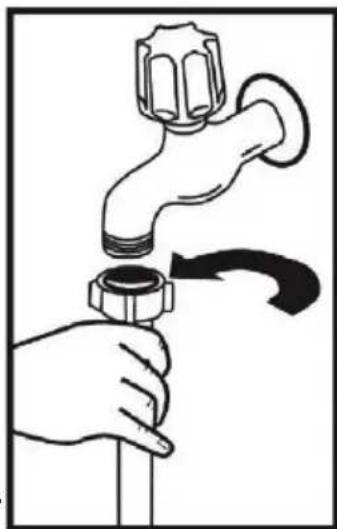
Do not use a water supply hose from and old appliance. Always use the new hose supplied in the packaging. If the water pipes are new or have not been used for a long time, first allow sufficient water to drain until completely clear water flows out. Connect the water supply hose directly to the tap. The water supply pressure must be a minimum of 0.03, MPA and a maximum of 1, MPA. If the water pressure is higher than 1, MPA, a safety valve must be installed.
After connecting, the tap must be fully opened and checked for water leaks. For safety reasons, switch off the water supply whenever you are not using the dishwasher (after completing a program).
The supply hose is intended for cold water. Maximum temperature must not exceed 25^ C.
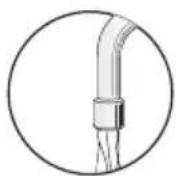
Note: Aquastop is used in some models. Dangerous stress can occur if the Aquastop is used. Do not cut the drain opening. Do not allow this device to bend.
natural_image
Illustration of a hand holding a faucet with a valve, showing a curved arrow indicating rotation (no text or symbols)English
Water drain hose
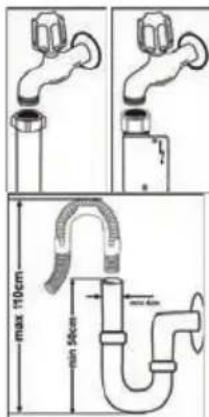
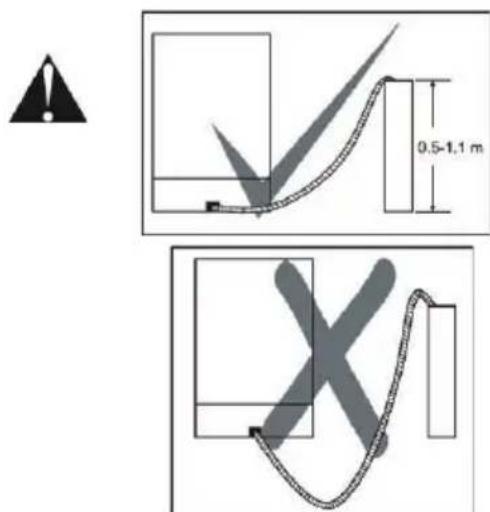
The water drain hose can be connected directly to the water drain or to the siphon. This connection must be 50 - 110 cm above floor level.
Warning: Keep in mind that the hose must not be longer than 4 meters even with an extension. A longer drain hose would prevent proper functioning of the dishwasher. In this case, our company is not responsible for the poor quality of the washing result.
Electrical wiring
The grounded plug of your appliance must be connected to a grounded socket of suitable voltage. If there is no grounding, have it done by a qualified electrician. If the appliance is connected to an ungrounded socket, our company is not responsible for any problems that may occur. The plug of this appliance may contain a 13 A fuse depending on the local regulations in force in each country.
Your appliance is set to 220 - 240 V. Always disconnect the appliance from the power supply during handling. Always use only the plug supplied with your appliance.
Starting at low voltage will degrade the quality of the washing. The power cord must be replaced by an authorized service center or technician. Failure to follow these instructions may result in injury or damage to the appliance. For safety reasons, always unplug the appliance after completing the washing program.
To reduce the risk of electric shock, do not unplug with wet hands. When disconnecting the appliance from power, pull on the plug, not on the cable.
Appliance installation
If you wish to install the appliance in a kitchen counter, make sure that you have enough space and make sure that you have the appropriate distribution systems ①. If you find that the space in the kitchen counter is suitable for installing the appliance, remove the top plate of the dishwasher as shown in figure ②.
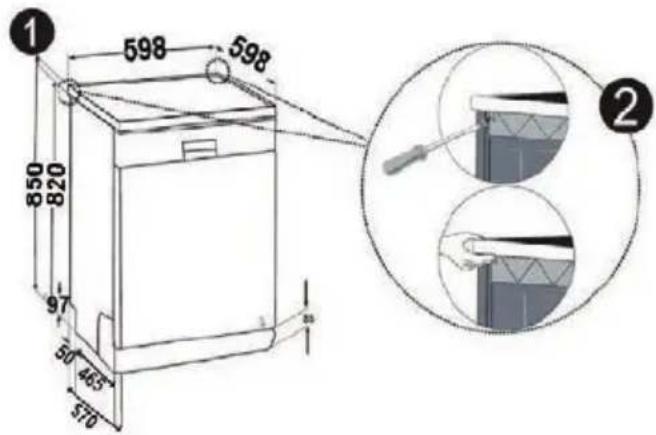
Warning: The worktop under which the dishwasher will be placed must be firm and level to prevent lack of balance and instability of the appliance. To remove the top plate of the dishwasher, remove the screws that hold the plate and are located at the back of the appliance;
Adjust the feet of the appliance according to the slope of the floor ③. Insert the appliance into the line and do not allow the hoses to be crushed or bent <209>4</209>.
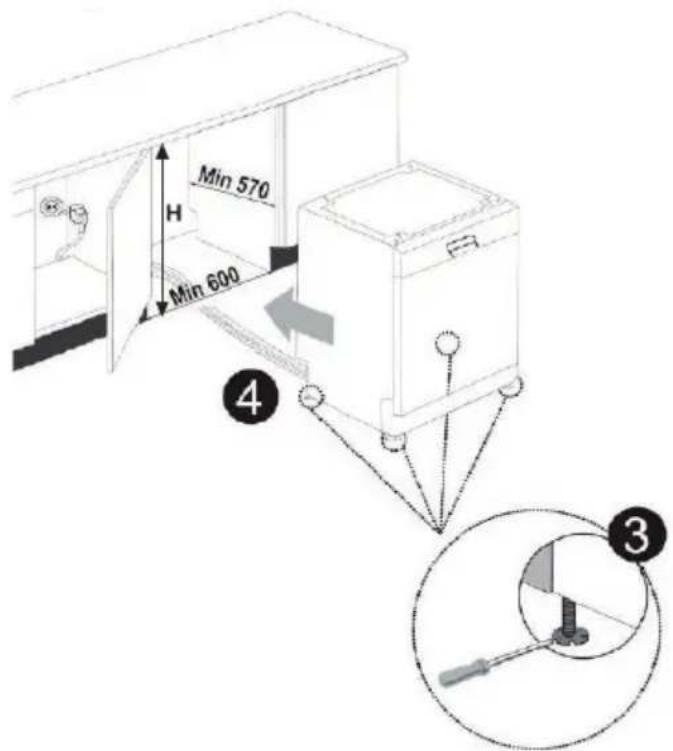
Warning: After removing the top plate of the dishwasher, the appliance should be placed in the space of dimensions shown above.
BEFORE USING THE APPLIANCE
Preparing the dishwasher for the first use
• Make sure that the water and electricity distribution lines correspond to the values indicated in the installation instructions for the appliance.
- Remove all packaging from the inside of the appliance.
- Adjust the water softening level.
• Fill the rinse aid dispenser.
Using salt
To achieve a good result, the dishwasher needs soft, less limey water. Otherwise, scale will remain on the dishes and inside the dishwasher. This will negatively affect the washing, drying and rinsing performance of your dishwasher. As water flows through the softening system, hardness -causing ions are removed and the water reaches the softness needed to achieve the best washing result. Depending on the degree of hardness of the supplied water, these ions, which harden quickly, accumulate rapidly inside the softening system. The water softening system needs to be replaced to ensure the same performance during the next wash. Dishwasher salt is used for this.
Only special salt designed to soften water can be used in the dishwasher. Do not use any salts with small grains or powdered salts that would easily dissolve. Using another type of salt can damage the appliance.
Fill the salt
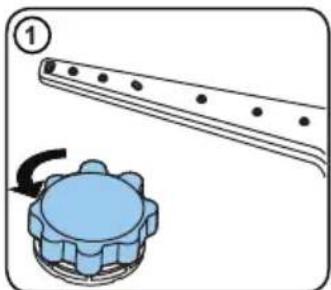
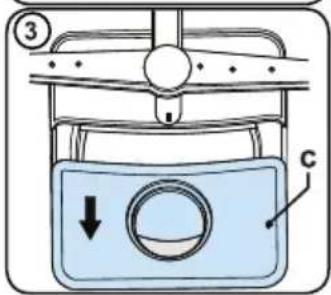
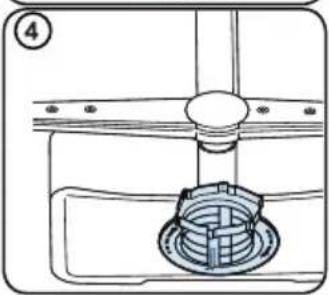
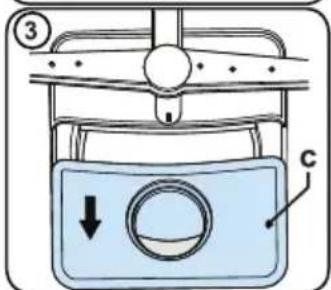
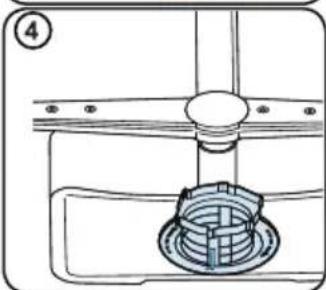
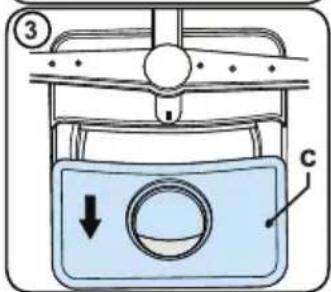
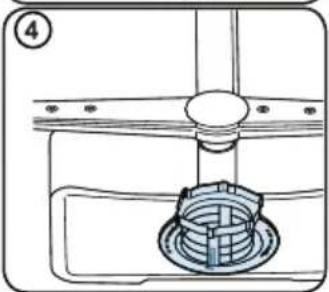
Open the lid of the salt dispenser by turning it counter-clockwise. (1) (2) When using for the first time, fill the salt dispenser with 1 kg salt and water (3) until it almost overflows. If possible, use the funnel (4) (not included in the package) to facilitate filling. Replace and close the lid. Add salt to the dishwasher until the hopper is full (approximately 1 kg) after every 20-30 cycles. Lack of salt is indicated by a light on the control panel.
Only fill the salt dispenser with water the first time you use it.
Use salt intended for use in dishwashers.
When you start the dishwasher, the salt dispenser is filled with water, so put salt in the dishwasher before you start washing.
If the salt has overflowed and you have not started the dishwasher immediately, run a short washing program to protect the dishwasher from corrosion.
natural_image
Diagram showing a mechanical component with a gear-like base and a rotating arrow, no text or symbols present.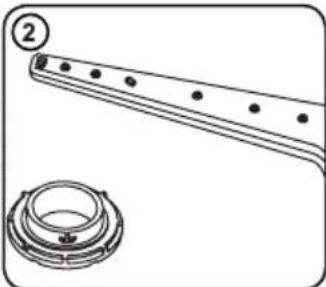
natural_image
Technical line drawing of a mechanical component with a circular base and evenly spaced holes (no text or symbols)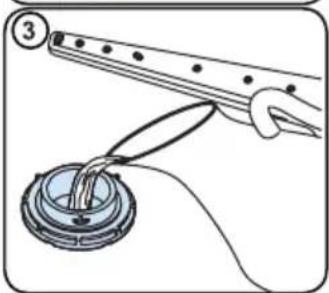
natural_image
Illustration of a hand holding a tool interacting with a circular component, no text or symbols present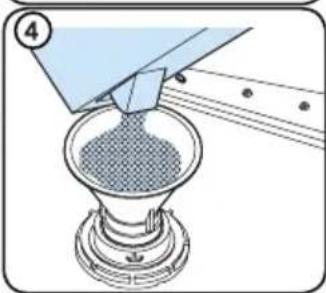
natural_image
Illustration of a funnel pouring granular material into a conical flask (no text or symbols)Water hardness test strip
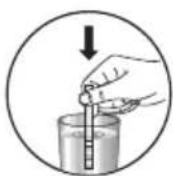
Let the water tap run (1 min)
Immerse the strip in water for 1 second
Shake the strip Wait (1 min.) Set the water
hardness level.

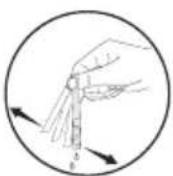
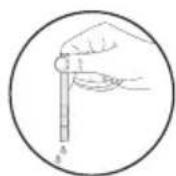
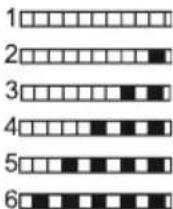
NOTE: The default level is 3. If the water is from a well or has a hardness level above 90 dF, we recommend using a filtration and cleaning device.
Water hardness table
| Water hardness level | German marking of water hardness level dh | French marking of water hardness level dF | British marking of water hardness level dE | Water hardness level |
| 1 0–5 0–9 0 | -6 The Wash light is on. | |||
| 2 6–11 10–20 | 7–14 The End light is on. | |||
| 3 12–17 21 | -30 15–21 Start/Pause button is lit. | |||
| 4 18–22 31 | -40 22–28 The Wash light is on. | The End light is on. | ||
| 5 23–31 41 | -55 29–39 The Wash light is on. | Start/Pause button is lit. | ||
| 6 32–50 56 | -90 40–63 The End light is on. | Start/Pause button is lit. |
Water softening system
The dishwasher is equipped with a water softening system that reduces the hardness of the inlet water. To find out the hardness level of tap water, contact your water company or use a test strip (if available).
The procedure to set the water hardness
Based on the water hardness test, set the softener according to the hardness of the tap water as follows.

- Set the program selector/switch (4) in the position 1.
- Press and hold the Start/Pause button (3).
- Turn the program selector / switch (4) to position 2 by turning it one step clockwise.
- Keep the Start/Pause button (3) pressed until all indicators start flashing. After that the hardness indicator appears, which shows a predefined state (see chart on previous page).
- Now you can repeatedly press the Start/Pause button (3) to change the settings according to the water hardness setting table.
- Once you set your desired hardness, switch off the appliance by turning the program selector /off switch (4) to position 1. The last selected water hardness setting will be saved.
Warning: If you are moving, after moving, set the water hardness again according to the water quality in the new home. This is necessary for optimal dish washing.
Using detergent
Only use detergents intended for use in domestic dishwashers. Store detergents in a cool, dry place out of the reach of children.
For best results, add a suitable cleaner to the selected program. The amount of detergent required depends on the cycle, the amount of dishes and the level of soiling.
Do not add more detergent to the detergent dispenser than necessary; otherwise, whitish streaks or bluish layers will appear on the glass and dishes, which can scratch the glass. Continuous use of too much detergent can damage the appliance.
Using a small amount of detergent may result in poorly washed dishes. Or whitish streaks may appear on the dishes.
Read the detergent manufacturer's instructions for more information.
Filling the detergent dispenser
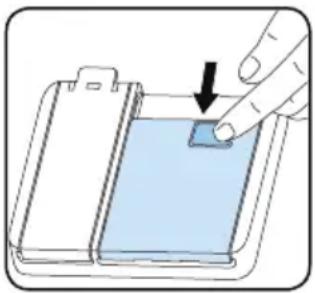
Push the latch to open the compartment and fill it with detergent. Fill the entire drawer for heavily soiled dishes. In the case of less soiled dishes, use about 1/3 less powder.
Do not overfill the detergent drawer. Closing the dispenser lid could damage it.
Close the lid by pushing on it until it clicks into place. Fill the drawer just before the start of each program.
natural_image
Illustration of a hand inserting a blue liquid into a plastic container (no text or symbols)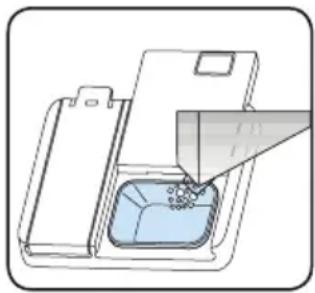
natural_image
Illustration of a container with liquid and a funnel inserted into it, no text or symbols presentUsing combination tablets of the "3 in 1" type.
General recommendations
These products are detergents with integrated rinse aid and softener (salt). In the case of 2 in 1 tablets, you have to watch which ingredients these tablets contain (whether detergent + rinse aid or detergent + salt). In general, combination preparations are sufficiently effective only under certain conditions because they contain a predetermined amount of detergent and rinse aid / salt.
What is necessary to consider:
- You should make sure prior to using these products that the hardness of your water allows the use of the tablets (see the recommendation of the manufacturer on the product package).
- These products should be used exactly according to the manufacturer's instructions.
- If these combination products are in tablet form, never place them freely into the dishwasher or the cutlery basket. Put them always in the detergent dispenser.
- If you encounter problems the first time you use a 3 in 1 product, please contact the tablet manufacturer's customer support line.
Notes:
- For better results when using combined detergents, fill the dishwasher with salt and rinse aid and set the water hardness and rinse aid dosage to the lowest values.
- The solubility of detergent tablets from different manufacturers may vary depending on temperature and time, so we do not recommend using these detergents in short programs. Powder detergents are preferable for shorter programs.
Using rinse aid
The rinse aid helps to dry the dishes without smudges and stains. In order for the dishes to be clean and the glass clear, it is necessary to use rinse aid. The rinse aid is added automatically during the hot rinsing phase. If the rinse aid dosage setting is too low, stains will remain on the dishes and will not be dried or clean.
If the rinse aid dosage setting is too high, bluish layers will appear on the glass and dishes.
Filling and setting the rinse aid
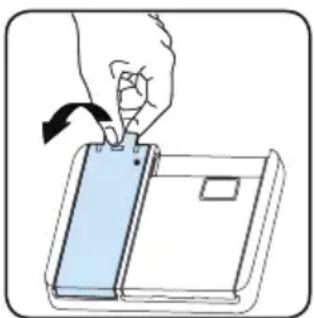
To refill the rinse aid, open the lid of the rinse aid dispenser. Top up the rinse aid to MAX and then close the lid. Do not add too much rinse aid and wipe off any remaining spilled rinse aid. Insufficient rinse aid is indicated by a light on the control panel.
If you want to change the rinse aid dosage, follow the steps below before switching on the appliance:
- Turn the knob to the "off" position.
- Press and hold the "Start/Pause" button.
- Turn the knob counter -clockwise one step.
- Hold down the "Start / Pause" button until the LEDs flash twice.
- The device displays the current settings.
- Set the level by pressing the "Start / Pause" button.
- Turn the knob to the "off" position to save the setting. The factory setting is "4".
natural_image
Illustration of a hand pressing down on a device with an arrow indicating rotation (no text or symbols)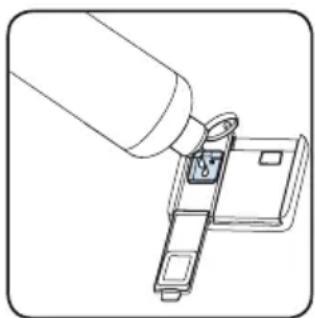
natural_image
Line drawing of a hand holding a lock attached to a device (no text or symbols)If the dishes are not dried properly or are dirty, raise the level. If blue spots appear on the dishes, lower the level.
| Level Rinse aid Indicators | ||
| 1 The rinse aid does not flow into the dishwasher | Wash indicator is on. | |
| 2 1 dose is released End indicator is on. | ||
| 3 2 doses are released Dry indicator is on. | ||
| 4 3 doses are released End indicator is on. | ||
| 5 4 doses are released Wash and End indicator is on. | ||
FILLING THE DISHWASHER
For best dish washing results, follow the instructions below.
Filling the dishwasher to the capacity specified by the manufacturer helps to save water and energy.
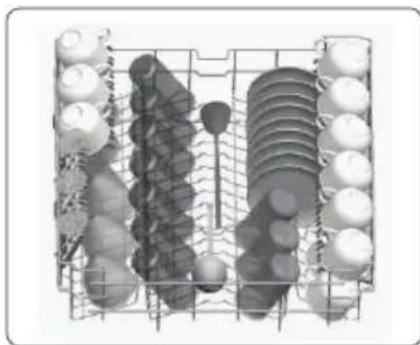
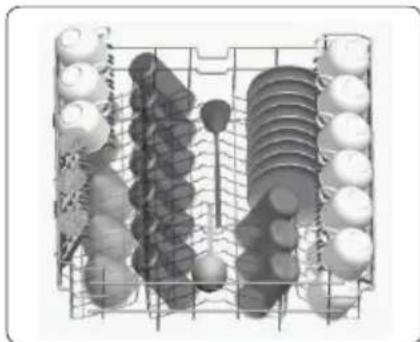
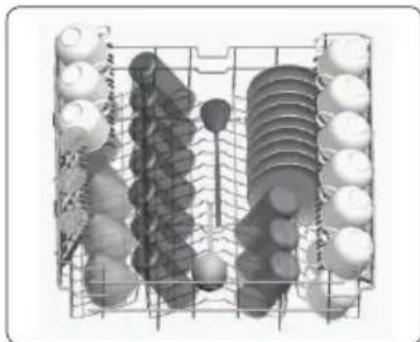
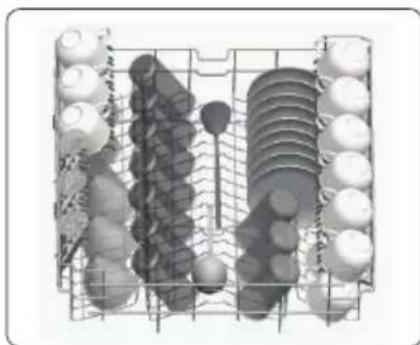
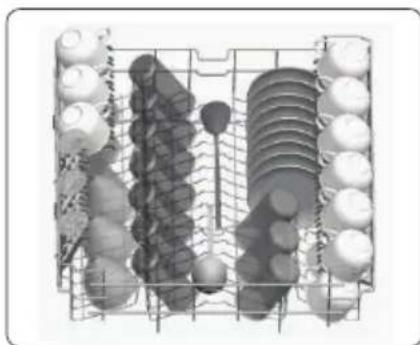
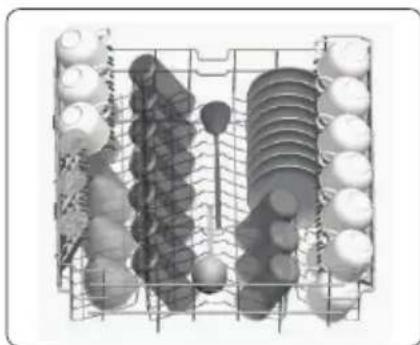
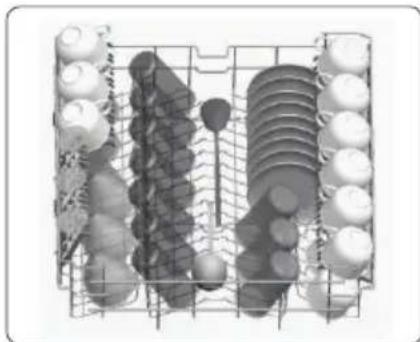
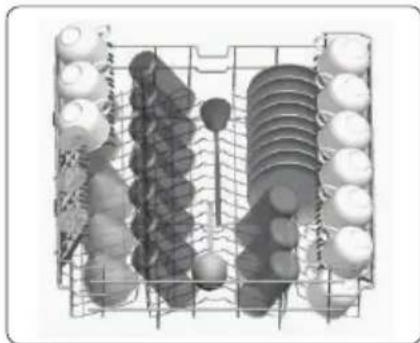
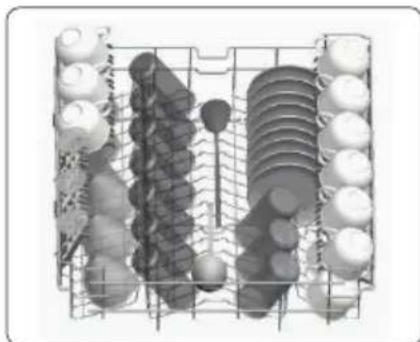
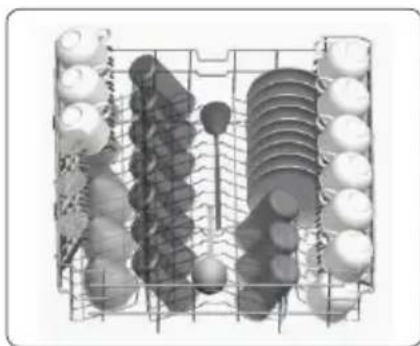
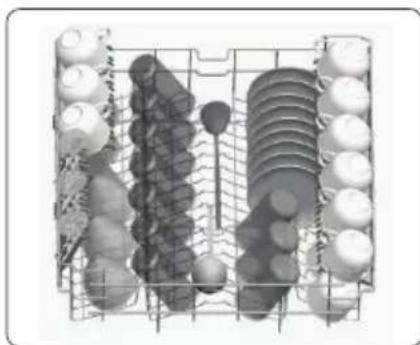
Manual pre - washing of the dishes increases water and energy consumption and is not recommended. You can place mugs, glasses, cutlery, small plates and bowls in the upper basket. Do not place tall glasses next to each other, they will not stand steady and could be damaged. Lean tall glasses and cups on the edges of the basket or shelf, not on each other
Put all dishes, such as mugs, glasses and pots, in the dishwasher with the opening facing downwards to prevent water from accumulating in them.
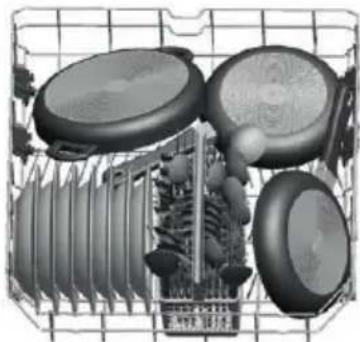
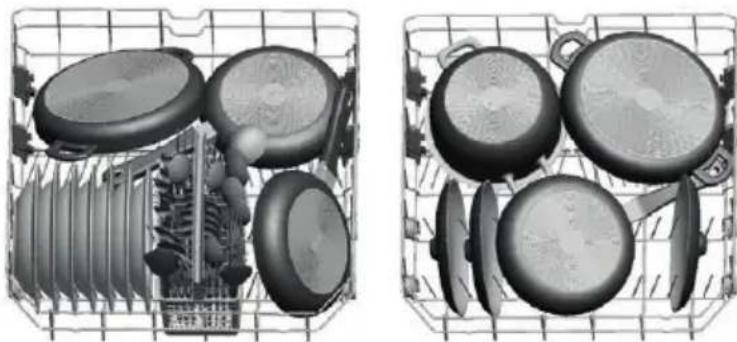
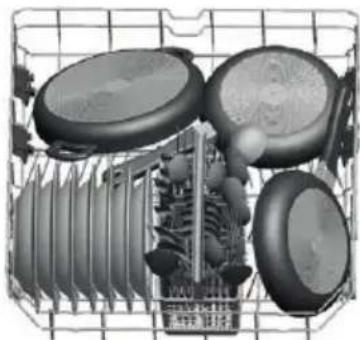
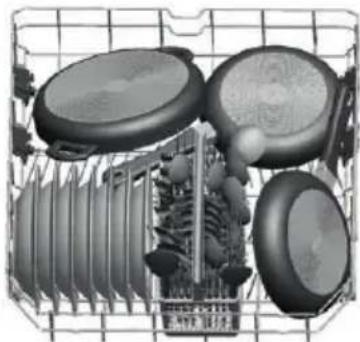
If the dishwasher is equipped with a cutlery basket, we recommend using it for the best washing results. Place all large containers (pots, pans, lids, bowls, etc.) and all very dirty dishes in the lower basket.
Do not stack dishes and cutlery on top of each other.
WARNING: Make sure that nothing prevents the rotation of the nozzle arms. Make sure that the detergent dispenser is not blocked after filling the dishwasher
Before placing the dishes in the dishwasher, remove any coarse food residue from it. Start the dishwasher when it is full.
Do not put too many dishes in the dishwasher and always place the dishes in the correct baskets.
WARNING: To prevent possible injuries, place knives with long handles and sharp edges with the blade down.
Put the dishes in the dishwasher correctly. There are two separate baskets in the dishwasher in which you can put dishes. The lower basket is designed for round and deep dishes. The upper basket is designed for thin and narrow dishes. We recommend using a cutlery basket for best results. To prevent possible injuries, place knives with long handles and sharp edges with the blade down.
WARNING: Put the dishes in the dishwasher so that they do not prevent the upper and lower spray arms from rotating.
Upper basket
Dish rack
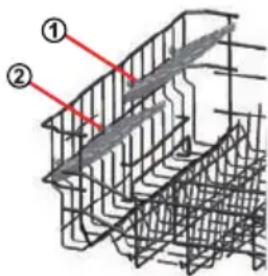
Thanks to the adjustable height, you can place dishes of various sizes on these racks. You can use the racks at 2 different heights.
Adjusting the height of the upper basket
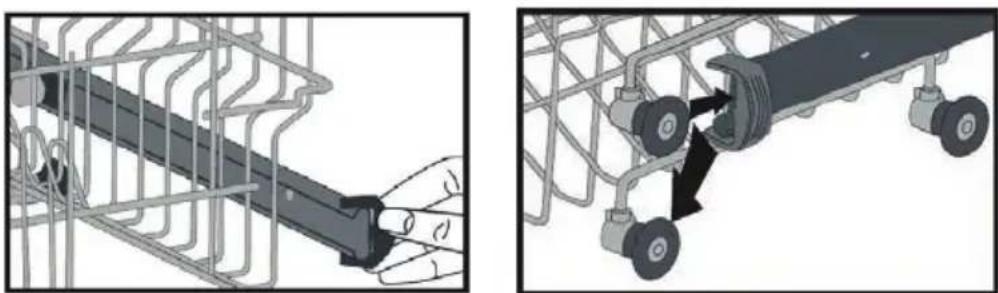
The upper basket is located at the top part of the appliance. When you place it in the lower position, you can insert large plates into it. Open the attachment parts on the rail. Turn them sideways and remove the basket. Reposition the wheels; put the basket back on the rails and close the attachment parts. This places the upper basket in the lower position.
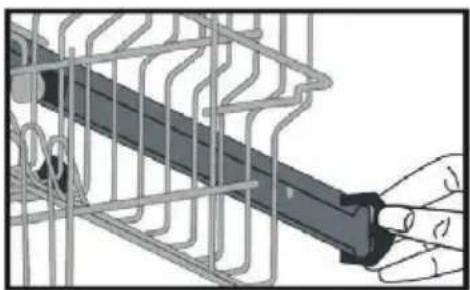
natural_image
Illustration of a hand holding a mechanical component inside a wire cage (no text or symbols visible)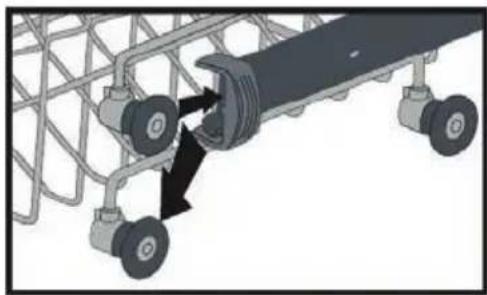
natural_image
Mechanical assembly diagram showing a conveyor belt system with two wheels and a central shaft (no text or symbols)Alternative basket filling
Bottom basket
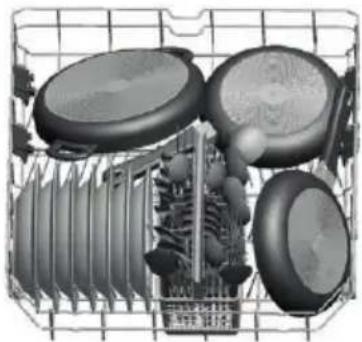
natural_image
Cross-sectional diagram of a mechanical device inside a wire cage (no text or symbols visible)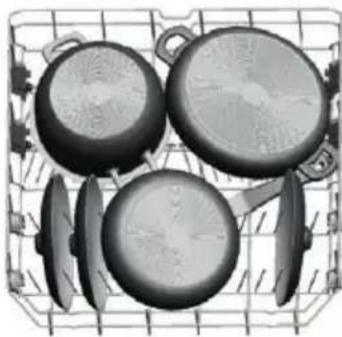
natural_image
Black-and-white photo of a basket containing four cooking pots and kitchen utensils (no text or symbols visible)Upper basket
natural_image
Grid of circular objects including spheres and rings, no visible text or symbolsIncorrect filling of the dishwasher
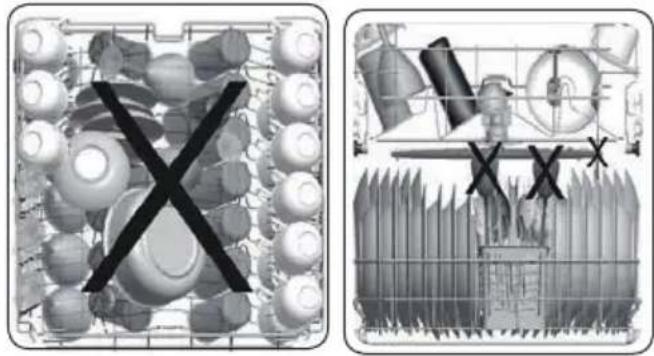
Incorrect filling of the dishwasher can reduce the washing and drying performance. For best results, please follow the manufacturer's instructions.
Examples of incorrect filling of the basket:
natural_image
Two grayscale industrial equipment diagrams showing circular components and a grid structure with X marks (no text or symbols)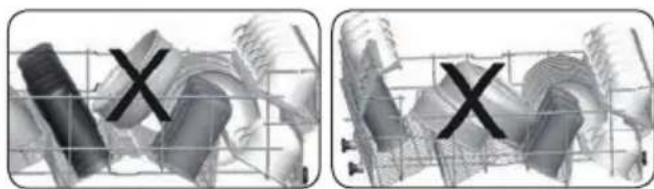
natural_image
Two grayscale 3D-rendered objects with 'X' marks, no visible text or symbolsPROGRAMS TABLE
| P1 P2 P3 | |||
| Name of the program: Eco | Super 50' Intensive 65 °C | ||
| Type of soiling | Standard program for normally soiled daily used dishes with reduced energy and water consumption. | Faster program for normally soiled dishes used daily. | For heavily soiled dishes. |
| Degree of soiling Medium | Medium Heavy | ||
| Amount of detergentA: 25 cm3B: 15 cm3 | AAA | ||
| Program length (h:min) 3:25 0:50 1:57 | |||
| Power consumption (kWh/cycle): | 0.923 1.100 1.700 | ||
| Water consumption (l/ cycle) | 12.0 12.0 17.2 | ||
- The duration of the program may vary depending on the amount of dishes, the water temperature, the ambient temperature and the additional functions selected.
• The values given for programs other than the environmental program are for information only. - If your model has a turbidity sensor, it has an auto program instead of an intensive program.
- The Eco (environmental) program is suitable for cleaning normally soiled dishes. It is the most efficient combined energy and water program for this use and is used to assess compliance with EU ecodesign legislation.
- Washing dishes in a home dishwasher usually consumes less energy and water during the use phase than washing dishes manually, when the household dishwasher is used according to the manufacturer's instructions.
-
Use powder detergent only for short programs.
-
Short programs to not include drying.
- To speed up drying, we recommend leaving the door slightly ajar after the cycle.
- You can access the product database for model information by loading the QR code on the energy label.
NOTE: According to regulations 1016/2010 and 1059/2010, the energy consumption values in the Eco program may differ. This table is in accordance with regulations 2019/2022 and 2019/2017.
SWITCHING ON THE APPLIANCE AND SELECTING A PROGRAM
Program selection and turning on the appliance
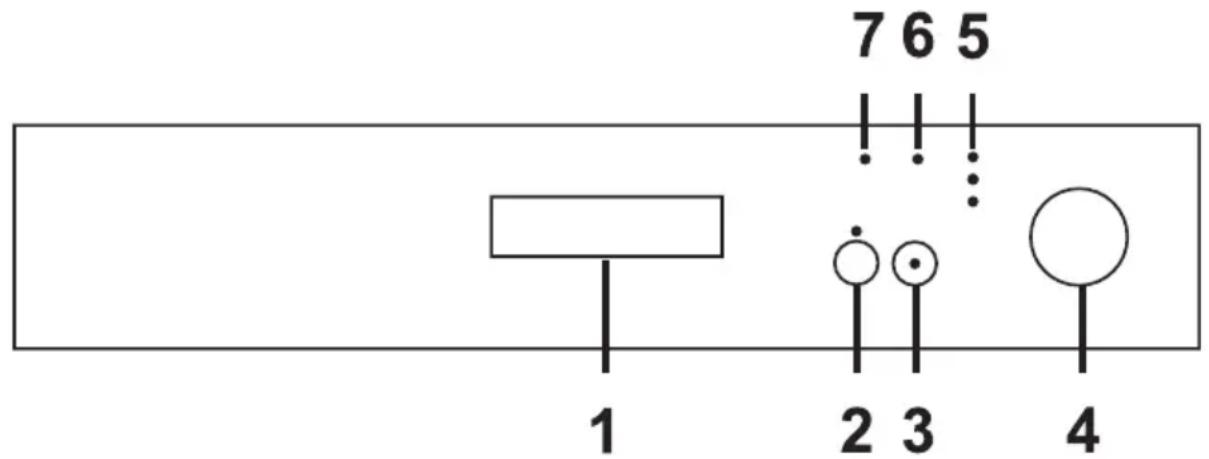
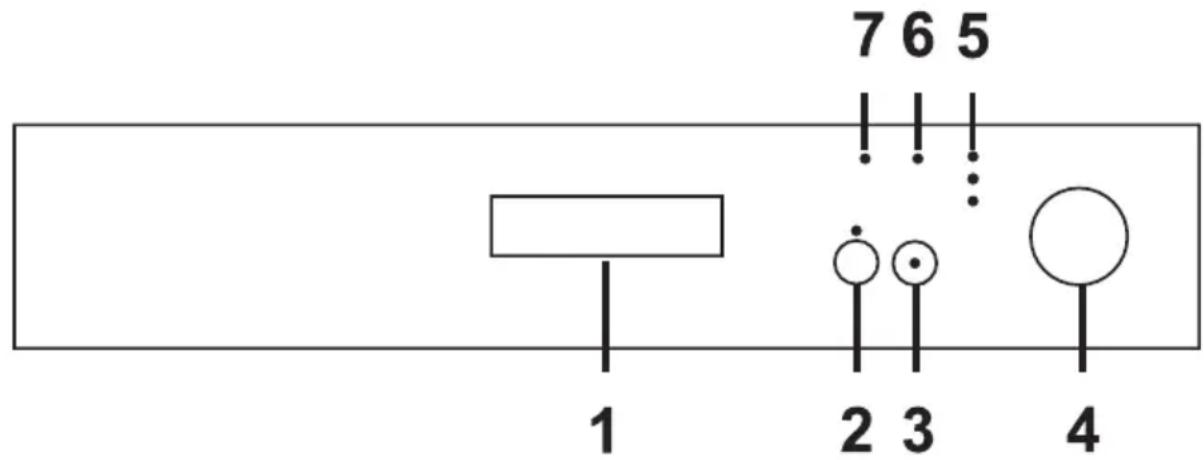
1. Door handle
Use the door handle to open / close the door of your appliance.
2. Delayed start and Half load button
Thanks to the delayed start function, you can delay the start time of the program by 3-6-9 hours. After pressing the Delayed start button, the 3 h indicator light comes on. The 6-9 hours lights come on with each press. You can cancel the delayed start by pressing the button after 9 hr. lights up. Activate the function by pressing the Start/Pause button. The countdown starts at this moment. If you would like to change the setting once the delayed start function is already activated, you can set a new time by pressing the Start/Pause button twice. To activate the function, press the Start/Pause button again. When the set time has elapsed, the light goes out and the program you selected starts. If you press the Start / Pause button when the 9-hour light comes on, the light will go out. If you press the Start / Pause button while the delay light is off, the selected program will start without delay. If the user switches the program selection button to the off position after activating the delay and the program has started, the activated delay function will be cancelled. If you press and hold button 2 for 3 seconds, the half load function is activated and the half -fill light comes on. Cancel the half load function by pressing and holding the button for 2 -3 seconds. The half load indicator goes off. Thanks to the half load function, you can shorten the duration of selected programs and reduce energy and water consumption.
NOTE: If you have used one of the functions (for example delay or half load) and then disconnected the power supply and subsequently reconnected the appliance, this function will not be active in the next washing program. To use this feature in the program you newly selected, you must set it up again.
3. Start/Pause button
When you press the Start/Pause button, the program selected with the program selection button starts and the Wash light comes on. The Start/Pause light goes off when the program starts. If you want to stop the program, press the Start/Pause button. In this case, the light on the Start / Pause button starts flashing. You can activate the program again by pressing the Start/Pause button once again.
4. Rotary knob for program selection
Turn the selector to select the desired program. Turn the selector to position "0" to switch off the appliance.
5. Setting program or delayed start monitoring indicators
You can monitor the progress of the program via the lights on the control panel.
- Wash
- Drying
• End
6. Indicator light - Lack of salt
If the low salt light is on, add salt, see chapter "Using salt".
7. Indicator light - Insufficient rinse aid
If the lack of rinse aid light is on, refill the rinse aid, see chapter "Using the rinse aid".
STARTING THE DISHWASHER AND SELECTING THE WASHING PROGRAM
Turning on the dishwasher
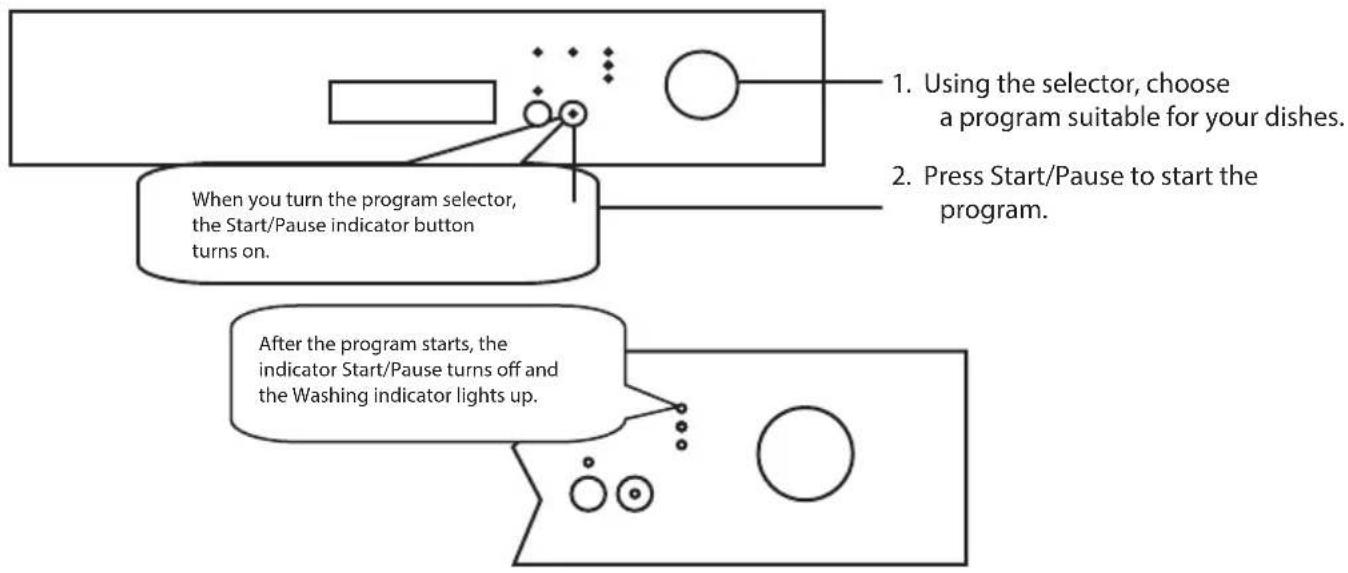
flowchart
graph TD
    A["Using the selector, choose a program suitable for your dishes."] --> B["Press Start/Pause to start the program."]
    C["When you turn the program selector, the Start/Pause indicator button turns on."] --> D["After the program starts, the indicator Start/Pause turns off and the Washing indicator lights up."]
Following the program
You can follow the running of the program using the indicators on the control panel.
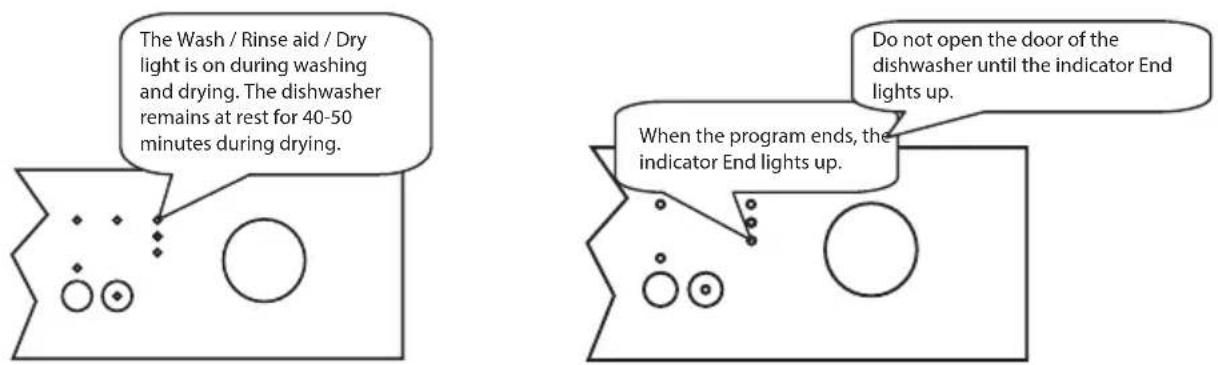
Changing program
If you want to change the program during the wash cycle, proceed as follows:
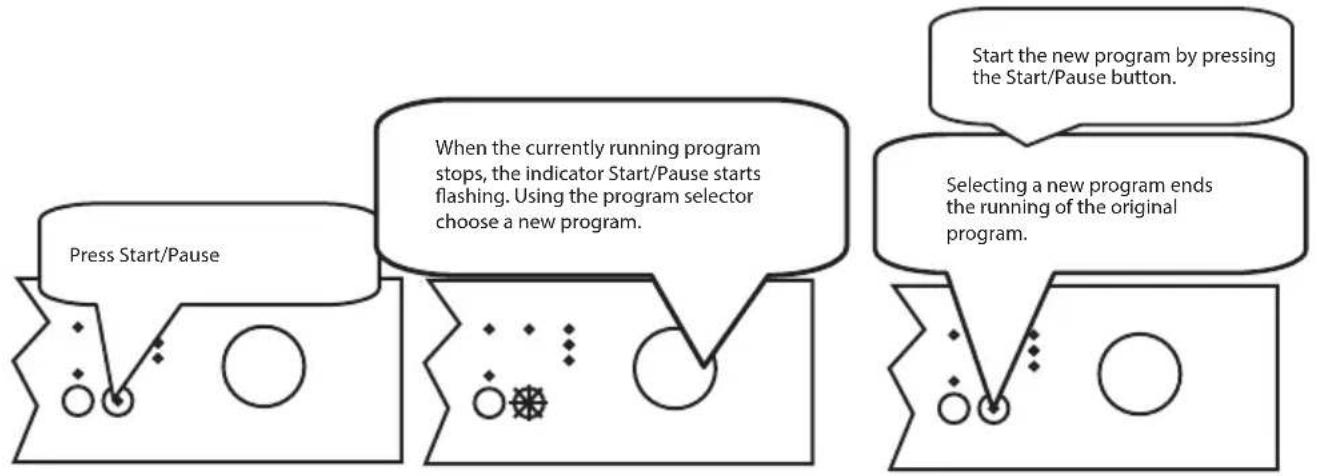
flowchart
graph TD
    A["Press Start/Pause"] --> B["When the currently running program stops, the indicator Start/Pause starts flashing. Using the program selector choose a new program."]
    B --> C["Start the new program by pressing the Start/Pause button. Selecting a new program ends the running of the original program."]
Cancelling program
If you want to cancel the program currently running, proceed as follows:
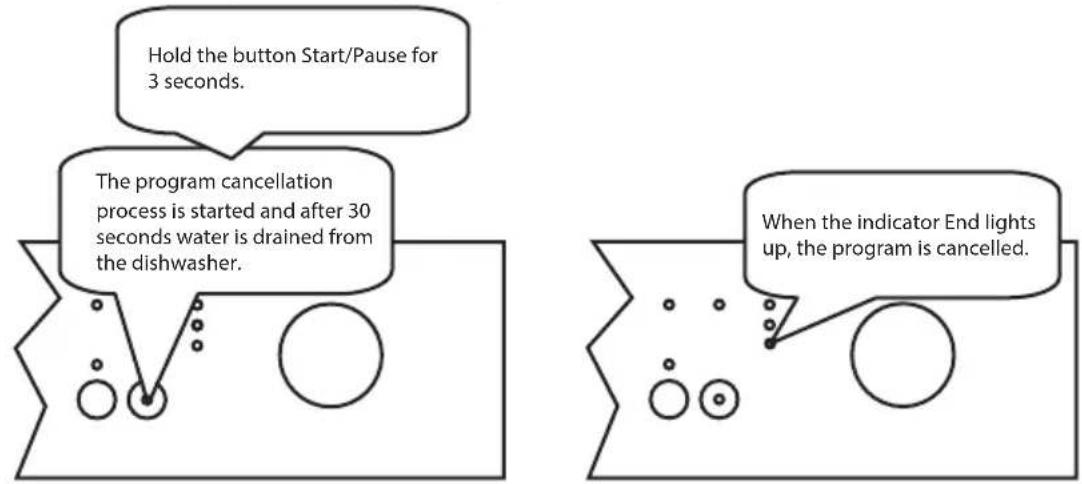
Turning off the dishwasher
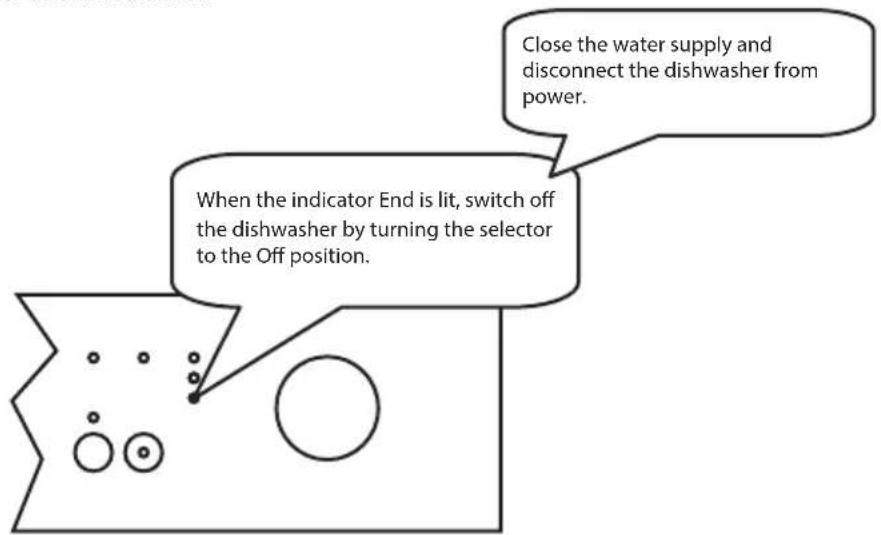
NOTES
• After completion of the wash program you can slightly open the door of the dishwasher to speed up the drying process.
- Open the door carefully, the steam coming from the open door is hot!
- If you open the dishwasher door or the power supply is interrupted during the washing program, the dishwasher will continue the program after closing the door or restoring power.
- It is dangerous to open the door during operation, there is a risk of scalding by the hot water.
- If the door is opened or the power supply is interrupted during the drying phase, the program will end. The dishwasher is ready for a new program selection.
Removal of the dishes from the dishwasher
- Before removing the dishes from the dishwasher, wait a few minutes before handling the dishes while they are still hot and there is a greater risk of breakage. Also, the dishes dry better.
• Empty first the lower basket then the upper one. Thus you will avoid water dripping from the upper into the bottom basket.
CLEANING AND MAINTENANCE
Unplug the appliance before cleaning and maintenance.
Cleaning the dishwasher is important to maintain the life of the appliance. Make sure that the water softening setting (if available) is made correctly and that the correct amount of detergent is used to prevent lime scale build-up. When the salt light comes on, add salt to the dispenser.
Oil and lime scale may build up in the dishwasher over time. If that happens:
- Fill the detergent dispenser, but do not put any dishes in the dishwasher. Select a high temperature dishwashing program and start it. If this does not clean your dishwasher sufficiently, use a dishwasher cleaner.
• To prolong the life of your dishwasher, clean it regularly every month. - Wipe the door seal regularly with a damp cloth to remove any accumulated debris or foreign objects.
Filters
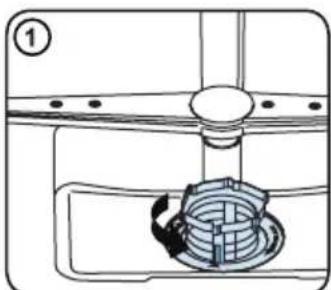
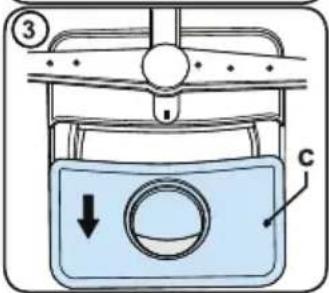
Clean the filters and spray arms at least once a week. If any food residue or foreign objects remain in the fine and coarse filters, remove the filters and clean them thoroughly under running water.
a) Micro filter
b) Coarse filter
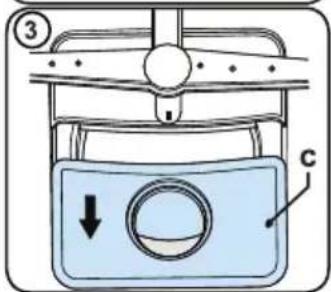
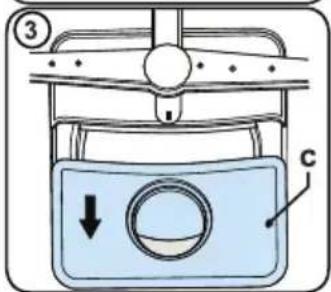
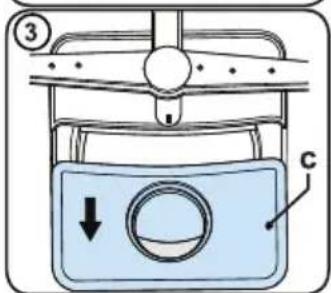
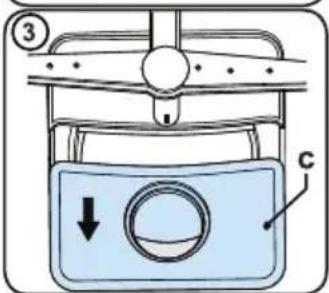
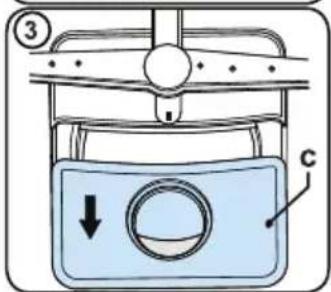
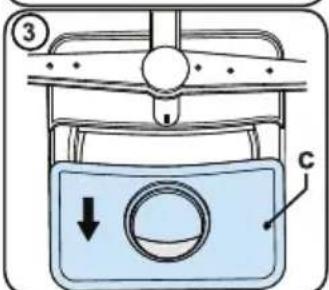
c) Metal filter
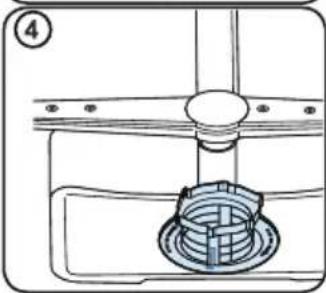
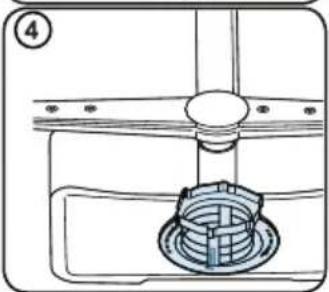
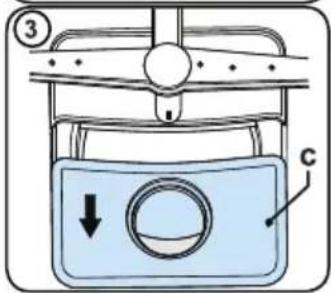
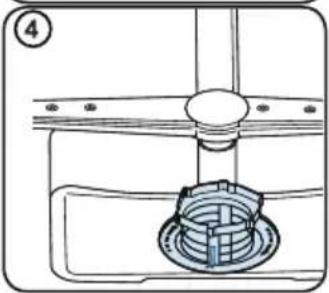
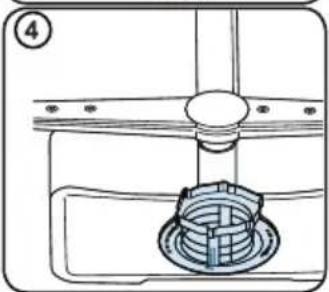
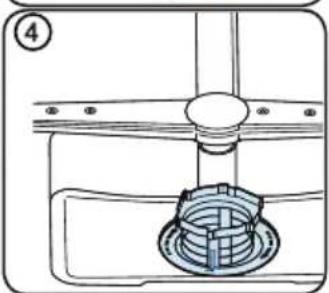
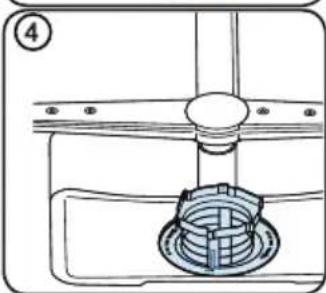
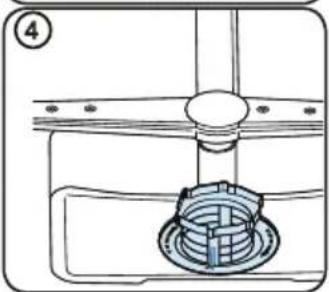
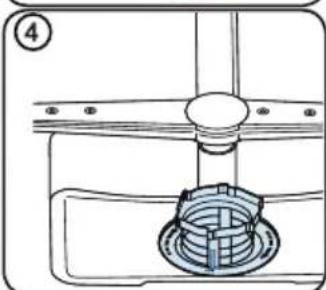
To remove and clean the filter combination, turn it counter -clockwise and lift it up ① to remove it. Remove the coarse filter from the micro filter ②. Then pull up and remove the metal filter ③. Thoroughly rinse the filter under running water. Reinstall the filters. Replace the filter assembly by turning it clockwise ④.
- Never use dishwasher without the filters.
- Incorrect installation of the filter will reduce the washing efficiency.
- Clean filters are necessary for proper operation of the appliance.
natural_image
Diagram of a mechanical assembly with a coiled spring and housing (no text or symbols)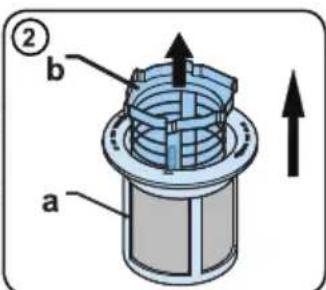
natural_image
Technical line drawing of a mechanical assembly with a central component and a circular base (no text or symbols)Spray arms
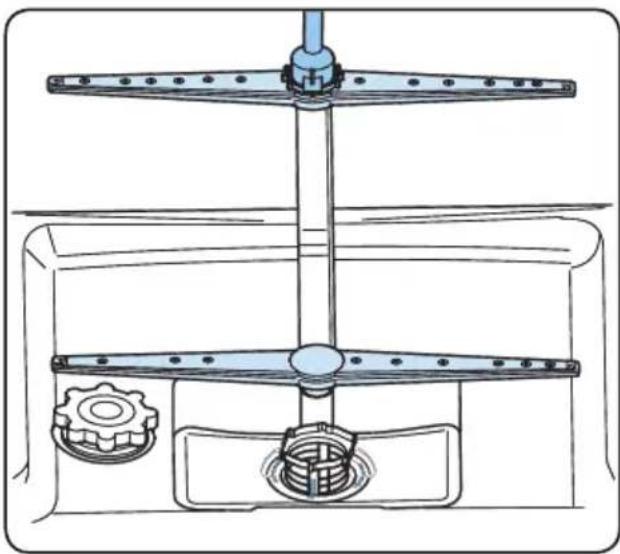
Make sure that the nozzle openings are not blocked and that no food residue or foreign objects remain on the arms. If any of the nozzles became clogged, remove the arm and clean it under running water. To remove the upper spray arm, loosen the nut that holds it in place by turning it clockwise and pulling it down. Make sure that the nut is tight when reinstalling the upper arm.
Drain pump
Large food residues or foreign objects that have not been caught by the filters can clog the waste water pump. The rinsing water will then be above the filter.
Warning - risk of cuts!
When cleaning the drain pump, be careful not to cut yourself on pieces of broken glass or pointed objects. In this case;
-
First, disconnect the appliance from power.
-
Remove the baskets.
-
Remove the filters.
-
Remove water. Use a sponge if necessary.
-
Check the area and remove all foreign objects.
-
Install filters.
-
Insert baskets back.
natural_image
Technical line drawing of a mechanical assembly with gears and a central shaft (no text or symbols)AUTOMATIC ERROR MESSAGES AND THEIR SOLUTIONS
| ERROR CODE | Error description Probable cause/Solution | ||
| Wash Exit | Start/ Suspension | ||
| Insufficient water supply. | |||
| Water supply error | |||
| Waste water does not drain from the dishwasher. | |||
 |  | The intended water temperature was not reached, defective heating element and sensor. | • Contact service | |
 |  | Active alarm – water overflowing | • Turn off the appliance and close the taps.• Contact service | |
 |  |  | Defective electronic card | • Contact service |
Installation and repairs must always be performed by an authorized service representative to avoid possible risks. The manufacturer is not liable for damage that may occur during procedures performed by unauthorized persons. Only a technician may perform repairs. If you need to replace a part, be sure to use only genuine spare parts.
Improper repairs or the use of non -original spare parts can cause considerable damage and expose the user to considerable risk.
Contact information for customer service can be found in the enclosed warranty.
One of the program lights is on and the Start / Pause light turns off and on
The appliance door is open, close it.
The program does not start
- Make sure the plug is plugged in.
- Check the fuses.
- Check that the tap on the water supply is open.
- Make sure you close the appliance's door.
- Check is you have switched off the appliance by pressing the On/ Off button.
- Check that the filter on the water supply and the filters in the appliance are not clogged.
The "Wash" and "End" lights are flashing
• Active alarm – water overflowing
- Switch off the water supply and contact an authorized service center.
The lights do not go out after the program is completed
The On/Off button is still on.
Detergent residues remain in the detergent dispenser
The detergent was added to wet detergent dispenser.
Water remains in the appliance at the end of the program
• The drain hose is clogged.
- Filters are clogged.
• The program is not yet completed.
The appliance stops during washing
- Power failure.
• Water supply failure. - The program could be in a standby mode.
There is noise during washing and the appliance shakes
• The dishes are put in incorrectly.
• The spray arms collide with the dishes.
Leftover food remains on the dishes
- The dishes are put incorrectly into the dishwasher, the water did not reach these specific places.
• The basket is overfilled.
• The dishes are tilted.
• The amount of detergent was small. - An incorrect program was chosen, rather weak.
• The dishes are tilted. - The spray arms nozzles are clogged with food remains.
- Filters are clogged.
There are white stains on the dishes
- The amount of detergent was insufficient.
- The rinse aid dosage setting was set to a very low level.
- Despite the high degree of water hardness the special salt in the softener was not used.
- The water softener is set to an insufficient level.
- The lid of the salt dispenser is not closed properly.
The dishes are not dry
- You selected a program without drying.
- The rinse aid dispenser is set to an insufficient level.
• The dishes were removed too fast.
There are rust stains on the dishes.
- Low quality of the stainless steel dishes.
• High salt content in the water. - The lid of the salt dispenser is not closed properly.
- When filling the salt dispenser, the dishes and the interior of the dishwasher became contaminated.
- Improper grounding.
If the problem persists after performing the recommended measures, or other defects occur, contact an authorized service center.
TECHNICAL SPECIFICATIONS
| EDF 6023 WE | |
| Number of dish sets 12 | |
| Height (cm) 85 | |
| Width (cm) 60 | |
| Depth incl. connection (cm) 60 | |
| Power input 220–240 Vac / 50 Hz | |
| Rated voltage/frequency 1900 W | |
| Water pressure (hydrodynamic pressure) 0.03, MPA (0.3 bar) – 1, MPA (10 bar) | |
| Voltage 10 A | |
DISPOSAL
Remove properly all the packaging material from the dishwasher.
All packaging material can be recycled.
Plastic parts are marked with standard international abbreviations:
• PE polyethylene, e.g. shrink wrap
- PS styrofoam, e.g. padding material
- POM polyoxymethylene, e.g. plastic clips
- PP polypropylene
• ABS acrylonitrile -butadiene -styrene, e.g. a control panel
CAUTION
- Packaging material may be dangerous for children!
- Please, hand over the unused packaging material to the collection center. Disable the appliance by removing the door and by cutting the power cord.
- Cardboard packaging is made from recycled paper and therefore should be separately collected for further recycling.
- Proper disposal of the device will help to protect the environment and human health, which could be jeopardized in case of improper handling of the product.
- For more information about recycling this product, contact your local authorities or collection center.
DISPOSAL: Do not place the product into unsorted municipal household garbage. Individual parts have to be separated according to the materials and stored separately for further processing.
Recycling
- Some parts of the appliance and packaging contain recyclable materials.
- Plastic parts are marked with international abbreviations: (>PE<, >PS<, >POM<, PP<).
- The cardboard parts of the packaging are made of recycled paper. Dispose of the cardboard at an old paper collection point for further recycling.
- Such materials cannot be disposed of with normal household waste. Dispose of them at the nearest waste collection point for recycling.
- For more information on disposal methods and collection points, please contact your local authority.
USE AND DISPOSAL OF WASTE
Wrapping paper and corrugated paperboard – deliver to scrapyard. Packing foil, PE bags, plastic elements – throw into plastic recycling containers.
DISPOSAL OF PRODUCTS AT THE END OF LIFETIME
Disposal of electric and electronic equipment (valid in EU member countries and other European countries with an implemented recycling system)
The represented symbol on the product or package means the product shall not be treated as domestic waste. Hand over the product to the specified location for recycling electric and electronic equipment. Prevent negative impacts on human health and the environment by properly recycling your product. Recycling contributes to preserving natural resources. For more information on the recycling of this product, refer to your local authority, domestic waste processing organization or store, where you purchased the product.
This product complies with EU directives on electromagnetic compatibility and electrical safety. This product meets the requirements for heavy metals in electrical equipment.
08/05

Note:
The appliance meets European standards and regulations in their current version:
• LVD – EU Directive 2014/35/EU
• EMC – EU Directive 2014/30/EU
• EUP 2019/2022
The above values were measured under specific conditions, in accordance with the relevant standards. Results may vary significantly depending on the amount and degree of soiling of the dishes, water hardness, amount of detergent, etc.
This instruction manual is written according to the standards and regulations of the European Union.
The operating manual is available at www.ecg-electro.eu.
Changes of text and technical parameters reserved.
SICHERHEITSHINWEISE
natural_image
Illustration of a hand holding a faucet with a valve, showing a curved arrow indicating rotation (no text or symbols)Elektroanschluss
natural_image
Diagram showing a mechanical component with a gear and a rotating arrow, no text or symbols present.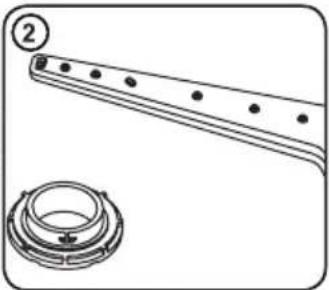
natural_image
Technical line drawing of a mechanical component with a circular part and a separate circular inset (no text or symbols)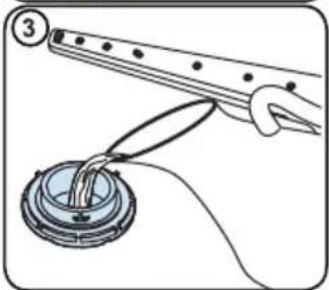
natural_image
Illustration of a hand holding a tool interacting with a circular device (no text or symbols present)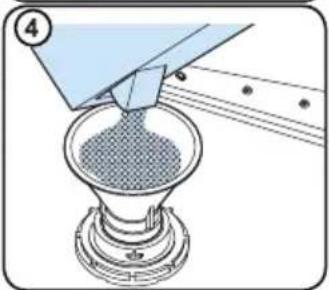
natural_image
Illustration of a funnel pouring granular material into a conical flask (no text or symbols)natural_image
Illustration of a hand inserting a blue liquid into a rectangular device (no text or symbols)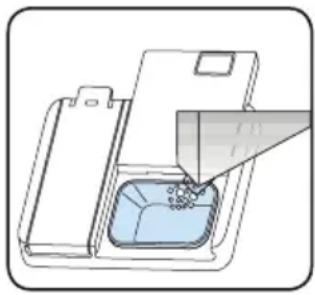
natural_image
Illustration of a container with liquid and granular material inside, no text or symbols presentnatural_image
Illustration of a hand pressing down on a blue notebook with an arrow indicating the process (no text or symbols present)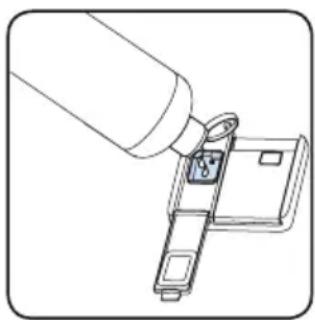
natural_image
Line drawing of a hand holding a key inserted into a device (no text or symbols)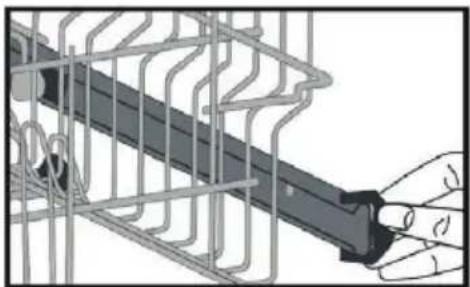
natural_image
Illustration of a hand using a tool to adjust or install a mechanical component inside a wire cage (no text or symbols visible)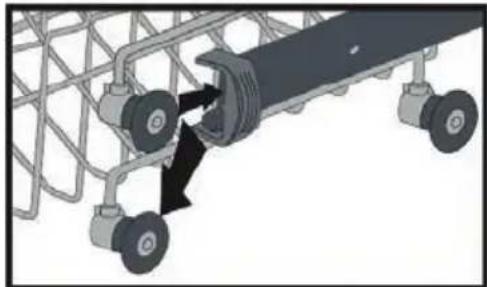
natural_image
Mechanical assembly diagram showing a conveyor belt system with two wheels and a central shaft (no text or symbols)natural_image
3D cutaway view of a mechanical device showing internal components and housing (no text or symbols visible)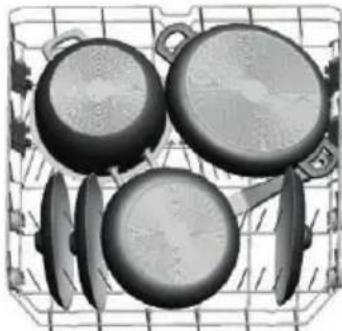
natural_image
Black-and-white photo of a grid-patterned basket containing four cooking pots (no text or symbols visible)Oberkorb
natural_image
Grid of circular objects including spheres and rings arranged in rows (no text or symbols visible)natural_image
Black X symbol crossed over a grid of circular objects, no text or symbols present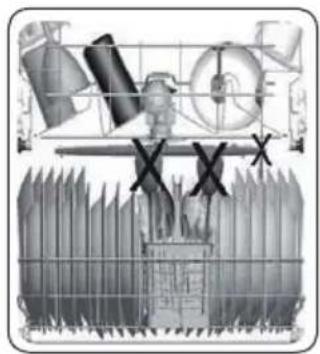
natural_image
Technical illustration of a mechanical assembly with no visible text or symbols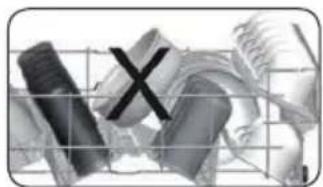
natural_image
Abstract grayscale image with intersecting lines and a central 'X' symbol, no readable text or symbols present.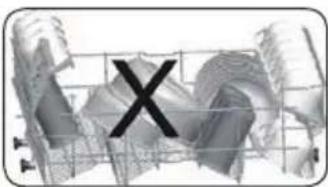
PROGRAMMTABELLE
natural_image
Diagram of a mechanical component with a circular component inserted into a housing (no text or symbols)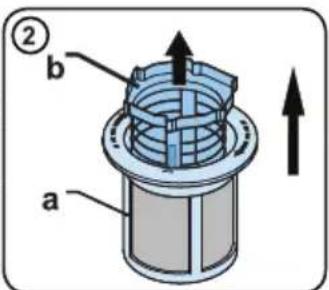
natural_image
Technical line drawing of a mechanical assembly with a central component and mounting flanges (no text or symbols)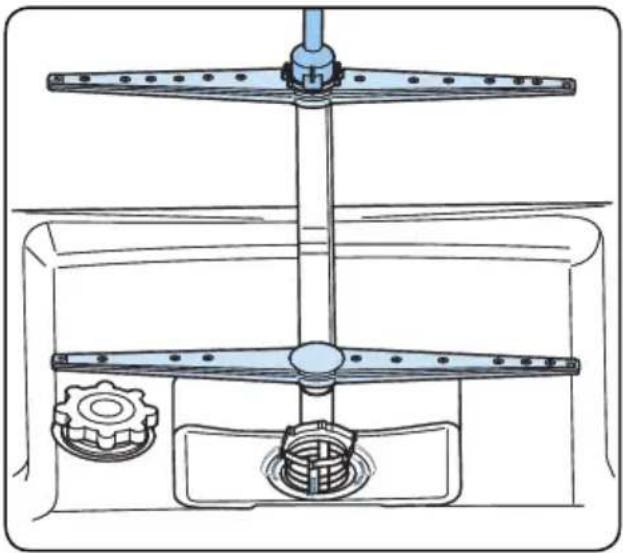
natural_image
Technical line drawing of a mechanical assembly with gears and shafts (no text or symbols)natural_image
Illustration of a hand holding a faucet with a valve, showing a curved arrow indicating rotation (no text or symbols)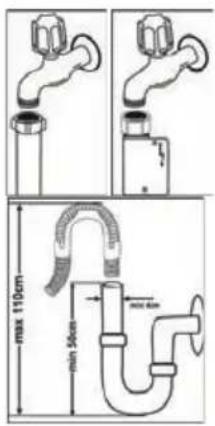
Elektrické zapojení
natural_image
Diagram showing a mechanical component with a gear-like base and a rotating arrow, no text or symbols present.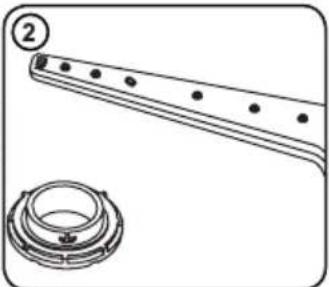
natural_image
Technical line drawing of a mechanical component with a circular inset showing a flanged base and bolt holes (no text or symbols)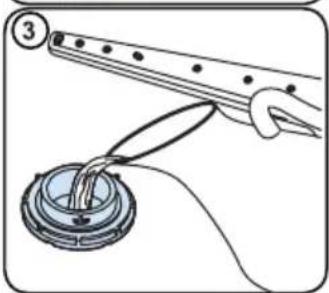
natural_image
Illustration of a hand holding a tool interacting with a circular device, no text or symbols present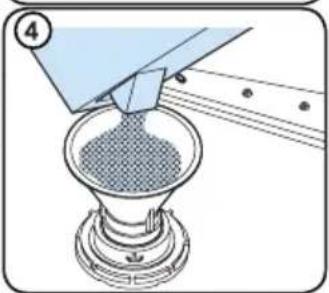
natural_image
Illustration of a funnel pouring granular material into a conical flask (no text or symbols)natural_image
Illustration of a hand pressing down on a blue liquid in a container (no text or symbols)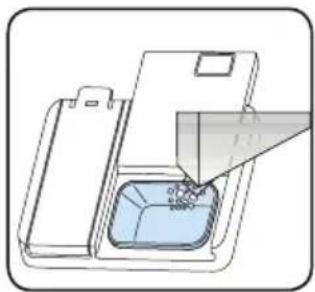
natural_image
Diagram of a container with liquid and a funnel inserted into it, showing material flow (no text or symbols)natural_image
Illustration of a hand pressing down on a blue notebook with an arrow indicating the process (no text or symbols present)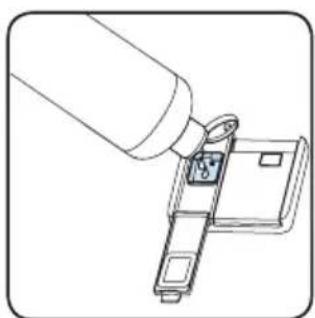
natural_image
Line drawing of a hand inserting a lock into a device (no text or symbols)natural_image
Illustration of a hand holding a black tool inside a wire cage (no text or symbols visible)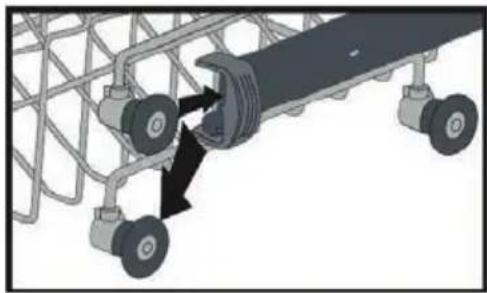
natural_image
Mechanical assembly diagram showing a conveyor belt system with two wheels and a central shaft (no text or symbols)natural_image
Cross-sectional diagram of a washing machine showing internal components and fan blades (no text or labels)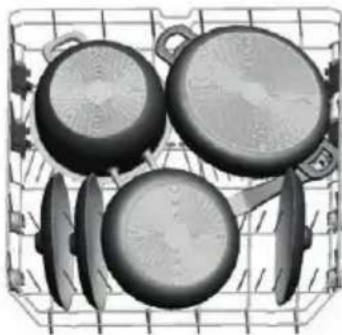
natural_image
Black-and-white photo of a basket filled with cooking utensils including ovens, panes, and kitchen utensils (no text or symbols visible)Horní koš
natural_image
Grid of circular objects including spheres and rings, no visible text or symbolsnatural_image
Abstract grayscale graphic with intersecting lines and a black 'X' symbol, no readable text or symbols present.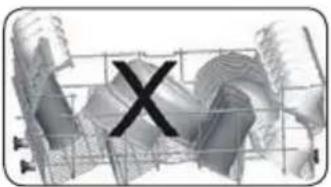
natural_image
Abstract 3D wireframe structure with a black 'X' mark overlay (no text or symbols)TABULKA PROGRAMÜ
natural_image
Diagram of a mechanical assembly with a central component and a curved housing (no text or symbols)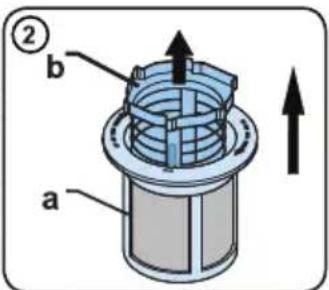
natural_image
Technical line drawing of a mechanical component with a central hub and base plate (no text or symbols)Ramena s tryskami
natural_image
Technical line drawing of a mechanical assembly with gears and a central shaft (no text or symbols)natural_image
Illustration of a hand holding a faucet with a valve, showing a curved arrow indicating rotation (no text or symbols)Vee äravooluvoolik
natural_image
Diagram showing a mechanical component with a gear-like base and a rotating arrow, no text or symbols present.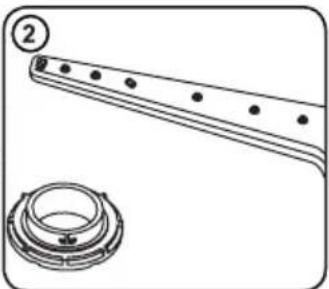
natural_image
Technical line drawing of a mechanical component with a flanged shaft and a circular base (no text or symbols)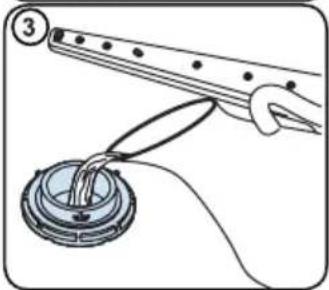
natural_image
Illustration of a hand holding a ruler above a circular component with wires, no text or symbols present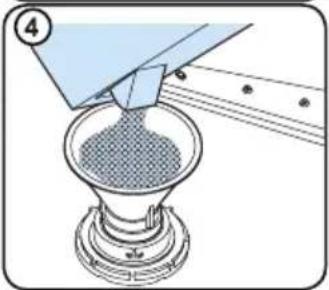
natural_image
Illustration of a funnel pouring granular material into a glass tube (no text or symbols)Veekareduse testriba
natural_image
Illustration of a hand pressing down on a blue liquid in a container (no text or symbols)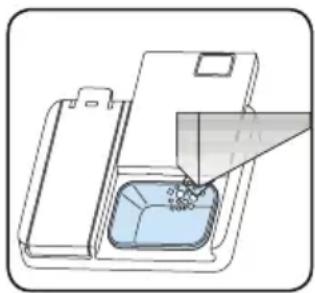
natural_image
Illustration of a container with liquid and a funnel inserted, no text or symbols presentnatural_image
Illustration of a hand inserting a card into a device (no text or symbols visible)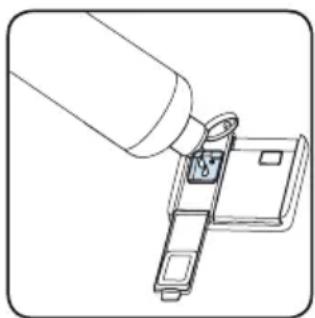
natural_image
Line drawing of a hand holding a key inserted into a device (no text or symbols)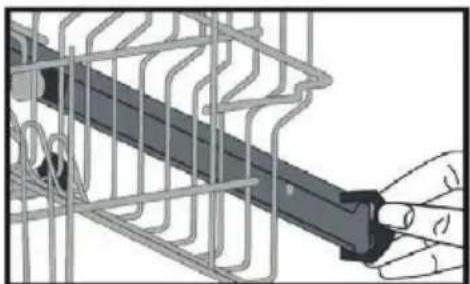
natural_image
Illustration of a hand holding a black object inside a wire cage (no text or symbols)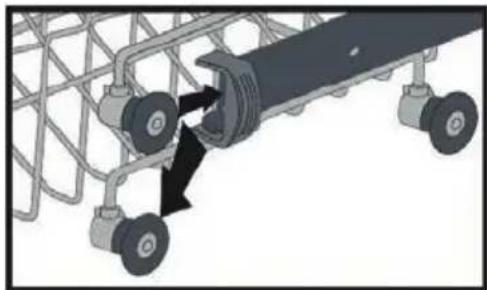
natural_image
Mechanical assembly diagram showing a motor with wheels and a connecting rod (no text or symbols)natural_image
Cross-sectional diagram of a mechanical device with internal components (no text or symbols visible)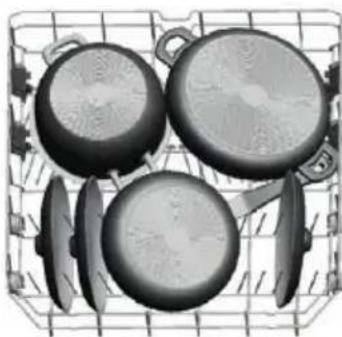
natural_image
Black-and-white photo of a basket filled with four cooking pots (no text or symbols visible)Ülemine korv
natural_image
Grid of circular objects including fruits and containers, no visible text or symbolsnatural_image
Two grayscale industrial equipment diagrams showing circular components and a grid structure with X marks (no text or symbols)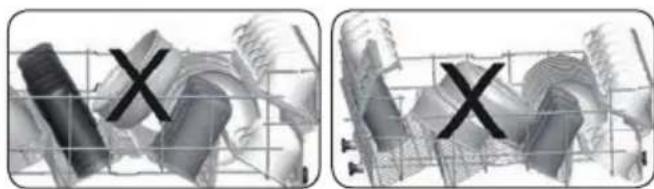
natural_image
Two grayscale 3D-rendered objects with 'X' marks overlaid on a grid background, no text or symbols present.PROGRAMMIDE TABEL
natural_image
Diagram of a mechanical assembly with a central component and a circular component, no visible text or symbols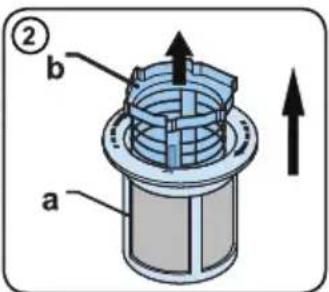
natural_image
Technical line drawing of a mechanical assembly with a central component and base plate (no text or symbols)Pihustustorud
natural_image
Technical line drawing of a mechanical assembly with gears and a central shaft (no text or symbols)AUTOMAATSED VEATEATED JA NENDE LAHENDUSED
natural_image
Illustration of a hand holding a faucet with a valve, showing a curved arrow indicating rotation (no text or symbols)natural_image
Diagram showing a mechanical component with a gear-like base and a rotating arrow, no text or symbols present.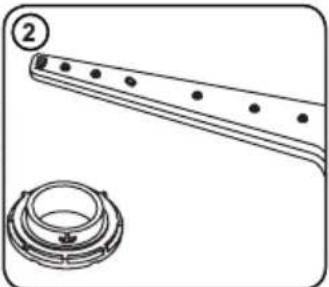
natural_image
Technical line drawing of a mechanical component with a circular inset showing a ring detail (no text or symbols)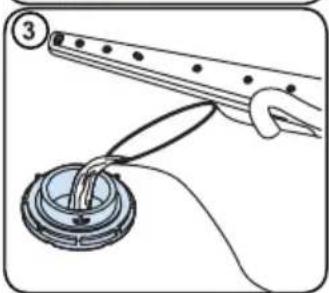
natural_image
Illustration of a hand holding a tool interacting with a circular component, no text or symbols present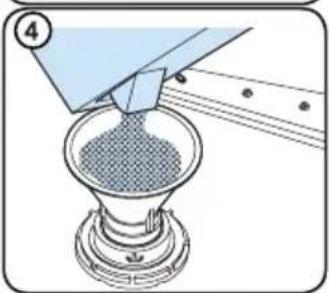
natural_image
Illustration of a funnel pouring granular material into a conical flask (no text or symbols)- Postavite birač za programe / prekidač (4) u položaj 1.
- Pritisnite i pridržite tipku Start/Pauza (3).
• Postavite birač za programe / prekidač (4) u položaj 2 okretanjem za jedan korak u smjeru kazaljke na satu. - Držite pritisnutu tipku Start / Pauza (3) dok ne zasvijetle sve kontrolne lampice. Prikazuje indikator tvrdoće vode koji pokazuje unaprijed definirani status (pogledajte tablicu na prethodnoj stranici).
- Sada možete promijeniti postavke prema tablici postavki tvrdoće vode pritiskajući tipku Start / Pauza (3).
- Nakon što ste postavili potrebnu tvrdoću, isključite perilicu posuđa okretanjem birača programa / prekidača (4) u položaj 1. Posljednja odabrana postavka tvrdoće vode pohranjuje se u memoriju
Upozorenje: U slučaju preseljenja, nakon preseljenja ponovo podesite tvrdoću vode prema kvaliteti vode u novom domu. To je neophodno za optimalno pranje posuđa.
Upotreba deterdženta
Koristite samo deterdžente namijenjene upotrebi u domaćim perilicama posuđa. Čuvajte deterdžente na hladnom i suhom mjestu, izvan dohvata djece.
Za najbolje rezultate u odabrani program dodajte odgovarajuće sredstvo za čišćenje. Potrebna količina deterdženta ovisi o ciklusu, količini posuđa i razini zaprljanosti.
Nemojte dodavati više deterdženta u spremnik za deterdžent nego što je potrebno; inače će se na staklu i posuđu pojaviti bjelkaste pruge ili plavičasti slojevi koji mogu uzrokovati ogrebanje stakla. Kontinuirana upotreba previše deterdženta može oštetiti uređaj.
Korištenje male količine deterdženta može rezultirati loše opranim sudem. Na posuđu se mogu pojaviti bjelkaste pruge.
Pogledajte upute proizvođača deterdženta za više informacija.
Punjenje spremnika za deterdžent
Pritisnite zasun da otvorite spremnik i napunite ga deterdžentom. Za jako zaprljano posuđe napunite cijeli spremnik. U slučaju manje zaprljanog posuđa, upotrijebite za oko 1/3 manje praha.
natural_image
Illustration of a hand pressing down on a blue liquid in a container (no text or symbols)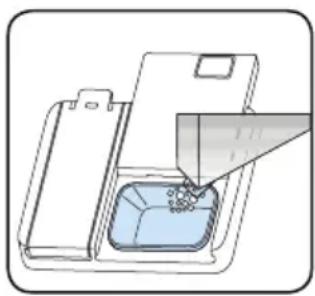
natural_image
Illustration of a container with liquid and a funnel inserted, showing a process (no text or symbols)natural_image
Illustration of a hand inserting a card into a notebook (no text or symbols visible)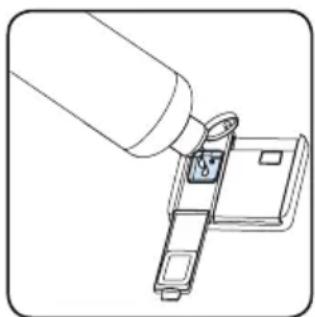
natural_image
Line drawing of a hand inserting a lock into a device (no text or symbols)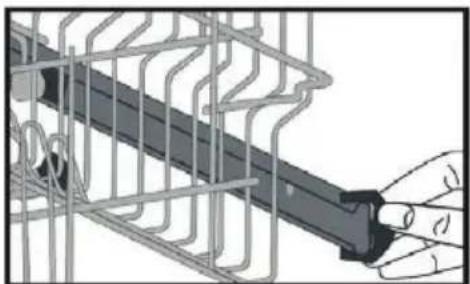
natural_image
Illustration of a hand inserting a component into a wire cage (no text or symbols)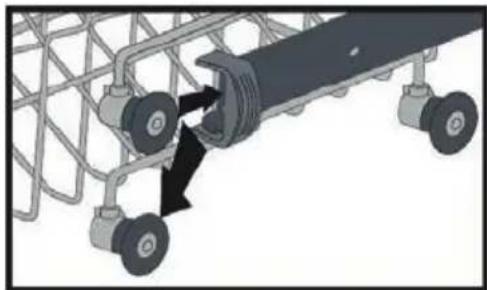
natural_image
Mechanical assembly diagram showing a vehicle with wheels and a mechanical component, no text or symbols presentAlternativno punjenje košara
Donji koš
natural_image
3D cutaway view of a washing machine showing internal components (no text or symbols visible)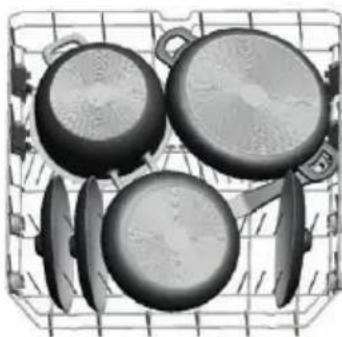
natural_image
Black-and-white photo of a basket filled with cooking utensils including a pan, pan, and knife (no text or symbols visible)Gornji koš
natural_image
Grid of circular objects including fruits and a spiral structure, no visible text or symbolsNepravilno punjenje perilice posuđa
Nepravilno punjenje perilice posuđa može smanjiti performanse pranja i sušenja. Za najbolje rezultate slijedite upute proizvođača.
natural_image
Two grayscale images showing a grid of circular objects with a black 'X' symbol overlaying them, and a close-up of mechanical components inside a cage-like structure (no text or symbols)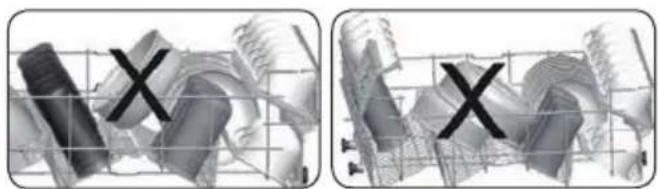
natural_image
Two identical 3D-rendered objects with 'X' marks, set against a grid background (no text or symbols)TABLICA PROGRAMA
| P1 P2 P3 | |||
| Naziv programa: Eco Super | 50' Intenzivno 65 °C | ||
| Vrsta onečišćenja | Standardni program za normalno zaprljano svakodnevno korišteno posuđe sa smanjenom potrošnjom energije i vode. | Brži program za svakodnevno normalno zaprljano svakodnevno korišteno posuđe. | Za jako zaprljano posuđe. |
| Razina onečišćenja Srednje | Srednje Jako | ||
| Količina deterdžentaA: 25 cm3B: 15 cm3 | AAA | ||
| Trajanje programa (h: min) | 3.25 0:50 1:57 | ||
| Potrošnja električne energije (kWh / ciklus): | 0,923 1,100 1,700 | ||
| Potrošnja vode (l/ciklus) 1 | 2,0 12,0 17,2 |
- Trajanje programa može se promijeniti ovisno o količini posuđa, temperaturi vode, okolnoj temperaturi i odabranim drugim funkcijama.
- Vrijednosti date za programe koji nisu ekološki programi su samo informativne.
- Ako vaš model ima senzor zamućenja, znači da ima automatski program umjesto intenzivnog programa.
- Eko program (ekološki) pogodan je za čišćenje normalno zaprljanog posuđa. To je najučinkovitiji kombinirani program za energiju i vodu za ovu upotrebu i koristi se za procjenu usklađenosti sa zakonodavstvom EU o ekološkom dizajnu.
- Pranje posuđa u kućnoj perilici posuđa obično troši manje energije i vode nego ručno pranje posuđa kada se perilica posuđa koristi prema uputama proizvođača.
-
Koristite deterdžent u prahu samo za kratke programe.
-
Kratki programi ne uključuju sušenje.
- Da biste ubrzali sušenje, preporučujemo da vrata nakon završetka ciklusa malo otvorite.
- Pristup bazi podataka proizvoda, gdje ćete naći informacije o modelu, omogućen je čitanjem QR koda na energetskoj naljepnici.
NAPOMENA: Prema propisima 1016/2010 i 1059/2010, vrijednosti potrošnje energije u programu Eco mogu se razlikovati. Ova je tablica u skladu s propisima 2019/2022 i 2019/2017.
UKLJUČIVANJE UREĐAJA I ODABIR PROGRAMA
Odabir programa i pokretanje uređaja

1. Ručka vrata
natural_image
Diagram of a mechanical assembly with a central component and a curved housing (no text or symbols)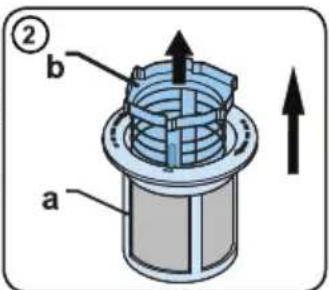
natural_image
Technical line drawing of a mechanical component with a central hub and circular base (no text or symbols)Nosači s mlaznicama
Pazite da otvori mlaznice nisu začepljeni i da na nosačima ne ostane ostataka hrane ili stranih predmeta. Ako se bilo koja mlaznica začepi, skinite nosač i očistite je pod mlazom vode. Da biste uklonili gornji nosač mlaznice, otpustite maticu koja je drži na mjestu okretanjem u smjeru kazaljke na satu i povlačenjem prema dolje. Prilikom postavljanja gornjeg nosača pripazite da matica bude čvrsto zategnuta.
Odvodna pumpa
natural_image
Technical line drawing of a mechanical assembly with gears and a central shaft (no text or symbols)PORUKE O AUTOMATSKIM POGREŠKAMA I NJIHOVA RJEŠENJA
natural_image
Illustration of a hand holding a faucet with a valve, showing a curved arrow indicating rotation (no text or symbols)Üdens novadšljutene
Elektrosavienojums
natural_image
Diagram showing a mechanical component with a gear-like base and a rotating arrow, no text or symbols present.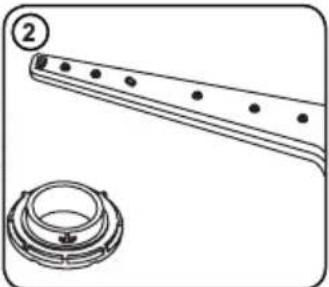
natural_image
Technical line drawing of a mechanical component with a circular inset showing a cylindrical housing (no text or symbols)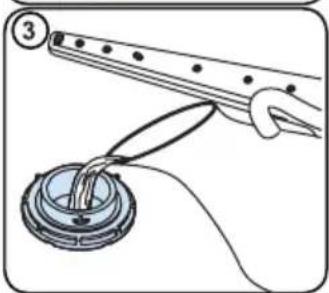
natural_image
Illustration of a hand holding a tool interacting with a circular component, no text or symbols present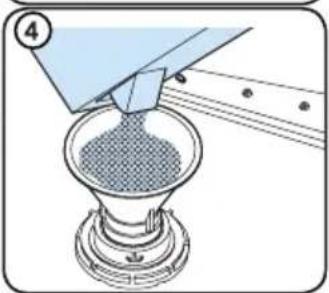
natural_image
Illustration of a funnel pouring granular material into a conical flask (no text or symbols)natural_image
Illustration of a hand pressing down on a blue liquid in a container (no text or symbols)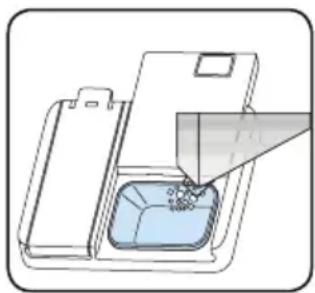
natural_image
Illustration of a container with liquid and a funnel inserted into it, no text or symbols presentnatural_image
Illustration of a hand pressing down on a blue notebook with an arrow indicating the process (no text or symbols present)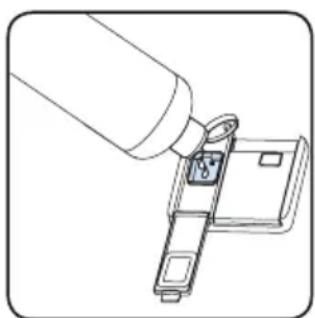
natural_image
Line drawing of a hand inserting a lock into a device (no text or symbols)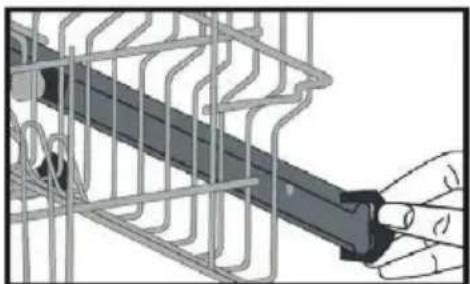
natural_image
Illustration of a hand holding a black object inside a wire cage (no text or symbols)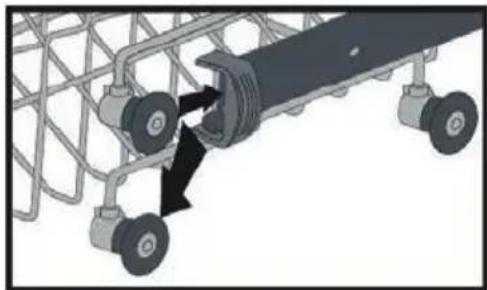
natural_image
Mechanical assembly diagram showing a vehicle with wheels and a mechanical component, no text or symbols presentnatural_image
Cross-sectional diagram of a washing machine (no text or labels visible)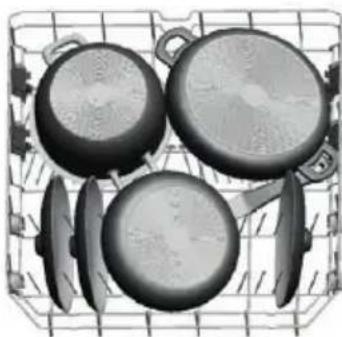
natural_image
Black-and-white photo of a basket containing four cooking pots (no text or symbols visible)Augšējais grozs
natural_image
Grid of circular objects including fruits and containers, no visible text or symbolsnatural_image
Abstract grayscale illustration of stacked objects with a black 'X' mark overlay (no text or symbols)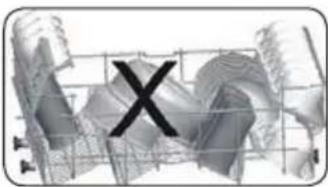
natural_image
Abstract 3D wireframe structure with a black 'X' symbol overlay (no text or symbols present)PROGRAMMU TABULA
natural_image
Diagram of a mechanical assembly with a central component and a curved housing (no text or symbols)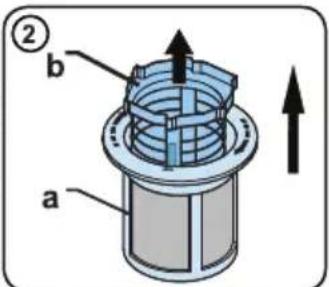
natural_image
Technical diagram of a mechanical assembly with a central component and flange (no text or symbols)natural_image
Technical line drawing of a mechanical assembly with gears and shafts (no text or symbols)AUTOMĀTISKIE KLŪDAS ZIŅOJUMI UN TO RISINĀJUMI
natural_image
Illustration of a hand holding a faucet with a valve, showing a curved arrow indicating rotation (no text or symbols)Elektros instaliacija
natural_image
Illustration of a hand pressing down on a blue liquid in a container (no text or symbols)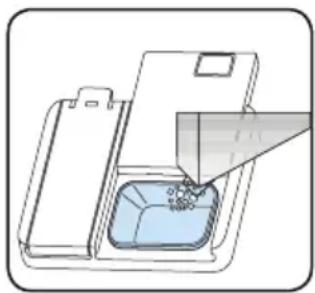
natural_image
Illustration of a container with liquid and a funnel inserted, showing material being poured into (no text or symbols)natural_image
Illustration of a hand using a tool to press or install a device (no text or symbols visible)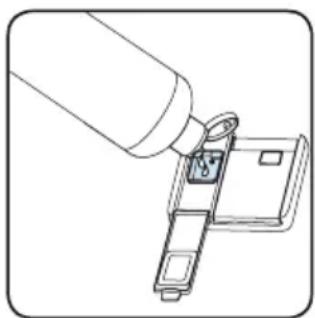
natural_image
Line drawing of a hand holding a lock attached to a device (no text or symbols)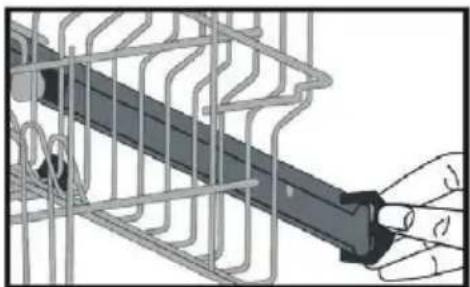
natural_image
Illustration of a hand inserting a cable into a wire cage (no text or symbols)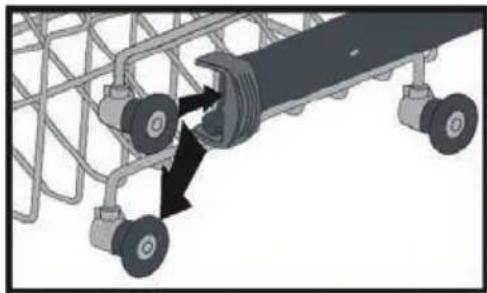
natural_image
Mechanical assembly diagram showing a conveyor belt system with two wheels and a central shaft (no text or symbols)natural_image
3D cutaway view of a mechanical component with no visible text or symbols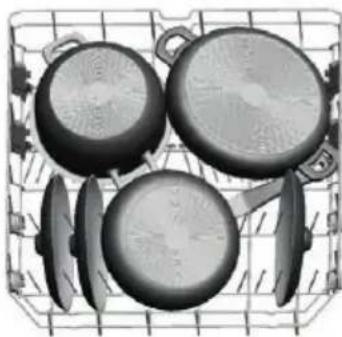
natural_image
Basket filled with four cooking pots and kitchen utensils (no text or symbols visible)Viršutinis krepšys
natural_image
Grid of circular objects arranged in rows, possibly food containers or containers (no visible text or symbols)Neteisingai užpildyta indaplové
natural_image
Mechanical diagram showing a mechanical assembly with a coiled spring and shaft (no text or symbols)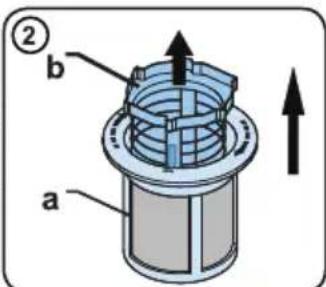
natural_image
Technical line drawing of a mechanical assembly with a central component and base (no text or symbols)natural_image
Technical line drawing of a mechanical assembly with gears and a central shaft (no text or symbols)AUTOMATINIAI KLAIDŲ PRANEŠIMAI IR JŲ SPRENDIMAI
natural_image
Illustration of a hand holding a faucet with a valve, showing a curved arrow indicating rotation (no text or symbols)Elektromos bekötés
natural_image
Illustration of a hand inserting a small object into a device panel (no text or symbols)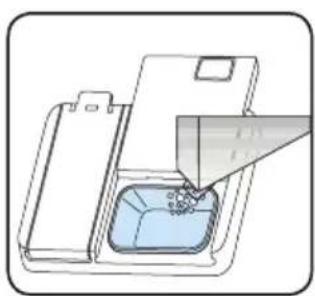
natural_image
Illustration of a kitchen appliance with a tray and lid, showing a blue interior and a knife inserted (no text or symbols)natural_image
Illustration of a hand pressing down on a device panel with an arrow indicating motion (no text or symbols)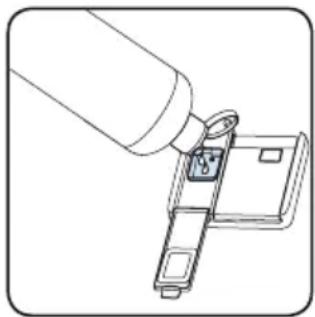
natural_image
Line drawing of a hand holding a key inserted into a device (no text or symbols)A MOSOGATÓGÉP MEGTÖLTÉSE EDÉNNYEL
A kosarak töltése
Alsó kosár
natural_image
Two 3D cutaway views of a kitchen appliance grid, showing internal components like a cylinder, pan, and pot (no text or symbols)Felső kosár
natural_image
Grid of circular objects arranged in rows, possibly for display or storage (no visible text or symbols)PROGRAMTÁBLÁZAT
natural_image
Diagram of a mechanical assembly with a central component and a curved housing (no text or symbols)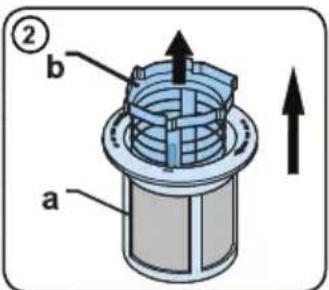
natural_image
Technical line drawing of a mechanical component with a central hub and base plate (no text or symbols)Fúvókás forgókarok
natural_image
Technical line drawing of a mechanical assembly with gears and a central shaft (no text or symbols)HIBAÜZENETEK ÉS MEGOLDÁSAIK
natural_image
Illustration of a hand holding a faucet with a valve, showing a curved arrow indicating rotation (no text or symbols)natural_image
Illustration of a hand pressing down on a blue surface with a downward arrow (no text or symbols)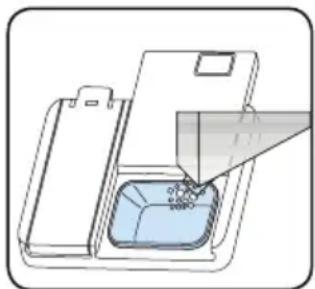
natural_image
Illustration of a hand pouring liquid into a container with a blue liquid inside (no text or symbols)natural_image
Illustration of a hand using a tool to press or install a device into a rectangular panel (no text or symbols visible)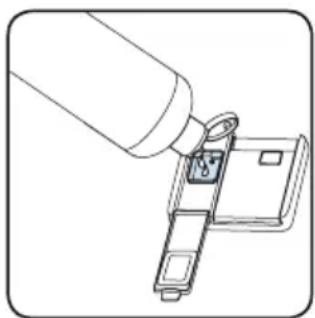
natural_image
Line drawing of a hand holding a lock attached to a device (no text or symbols)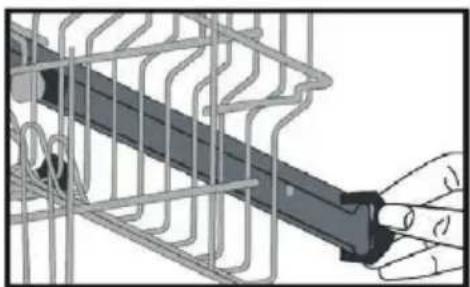
natural_image
Illustration of a hand inserting a black cable into a wire cage (no text or symbols)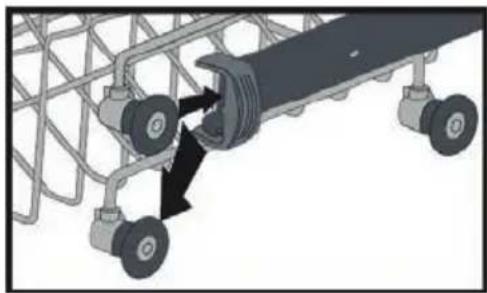
natural_image
Diagram of a mechanical assembly with wheels and a central component, showing directional arrows (no text or symbols)natural_image
3D cutaway view of a mechanical assembly with multiple components and no visible text or symbols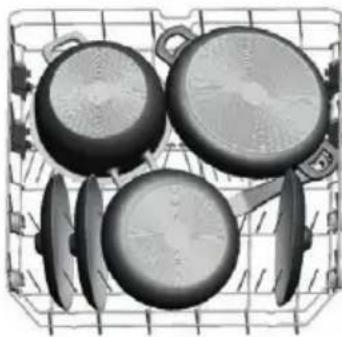
natural_image
Black-and-white photo of a grid with four cooking pots and kitchen utensils (no text or symbols visible)Górny kosz
natural_image
Grid of circular objects including spheres, rings, and a container with layered surfaces (no text or symbols)natural_image
Mechanical diagram showing a valve assembly with a coiled spring and housing (no text or symbols)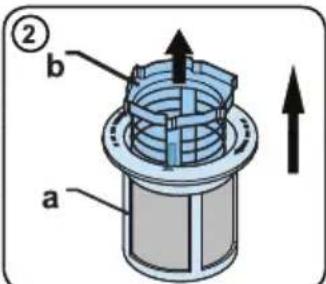
natural_image
Technical diagram of a mechanical assembly with a central component and a circular base (no text or symbols)Ramiona z dyszami
natural_image
Technical line drawing of a mechanical assembly with gears and shafts (no text or symbols)AUTOMATYCZNE KOMUNIKATY O BŁĘDACH I ICH ROZWIAŻANIA
natural_image
Illustration of a hand holding a faucet with a valve, showing a curved arrow indicating rotation (no text or symbols)natural_image
Illustration of a hand inserting a small object into a blue container with a black arrow indicating direction (no text or symbols)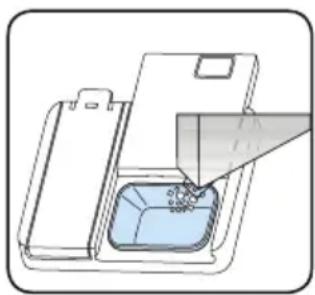
natural_image
Diagram of a device with a container and a funnel inserted, showing liquid level (no text or symbols)natural_image
Illustration of a hand inserting a device into a device (no text or symbols visible)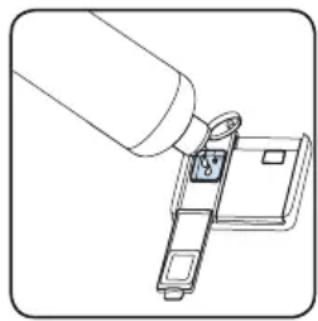
natural_image
Line drawing of a hand inserting a key into a device (no text or symbols)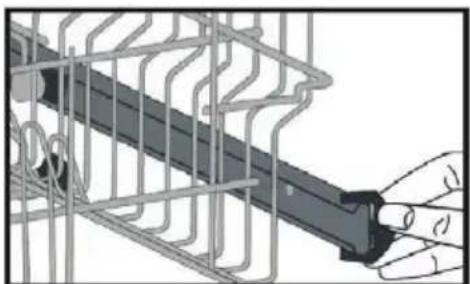
natural_image
Illustration of a hand holding a mechanical component inside a wire cage (no text or symbols visible)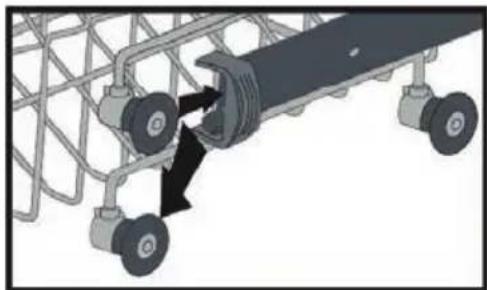
natural_image
Mechanical assembly diagram showing a vehicle with wheels and a mechanical component, no text or symbols presentAlternativne plnenie koša
Spodný kôš
natural_image
3D cutaway view of a mechanical component inside a wire cage (no text or symbols visible)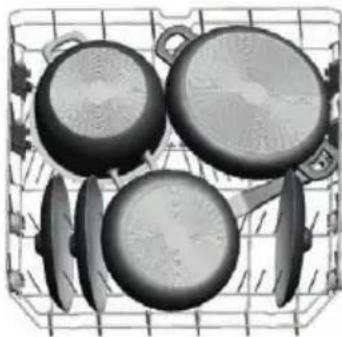
natural_image
Basket filled with kitchen utensils including a pan, saucer, and knife (no text or symbols visible)Horný kôš
natural_image
Grid of circular objects arranged in rows, possibly industrial equipment or storage units (no visible text or symbols)natural_image
Diagram of a mechanical assembly with a central component and a curved housing (no text or symbols)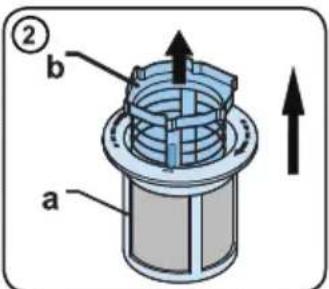
natural_image
Technical line drawing of a mechanical assembly with a central component and a circular base (no text or symbols)Ramená s dýzami
natural_image
Technical line drawing of a mechanical assembly with gears and a central shaft (no text or symbols)Varovanie – nebezpečenstvo porezania!
natural_image
Illustration of a hand holding a faucet with a valve, showing a curved arrow indicating rotation (no text or symbols)Cev za odtekanje vode
Električna vezava
natural_image
Illustration of a hand pressing down on a blue liquid in a container (no text or symbols)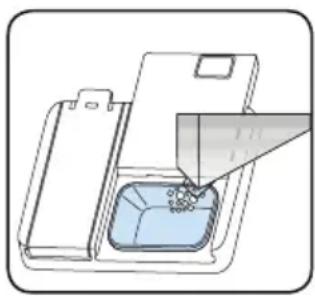
natural_image
Illustration of a hand pouring liquid into a container with granular material inside (no text or symbols)natural_image
Illustration of a hand using a tool to press or install a device into a rectangular panel (no text or symbols visible)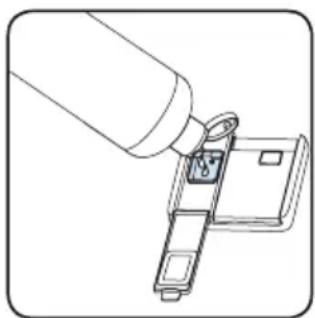
natural_image
Line drawing of a hand holding a lock attached to a device (no text or symbols)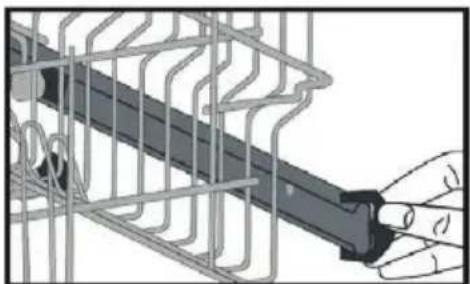
natural_image
Illustration of a hand holding a black tool inside a wire cage (no text or symbols visible)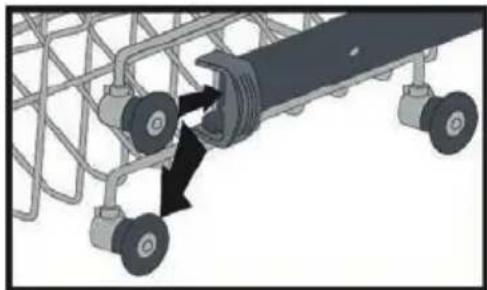
natural_image
Mechanical assembly diagram showing a vehicle with wheels and a central component, no text or symbols presentAlternativno polnjenje košare
Spodnja košara
natural_image
3D cutaway view of a washing machine showing internal components (no text or symbols visible)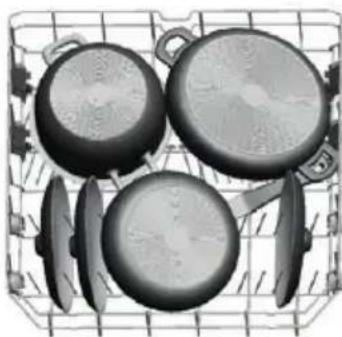
natural_image
Black-and-white photo of a basket filled with four cooking pots (no text or symbols visible)Zgornja košara
natural_image
Grid of circular objects including fruits and containers, no visible text or symbolsnatural_image
Diagram of a mechanical component with a coiled spring and base plate (no text or symbols)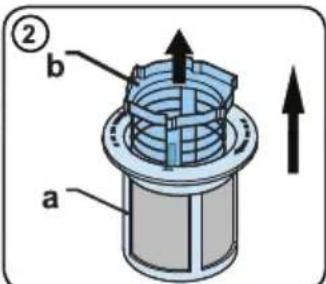
natural_image
Technical diagram of a mechanical assembly with a central component and a base housing (no text or symbols)Pršilne roke
natural_image
Technical line drawing of a mechanical assembly with gears and a central shaft (no text or symbols)SAMODEJNA SPOROČILA O NAPAKAH IN REŠITVE
250 69 Klíčany, Czech Rep. e-post: ECG@kbexpert.cz
Hrvatski
K+B Progres, a.s.
U Expertu 91 tel.: +420 272 122 111
250 69 Klíčany, Czech Rep. e-mail: informacije@kbprogres.cz
Bosanski
K+B Progres, a.s.
U Expertu 91 tel.: +420 272 122 111
250 69 Klíčany, Czech Rep. e-mail: informacije@kbprogres.cz
Latviešu valoda
K+B Progres, a.s.
U Expertu 91 tel.: +420 272 122 111
250 69 Kličany, Czech Rep. e-pasts: ECG@kbexpert.cz
Lietuviu kalba
K+B Progres, a.s.
U Expertu 91 tel.: +420 272 122 111
250 69 Klíčany, Czech Rep. el. paštas: ECG@kbexpert.cz
Magyar
K+B Progres, a.s.
U Expertu 91 tel.: +420 272 122 111
250 69 Kličany, Czech Rep. e-mail: ECG@kbexpert.cz
Polski
K+B Progres, a.s.
U Expertu 91 tel.: +420 272 122 111
250 69 Klíčany, Czech Rep. e-mail: ECG@kbexpert.cz
Slovenčina

- Read carefully and save for future use!
- Other recommendations concerning safety and use
- After the delivery of the appliance
- Points to pay attention to during installation
- In everyday use
- Recommendations during operation
- Objects that are not dishwasher safe:
- APPLIANCE DESCRIPTION
- APPLIANCE INSTALLATION
- Placing the appliance
- Water connection
- Water supply hose
- Water drain hose
- Electrical wiring
- BEFORE USING THE APPLIANCE
- Preparing the dishwasher for the first use
- Using salt
- Fill the salt
- Only fill the salt dispenser with water the first time you use it.
- Water hardness test strip
- Water hardness table
- Water softening system
- The procedure to set the water hardness
- Using detergent
- Filling the detergent dispenser
- Do not overfill the detergent drawer. Closing the dispenser lid could damage it.
- Using combination tablets of the "3 in 1" type.
- General recommendations
- What is necessary to consider:
- Notes:
- Using rinse aid
- Filling and setting the rinse aid
- If you want to change the rinse aid dosage, follow the steps below before switching on the appliance:
- FILLING THE DISHWASHER
- Upper basket
- Dish rack
- Adjusting the height of the upper basket
- Alternative basket filling
- Bottom basket
- Incorrect filling of the dishwasher
- Examples of incorrect filling of the basket:
- PROGRAMS TABLE
- SWITCHING ON THE APPLIANCE AND SELECTING A PROGRAM
- Door handle
- Delayed start and Half load button
- Start/Pause button
- Rotary knob for program selection
- Setting program or delayed start monitoring indicators
- Indicator light - Lack of salt
- Indicator light - Insufficient rinse aid
- STARTING THE DISHWASHER AND SELECTING THE WASHING PROGRAM
- Following the program
- Changing program
- Cancelling program
- NOTES
- Removal of the dishes from the dishwasher
- CLEANING AND MAINTENANCE
- Unplug the appliance before cleaning and maintenance.
- Filters
- Spray arms
- Drain pump
- Warning - risk of cuts!
- One of the program lights is on and the Start / Pause light turns off and on
- The program does not start
- The "Wash" and "End" lights are flashing
- The lights do not go out after the program is completed
- Detergent residues remain in the detergent dispenser
- Water remains in the appliance at the end of the program
- The appliance stops during washing
- There is noise during washing and the appliance shakes
- Leftover food remains on the dishes
- There are white stains on the dishes
- The dishes are not dry
- There are rust stains on the dishes.
- DISPOSAL
- CAUTION
- Recycling
- USE AND DISPOSAL OF WASTE
- DISPOSAL OF PRODUCTS AT THE END OF LIFETIME
- Disposal of electric and electronic equipment (valid in EU member countries and other European countries with an implemented recycling system)
- Note:
- SICHERHEITSHINWEISE
- Elektroanschluss
- Oberkorb
- Elektrické zapojení
- Horní koš
- Ramena s tryskami
- Vee äravooluvoolik
- Veekareduse testriba
- Ülemine korv
- PROGRAMMIDE TABEL
- Pihustustorud
- Upotreba deterdženta
- Punjenje spremnika za deterdžent
- Alternativno punjenje košara
- Donji koš
- Gornji koš
- Nepravilno punjenje perilice posuđa
- UKLJUČIVANJE UREĐAJA I ODABIR PROGRAMA
- Ručka vrata
- Nosači s mlaznicama
- Odvodna pumpa
- Üdens novadšljutene
- Elektrosavienojums
- Augšējais grozs
- Elektros instaliacija
- Viršutinis krepšys
- Neteisingai užpildyta indaplové
- Elektromos bekötés
- A MOSOGATÓGÉP MEGTÖLTÉSE EDÉNNYEL
- A kosarak töltése
- Fúvókás forgókarok
- Górny kosz
- Ramiona z dyszami
- Alternativne plnenie koša
- Spodný kôš
- Horný kôš
- Ramená s dýzami
- Varovanie – nebezpečenstvo porezania!
- Cev za odtekanje vode
- Električna vezava
- Alternativno polnjenje košare
- Spodnja košara
- Zgornja košara
- Pršilne roke
- SAMODEJNA SPOROČILA O NAPAKAH IN REŠITVE
- Hrvatski
- Bosanski
- Latviešu valoda
- Lietuviu kalba
- Magyar
- Polski
- Slovenčina
Brand : ECG
Model : EDF 6023 WE
Category : Dishwasher