
Z3 Run - Dash Cam Xblitz - Free user manual and instructions
Find the device manual for free Z3 Run Xblitz in PDF.


| Product Type | Dashboard Camera |
| Brand | Xblitz |
| Model | Z3 Run |
| CPU | GP2247 |
| Video Resolution | Max 1920x1080 @ 24fps |
| Sensor | H63 |
| Lens | 4G |
| View Angle | 110 degrees |
| Display | 2 inch TFT |
| Memory | microSD up to 32GB (Class 10) |
| Recording Format | AVI |
| Power Supply | 5V via miniUSB |
| Charger | 5V/1A (included) |
| Battery | Yes (up to 5 min recording backup) |
| Mounting | Windshield holder with suction cup |
| Functions | Loop recording, G-Sensor, Parking mode, Motion detection, Sound recording |
| Operating Temperature | 0°C to 35°C |
| Storage Temperature | 5°C to 45°C |
| Operating Humidity | 5-90% without condensation |
| Package Contents | Dashcam, memory card reader, charger, holder, USB cable, user manual |
| Safety | Do not disassemble; use original charger only |
| Cleaning | Disconnect power, clean lens with soft cloth, no chemicals |
Frequently Asked Questions - Z3 Run Xblitz
User questions about Z3 Run Xblitz
0 question about this device. Answer the ones you know or ask your own.
Ask a new question about this device
Download the instructions for your Dash Cam in PDF format for free! Find your manual Z3 Run - Xblitz and take your electronic device back in hand. On this page are published all the documents necessary for the use of your device. Z3 Run by Xblitz.
USER MANUAL Z3 Run Xblitz
natural_image
Two blackzlitz headsets with camera lens and front screen displaying a scenic road scene (no text or symbols on main body)A
B
natural_image
Top-down schematic of a car dashboard and steering wheel (no text or symbols)INSTRUKCJA OBSŁUGI
Thank you for purchasing our product - we hope it will satisfy your expectations. This product is a dashboard camera, powered by a 12V/24V socket, meant for use in a car, designed to record footage from the road taken by the vehicle. It is made of components and elements of the highest quality. Before using the product, please read the user's manual carefully.
01. PACKAGE CONTENTS
- Dashboard camera
- Memory card reader
- Charger
- Holder
- USB cable
- User's manual
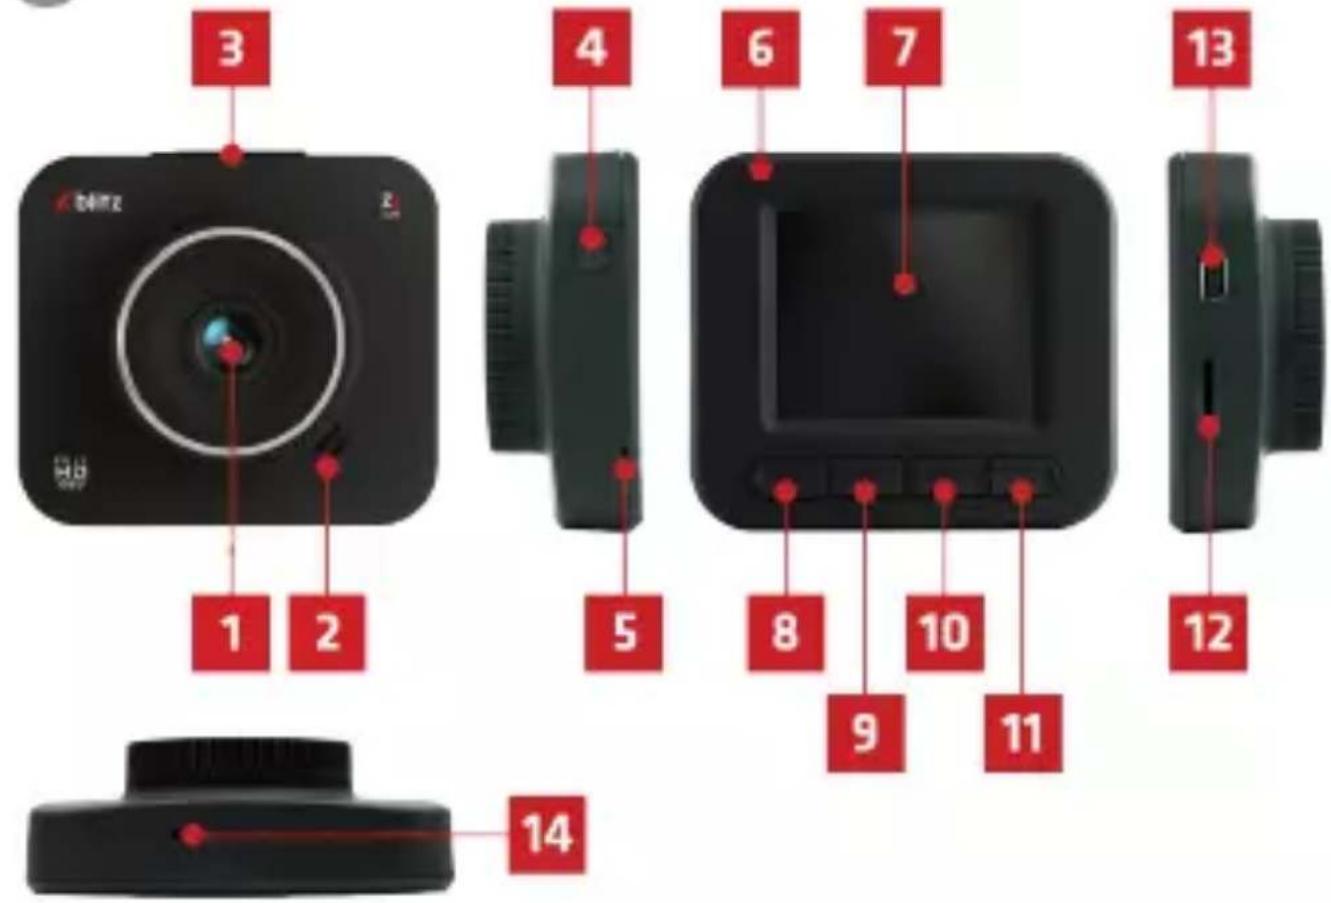
02. DASHCAM DESCRIPTION
SEE FIG. A
- Lens
- Speaker
- Holder mounting point
- POWER button
-
Microphone
-
LED diode
- Display screen
- MODE button
- UP button
- DOWN button
- MENU button
- microSD card slot
- miniUSB port
- RESET button
03. BUTTONS DESCRIPTION
1. POWER
Hold for 3 seconds to turn the camera on or off.
In VIDEO mode, a short press starts and stops the recording.
In PHOTO mode, a short press takes a photo.
In PLAY VIDEO mode, a short press serves as play/pause button.
In Menu, a short press confirms your choice.
2. MODE
A short press outside of menu (when the camera isn't recording), switches between VIDEO/PHOTO/VIDEO PLAY modes. When video is being recorded, a short press protects the current recording from being overwritten later.
3. UP
In MENU and VIDEO PLAY mode, the button is used to navigate through options.
4. DOWN
In MENU and VIDEO PLAY mode, the button is used to navigate through option.
In VIDEO mode, a short press turns the parking mode on and off.
5. MENU
Pressing the button opens a contextual menu (unless the camera is recording).
Pressing it again takes you back to the general menu.
6. RESET
Pressing the button resets the camera and restores default settings.
04. BEFORE USE
- Using brand microSD memory cards (from 8GB to 32GB of memory) with speed class 10 is recommended.
- Before putting the card into the camera, it needs to be formatted to FAT32 file system on your computer, and then again in your camera.
- The memory card should be installed when the device is turned off, otherwise you can damage the card and the device. The same is true for taking out the memory card.
- A fully charged battery lets the camera record video with no power supply
for maximally 5 minutes. The battery's primary purpose is ensuring that the device's settings won't be reset due to lack of power.
-
When the memory card gets full, the oldest unprotected recordings will be overwritten.
-
It is recommended that you use the device's functions as intended. Do not use MOTION DETECTION and PARKING MODE when driving, as it can cause the device to turn on and off by itself, e.g. when you stop at a crossroads. It is recommended to set the G-SENSOR option to minimum to avoid protecting unimportant files and loss of space on your memory card. The memory card has to be formatted to FAT32 file system, first on a computer and then in the camera.
-
Sound: the device has a condenser microphone that continuously records all of the surrounding sounds. The sounds can overlap and cause distortion.
05. CAMERA MOUNTING MANUAL
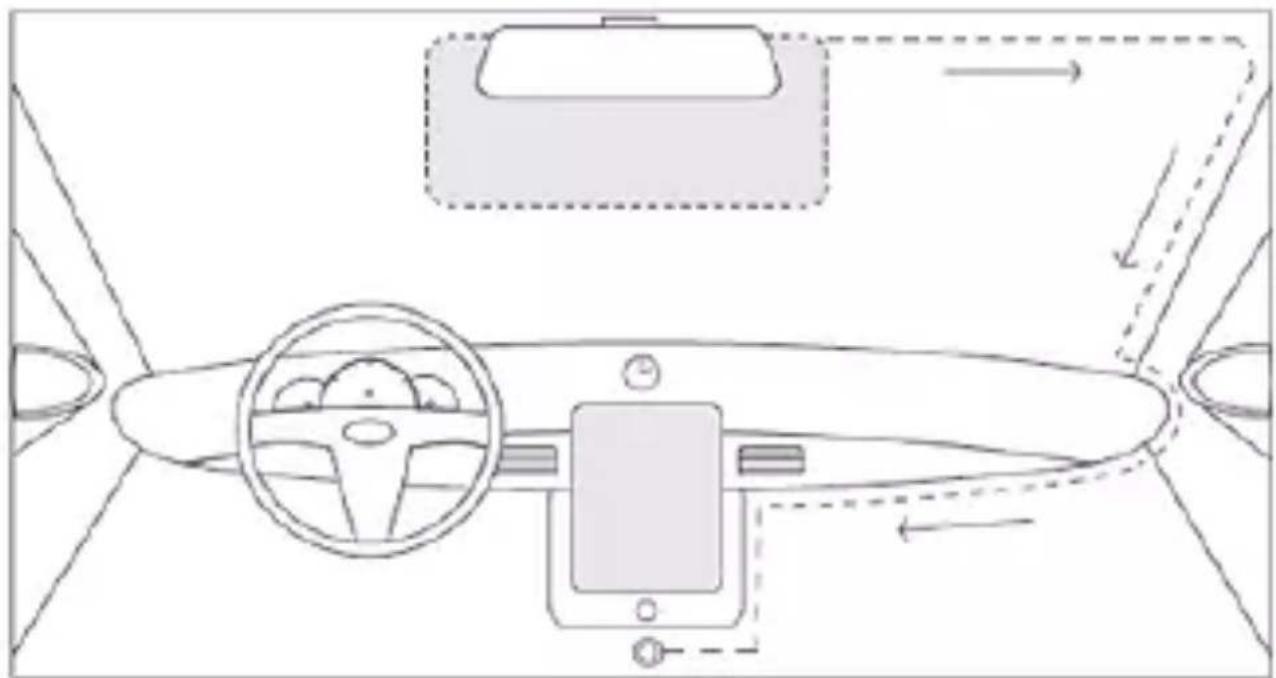
SEE FIG. B
- Pick a spot to place your camera. It is best to place your camera in a place that makes as much space in front of the vehicle as possible visible on the display screen.
Make sure, that the camera will not obscure the driver's line of sight when driving.
-
Mount the holder on the windshield and then place the camera in the holder.
-
Place the USB cable as shown in the picture above.
-
Connect the miniUSB plug to the camera.
-
Connect the charger to the 12V lighter socket.
- Mount the camera and connect it to the power supply.
- Put in a microSD memory card, formatted to FAT32 file system. WARNING the card should be put in and take out only when the device is turned off.
- Set the:
a. time and date,
b. Loop recording (set the time of recordings). If you turn loop recording off, files will not be overwritten,
c. set the highest resolution available,
d. set the G-Sensor to the lowest sensitivity available, so that the camera doesn't save unnecessary video files when you drive on uneven roads.
- Make sure that MOTION DETECTION and PARKING MODE are turned off. If they remain turned on when you're driving, they will interfere with your recording.
Turning parking mode on is recommended only when you leave your vehicle parked.
PARKING MODE can be quickly turned on and off in recording mode by pressing and holding the DOWN button.
- The camera will start recording automatically when you turn the engine on (unless your car has a constant power supply in its lighter socket).
07. MAIN FEATURES OF THE CAMERA
1. Camera mode
The camera has 3 modes of operation. Recording mode: the camera records video.
Photo mode: the camera takes pictures. Video Play mode: browsing the footage recorded by the camera.
1. Loop recording
The camera divides the recordings into files of length of your choice. When the memory card is full, the oldest recording will be overwritten.
2. Resolution
The camera can record in many resolutions. The higher the resolution, the better the quality of recordings, at the cost of more space on the memory card being taken. It is recommended that you use the highest resolution available.
3. G-Sensor
Gravity sensor. When the sensor is turned on and your car is hit, the recording from the event will be protected from overwriting. Using the lowest sensitivity setting is recommended, as at higher settings the sensor can trigger when you drive on uneven roads and fill up your memory card with files that won't be overwritten.
4. Parking mode
When it's turned on, the camera left in your car (if connected to power supply) registers the car shaking (for example, due to a parking crash), turns on and starts recording (the recordings are automatically protected from being overwritten.) Turning the parking mode off when driving is recommended. It can block the loop recording function.
5. Motion detection mode
When it's turned on and you leave the camera in standby mode, plugged to power supply, the camera will turn on and record a short video if it detects motion.
6. Sound recording
The camera can record sound along with video footage.
08. SAFETY MEASURES
-
Do not disassembly or interfere with the camera. If the device is faulty, contact the service point.
-
Only use the original accessories.
- Use only the original charger, included in the set. Using a different power supply can affect the battery negatively.
- Do not use the device for purposes that are against the law of the country or region you are in.
- The operating temperature of the device is 0-35°C. Storage temp. is 5°C to 45°. Operating air humidity is 5-90% without condensation
- Avoid damaging the device with physical force.
- Clean the device, especially the lens. Do not use detergents or other chemicals when cleaning the device.
- Clean the device only when it's disconnected from the power supply.
- Keep the device away from children.
- Do not expose the device to very high temperatures and fire.
09. FAQ
- The device doesn't turn on, the screen is flickering.
Charge the device's battery before using the device. - The device doesn't turn on/off automatically.
This can be caused by a constant power supply in the car's lighter socket.
- The device restarts when driving.
Check the power supply.
- The device doesn't record in loop (or records randomly).
Check the „Motion detection“ and „Parking mode“ settings - both should be turned off when driving.
- The device displays a „Memory card full” message.
Check „G-sensor“ and „Parking mode“ settings and set them to minimum.
The memory card should be formatted to FAT32 file system, first on a computer and then in the camera.
- The device records noise or distorted, unclear sound.
The device has a very sensitive microphone that records sound from the surroundings.
The recorded sounds can overlap. Air conditioning blowing air on your front windshield can also affect the sound recorded.
- The device doesn't respond.
Press the RESET button or restore factory settings.
- There are vertical stripes on the recording.
Wrong screen refresh rate setting. Change the frequency to „50Hz” or „60Hz”, depending on the local settings.
Due to constant improvement of our products, the manufacturer reserves the right to making changes in the device and its set without prior information, some of the functions described in this manual can slightly differ in reality.
WARNING: use only the original charger with 5V/1A power output. (Do not connect directly to a 220V/230V power socket.) Not following the instructions can lead to damaging the camera or dangerous situations.
WARNING: Playing the files on a computer: The camera does not have a mass memory drive mode. To play the files on a computer, take the memory card out of the device and use a memory card reader to connect it to a computer.
10. SPECIFICATION
CPU: GP2247 | Video resolution: Max. 1920x1080 24fps | Sensor: H63 | Lens: 4G | View angle: 110 degrees | Dimensions height/width/depth: 58x66x25mm | Display screen: 2 inch TFT | Memory: microSD memory card with up to 32G of memory, speed class 10 | Recording format: AVI | Power supply: 5V | USB: Mini USB | Microphone/Speaker: Built-in | Battery: YES
11. WARRANTY CARD
The product is covered by a 24-month warranty. The terms of the guarantee can be found at: https://xblitz.pl/warranty/
Complaints should be reported using the complaint form located at:
Details, contact and website address can be found at: www.xblitz.pl
Specifications and contents of the kit are subject to change without notice.
We apologise for any inconvenience.
DE
BEDIENUNGSANLEITUNG
01. PAKUOTĖS TURINYS
https://xblitz.pl/warranty/.
Kaebustest tuleb teatada, kasutades kaebuse vormi, mis asub aadressil:
The crossed out trash can symbol indicates that unusable electrical or electronic devices, its accessories (such as power supplies, cords) or components (for example batteries, if included) cannot be disposed of alongside with household waste. In order to dispose of the devices or its components (for example, batteries) deliver the device to the collection point, where it will be accepted free of Disposal is subject to the recast version of the WEEE Directive 19/EU and the Directive on batteries and accumulators (2006/66 / oper disposal of the device prevents degradation of the natural ment. Information about the collection points of the facilities is by the competent local authorities. Incorrect disposal of waste is to penalties provided for by the law in force in the given area.
DE


- INSTRUKCJA OBSŁUGI
- PACKAGE CONTENTS
- DASHCAM DESCRIPTION
- SEE FIG. A
- BUTTONS DESCRIPTION
- POWER
- MODE
- UP
- DOWN
- MENU
- RESET
- BEFORE USE
- CAMERA MOUNTING MANUAL
- SEE FIG. B
- MAIN FEATURES OF THE CAMERA
- Camera mode
- Loop recording
- Resolution
- G-Sensor
- Parking mode
- Motion detection mode
- Sound recording
- SAFETY MEASURES
- FAQ
- SPECIFICATION
- WARRANTY CARD
- DE
- BEDIENUNGSANLEITUNG
- PAKUOTĖS TURINYS
Brand : Xblitz
Model : Z3 Run
Category : Dash Cam