
MS 007 - Weather Station ECG - Free user manual and instructions
Find the device manual for free MS 007 ECG in PDF.


| Product Type | Weather Station |
| Brand | ECG |
| Model | MS 007 |
| Dimensions (approx.) | 150 x 100 x 30 mm (main unit) |
| Weight (approx.) | 200 g (main unit) |
| Power Supply | 2 x AAA batteries (not included) |
| Display Type | LCD |
| Indoor Temperature Range | 0°C to 50°C |
| Outdoor Temperature Range | -20°C to 60°C (via sensor) |
| Humidity Measurement | Indoor and outdoor (20% – 95% RH) |
| Barometric Pressure | Display with weather forecast |
| Wireless Sensor Range | Up to 100 m (open area) |
| Radio Controlled Clock | DCF-77 (Europe) or MSF-60 (UK) |
| Alarm Function | Yes, with snooze |
| Min/Max Memory | Yes, for temperature and humidity |
| Weather Forecast Icons | Sunny, partly cloudy, cloudy, rainy, storm |
| Language Support | Multiple (based on manual) |
| Cleaning | Wipe with a dry cloth; avoid water |
| Safety | Keep away from heat sources and water |
| Spare Parts / Repairability | Only authorized service |
Frequently Asked Questions - MS 007 ECG
User questions about MS 007 ECG
0 question about this device. Answer the ones you know or ask your own.
Ask a new question about this device
Download the instructions for your Weather Station in PDF format for free! Find your manual MS 007 - ECG and take your electronic device back in hand. On this page are published all the documents necessary for the use of your device. MS 007 by ECG.
USER MANUAL MS 007 ECG
MS 007
CZ
METEOROLOGICKÁ STANICE S BEZDRÁTOVÝM ČIDLEM
NAVOD K OBSLUZE
SK
METEOROLOGICKÁ STANICA S BEZDRÔTOVÝM SNÍMAČOM
NAVOD NA OBSLUHU
PL
STACJA METEOROLOGICZNA Z CZUJNIKIEM BEZPRZEWODOWYM
INSTRUKCJA OBSŁUGI
HU
METEOROLÓGIAI ÁLLOMÁS VEZETÉK NÉLKÜLI ÉRZÉKELŐVEL
HASZNALATI UTMUTATO
DE
METEOROLOGISCHE STATION MIT DRAHTLOSEM SENSOR
BEDIENUNGSANLEITUNG
GB
WEATHER FORECAST STATION WITH WIRELESS SENSOR
INSTRUCTION MANUAL
BEZPEČNOSTNÍ POKYNY
Do not immerse in water! – Neponořovat do vody!
NASTAVENÍ JASU DISPLEJE
Do not immerse in water! – Neponárat do vody!

NASTAVENIE JASU DISPLEJA
HU
Read carefully and keep for future reference!
Warning: The safety precautions and instructions in this manual do not cover all possible conditions and situations that may occur. The user must understand that a factor that cannot be built into any of the products is common sense, caution and care. These factors must therefore be ensured by the user/users using and operating this device. We are not liable for damages occurring during transport, misuse, voltage fluctuations or alteration or modification of any part of the device.
To prevent fire or electric shock, basic precautions should always be followed when using electrical equipment, including the following:
- Never use the appliance if it is damaged. All servicing should be done by qualified service center!
- Do not expose the appliance to strong pressure, excessive humidity or high temperatures (for example near a heat source). Protect it against direct sunlight.
- The device should be located at a sufficient distance from other electrical equipment with strong radiation.
- Use only original accessories provided by the manufacturer.
- Only use the device in accordance with the instructions in this manual. The appliance is designed for domestic use only. The manufacturer is not liable for damages caused by the improper use.
- The device is not intended for medical purposes or official weather reports.
- This appliance may be used by children aged 8 years and over and persons with reduced physical or mental abilities or lack of experience and knowledge, provided they are supervised or have been instructed in the safe use of the appliance and understand the potential dangers. Children shall not play with the appliance. Cleaning and maintenance operations performed by the user shall not be carried out by children, if they are not older than 8 years and
under supervision. Children under the age of 8 shall keep away from the appliance and its power supply.
- The principle of weather forecasting is based on changes in barometric pressure.
- This device is used to display indoor and outdoor temperature and time, and as an alarm clock.
Do not immerse in water!
DANGER TO CHILDREN: Children may not play with the packaging material. Do not let children play with the plastic bags. Risk of suffocation.
DESCRIPTION
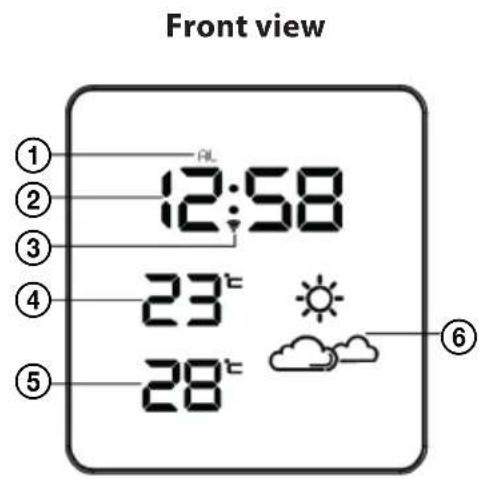
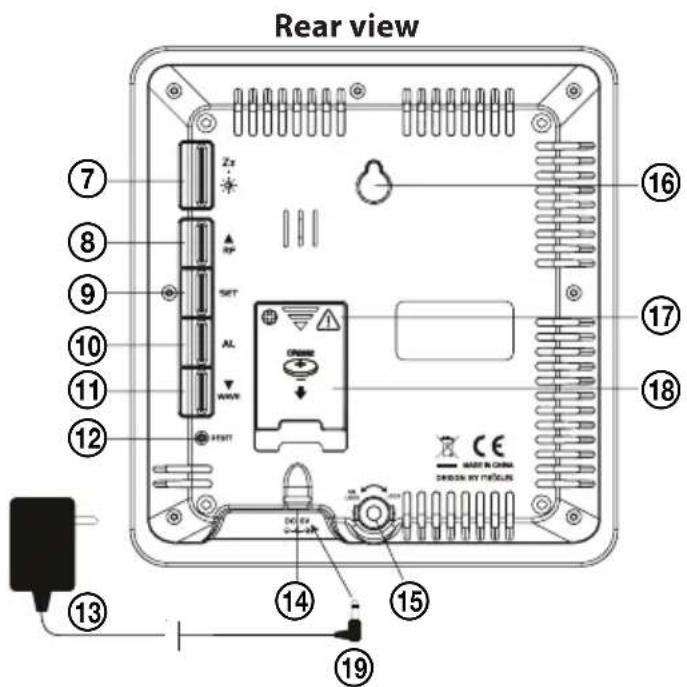
EN
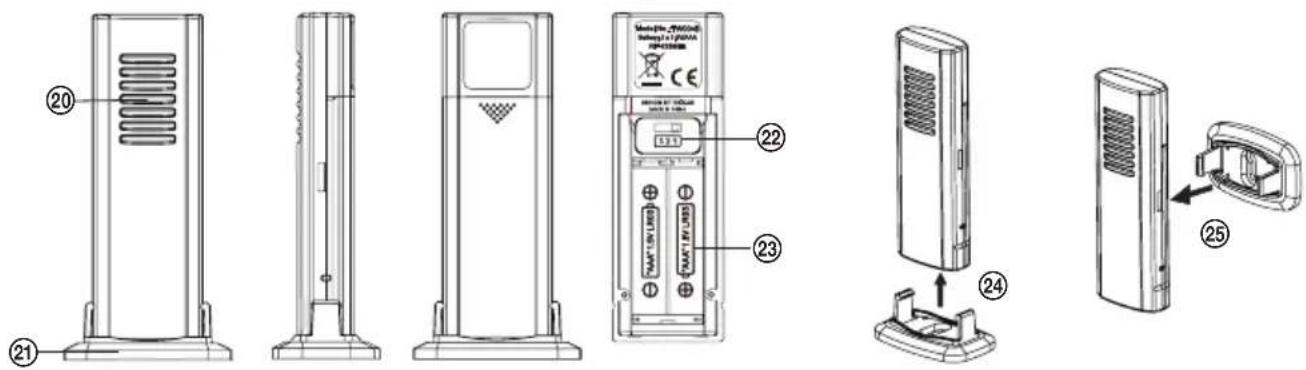
External temperature sensor
- Alarm clock on indicator
- Clock
- Radio transmission indicator
- Room temperature
- External temperature
- Weather forecast
- Dimming display/snooze
- Up/RF
- Setup button
- Alarm clock button
- Down/WAVE
- Reset
- AC/DC adapter
- Power adapter jack
-
Opening for the stand
-
Slot for hanging
- Battery compartment
- Insert 1 CR2032 battery
- Insert AC/DC adapter connector
- LED control
- Stand
- Channel switch 1/2/3*
- Insert 2 batteries (AAA)
- If the sensor should stand on an underpad, mount the stand from the bottom.
- In the case of wall mounting, snap the sensor into the stand, which is screwed to the wall from the back.
* Model MS 007 works on channel 1
CONDITIONS AFFECTING WIRELESS TRANSMISSION
This device contains accurate clock controlled by a radio signal. Like in case of other wireless equipment, reception capability is affected among others by following conditions:
• Distance from signal source
- Terrain unevenness
• High buildings in vicinity
- By railway lines, high voltage lines, etc.
• Highways, airports vicinity, etc.
• Large building sites in vicinity
• Ferro-concrete constructions
- By close electrical appliances
- By close computers and TV sets
• Inside means of transport
• Metal constructions and objects
Install the device to a place with optimal transmission conditions, close to windows, out of electronic devices and metal objects.

QUICK SETUP
Step 1:
Inserting a backup battery
Loosen the screw and remove the battery compartment cover on the back of the device by sliding it in the direction of the arrow, then insert the lithium battery (1 × CR2032). Make sure that the battery is inserted with the + pole up. Replace the battery compartment cover and screw in the lock screw.
Step 2:
Plug the AC/DC adapter in the electrical outlet. Insert the DC connector of the adapter in the power jack at the rear of the device. Attach the stand to the underside of the weather station.
Step 3:
Put the device and the wireless sensor close. Slide open the battery cover on the rear of the wireless sensor and insert two (AAA) alkaline batteries. Observe the polarity marked in the battery compartment. Put back the battery compartment cover. The weather station will start receiving signal from the wireless sensor within few seconds. Now you can place the wireless sensor outside in a dry and shady place.
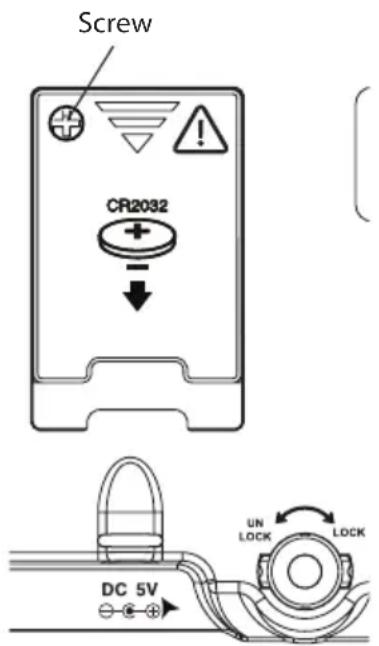
Step 4:
Peel off the protective film from the front panel. The device is now ready for use.
Step 5:
Once the weather station receives the data about the outside temperature, it will start to search for the DCF signal.
THE RECEPTION OF THE DCF SIGNAL AND SIGNAL INDICATOR
After the device is switched on, it will start receiving the DCF signal. Icon flashes.
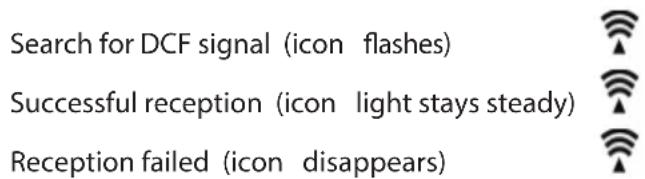
Press ▼/WAVE once during the reception of the signal to display the reception mode and the strength of the signal. The following will be displayed:

The signal strength may vary from one to three bars during the reception. This is normal, because the device detects the DCF signal together with other signals.
Press the SET button to return to time display with flashing symbol 📤.
EN
Successful or unsuccessful reception
When the reception is successful, the icon will be steady (stops flashing).
In case of reception failure, the icon disappears from the display.
Automatic and manual reception
The device starts automatic reception always at 1:00, 2:00 and 3:00. If the device does not succeed in receiving the DCF time signal at 3:00, it will try the reception again at 4:00. In case of another failure, it will try at 5:00. If it fails again to receive the signal, it automatically starts receiving again at 1:00 the following day.
Manual signal reception: Simply press and hold ▼/WAVE. The device beeps briefly and starts manual reception. Press and hold ▼/WAVE to stop DCF reception.
When your weather station receives radio time signal, the display darkens. When the radio time signal is received, the display returns to the previously set brightness level.
During radio time signal reception, the buttons of the device do not work and no temperature measurements are carried out. The display shows the original temperature. Current, accurate temperature returns to display after about 30 minutes.
SETTING THE CLOCK
- Hold the SET button for 2 seconds, the numbers on the clock start flashing. Using ▲/▼ set hour.
- Press again SET, the minute numbers start flashing. Using ▲/▼ set minutes.
- Press SET once again. The display shows flashing :05. Using ▲/▼ set the snooze interval in the 5–60 minutes range.
-
Then press SET once again. The display shows 00. Using ▲/▼ select the time zone.
"00" = GMT + 1 hour (i.e. Czech Republic)
"01" = GMT + 2 hours (i.e. Finland)
"-01" = GMT 00 (i.e. Great Britain) -
Press SET to return to regular mode. When you will not press any button within about 10 seconds the device will return to regular mode automatically.
-
The clock is set in 24 hours format.
SETTING ALARM
(The default alarm clock setting is 6:00)
- Press and hold the AL button. The hours and the symbol AL start flashing. Using ▲/▼ set the desired wake up time.
- Press ALagain, the minute numbers start flashing. Using ▲/▼ set minutes.
- When you press AL again, you will save the alarm setting and return to regular time display. When you will not press any button within about 10 seconds the device will return to regular mode automatically.
ALARM CLOCK TURN ON AND OFF
You will switch the alarm clock on or off by pressing AL. When the alarm is on, symbol AL appears above the time display.
SNOOZE
When the set alarm time is reached the alarm clock starts ringing and the AL symbol is flashing.
- Press snooze once SNOOZE to switch the alarm off temporarily, symbol AL continues flashing. If you did not set another snooze time interval, the alarm will ring again 5 minutes later.
- If you want to switch the alarm clock off, press during ringing any button but snooze.
Alarm duration: 2 minutes
DISPLAY BRIGHTNESS SETUP
Press SNOOZE/DIMMER to set the display brightness high or low.
USING THE WEATHER FORECAST
The weather station uses four weather symbols:
 | SUNNY |
 | PARTLY CLOUDY |
 | OVERCAST |
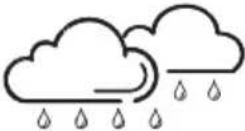 | RAIN |
Note: Moving the weather station around the building affects its accuracy, because sudden changes in altitude have an effect on its accuracy. It takes about 24 hours for the weather station to stabilize after it is turned on. The weather symbols on the display provide indication of weather in the next 6 to 12 hours and may not correspond to current weather outside.
If you loose information about the outdoor temperature
If the display shows “--” instead of the information about the outdoor temperature, it means interruption or failure of the wireless communication with the external sensor. Press and hold the 🔊 button on the weather station. If the interruptions in communication with the external sensor continue, try to put the external unit in another location, which will ensure a trouble-free reception of temperature data.
Notes:
The real range of the wireless transmission of data from the sensor depends on the obstacles in the path of the signal. Each obstacle (roof, wall, ceiling, thick tree, etc) reduces the effective range of the external unit transmitter.
- Do not expose the device to extreme temperatures, direct sunlight, or liquids.
- Avoid contact with agents causing rust.
- Do not expose the device to mechanical stress, dust or high humidity.
- Do not open the device or tamper with its parts.
- Use only the power adapted supplied with the device.
TROUBLE SHOOTING
If the weather station displays incorrect information or characters, its operation could have been affected by static electricity or by other devices. Press RESET button in the device's back. Reset the device to default date and time and the reception of the radio control signal will start.

| Problem Solution | |
| LCD display is empty. | 1. Press RESET button on the device.2. Replace batteries in the device. |
| Outer temperature is not shown. | 1. Hold the ▲ button and then press RESET on the external sensor.2. The batteries of the external sensor may be empty. In that case, replace the batteries in the external sensor.3. Check if no jamming electronic apparatus (computer monitor, TV, headphones, speakers) stands in signal path. Signal is transmitted by the shortest path and a jamming source close to this path may cause problems. |
| Incorrect temperature information. | 1. Reset the device.2. Check if the outdoor temperature sensor is protected from direct sunshine or is not located close to sources of hot or cold. |
TECHNICAL SPECIFICATIONS
Temperature range
Internal 0°C to +50°C (HH.H / LL.L is displayed when out of
this range)
External -40^ to +70^ (HH.H / LL.L is displayed when out of
this range)
Temperature resolution 1 °C
Time interval for measuring the outside temperature 3 minutes
Alarm duration 2 minutes
Snooze 5–60 minutes
Transmitting frequency 433 MHz
Range of the wireless transmission 30 m (in an open space without obstacles)
Outdoor sensor TW004
Power:
AC: 100–230 V\~ 50/60 Hz, 0.3 A max.
DC: 5 V, 1.2 A
Batteries: 2× AAA (1.5 V)
USE AND DISPOSAL OF WASTE
Dispose of used packaging material at a waste disposal site in your municipality/city.
DISPOSAL OF PRODUCTS AT THE END OF LIFETIME
Disposal of electric and electronic equipment (valid in EU member countries and other European countries with an implemented recycling system)
This symbol on the products or in the original documentation means that discarded electrical or electronic products should not be disposed of with normal household waste. Take this waste to designated collection points for proper disposal, refurbishment or recycling.
The proper disposal of this product will help protect valuable natural resources and prevent damage to the environment and health.
08/05
For details, contact your local authorities, collection center or the place where you purchased the product. According to national regulations, fines may be imposed for improper disposal of this type of waste.
Text, design and specifications are subject to change without notice and we reserve the right to make changes.
K + B Progres, a.s. hereby declares that the type of radio equipment ECG MS 007 complies with Directive 2014/53/EU.

The full Declaration of Conformity is available at www.ecg-electro.eu.
The instruction manual is available at www.ecg-electro.eu.
Changes of text and technical parameters reserved.
www.ecg-electro.eu
CZ
K+B Progres, a.s.
U Expertu 91 tel.: +420 272 122 111
250 69 Klíčany e-mail: ECG@kbexpert.cz
SK
Distribútor pre SR: K+B Elektro – Media, k.s.
Mlynské Nivy 73 tel.: +421 232 113 410
821 05 Bratislava e-mail: ECG@kbexpert.cz
PL
K+B Progres, a.s.
U Expertu 91 tel.: +420 272 122 111
250 69 Klíčany, Czech Rep. e-mail: ECG@kbexpert.cz
HU
K+B Progres, a.s.
U Expertu 91 tel.: +420 272 122 111
250 69 Klíčany, Czech Rep. e-mail: ECG@kbexpert.cz
DE



- MS 007
- BEZPEČNOSTNÍ POKYNY
- Do not immerse in water! – Neponořovat do vody!
- NASTAVENÍ JASU DISPLEJE
- Do not immerse in water! – Neponárat do vody!
- NASTAVENIE JASU DISPLEJA
- Read carefully and keep for future reference!
- Do not immerse in water!
- DESCRIPTION
- External temperature sensor
- CONDITIONS AFFECTING WIRELESS TRANSMISSION
- QUICK SETUP
- Step 1:
- Inserting a backup battery
- Step 2:
- Step 3:
- Step 4:
- Step 5:
- THE RECEPTION OF THE DCF SIGNAL AND SIGNAL INDICATOR
- EN
- Successful or unsuccessful reception
- Automatic and manual reception
- SETTING THE CLOCK
- SETTING ALARM
- ALARM CLOCK TURN ON AND OFF
- SNOOZE
- DISPLAY BRIGHTNESS SETUP
- USING THE WEATHER FORECAST
- If you loose information about the outdoor temperature
- Notes:
- TROUBLE SHOOTING
- TECHNICAL SPECIFICATIONS
- Temperature range
- USE AND DISPOSAL OF WASTE
- DISPOSAL OF PRODUCTS AT THE END OF LIFETIME
- www.ecg-electro.eu
Brand : ECG
Model : MS 007
Category : Weather Station