
MH 008 - Weather Station ECG - Free user manual and instructions
Find the device manual for free MH 008 ECG in PDF.


| Product Type | Weather Station |
| Brand | ECG |
| Model | MH 008 |
| Display Type | LCD with backlight |
| Dimensions (Main Unit) | Approx. 150 x 100 x 30 mm |
| Weight (Main Unit) | Approx. 200 g |
| Power Supply | 2x AAA 1.5V batteries (not included) |
| Outdoor Sensor Power | 2x AA 1.5V batteries (not included) |
| Transmission Frequency | 433 MHz |
| Maximum Sensor Range | Up to 100 m (open area) |
| Temperature Measurement Range (Indoor) | 0°C to +50°C |
| Temperature Measurement Range (Outdoor) | -20°C to +60°C |
| Humidity Measurement Range | 20% to 95% |
| Barometric Pressure Display | hPa / inHg (selectable) |
| Weather Forecast Icons | Sunny, Slightly Cloudy, Cloudy, Rainy, Snowy |
| Moon Phase Display | Yes (8 phases) |
| Time Synchronization | DCF-77 radio controlled (optional manual setting) |
| Alarm Function | Yes (daily alarm) |
| Maintenance | Clean with a soft, dry cloth. Do not use chemical solvents. |
| Safety Warnings | Keep away from direct sunlight and moisture. Do not open the device. |
| Spare Parts Availability | Contact ECG customer service for replacement sensors or power adapters. |
| Warranty | 2 years from date of purchase |
| Package Contents | Main unit, outdoor sensor, user manual |
Frequently Asked Questions - MH 008 ECG
User questions about MH 008 ECG
0 question about this device. Answer the ones you know or ask your own.
Ask a new question about this device
Download the instructions for your Weather Station in PDF format for free! Find your manual MH 008 - ECG and take your electronic device back in hand. On this page are published all the documents necessary for the use of your device. MH 008 by ECG.
USER MANUAL MH 008 ECG
MH 008
HODINY S PŘEDPOVĚDÍ POČASÍ
NÁVOD K OBSLUZE
HODINY S PREDPOVEĐOU POČASIA
NÁVOD NA OBSLUHU
ZEGAR Z PROGNOZA POGODY
INSTRUKCJA OBSŁUGI
ÓRA IDŐJÁRÁS ELŐREJELZÉSSEL
HASZNÁLATI ÚTMUTATÓ
UHR MIT WETTERVORHERSAGE
BEDIENUNGSANLEITUNG
CLOCK WITH WEATHER FORECAST
INSTRUCTION MANUAL
CZ
SK
PL
HU
DE
EN
POPIS
Pohled zepredu
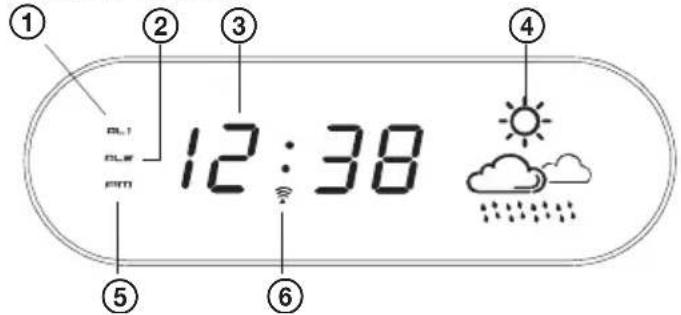
Pohled zepredu
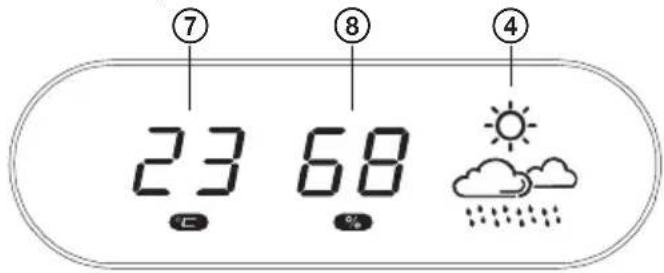
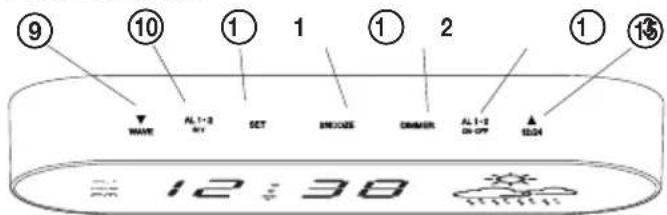
Pohled shora
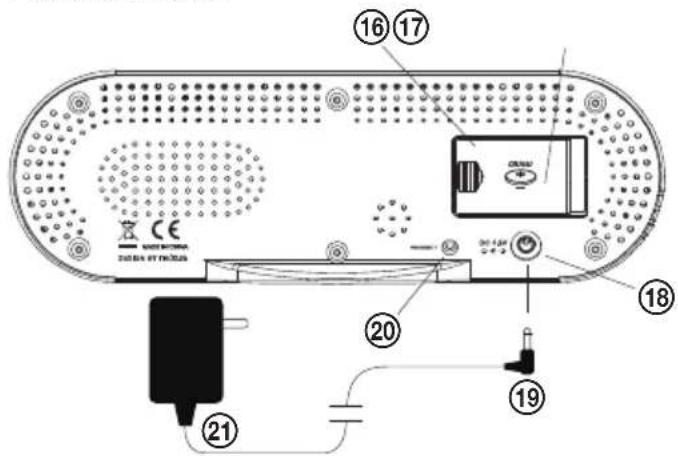
Pohled zezadu
CZ
-
Budík 1
-
Budík 2
3.①Hodiny
NASTAVENÍ JASU DISPLEJE
HODINY S PREDPOVEĐOU POČASIA
POPIS
Pohl'ad spredu
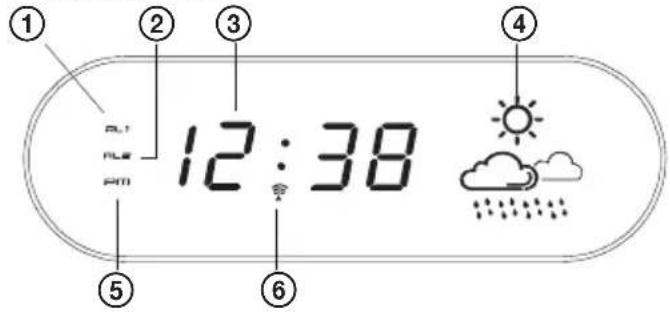
Pohl'ad spredu
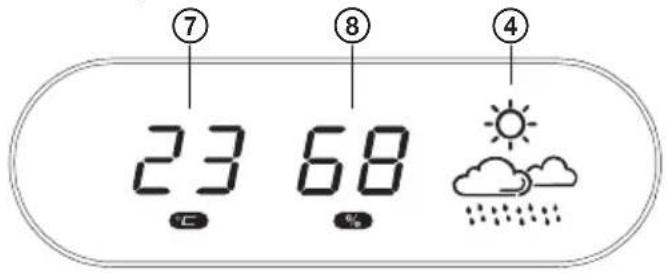
Pohl'ad zhora
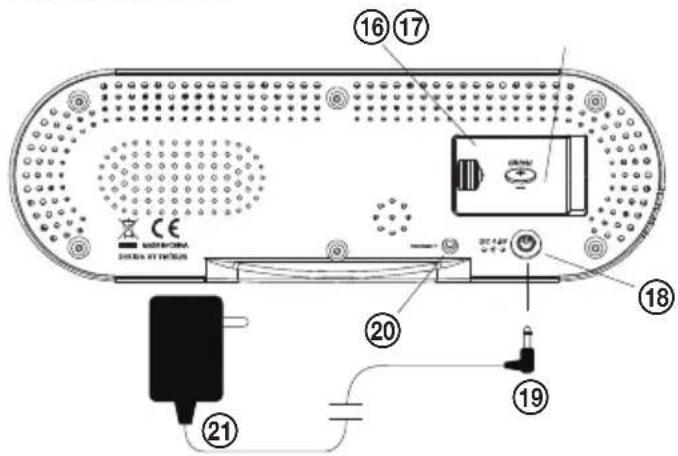
Pohl'ad zozadu
- Budík 1
- Budík 2
- ① Hodiny
- Predpoved počasia
- Indikátor PM
- Indikátor rádiového prenosu
- Izbová teplota
- Relativna vlhkost
- Šípka dole/WAVE
- Nastavenie budíka 1/2
- Tlačidlo nastavenia
- Odložené budenie
- Stlmenie jasu displeja
- Zapnutie/vypnutie budíka 1/2
- Šípka hore / 12-24
- Dvierka batériového priestoru
- Do batériového priestoru vložte 1 batériu CR2032
- Zdierka DC napájania
- Konektor AC/DC adaptéra zasuňte do zdierky napájania
- Reset
- AC/DC napájací adaptér
PODMIENKY OVPLYVŇUJÚCE BEZDRÔTOVÝ PRENOS
NASTAVENIE JASU DISPLEJA
The image contains no text or mathematical content. It displays a series of black dots arranged in two rows, each row containing three small dots and one dot. Therefore, the correct OCR output is an empty string.
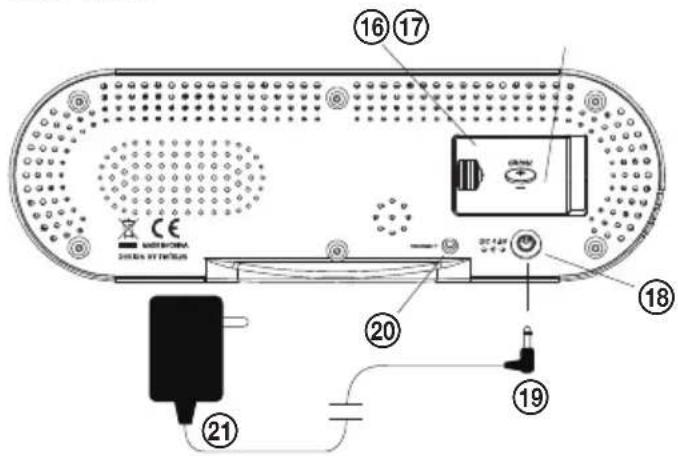
Rear view
- Alarm 1
- Alarm 2
- ①Clock 4
- Weather forecast
- PM indicator
- Radio transmission indicator
- Room temperature
- Relative humidity
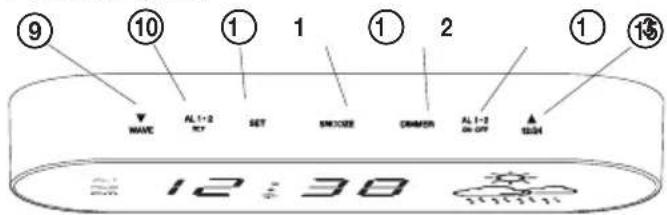
- Down arrow/WAVE
- Alarm clock setting 1/2
- Setup button
- Snooze
- Dimming brightness of the display
- Alarm clock on and off 1/2
- Up arrow / 12-24
- Battery compartment cover
- Insert 1 battery CR2032 into the battery compartment
- DC power jack
- Insert the connector of the AC/DC adapter in the power jack
- Reset
- AC/DC power adapter
EN
CONDITIONS AFFECTING WIRELESS TRANSMISSION
This device contains accurate clock controlled by a radio signal. Like in case of other wireless equipment, reception capability is affected among others by following conditions:
• Distance from signal source
• Ferro-concrete constructions
- Terrain unevenness
- By close electrical appliances
• High buildings in vicinity
- By close computers and TV sets
- By railway lines, high voltage lines, etc.
• Inside means of transport
• Highways, airports vicinity, etc.
• Metal constructions and objects
• Large building sites in vicinity
Install the device to a place with optimal transmission conditions, close to windows, away from electronic devices and metal objects.
QUICK SETUP
Step 1:
Slide off the cover of the battery compartment in the rear of the device and insert lithium battery (1 × CR2032). Make sure that the battery is inserted with the + pole up. Put on the battery compartment cover back.
Step 2:
Plug the AC/DC adapter in the electrical outlet. Insert the DC connector of the adapter in the power jack at the rear of the device.
Step 3:
The device will start search for DCF signal.
THE RECEPTION OF THE DCF SIGNAL AND SIGNAL INDICATOR
After the device is switched on, it will start receiving the DCF signal. Icon ✉ flashes.
Search for DCF signal (icon

fl ashes)
Successful reception (icon

light stays steady)
Reception failed (icon

disappears)
You can view during signal reception by pressing once the ▼/WAVE button the reception mode and the signal strength. The following will be displayed:
- Three bars on the display indicate strong signal
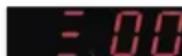
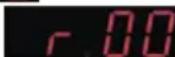
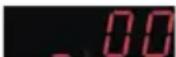
- When the DCF signal is weak or none, the display will show
The signal strength may vary from one to three bars during the reception. This is normal, because the device detects the DCF signal together with other signals.
- Press the SET button to return to regular time display. Press again the ▼/WAVE button to return to the reception mode and the signal strength display.
EN
Successful or unsuccessful reception
- When the reception is successful, the icon will be steady (stops flashing).
• In case of reception failure, the icon 📋 disappears from the display.
Automatic and manual reception
The device starts automatic reception always at 1:00, 2:00 and 3:00. If the device does not succeed in receiving the DCF time signal at 3:00, it will try the reception again at 4:00. In case of another failure, it will try at 5:00. If it fails again to receive the signal, it automatically starts receiving again at 1:00 the following day.
Manual signal reception: Simply press and hold ▼/WAVE. The device beeps briefly and starts manual reception. Press and hold ▼/WAVE to stop DCF reception.
When receiving the time signal, the buttons of the device do not work and no measurements of temperature and humidity is carried on. The display shows the original temperature and relative humidity. The actual temperature and humidity will show again on the display after about 30 minutes.
Cancelling the DCF signal reception
Press and hold two buttons in the same time for 2 seconds ▼ / WAVE and ▲ / 12/24. The device beeps briefly twice and the radio control function is permanently disabled.
If you want to renew the radio control function, hold two buttons ▼ / WAVE and ▲ / 12/24 for 2 seconds. The device beeps briefly twice and the DCF function restarts immediately.
TIME DISPLAY IN THE 12H OR 24H FORMAT
Press ▲ / 12/24 to switch between 12HR and 24HR time display mode. If you select 12HR mode, the display will show in the afternoon PM symbol on the left.
SETTING TIME
- Hold the SET button for 2 seconds, the numbers on the clock start flashing. Using ▲/▼ set hour.
- Press again SET, the minute numbers start flashing. Using ▲/▼ set minutes.
- Then press SET once again. The display shows 00. Using ▲/▼ select the time zone.
$$ " 0 0" = \text { GMT } + 1 \text { hour (i.e. Czech Republic) } $$
$$ " 0 1" = \text { GMT } + 2 \text { hours (i.e. Finland) } $$
$$ " - 0 1" = \text { GMT } 0 0 (\text { i.e. Great Britain }) $$
- Press SET to return to regular mode. When you will not press any button within about 8 seconds the device will return to regular mode automatically.
SETTING ALARM
- Press and hold the AL 1-2 SET button. The time starts flashing together with the alarm clock symbol. Using ▲set the desired wake up time.
- Press again AL 1-2 SET to save the alarm clock setup and to return to regular time display. When you will not press any button within about 8 seconds the device will return to regular mode automatically.
ALARM CLOCK TURN ON AND OFF
Press the AL 1-2 ON-OFF to switch on or off alarm clock 1 or 2. When the alarm clock function is on, on the display of regular time, there is a symbol AL1 or AL2 to the left of the time display.
EN
SNOOZE
When the set alarm time is reached the alarm clock starts ringing and the AL symbol is flashing.
- Press the SNOOZE button once to switch the alarm clock off temporarily; the symbol AL1 or AL2 continues flashing. The alarm clock sounds again in 5 minutes.
- If you want to switch off the alarm clock, press and hold the AL 1-2 ON-OFF button. The alarm clock will be off, the symbol AL1 or AL2 will stop flashing and the alarm clock will sound again the next day in the same time.
Alarm duration: 2 minutes
DISPLAY BRIGHTNESS SETUP
Press the DIMMER button to set high or low brightness of the display.
TEMPERATURE AND HUMIDITY DISPLAY
Press briefly SNOOZE to switch the display from showing time to showing temperature and relative humidity. Press again SNOOZE to return to time display.
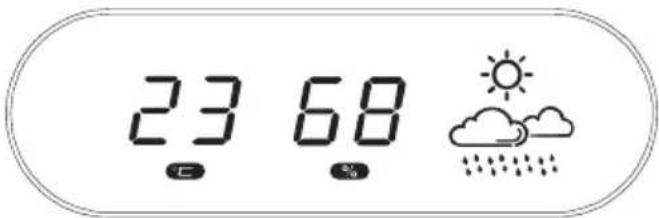
If you hold SNOOZE for two seconds, the device beeps briefly, and the display will alternate between showing the time (for 10 seconds) with showing the temperature and relative humidity (5 seconds). Press again SNOOZE for longer time to return to regular time display.
USING THE WEATHER FORECAST
The weather station uses four weather symbols:
 | SUNNY |
 | PARTLY CLOUDY |
 | OVERCAST |
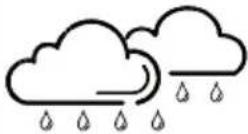 | RAIN |
Note: It takes about 24 hours for the weather station to stabilize. The weather symbols on the display provide indication of weather in the next 6 to 12 hours and may not correspond to current weather outside.
CARE AND MAINTENANCE
- Do not expose the device to extreme temperatures, direct sunlight, or liquids.
- Avoid contact with agents causing rust.
- Do not expose the device to mechanical stress, dust or high humidity.
- Do not open the device or tamper with parts.
- Use only the power adapted supplied with the device.
TROUBLE SHOOTING
If the weather station displays incorrect information or characters, its operation could have been affected by static electricity or by other devices. Press RESET button in the device's back. Reset the device to default date and time and the reception of the radio control signal will start.
| Problem Solution | |
| LCD display is empty. | 1. Press RESET button on the device.2. Replace batteries in the device. |
| Incorrect temperature information. 1. Reset the device.2. Make sure that the device is protected against direct sunlight and it is not located close to sources of heat or cold. | |
TECHNICAL SPECIFICATIONS:
Temperature range 0^ C to +50^ C (HH / LL is displayed when outside of the range)
Humidity range 20% – 95% (20% or 95% is displayed when outside of the range)
Temperature resolution 1 °C
Humidity resolution 1%
Alarm duration 2 minutes
Snooze interval 5 minutes
USE AND DISPOSAL OF WASTE
Wrapping paper and corrugated paperboard – deliver to scrapyard. Packing foil, PE bags, plastic elements – throw into plastic recycling containers.
DISPOSAL OF PRODUCTS AT THE END OF LIFETIME
Disposal of electric and electronic equipment (valid in EU member countries and other European countries with an implemented recycling system)
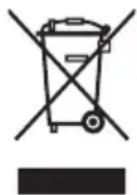
The represented symbol on the product or package means the product shall not be treated as domestic waste. Hand over the product to the specified location for recycling electric and electronic equipment. Prevent negative impacts on human health and the environment by properly recycling your product.
Recycling contributes to preserving natural resources. For more information on the recycling of this product, refer to your local authority, domestic waste processing organization or store, where you purchased the product.
This product complies with EU directive requirements on electromagnetic compatibility and electrical safety.
Changes in text and technical parameters reserved.
08/05


www.ecg.cz



- MH 008
- HODINY S PŘEDPOVĚDÍ POČASÍ
- HODINY S PREDPOVEĐOU POČASIA
- ZEGAR Z PROGNOZA POGODY
- ÓRA IDŐJÁRÁS ELŐREJELZÉSSEL
- UHR MIT WETTERVORHERSAGE
- CLOCK WITH WEATHER FORECAST
- POPIS
- NASTAVENÍ JASU DISPLEJE
- PODMIENKY OVPLYVŇUJÚCE BEZDRÔTOVÝ PRENOS
- NASTAVENIE JASU DISPLEJA
- CONDITIONS AFFECTING WIRELESS TRANSMISSION
- QUICK SETUP
- Step 1:
- Step 2:
- Step 3:
- THE RECEPTION OF THE DCF SIGNAL AND SIGNAL INDICATOR
- EN
- Successful or unsuccessful reception
- Automatic and manual reception
- Cancelling the DCF signal reception
- TIME DISPLAY IN THE 12H OR 24H FORMAT
- SETTING TIME
- SETTING ALARM
- ALARM CLOCK TURN ON AND OFF
- SNOOZE
- DISPLAY BRIGHTNESS SETUP
- TEMPERATURE AND HUMIDITY DISPLAY
- USING THE WEATHER FORECAST
- CARE AND MAINTENANCE
- TROUBLE SHOOTING
- TECHNICAL SPECIFICATIONS:
- USE AND DISPOSAL OF WASTE
- DISPOSAL OF PRODUCTS AT THE END OF LIFETIME
- www.ecg.cz
Brand : ECG
Model : MH 008
Category : Weather Station