
VT-1833 - Vacuum Cleaner Vitek - Free user manual and instructions
Find the device manual for free VT-1833 Vitek in PDF.


| Product Type | Water filter vacuum cleaner for dry cleaning |
| Brand | Vitek |
| Model | VT-1833 |
| Power Supply | 220 V ~ 50 Hz |
| Power Consumption | 1800 W |
| Suction Power | 400 W |
| Dust-Collecting Bin Capacity | 3.5 L |
| Water Tank Capacity | 0.6 L (600 ml) |
| Filtration System | HEPA filter, sponge filter (2 pieces), filter holder with filter |
| Attachments Included | Flexible hose, telescopic extension pipe, carpet/floor brush, small brush, crevice attachment, upholstery cleaning attachment, turbo brush |
| Cord Length | Approximately 5 m (estimated, not specified) |
| Weight | Approximately 5.5 kg (estimated, not specified) |
| Dimensions (approx.) | 400 x 300 x 300 mm (estimated) |
| Noise Level | Not specified |
| Main Features | Water filtration, adjustable suction power, power cord winding, telescopic tube, turbo brush for pet hair, parking area for brush |
| Maintenance | Clean filters every 6 months or more, wash and dry filters, do not use dishwasher, wipe housing with damp cloth |
| Safety | Do not use without water in bin, do not pick up flammable liquids, keep away from children, unplug when not in use |
| Minimum Service Life | 5 years |
| Guarantee | Subject to dealer conditions, requires proof of purchase |
Frequently Asked Questions - VT-1833 Vitek
User questions about VT-1833 Vitek
0 question about this device. Answer the ones you know or ask your own.
Ask a new question about this device
Download the instructions for your Vacuum Cleaner in PDF format for free! Find your manual VT-1833 - Vitek and take your electronic device back in hand. On this page are published all the documents necessary for the use of your device. VT-1833 by Vitek.
USER MANUAL VT-1833 Vitek
natural_image
Diagram of a hand using a tool to press down a component, with no visible text or symbols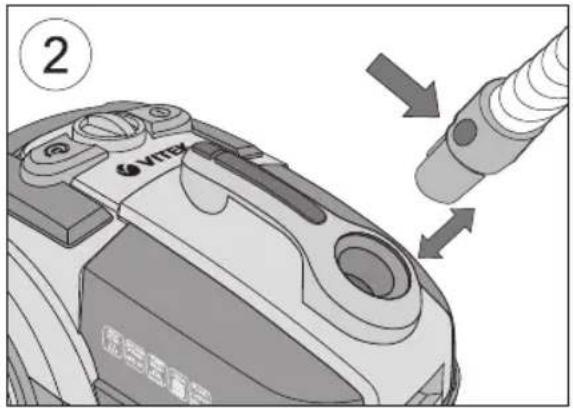
natural_image
Diagram of a medical or laboratory procedure showing a tool interacting with a cylindrical component, with an arrow indicating motion (no text or symbols present)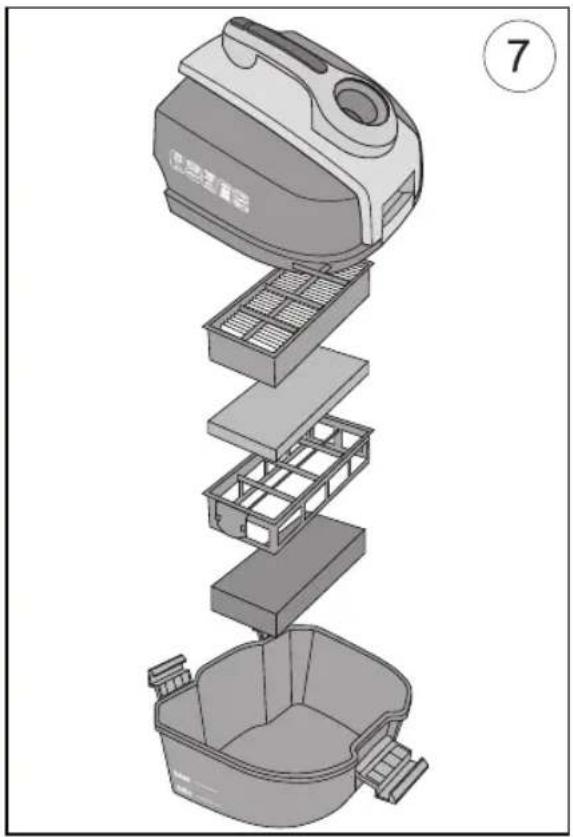
natural_image
Exploded view diagram of a multi-tiered kitchen appliance with internal compartments and a base bowl (no text or symbols)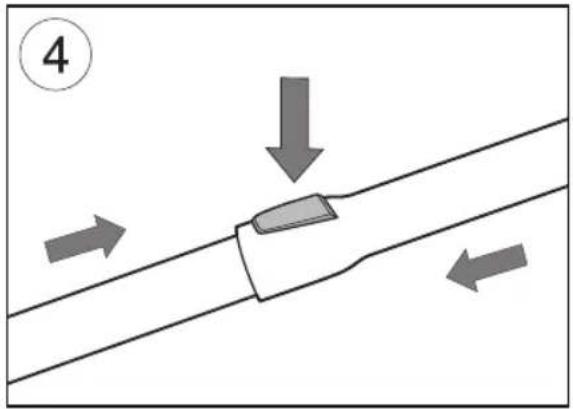
ENGLISH
VACUUM CLEANER
DESCRIPTION
- Power cord winding button
- Power control
- On/Off button
- Locking button for dust-collecting bin
- Handle of the dust-collecting bin
- Air inlet
- Locks of the flexible hose end
- Flexible hose end
- Flexible hose
- Flexible hose handle
- Telescopic extension pipe
- Carpet/floor brush
- Output filter
- Output filter lid
- Small brush
- Crevice attachment
- Attachment for furniture upholstery cleaning
- Turbo-brush
- Dust-collecting bin lid
- HEPA-filter
21, 24. Sponge filters - Filter lock
- Filter holder
- Dust-collecting bin latches
- Lower part of the dust-collecting bin
- Brush "parking" area
IMPORTANT SAFEGUARDS
Read this instruction carefully before using the vacuum cleaner.
To reduce risk of fire, electric shock or injuries:
- The unit is intended only for household usage and the instructions should always be followed.
- Before turning the unit on, make sure that the mains voltage corresponds to the voltage specified on the housing of the unit.
- Use only the attachments supplied.
- Do not leave the vacuum cleaner unattended when it is plugged in the socket.
Always unplug the vacuum cleaner after using, while cleaning.
- To reduce the risks of getting electric shock do not use the vacuum cleaner outdoors or on wet surfaces.
- Do not allow children to use the vacuum cleaner as a toy. Pay special attention when children or disabled persons are near the unit.
- Regularly check the power cord. If you notice any defects in the power cord or if the unit malfunctions, do not use the device and apply to the authorized service center.
- Do not use the power cord as a carrying handle, do not close the door if the power cord passes through the doorway, and keep the power cord away from sharp edges, corners and heated surfaces. Do not run the vacuum over the power cord-you may damage it.
- Do not pull the cord to unplug the device from the power outlet. Instead, grasp the plug.
- Do not touch the plug with wet hands.
- When unwinding the power cord, hold the cable in your hands and don't let the plug hit the floor.
- Do not cover the input and output openings. Never turn on the device if either of the openings is blocked.
- Make sure that dust or any rubbish is not accumulated on the sponge filter (21), it will impede normal suction of air. Clean the sponge filter regularly.
- Keep hair, loose clothing, fingers and other parts of the body away from the suction openings and the rotating turbo-brush.
- Always turn the vacuum cleaner off first with the on/off button, and only then unplug it from the power outlet.
- Turn off the unit before removing of the dust-collecting bin.
- Be especially attentive when using the vacuum cleaner on stairs.
- Never use the vacuum cleaner to pick
ENGLISH
up flammable liquids such as petrol, solvents, and never use it where such liquids are stored.
- Never use the vacuum cleaner to pick up water or other liquids, burning or smoke-emitting cigarettes, matches, smoldering ashes or fine dust such as from plaster, cement, flour or cinder.
- Do not use the vacuum cleaner:
- without dust-collecting bin;
- if there is no water in the dust-collecting bin;
- if the filters (20, 21, 24) are not installed in the dust-collecting bin;
- if the output filter (13) is not installed
- The unit is intended for household usage only; commercial usage of the vacuum cleaner is prohibited.
STORE THE INSTRUCTIONS IN A CONVENIENT PLACE
SAFETY PRECAUTIONS
- Do not use the vacuum cleaner in the immediate vicinity of very hot surfaces, next to ash trays, or where flammable liquids are stored.
- Before beginning to clean, remove sharp objects from the floor to avoid damage of the filters.
- If suction power decreases abruptly while cleaning, immediately turn off the vacuum cleaner and check the telescoping tube or flexible hose for foreign objects. Turn off the vacuum cleaner, and then unplug it from the power outlet. Clear the obstruction and only then proceed with cleaning.
ASSEMBLING THE VACUUM CLEANER
Completely unpack the vacuum cleaner and check it for damages.
Before turning on the vacuum cleaner, make sure that the voltage of the mains corresponds to the voltage of the vacuum cleaner.
Always turn off the vacuum cleaner and unplug it from the outlet before changing the brushes/attachments, and before performing maintenance on it.
Filling the dust-collecting bin with water
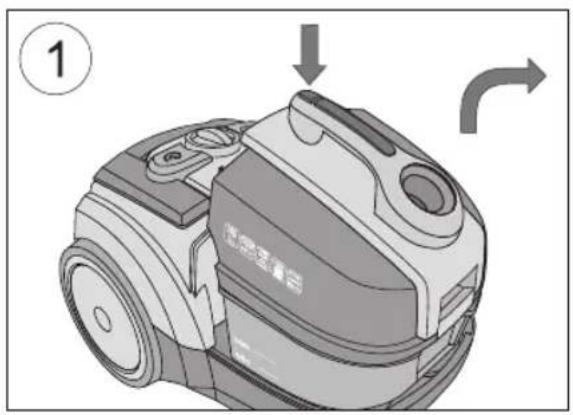
- Holding the handle (5) press the locking button (4) and take the bin out of the vacuum cleaner (pic. 1).
- Open the latches (25) and remove the lid of the bin (19).
- Fill the lower part of the bin (26) with water till the MAX mark.
Note: Necessary quantity of water - 600 ml.
- Put the lid (19) on the lower part of the bin (26) and lock the latches (25).
- Put the dust-collecting bin on its place; check that the bin is locked in the case of the vacuum cleaner.
Attaching and removing the flexible hose (pic. 2)
- Insert the end of the flexible hose (8) in the air inlet (6). Insert the hose until it snaps, confirming a proper connection.
- To remove the flexible hose press the locks (7) and disconnect the hose.
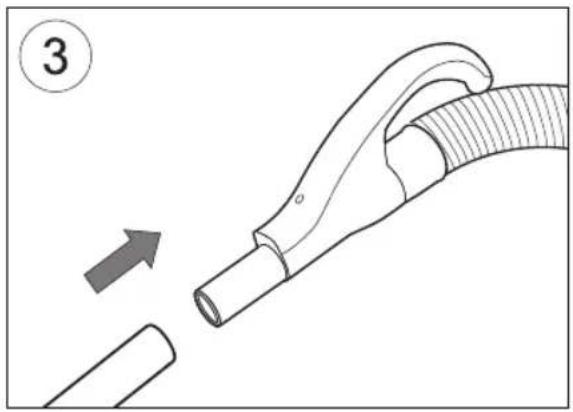
Attaching the extension tubes and attachments (pic. 3, 4)
- Attach the telescoping extension tube (11) to the flexible hose handle (10).
- Extend the lower part of the telescoping tube to the desired length by pressing the locking button.
- Select the desired attachment: carpet/floor brush (12), small brush (15), crevice attachment (16), attachment for furniture upholstery cleaning (17) or turbo-brush (18) and connect it to the telescoping extension pipe (11).
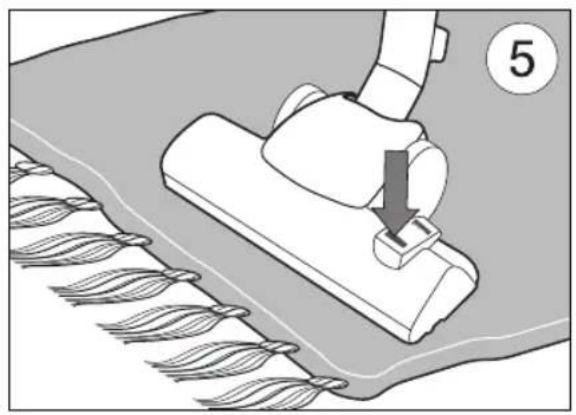
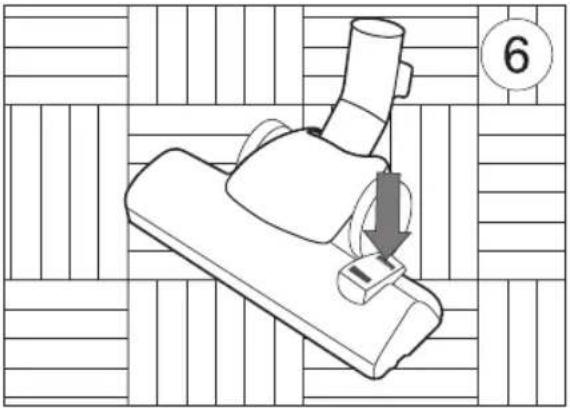
Carpet/floor brush (12) (pic. 5, 6)
Set the switch on the brush to the desired position (depending on the type of the surface you wish to clean).
ENGLISH
Small brush (15)
The brush is intended to collect dust from the surface of the furniture, presence of pile prevents polished surface of the furniture from damages.
Crevice attachment (16)
The attachment is intended for cleaning of radiators, crevices, corners and between sofa pillows.
Attachment for furniture upholstery cleaning (17)
Attachment is intended to clean fabric surface of upholstered furniture.
Turbo-brush (18)
The turbo brush (18) can be used to clean floors, rugs and carpets with long or short pile, and is ideal for picking up animal fur. The cylindrical brush with hard bristles rotates under the action of the air current and its bristles effectively remove animal fur and loose carpet and rug fibers.
Note: Never use the turbo brush to clean rugs with fringe and pile of 15 mm or more, because the rotating brush can cause damage to such rugs. Do not run the turbo brush over power cords and turn off the vacuum cleaner immediately after you are done using it.
USAGE INSTRUCTIONS
Attention!
The vacuum cleaner with a water filter is intended only for dry cleaning; do not use the unit to pick up water or any other liquids.
Before using the vacuum cleaner, pull the power cord out to the desired length and insert the plug into an outlet. The yellow mark on the power cord warns you when to stop pulling. Never pull the power cord past the red mark.
Attention!
Always turn on the vacuum cleaner only
with the installed dust-collecting bin filled with water and with the installed filters (20, 21, 24). Always check whether the filters are installed properly or not.
- To turn on the vacuum cleaner press the On/Off button (3).
- During operation you can adjust suction power using the suction control (2).
- After the cleaning is over, press the On/Off button (3) and take the plug out of the socket.
- Press the power cord-winding button (1), and hold the winding cord with your hand to prevent damage.
SERVICE
- When water in the bin (19) becomes dirty (suction power can be reduced), you should pour out it, to proceed with cleaning, fill the bin with clear water, refer to the “Cleaning of the dust-collecting bin” section.
Note: it is recommended that you empty the dust collection bin and wash the bin after each use. - Before removal of the dust-collecting bin, it is necessary to turn off the unit with the switch (3), and then unplug the unit.
Cleaning of the dust-collecting bin
- Holding the handle (5) press the locking button (4) and take the bin out of the vacuum cleaner (pic. 1).
- Open the latches (25) and remove the lid of the bin (19).
- Pour out dirty water from the lower part of the bin (26) and rinse it.
- Fill the lower part of the bin (26) with water till the MAX mark.
Note: Necessary quantity of water - 600 ml.
- Put the lid (19) on the lower part of the bin (26) and lock the latches (25).
- Put the dust-collecting bin on its place; check that the bin is locked in the case of the vacuum cleaner.
ENGLISH
- Turn on the vacuum cleaner and continue cleaning.
Cleaning of the filters (pic. 1, 7)
Keep the HEPA-filter (20), and the filters (21, 24) clean, as the operational effectiveness of you vacuum cleaner depends on it; clean the filters not less than six times a year and if they get really dirty – then more often. Replacement of the HEPA-filter (20) is done when necessary.
- Holding the handle (5) press the locking button (4) and take the bin out of the vacuum cleaner (pic. 1).
- Open the latches (25) and remove the lid of the bin (19).
- Pres the lock (22) remove the filter holder (23) with the filter (24), sponge filter (21), HEPA-filter (20) and wash them under warm tapping water (pic. 7).
- Do not use a dish-wash machine to clean the filters.
- Dry the filters. Do not use a hair dryer to dry the filters.
- Set the filters on their place. Check that they are set properly.
- Put the lid (19) on the lower part of the bin (26) and lock the latches (25).
- Put the dust-collecting bin on its place; check that the bin is locked in the case of the vacuum cleaner.
Vacuum cleaner housing
- Wipe the housing with a damp cloth.
- Do not allow water or other liquid to get inside the housing of the vacuum cleaner.
- Never use solvents or abrasive cleaning products to clean the surface of the vacuum cleaner.
Storage
- Keep the vacuum cleaner in a dry cool place, out of the reach of children.
- Use the brush "parking" place (27) during intervals in operation or during storage.
Attention: Always pour out dirty water from the bin and wash the bin, wash and dry the filters (20, 21, 24) before taking the vacuum cleaner for storage.
Delivery set
- Vacuum cleaner (with the installed filters and the dust-collecting bin) - 1 pc.
- Flexible hose - 1 pc.
- Carpet/floor brush - 1 pc.
- Crevice attachment - 1 pc.
- Attachment for furniture upholstery cleaning - 1 pc.
- Turbo-brush - 1pc.
- Telescopic tube - 1pc.
- Dusting brush - 1pc.
- Instruction manual - 1 pc.
SPECIFICATIONS
Power supply: 220 V \~ 50 Hz Power consumption: 1800 W Suction power: 400 W Dust-collecting bin capacity 3,5 l Water tank capacity 0,6 l
Specifications subject to change without prior notice.
MINIMUM SERVICE LIFE - 5 YEARS
GUARANTEE
Details regarding guarantee conditions can be obtained from the dealer from whom the appliance was purchased. The bill of sale or receipt must be produced when making any claim under the terms of this guarantee.

This product conforms to the EMC-Requirements as laid down by the Council Directive 89/336/EEC and to the Law Voltage Regulation (73/23 EEC)
DEUTSCH
STAUBSAUGER
BESCHREIBUNG
USCHOVEJTE INSTRUKCI V PRISTUPNIM MISTE
A production date of the item is indicated in the serial number on the technical data plate. A serial number is an eleven-unit number, with the first four figures indicating the production date. For example, serial number 0606xxxxxxx means that the item was manufactured in June (the sixth month) 2006.
DE
- ENGLISH
- VACUUM CLEANER
- DESCRIPTION
- IMPORTANT SAFEGUARDS
- Read this instruction carefully before using the vacuum cleaner.
- SAFETY PRECAUTIONS
- ASSEMBLING THE VACUUM CLEANER
- Filling the dust-collecting bin with water
- Note: Necessary quantity of water - 600 ml.
- Attaching and removing the flexible hose (pic. 2)
- Attaching the extension tubes and attachments (pic. 3, 4)
- Carpet/floor brush (12) (pic. 5, 6)
- Small brush (15)
- Crevice attachment (16)
- Turbo-brush (18)
- USAGE INSTRUCTIONS
- Attention!
- SERVICE
- Cleaning of the dust-collecting bin
- Cleaning of the filters (pic. 1, 7)
- Vacuum cleaner housing
- Storage
- Delivery set
- SPECIFICATIONS
- MINIMUM SERVICE LIFE - 5 YEARS
- GUARANTEE
- DEUTSCH
- STAUBSAUGER
- BESCHREIBUNG
- DE
Brand : Vitek
Model : VT-1833
Category : Vacuum Cleaner