VT-1838 - Vacuum Cleaner Vitek - Free user manual and instructions
Find the device manual for free VT-1838 Vitek in PDF.


| Product Type | Vacuum Cleaner |
| Brand | Vitek |
| Model | VT-1838 |
| Power Consumption | 1800 W |
| Suction Power | 350 Air Watts (approx.) |
| Dust Capacity | 2.5 L (bagless) |
| Filtration System | HEPA washable filter |
| Noise Level | 78 dB |
| Weight | 5.5 kg |
| Dimensions (H x W x D) | 350 x 250 x 300 mm |
| Cord Length | 5 m |
| Automatic Cord Rewind | Yes |
| Variable Suction Control | Yes, electronic |
| Attachments Included | Floor brush, crevice tool, upholstery brush |
| Motor Protection | Overheating protection with auto shut-off |
| Maintenance | Empty dust cup; wash filter every 3 months |
| Replaceable Parts | HEPA filter, foam filter |
| Safety | CE marked; double insulated |
Frequently Asked Questions - VT-1838 Vitek
User questions about VT-1838 Vitek
0 question about this device. Answer the ones you know or ask your own.
Ask a new question about this device
Download the instructions for your Vacuum Cleaner in PDF format for free! Find your manual VT-1838 - Vitek and take your electronic device back in hand. On this page are published all the documents necessary for the use of your device. VT-1838 by Vitek.
USER MANUAL VT-1838 Vitek
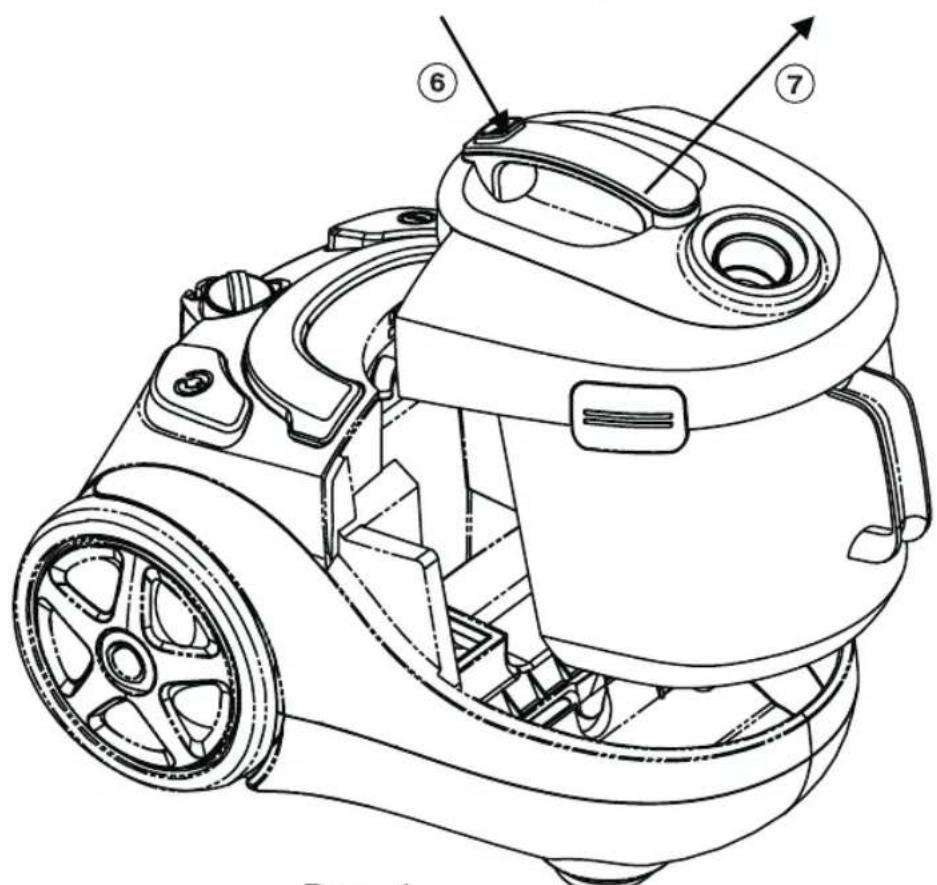
Рис. 1
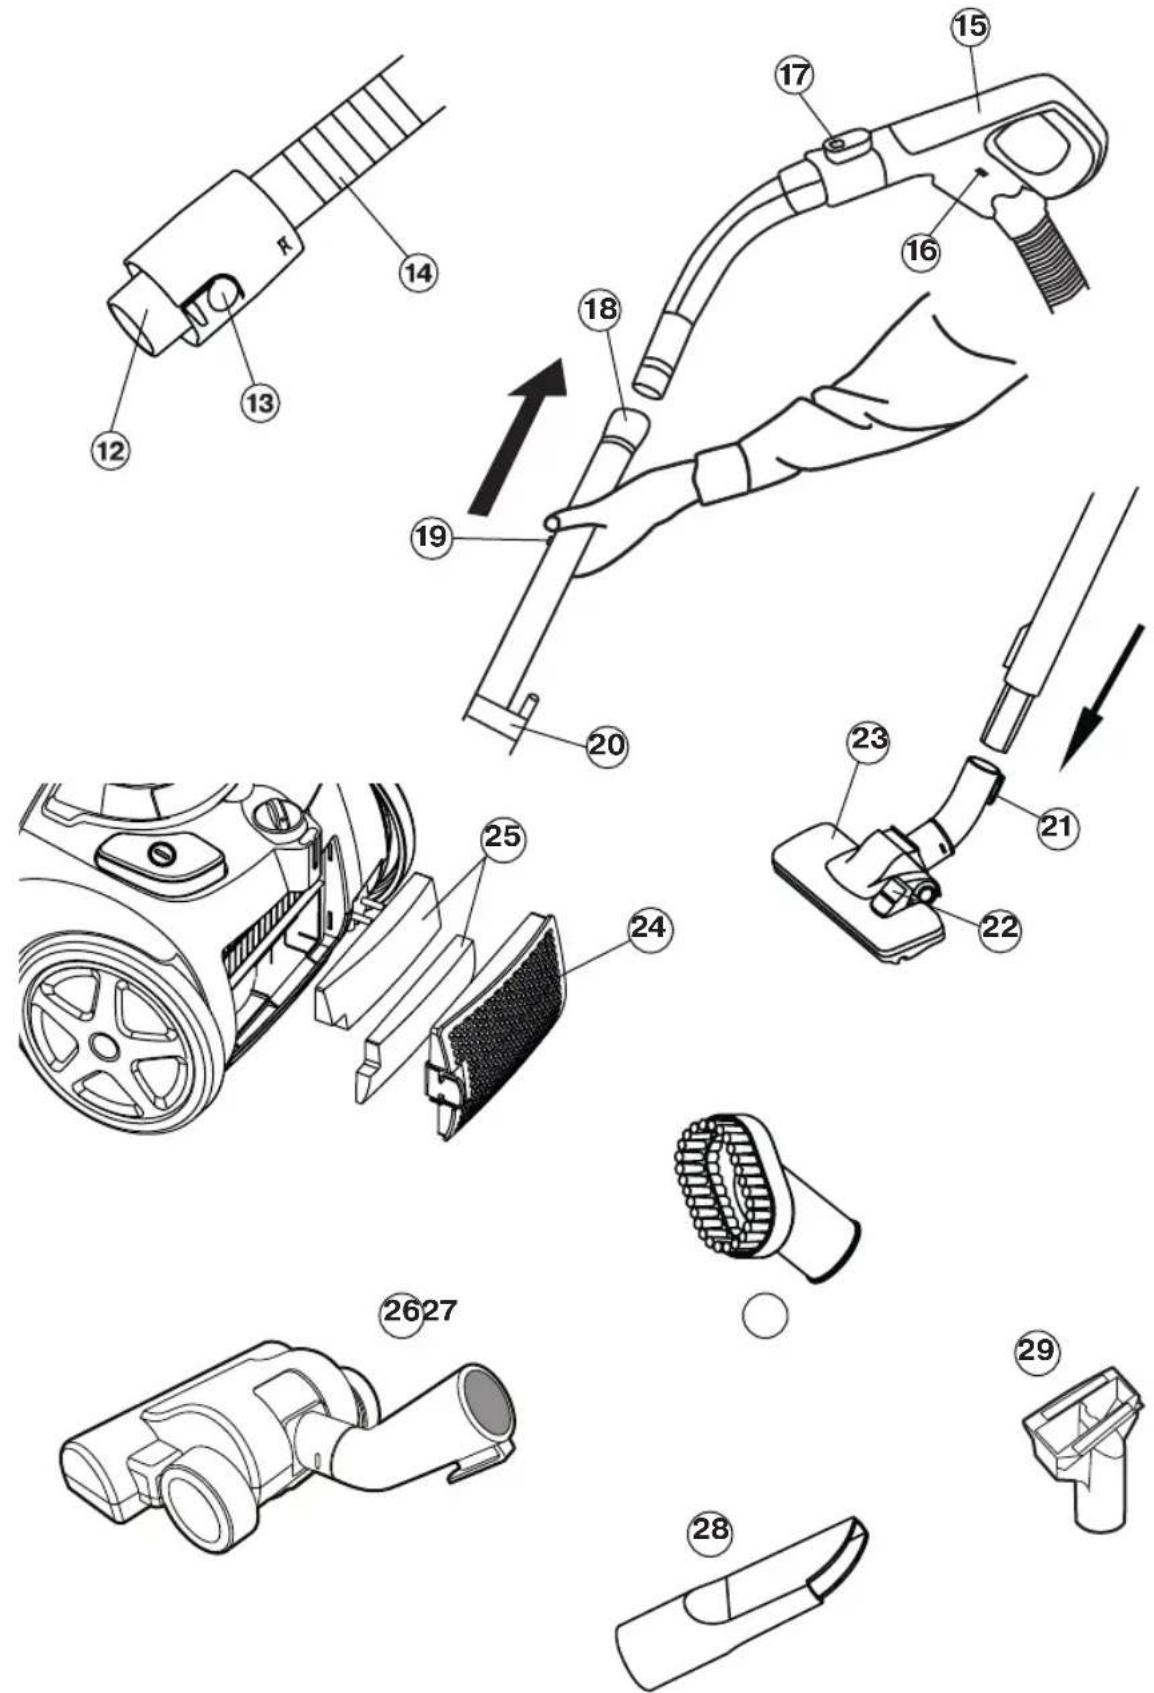
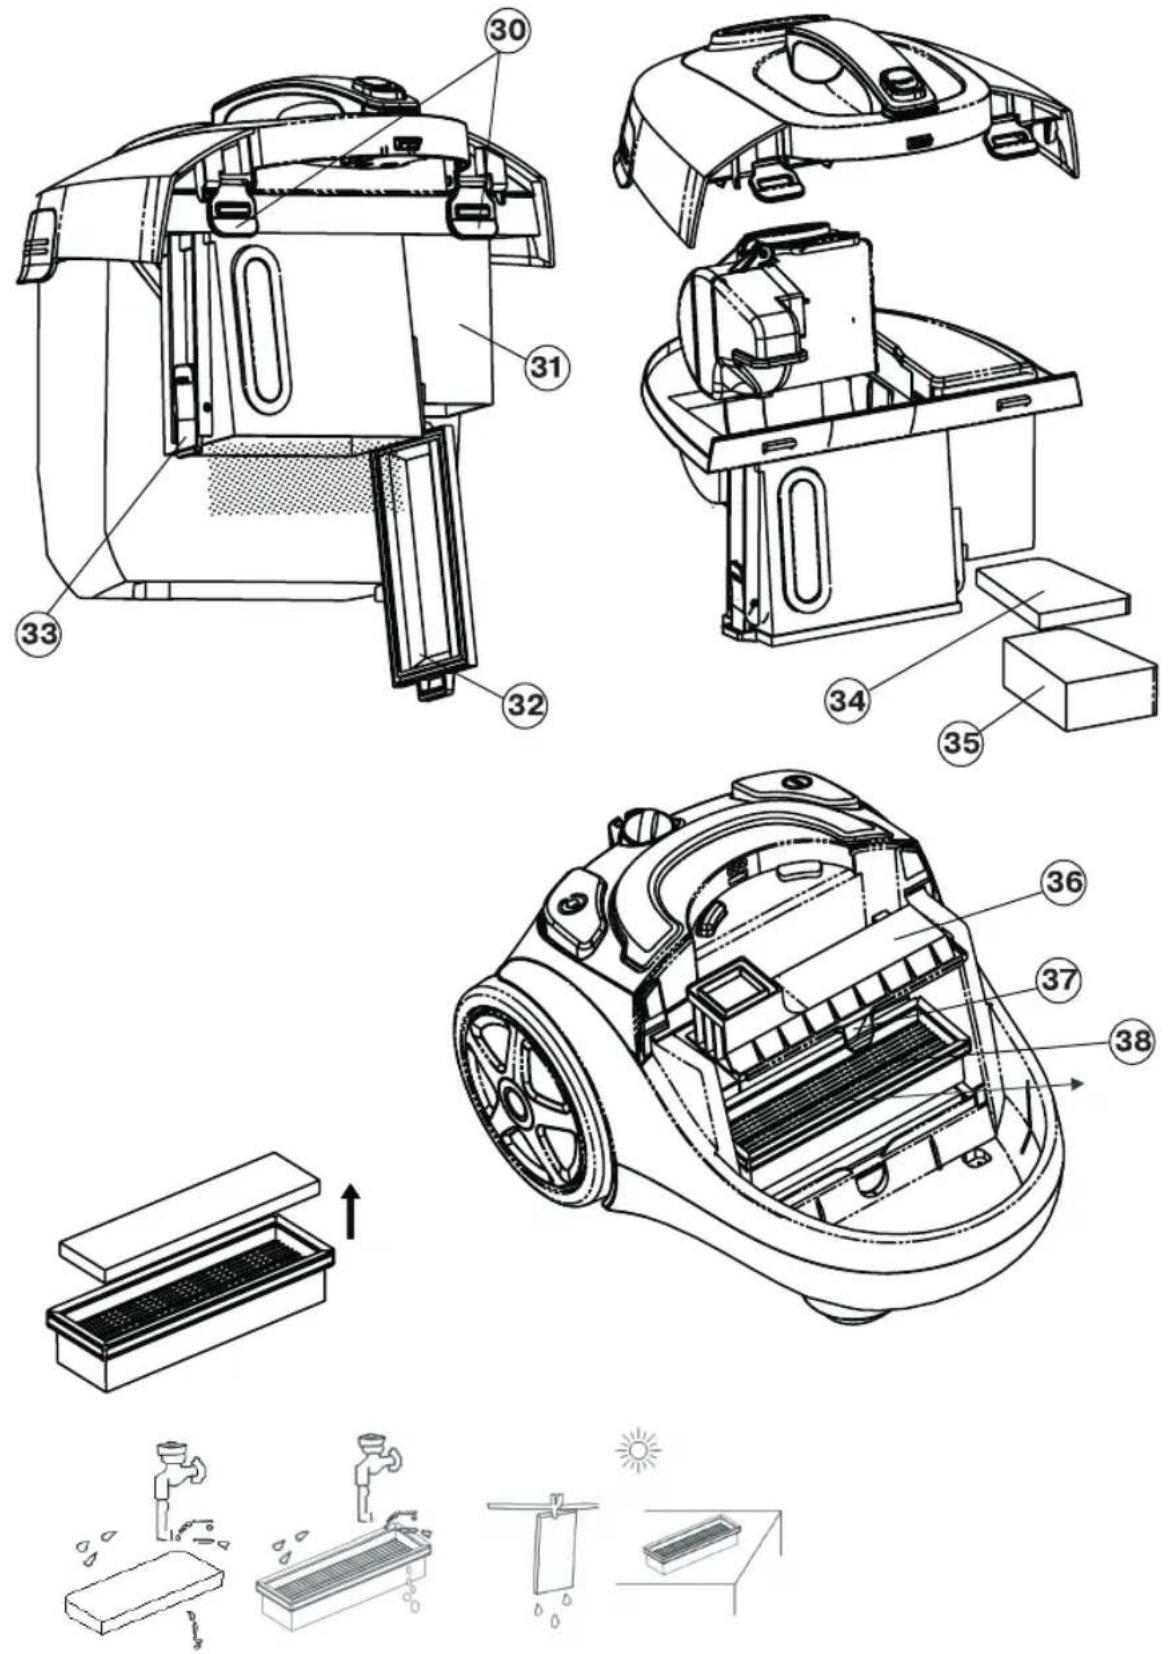
Рис. 3
ENGLISH
VACUUM CLEANER
Description
- On/off button
- Power control
- Brush storage space
- Power cord winding button
- Carrying handle
- Dust container clamping button
- Dust container carrying handle
- Dust container
-
Dust container clamp
-
Air inlet
-
Water container
- Flexible hose nozzle
- Flexible hose clamping button
- Flexible hose
- Hose handle
- Hose handle clamp
- Telescopic pipe clamp
- Telescopic extension pipe
- Clamp for telescopic pipe length adjustment
-
Attachment holder
-
Bracket for telescopic pipe storage space
-
"Carpet/floor" modes switch
-
Floor/carpet brush
-
Outlet filter grid
-
Outlet filter
-
Turbo brush
-
Small brush
-
Crevice nozzle
-
Furniture brush
-
Dust container lid clamp
-
Block of filters
-
Lower lid
-
Lower lid opening button
-
Foam filter
-
Foam protection
-
HEPA filter lid
-
HEPA filter lid clamp
-
HEPA filter
ATTENTION!
For additional protection you can install a residual current device with nominal current of operation, not exceeding 30 mA into the mains; contact specialist for installation.
SAFETY MEASURES
Read this instruction manual carefully before using the unit and keep it for the whole operation period. Use the unit only for intended purposes, as specified in this manual. Mishandling the unit can lead to its breakage and cause harm to the user or damage to his/her property.
WARNING
To avoid the hazard of electric shock, fire and injury:
- Before connecting the unit to the mains, make sure that electricity supply corresponds to the voltage of current specified on the unit body.
- In order to avoid fire or electric shock do not use adapters for plugging the unit in.
- Do not leave the vacuum cleaner, when it is plugged in, unattended. Always unplug the unit if it is not being used or before maintenance works.
- To reduce electric shock hazard do not use vacuum cleaner outdoors, do not use it for water or other liquids collecting.
- Never allow children to use the unit as a toy. Close supervision is necessary when children or disabled persons are near the operating unit.
- This unit is not intended for usage by children or disabled persons unless they are given all the necessary instructions by a person who is responsible for their safety on safety measures and information about danger that can be caused by improper usage of the unit.
- Do not use the power cord as a handle for carrying the vacuum cleaner, do not close the door if the power cord goes through the doorway, do not let the power cord come in contact with sharp corners or edges of furniture. Do not run over the power cord with vacuum cleaner while room cleaning as this can damage the cord.
- Always switch off the vacuum cleaner with On/Off button first and after that take the plug out of the socket.
- When unplugging the unit, pull the plug but not the cord.
- Do not touch the plug and vacuum cleaner body with wet hands.
- Hold the cord with hand while winding it in order to avoid the plug hitting against the floor.
ENGLISH
- Do not cover the unit outlets with foreign objects. Do not switch on the unit if any of its openings is blocked.
- Provide that no hair, free hanging clothes items, fingers and other parts of your body are near the vacuum cleaner air inlet openings.
- Be especially attentive while cleaning the stairs landings.
- Do not use the vacuum cleaner for collecting of such inflammable liquids as gasoline and solvents, do not use the unit in places where such liquids are stored.
- Do not use the vacuum cleaner for collecting of water and other liquids, burning or smoking cigarettes, matches, smouldering ash as well as finely dispersed dust, for example, of plaster, concrete, flour or ashes.
- Do not run over accumulations of dust, dirt, fluff and hair etc. with the vacuum cleaner.
- Do not use the vacuum cleaner, if: - the dust container is not installed or is improperly assembled;
- the water container is empty; - not all filters are installed.
- Regularly check that the power cord and the plug are not damaged. If the power cord or the plug is damaged or in case of improper operation of the vacuum cleaner contact the authorized service center.
- For children safety do not leave polyethylene bags, used as a packaging, unattended.
Attention! Do not allow children to play with polyethylene bags and film. Danger of suffocation!
- Do not use the vacuum cleaner near hot surfaces, ashtrays and in the places where highly flammable liquids are stored.
• Take sharp objects away from the floor before cleaning to prevent unit damage.
- If the suction power of the vacuum cleaner has dramatically decreased while cleaning, switch it off immediately and check the telescopic pipe and the flexible hose for obstruction. Switch off the vacuum cleaner, unplug it, remove the obstruction and after that you can continue cleaning.
Assembling of vacuum cleaner
Unpack the vacuum cleaner completely and check it for damages. Do not use the unit in case of any damages.
Note:
- In case of unit transportation or storage at low temperature it is necessary to keep it for at least two hours at room temperature before switching on.
- Before switching on make sure that the voltage of the electric network corresponds to the operating voltage of the vacuum cleaner.
- Always switch off the vacuum cleaner and unplug it while replacing the brush attachments and before cleaning the dust container (8).
Filling the dust container (8) with water
- Remove the dust container (8) pressing the button (6) and pulling it by the handle (7) (pic. 1).
- Detach the water container (11) having opened the clamps (9) (pic. 2).
- Fill the container (11) with water to the "MAX" mark.
Note: The required water amount is approximately 500 ml.
- Assemble the dust container (8). Make sure that it is assembled properly.
- Close the clamps (9).
- Install the dust container (8) in its place until the clamp (6) clicks.
Note:
- Do not exceed the "MAX" mark.
- Do not make excessive efforts while closing the lid to prevent its damage or breakage.
Attaching of flexible hose, telescopic pipe and attachments
- Insert the flexible hose nozzle (12) into the air inlet (10). Insert the hose until click indicating proper connection. To remove the flexible hose press the clamping button (13) and detach the hose.
- Insert the hose (14) into the handle opening (15) till the clamps (16) click. Press the clamps (16) to detach the handle (15).
- Attach the telescopic extension pipe (18) to the flexible hose (15) handle till the clamp (17) clicks. Press the clamp (17) to detach the telescopic extension pipe (18).
ENGLISH
- Extend the lower part of the telescopic extension pipe (18) to the required length, having preliminary pressed the clamping button (19).
- Select the required attachment: floor/carpet brush (23), turbo brush (26), small brush (27), crevice nozzle (28) or furniture brush (29) and attach it to the telescopic extension pipe (18).
USING BRUSH ATTACHMENTS
Floor/carpet brush (23)
Set the switch (22) to the required position (depending on the type of the surface being cleaned).
Turbo brush (26)
You can use the turbo brush (26) for cleaning the floors and carpets with high and low pile, it is perfect for removal of pet hair from carpets. The cylindrical hard-bristled brush rotates under the air flow, its bristle combs pet hair out thoroughly and sweeps the motes out of the carpet pile.
Note:
Do not use the turbo brush for cleaning carpets with high fringe and pile of more than 15 mm in order to avoid carpet damaging at brush rotation. Do not run over the wires with the turbo brush, after cleaning is completed, switch the vacuum cleaner off after usage of the turbo brush.
Small brush (27)
Small brush (27) is intended for collecting of dust from furniture surface, pile prevents damage of polished furniture surface.
Crevice nozzle (28)
The crevice nozzle (28) is intended for cleaning of radiators, chinks, corners and spaces between sofa cushions.
Furniture brush (29)
The attachment (29) is intended for cleaning of fabric surfaces of upholstered furniture.
Attachment holder (20)
For easy storing of different attachments there is an attachment holder (20) included.
Fix the holder on the telescopic pipe using the fixing screw.
OPERATION
Attention! Always switch on the vacuum cleaner with the installed dust container (8) filled with water, with the filters (25, 34, 35 and 38) installed. Always make sure that the filters are installed properly.
- Before using the unit, unwind the power cord to the required length and insert the plug into the socket. Yellow mark on the power cord indicates the maximum cord length. Do not unwind the power cord further than the red mark.
- Press the button (1) to switch the vacuum cleaner on.
- During unit operation you can control the suction power using the power control (2).
- After the unit operation, switch off the vacuum cleaner by pressing the button (1) and unplug the unit.
- To wind the cord press the button (4), hold the winding cord with your hand in order to avoid its twisting and damage.
- Between operations use the brush storage space (3).
- Use the handle (5) for carrying the vacuum cleaner.
WARNING: Do not use the dust container (10) handle and the water container (11) handle for carrying the unit.
Vacuum cleaner maintenance during operation
Change water as it becomes dirty during unit operation. This procedure is described in the section "Filling the dust container with water". In case of suction power decrease clean the filters. This procedure is described in the section "CLEANING AND CARE".
Note: Pour dirty water out of the container and wash the dust container (8) every time after using the vacuum cleaner.
- Before removing the dust container (8) first switch off the vacuum cleaner by pressing the button (1), and take the plug out of the socket.
CLEANING AND CARE
Cleaning of dust container (8)
- Switch off and unplug the unit.
- Detach the flexible hose (14) having pressed the clamps (13) and pulling it upwards.
ENGLISH
- Remove the dust container (8) pressing the button (6) and pulling it by the handle (7) (pic. 1).
- Detach the water container (11) having opened the clamps (9) (pic. 2).
- Pour dirty water out of the container (11) wash it thoroughly with warm water, and then dry it.
- Remove heavy dust and trash from the block of filters (31) having opened the lower lid (32). For this purpose pull the clamp (33) towards yourself.
Note: Place the block of filters (31) over a dustbin.
- Disassemble the block of filters (31) having opened the clamps (30).
- Take the foam protection (35) and the foam filter (34) out.
- Wash the dust container lid (8), the block of filters (31), the foam filter (34) and the foam protection (35), dry them thoroughly.
- Assemble the block of filters (31).
- Place the foam filter (34), then the foam protection (35) back in their places.
- Install the dust container lid (8) back to its place and fix it having closed the clamps (30).
- Install the block of filters (31) into the container (11). Make sure that it is installed properly.
- Fix the water container (11) having closed the clamps (9).
Cleaning the HEPA Filter (38)
HEPA filter is located in the lower part of the unit and is intended for prevention of dust and dirt particles exhaust back to the room being cleaned.
Note: Take the dust container (8) out before removing the HEPA Filter (38).
- Remove the HEPA filter lid (36) pulling it upwards by the clamp (37).
- Take the HEPA Filter (38) with foam rubber gasket out,
- Wash the HEPA Filter (38) and its foam rubber gasket with warm water and dry them thoroughly (pic. 3).
Note:
- Wash the HEPA Filter (38) directing the water jet to the outer side of the HEPA Filter.
- Do not wash filters in a dishwashing machine.
• Do not dry filters with a hair dryer. - Insert the foam rubber gasket into the HEPA Filter (38), then install the HEPA Filter back
back in its place.
- Install the lid (36) in its place, press it until the clamp (37) clicks.
Attention!
Before inserting the dust container (8) into the vacuum cleaner body make sure that the filters, in particular, the HEPA Filter (38), are dry and there is no moisture inside the block of filters (31).
Cleaning of outlet filter (25)
Regularly clean the outlet filter (25).
- Remove the outlet filter grid (24) having pressed the clamp and pulled the grid (24) towards yourself.
- Remove the outlet filter (25) from the inner side of the grid (24), wash them under warm water jet and then dry them thoroughly.
- Fix the outlet filter (25) on the inner side of the grid (24).
- Install the grid (24) back in its place.
Note: Check the filters regularly for dirt accumulation and clean them if necessary.
Vacuum cleaner body
- Wipe the vacuum cleaner body with a soft damp cloth.
- Do not immerse the body, the power cord and the power plug of the unit into water or other liquids. Provide that no water gets inside the unit.
- Never use solvents or abrasives to clean the surface of the vacuum cleaner.
STORAGE
- Before taking the vacuum cleaner away for storage clean its body, the dust container (8) and the filters (24, 34, 35 and 38).
- For easy storing use the attachment holder (20) and the brush storage space (3) when the vacuum cleaner body is in the vertical position.
- Keep the vacuum cleaner away from children in a dry cool place.
DELIVERY SET
- Vacuum cleaner with the filters and the dust container installed - 1 pc.
- Flexible hose - 1 pc.
- Flexible hose handle - 1 pc.
- Telescopic extension pipe - 1 pc.
- Attachment holder - 1 pc.
ENGLISH
- Universal brush - 1 pc.
- Turbo brush - 1 pc.
- Small brush - 1 pc.
- Crevice nozzle - 1 pc.
- Furniture brush - 1 pc.
- Instruction manual - 1 pc.
TECHNICAL SPECIFICTAIONS
Power supply: 220-240 V \~50 Hz
Maximal power consumption: 1800 W
Suction power: 400 W
The manufacturer preserves the right to change the specifications of the unit without a preliminary notification.
Unit operating life is 5 years
Guarantee
Details regarding guarantee conditions can be obtained from the dealer from whom the appliance was purchased. The bill of sale or receipt must be produced when making any claim under the terms of this guarantee.

This product conforms to the EMC-Requirements as laid down by the
Council Directive 89/336/EEC and to
the Low Voltage Regulation (73/23 EEC)
DEUTSCH
STAUBSAUGER
Beschreibung
A production date of the item is indicated in the serial number on the technical data plate. A serial number is an eleven-unit number, with the first four figures indicating the production date. For example, serial number 0606xxxxxxx means that the item was manufactured in June (the sixth month) 2006.
DE
- ENGLISH
- VACUUM CLEANER
- Description
- ATTENTION!
- SAFETY MEASURES
- WARNING
- Assembling of vacuum cleaner
- Note:
- Filling the dust container (8) with water
- Attaching of flexible hose, telescopic pipe and attachments
- USING BRUSH ATTACHMENTS
- Floor/carpet brush (23)
- Turbo brush (26)
- Small brush (27)
- Crevice nozzle (28)
- Furniture brush (29)
- Attachment holder (20)
- OPERATION
- Vacuum cleaner maintenance during operation
- CLEANING AND CARE
- Cleaning of dust container (8)
- Cleaning the HEPA Filter (38)
- Cleaning of outlet filter (25)
- Vacuum cleaner body
- STORAGE
- DELIVERY SET
- TECHNICAL SPECIFICTAIONS
- Unit operating life is 5 years
- Guarantee
- DEUTSCH
- STAUBSAUGER
- Beschreibung
- DE
Brand : Vitek
Model : VT-1838
Category : Vacuum Cleaner