VT-1837 - Vacuum Cleaner Vitek - Free user manual and instructions
Find the device manual for free VT-1837 Vitek in PDF.


| Product Type | Cylinder Vacuum Cleaner |
| Model | VT-1837 |
| Brand | Vitek |
| Dimensions (L x W x H) | Approx. 400 x 280 x 250 mm |
| Weight | Approx. 4.5 kg |
| Power Consumption | 1600 W |
| Dust Container Capacity | 2 L |
| Filtration System | HEPA 13 filter |
| Noise Level | 78 dB |
| Cord Length | 5 m |
| Power Cord Type | Retractable |
| Cleaning Modes | Carpet, Hard Floor, Upholstery |
| Accessories Included | Crevice nozzle, brush nozzle, upholstery tool |
| Body Material | ABS Plastic |
| Warranty | 2 years |
Frequently Asked Questions - VT-1837 Vitek
User questions about VT-1837 Vitek
0 question about this device. Answer the ones you know or ask your own.
Ask a new question about this device
Download the instructions for your Vacuum Cleaner in PDF format for free! Find your manual VT-1837 - Vitek and take your electronic device back in hand. On this page are published all the documents necessary for the use of your device. VT-1837 by Vitek.
USER MANUAL VT-1837 Vitek
natural_image
Simple line drawing of a pair of hair blisters (no text or symbols)
natural_image
Line drawing of a steam iron (no text or symbols)
natural_image
Line drawing of a vacuum cleaner (no text or symbols)
natural_image
Line drawing of a kitchen feeder (no text or symbols)
natural_image
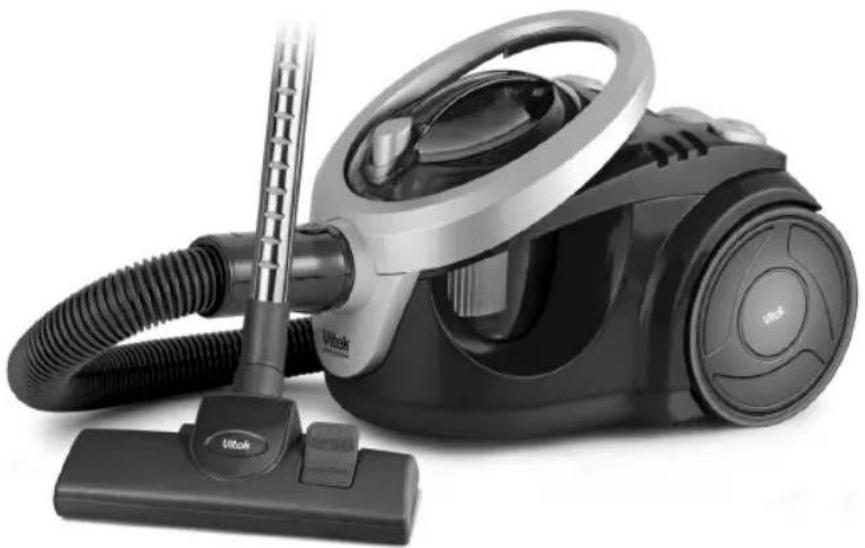
Black and silver photo of a UItook vacuum cleaner with attached hose and base (no visible text or symbols)MANUAL INSTRUCTION
GB MANUAL INSTRUCTION 4
SCG UPUSTVO ZA UPOTREBU 22
PL INSTRUKCJA OBSŁUGI 25
CZ NÁVOD K POUŽITÍ 28
natural_image
Diagram of a mobile vacuum cleaner with adjustable arm and base, showing motion arrows (no text or symbols)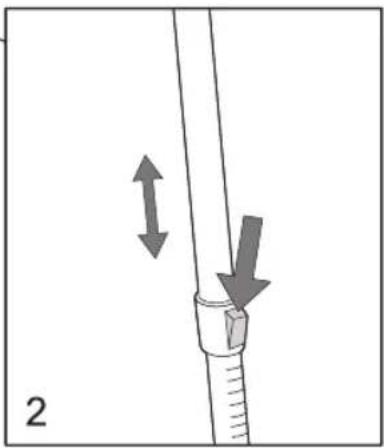
natural_image
Diagram of a mechanical joint with two directional arrows indicating movement or force (no text or symbols present)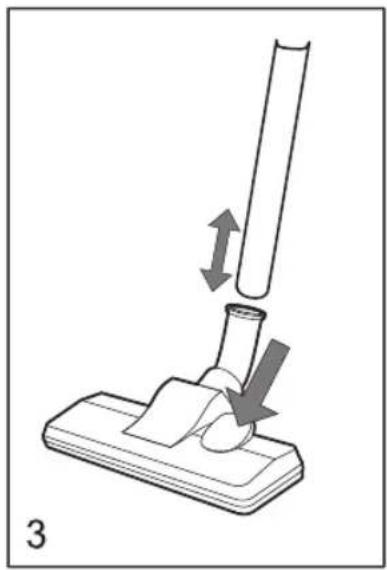
natural_image
Diagram of a mechanical device with a lever and base, showing motion arrows (no text or symbols)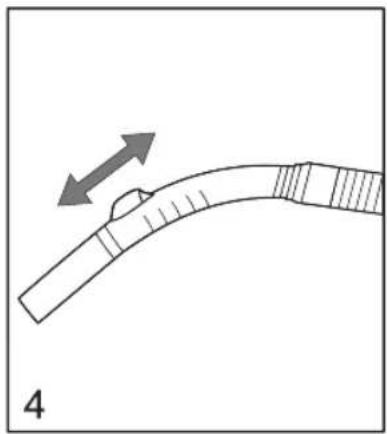
natural_image
Diagram of a curved pipe or duct with directional arrows indicating movement, labeled '4' at bottom left (no text or symbols on the diagram itself)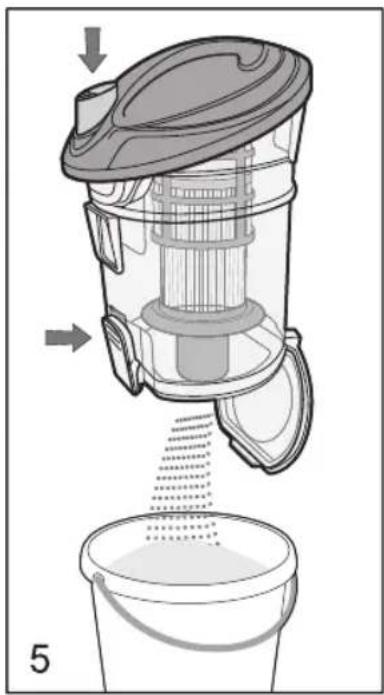
natural_image
Diagram of a vacuum cleaner with liquid being poured into a bucket, showing internal structure and flow direction (no text or symbols)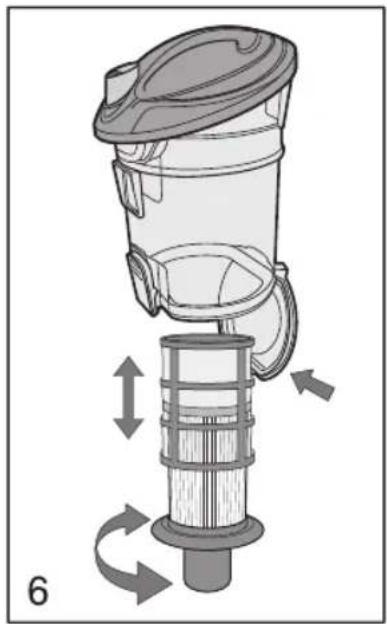
natural_image
Diagram of a mechanical device with directional arrows indicating flow or movement (no text or symbols present)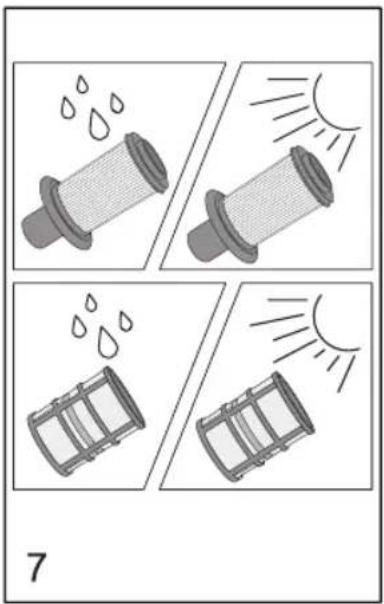
natural_image
Four-panel illustration showing a water filter with raindrops and sun rays, no text or symbols present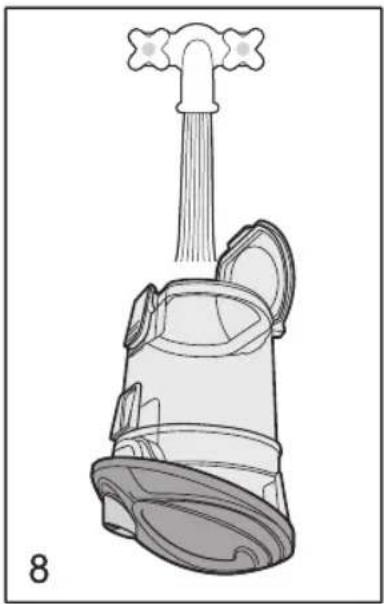
natural_image
Line drawing of a faucet with a handle and base plate, no text or symbols present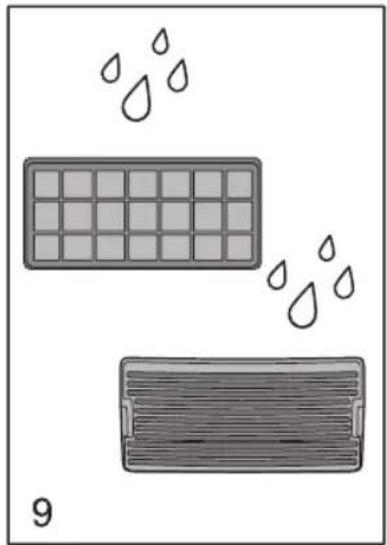
natural_image
Illustration of two rectangular containers with water droplets above, no text or symbols presentENGLISH
VACUUM CLEANER
DESCRIPTION
- Floor/Carpet brush
- Telescopic tube
- Suction power knob
- Flexible hose handle
- Flexible hose
- Flexible hose cup with clamp
- Air inlet
- Dust collection container removal button
- Dust collection container
- Dust collection container handle
- On/Off button
- Power cord rewind button
- Power Cord
- Power control knob
- Brush storage location
- Outlet filter grid
- Outlet filter
DUST COLLECTION CONTAINER (Fig. A).
- Collection container bottom cover
- Collection container cover clamp button
- Mesh pre-filter.
- Main HEPA filter
ADDITIONAL NOZZLES
-
Furniture brush
-
Universal brush
When using electrical appliances always observe basic safety measures and precautions.
SAFETY INSTRUCTIONS
- Please, read these instructions attentively before using the device for the first time, and keep it for future reference.
- Remove the vacuum cleaner from the packing and inspect it for damages. Any factory defect or damages occurred during transportation are covered by the guarantee.
- Before using the device for the first time, make sure that the device operating voltage corresponds to the voltage of the local power supply.
-
Do not leave the vacuum cleaner without supervision when connected to the power supply. - Always disconnect the unit from the power supply, when not in use or before maintenance.
-
To reduce the risk of electric shock, do not use the device outdoors or on wet surfaces.
- Do not touch the power cord plug and the device enclosure with wet hands.
- Do not operate the device in places where easily inflammable liquids or aerosols are used or stored, such as benzene or aerosols.
- Do not collect with the vacuum cleaner water or other liquids, burning or smoking cigarettes, matches, smoldering ash, finely dispersed dust, such as from plaster, concrete, flour or ashes, as well as sharp or cutting objects – each of this can lead to serious damage of electric motor. Take into account that these cases are not covered by the guarantee.
- Use and store the device away from sources of heat.
- Do not allow children to use the device like a toy. Special precautions should be taken when the device is used near children or people with impaired capabilities.
- Check the power cord periodically. Do not operate the device if you notice any problems with the device or the power cord.
- To replace the power cord or to repair the device, apply to the authorized service center.
- Do not use the power cord as a carrying handle, do not close the door when the power cord comes through the door, also avoid the power cord to contact any sharp edges or angles.
- When operating the device, do not run the vacuum cleaner over the power cord – you may damage it. Keep the power cord away from the sources of heat.
- Turn on the vacuum cleaner after checking that the collection container filters and the container itself have been installed correctly.
- To ensure the optimum operation use only the accessories supplied with the device.
- The manufacturer does not accept responsibility for malfunctions resulting from the improper use of the device.
PRECAUTIONS
If during cleaning, the suction power of the device has sharply reduced, turn off the device immediately and check if the telescopic tube or the flexible hose are blocked. Switch off the device and disconnect it from the power supply, remove the obstruction and continue cleaning.
- Do not clean using the vacuum cleaner the
ENGLISH
immediate vicinity of very hot surfaces, near ash-trays or where inflammable liquids are stored.
- Make sure your hands are dry when you connect the power cord to the outlet.
- Before cleaning, remove sharp objects from the floor, not to damage pre-filter of HEPA filter.
- Always take the power plug in order to disconnect the device from electrical power; never pull on the power cord.
PREPARING FOR OPERATION
Fully remove the packing. Before turning on the device make sure that the voltage of the local power supply matches the device operating voltage.
Always turn off the device and disconnect the power plug from the outlet when changing the nozzles and also during maintenance.
USING THE VACUUM CLEANER
- Make sure that the collection container (9) and filters (20, 21) are installed correctly.
- Insert the flexible hose nozzle (6) into the inlet air opening (7). To remove the flexible hose, press the clamp buttons and disconnect the hose.
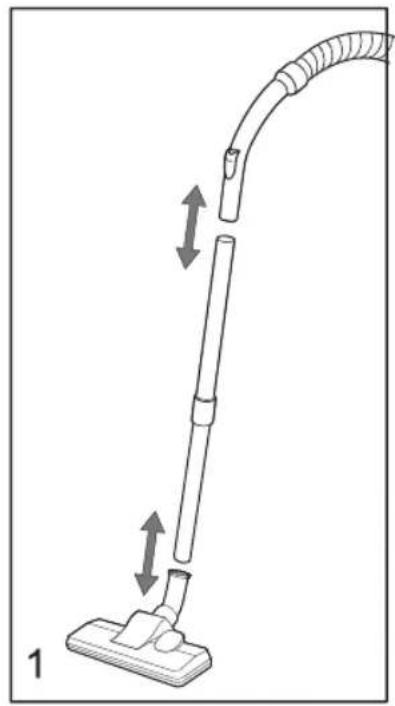
- Attach to the hose handle (4) telescopic tube (2) (Fig.1).
Telescopic tube (2)
- Extend the telescopic tube lower part as needed, for that press the clamp button (Fig.2).
Floor/Carpet brush (1)
- Connect the brush (1) to the telescopic tube (2) (Fig.3).
- Set the Floor/Carpet switch on the brush to the needed position, depending on the type of surface being cleaned (Fig.3).
Furniture brush (22)
- The brush is used specially to clean fabrics surfaces.
Universal brush (23)
- Is used to clean in radiators, crevices, angles and between divan cushions.
- The brush is used to collect dust from the furniture surface, the brush nap prevents from damaging the funiture surface.
INSTRUCTIONS FOR USE
Before the work extend the power cord as desired and insert the cord plug to the power outlet. Yellow mark on the cord alerts about the maximum cable length.
Do not extend the cable above the red mark.
Turn on the vacuum cleaner only after the collection container (9) and its filters (20, 21) have been installed.
- To turn off the device, press the ON/Off button (11).
- To wind the power cord, press the cord wind button (12), hold the cord with you hand to avoid its whipping or damage.
- During cleaning you can adjust the suction power, by turning the control knob (14) clockwise or counterclockwise, and also using mechanical regulator (3), located on the flexible hose handle(4) (Fig.4).
MAINTENANCE
Removing dust from the collection container Always use the vacuum cleaner only when the dust collection container is installed. If in the collection container no HEPA filter (21) or pre-filter (20) is installed, the device electric motor can be damaged, and such cases are not covered by guarantee. Make sure that the filters are installed correctly in the collection container.
- Turn off the vacuum cleaner using the ON/OFF button (11) and disconnect it from the power outlet.
- Press the flexible hose nozzle clamps (6) and disconnect the hose from the device body.
- Press the collection container clamp button (8) and remove the container.
- Press the button (19) to remove dust and sweepings from the container (9).
- Close the container cover (18).
- Install the collection container (9) on its place, by slightly pressing on it until clicking is heard (Fig.5).
NOTE: we recommend cleaning the collection container after each usage of the device.
Cleaning filters (20, 21) in the collection container
Take care that the filters in the container are clean, as the device effectiveness depends on it. Clean the HEPA filter no less than three-four times a year, or oftener, if the filter becomes
ENGLISH
too clogged. Replacing the HEPA filter is done as necessary, but no less than once a year. We recommend cleaning the pre-filter (20) as it becomes dirty.
- Turn off the device, disconnect it from the power supply, remove the container and remove dust from it.
- Holding the bottom stand of the filter (19 21), rotate it counterclockwise and remove the filter (Fig. 6).
• Take and clean the pre-filter (20) and HEPA filter (21) under the running slightly warm water. Do not clean the filters in a dish washer. - Dry the filters. Do not use a hair drier to dry the filters (Fig. 7).
- Wash the container (9) and dry it (Fig.8).
Install the collection container:
- Fixate the filters block (20, 21) in place, by turning it counterclockwise until it stops.
- Close the container cover (18).
• Install the container onto its place, by slightly pressing on it till it fully stops.
Cleaning the outlet filter
- Open the outlet filter cover (16).
- Remove the filter (17) and rinse it under the running slightly warm water and dry.
• Install the filter (17) onto its place and close the cover (16) (Fig.9).
NOTE: clean the outlet filter (17) no less than once a year.
Vacuum cleaner body
- Wipe the device body with a wet cloth.
- Do not allow any liquid to get into the device body.
- Do not use solvents or abrasive cleaners to clean the device body.
Storage
Use the brush storage place (15) when the vacuum cleaner is not used or is stored.
Specifications:
AC power voltage: 220V \~ 50 Hz
Power consumption: 1600 W
Suction power: 300 W
Dust container capacity: 1.2 liter
Noise level: 76 dB
The manufacturer reserves the right to change the device's characteristics without prior notice.
Service life - no less than 5 years.
GUARANTEE
Details regarding guarantee conditions can be obtained from the dealer from whom the appliance was purchased. The bill of sale or receipt must be produced when making any claim under the terms of this guarantee.

This product conforms to the EMC-Requirements as laid down by the Council Directive 89/336/EEC and to the Low Voltage Regulation (73/23 EEC)
DEUTSCH
STAUBSAUGER
BESCHREIBUNG
- MANUAL INSTRUCTION
- ENGLISH
- VACUUM CLEANER
- DESCRIPTION
- DUST COLLECTION CONTAINER (Fig. A).
- ADDITIONAL NOZZLES
- SAFETY INSTRUCTIONS
- PRECAUTIONS
- PREPARING FOR OPERATION
- USING THE VACUUM CLEANER
- Telescopic tube (2)
- Floor/Carpet brush (1)
- Furniture brush (22)
- Universal brush (23)
- INSTRUCTIONS FOR USE
- MAINTENANCE
- Cleaning filters (20, 21) in the collection container
- Install the collection container:
- Cleaning the outlet filter
- Vacuum cleaner body
- Storage
- Specifications:
- Service life - no less than 5 years.
- GUARANTEE
- DEUTSCH
- STAUBSAUGER
- BESCHREIBUNG
Brand : Vitek
Model : VT-1837
Category : Vacuum Cleaner