
PRO RL1100-T - Saw Cocraft - Free user manual and instructions
Find the device manual for free PRO RL1100-T Cocraft in PDF.


| Product Type | Circular Saw |
| Model | PRO RL1100-T |
| Brand | Cocraft |
| Power Supply | AC 230V, 50Hz |
| Power Consumption | 1100 W |
| No-Load Speed | 4500 rpm |
| Blade Diameter | 185 mm (7-1/4") |
| Blade Bore | 20 mm |
| Max Cutting Depth at 90° | 64 mm |
| Max Cutting Depth at 45° | 48 mm |
| Bevel Capacity | 0° - 45° |
| Net Weight | 3.9 kg |
| Dimensions (L x W x H) | 310 x 250 x 280 mm |
| Dust Extraction | Compatible with 35 mm vacuum hose |
| Safety Features | Blade guard, safety switch, spindle lock |
| Maintenance | Regular cleaning of vents, blade replacement as needed |
| Spare Parts Availability | Blades, carbon brushes, guard assemblies available |
| Repairability | Consumer replaceable parts: blade, brushes |
| Certifications | CE, EAC |
| Included Accessories | Blade, rip fence, wrench |
Frequently Asked Questions - PRO RL1100-T Cocraft
User questions about PRO RL1100-T Cocraft
0 question about this device. Answer the ones you know or ask your own.
Ask a new question about this device
Download the instructions for your Saw in PDF format for free! Find your manual PRO RL1100-T - Cocraft and take your electronic device back in hand. On this page are published all the documents necessary for the use of your device. PRO RL1100-T by Cocraft.
USER MANUAL PRO RL1100-T Cocraft
RECIPROCATING SAW 1100W
PRO RL1100-T
TIGERSÅG
PUUKKOSAHA
MULTISAG
SÄBELSÄGE

Important!
Read the entire instruction manual carefully and make sure that you fully understand it before you use the equipment. Keep the manual for future reference.
Viktig information:
Original instructions
Bruksanvisning i original
Please read the entire instruction manual before using the product and then save it for future reference. We reserve the right for any errors in text or images and any necessary changes made to technical data.
In the event of technical problems or other queries, please contact our Customer Services (see address details on the back).
Safety
General Power Tool Safety Warnings
WARNING! Read all safety warnings and all instructions. Failure to follow the warnings and instructions may result in electric shock, fire and/or serious injury.
SAVE ALL WARNINGS AND INSTRUCTIONS FOR FUTURE REFERENCE.
The term “power tool” in the warnings refers to your mains-operated (corded) power tool or battery-operated (cordless) power tool.
1) Work area safety
a) Keep work area clean and well lit. Cluttered or dark areas invite accidents.
b) Do not operate power tools in explosive atmospheres, such as in the presence of flammable liquids, gases or dust. Power tools create sparks which may ignite the dust or fumes.
c) Keep children and bystanders away while operating a power tool.
Distractions can cause you to lose control.
2) Electrical safety
a) Power tool plugs must match the outlet. Never modify the plug in any way. Do not use any adapter plugs with earthed (grounded) power tools. Unmodified plugs and matching outlets will reduce risk of electric shock.
b) Grounded surfaces, such as pipes, radiators, ranges and refrigerators. There is an increased risk of electric shock if your body is earthed or grounded.
c) Do not expose power tools to rain or wet conditions. Water entering a power tool will increase the risk of electric shock.
d) Do not abuse the cord. Never use the cord for carrying, pulling or unplugging the power tool. Keep cord away from heat, oil, sharp edges or moving parts. Damaged or entangled cords increase the risk of electric shock.
e) When operating a power tool outdoors, use an extension cord suitable for outdoor use. Use of a cord suitable for outdoor use reduces the risk of electric shock.
f) If operating a power tool in a damp location is unavoidable, use a residual current device (RCD) protected supply. Use of an RCD reduces the risk of electric shock. Note: The term “residual current device (RCD)” may be replaced by the term “ground fault circuit interrupter (GFCI)” or “earth leakage circuit breaker (ELCB)”.
3) Personal safety
a) Stay alert, watch what you are doing and use common sense when operating a power tool. Do not use a power tool while you are tired or under the influence of drugs, alcohol or medication. A moment of inattention while operating power tools may result in serious personal injury.
b) Use personal protective equipment. Always wear eye protection. Protective equipment such as dust mask, non-skid safety shoes, hard hat, or hearing protection used for appropriate conditions will reduce personal injuries.
c) Prevent unintentional starting. Ensure the switch is in the off-position before connecting to power source and/or battery pack, picking up or carrying the tool. Carrying power tools with your finger on the switch or energising power tools that have the switch on invites accidents.
d) Remove any adjusting key or wrench before turning the power tool on. A wrench or a key left attached to a rotating part of the power tool may result in personal injury.
e) Do not overreach. Keep proper footing and balance at all times. This enables better control of the power tool in unexpected situations.
f) Dress properly. Do not wear loose clothing or jewellery. Keep your hair, clothing and gloves away from moving parts. Loose clothes, jewellery or long hair can be caught in moving parts.
g) If devices are provided for the connection of dust extraction and collection facilities, ensure these are connected and properly used. Use of dust collection can reduce dust-related hazards.
4) Power tool use and care
a) Do not force the power tool. Use the correct power tool for your application. The correct power tool will do the job better and safer at the rate for which it was designed.
b) Do not use the power tool if the switch does not turn it on and off. Any power tool that cannot be controlled with the switch is dangerous and must be repaired.
c) Disconnect the plug from the power source and/or the battery pack from the power tool before making any adjustments, changing accessories, or storing power tools. Such preventive safety measures reduce the risk of starting the power tool accidentally.
d) Store idle power tools out of the reach of children and do not allow persons unfamiliar with the power tool or these instructions to operate the power tool. Power tools are dangerous in the hands of untrained users.
e) Maintain power tools. Check for misalignment or binding of moving parts, breakage of parts and any other condition that may affect the power tool's operation. If damaged, have the power tool repaired before use. Many accidents are caused by poorly maintained power tools.
f) Keep cutting tools sharp and clean. Properly maintained cutting tools with sharp cutting edges are less likely to bind and are easier to control.
g) Use the power tool, accessories and tool bits etc. in accordance with these instructions, taking into account the working conditions and the work to be performed. Use of the power tool for operations different from those intended could result in a hazardous situation.
5) Service
a) Have your power tool serviced by a qualified repair person using only identical replacement parts. This will ensure that the safety of the power tool is maintained.
Specific safety instructions for reciprocating saws
Warning: Always disconnect the plug from the mains before adjusting, servicing or performing maintenance on the machine.
- If the mains lead is damaged it should only be replaced by the retailer.
- Keep your hands away from the blade and other moving parts. Do not reach under the workpiece being sawed. The blade or your hand could be out of your sight.
- Never put your hand or finger between the pendulum arm and gearbox. There is a risk of crushing.
- Do not drill into walls or other places where there might be hidden electric cables. If it is necessary to saw in any case: Remove all fuses and cut off all the power supply to any wiring circuits which may be hidden behind the wall. Grip only the plastic parts of the reciprocating saw. Never touch any metal parts of the saw when cutting in areas where there might be live electrical wires.
- Do not use blunt or damaged saw blades. Bent saw blades can easily break or cause kickback.
- Start the saw and let it get up to speed before starting to cut.
- Fasten smaller workpieces with a clamp, vice, etc. before beginning to saw. It is easy to lose control over the machine on pieces that bend or begin to vibrate.
- Make sure that the settings are correct and that the blade is securely fastened in the blade holder before beginning to saw.
Product safety symbols

Read the entire instruction manual.

Always use ear defenders, safety goggles/visor and a face mask.
Product description
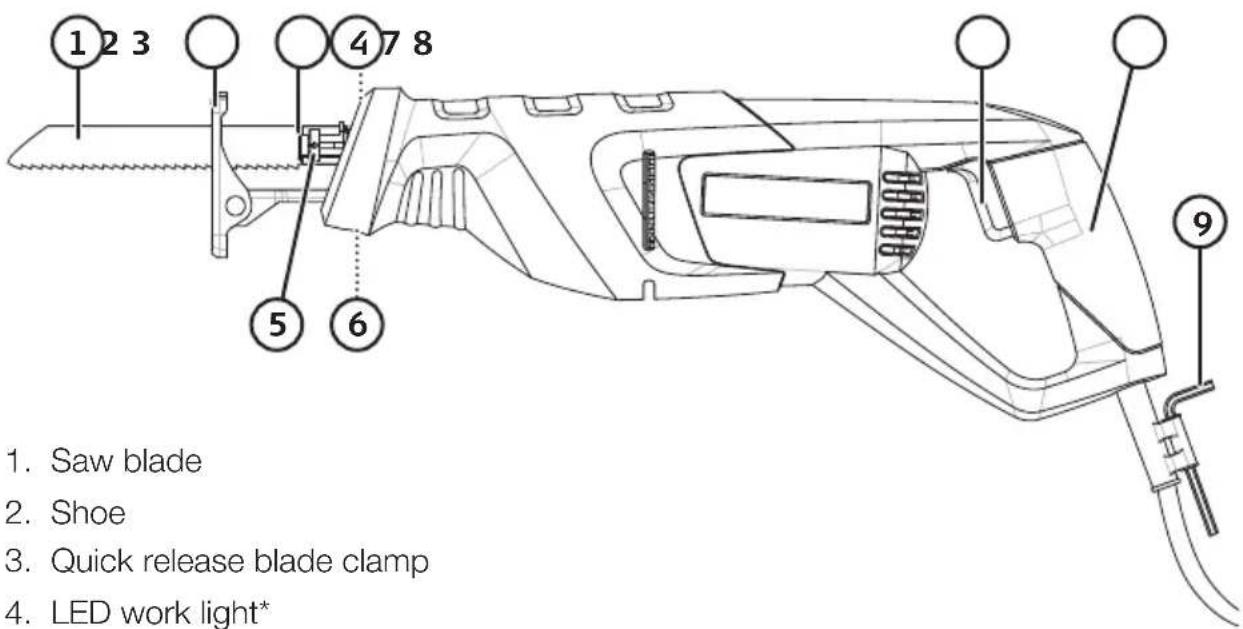
- Saw blade
- Shoe
- Quick release blade clamp
- LED work light*
- Tool-free blade clamp release
- Shoe retaining screws
- Power trigger
- Soft-grip handle
- Hex key for adjusting the footplate
* The brightness of the light changes in relation to the speed of the motor and the light shines brightest when the saw is run at full speed.
Assembly and setup
Note: Always unplug the mains plug from the electrical socket before carrying out any assembly, adjustment or service.
Fitting and replacing the blade
Fitting the blade
natural_image
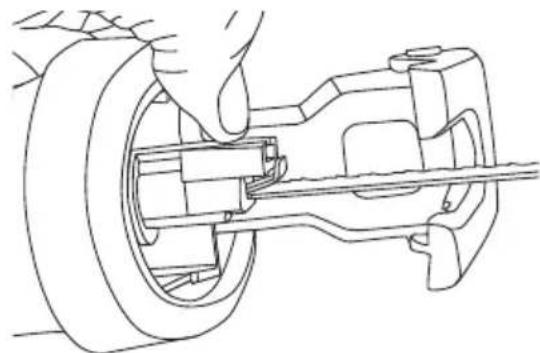
Technical line drawing of a car tire assembly with a hand adjusting the wheel (no text or symbols)- Slide back the clamp release lever (5) and insert the saw blade until it touches the bottom of the blade clamp.
natural_image
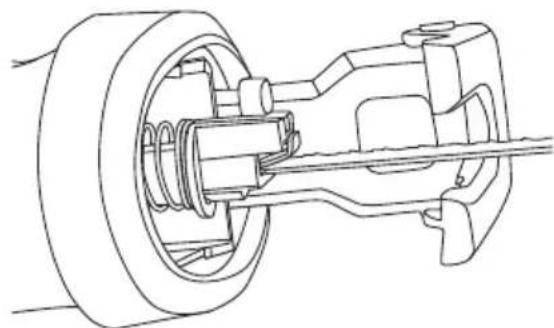
Technical line drawing of a mechanical assembly with gears and shafts (no text or symbols)- Release the blade clamp release lever. Make sure that the lever springs all the way back to its original position and that the blade is securely clamped (pull it to check).
Note: Wear protective gloves as the blade is sharp.
Replacing the blade
Slide back the clamp release lever (5) on the blade clamp, remove the saw blade and replace it with a new one as described above.
Adjusting the shoe
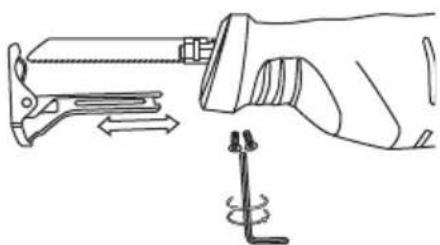
The shoe can be moved in and out for different depths of cut. Undo the two retaining screws on the underside using the provided hex key (located on the mains lead).
natural_image
Line drawing of a hand holding a tool with a spring, showing motion and angle (no text or symbols)Operating instructions
• Make sure that the saw blade and the shoe are both locked before starting to saw.
- If necessary, secure the workpiece in a vice or with clamps. Make sure that the workpiece is fastened down and cannot move while you are sawing it. Especially when working on small, light workpieces.
- Mark the cut line clearly before starting to cut.
- Make sure that the shoe is against the workpiece throughout the entire cut, otherwise you risk losing control over the saw.
- Hold the saw in a firm grip at a comfortable working distance from the workpiece and make sure that the blade is not touching anything when the saw is turned on.
- Make sure that the mains lead cannot become tangled in the saw blade and be damaged.
- Start the saw by pressing in the power trigger.
- Place the shoe against the workpiece and line the blade up with the cut line.
- Do not overload the saw – let it work at its own pace. It is the saw blade that should do the work; do not force the blade into the workpiece.
Power trigger
- The power trigger switches the saw on and off and also controls the speed.
The more the power trigger is squeezed, the higher the speed the blade reciprocates. - The speed should be adjusted to suit the material and work situation.
When cutting aluminium or plastic for example, a lower speed is recommended.
Cutting flush to a surface
Tip: By using a flexible bi-metallic blade, it is possible to saw with a bowed blade. This can be useful for e.g. cutting protruding pipes off flush to a wall.
- Lay the side of the saw blade flat against the surface/wall and tilt the saw so that the side of the shoe rests against the surface/wall.
- Lay a thin piece of hard plastic between the blade and the surface to protect the surface.
Plunge cutting
Plunge cutting must only be done into soft materials such as wood, fibreboard, plasterboard or similar. Use only short saw blades for plunge cutting.
- Angle the saw with the edge of the shoe resting on the workpiece and the blade free in the air.
- Start the saw and let it come up to speed.
- Keeping the shoe resting on the workpiece, slowly tilt the saw so that the blade plunges tip-first into the workpiece. Hold the saw firmly and do not rush this task.
- When you have tilted the saw until the shoe is flat on the workpiece you can continue sawing through the material as normal.
Cutting metal
Use a sharp blade specially designed for cutting metal. Use cutting oil* for cooling and lubrication while cutting metal. Do not overload the saw – let it work at its own pace.
Care and maintenance
- Unplug the mains lead from the wall socket.
- Clean the saw by wiping it with a damp cloth. Use only mild cleaning agents, never solvents or corrosive chemicals.
- Remove all dirt from around the motor housing ventilation slots.
- If the product is not to be used for an extended period, it should be unplugged and stored in a dry and dust-free location out of reach of children.
Responsible disposal
This symbol indicates that this product should not be disposed of with general household waste. This applies throughout the entire EU. In order to prevent any harm to the environment or health hazards caused by incorrect waste disposal, the product must be handed in for recycling so that the material can be disposed of in a responsible manner. When recycling your product, take it to your local collection facility or contact the place of purchase. They will ensure that the product is disposed of in an environmentally sound manner.
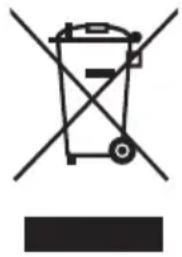
natural_image
Symbol of a trash bin with crossed-out lines and a blank rectangular base (no text or labels)Specifications
Power supply 230 V AC, 50 Hz
Power 1100 W
No-load speed 0–2700/min
Cutting capacity
in wood max 300 mm
Cutting capacity
in metal section max 100 mm
Stroke length 28 mm
LpA (sound pressure) 89 dB(A), KpA: 3 dB(A)
LwA (sound power) 100 dB(A), KwA: 3 dB(A)
Vibration when
sawing board a h, B = 15.26 m/s^2, K_B = 1.5 m/s^2
Vibration when
sawing wooden beam a h, WB = 10.92 m/s^2, KWB = 1.5 m/s^2
Tigersåg
Art.nr 40-9924 Modell PSR110H.1
natural_image
Line drawing of a car tire assembly with a hand adjusting the wheel (no text or symbols)natural_image
Technical line drawing of a mechanical assembly with no visible text or symbolsnatural_image
Line drawing of a hand holding a tool with a spring, showing motion and assembly (no text or symbols)Användning
natural_image
Symbol of a trash bin with crossed lines indicating no waste or restriction, and a solid black rectangle below (no text or labels)Specifikationer
natural_image
Technical line drawing of a car tire assembly with a hand adjusting the wheel (no text or symbols)natural_image
Technical line drawing of a mechanical assembly with no visible text or symbolsnatural_image
Line drawing of a hand holding a tool with a spring, showing motion and angle (no text or symbols)Bruk
natural_image
Symbol of a trash bin with crossed-out lines and a blank rectangular base (no text or labels)Spesifikasjoner
natural_image
Technical line drawing of a car tire assembly with a hand adjusting the wheel (no text or symbols)natural_image
Technical line drawing of a mechanical assembly with no visible text or symbolsnatural_image
Line drawing of a hand holding a saw with a spring scale, showing motion and angle (no text or symbols)Käyttö
natural_image
Technical line drawing of a car tire assembly with a hand adjusting the wheel (no text or symbols)natural_image
Technical line drawing of a mechanical assembly with gears and shafts (no text or symbols)natural_image
Line drawing of a hand holding a tool with a spring, showing motion direction (no text or symbols)Benutzung
natural_image
Symbol of a trash bin crossed out by two crossed lines, with no text or labels present.Technische Daten
Declaration of Conformity
Declares that this product complies with the requirements of the following directives and standards
Machinery Directive 2006/42/EC
EN 60745-1:2009
+A11:2010
EN 60745-2-11:2010
EMC Directive 2014/30/EU
EN 55014-1:2006
+A1:2009+A2:2011
EN 55014-2:2015
EN 61000-3-2:2006
+A1:2009+A2:2009
EN 61000-3-3:2013
Henrik Alfredsson
Manager Technique & Quality
Insjön, Sweden, 2017-01-31
CLAS OHLSON AB, SE-793 85 INSJÖN, SWEDEN
Sverige
Postal 10 - 13 Market Place
Kingston Upon Thames
Surrey
KT1 1JZ
Deutschland
Kundenservice Hotline: 040 2999 78111
E-Mail: kundenservice@clasohlson.de
Homepage
www.clasohlson.de

- RECIPROCATING SAW 1100W
- PRO RL1100-T
- Important!
- Viktig information:
- Safety
- General Power Tool Safety Warnings
- SAVE ALL WARNINGS AND INSTRUCTIONS FOR FUTURE REFERENCE.
- 1) Work area safety
- 2) Electrical safety
- 3) Personal safety
- 4) Power tool use and care
- 5) Service
- Specific safety instructions for reciprocating saws
- Product safety symbols
- Product description
- Assembly and setup
- Fitting and replacing the blade
- Replacing the blade
- Adjusting the shoe
- Operating instructions
- Power trigger
- Cutting flush to a surface
- Plunge cutting
- Cutting metal
- Care and maintenance
- Responsible disposal
- Specifications
- Tigersåg
- Användning
- Specifikationer
- Bruk
- Spesifikasjoner
- Käyttö
- Benutzung
- Technische Daten
- Declaration of Conformity
- Sverige
- Deutschland
Brand : Cocraft
Model : PRO RL1100-T
Category : Saw