HT 10 - Saw Cocraft - Free user manual and instructions
Find the device manual for free HT 10 Cocraft in PDF.


| Product Type | Table Saw |
| Brand | Cocraft |
| Model | HT 10 |
| Power Supply | 220–240 V AC, 50 Hz |
| Power (S1) | 1800 W |
| Power (S6 25%) | 2000 W |
| No-Load Speed | 5000 rpm |
| Saw Blade Diameter | 250 mm |
| Saw Blade Arbor | 30 mm |
| Saw Blade Thickness | 2.8 mm |
| Saw Teeth | 24 |
| Riving Knife Thickness | 2 mm |
| Table Size (without extension) | 583 × 563 mm |
| Table Size (with extension) | 583 × 895 mm |
| Blade Tilt Range | 0–45° |
| Max Cutting Height at 90° | 85 mm |
| Max Cutting Height at 45° | 65 mm |
| Dust Extraction Port Diameter | 35 mm |
| Weight | Approx. 22 kg |
| Sound Pressure Level (LpA) | 94.0 dB(A) (K=3 dB) |
| Sound Power Level (LwA) | 107.0 dB(A) (K=3 dB) |
| Vibration Emission | < 1.16 m/s² |
| Protection Class | II (Double Insulated) |
| Included Accessories | Leg set, push stick, table extension, mitre guide, riving knife, suction hose, blade guard, rip fence, table insert, saw blade, spanners |
| Safety Features | No-volt release switch, overload cut-out, blade guard, riving knife, push stick |
| Maintenance | Clean with damp cloth, vacuum sawdust; replace blade when blunt |
Frequently Asked Questions - HT 10 Cocraft
User questions about HT 10 Cocraft
0 question about this device. Answer the ones you know or ask your own.
Ask a new question about this device
Download the instructions for your Saw in PDF format for free! Find your manual HT 10 - Cocraft and take your electronic device back in hand. On this page are published all the documents necessary for the use of your device. HT 10 by Cocraft.
USER MANUAL HT 10 Cocraft
Read the entire instruction manual carefully and make sure that you fully understand it before you use the equipment. Keep the manual for future reference.
Viktig information:
Original instructions
Bruksanvisning i original
Originalbruksanvisning
For Assembly go to page 54
Please read the entire instruction manual before using the product and then save it for future reference.
We reserve the right for any errors in text or images and any necessary changes made to technical data.
In the event of technical problems or other queries, please contact our Customer Services (see address details on the back).
Warning: Failure to follow the safety instructions could result in serious injury, fatality or damage to the product.

Important: Read the instruction manual.
Wear ear protection.
Wear a respiratory mask.
Wear eye protection.
Wear protective gloves.
Risk of personal injury. Keep hands away from the rotating saw blade.
Protection class II. Double insulated
General power tool safety warnings
WARNING: Read all safety warnings, instructions, illustrations and specification provided with this power tool. Failure to follow all instructions listed below may result in electric shock, fire and/or serious injury.
Save all warnings and instructions for future reference.
The term “power tool” in the warnings refers to your mains-operated (corded) power tool or battery-operated (cordless) power tool.
1) Work area safety
a) Keep the work area clean and well lit. Cluttered or dark areas invite accidents.
b) Do not operate power tools in explosive atmospheres, such as in the presence of flammable liquids, gases or dust. Power tools create sparks which may ignite the dust or fumes.
c) Keep children and bystanders away while operating a power tool. Distractions can cause you to lose control.
2) Electrical safety
a) Power tool plugs must match the outlet. Never modify the plug in any way. Do not use any adapter plugs with earthed (grounded) power tools. Unmodified plugs and matching outlets will reduce risk of electric shock.
b) Avoid body contact with earthed or grounded surfaces, such as pipes, radiators, ranges and refrigerators. There is an increased risk of electric shock if your body is earthed or grounded.
c) Do not expose power tools to rain or wet conditions. Water entering a power tool will increase the risk of electric shock.
d) Do not abuse the cord. Never use the cord for carrying, pulling or unplugging the power tool. Keep cord away from heat, oil, sharp edges or moving parts. Damaged or entangled cords increase the risk of electric shock.
e) When operating a power tool outdoors, use an extension cord suitable for outdoor use. Use of a cord suitable for outdoor use reduces the risk of electric shock.
f) If operating a power tool in a damp location is unavoidable, use a residual current device (RCD) protected supply. Use of an RCD reduces the risk of electric shock.
3) Personal safety
a) Stay alert, watch what you are doing and use common sense when operating a power tool. Do not use a power tool while you are tired or under the influence of drugs, alcohol or medication. A moment of inattention while operating power tools may result in serious personal injury.
b) Use personal protective equipment. Always wear eye protection. Protective equipment such as a dust mask, non-skid safety shoes, hard hat or hearing protection used for appropriate conditions will reduce personal injuries.
c) Prevent unintentional starting. Ensure the switch is in the off-position before connecting to power source and/or battery pack, picking up or carrying the tool. Carrying power tools with your finger on the switch or energising power tools that have the switch on invites accidents.
d) Remove any adjusting key or wrench before turning the power tool on. A wrench or a key left attached to a rotating part of the power tool may result in personal injury.
e) Do not overreach. Keep proper footing and balance at all times. This enables better control of the power tool in unexpected situations.
f) Dress properly. Do not wear loose clothing or jewellery. Keep your hair and clothing away from moving parts. Loose clothes, jewellery or long hair can be caught in moving parts.
g) If devices are provided for the connection of dust extraction and collection facilities, ensure these are connected and properly used. Use of dust collection can reduce dust-related hazards.
h) Do not let familiarity gained from frequent use of tools allow you to become complacent and ignore tool safety principles. A careless action can cause severe injury within a fraction of a second.
4) Power tool use and care
a) Do not force the power tool. Use the correct power tool for your application. The correct power tool will do the job better and safer at the rate for which it was designed.
b) Do not use the power tool if the switch does not turn it on and off. Any power tool that cannot be controlled with the switch is dangerous and must be repaired.
c) Disconnect the plug from the power source and/or remove the battery pack, if detachable, from the power tool before making any adjustments, changing accessories, or storing power tools. Such preventive safety measures reduce the risk of starting the power tool accidentally.
d) Store idle power tools out of the reach of children and do not allow persons unfamiliar with the power tool or these instructions to operate the power tool. Power tools are dangerous in the hands of untrained users.
e) Maintain power tools and accessories. Check for misalignment or binding of moving parts, breakage of parts and any other condition that may affect the power tool's operation. If damaged, have the power tool repaired before use. Many accidents are caused by poorly maintained power tools.
f) Keep cutting tools sharp and clean. Properly maintained cutting tools with sharp cutting edges are less likely to bind and are easier to control.
g) Use the power tool, accessories and tool bits etc. in accordance with these instructions, taking into account the working conditions and the work to be performed. Use of the power tool for operations different from those intended could result in a hazardous situation.
h) Keep handles and grasping surfaces dry, clean and free from oil and grease. Slippery handles and grasping surfaces do not allow for safe handling and control of the tool in unexpected situations.
5) Service
a) Have your power tool serviced by a qualified repair person using only identical replacement parts. This will ensure that the safety of the power tool is maintained.

WARNING
This electric tool generates an electromagnetic field during operation. This field can impair active or passive medical implants under certain conditions. In order to prevent the risk of serious or deadly injuries, we recommend that persons with medical implants consult with their physician and the manufacturer of the medical implant prior to operating the electric tool.
Safety instructions for table saws
1) Guarding related warnings
a) Keep guards in place. Guards must be in working order and be properly mounted. A guard that is loose, damaged, or is not functioning correctly must be repaired or replaced.
b) Always use a saw blade guard and riving knife for every through-cutting operation. For through-cutting operations where the saw blade cuts completely through the thickness of the workpiece, the guard and other safety devices help reduce the risk of injury.
c) After completing working procedures where the removal of the blade guard and/or riving knife is necessary (e.g. rebating, cutting grooves or other procedures where the workpiece needs to be turned over), the guard must be reattached immediately. The guard helps to reduce the risk of injury.
d) Make sure the saw blade is not touching the guard, riving knife or the workpiece before the switch is turned on. Inadvertent contact of these items with the saw blade could cause a hazardous condition.
e) Adjust the riving knife as described in this instruction manual. Incorrect spacing, positioning and alignment can make the riving knife ineffective in reducing the likelihood of kickback.
f) For the riving knife to work, it must be engaged in the workpiece. The riving knife is ineffective when cutting workpieces that are too short to be engaged with the riving knife. Under these conditions a kickback cannot be prevented by the riving knife.
g) Use the appropriate saw blade for the riving knife. For the riving knife to function properly, the saw blade diameter must match the appropriate riving knife and the body of the saw blade must be thinner than the thickness of the riving knife and the cutting width of the saw blade must be wider than the thickness of the riving knife.
2) Cutting procedure warnings
a) ⚠️ DANGER: Never place your hands and fingers in the sawing area or close to the saw blade. A moment of carelessness or a slip could steer your hand towards the saw blade and result in serious injuries.
b) Feed the workpiece into the saw blade only against the direction of rotation. Feeding the workpiece in the same direction as the saw blade is rotating above the table may lead to the workpiece and your hand being drawn into the saw blade.
c) Never use the mitre gauge to feed the workpiece when ripping and do not use the rip fence as a length stop when cross cutting with the mitre gauge. Guiding the workpiece with the rip fence and the mitre gauge at the same time increases the likelihood of saw blade binding and kickback.
d) When ripping, always apply the workpiece feeding force between the fence and the saw blade. Use a push stick when the distance between the fence and the saw blade is less than 150 mm, and use a push block when this distance is less than 50 mm. These working aids will help ensure that your hands remain a safe distance from the saw blade.
e) Only use the push stick provided by the manufacturer, or a push stick that has been produced in accordance with the instructions. The push stick ensures a sufficient distance between the hand and saw blade.
f) Never use a damaged or partially sawn push stick. A damaged push stick may break and lead to your hand running into the saw blade.
g) Never work "freehand". Always use either the rip fence or the mitre gauge to position and guide the workpiece. "Freehand" means using your hands to support or guide the workpiece, in lieu of a rip fence or mitre gauge. Free-handed sawing leads to incorrect alignment, jamming and kickback.
h) Never reach around or over a rotating saw blade. Reaching for a workpiece can lead to accidental contact with the rotating saw blade.
i) Support long and/or wide workpieces at the rear and/or side of the saw table, so that they remain horizontal. Long and/or wide workpieces tend to tilt at the edge of the saw table; this leads to a loss of control, jamming of the saw blade and kickback.
j) Feed the workpiece steadily and evenly. Do not bend or twist the workpiece. If the saw blade jams, switch off the saw immediately, unplug the saw and remedy the cause of the jam. IJamming of the saw blade by the workpiece can cause kickback or stall the motor.
k) Do not remove pieces of cut-off material whilst the saw is running. The material may become trapped between the saw blade guard and the fence the saw blade and may draw your fingers into the saw blade during removal. Switch the saw off and wait until the saw blade has come to a standstill, before removing the material.
When ripping workpieces that are thinner than 2 mm, use an additional fence in contact with the table surface. Thin workpieces can wedge under the rip fence and lead to kickback.
3) Kickback - causes and related warnings
Kickback is a sudden reaction of the workpiece to a catching or jamming saw blade, or a cut created in the workpiece at an angle to the saw blade, or if part of the workpiece becomes jammed between the saw blade and the rip fence or other fixed object.
In the majority of cases, with kickback the workpiece is caught by the rear part of the saw blade, lifted off the saw table and thrust in the direction of the operator. Kickback is the result of saw misuse and/or incorrect operating procedures or conditions and can be avoided by taking proper precautions as given below.
a) Never stand directly in line with the saw blade. Always position your body on the same side of the saw blade as the fence. With kickback, the workpiece may be thrust at high speed towards those persons who stand in front of, or in line with the saw blade.
b) Never reach over or behind the saw blade to pull or support the workpiece. This can result in accidental contact with the saw blade, or kickback can lead to your fingers being drawn into the saw blade.
c) Never hold and push the workpiece against the rotating saw blade during sawing. Pushing the workpiece against the saw blade during sawing will lead to jamming and kickback.
d) Align the fence parallel to the saw blade. A misaligned fence will push the workpiece against the saw blade and create kickback.
e) Use a featherboard to hold the workpiece against the table when not sawing completely through the workpiece such as in rebating, cutting slots or ripping. The featherboard will help to hold the workpiece in the event of kickback.
f) Use extra caution when making a cut into blind areas of assembled workpieces. The protruding saw blade can saw into objects that could cause a kickback.
g) Support large panels, in order to avoid the risk of kickback due to a pinched saw blade. Large panels may bend under their own weight. Panels must be supported in all areas where they overhang the table surface.
h) Use extra caution when cutting a workpiece that is twisted, knotted, warped or does not have a straight edge to guide it with a mitre gauge or along the fence. A twisted, knotted or warped workpiece is unstable and results in incorrect alignment of the kerf with the saw blade, jamming and kickback.
i) Never saw multiple workpieces stacked on top of each other, or one behind the other. The saw blade could engage in one or more parts and result in kickback.
j) When restarting the saw with the saw blade in the workpiece, centre the saw blade in the kerf so that the saw teeth are not engaged in the material. If the saw blade binds, it can lift the workpiece and cause kickback when the saw is restarted.
k) Always keep saw blades clean, sharp and sufficiently set. Never use warped saw blades or saw blades with cracked or broken teeth. Sharp and correctly set saw blades minimise binding, stalling and kickback.
4) Table saw operating procedure warnings
a) Switch off the table saw and disconnect it from the power supply before removing the table insert, changing the saw blade, making adjustments to the riving knife or the saw blade guard, and if the machine is left unattended. Precautionary measures serve to prevent accidents.
b) Never leave the table saw running unattended. Switch the saw off and don't leave it until it has come to a complete standstill. An unattended running saw poses an uncontrolled hazard.
c) Set up the table saw in a location that is level and well ventilated, and where it can stand safely and remain balanced. The installation site must provide sufficient space for easily handling the size of your workpieces. Cramped, dark working areas, and uneven, slippery floors may lead to accidents.
d) Regularly clean and remove sawdust from beneath the saw table and/or from the dust extraction system. Accumulated sawdust is flammable and can self-ignite.
e) Secure the table saw. A table saw that is not properly secured may move or topple over.
f) Remove tools and scraps of wood from the table before switching the saw on. Distractions and potential jams could be dangerous.
g) Always use saw blades with correct size and shape (diamond versus round) of arbor holes.
Saw blades that do not match the mounting hardware of the saw will run off-centre, causing loss of control.
h) Never use damaged or incorrect saw blade mounting materials, such as flanges, washers, screws or nuts. These saw blade mounting materials have been specially designed for your saw, for optimum performance and operational safety.
i) Never stand on the table saw and do not use it as a step stool. Serious injuries can arise if the tool topples or if you accidentally come into contact with the saw blade.
j) Make sure that the saw blade is installed to rotate in the correct direction. Do not use grinding discs, wire brushes or abrasive wheels on the table saw. Incorrect fitting of the saw blade or the use of accessories that have not been recommended can result in serious injuries.
Safety instructions for handling saw blades
- Only use tools which you know how to handle.
- Pay attention to the maximum speed. The maximum speed stated on the tool being used must not be exceeded. Keep within the speed range if one is specified
- Note the direction of rotation of the motor and saw blade.
- Do not use a cracked saw blade. Never attempt to repair a cracked saw blade. Damaged blades must be replaced.
- Do not use any loose reducing rings or bushes to reduce the size of arbor holes on circular saw blades.
- Handle saw blades with care. It is best to store them in their original packaging or special containers. Always wear protective gloves to improve your grip and further reduce the risk of injury.
- Make sure that all safety devices are fitted correctly before installing the saw blade.
- Make sure that the saw blade fulfills the technical specifications and is correctly fitted.
- The saw blade supplied should only be used for sawing wood, never for sawing metal.
- Always select the correct saw blade for the material to be cut.
- Make sure that the diameter of the saw blade corresponds to the specifications of the saw.
- Use only saw blades that are marked with an equal or higher rotation speed than that marked on the saw.
- Use only saw blades recommended by the manufacturer which conform to EN 847-1, if intended for cutting wood or similar materials.
- Wear suitable personal protective equipment, such as:
- hearing protection
- protective gloves when handling saw blades.
- WARNING: When changing the saw blade, make sure that the Kerf of the blade is not less than the thickness of the riving knife and that the thickness of the blade is not greater than the thickness of the riving knife.
- When sawing wood and plastics, avoid overheating the saw teeth. Reduce the feed speed to avoid the plastic melting.
Residual risks
This table saw has been constructed in accordance with the latest technology and generally recognised safety regulations. Nevertheless, hazardous situations cannot be ruled out during operation.
- There is a risk of electric shock if unsuitable electrical equipment is used to connect the saw to the power supply.
- In addition, concealed residual risks may be present in spite of all the precautions that have been taken.
- Residual risks can be minimised by observing the safety warnings and by using the table saw for the correct purpose and in the manner described in this instruction manual.
- Excessive feed speed and force on the workpiece during sawing will quickly damage the saw blade. This may result in a reduction in the performance of the machine, as well as a reduction in the cutting accuracy.
- Avoid switching the machine on by accident: the power button must not be pressed in when the plug is inserted into the wall socket
- Use the saw blade which is recommended in this manual. This will ensure the optimal performance of your saw.
- Keep your hands away from the working area when the machine is in operation.
- Before you carry out any adjustments or servicing work, turn the device off and remove the mains plug.
Product description
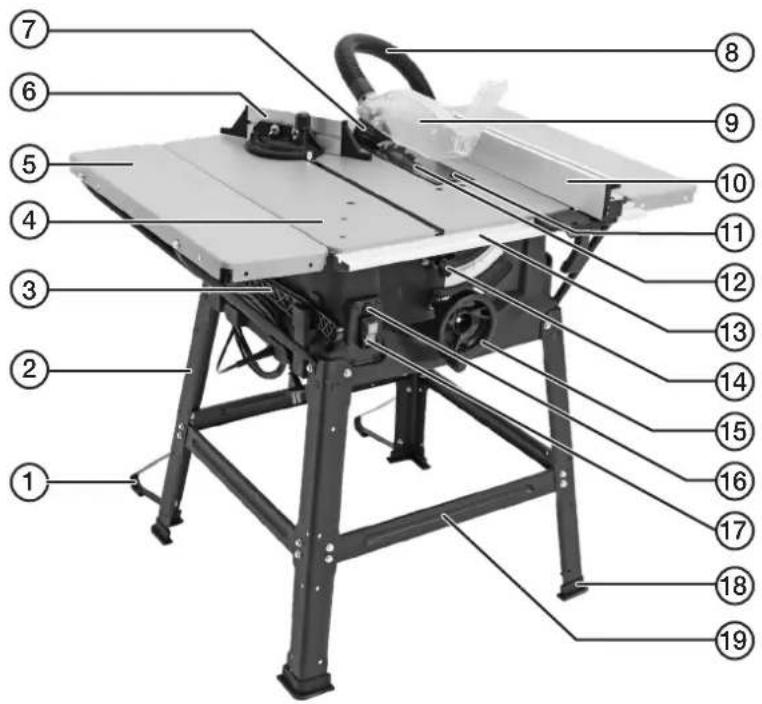
- Leg support stay
- Leg
- Push stick
- Saw table
- Table extension
- Mitre guide
- Riving knife
- Suction hose
- Blade guard
- Rip fence
- Table insert
- Saw blade
- Guide rail
- Blade tilt locking knob
- Blade height/tilt angle hand wheel
- Motor overload cut-out reset button
- Power switch
- Rubber foot
- Cross member
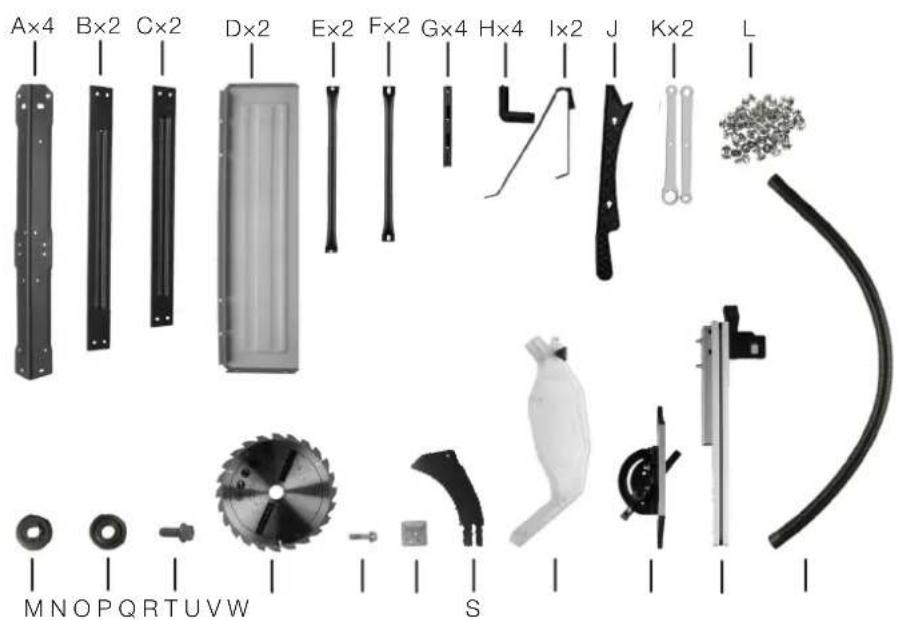
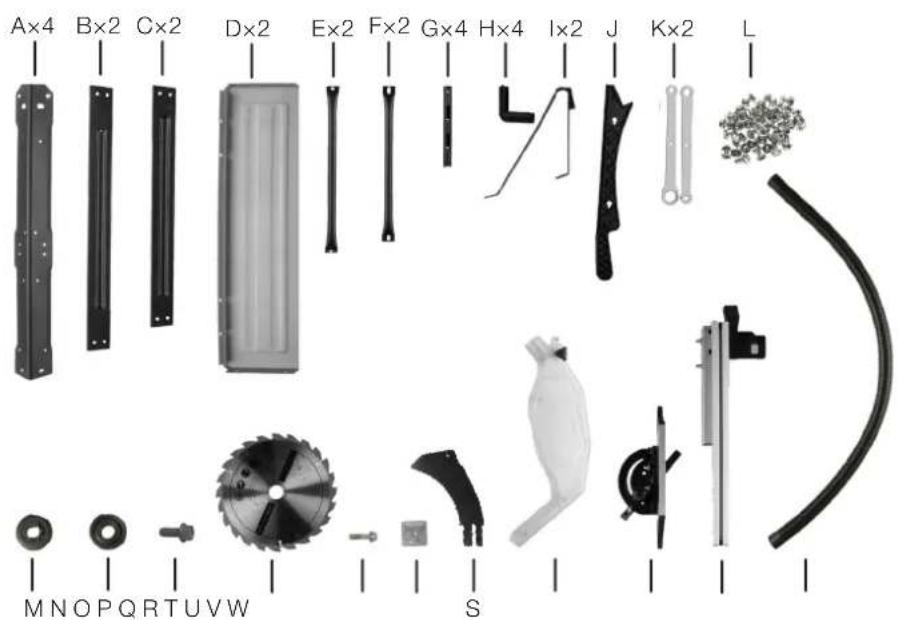
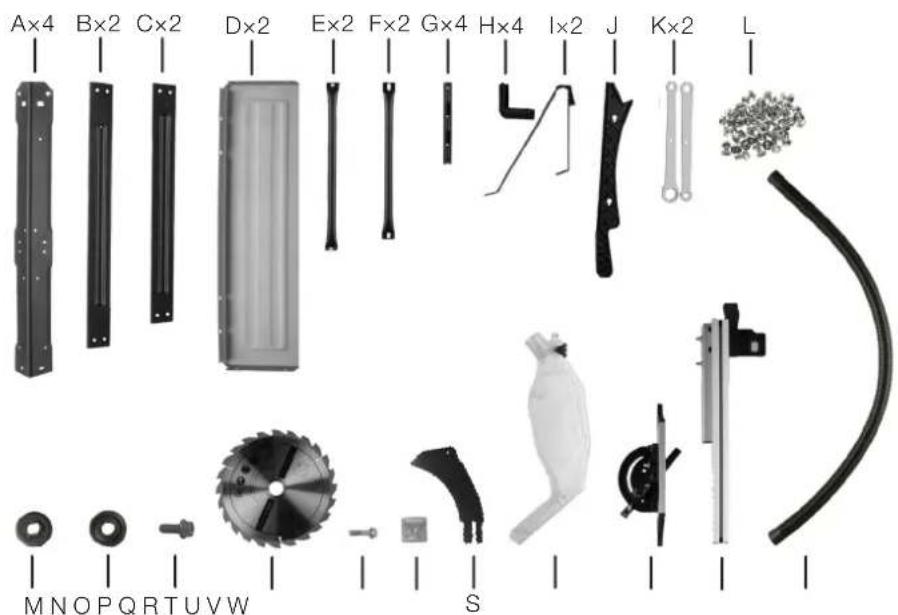
A) Leg (A)
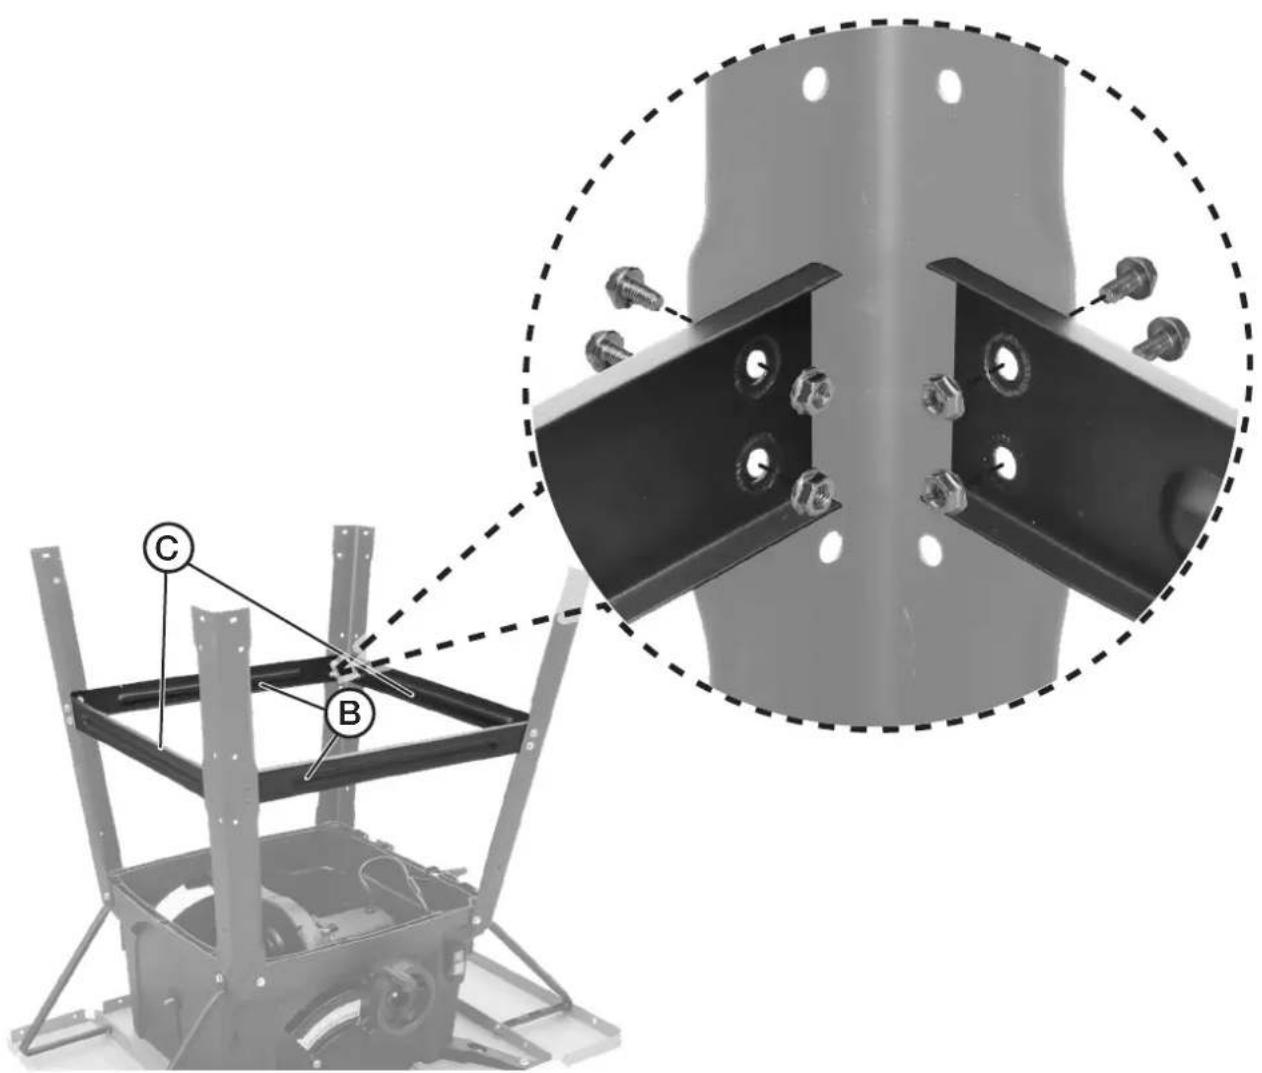
B) Strut (B)
C) Strut (C)
D) Table extension
E) Support strut for table extension
F) Support strut for table extension
G) Nut holder
H) Rubber foot
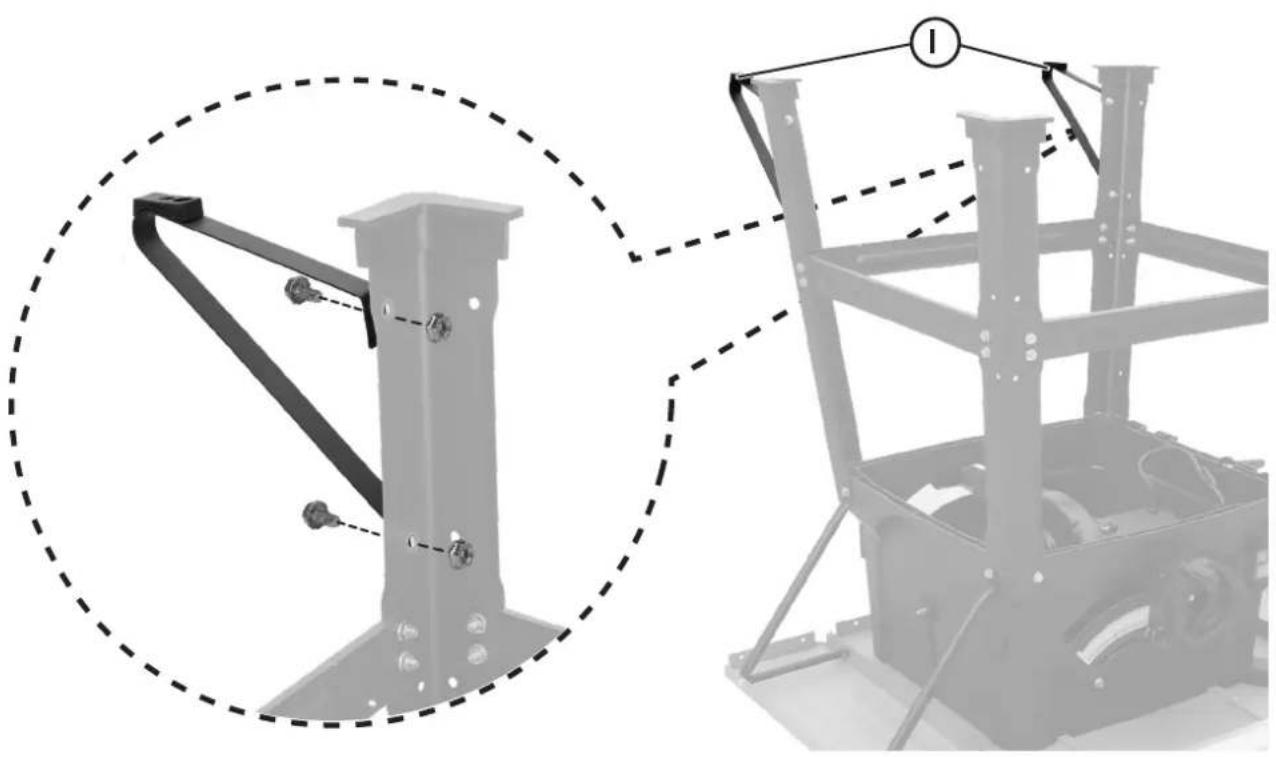
I) Leg support stay
J) Push stick
K) Spanners
L) Nuts and bolts
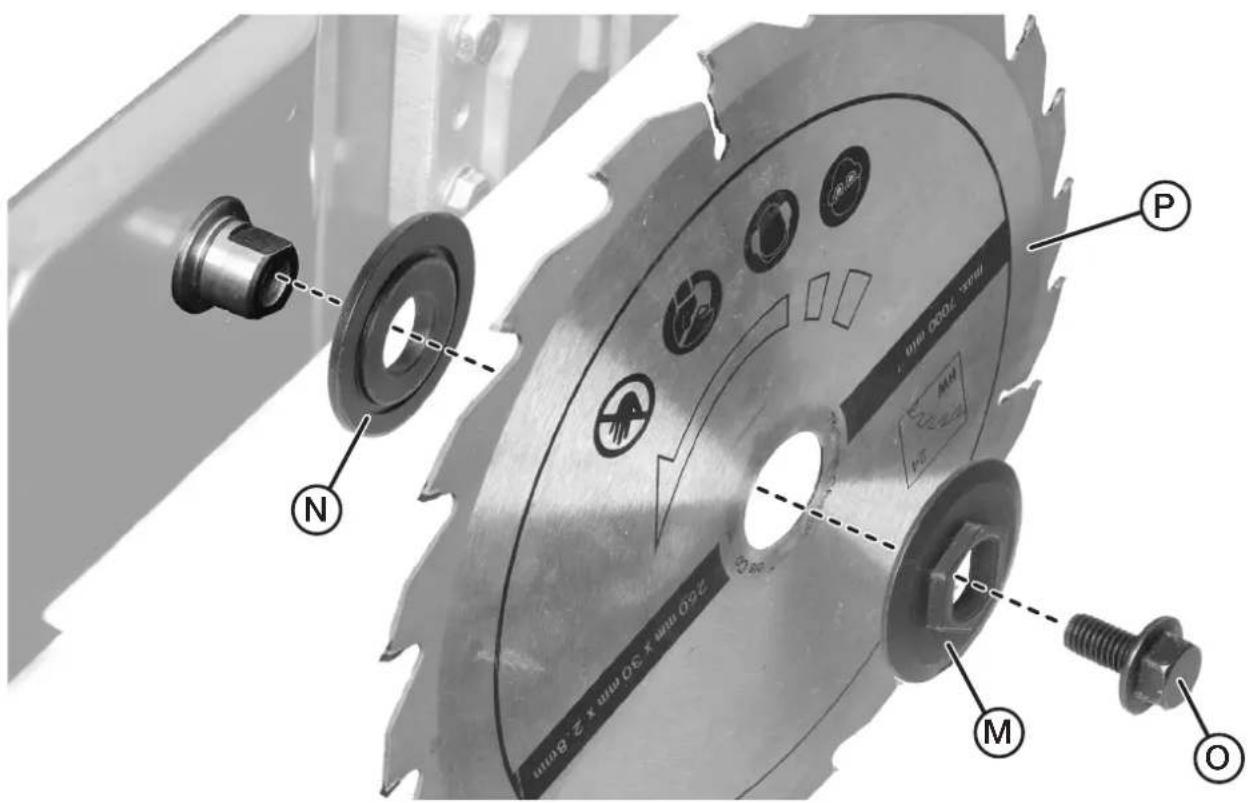
M) Saw blade lock washer
N) Saw blade flange washer
O) Saw blade flange bolt
P) Saw blade
Q) Riving knife flange bolt
R) Riving knife lock washer
S) Riving knife
T) Blade guard
U) Mitre guide
V) Rip fence
W) Suction hose
NOTE! Assembly see page 54
Instructions for use
• Make sure that the saw is completely intact and correctly assembled before commencing work.
- Check that the saw blade is vertical (90°) and is not set higher than is necessary to just manage to saw through the thickness of the workpiece.
• Regularly check that all nuts and bolts are tight.
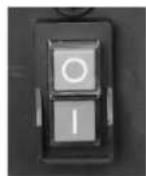
On/off switch
Plug the mains lead into a wall socket.
Switching on: Push the green button [I] to switch the saw on.
Switching off: Push the red button [0] to switch the saw off.
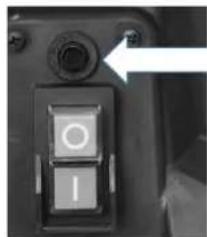
No-volt release switch
The saw is equipped with a no-volt release switch which prevents it from starting automatically when the power comes back on following a power cut. Once power has been restored the saw must be switched on again by pressing [I].
Overload safety cut-out
If the motor is overloaded due to incorrect workpiece feed or the saw blade being obstructed by debris, the overload cut-out may be triggered.
If the overload safety cut-out switch is triggered:
- Unplug the mains lead and let the saw cool down for at least 10 minutes.
- Make sure that no contaminants hinder the rotation of the saw blade, brush off and vacuum saw dust as and when required.
- Press the overload cut-out reset button (16).
- Switch the saw on by pressing [I].
natural_image
Close-up of a black mechanical button with a circular indicator and an arrow pointing to it (no text or symbols visible)Rip fence
natural_image
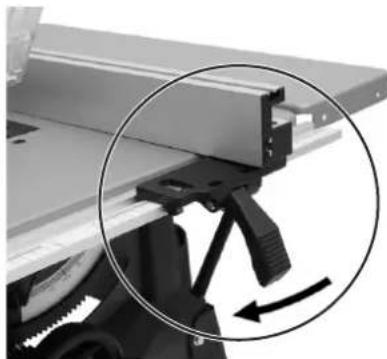
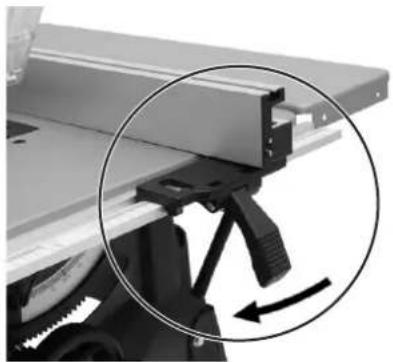
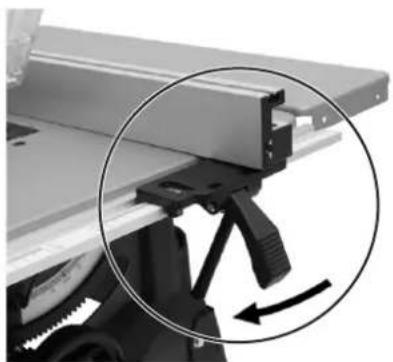
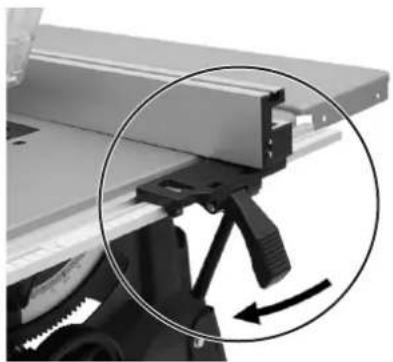
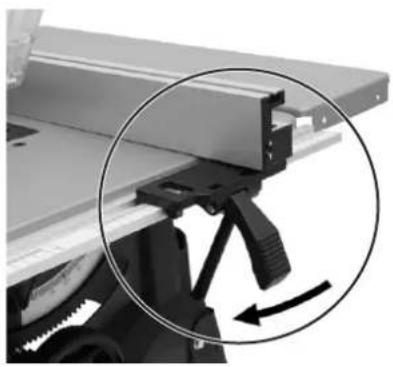
Close-up of a mechanical assembly with a magnified inset showing a lever mechanism (no text or symbols visible)Place the rip fence onto the guide rail and lock it in place by lowering the locking lever.
natural_image
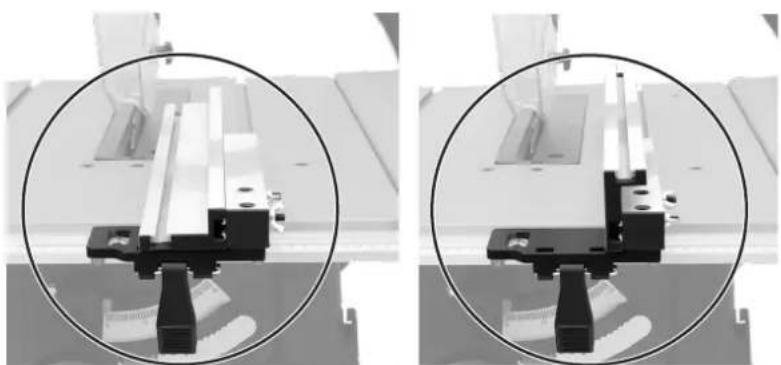
Two circular images showing mechanical components with no visible text or symbolsThe rip fence can be attached in two ways, with the high side or the low side facing the blade. The low side makes it easier to handle thin material such as plywood.
You can also decide yourself on which side of the blade you want to place the rip fence, to the left or right.
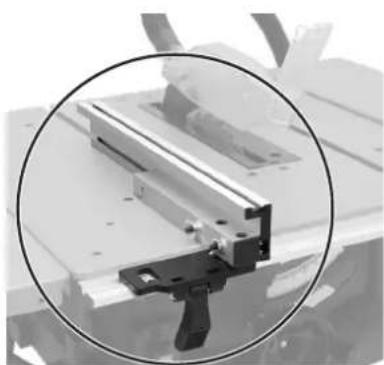
Loosen the wing nuts and remove the rip fence from the rail. Position the rip fence in the desired position and tighten the wing nuts.
natural_image
Close-up of a mechanical clamp or bracket component with a magnified circular inset (no visible text or symbols)Setting the saw blade height
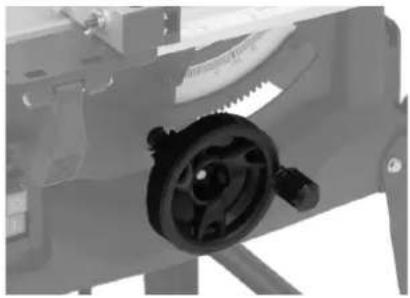
Turn the hand wheel (15) to set the desired height. Never set the blade higher than is necessary to saw through the workpiece.
natural_image
Close-up of a mechanical gear assembly with a black gear wheel and mounting bracket (no visible text or symbols)Rip cutting
△ Note Important
- Rehearse every step of the cutting task without turning the saw on if you are unsure how to hold the workpiece and work safely.
- Make a test cut on a scrap piece of wood to check the setup before starting to rip cut the actual workpiece.
• Always let the saw come up to full speed before starting to cut. - Be extra careful at the beginning of every cut.
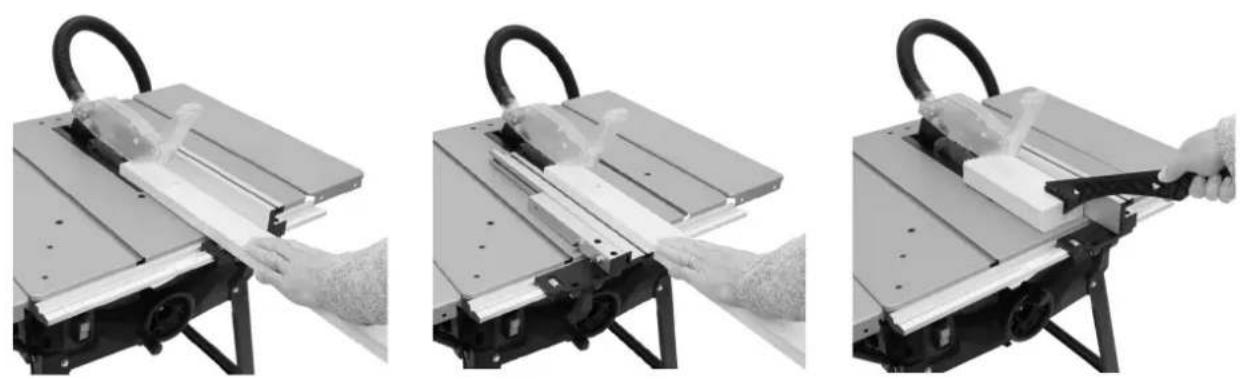
- Hold one side of the material against the rip fence and the flat face against the surface of the table.
- Do not stand directly behind the workpiece when rip cutting. The workpiece can be thrown back towards the operator.
- Place your hands on the workpiece and press it against the table and the rip fence. Feed the workpiece into the blade in a controlled and smooth motion.
natural_image
Three-panel sequence showing hands operating a machine tool on a flatbed workbench, with no visible text or symbols.Warning:
Always use a push-stick if any of your hands comes closer than 125 mm to the saw blade during the cutting process. Never use a damaged push-stick, replace a damaged stick before resuming work. Leave the offcuts on the saw table until the saw blade has completely stopped rotating after the saw has been switched off.
Setting the blade tilt
△ Important
Check all the angles before starting to saw. Make a test cut on a scrap piece of wood to check the setup before starting to cut the actual workpiece.
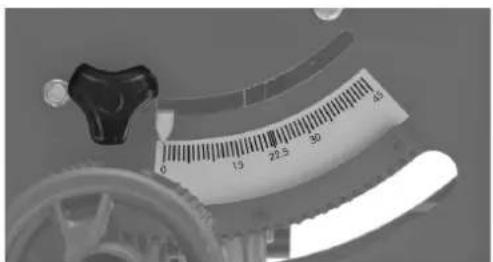
- Undo the locking knob (14).
- Push in the blade height/tilt angle hand wheel (15) and set the desired angle.
- Tighten the locking knob again.
Mitre guide
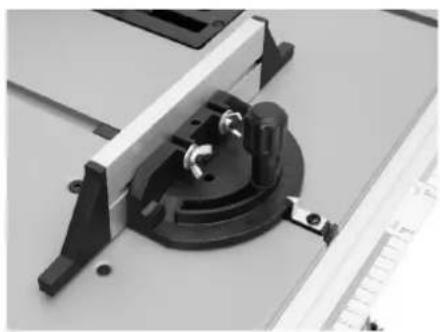
- Slide the mitre guide into one of the slots on the table.
- Undo the locking knob and set the desired angle. Tighten the locking knob again.
- If necessary, undo the two wing nuts and slide the guide fence along, making sure that it will not catch on the blade, then tighten the wing nuts again.
natural_image
Close-up of a mechanical clamp or fixture with metal components and a circular base (no visible text or symbols)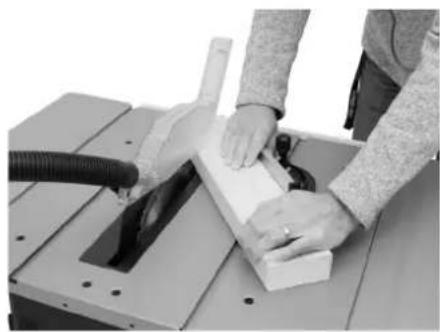
natural_image
Person operating a machine tool with a wooden block and hose (no visible text or symbols)Care and maintenance
• Always unplug the mains lead from the wall socket before servicing, cleaning and replacement of the saw blade.
- Clean the saw by wiping it with a damp cloth. Use only mild cleaning agents, never solvents or corrosive chemicals. Vacuum up sawdust if necessary.
- If the saw is not to be used for an extended period, it should be unplugged and stored in a dry and dust-free location out of reach of children.
Troubleshooting guide
| The saw does not start. | Make sure that the mains lead is undamaged and properly connected to the wall socket.Is the wall socket energised?The motor overload protection has tripped. Let the motor cool down for 10 minutes and then press the safety cut-out reset button (16). Refer to the Overload safety cut-out section.The saw should now function normally again. |
| The saw overheats and the motor overload cut-out triggers. | Do not overload the saw by feeding material into the blade too forcefully, let the saw do the work at its own pace.Does the work task exceed the capacity of the saw?Debris obstructing saw blade. Disconnect the saw from the power supply and clean it.Make sure that the air vents of the motor are not covered with dust or debris.Let the motor cool down for 10 minutes and then press the safety cut-out reset button (16).Refer to the Overload safety cut-out section. The saw should now function normally again. |
| Poor cutting performance. | Blunt or worn blade. Replace if necessary.Is the blade is fitted correctly? |
| The saw cut is not at the correct angle. | Check and adjust the angles. |
| The workpiece binds on the blade when rip cutting. | Adjusting the riving knife. Refer to the Adjusting the riving knife section. |
| The workpiece or parts of it are thrown backwards. | Adjust the riving knife, refer to the Adjusting the riving knife section.Feed the entire workpiece past the blade before letting go of it (use a push stick if necessary). Inspect the saw blade regularly, change if necessary. |
| Abnormal vibrations. Check that all parts are correctly assembled and that all screws, bolts and nuts are tight.Check that the blade is in good condition and is correctly fitted.Check that the floor is level and that the saw has all four legs squarely on the floor. | |
| The motor stops, the workpiece gets burn marks when rip cutting. | The saw blade may be blunt, replace if necessary.Do not overload and feed the saw too quickly – let it work at its own pace.Adjust the riving knife, refer to the Adjusting the riving knife section. |
Responsible disposal
This symbol indicates that the product should not be disposed of with general household waste. This applies throughout the entire EU. In order to prevent any harm to the environment or health hazards caused by incorrect waste disposal, the product must be handed in for recycling so that the material can be disposed of in a responsible manner. When recycling your product, take it to your local collection facility or contact the place of purchase. They will ensure that the product is disposed of in an environmentally sound manner.
Specifications
Power supply 220–240 V AC, 50 Hz
Power S1 1800 W, S6 25% 2000 W
No-load speed 5000 rpm
Saw blade ∅ 250 mm × ∅ 30 mm × 2.8 mm, 24 teeth
Riving knife 2 mm
Table size 583 × 563 mm
Table size with extension 583 x 895 mm
Saw blade tilt 0–45°
Dust extraction port ∅ 35 mm
Max cutting height 85 mm at 90°, 65 mm at 45°
LpA (sound pressure) 94.0 dB(A), (Uncertainty K 3 m/s²)
LwA (sound power) 107.0 dB(A), (Uncertainty K 3 m/s ^4 )
Vibration < 1.16 m/s ^4
Weight approx. 22 kg
Vibration
- The measurement of the vibration emission level (triaxial vector sum) and the noise level values declared in this instruction manual have been carried out in accordance with a standardised test method described in EN 60745 and can be used for comparing one power tool with another.
- The measurement method may also be used for a preliminary assessment of vibration exposure.
- The declared vibration emission level applies when the power tool is used in accordance with this instruction manual. If however, the power tool is used for other purposes and with other accessories or has not been properly maintained, the vibration emission level could increase significantly over the total working period.
- For an exact assessment of the vibration exposure, the times when the tool is switched off or running idle should also be taken into account. This significantly reduces the vibration exposure over the total working period. Decide upon safety measures to protect the operator from the effects of vibration during all types of use.
Bordscirkelsåg
Art.nr
41-2005
Modell
M1H-ZP5-250
18-2945
M1H-ZP5-250
A) Ben (A)
B) Stag (B)
C) Stag (C)
D) Bordsbreddning
natural_image
Close-up of a black electronic switch with an arrow pointing to the left button (no text or symbols visible)Klyvanhåll
natural_image
Close-up of a mechanical assembly with a magnified inset showing a lever mechanism (no text or symbols visible)natural_image
Close-up of a mechanical device with a circular inset highlighting a component (no visible text or symbols)natural_image
Close-up of a mechanical assembly with a circular inset highlighting a component (no visible text or symbols)natural_image
Close-up of a mechanical bracket component with a magnified circular inset showing detail (no text or symbols visible)natural_image
Close-up of a mechanical gear assembly with a black gear wheel and saw (no visible text or symbols)Klyvning
Obs! / Viktigt
natural_image
Three-panel sequence showing hands operating a machine tool on a flatbed workbench, with no visible text or symbols.⚠ Varning!
natural_image
Close-up of a mechanical clamp or fixture with metal components and mounting bracket (no visible text or symbols)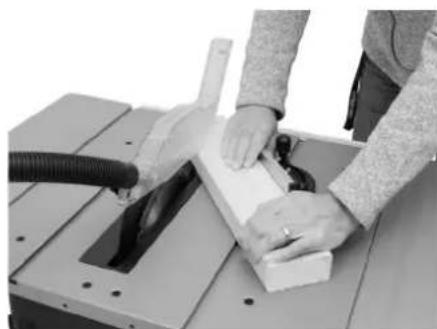
natural_image
Person operating a machine tool with a wooden block and coiled tubing (no visible text or symbols)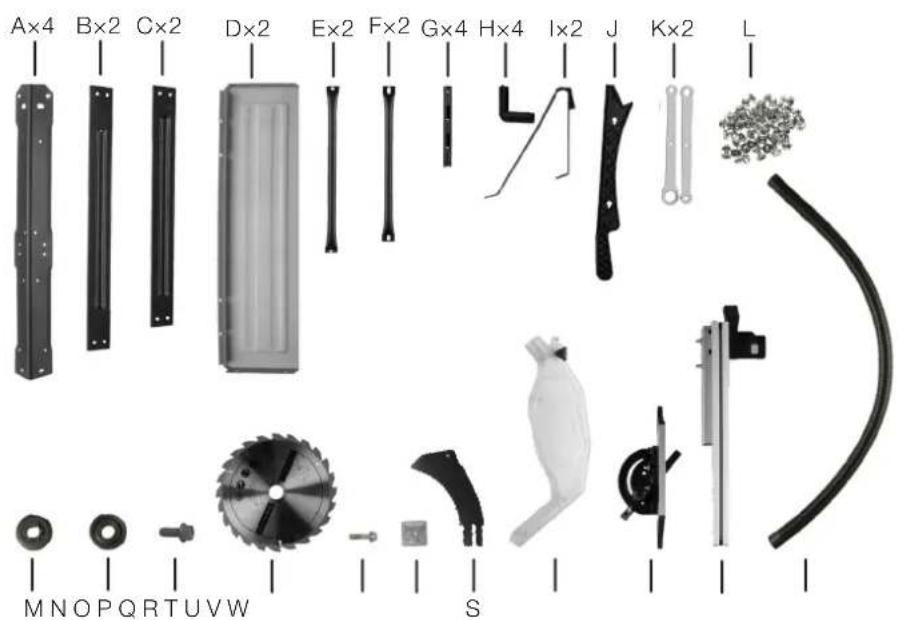
natural_image
Close-up of a black-and-white photo of a computer control panel with an arrow pointing to the button (no text or symbols visible)Kløyveanhold
natural_image
Close-up of a mechanical assembly with a magnified inset showing a lever mechanism (no text or symbols visible)natural_image
Close-up of a mechanical device with a circular inset highlighting a component (no visible text or symbols)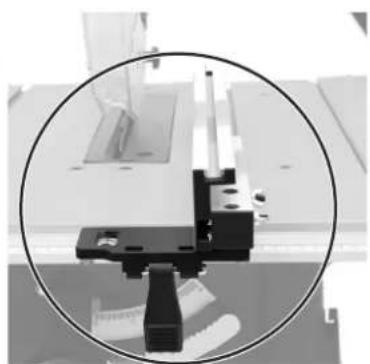
natural_image
Close-up of a mechanical assembly with a circular inset highlighting a component (no visible text or symbols)natural_image
Close-up of a mechanical bracket component with a circular inset highlighting the part (no visible text or symbols)natural_image
Close-up of a mechanical gear assembly with a black gear wheel and mounting bracket (no visible text or symbols)Kløyving
Obs! / Viktig
natural_image
Three-panel sequence showing hands operating a machine tool on a flatbed workbench, with no visible text or symbols.Advarsel!
Bruk alltid påskyver hvis hendene kommer nærmere sagbladet enn 125 mm mens du jobber. Ikke bruk en ødelagt påskyver, men skift den ut før sagingen starter. La kapp bli liggende på bordet til sagen er helt stoppet.
natural_image
Close-up of a mechanical clamp or fixture with metallic components and mounting bracket (no visible text or symbols)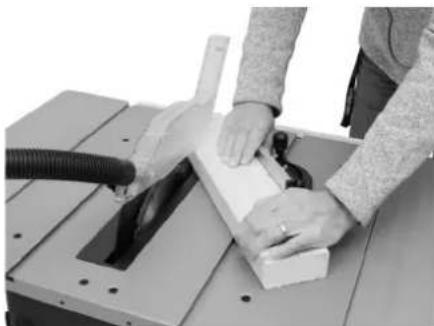
natural_image
Person operating a machine tool with a wooden block and coiled tubing (no visible text or symbols)Vedlikehold
Stuss for sponutsuger ∅ 35 mm
natural_image
Close-up of a black mechanical control panel with an arrow pointing to the button (no text or symbols visible)Halkaisuvaste
natural_image
Close-up of a mechanical assembly with a magnified inset showing a lever mechanism (no text or symbols visible)natural_image
Close-up of a mechanical device with a circular inset highlighting a component (no visible text or symbols)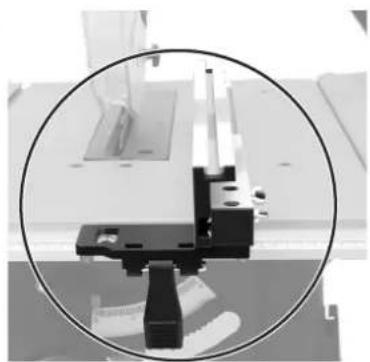
natural_image
Close-up of a mechanical assembly with a circular inset highlighting a component (no visible text or symbols)natural_image
Close-up of a mechanical component with a circular inset highlighting a detail (no visible text or symbols)natural_image
Close-up of a mechanical gear assembly with a black gear wheel and saw (no visible text or symbols)Halkaisu
△ Huom.! / Tärkeää
natural_image
Three-panel sequence showing hands operating a machine tool on a flatbed workbench, with no visible text or symbols.⚠️ Varoitus!
natural_image
Close-up of a mechanical clamp or fixture with metallic components and mounting brackets (no visible text or symbols)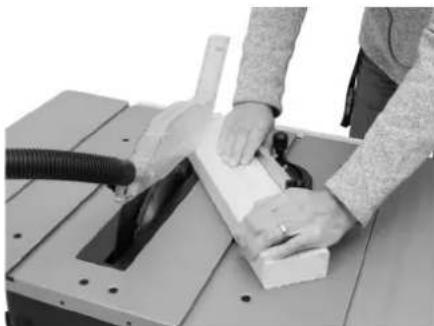
natural_image
Person operating a machine tool with a wooden block and coiled tubing (no visible text or symbols)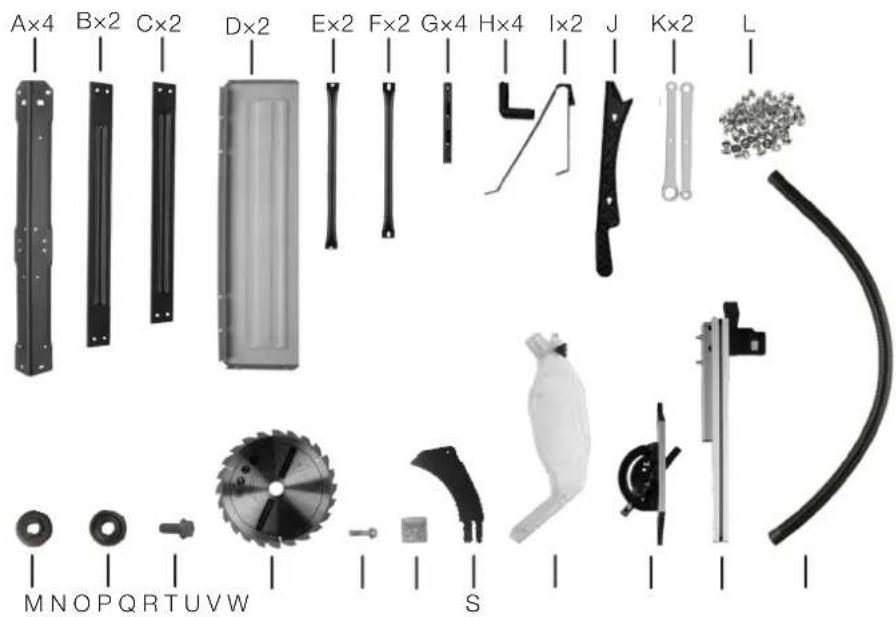
A) Beine (A)
B) Strebe (B)
C) Strebe (C)
natural_image
Close-up of a black electronic control panel with an arrow pointing to the left button (no text or symbols visible)Parallelanschlag
natural_image
Close-up of a mechanical assembly with a magnified inset showing a lever mechanism (no text or symbols visible)natural_image
Two circular views of a mechanical assembly with black and white components, no visible text or symbols.natural_image
Close-up of a mechanical clamp or bracket component with a circular inset highlighting the part (no visible text or symbols)natural_image
Close-up of a mechanical component with a gear and mounting bracket (no visible text or symbols)Spalten
△ Wichtiger Hinweis
natural_image
Three-panel sequence showing hands operating a machine tool with a tool, no visible text or symbols⚠ Warning!
natural_image
Close-up of a medical device with a ruler and scale, showing measurement markings (no readable text or symbols)Gehrungslineal
natural_image
Two-panel image showing a machine tool and a wooden workbench with hands operating the work (no visible text or symbols)Pflege und Wartung
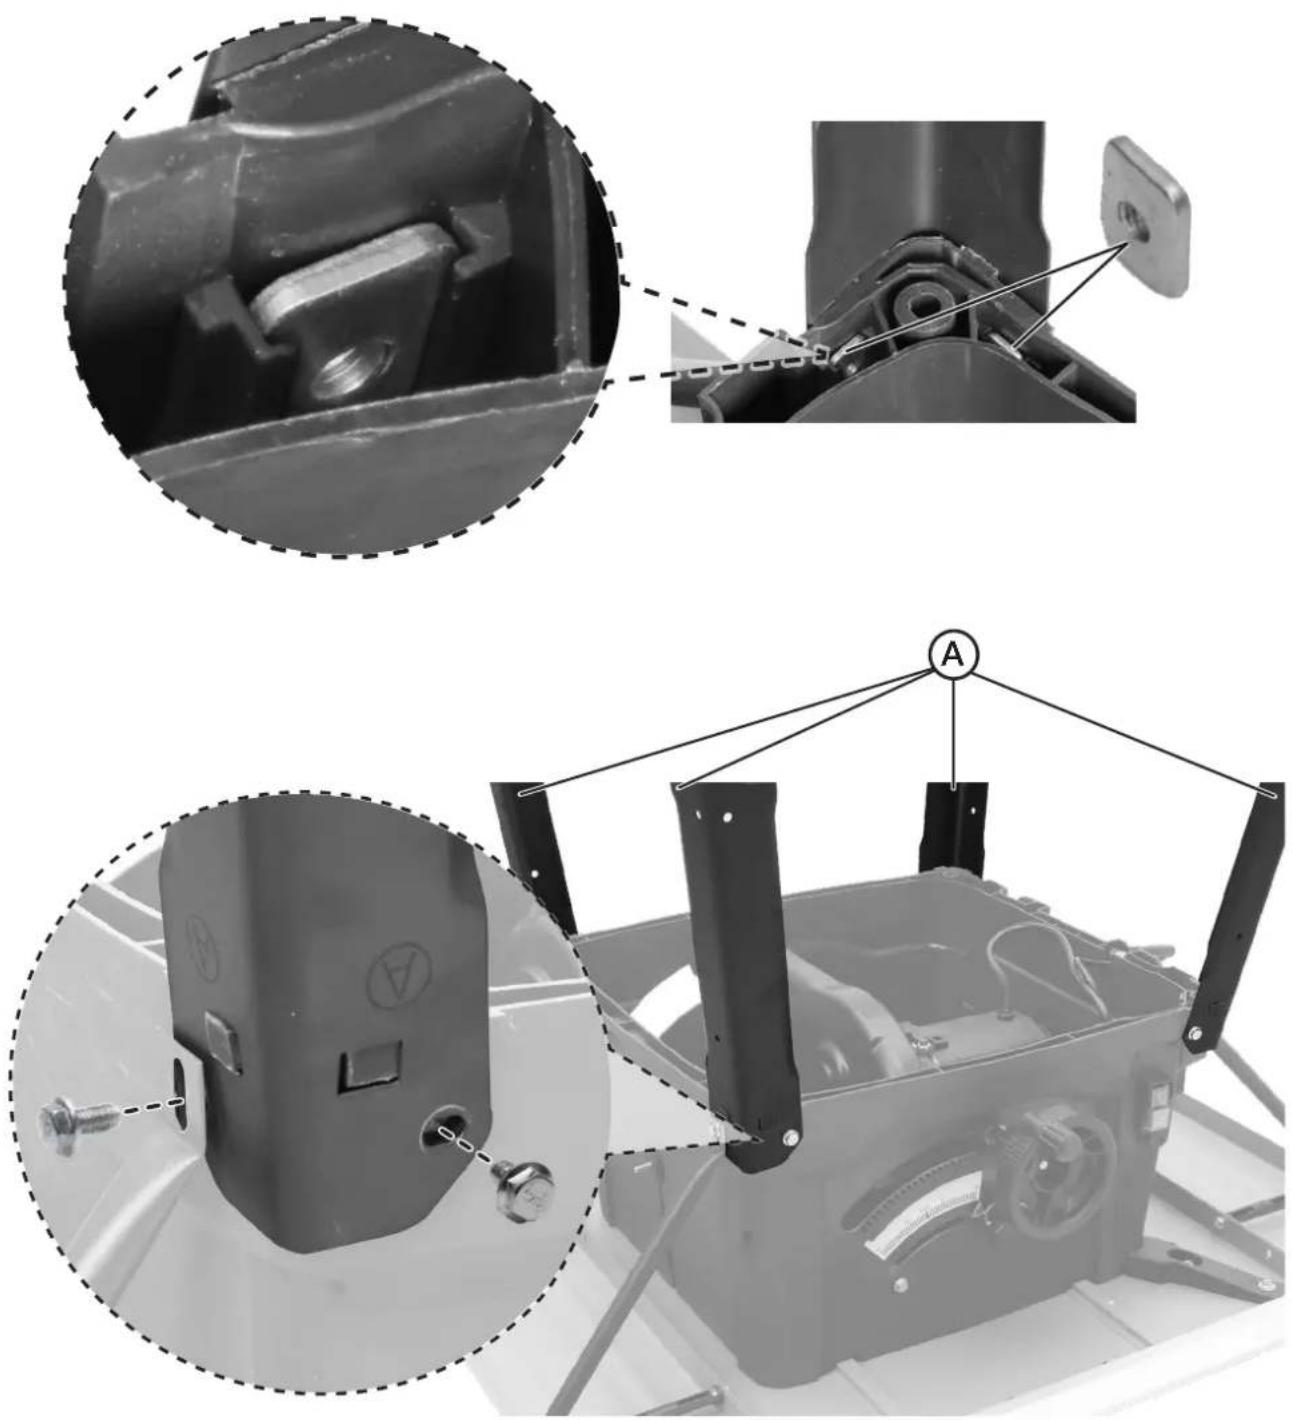
Turn the saw upside down and place it on the floor with the table facing down.
Legs / Ben / Bein / Jalat / Beine
⚠️ Important! Check that all the square nuts are in place.
⚠ Viktigt Kontrollera att alla fyrkantsmuttrar ligger på plats.
⚠️ Viktig Kontroller at alle firkantmuttere er på plass.
⚠️ Tärkeää Varmista, että kaikki neliömutterit ovat paikoillaan.
⚠️ Wichtig Sicherstellen, dass sich alle Vierkantmuttern an Ort und Stelle befinden.
natural_image
Technical diagram showing mechanical assembly with close-ups of components and a labeled component 'A' (no text or symbols beyond labels)Struts, leg support stay and rubber feet Stag, stödstag och gummifötter Stag, støttestag og gummiføtter Tuki, tukivarsi ja kumijalat Streben, Stützstreben und Gummifüße
natural_image
Mechanical assembly diagram showing a metal frame with labeled components (B, C) and a close-up of a mechanical component with bolts and cross-sections (no text or symbols present)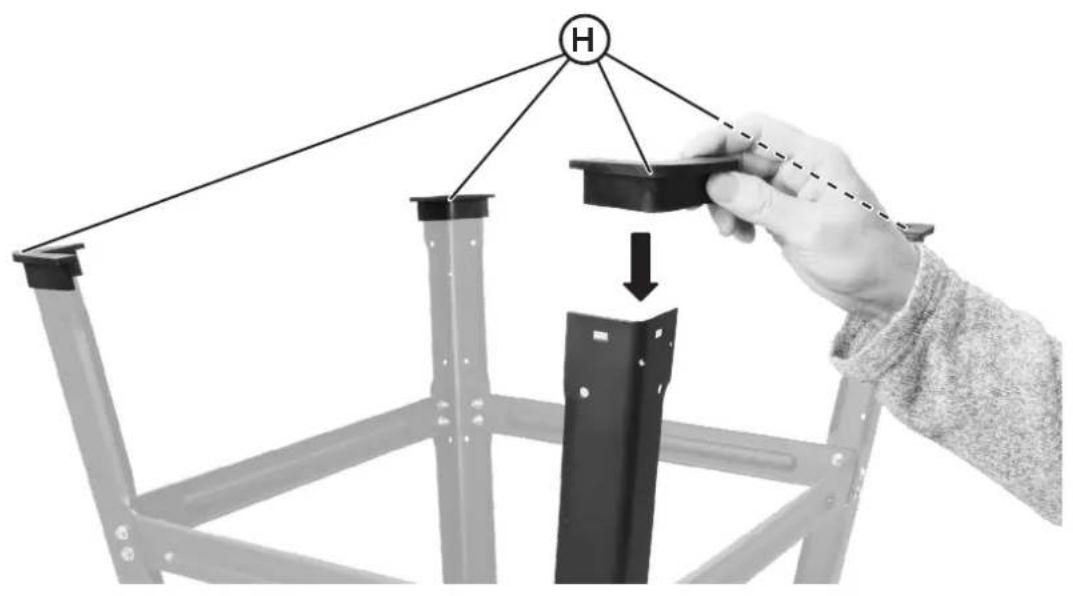
natural_image
Mechanical assembly diagram showing a bracket with mounting holes and a suspended frame (no text or symbols)Riving knife and saw blade / Klyvkil och sågklinga Kløyvekile og sagblad / Halkaisukiila ja sahanterä Spaltkeil und Sägeblatt
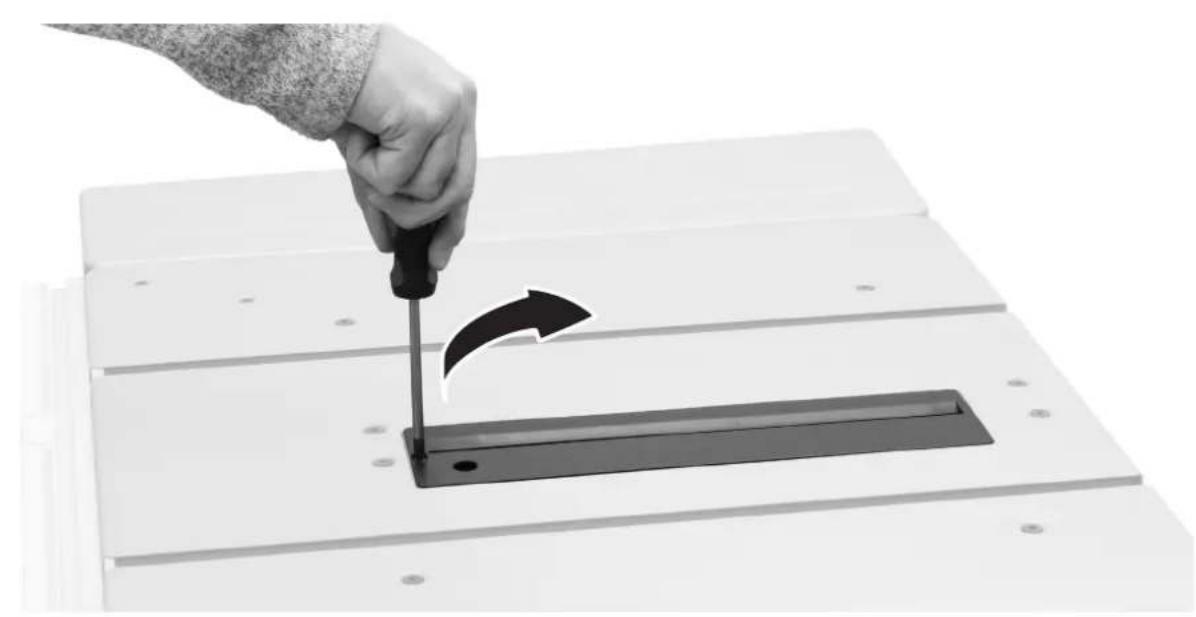
Riving knife / Klyvkil / Kløyvekile / Halkaisukiila / Spaltkeil
natural_image
Hand using a screwdriver to cut a black metal component on a white workbench (no text or symbols visible)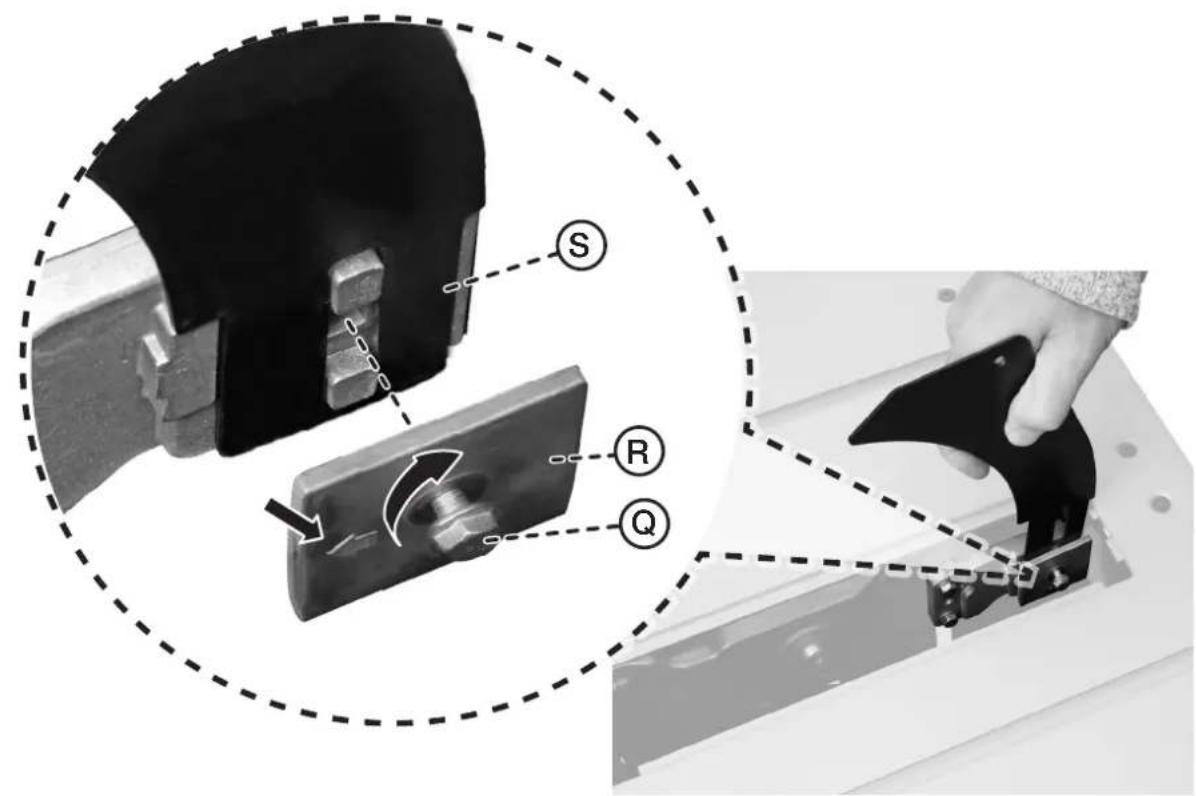
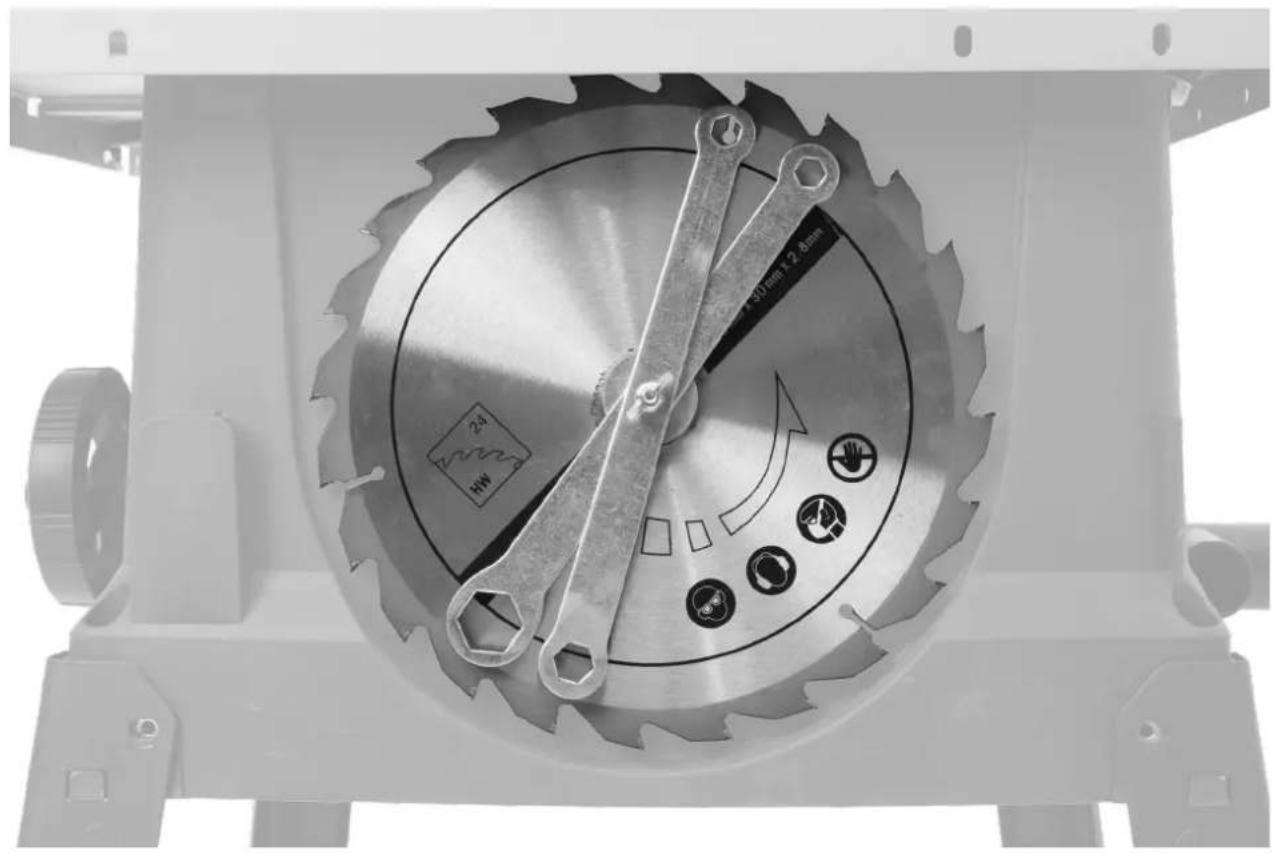
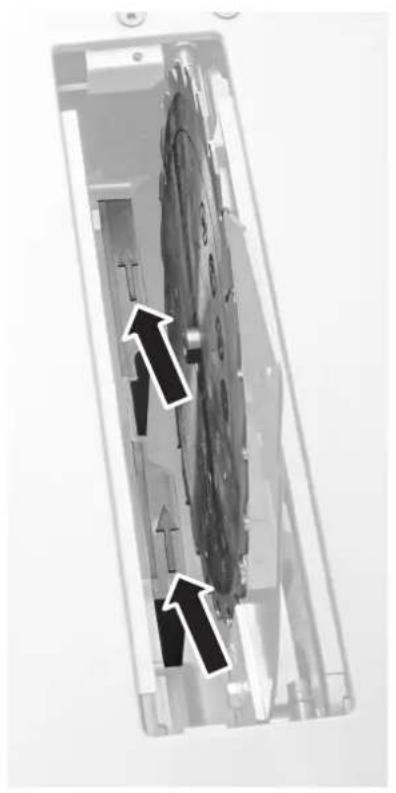
Saw blade / Sågklinga / Sagblad / Sahanterä / Sägeblatt
natural_image
Interior view of a smartphone showing internal components and a circular structure with arrows indicating direction (no text or symbols)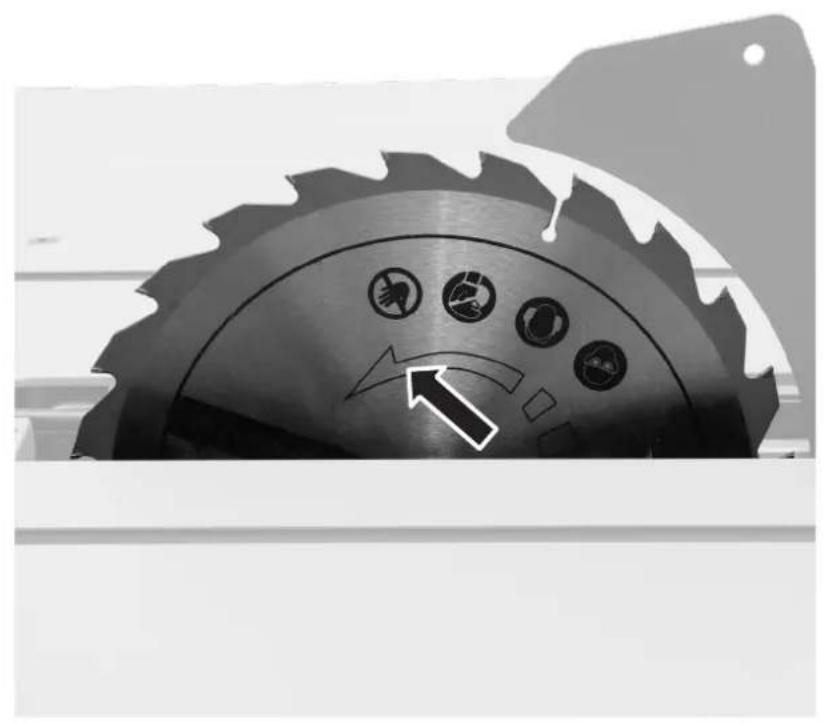
natural_image
Close-up of a mechanical cutting cutter head with circular guide icons and an arrow pointing to it (no text or symbols)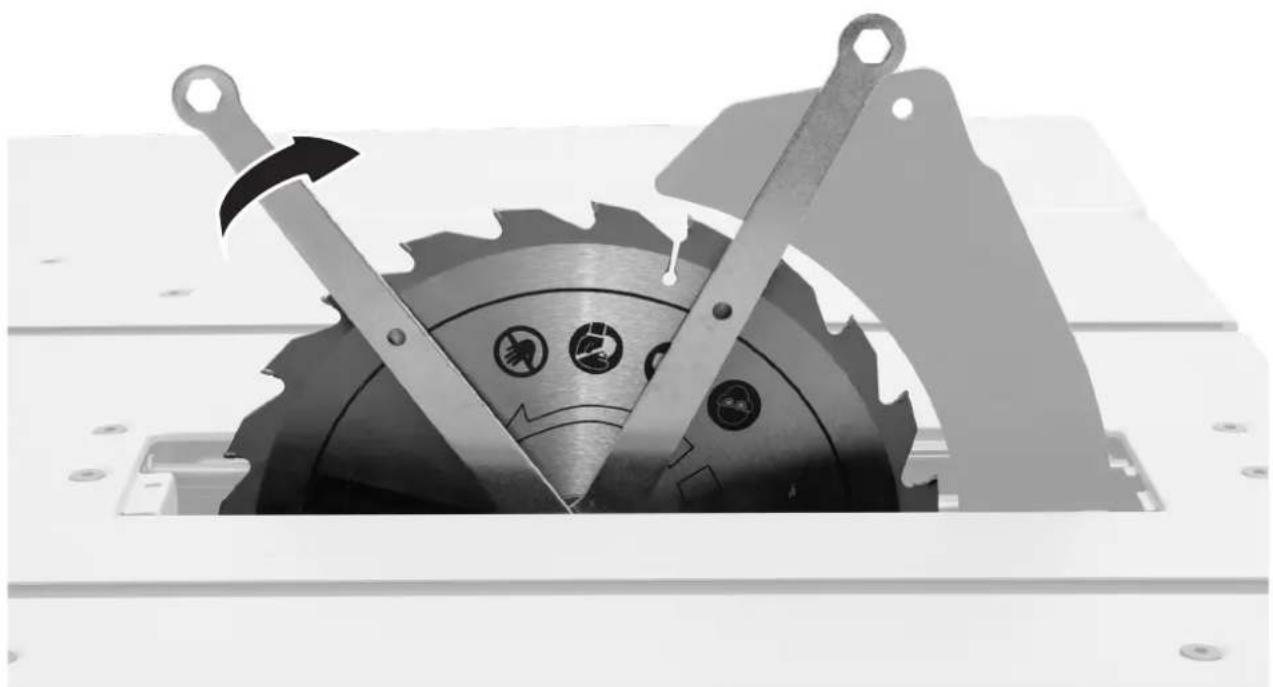
natural_image
Close-up of a mechanical cutting tool with a hammer and gear assembly (no visible text or symbols)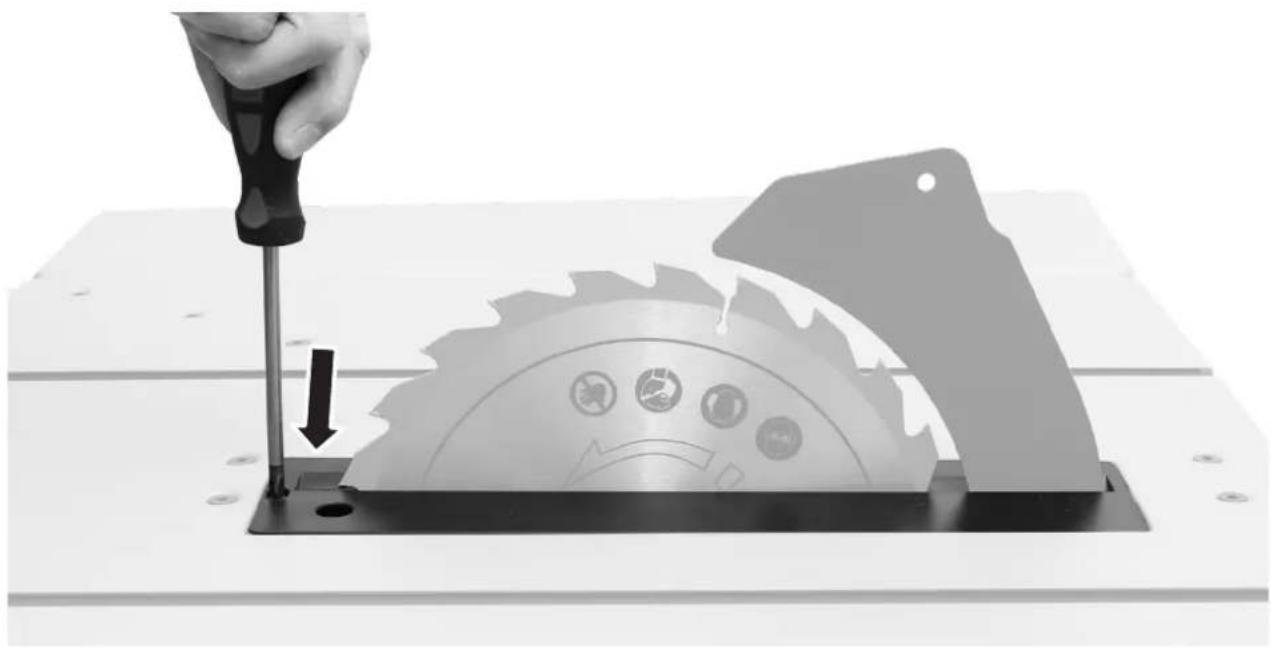
natural_image
Hand using a screwdriver to cut a circular saw blade on a workbench, with no visible text or symbols.Adjust the riving knife / Justera klyvkniven / Juster kløyvekniven Halkaisukiilan säätäminen / Den Spaltkeil einstellen
Undo the riving knife flange bolt and adjust the knife so that it follows the curvature of the saw blade with a maximum distance from the blade of 5 mm.
natural_image
3D rendering of a mechanical component with a labeled part (T) and an arrow pointing to a black tool or part on a workbench (no text or symbols beyond label)Suction hose / Sugslang / Sugeslange / Imuletku / Saugschlauch
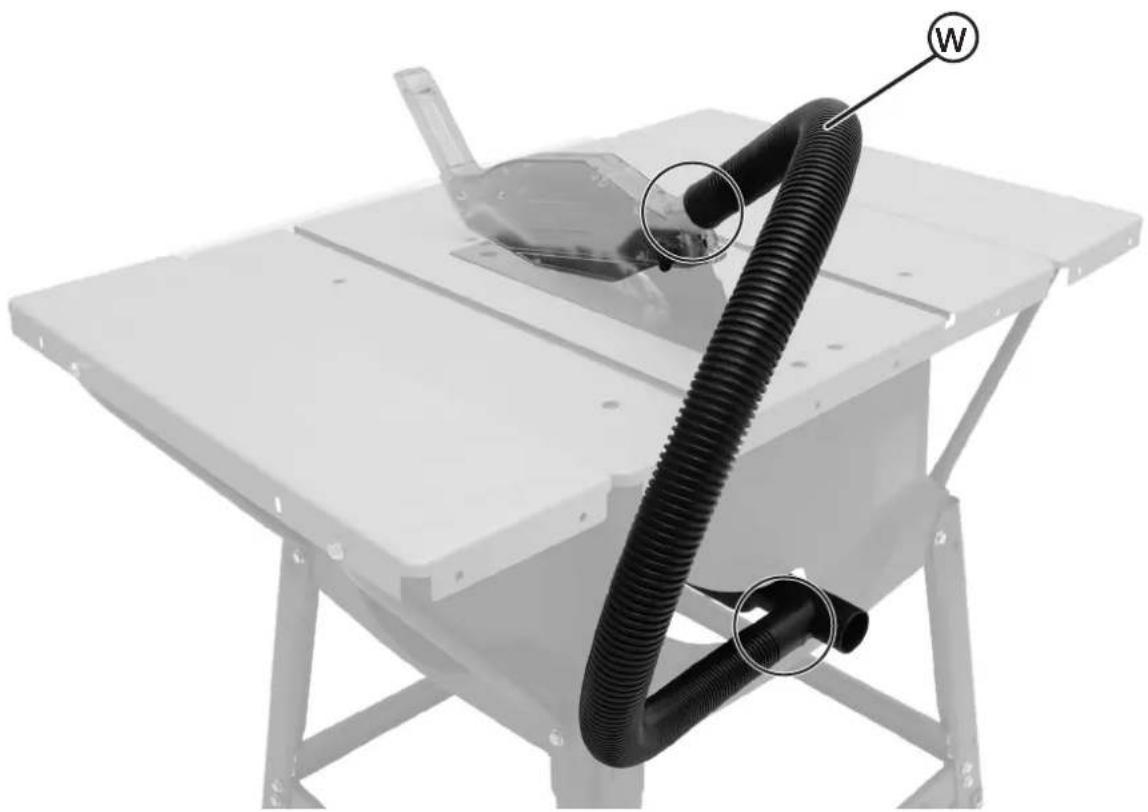
natural_image
Mechanical assembly diagram showing a vacuum tube mounted on a workbench with labeled parts (W and circled), no readable text or symbols present.Declaration of Conformity
Declares that this product complies with the requirements of the following directives and standards
Machinery Directive 2006/42/EC
EMC Directive 2014/30/EU
EN 62841-1: 2015
EN: 61000-3-2: 2014
EN 62841-3-
EN: 61000-3-3: 2013
1:2014+A11:2017
EN: 55014-1: 2006+A1:2011
AFPS GS 2014:01 PA
EN: 55014-2: 2017
Henrik Alfredsson
Product Quality & Compliance Manager
Insjön, Sweden, 2020-02-18
CLAS OHLSON AB, SE-793 85 INSJÖN, SWEDEN
Sverige
Clas Ohlson Ltd, Aquilla House (First floor),
1 Becketts Wharf, Lower Teddington Road,
Hampton Wick, Kingston Upon Thames, KT1 4ER
Deutschland
Kundenservice
Hotline: 040 2999 78111
E-Mail: kundenservice@clasohlson.de
Homepage
www.clasohlson.de
Postanschrift
Clas Ohlson GmbH, Valentinskamp 88
20355 Hamburg

- General power tool safety warnings
- 1) Work area safety
- 2) Electrical safety
- 3) Personal safety
- 4) Power tool use and care
- 5) Service
- WARNING
- Safety instructions for table saws
- 1) Guarding related warnings
- 2) Cutting procedure warnings
- 3) Kickback - causes and related warnings
- 4) Table saw operating procedure warnings
- Safety instructions for handling saw blades
- Residual risks
- Product description
- NOTE! Assembly see page 54
- Instructions for use
- On/off switch
- No-volt release switch
- Overload safety cut-out
- Rip fence
- Setting the saw blade height
- Rip cutting
- △ Note Important
- Warning:
- Setting the blade tilt
- △ Important
- Mitre guide
- Care and maintenance
- Responsible disposal
- Specifications
- Vibration
- Bordscirkelsåg
- Klyvanhåll
- Klyvning
- Obs! / Viktigt
- ⚠ Varning!
- Kløyveanhold
- Kløyving
- Obs! / Viktig
- Advarsel!
- Vedlikehold
- Halkaisuvaste
- Halkaisu
- △ Huom.! / Tärkeää
- ⚠️ Varoitus!
- Parallelanschlag
- Spalten
- △ Wichtiger Hinweis
- ⚠ Warning!
- Gehrungslineal
- Pflege und Wartung
- Legs / Ben / Bein / Jalat / Beine
- Riving knife and saw blade / Klyvkil och sågklinga Kløyvekile og sagblad / Halkaisukiila ja sahanterä Spaltkeil und Sägeblatt
- Adjust the riving knife / Justera klyvkniven / Juster kløyvekniven Halkaisukiilan säätäminen / Den Spaltkeil einstellen
- Declaration of Conformity
- Sverige
- Deutschland
Brand : Cocraft
Model : HT 10
Category : Saw