
KCM22B - Saw Cocraft - Free user manual and instructions
Find the device manual for free KCM22B Cocraft in PDF.


| Brand | Cocraft |
| Model | KCM22B |
| Product type | Chainsaw |
| Engine displacement | 37 cm³ |
| Power | 1.2 kW / 1.6 hp @ 8000 min⁻¹ |
| Fuel | Mixture of environmental petrol with 2% oil or 50:1 petrol/oil |
| Fuel capacity | 310 cm³ |
| Chain oil capacity | 210 cm³ |
| Chain oil pump | Automatic |
| Guide bar length | 14" (350 mm) |
| Saw chain type | 91VG, pitch 3/8" (9.53 mm), gauge 0.05" (1.3 mm), 52 links |
| Chain brake | Automatic and manual |
| Sound power level (guaranteed) | 99.7 dB(A) |
| Sound pressure level | 100 dB(A) K=3 dB(A) |
| Vibration front handle | 7.87 m/s² K=1.5 m/s² |
| Vibration rear handle | 9.44 m/s² K=1.5 m/s² |
| Dimensions | 73 × 25 × 25 cm |
| Weight (without guide bar & chain) | 4.4 kg |
| Weight (with guide bar & chain) | 4.9 kg |
| Spark plug | Bosch WSR6F (gap 0.6-0.7 mm) |
| Ignition system | Breakerless (CDI) |
| Carburettor | Walbro WT diaphragm type |
| Idle speed | 2800 ± 400 min⁻¹ |
| Max engine speed | 10000 min⁻¹ |
Frequently Asked Questions - KCM22B Cocraft
User questions about KCM22B Cocraft
0 question about this device. Answer the ones you know or ask your own.
Ask a new question about this device
Download the instructions for your Saw in PDF format for free! Find your manual KCM22B - Cocraft and take your electronic device back in hand. On this page are published all the documents necessary for the use of your device. KCM22B by Cocraft.
USER MANUAL KCM22B Cocraft
Read the entire instruction manual carefully and make sure that you fully understand it before you use the equipment. Keep the manual for future reference.
Viktig information:
natural_image
Orange Crecraft HC 3800 electric shaver with black handle and visible brand mark (no text or symbols on body)Art.no Model
31-9034
WLCS38A-375
Ver. 20190109
Original instructions
Bruksanvisning i original
Originalbruksanvisning
Art.no 31-9034 Model WLCS38A-375
Please read the entire instruction manual before using the product and then save it for future reference.
We reserve the right for any errors in text or images and any necessary changes made to technical data.
In the event of technical problems or other queries, please contact our Customer Services (see address details on the back).
Safety

Warning: Read all safety information, warnings and instructions. Failure to read safety information, warnings and instructions can lead to fire, property damage or serious personal injury.
Persons (including children) whose physical, sensory or mental capability or lack of experience and knowledge means that they cannot use the saw in a safe way must not use it without supervision or instruction. Children shall be supervised to ensure that they do not play with the saw.
1) Work area safety
a) Keep the work area clean and well illuminated. Cluttered and poorly lit areas invite accidents. Rags, clothing, cables, gloves or other materials must not be left in the work area.
b) Do not use the saw in explosive environments, such as in the presence of flammable liquids, gases or dust. The saw can create sparks which may ignite dust or fumes.
c) Keep children and bystanders away from the area when you are using the saw. Distractions can cause you to lose control.
2) Personal safety
a) Pay attention to what you are doing and use common sense when using the saw. Never use the saw if you are tired or under the influence of drugs, alcohol or medication. One moment of inattention while using a chainsaw may result in serious injury.
b) Wear protective clothing. Always wear safety glasses. Using protective clothing such as dust masks, non-slip safety shoes, helmets and ear defenders reduces the risk of injury.
c) Remove all service tools/keys before starting the chainsaw. A spanner or other tool which has been left on a rotating part of the saw could result in an injury.
d) Do not overreach. Keep proper footing and balance at all times. This will allow you to have better control of the saw in unexpected situations.
e) Wear suitable clothing. Do not wear loose-fitting clothing or jewellery. Keep hair, clothes and gloves away from moving parts. Loose-fitting clothes, jewellery or long hair could become caught in moving parts.
3) Use and maintenance of the saw
a) Do not force the saw. Make sure that the saw is designed for the work you are about to perform. The saw must only be used as described in this instruction manual.
b) Do not use the saw if the power switch is not functioning properly. Any saw that cannot be controlled by the power switch is dangerous and must be repaired.
c) Store chainsaws that are not being used out of children's reach. Do not allow people who are unfamiliar with chainsaws or these instructions to operate them. Chainsaws can be dangerous if they fall into the hands of inexperienced users.
d) Properly maintain the saw. Check for misalignment, binding of moving parts, broken parts or anything else which might affect the operation of the saw. If any damage is noticed, have the saw repaired before using. Many accidents are caused by poorly maintained saws.
e) Keep the chain sharp and clean. Properly maintained chains with sharp edges are easier to control.
f) Use the saw, and any accessories in accordance with these instructions, taking into account the working conditions and the work to be performed. Use of the saw for a purpose other than that for which it is intended could result in a dangerous situation.
- Keep all parts of your body away from the saw chain once the saw has been started. Before starting the saw, check that the saw chain is not in contact with any objects and can run freely. Even a brief moment of inattention can lead to the saw chain fastening in an item of clothing or a body part.
-
Always hold the saw with your right hand on the rear handle and your left hand on the front handle. Never hold the saw in any other way, it increases the risk of personal injury.
-
Use protective eyewear and hearing protection. Protective equipment for hands, head, legs and feet are also recommended. Wearing the correct type of safety clothing reduces the risk of personal injury from the saw chain or flying debris from the sawing.
- Never climb a tree to operate the chainsaw. Using a chainsaw in a tree can result in personal injury.
- Make sure that you stand on a firm, level surface when you use the saw. Slippery and unstable platforms such as ladders can result in a loss of balance and loss of control over the saw.
- Be prepared for branches under tension to spring back during the sawing process. When the tension in branches is released they can spring back and strike chainsaw operators causing them to lose control of their saws.
- Be very careful when cutting brush and saplings. Thin twigs can get caught in the saw chain and be projected towards you or cause you to lose your balance.
- Always carry the chainsaw by the front handle with the guide bar pointing away from your body. The scabbard must always be fitted when the chainsaw is being transported or stored. Using the chainsaw correctly will reduce the likelihood of contact with the saw chain when it is in motion.
- Follow the instructions regarding lubrication, chain tensioning and changing of accessories. An improperly tensioned or lubricated chain increases the risk of chain breakage or kickback.
- Always keep the handles dry, clean and free of oil and grease. Slippery handles covered in oil can cause you to lose control over the saw.
- Cut wood only. The saw is not designed for sawing plastic, hardboard or other building materials not made of wood. Using the saw to saw a material it was not designed to saw could lead to a dangerous situation.
Causes and prevention of kickback
Kickback can occur when the tip of the guide bar contacts an object or if the saw cut closes and traps the chain.
If the tip of the guide bar touches an object it can cause a reaction which throws the guide bar back up towards the operator.
Pinching the saw chain along the top of the guide bar may push the guide bar rapidly back towards the operator.
All of these reactions may cause you to lose control of the saw which could result in serious personal injury.
Do not rely solely on the safety features fitted to the saw. When using the saw you yourself must take precautions to prevent accidents and injuries. Kickback is caused either by poor maintenance, an incorrect sawing method or using the saw for the wrong purpose. This can be avoided by following the following safety precautions:
- If you understand what causes kickback the risk of being surprised and losing control will be reduced.
- Hold the saw firmly with both hands. Hold the saw with your right hand on the rear handle and your left hand on the front handle. Maintain a firm grip with thumbs and fingers encircling the handles and your arms and body positioned in such a way that you can resist kickback forces should they occur. You can control the forces arising from a kickback if the correct precautions are taken. Never let go of the saw when the engine is running.
- Make sure that the work area is free of obstacles. Never let the tip of the guide bar contact a tree trunk, branch or other object.
• Always saw using full throttle. - Do not overreach and do not saw above shoulder height. This will help you to prevent the tip of the guide bar from accidentally coming into contact with objects and and cause you to lose control over the saw if something unexpected should happen.
- Follow the manufacturer's instructions regarding sharpening and maintenance of the saw chain. A blunt chain also increases the likelihood of kickback.
- Use only those replacement parts, guide bar and saw chain recommended by the manufacturer. Using a guide bar or saw chain of the incorrect type can lead to kickback or chain breakage.
WARNING: BEWARE OF KICKBACK!

Warning: Kickback poses a serious accident risk and can cause the operator to lose control of the saw. This can result in serious injury to the operator and any bystanders. Be vigilant at all times.
Kickback caused by the nose or tip of the guide bar touching an object or by the wood closing and pinching the saw chain in the cut is the main cause of chainsaw accidents.
General safety rules
- Never use the saw when you are tired, sick, under the influence of alcohol or medicine.
- Local regulations may restrict the age of the operator; check what minimum operator age requirements apply to your region.
- Always be careful when handling fuel. Wipe off any spilt fuel and move the saw at least 3 metres away from the refuelling location before starting it.
- Remove any sources of ignition and see that there are no sparks, naked flames, lit cigarettes, etc. in the area where the fuel is mixed, used or stored.
- Never smoke when refuelling or operating the saw.
- Do not permit anyone other than the operator to come close to the saw when it is being started or used. Children, pets and onlookers should be kept at least 10 metres away from the saw when it is being started or used.
- Never begin using the saw without having full view of the entire work area. Keep your proper footing and balance and make sure that you have a planned retreat path to a safe place away from the falling tree.
- Never work alone, always have a person close by whom you can call if you need help.
- Never work in poor light conditions, heavy rain or strong wind.
- The saw must only be used for cutting natural untreated wood.
- Never use the chainsaw on treated wood.
- The saw must not be used for clearing brush.
- Make sure that the saw chain is not in contact with any object before starting.
• Always carry the chainsaw with the engine shut off, the guide bar to the rear and the silencer pointing away from the body. - Always inspect the saw before starting it. Do not start it if there are worn, missing or damaged parts. Never use the saw if it is damaged, incorrectly adjusted or incorrectly assembled. When the engine has started: Check that the chain saw stops completely when you let go of the throttle.
• Any service of the saw other than that mentioned in this instruction manual should be carried out by qualified service personnel.
• Always shut off the engine before placing the saw on the ground. - Use extreme caution when cutting brush and saplings because slender material may fasten in the saw chain and be whipped towards you or pull you off balance. Be careful when cutting limbs under tension. Guard against falling branches and be alert for springback and pinching of the guide bar when the tension in the fibres of the wood is released.
- Keep the handles dry, clean and free of oil and fuel mixture.
- Operate the chainsaw only in well-ventilated areas.
- Never operate the saw in a tree unless you have been specially trained for such work.
- Never transport the saw without the scabbard fitted.
- Never operate the saw close to flammable liquids or gases, doing so poses a risk of fire or explosion.
- Never refuel, top up the oil or perform any maintenance to the saw when the engine is running.
- First-time users should be equipped with safety equipment and be instructed in the correct use of the chainsaw by an experienced operator.
- Never start the saw indoors. The saw will emit poisonous exhaust gases as soon as it is started, these gases may be invisible and odourless but are harmful if inhaled. Be aware that the saw will produce harmful sawdust and oil mist from chain lubrication, protect yourself accordingly.
- Always wear gloves and keep your hands warm when using the product. Long-term exposure to hand-arm vibration from using a chainsaw can lead to permanent damage to hands and arms. If you experience symptoms such as poor blood circulation, white finger tips, reduction in sense of touch, numbness or tingling in fingers, contact a doctor.
- Drive in the spiked bumper directly behind the intended cut and let this be the hinge around which the saw pivots.
Safety symbols

Make sure that you have read and understood the entire instruction manual before starting to use the product.

Wear an approved helmet, approved ear defenders and safety glasses/visor.

Improper use can cause injury and damage to the product.

Warning: Risk of kickback.

Always hold the product with both hands.
Do not use the product in the rain.
Always wear safety gloves.
Wear a mask in dusty conditions.
In accordance with essential applicable safety standards of European directives.
Always wear approved safety shoes.
Product description
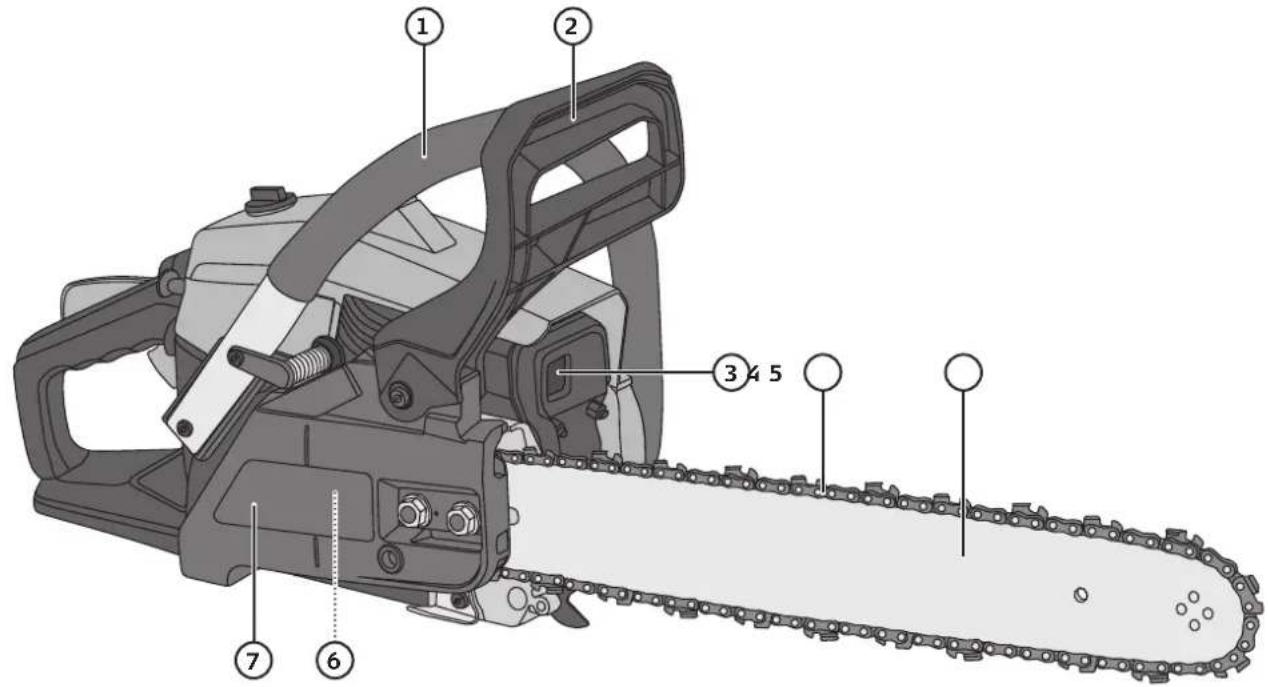
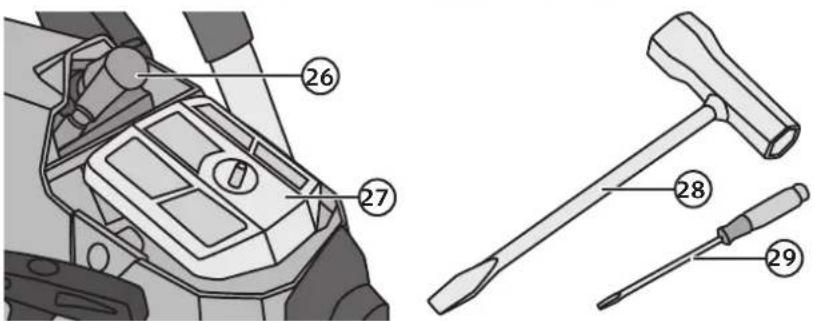
- Front handle
- Chain brake lever
- Silencer
- Saw chain
- Guide bar
- Clutch (under cover)
- Drive sprocket and clutch cover
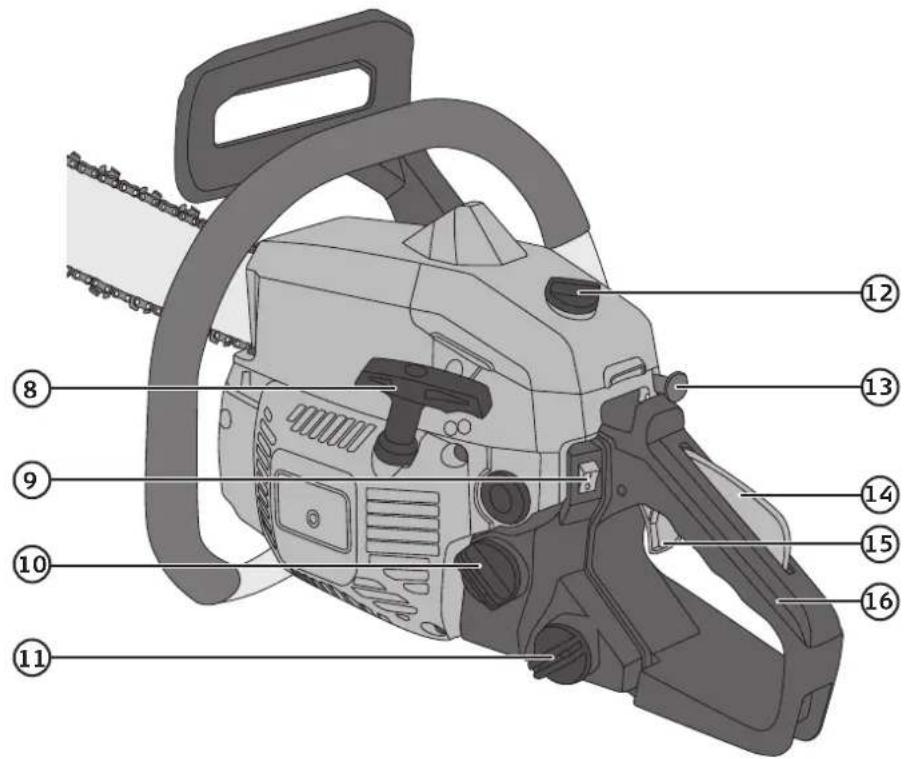
- Starter handle
- Power switch
- Fuel cap
- Chain oil cap
- Top cover locking knob
- Choke
- Safety catch
- Throttle
- Rear handle
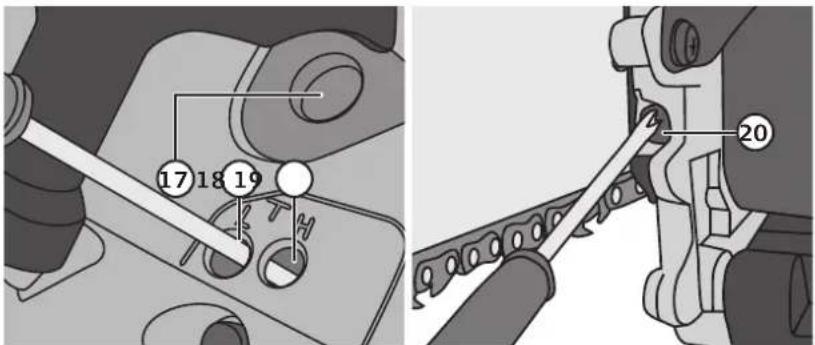
- T, Idle speed adjuster
- L, Low speed fuel valve adjuster
-
H, High speed fuel valve adjuster
-
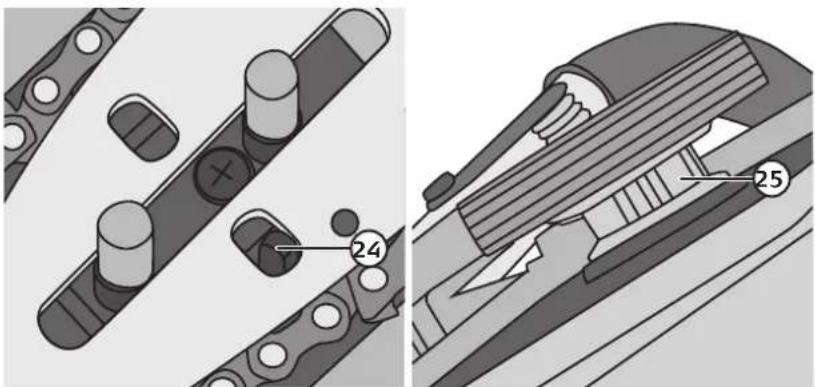
Saw chain tension adjuster screw
-
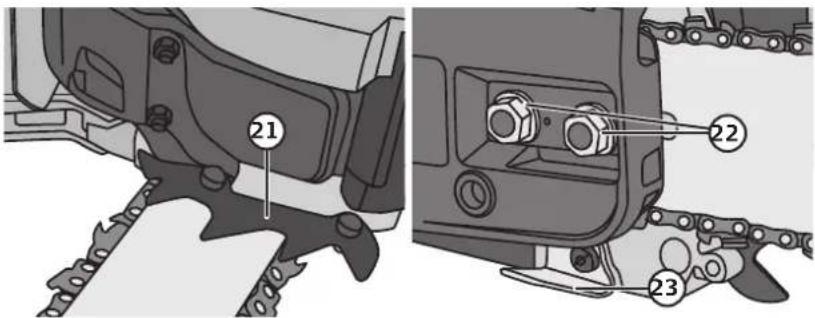
Spiked bumper
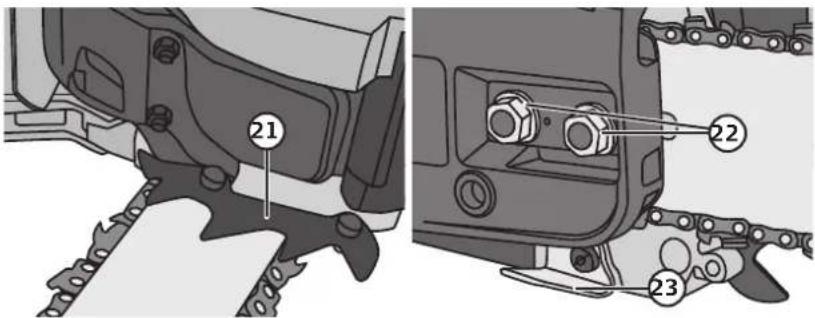
- Guide bar retaining nuts
-
Chain catcher
-
Chain tensioner
-
Drive sprocket
-
Spark plug cap
-
Air filter
-
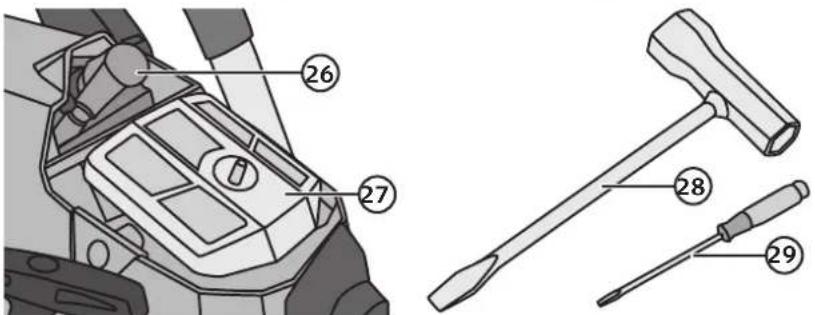
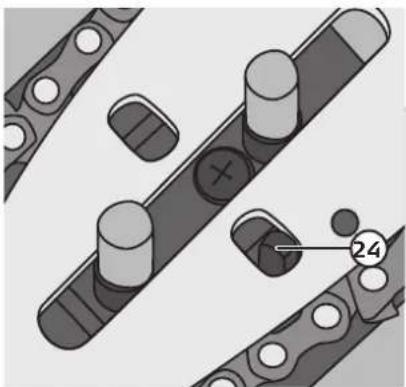
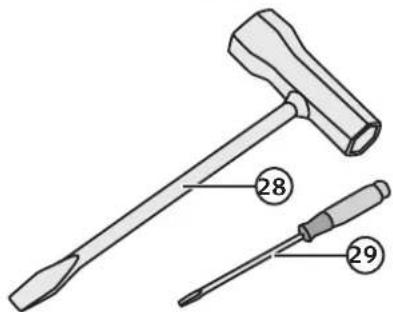
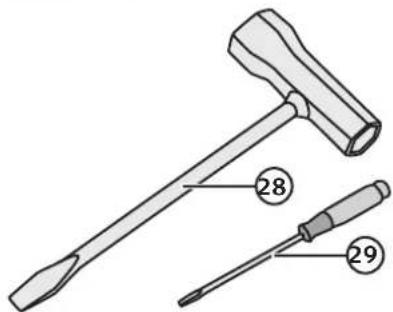
Spark plug spanner
-
Screwdriver
-
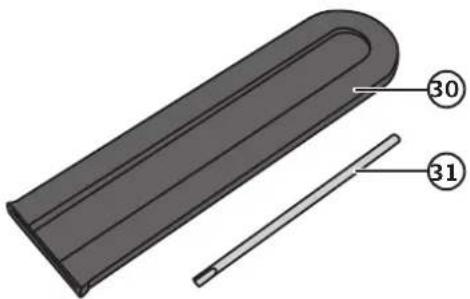
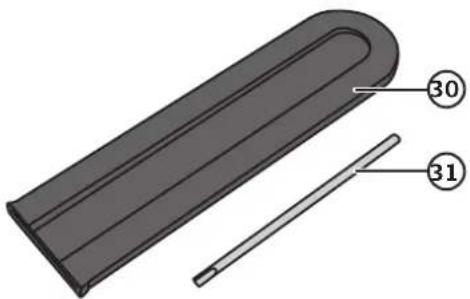
Saw chain scabbard
- File
natural_image
3D diagram of a U-shaped object with two labeled parts (30 and 31), no text or symbols present.Fitting the guide bar and saw chain
Note: Only use a 14" (35 cm) bar and 52-link 3/8" chain.
Warning:
- The saw chain is very sharp. Wear protective gloves.
-
Only use the included guide bar or one recommended by the manufacturer. Use of other types of guide bar can lead to personal injury or damage to the product.
-
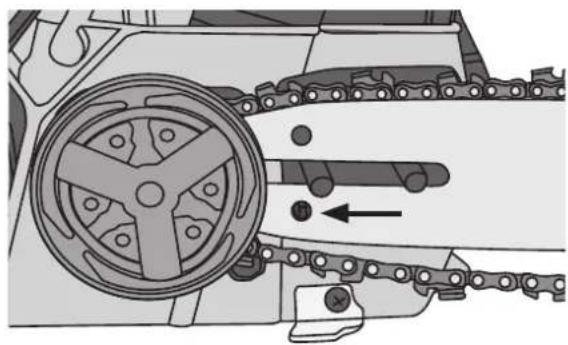
Remove the cover (7) over the drive sprocket and clutch by first removing the two retaining nuts.
natural_image
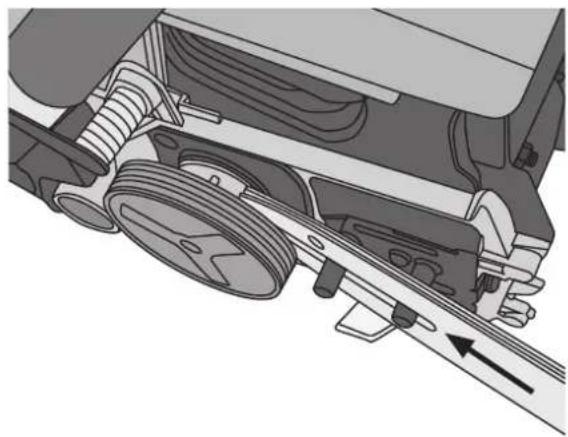
Mechanical assembly diagram showing internal components and motion direction (no text or symbols)- Place the guide bar over the two bolts and slide it towards the drive sprocket.
natural_image
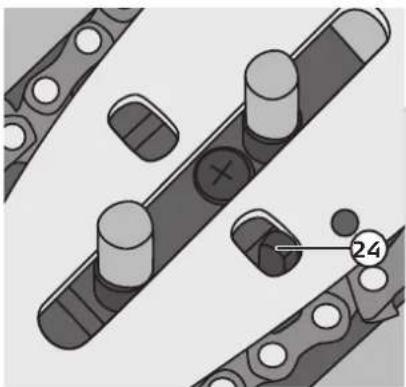
Mechanical assembly diagram showing a wheel and chain with directional arrows (no text or symbols)- Move the guide bar so that the chain tensioner is in its hole in the bar.
natural_image
Diagram of two parallel chains with circular ends, one with an arrow indicating direction (no text or symbols)- Turn the chain by hand so that you can feel that it runs freely and is sitting correctly on the drive sprocket.
- Tighten the two retaining nuts (to a torque of 12–15 Nm).
natural_image
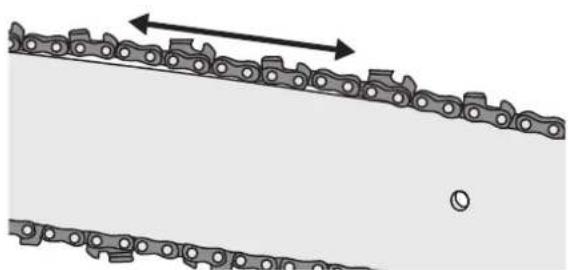
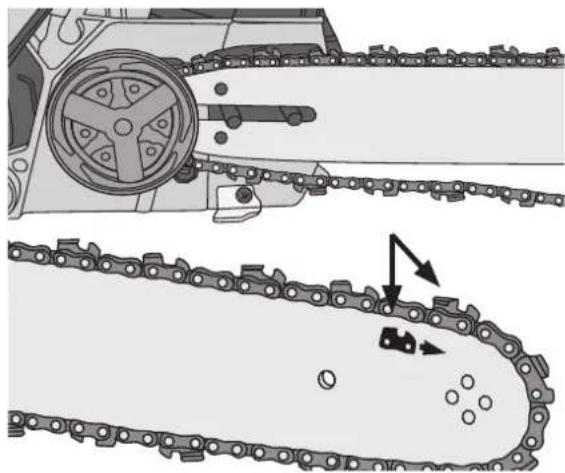
Technical illustration of a mechanical chain assembly with gear and chain links (no text or symbols)- Place the saw chain around the drive sprocket (25) and into the groove in the guide bar with the links pointing in the direction shown on the guide bar.
natural_image
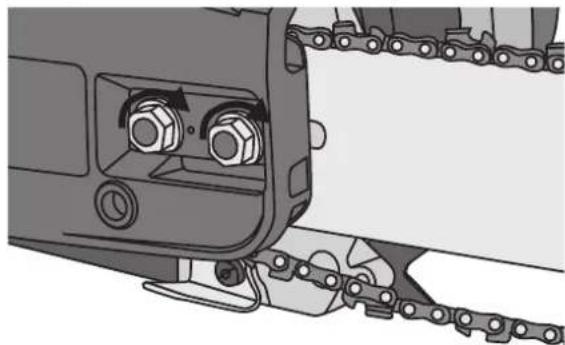
Mechanical assembly diagram showing a chain link mechanism with two bolts and a gear-like component (no text or symbols)- Refit the cover, hand-tighten the nuts enough for the cover to hold the guide bar in place. If you tighten the nuts too much you won't be able to tension the chain.
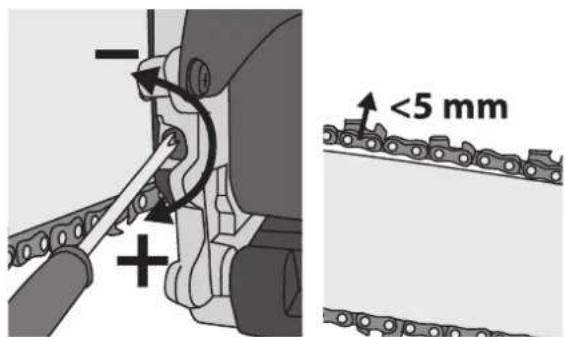
- Tension the chain by turning the adjuster screw clockwise. Tension the chain until it can be lifted no more than 5 mm from the guide bar.
Fuel and lubrication
Petrol
- Warning: Never refuel the saw while the engine is running.
- Let the engine cool for a few minutes before beginning to refuel.
- Use a ready-mixed mixture of environmentally-friendly petrol (alkylate petrol) and 2% oil.
- Wipe off any spilt fuel and move the saw at least 3 metres away from the refuelling location before starting it.
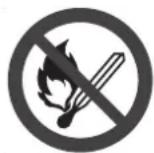
Note: Always refuel outdoors, never indoors.
- Lay the saw on its side, remove the fuel cap and pour in fuel until the tank is roughly 80% full.
- Wipe up any fuel spills immediately.
- Screw the filler cap back on.
Chain oil
Warning: Never start the chainsaw without first filling the chain oil reservoir. Using the saw without chain oil will soon wear out both the chain and the guide bar.
- Lay the saw on its side, remove the oil filler cap and pour in oil until the reservoir is roughly 80% full.
- Wipe up any spills immediately.
- Screw the filler cap back on.
Chain brake
The saw is equipped with an automatic chain brake which stops the saw chain in the event of kickback. The chain brake is activated by the inertial forces triggered by the kickback itself. The chain brake can also be activated manually by pushing the lever (2) forward towards the chain. The brake lever should click into position.
If the chain brake is activated, pull the handle back towards the saw again until it clicks and the brake is disengaged.
Warning: Always check the chain brake before starting the saw.
What to do:
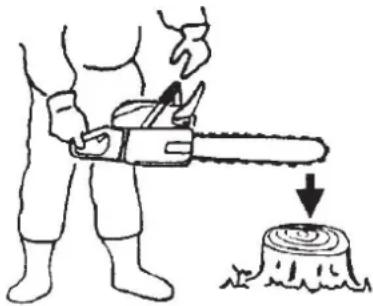
- Hold the saw horizontal over a tree stump or similar. Hold the rear handle and let go of the front handle so that the guide bar bumps against the tree stump. The chain brake should engage automatically. Contact the retailer for reparation if the chain brake does not activate.
- In the event of a kickback and the chain brake activates while you are working, it is important that you release the throttle immediately. Running the engine at high speed with the chain brake activated will damage the clutch.
natural_image
Illustration of a person using a chainsaw to cut tree bark (no text or symbols)Starting the engine
Warning: Check that the saw is intact and that the guide bar and chain are correctly fitted before starting it. The saw must never be started if the chain or guide bar is damaged in any way.
Cold start
- Activate the chain brake.
- Pull the choke control all the way out, this activates the choke plate and supplies starting fuel to facilitate ignition.
- Place the chainsaw securely on the ground. Place one foot on the rear handle and hold the front handle with one hand.
- Pull firmly on the starter handle with your other hand. When the engine has fired once, push the choke control all the way in. The choke is now disengaged but a little starting fuel is kept.
- Firmly pull the starter handle until the engine starts. The engine is now running on starting fuel, squeeze the throttle once to disengage the starting fuel.
Warm start
- Activate the chain brake.
- To activate the starting fuel only, first pull the choke control all the way out and then push it all the way back in. This will help to start the engine.
- Place the chainsaw securely on the ground. Place one foot on the rear handle and hold the front handle with one hand.
- Pull firmly on the starter handle with your other hand until the engine starts. The engine is now running on starting fuel, squeeze the throttle once to disengage the starting fuel.
Check the chain lubrication
Warning! The guide bar, saw chain and drive sprocket should always be assembled while checking the chain lubrication. If you start without these being assembled you can be injured by rotating parts or by the centrifugal clutch's weights. It is very dangerous to start the chain saw if all the parts are not mounted.
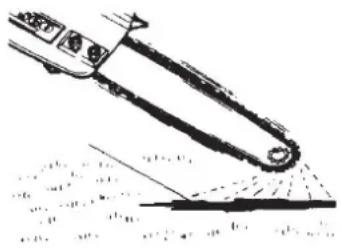
Start the engine and let it run on medium speed. Keep the guide bar with the saw chain close to the ground or an object. If the chain lubrication is working a small amount of oil should spatter in front of and under the guide bar.
natural_image
Illustration of a mechanical device with a triangular load and triangular tip, no text or symbols presentSwitching off
- Release the throttle.
- Turn the power switch to 0.
Tips for using the chainsaw Chopping firewood
Safety rules:
- Make sure that the log is secure and not able to slide/roll around during sawing. Try to fasten small logs before starting to cut them.
- Only use the chainsaw for cutting wood. Make sure that no stones, nails or other objects that can be projected or damage the chain are close to the chainsaw during use. Avoid letting the chainsaw come into contact with the ground, barbed wire fences, etc, during operation.
- Make sure that the tip of the guide bar does not come into contact with small branches, chop one branch/twig at a time. Make sure you have a steady stance, use safety footwear with non-slip soles.
- The chainsaw must always be switched off when you move around. Do not keep your hand on the power trigger so that the saw can start if you trip over something.
Remember
- The chainsaw must always be started first and running at full speed before the saw chain is pressed against the wood.
- Start the saw by pressing in the lock-off switch and squeezing the trigger on the rear handle (16).
- Place the lower part of the spiked bumper (21) against the wood and begin sawing. Pull the chainsaw backwards a little and move it so that the wood is higher up on the spiked bumper and continue sawing.
- Be careful when sawing wood that is split or cracked, splinters might be ejected.
Sawing trees that are under tension or compression
Warning: Be careful when cutting branches that are under tension or compression.
Size up the job and work out how the tree or branch is bowed before starting to saw. If you saw into wood that is under compression, the saw could get stuck; if you saw into wood that is under tension, the wood could split and spring back unexpectedly.
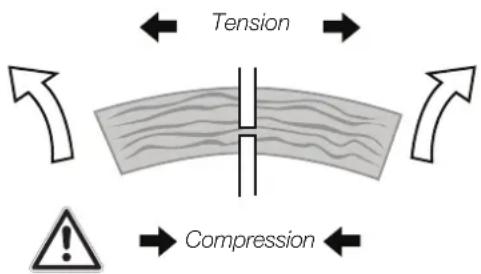
The top of the wood is under tension and the bottom of the wood is under compression.
Warning: The wood will spring upwards when it is cut.
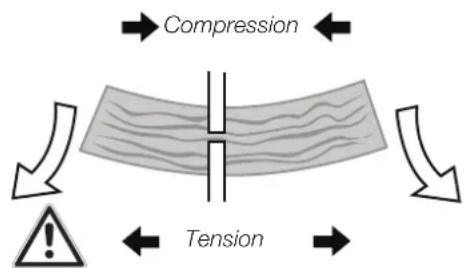
The bottom of the wood is under tension and the top of the wood is under compression.
Warning: The wood will collapse when it is cut.
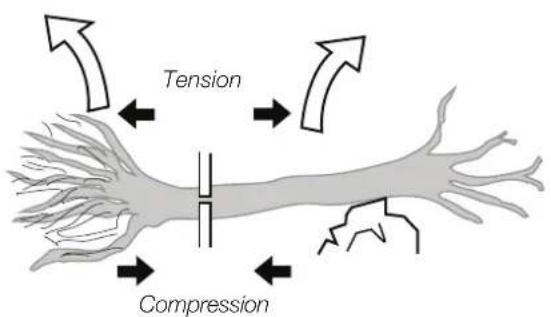
The top of the wood is under tension and the bottom of the wood is under compression.
Warning: The tree trunk will spring up with force and twist when cut and the roots can tip forwards or backwards. Use extreme caution in this situation!
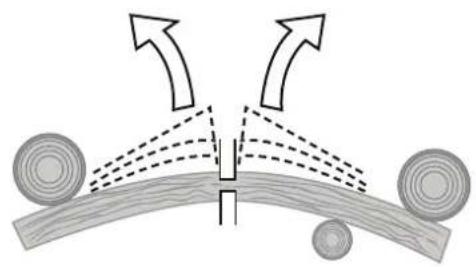
natural_image
Diagram showing two curved arrows pointing upward above a wooden beam with circular supports (no text or symbols)Both sides of the wood are under stress.
Warning: The tree trunk can move sideways when cut. Use extreme caution in this situation!
Tree felling
This chainsaw is not intended for felling, but mostly for small jobs such as removing branches and sawing logs. However, it can be used on exception for felling small trees. Ask someone who knows how to use a chainsaw for advice if you are in the least unsure of how to use the chainsaw.
Protective equipment should always be used for forestry work: Helmet with ear defenders and visor, chainsaw trousers or leggings, chainsaw boots or shoes with non-slip soles and toe caps and of course a first aid kit. Also use work clothes in a visible colour that stands out.
- Small trees can often be felled with one cut almost entirely through the whole trunk and pushed in the correct direction by hand or by a shoulder. (Do not cut completely through, save a little of the trunk to be used as a hinge).
- Larger trees require directional cuts. Directional cuts determine the direction of the fall.
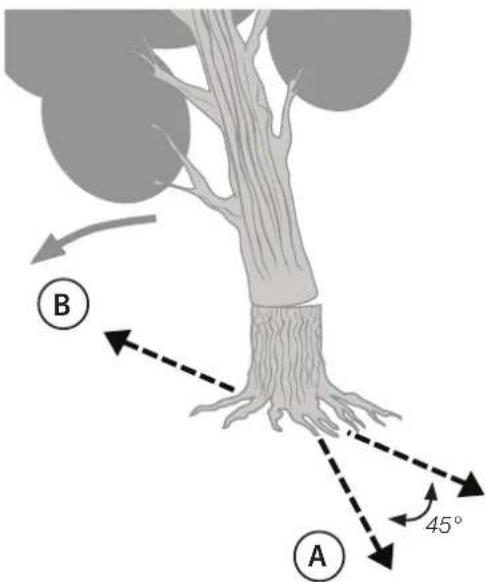
Warning: Always make sure that you have an escape route ready. If needed take away bushes and branches that are in the way. The best escape route (A) is diagonally to the rear of the expected line of fall.
Warning: If the terrain is sloped or uneven, the chainsaw operator should keep on the uphill side of the tree, as the tree is likely to roll or slide downhill after it is felled.
Note: The direction of fall (B) is determined by the notch cut. Before felling, consider the natural lean of the tree, the location of larger branches and the wind direction to judge which way the tree will fall.
Warning: Never fell a tree alone if there is a risk of it falling onto something which can be damaged such as a house or fence. Get help from a professional. Never fell a tree close to a power line or telephone line. Check that there are no onlookers or pets close by before you begin cutting. Look up often and check that no one is approaching the danger area.
- Normal tree felling consists of two cutting phases, the notching undercut (C) and the felling back cut (D).
- Start with the upper notching cut (C) on the side of the tree facing the direction of fall (E). Then make the lower, horizontal notching cut so that it meets the upper notching cut (do not cut too far).
- The notching undercut should be wide enough to steer the tree during as much of the fall as possible. Warning: Never walk in front of a tree in which you have made a notching undercut.
- Make the felling back cut (D) from the other side of the tree, parallel to but 3–5 cm higher than the horizontal notching cut.
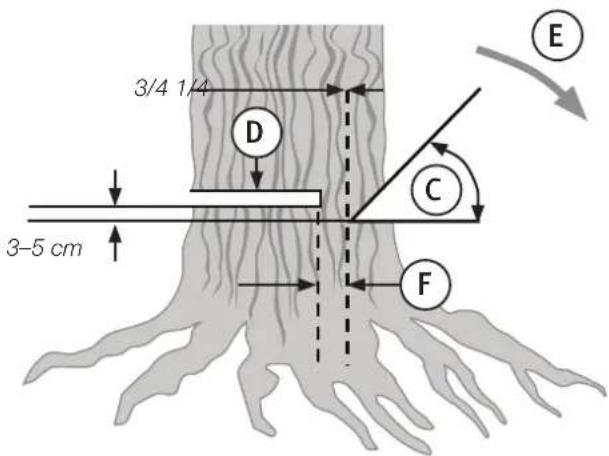
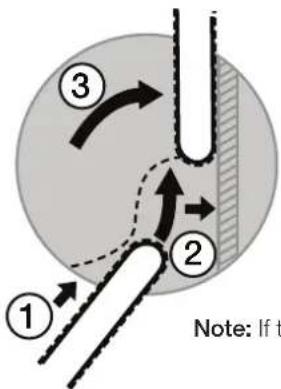
NEVER cut completely through the remaining trunk. ALWAYS leave a hinge (F). It is the hinge that steers the tree during the fall. The hinge wood keeps the tree from twisting and falling in the wrong direction. Do not cut through the hinge. As the saw chain gets close to the hinge, a felling wedge should be inserted into the felling back cut. If the entire felling cut is made before a felling wedge has been placed in the saw cut, there is a risk of the tree rocking backwards and pinching the saw chain. Before felling the tree by driving in the felling wedge, make sure that there are no bystanders or pets in the fall area.
Warning: Before making the final cut, check again that there are no onlookers, pets or other obstacles in the vicinity.
Use a felling wedge of plastic or wood to prevent the guide bar from being clamped down upon in the cut.
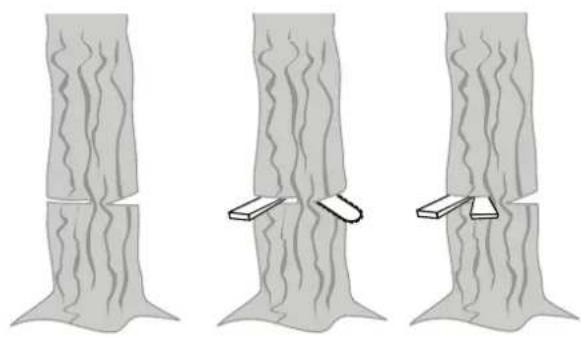
natural_image
Three diagrams showing a tree with wavy lines and two small blocks attached to its branches (no text or symbols present)Note: If the diameter of the tree is larger than the length of the guide bar you must make two cuts.
Warning: When the felling cut (D) has been made so deep that only the hinge (F) is left, the tree can begin to fall, otherwise you must use a felling wedge or crowbar to help.
When the tree begins to fall, remove the chainsaw from the cut and switch off the motor. Retreat diagonally backwards and to the side along your planned escape route and keep your eye on the tree while it is falling.
De-limbing/Snedding
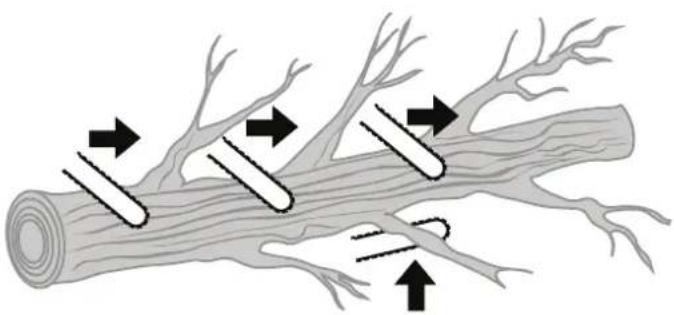
De-limbing (or snedding) means cutting away the branches and shoots of a fallen tree. Start by cutting the higher branches on the tree. Stand to one side of the tree and de-limb them from the other side of the trunk/stem (the trunk will serve as protection between you and the chainsaw). Use caution when cutting branches which are under tension. They must be cut from the correct side; otherwise the guide bar will get stuck.
Warning: Never stand on the stem of a tree while de-limbing (snedding) it.
natural_image
Diagram of tree branches with arrows indicating movement or force, no text or symbols presentBucking
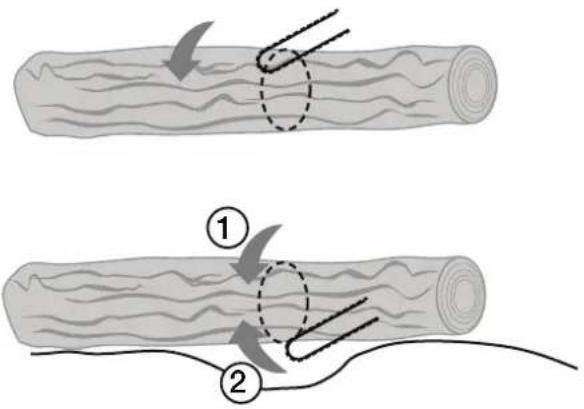
Bucking is cutting fallen tree stems into lengths. Make sure that you are standing steady with good balance. If the ground is sloped you should stand uphill of the tree stem when cutting. The stem of the tree should preferably be chocked up on something so that it is not lying directly on the ground. This helps to prevent the saw chain from cutting into the ground and blunting. If the stem is supported at both ends, you must begin by cutting the stem in half at the middle. Start by cutting half the way through the stem from the upper side, then cut up towards this cut from the underside of the stem (to avoid pinching). Be careful not to let the saw chain come in contact with the ground.
- A tree stem supported along the entire length: Cut from the top first, then roll the stem over and make another cut from the top which meets the first cut.
- A tree stem supported at one end (such as a log lying in a saw horse): Cut 1/3 of the way through the stem from the underside first (to avoid splintering). Then make a cut from above which meets the first cut (to avoid pinching).
- A tree stem supported at both ends: First cut 1/3 of the way through the stem from the upper side (to avoid splitting). Then make a second cut from underneath to meet the first cut.
Note: Whenever possible the stem should be supported and raised off the ground, preferably in a saw horse. If this is not possible, the stem should be supported on limbs, logs or chocks. Make sure that the log is secure and not able to slide/roll around while it is being cut.
Bucking with the help of a saw horse
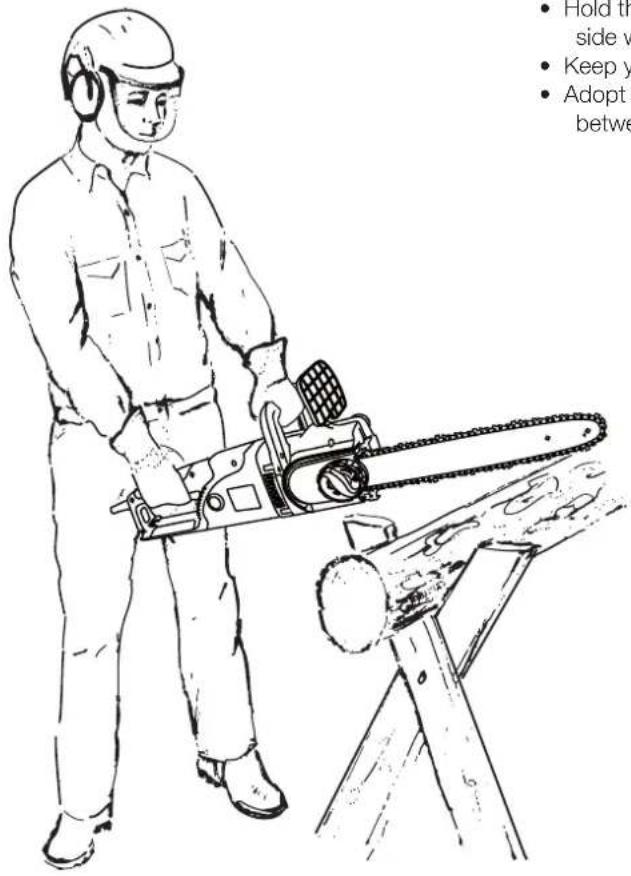
- Hold the chainsaw firmly with both hands on your right-hand side while cutting.
- Keep your left arm as straight as possible.
- Adopt a steady stance with your weight divided equally between both feet.
Care and maintenance
Warning: Switch the saw off and let it cool before inspecting, cleaning or servicing it. Disconnect the spark plug cable from the spark plug to prevent the engine from starting accidentally.
Note:
- Do not expose the saw to constant sunlight or rain.
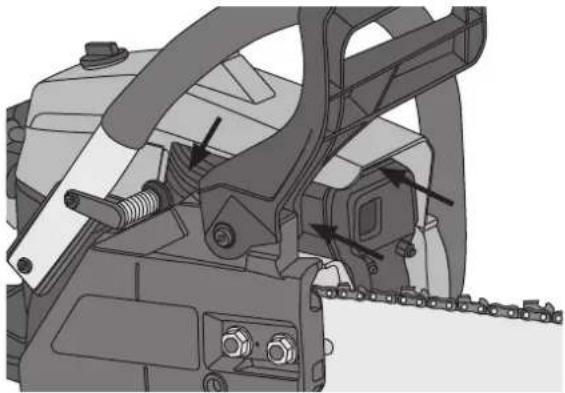
- Air-blast or brush the saw clean after every use. Make sure that the cooling fins and area around the silencer (see fig.) are not clogged with dirt.
natural_image
Mechanical assembly diagram showing a chain drive mechanism with no visible text or symbolsOperational checks
In order for the saw to operate normally and the risk of accidents to be kept to a minimum, check that:
- the chain is stretched and receives enough lubrication. Tighten the chain and top up the oil if necessary.
• all nuts and bolts are tight.
• the chain brake functions as it should. - the throttle and throttle safety catch function as they should.
• the power switch works properly.
Clean the air filter regularly and make sure that the saw is kept clean.
Adjusting the carburettor
Note: The guide bar and saw chain must always be fitted before carburettor adjustments can be made.
The carburettor is carefully calibrated at the factory and normally needs no adjustment. External factors such as temperature and humidity can require the carburettor to be fine-tuned a little for best performance. What to do:
- Check that the air filter is intact and clean and that the fuel is of good quality and the correct mixture ratio.
- Switch the engine off and screw in (clockwise) both the valves (H and L) completely. Note: Do not overtighten them, just close them.
- Then unscrew (anticlockwise) them. H (high speed valve): 3/4 turn ± 3/8 turn. L (low speed valve): 1½ turns ± 1/4 turn
- Start the engine and warm it up on half-throttle.
- Carefully turn the low speed valve (L) clockwise to a position which gives the highest idle speed. Then turn the valve back 14 turn anticlockwise.
- Turn the idle screw (T) anticlockwise and decrease the engine speed until the saw chain stops.
- Turn the idle screw (T) clockwise if the idle speed is too low.
- Make a test cut and adjust the high speed valve (H) for maximum power, not for maximum speed. The engine should not race, it should run smoothly.
Air filter
- The exterior of the saw should be wiped clean using a soft, damp cloth. Use only mild cleaning agents, never solvents or corrosive chemicals.
natural_image
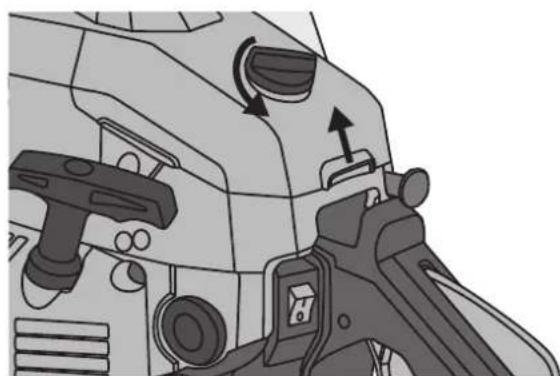
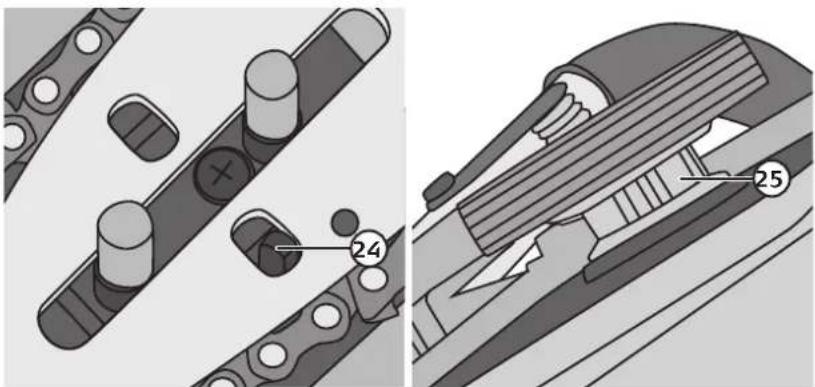
Mechanical device component diagram showing lever, grip, and adjustment knob (no text or symbols)- Undo the top cover locking knob (12) and remove the cover.
natural_image
Diagram of a vehicle's internal components with directional arrows indicating flow or movement (no text or symbols)-
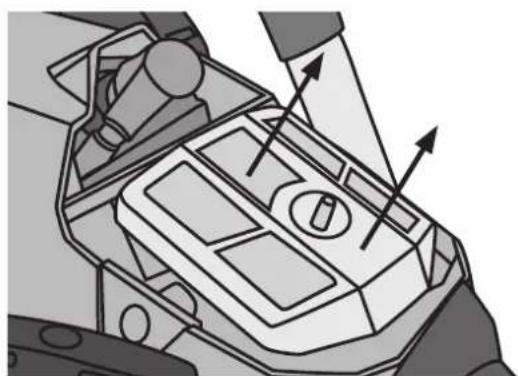
Lift the air filter off the carburettor.
-
Carefully take the filter apart.
- Wash the filter in petrol or soapy water and blow it clean from the inside out with compressed air.
- Reassemble the air filter and refit it in the reverse order.
natural_image
Line drawing of a rectangular device with three compartments and a knife inserted (no text or symbols)Spark plug
- The exterior of the saw should be wiped clean using a soft, damp cloth. Use only mild cleaning agents, never solvents or corrosive chemicals.
natural_image
Mechanical device component diagram showing lever, grip, and adjustment knob (no text or symbols)-
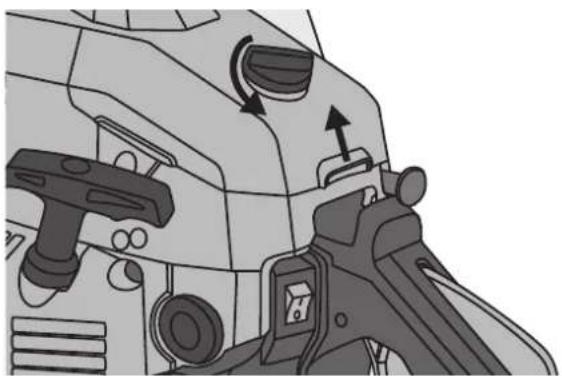
Undo the top cover locking knob (12) and remove the cover.
-
Remove the spark plug.
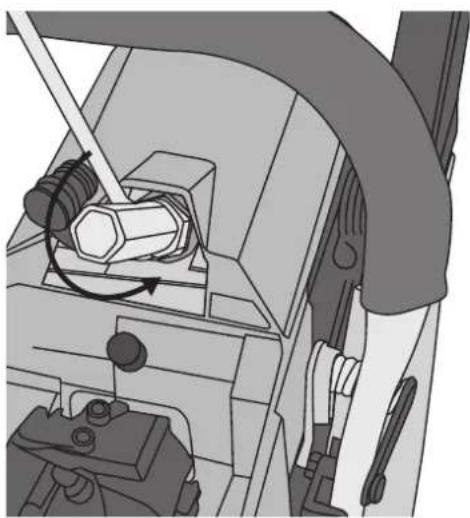
- Clean the spark plug with a wire brush if necessary and check that the electrode gap is 0.6–0.7 mm.
- Replace the spark plug with a new one if necessary. Check the gap of the new spark plug before fitting it.
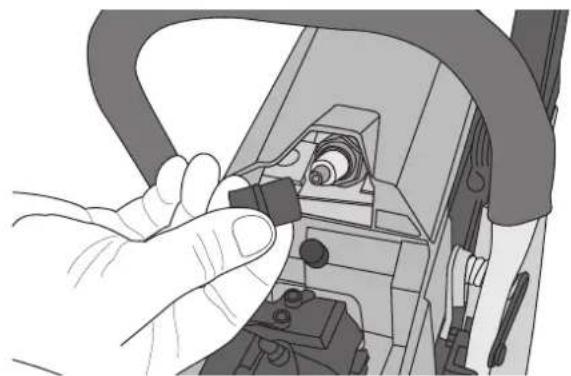
natural_image
Close-up of a hand holding a small black component inside a mechanical device (no visible text or symbols)- Remove the spark plug cap from the spark plug.
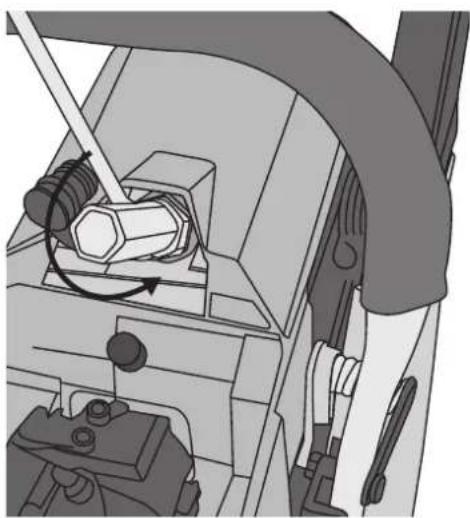
natural_image
Mechanical assembly diagram showing a tool interacting with a hexagonal nut (no text or symbols visible)Maintenance of guide bar and saw chain
Saw chain
Warning! It is very important that the saw chain is sharp for safe and effective use of the chain saw.
Chain should be sharpened:
- When saw dust becomes like powder.
- When the chain saw needs to be pressed against the object to be cut.
- When the cut is not straight.
- When vibration increases.
- When use of fuel increases.
Warning! Always use work gloves while handling the saw chain.
Before filing begins:
• Make sure that the chain saw is shut off.
• Make sure that the chain saw is held in a steady grip.
- Make sure that you have the correct equipment: A good file with the correct dimension: ∅ 4mm and preferably some type of filing gauge for filing at the right angle and depth. Chain type: 91VG
File diameter: ∅ 4 mm (5/32")
Place the saw in a cut track or in a screw vice so that both hands can be used for filing.
Place the file in a tooth and push the file forward according to the picture.
File each tooth equally. Keep count of how many cutting teeth which are filed so you know when the whole chain is filed.
When all the teeth have been filed the clearance heels must be measured and filed to correct height according to the picture.
Warning! Remember to round off the support heels to reduce the risk for kickback or chain break.
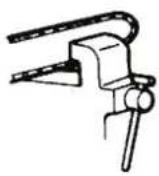
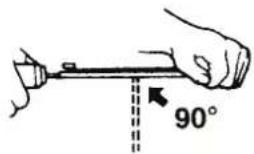
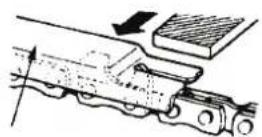
Support template
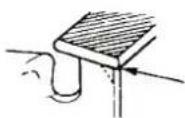
Round off the support heels (keep the original angle)
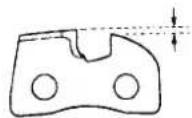
Support size 0.64 mm.
Check that all the cutting teeth have the same length and cutting angle illustrated in the picture:
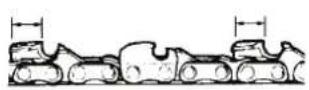
Cutter length Filing angle Angle cutting
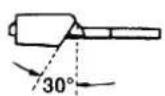
teeth side
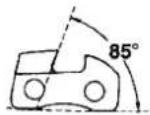
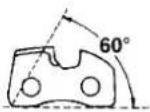
Cutting teeth
Guide bar
Turn the guide bar once in a while to avoid wearing it out on one side.
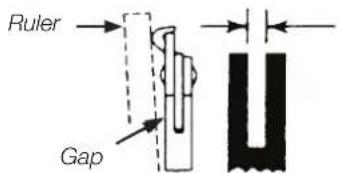
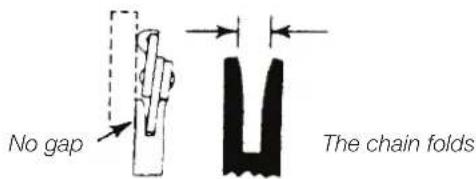
The guide track on the guide bar should have straight edges. Check for wear: Press a ruler against the guide bar and up against the outside of a guide link. If a gap between them is seen then the guide bar is good. If no gap is seen then the guide track is worn and the guide bar must be changed.
Transport and storage
Transport
- In order to avoid fuel leaks, damage to the saw and personal injury: secure the saw firmly so that there is no risk of it coming loose during transport.
• Always make sure that the guide bar scabbard is fitted during transport.
Storage
The following actions should be taken before the saw is put away for storage for an extended period (more than 30 days).
- Empty the fuel tank.
- Start the engine and let it run until it is out of fuel.
- Allow the engine to cool for 5 minutes.
- Remove the spark plug.
- Pour about 1 teaspoonful of 2-stroke engine oil into the cylinder.
- Turn the engine over by hand using the starter handle a few times to coat all the parts with oil.
- Refit the spark plug.
- Clean the exterior of the saw.
- The saw should be stored in a dry location away from any sources of ignition such as naked flames, sparks, heaters and smoking areas.
Using the saw after long-term storage
- Remove the spark plug.
- Turn the engine over by hand using the starter handle a few times to remove any excess oil from the cylinder.
- Clean the electrodes and check that the electrode gap is 0.028–0.031 inch (0.6–0.7 mm).
- Check that the saw is lubricated and that all the safety features work as they should.
- Top up the fuel and chain oil.
Troubleshooting guide
| Problem with starting. | Check that the fuel does not contain water or has become bad. | Rinse the can out and fill with new fuel. |
| Check if the engine has “flooded” (too much petrol in the cylinders). | Take out the spark plug and dry it.Pull the start cord a couple of times to empty the cylinder (without the spark plug and with the choke lever pushed in). | |
| Check if the spark plug sparks. Change spark plug. | ||
| Weak power/weak acceleration/weak idle. | Check that the fuel does not contain water or has become bad. | Rinse the can out and fill with new fuel. |
| Check the air filter and fuel filter. Clean or change if needed. | ||
| Check carburettor setting. Adjust the nozzle. | ||
| No feed from chain oil. | Check if the oil has the right quality and viscosity. | Rinse the can out and fill with new chain oil. |
If this trouble shooting schedule does not assist in finding the fault you should leave the chain saw to a repair shop.
Responsible disposal
This symbol indicates that this product should not be disposed of with general household waste. This applies throughout the entire EU. In order to prevent any harm to the environment or health hazards caused by incorrect waste disposal, the product must be handed in for recycling so that the material can be disposed of in a responsible manner. When recycling your product, take it to your local collection facility or contact the place of purchase. They will ensure that the product is disposed of in an environmentally sound manner.
Specifications
Engine
Engine capacity 37 cm ^4
Power 1.2 kW/1.6 hk @ 8000 min -1
Idle speed 2800 ± 400 min -1
Max engine speed 10000 min -1
Fuel Mixture of environmental petrol with 2% oil or 50:1 mixture of petrol and two-stroke oil.
Fuel capacity 310 cm ^4
Chain lubrication Saw chain oil
Oil capacity 210 cm ^4
Chain oil pump Automatic
Carburettor Walbro WT diaphragm type
Ignition system Breakerless (CDI)
Spark plug Bosch WSR6F
Chain sprocket 6T × 3/8" (teeth × pitch)
Dimensions 73 × 25 × 25 cm
Dry weight 4.4 kg w/o guide bar and chain, 4.9 kg with guide bar and chain
Guide bar
| Type | With nose wheel |
| Length | 14" (350 mm) |
Saw chain
Type 91VG
Pitch 3/8" (9.53 mm)
Gauge 0.05" (1.3 mm)
Links 52
Noise level
Guaranteed sound power level (LwA) 99.7 dB(A)
Measured sound power level (LwA) 109.8 dB(A)
Sound pressure level (LpA) 100 dB(A), K = 3 dB(A)
Vibration value front handle 7.87 m/s ^2 , K = 1.5 m/s ^2
Vibration value rear handle 9.44 m/s ^2 , K = 1.5 m/s ^2
Motorsåg
Art.nr 31-9034 Modell WLCS38A-375
natural_image
Mechanical assembly diagram showing a tool interacting with a chain (no text or symbols visible)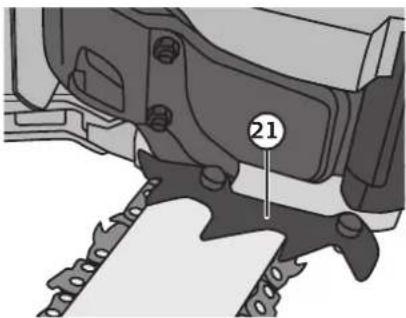
natural_image
Mechanical component diagram showing a gear assembly with labeled part 21 (no text or symbols beyond label)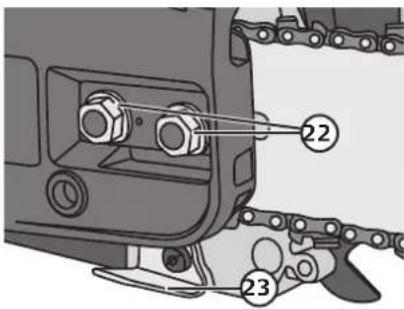
natural_image
Mechanical assembly diagram showing components with no visible text or symbols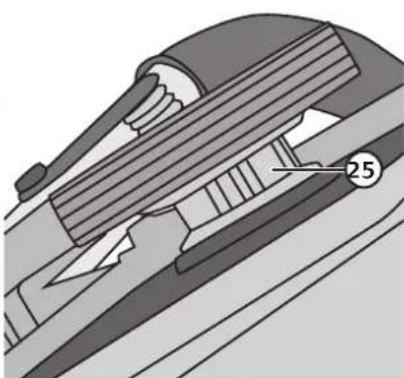
natural_image
Technical diagram of a mechanical component with numbered annotation (25), no readable text or symbols present.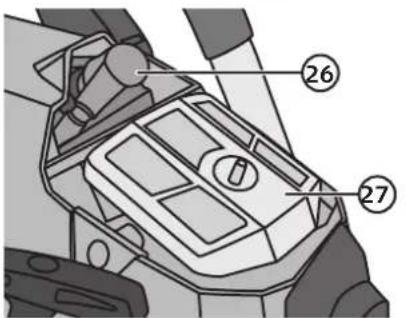
natural_image
Illustration of a hammer and screwdriver tool with labeled parts (no text or symbols present)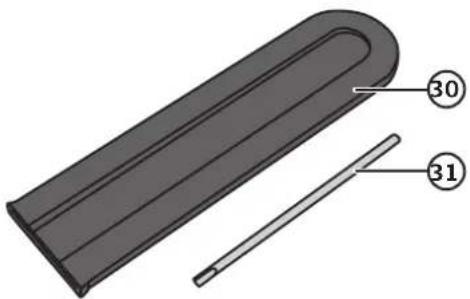
natural_image
3D diagram of a U-shaped object with two labeled parts (30 and 31), no text or symbols present.natural_image
Mechanical assembly diagram showing internal components and a directional arrow (no text or symbols)natural_image
Mechanical assembly diagram showing a wheel and chain with directional arrows indicating motion (no text or symbols)natural_image
Diagram of two parallel chains with circular ends, one with an arrow indicating direction (no text or symbols)natural_image
Technical illustration of a mechanical chain assembly with gear and chain links (no text or symbols)natural_image
Mechanical assembly diagram showing a chain link mechanism with two bolts and a chain attachment (no text or symbols)natural_image
Illustration of a person using a chainsaw to cut tree roots (no text or symbols)Start
natural_image
Illustration of a mechanical device with a lever and pivot point, no text or symbols presentSlå av
natural_image
Diagram showing two curved arrows pointing upward above a wooden beam with circular supports (no text or symbols)natural_image
Three diagrams showing a tree with wavy lines and two small blocks attached to it, no text or symbols present.natural_image
Diagram of tree branches with arrows indicating movement or force (no text or labels)Kapning
natural_image
Illustration of a wooden log with visible grain and a curved arrow indicating direction (no text or symbols)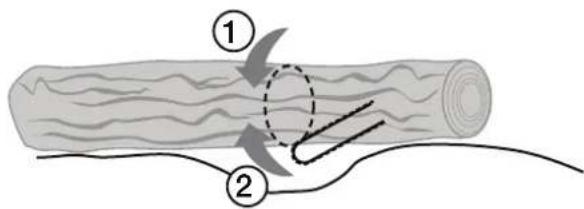
natural_image
Mechanical assembly diagram showing a chain drive mechanism with no visible text or symbolsnatural_image
Diagram of a mechanical device with directional arrows indicating rotation or movement (no text or symbols present)natural_image
Diagram of a vehicle dashboard with directional arrows indicating movement or force (no text or symbols present)natural_image
Line drawing of a device with a handle and three compartments (no text or symbols)Tändstift
natural_image
Mechanical device component diagram showing lever, grip, and adjustment knob (no text or symbols)natural_image
Close-up of a hand holding a small electronic component, possibly a connector or socket, inside a mechanical device (no visible text or symbols)natural_image
Mechanical assembly diagram showing a tool interacting with a hexagonal nut (no text or symbols visible)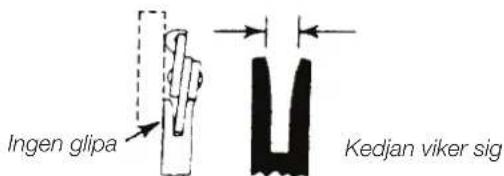
natural_image
Mechanical assembly diagram showing a lever mechanism with a numbered component (20), no visible text or symbols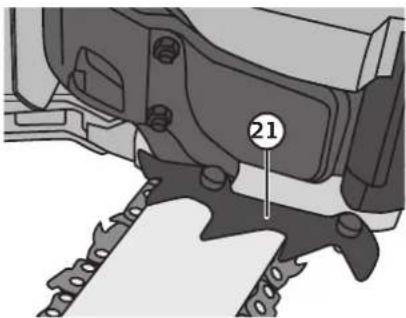
natural_image
Mechanical component diagram showing a gear assembly with labeled part 21 (no text or symbols beyond label)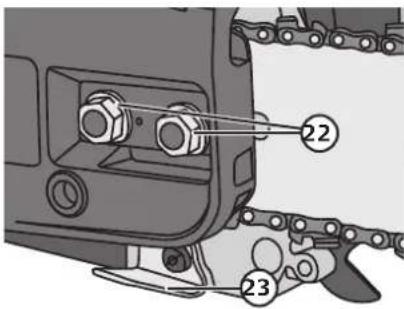
natural_image
Mechanical component diagram showing a shaft with multiple cylindrical parts and a labeled part '24' (no text or symbols beyond the label)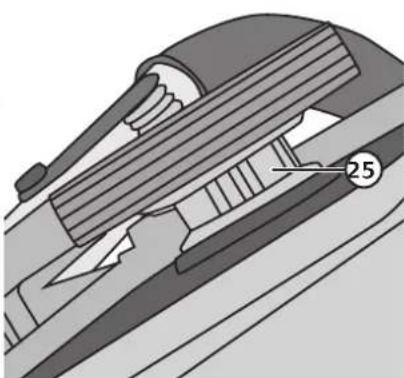
natural_image
Cross-sectional diagram of a mechanical component with numbered annotation (25), no readable text or symbols present.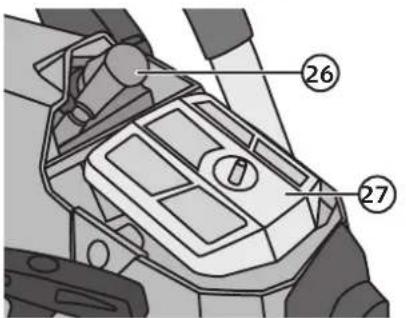
natural_image
Illustration of a hammer and screwdriver with numbered parts (no text or symbols)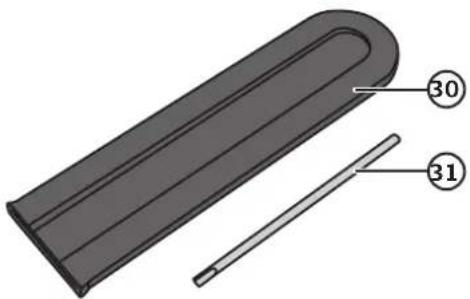
natural_image
3D diagram of a U-shaped object with two labeled parts (30 and 31), no text or symbols present.natural_image
Mechanical assembly diagram showing internal components and motion direction (no text or symbols)natural_image
Mechanical assembly diagram showing a wheel and chain with directional arrows (no text or symbols)natural_image
Diagram of two mechanical linkages with directional arrows indicating movement (no text or symbols)natural_image
Technical illustration of a chain-linking device with gear and chains, showing mechanical components and motion arrows (no text or symbols)natural_image
Mechanical assembly diagram showing a chain link mechanism with two circular components and directional arrows (no text or symbols)natural_image
Illustration of a person using a chainsaw to cut tree bark (no text or symbols)Start
natural_image
Simple line drawing of a mechanical device with a lever and base, no text or symbols presentSlå av
natural_image
Diagram showing two curved wooden beams with circular ends and directional arrows indicating flow or movement (no text or symbols)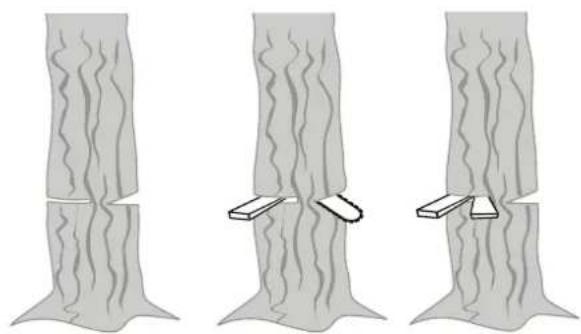
natural_image
Three diagrams showing a tree with wavy lines and two small blocks attached to its base (no text or symbols present)natural_image
Diagram of a tree with branches and arrows indicating movement or force (no text or symbols)Kapping
natural_image
Illustration of a wooden log being cut with a tool, showing texture and a dashed circle highlighting the point (no text or symbols)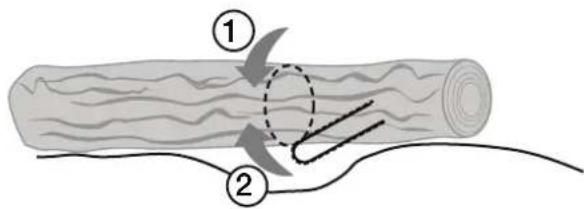
natural_image
Mechanical assembly diagram showing a chain drive mechanism with no visible text or symbolsnatural_image
Mechanical device interior showing lever, grip, and adjustment knob (no text or symbols)natural_image
Diagram of a vehicle dashboard with directional arrows indicating movement or force (no text or symbols present)natural_image
Line drawing of a rectangular device with three compartments and a knife inserted (no text or symbols)Tennplugg
natural_image
Mechanical device component diagram showing lever, grip, and adjustment knob (no text or symbols)natural_image
Hand inserting a small component into a mechanical device (no text or symbols visible)natural_image
Mechanical assembly diagram showing a tool interacting with a hexagonal nut and mechanical components (no text or symbols visible)Tennplugg Bosch WSR6F
Kjededrev 6T × 3/8" (tenner x deling)
Mål 73 × 25 × 25 cm
Deling 3/8" (9,53 mm)
Sporvidde 0,05" (1,3 mm)
Lenker 52
Lyd
Garantert lydeffektnivå (LwA) 99,7 dB(A)
Målt lydeffektnivå (LwA) 109,8 dB(A)
natural_image
Mechanical assembly diagram showing internal components and motion direction (no text or symbols)natural_image
Mechanical assembly diagram showing a wheel and chain with directional arrows (no text or symbols)natural_image
Diagram of two conveyor chains with directional arrows indicating movement (no text or symbols)natural_image
Technical illustration of a mechanical chain assembly with gear and chain links (no text or symbols)natural_image
Mechanical assembly diagram showing a chain link mechanism with two bolted components and directional arrows (no text or labels)natural_image
Illustration of a person using a chainsaw to cut tree roots (no text or symbols)Käynnistys
natural_image
Illustration of a mechanical tool interacting with a surface, showing motion lines and no text or symbolsSammuttaminen
natural_image
Diagram showing two curved arrows interacting with a wooden beam and circular objects (no text or symbols)natural_image
Three-panel illustration showing a tree with wavy, layered bark structures and small rectangular objects on the base (no text or symbols)natural_image
Diagram of tree branches with arrows indicating movement or force (no text or symbols)Katkaisminen
natural_image
Illustration of a wooden log with a curved arrow pointing to a circular hole, no text or symbols present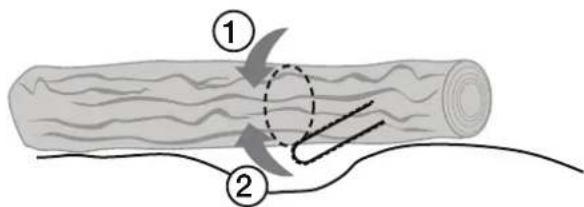
natural_image
Mechanical assembly diagram showing a chain drive mechanism with no visible text or symbolsnatural_image
Mechanical device component diagram showing lever, grip, and adjustment knob (no text or symbols)natural_image
Diagram of a vehicle dashboard with directional arrows indicating movement or force (no text or symbols present)natural_image
Line drawing of a tray with three compartments and a knife inserted (no text or symbols)Sytytystulppa
natural_image
Mechanical device component diagram showing lever, grip, and adjustment knob (no text or symbols)natural_image
Close-up of a hand holding a small black component inside a mechanical device (no visible text or symbols)- Irrota sytytyshattu sytytystulpasta.
natural_image
Mechanical assembly diagram showing a tool interacting with a hexagonal nut (no text or symbols visible)
natural_image
3D diagram of a U-shaped object with two labeled parts (30 and 31), no text or symbols present.natural_image
Mechanical assembly diagram showing internal components and motion direction (no text or symbols)natural_image
Mechanical assembly diagram showing a wheel and chain with directional arrows (no text or symbols)natural_image
Diagram of two parallel chain links with directional arrows indicating movement (no text or symbols)natural_image
Technical illustration of a mechanical chain assembly with gear and chains, showing alignment and disassembly (no text or symbols)natural_image
Mechanical assembly diagram showing a chain link and two circular components (no text or symbols)natural_image
Illustration of a person using a chainsaw to cut tree bark (no text or symbols)Start
natural_image
Illustration of a mechanical device with a lever and pivot point, no text or symbols presentAusschalten
natural_image
Diagram showing two curved arrows pointing upward above a wooden beam with circular supports (no text or symbols)natural_image
Three diagrams showing a tree with wavy lines and two small blocks attached to its branches (no text or symbols present)natural_image
Diagram of a tree with branches and arrows indicating movement or force (no text or symbols)Baumstamm ablängen
natural_image
Mechanical assembly diagram showing a chain drive mechanism with no visible text or symbolsnatural_image
Mechanical device component diagram showing lever, grip, and adjustment knob (no text or symbols)natural_image
Technical diagram of a vehicle dashboard with directional arrows indicating components (no text or symbols)natural_image
Line drawing of a tray with three compartments and a knife inserted (no text or symbols)Zündkerze
natural_image
Mechanical device component diagram showing lever, grip, and adjustment knob (no text or symbols)natural_image
Illustration of a hand inserting a small component into a mechanical device (no text or symbols visible)natural_image
Mechanical assembly diagram showing a tool interacting with a component, no visible text or symbolsnatural_image
Pure mechanical part diagrams without any text, numbers, or symbolsKette gibt nach
Declaration of Conformity
Machinery Directive 2006/42/EC
EN ISO 11681-1:2011
EC TYPE CERTIFICATE, NO. 12SHW1432-02
ISSUED BY THE FOLLOWING NOTIFIED BODY:
UTFÄRDATS AV FÖLJANDE ANMÄLDA ORGAN:
UTSTEDT AV F∅LGENDE TEKNISK KONTROLLORGAN:
MYÖNTÄNYT SEURAAVA ILMOITETTU LAITOS:
Manager Technique & Quality
Insjön, Sweden, 2016-04-08
Sverige
10 - 13 Market Place
Kingston Upon Thames
Surrey
KT1 1JZ
Deutschland
Kundenservice

- Viktig information:
- Safety
- 1) Work area safety
- 2) Personal safety
- 3) Use and maintenance of the saw
- Causes and prevention of kickback
- WARNING: BEWARE OF KICKBACK!
- General safety rules
- Safety symbols
- Product description
- Fitting the guide bar and saw chain
- Warning:
- Fuel and lubrication
- Petrol
- Chain oil
- Chain brake
- Warning: Always check the chain brake before starting the saw.
- Starting the engine
- Cold start
- Warm start
- Check the chain lubrication
- Switching off
- Tips for using the chainsaw Chopping firewood
- Remember
- Sawing trees that are under tension or compression
- Tree felling
- De-limbing/Snedding
- Bucking
- Bucking with the help of a saw horse
- Care and maintenance
- Note:
- Operational checks
- Adjusting the carburettor
- Air filter
- Spark plug
- Maintenance of guide bar and saw chain
- Saw chain
- Before filing begins:
- Guide bar
- Transport and storage
- Transport
- Storage
- Using the saw after long-term storage
- Troubleshooting guide
- Responsible disposal
- Specifications
- Engine
- Noise level
- Motorsåg
- Start
- Slå av
- Kapning
- Tändstift
- Kapping
- Tennplugg
- Lyd
- Käynnistys
- Sammuttaminen
- Katkaisminen
- Sytytystulppa
- Ausschalten
- Baumstamm ablängen
- Zündkerze
- Declaration of Conformity
- Sverige
- Deutschland
Brand : Cocraft
Model : KCM22B
Category : Saw