
Multi AeroCooker 182090 - Deep fryer PRINCESS - Free user manual and instructions
Find the device manual for free Multi AeroCooker 182090 PRINCESS in PDF.


| Product type | Multi-function hot air fryer with pressure cooking |
| Brand | Princess |
| Model | Multi AeroCooker 182090 |
| Power supply | Mains 220-240 V, 50/60 Hz (standard estimate) |
| Power | 1500 W (standard estimate for this type of appliance) |
| Main functions | AeroFry, Grill/Roast, Bake, Pressure Cook, Slow Cook, Steam, Soup/Broth, Rice/Grains, Yogurt, Stir Fry |
| Additional programs | Dehydration, Keep Warm, Delayed Start |
| Tank capacity | Approximately 5 L (estimate based on indicated quantities) |
| Tank material | Removable non-stick pot |
| Coating | Non-stick (do not use metal utensils) |
| Control panel | Touchscreen with digital display and +/-, Start/Stop, Steam Release, Delay Timer buttons |
| Display | Alternating temperature and time |
| Safety | Lid lock, plate detection, automatic shut-off, error messages (NOT-LOCK, NO-POT) |
| Cleaning | Removable parts washable in soapy water or dishwasher (pot, basket, steam rack). Do not use metal scouring pads. |
| Included accessories | Non-stick pot, fryer grid, pressure plate, basket, steam rack, Aeroflow support, plate handle, basket handle, condensation tray |
| Spare parts | Available at www.princesshome.eu |
| Maintenance | Clean after each use, dry thoroughly, store in a cool, dry place |
| Prohibited use | Do not deep-fry in oil, do not use metal utensils, do not immerse base |
| Warranty | Consult the manual or manufacturer's website |
| Manual | 212 pages, available for free download at notice-facile.com |
Frequently Asked Questions - Multi AeroCooker 182090 PRINCESS
User questions about Multi AeroCooker 182090 PRINCESS
0 question about this device. Answer the ones you know or ask your own.
Ask a new question about this device
Download the instructions for your Deep fryer in PDF format for free! Find your manual Multi AeroCooker 182090 - PRINCESS and take your electronic device back in hand. On this page are published all the documents necessary for the use of your device. Multi AeroCooker 182090 by PRINCESS.
USER MANUAL Multi AeroCooker 182090 PRINCESS
Multi AeroCooker
01.182090.01.001
PRINCESS
PARTS DESCRIPTION / ONDERDELENBESCHRIJVING / DESCRIPTION DES PIÈCES / TEILEBESCHREIBUNG / DESCRIPCIÓN DE LAS PIEZAS / DESCRIÇÃO DOS COMPONENTES / DESCRIZIONE DELLE PARTI / BESKRIVNING AV DELAR / OPIS CZĘŚCI / POPIS SOUĆASTÍ / POPIS SÚĆASTÍ / ОПИСАНИЕ ЗАПЧАСТИ
SAFETY
- By ignoring the safety instructions the manufacturer cannot be held responsible for the damage.
- If the supply cord is damaged, it must be replaced by the manufacturer, its service agent or similarly qualified persons in order to avoid a hazard.
- Never move the appliance by pulling the cord and make sure the cord cannot become entangled.
• The appliance must be placed on a stable, level surface. - The user must not leave the device unattended while it is connected to the supply.
- This appliance is not intended for use by persons (including children) with reduced physical, sensory or mental capabilities, or lack of experience and knowledge, unless they have been given supervision or instruction concerning use of the appliance by a person responsible for their safety.
-
Close supervision is necessary when any appliance is used by or near children.
-
WARNING: Spilled food can cause serious burns. Keep appliance and cord away from children. Never drape cord over edge of counter, never use outlet below counter, and never use with an extension cord.
- The use of accessory attachments not recommended by the appliance manufacturer may cause injuries.
- Do not use outdoors.
- Do not place on or near a hot gas or electric burner, or in a heated oven.
- Do not clean with metal scouring pads. Pieces can break off the pad and touch electrical parts, creating a risk of electric shock.
- Use extreme caution when removing tray or disposing of hot grease
- Extreme caution must be used when moving an appliance containing hot oil or other hot liquids.
- CAUTION: To protect against damage or electric shock, do not cook in the base unit. Cook only in the cooking pot provided.
- To disconnect, press the power button, then remove plug from wall outlet.
- Do not use pressure plate, air fry grate, or cooking pot if dented or worn.
PRINCESS
Instruction manual
- WARNING: Never deep-fry or pressure-fry in the Aerofryer, regardless of whether the lid is on or off. THIS IS DANGEROUS, AND CAN CAUSE A FIRE AND SERIOUS DAMAGE.
- ALWAYS use detachable handle to insert or remove aerofryer grate or pressure plate insert.
- Ensure filter and pressure release valve are free of food residue or debris.
- Never fill the cooking pot over the max fill line.
- Before placing cooking pot into the base, ensure both pot and base are dry by wiping with a soft cloth.
• Always ensure the appliance is properly assembled before use. - This appliance cooks under pressure. Improper use may result in scalding injury. Make certain unit is properly closed before operating.
- When using the pressure plate, always ensure pressure plate is installed and lid is properly closed before operating.
- Do not cover the pressure release valve.
-
Care should be taken when lifting the cooking pot from the base.
-
When removable cooking pot is empty do not heat it for more than 10 minutes, this may damage the cooking surface.
- When using the Stir fry function always leave lid in the open position.
• To avoid possible damage from steam, place the unit away from walls and cabinets during use. - Never lift the unit by the lid side tabs.
- Never touch exposed heating element.
• To protect yourself against an electric shock, do not immerse the cord, plug or appliance in the water or any other liquid.
• This appliance is intended to be used in household and similar applications such as: - Staff kitchen areas in shops, offices and other working environments.
- By clients in hotels, motels and other residential type environments.
• Bed and breakfast type environments. - Farm houses.
• Children shall not play with the appliance. - This appliance shall not be used by children. Keep the appliance and its cord out of reach of children.
• To protect yourself against an electric shock, do not immerse the cord, plug or appliance in the water or any other liquid.
- Do not heat the food for too long.
• The heating element surface is subject to residual heat after use.
- The connector must be removed before the appliance will be cleaned, please make sure the inlet is completely dry before the unit will be used again.
- The pressure container must not be opened until the pressure has decreased sufficiently and during use.

liable to get hot during
- WARNING: If the surface is cracked, switch off the appliance to avoid the possibility of an electric shock.
- The temperature of accessible surfaces may be high when the appliance is operating.
- The appliance is not intended to be operated by means of an external timer or a separate remote-control system.
• The appliance is to be connected to a socket-outlet having an earthed contact (for class I appliances).
- In order to prevent disruptions of the airflow do not put anything on top of the appliance and make sure there is always 10 centimeter of free space around the appliance.
- This appliance is only to be used for household purposes and only for the purpose it is made for. In worst case the food can catch fire. (i.e. do not use more than one tea spoon of oil, no meat that will release to much grease or water intended for boiling foods.
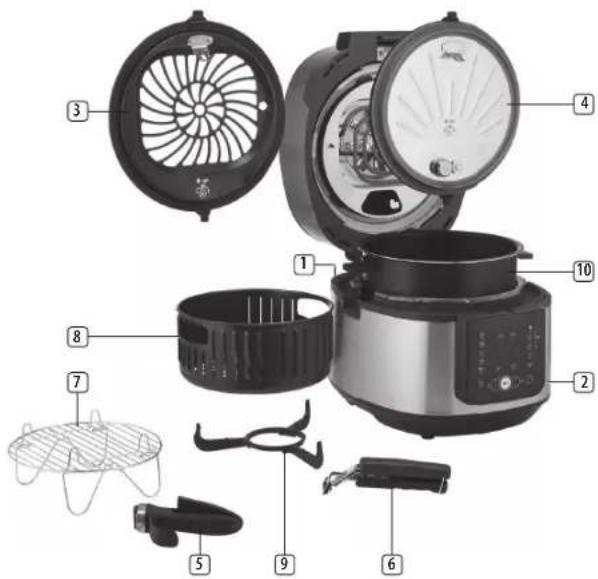
PARTS DESCRIPTION
- Condensation tray
- Unit
- Aerofryer grate
- Pressure plate
- Plate handle for Pressure Plate and Aerofry grate
- Handle for Aerofry basket
- Steam rack
- Aerofryer basket
- Aeroflow stand
- Non stick cooking pot
CONTROL PANEL

Illustration 1:
| 1:Pressure cook 11:Bake | |
| 2:Slow cook 12:Yoghurt | |
| 3:Steam 13:Stir fry | |
| 4:Soup/Broth 14:Power |
| 5: Rice/Grains 15: Display | |
| 6: Steam release 16: Keep warm | |
| 7: Pressure cooker icon 17: Delay start | |
| 8: Aerofryer icon 18: Temp +/- | |
| 9: Aerofry 19: Start/Stop | |
| 10: Grill/Roast 20: Time +/- | |
Power On/Off Button
- Press this button to power the unit on and off. Once plugged in, the power button will illuminate in red. Once the button is pressed, the light will switch to white.
Aerofryer Icon
- This icon will illuminate automatically once the aerofryer grate is securely inserted and the unit is ready for aero frying functions. Note: The following functions are based on the aerofryer Grate: Aero Fry, Grill/Roast and Bake. Only when the aerofryer grate is inserted will these functions be illuminated and ready to select.
Pressure Cooker Icon
- This icon will illuminate automatically once the pressure plate is securely inserted and the unit is ready for pressure cooking functions.
Note: The following functions are based on the Pressure Plate function: Pressure Cook, Slow Cook, Steam, Soup/Broth, Rice/Grains, Yogurt & Stir fry. Only when the pressure plate is securely inserted will these functions be illuminated and ready to select. Note: The Stir fry function will still work when the lid is opened.
Display
- Displays temperature and time, the temperature and time icons will alternatively light up.
Start/Stop Button
- Touch this once to start or stop the cooking process.
Plus Button
- Touch to increase the Temperature or Time.
Minus Button
- Touch to decrease the Temperature or Time.
Steam Release Button
- When pressure cooking is complete, press the Steam Release button to release the pressure. The steam release cycle is 3 minutes long. Once all the steam is released, the lid can safely be opened.
Note: In order to stop a cooking program before it has completed, press the START/STOP button to end cooking, then press STEAM RELEASE.
Keep Warm Function
- Once cooking is complete, the unit will automatically turn to Keep Warm.
Delay Start Function
- Press this button to delay cooking until your desired start time (range: 30mins – 24hrs). Press desired cook function first, then press the delay timer button, the light will flicker, once this happens adjust to the desired delayed cook and press START to set. To cancel the delay timer setting, press the delay timer button again (before pressing start).
BEFORE THE FIRST USE
- Remove all packaging material.
- Remove any stickers or labels from the appliance.
- Thoroughly clean the parts with hot water, some washing-up liquid and a non-abrasive sponge.
- Wipe the inside and outside of the appliance with a moist cloth.
- Place the appliance on a stable, horizontal and level surface, do not place the appliance on non-heat-resistant surfaces.
- This is an air fryer that works on hot air. Do not fill the pan with oil or frying fat.
- In order to prevent disruptions of the airflow do not put anything on top of the appliance and make sure there is always 10 centimeter of free space around the appliance.
Setting up the Steam Rack
- To set up the steam rack, unfold the legs and carefully secure the middle "V" part to hook located near the edge. (Figure 1)

- Based on recipe and cooking preference, food can be placed either side of the reversible steam rack to achieve the desired result. (Figure 2)

- The legs of the steam rack can be folded down for storage. Carefully push the middle "V" part outward to unlock, then fold the legs inwards.
LID INSERTS
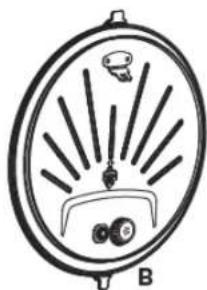
This unit comes with two different lid inserts, the Pressure Plate and the Aerofryer Grate. The two inserts allow users to pressure cook, aero fry, and more in the same unit by interchanging the plates.
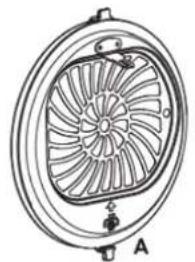

Aerofryer Grate (A)
The Aerofryer Grate will need to be installed for access to these cooking functions:
- Aero Fry
- Grill/Roast
• Bake
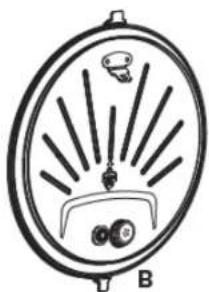
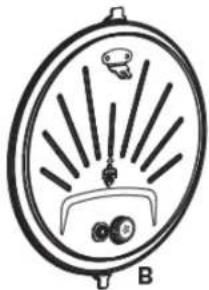
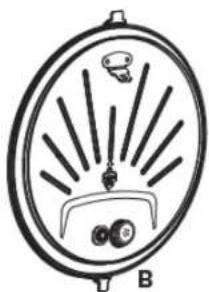
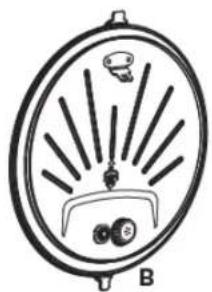
Pressure Plate (B)
The Pressure Plate will need to be installed for access to these cooking functions:
- Pressure Cook
- Slow Cook
- Steam
- Soup/Broth
- Rice/Grains
• Yoghurt - Stir Fry
NOTE: Cooking functions will be able to be selected, only once the correct cooking insert has been installed.
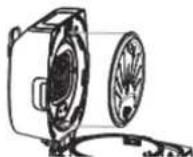
REMOVE/INSERT THE PRESSURE PLATE OR AEROFRYER GRATE
Where possible, leave the hot pressure plate insert or aerofryer grate in place until the unit has completely cooled. For recipes where switching the plate or insert is needed during the cooking process, always use the included plate handle. This handle is designed to conveniently allow you to insert and remove the plates even when they are hot.
-
Firmly grasp the plate handle with the extended knuckle guard facing down (3).
-
Connect the end of the handle to the protruding metal tab on the plate. Once secure, press the button on the left to lock (4).
- When the handle is securely locked to the plate, press the release tab at the top of the plate (5).
- With the handle, carefully lift the plate out of the unit and place on a sturdy, flat, heat resistant surface.
- To remove the handle from the plate, press the button on the right side of the handle and pull the handle out (6).
- Allow the plate to fully cool before moving or cleaning.
- Picture 7 shows where to place the plate into the lid.
3

4

5

6

7
USE
Aerofryer Functions
How to use the Aerofry function
- Open the top lid by turning the lid knob counter clock wise.
- Ensure the pressure plate insert is removed. Always use the plate handle if plates are hot.
- Insert the aerofryer grate.
- Place the non-stick cooking pot inside the unit. Place the air fry basket inside the cooking pot. Place food inside the aero fry basket.
- Close the lid and lock by turning clock wise
- Press the power button and then select AEROFRY. The aerofryer icon will illuminate. Using the + and - buttons, adjust the temperature and time to the desired cooking settings.
- Press the START/STOP button to begin cooking. The count down timer and selected
- temperature will be displayed alternately on the screen.
- When cooking is complete audible tone will sound.
Note: The aerofry cycle can be 'paused' by either lifting the lid, or pressing the START/STOP
button. Once the lid is closed, or the START/STOP button is pressed, cooking will resume.
How to Grill / Roast
- Open the top lid by turning the lid knob counter clock wise.
- Ensure the pressure plate insert is removed. Always use the plate handle if plates are hot. Insert the aerofryer grate.
-
Place the non-stick cooking pot inside the unit. If needed, add the steam rack inside the cooking pot, and arrange food on top of the steam rack.
-
Close the lid and lock by turning clock wise.
- Press the power button and then select GRILL/ROAST. The aerofryer icon will illuminate. Using the + and - buttons, adjust the temperature and time to the desired cooking settings. Press the START/STOP button to begin cooking. The count down timer and selected temperature will be displayed alternately on the screen.
- GRILL/ROAST cycle can be 'paused' by either lifting the lid, or pressing the START/STOP button. Once the lid is closed, or the START/STOP button is pressed, cooking will resume.
- When cooking is complete audible tone will sound and unit will go to keep warm mode.
How to Bake
- Open the top lid by turning the lid knob counter clock wise.
- Ensure the pressure plate insert is removed. Always use the plate handle if plates are hot. Insert the aerofryer grate.
- Place the non-stick cooking pot inside the unit. If needed, add the steam rack inside the cooking pot, and arrange food on top of the steam rack.
- Close the lid and lock by turning clock wise.
- Press the power button and then select BAKE. The aerofryer icon will illuminate. Using the + and - buttons, adjust the temperature and time to the desired cooking settings. Press the START/STOP button to begin cooking. The count down timer and selected temperature will be displayed alternately on the screen.
- Bake cycle can be 'paused' by either lifting the lid, or pressing the START/STOP button. Once the lid is closed, or the START/STOP button is pressed, cooking will resume.
- When cooking is complete audible tone will sound and unit will go to keep warm mode.
With this function it is also possible to dehydrate fruit and/or vegetables. See the aerofryer functions table for more information.
Pressure Cook Functions Pressure Cook function
- Open the top lid by turning the knob counter clock wise.
- Ensure the aerofryer grate has been removed. Always use the plate handle. Insert the pressure plate.
- Place the non-stick cooking pot inside the unit and place food inside the cooking pot.
- Close the lid and lock by turning clock wise.
- Press the power button and then select PRESSURE COOK. The pressure icon will illuminate. Using the + and - buttons, adjust to the desired cook time.
- Once the correct pressure has been reached, the display will switch from the cycling dashes to the timer count down.
- When cooking is complete an audible tone will sound. The unit will automatically go to 'keep warm' mode once cooking is complete.
- When pressure cooking is complete, press the STEAM RELEASE button to release the pressure. The steam release cycle is 3 minutes long. Once all the steam is released, the lid can safely be opened.
- To Stop a cooking program before cooking has completed, press the START/STOP button to end cooking, then press STEAM RELEASE.
NEVER place your face or hands over the unit during steam release, or when opening the lid. ALWAYS use pot holders during Steam Release or when opening the lid. Note: press DELAY TIMER and
adjust time to set the delay start feature. If you would like cooking to start immediately, press the START/STOP button to begin cooking. Dash lines will cycle across the control panel to indicate the unit is coming to pressure.
Slow Cook function
- Open the top lid by turning the knob counter clock wise.
- Ensure the aerofryer grate has been removed. Always use the plate handle. Insert the pressure plate.
- Place the non-stick cooking pot inside the unit and place food inside the cooking pot.
- Close the lid and lock by turning clock wise.
- Press the power button and then select SLOW COOK. The pressure icon will illuminate. Using the + and - buttons, adjust the timer to the desired cooking time.
- Once the correct temperature has been reached, the display will switch from the cycling dashes to the timer count down.
- When cooking is complete an audible tone will sound. The unit will automatically go to KEEP WARM mode once cooking is complete.
- When pressure cooking is complete, press the STEAM RELEASE button to release the pressure. The steam release cycle is 3 minutes long. Once all the steam is released, the lid can safely be opened.
- To Stop a cooking program before cooking has completed, press the START/STOP button to end cooking, then press STEAM RELEASE.
PRINCESS
Instruction manual
Note: press DELAY TIMER and adjust time to set the delay start feature. If you would like cooking to start immediately, press the START/STOP button to begin cooking. Dash lines will cycle across the control panel to indicate the unit is coming to temperature. Steam function
- Open the top lid by turning the knob counter clock wise.
- Ensure the aerofryer grate has been removed. Always use the plate handle. Insert the pressure plate.
- Place the non-stick cooking pot inside the unit. Arrange the food on the steam rack provided. Never fill the cooking pot more than 2/3 full.
- Add 1.5 cups of water or steaming liquid into the cooking pot.
- Close the lid and lock by turning clock wise.
- Press the power button and then select STEAM. The pressure icon will illuminate. Using the + and - buttons, adjust to the desired cook time.
- Press the START/STOP button to begin cooking. Dash lines will cycle across the control panel to indicate the unit is coming to temperature.
- Once the correct pressure/temperature has been reached, the display will switch from the cycling dashes to the timer count down.
- When cooking is complete an audible tone will sound. Once cooking is complete and you are ready to remove your food, press the STEAM RELEASE button.
-
When pressure cooking is complete, press the STEAM RELEASE button to release the pressure. The steam release cycle is 3 minutes long. Once all the steam is released, the lid can safely be opened.
-
To Stop a cooking program before cooking has completed, press the START/STOP button to end cooking, then press STEAM RELEASE.
- Open the top lid by turning the lid knob counter clock wise.
- Ensure the pressure plate insert is removed. Always use the plate handle if plates are hot. Insert the aerofryer grate.
- Place the non-stick cooking pot inside the unit. Place the aerofryer basket inside the cooking pot. Lay the ingredients inside the basket.
- Close the lid and lock by turning clock wise.
- Press the power button and then select SOUP/BROTH function. The aerofryer icon will illuminate. Using the + and - buttons, adjust the temperature and time to the desired cooking settings.
- Press the START/STOP button to begin cooking. The count down timer and selected temperature will be displayed alternately on the screen.
- When cooking is complete audible tone will sound.
- When pressure cooking is complete, press the STEAM RELEASE button to release the pressure. The steam release cycle is 3 minutes long. Once all the steam is released, the lid can safely be opened.
- To Stop a cooking program before cooking has completed, press the START/STOP button to end cooking, then press STEAM RELEASE.
- Open the top lid by turning the knob counter clock wise.
- Ensure the aerofryer grate has been removed. Always use the plate handle. Insert the pressure plate.
How to use the Soup / Broth function
How to use the Rice / Grains function
- Place the non-stick cooking pot inside the unit. Place uncooked rice and liquid inside the cooking pot.
- Close the lid and lock by turning clock wise.
- Press the power button and then select RICE/GRAINS. The pressure icon will illuminate. Using the + and - buttons, adjust to the desired cook time.
- Once pressure has been reached, the display will switch from the cycling dashes to the timer count down.
- When cooking is complete an audible tone will sound. The unit will automatically go to KEEP WARM mode once cooking is complete.
- When pressure cooking is complete, press the STEAM RELEASE button to release the pressure. The steam release cycle is 3 minutes long. Once all the steam is released, the lid can safely be opened.
- To Stop a cooking program before cooking has completed, press the START/STOP button to end cooking, then press STEAM RELEASE.
NEVER place your face or hands over the unit during steam release, or when opening the lid. ALWAYS use pot holders during STEAM RELEASE or when opening the lid.
Note: when cooking foods that expand, do not fill the cooking pot more than half way.
Note: press DELAY TIMER and adjust time to set the delay start feature. - If you would like cooking to start immediately, press the START/STOP button to begin cooking. Dash lines will cycle across the control panel to indicate the unit is coming to pressure.
Yogurt Function
- Open the top lid by turning the knob counter clock wise.
- Ensure the aerofryer grate has been removed. Always use the plate handle.
- Insert the pressure plate.
- Place the non-stick cooking pot inside the unit and place food inside the cooking pot.
- Close the lid and lock by turning clock wise.
- Press the power button and then select YOGURT. The pressure icon will illuminate. Using the + and - buttons, adjust to the desired cook time.
- Once pressure has been reached, the display will switch from the cycling dashes to the timer count down.
- When cooking is complete an audible tone will sound.
Note: press DELAY TIMER and adjust time to set the delay start feature. If you would like cooking to start immediately, press the START/STOP button to begin cooking. Dash lines will cycle across the control panel to indicate the unit is coming to pressure.
How to Stir fry
- Open the top lid by turning the knob counter clock wise.
- Ensure the aerofryer grate has been removed. Always use the plate handle if plates are hot.
- Insert the pressure plate.
- Place the non-stick cooking pot inside the unit.
- The lid can remain in the open position during when using the Stir fry function

Instruction manual
- Press the power button and then select STIR FRY. The pressure icon will illuminate. Using the + and - buttons, adjust the temperature to the desired cooking temperature (High, Medium or Low).
- Press the START/STOP button to begin cooking.
- When cooking is complete press the START/STOP button.
- When pressure cooking is complete, press the STEAM RELEASE button to release the pressure. The steam release cycle is 3 minutes long. Once all the steam is released, the lid can safely be opened.
- To Stop a cooking program before cooking has completed, press the START/STOP button to end cooking, then press STEAM RELEASE.
NOTE: NEVER use metal utensils with your Aerofryer as these may scratch the non-stick cooking pot or pressure grate.
AEROFRYER FUNCTIONS
| Program Aerofry | |
| Logo | |
| Default time (min) 20 min | |
| Range (min) 1-60 min | |
| Default temperature°C 200 °C | |
| Range°C 80-200 °C | |
| Quantity 500-750g |
| Extra information Shake every 5 | minutes when making fries |
| Program Grill/Roast | |
| Logo | |
| Default time (min) 10 min | |
| Range (min) 1-60 min | |
| Default temperature°C 220 °C | |
| Range°C 80-220 °C | |
| Quantity 250-500g | |
| Program Bake/Dehydrate | |
| Logo | |
| Default time (min) 15 min | |
| Range (min) 1 min-24 hours | |
| Default temperature°C 200 °C | |
| Range°C 30-200 °C | |
| Quantity 250-500g | |
| Extra information From 1-89 min | step 1 minute, 90 min-24 hours step by 30 min. With this function it is possible to dehydrate fruit and/or vegetables. Preferred settings: 30-70°C degrees for 5-10 hours, depending on type of food. |
• Always make sure you have inserted the Aerofry grate when using this functions.
- When cooking has finished the timer will go to "0" then will automatically switch to Keep Warm function for 30mins at 80°C .
Aerofryer pressure functions
| Program Pressure Cook | |
| Logo | |
| Default time (min) 30 min | |
| Range (min) 0-4 Hrs | |
| Quantity See max indicator innerpan | |
| Extra information When pressure cooking is complete, press the Steam Release button to release the pressure. The steam release cycle is 3 minutes long. Once all the steam is released, the lid can safely be opened. | |
| Program Slow Cook | |
| Logo | |
| Default time (min) 4 Hrs | |
| Range (min) 4-12 Hrs | |
| Quantity See max indicator innerpan | |
| Extra information Default temperature is HI (Settings:HI,LO). When pressure cooking is complete, press the Steam Release button to release the pressure. The steam release cycle is 3 minutes long. Once all the steam is released, the lid can safely be opened. | |
| Program Steam | |
| Logo | |
| Default time (min) 10 min | |
| Range (min) 1-30 min | |
| Quantity 500-750g | |
| Extra information Add 1,5 cup of water into the cooking pot, max volume of 2/3 of the cooking pot. When pressure cooking is complete, press the Steam Release button to release the pressure. The steam release cycle is 3 minutes long. Once all the steam is released, the lid can safely be opened. | |
| Program Soup/Broth | |
| Logo | |
EN

Instruction manual
| Default time (min) 1 Hr | |
| Range (min) 0.5 - 4 Hrs | |
| Quantity See max indicator innerpan | |
| Extra information Use the stir fry function if you first want to sear/saute your vegetables.When pressure cooking is complete, press the Steam Release button to release the pressure. The steam release cycle is 3 minutes long. Once all the steam is released, the lid can safely be opened. | |
| Program Rice/Grains | |
| Logo | |
| Default time (min) 20 min | |
| Range (min) 3-60 min | |
| Quantity Using 4 cups of rice and | 5 cups of water |
| Extra information 100g uncooked | rice becomes250g cooked rice, different rice/grains requires different ratio of water.When pressure cooking is complete, press the Steam Release button to release the pressure. The steam release cycle is 3 minutes long. Once all the steam is released, the lid can safely be opened. |
| Program Yoghurt | |
| Logo | |
| Default time (min) 6 Hrs | |
| Range (min) 4-12 Hrs | |
| Quantity 9 bottles of 120ml/bottle | |
| Program Stir fry | |
| Logo | |
| Default time (min) 10 min | |
| Range (min) 1-30 min | |
| Quantity 500g |
| Extra information Default temperature is HI(Settings: HI, MD, LO), when using this function lid can be opened.When pressure cooking is complete, press the Steam Release button to release the pressure. The steam release cycle is 3 minutes long. Once all the steam is released, the lid can safely be opened. |
• Always make sure you have inserted the Pressure plate when using this functions.
- When cooking has finished the timer will go to "0" then will automatically switch to keep warm function, default 4 Hrs.
CLEANING AND MAINTENANCE
- Before cleaning, unplug the appliance and wait for the appliance to cool down.
- Use a soft damp cloth to wipe clean the base and lid of the unit after every use.
- Use a small brush or cotton swab if necessary. Never pour any liquid into the base of the unit.
- Wash the removable parts (cooking pot, basket, stand, steam rack, pressure plate, aerofryer grate, plate handle, removal tool and condensation tray) in warm soapy water with a soft cloth or sponge.
- Before washing the lid inserts, please always follow the steps for safe and proper plate removal.
• Dry each piece thoroughly.
- Note that the cooking pot, basket and steam rack are dishwasher safe. However, we recommend to wash them by hand as this will be beneficial for the lifetime of the product.
- When cleaning or cooking with the cooking pot or basket, never use metal utensils or scouring pads in order to avoid damage to the non-stick coating.
- Never use harsh chemical detergents, scouring pads or powders on any of the parts or accessories.
Storing Instructions
- Unplug allow unit to cool completely.
- Store the cooking pot, and plate handle inside the unit.
- Store the unit in its original box or covered in a cool, dry place.
TROUBLE SHOOTING
The unit is equipped with safety features that will shut the unit down if an abnormal condition is encountered during cooking. An error signal will be displayed on the control panel. Depending on the error, audible beeping may be heard. Once the problem has been identified and corrected, plug in the unit and resume pressure cooking.
| Description Solution | |
| ERROR: NOT-LOCK | |
| Top lid is in the open position. Close | the lid and turn the lid knob clock-wise to securely close. |
| ERROR: Unit is not working under pressure cook mode | |
| Pressure plate is not properly inserted. | Insert pressure plate as per instructions.Ensure air fry grate has been removed. |
| ERROR: Unit is not working under aerofryer mode | |
| Aerofryer grate is not properly inserted. | Insert aerofryer grate as per instructions.Ensure pressure plate has been removed. |
| ERROR: NO-POT | |
| Cooking pot not inserted correctly. | Gently push the pressure pot down into the unit until the pot touches the heating plate on the bottom of the unit. |
ENVIRONMENT

This appliance should not be put into the domestic garbage at
the end of its durability, but must be offered at a central point for the recycling of electric and electronic domestic appliances. This symbol on the appliance, instruction manual and packaging puts your attention to this important issue. The materials used in this appliance can be recycled. By recycling of used domestic appliances you contribute an important push to the protection of our environment. Ask your local authorities for information regarding the point of recollection.
Support
You can find all available information and spare parts at www.princesshome.eu!
VEILIGHEID
Aerofryer-rooster (A)


Heißluftrost (A)

Rejilla de la freidora Aerofryer (A)
Grelha Aerofryer (A)
Illustrazione 1:

Luftfritösgaller (A)

Ilustrácia 1:
FOR ACCESSORIES AND SPARE PARTS TO EXTEND YOUR ITEM!

© Princess 2020 | Jules Verneweg 87
5015 BH Tilburg | The Netherlands | www.princesshome.eu



- PRINCESS
- SAFETY
- PARTS DESCRIPTION
- POWER ON/OFF BUTTON
- AEROFRYER ICON
- PRESSURE COOKER ICON
- DISPLAY
- START/STOP BUTTON
- PLUS BUTTON
- MINUS BUTTON
- STEAM RELEASE BUTTON
- KEEP WARM FUNCTION
- DELAY START FUNCTION
- BEFORE THE FIRST USE
- SETTING UP THE STEAM RACK
- LID INSERTS
- AEROFRYER GRATE (A)
- PRESSURE PLATE (B)
- REMOVE/INSERT THE PRESSURE PLATE OR AEROFRYER GRATE
- USE
- AEROFRYER FUNCTIONS
- HOW TO USE THE AEROFRY FUNCTION
- HOW TO GRILL / ROAST
- HOW TO BAKE
- PRESSURE COOK FUNCTIONS PRESSURE COOK FUNCTION
- SLOW COOK FUNCTION
- HOW TO USE THE SOUP / BROTH FUNCTION
- HOW TO USE THE RICE / GRAINS FUNCTION
- YOGURT FUNCTION
- HOW TO STIR FRY
- CLEANING AND MAINTENANCE
- STORING INSTRUCTIONS
- TROUBLE SHOOTING
- ENVIRONMENT
- SUPPORT
- VEILIGHEID
- AEROFRYER-ROOSTER (A)
- HEISSLUFTROST (A)
- REJILLA DE LA FREIDORA AEROFRYER (A)
- GRELHA AEROFRYER (A)
- LUFTFRITÖSGALLER (A)
Brand : PRINCESS
Model : Multi AeroCooker 182090
Category : Deep fryer