IAN 310298 - Vibrating platform CRIVIT - Free user manual and instructions
Find the device manual for free IAN 310298 CRIVIT in PDF.

| Product type | Vibrating platform |
| Brand | CRIVIT |
| Model | IAN 310298 |
| Supply voltage | 230-240 V ~ 50 Hz |
| Power | 200 W |
| Dimensions (L x W x H) | approx. 72.5 x 37.5 x 15 cm |
| Weight | approx. 18 kg |
| Maximum load capacity | 130 kg |
| Predefined training programs | 5 (P1 to P5) |
| Training duration | 1 to 10 minutes (adjustable) |
| Vibration frequency | 5 to 16 Hz |
| Vibration levels | 20 levels |
| Vibration amplitude | 1 to 10 mm (from inside to outside) |
| Remote control power supply | 1 CR2032 battery (3 V) |
| Vibration function | Lateral/tilt alternation |
| Protection class | Class 1 |
| Included accessories | Mat, remote control, case, battery, armband, power cable, 2 training elastic bands |
| Usage | Indoor, private, fitness and massage |
| Warranty | 3 years |
| After-sales service France | 0800 919270 |
| After-sales service Belgium | 070 270 171 (0.15 EUR/min) |
| Manufacturing date (month/year) | 11/2018 |
| Standards | DIN EN ISO 20957-1, CE |
| Cleaning | Wipe with a slightly damp cloth |
Frequently Asked Questions - IAN 310298 CRIVIT
User questions about IAN 310298 CRIVIT
0 question about this device. Answer the ones you know or ask your own.
Ask a new question about this device
Download the instructions for your Vibrating platform in PDF format for free! Find your manual IAN 310298 - CRIVIT and take your electronic device back in hand. On this page are published all the documents necessary for the use of your device. IAN 310298 by CRIVIT.
USER MANUAL IAN 310298 CRIVIT
natural_image
Exterior view of a Crivit self-service device with attached cables and accessories (no signage)VIBRATIONSBOARD VIBRATION PLATE PLATEFORME VIBRANTE
DE AT CH
VIBRATIONSBOARD
Bedienungsanleitung
PLATEFORME VIBRANTE
Instructions for use
TRILPLAAT
Gebruiksaewilizing
[Unreadable]
VIBRACNÍ PLOŠINA
Návodu k použití


M M O
Before reading, told out the illustration page and get to know all of the functions of your unit.
④ ⑤
GS/IE Instructors and Safety Online Page 36
DELTA-SPORT HANDELSKONITOR GMBH
Wergelurp € 0522397 Hungary
C. 2014年
□
1/2018
De la Secret N. : 18-5626
2013.09.17

IAN 310298IAN 310298
① H ② P1 C2 S3

natural_image
Diagram showing two views of a curved object with directional arrows indicating rotation or movement (no text or symbols)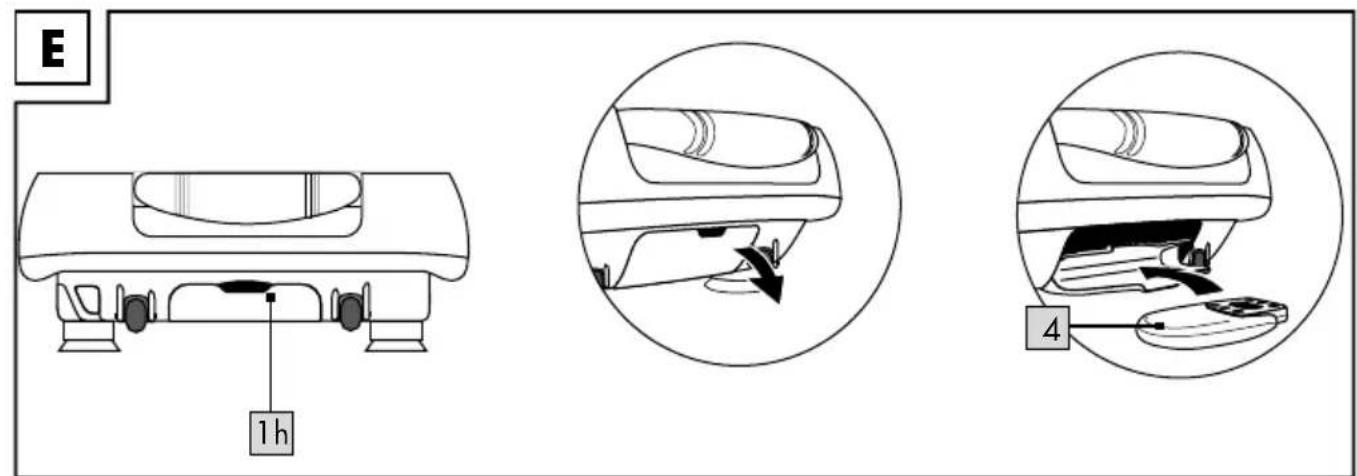
flowchart
graph TD
    A["1"] --> B["3a"]
    A --> C["3b"]
    A --> D["3c"]
    A --> E["3k"]
    A --> F["3i"]
    A --> G["SPEED+"]
    A --> H["TIME-TIME+"]
    A --> I["SPEED-"]
    A --> J["3d"]
    A --> K["3e"]
    A --> L["3f"]
    A --> M["3i"]
    A --> N["3h"]
    A --> O["3g"]

DE AT CH
Training abbrechen 30
Vibration board parts list 36
Remote control parts list (Fig. I) 36
Technical data 36 - 37
Intended use 37
Safety information 37-40
Risk of electric shock! 37-38
Risk of damaging your health! 38 - 39
Risk of injury! 39
Risk of injury to children and persons with reduced physical, sensory or mental abilities 40
Dangers due to wear and tear 40
Battery warning notices 41
Using the item 41 - 42
How the vibration board works 41
Vibration level 41
Display (Fig. H) 41-42
Connecting the item 42
Turning the item on and off 42
Using the handles 42
Using the expander bands 42
Remote control 42 - 43
Inserting the battery into the remote control (Fig. J) 42
Replacing the battery 42
Using the remote control with the case ..... 42
Using the remote control with the wrist strap 43
Using the remote control (Fig. I) 43
Using the speed dial buttons 43
Selecting the mode 43 - 44
Making pre-programmed settings 43
Exercising in programme mode 43
Programme selection 43 - 44
Customised training 44
General exercise notes and tips 44 - 45
Warming up 45
Exercise routine 45 - 47
Checking your pulse 45 - 46
Taking your pulse 46
Calculating your personal maximum
heart rate 46
Calculating your lower and upper limit training
heart rate 46
Varying the amplitude 46
Varying the frequency 46
Structuring your workouts 46
Stopping the workout 46 - 47
Exercise suggestions 47 - 49
Use the QR-code 49
Stretching 49
Storage, cleaning 50
Information on disposal 50
Disposal measures for batteries 50
Notes on the guarantee and service
handling 50
Possible defects 51
FR BE
Programmakeuze 78-79
Individueel trainen 79
$$ 1 \times 3 V = C R 2 0 3 2 $$


Congratulations! With this purchase you have opted for a high-quality item. Familiarise yourself with the product before using it for the first time.

Read the following instructions carefully.
Only use this item in the manner described and for the purpose for which it was intended. Keep these instructions in a safe place. When passing the item on to third parties, hand over all accompanying documents as well.
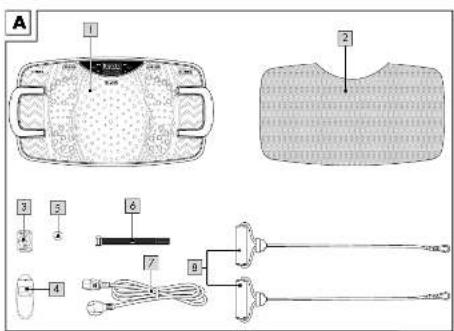
Package contents (Fig. A)
1 x vibration board including handles (1)
1 x mat (2)
1 x remote control (3)
1 x case (4)
1 x battery (3V =CR2032) (5)
1 x wristband (6)
1 x power cable (7)
2 x expansion bands (8)
1 x instructions for use
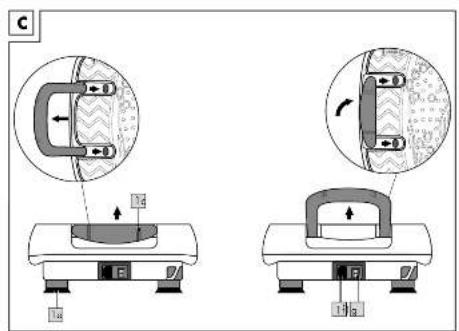
Vibration board parts list
Figure B
- Control panel (1a)
- Massage balls (1b)
- Handles (1c)
- Vibration areas (WALKING, JOGGING, RUNNING) (1d)
Figure C
- Feet with suction pads (1e)
- Mains supply (1f)
- Main ON/OFF switch (1g)
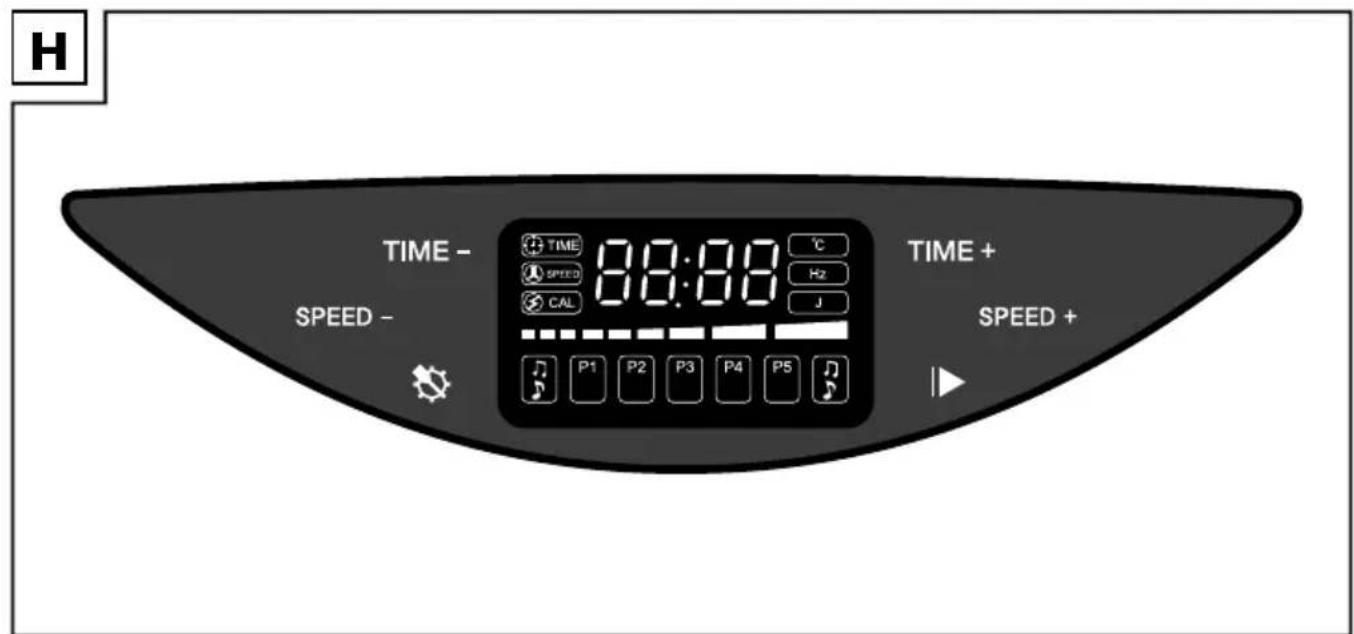
Vibration board display (Fig. H)
- TIME + touch-sensitive button: Increase the workout time
- SPEED + touch-sensitive button: increase the vibration frequency
- START/STOP |▶ touch-sensitive button: Start/stop workout
- SET touch-sensitive button: Select exercise programme
- SPEED - touch-sensitive button: Decrease the vibration frequency
- TIME - touch-sensitive button: Reduce the work-out time
Your selection is shown on the display by using the remote control or pressing the touch-sensitive buttons.
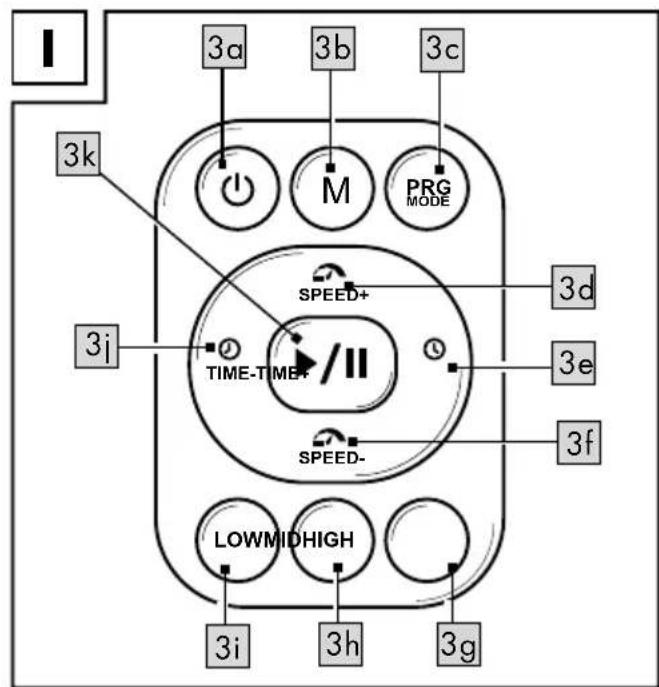
Remote control parts list (Fig. I)
- Turn the item on/off (3a)
• M button: Switch to speed dial (3b) - PRG MODE button: Select the exercise programme (3c)
- SPEED + button: Increase vibration frequency (3d)
• TIME + button: Increase the workout time (3e) - SPEED - button: Decrease the vibration frequency (3f)
• HIGH speed dial button (3g)
• MID speed dial button (3h) - LOW speed dial button (3i)
• TIME - button: Reduce the workout time (3j) - START/STOP button: Start/stop workout (3k)
Technical data
Mains voltage: 230-240V 50Hz
Power output: 200W
Ambient temperature: +10 °C to +40 °C
Vibration action: Side alternating/rocking vibration
Dimensions (L x W x D):
approx. 72.5 x 37.5 x 15cm
Weight: approx. 18kg
Programme: 5
Programme duration: max. 10 minutes
Manual programme duration setting:
1 - 10 minutes
Vibrations/frequency:
5-16Hz freely adjustable in 20 steps
Amplitude: from the inside out 1–10mm
Remote control power supply: 1 x 3V=CR2032
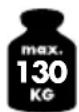
Maximum load: 130kg
Symbol for DC voltage
\~ Symbol for AC voltage

Delta-Sport Handelskontor GmbH, hereby declares that this product meets the following basic requirements, as well as other important regulations:
2014/30/EU - EMC Directive
2011/65/EU - RoHS Directive
Full declarations of conformity are available under http://www.conformity.delta-sport.com/

Date of manufacture (month/year): 11/2018

This symbol identifies the vibration board as a protection class 1 device.
Tested according to: DIN EN ISO 20957-1:2014, DIN 32935: 1987
Expander bands strength chart
| Max. stretch length (in cm) approx. | 120 1 | 40 160 | 185 | |
| Force (N) approx. 27 | 34 4 | 53 |
The tolerance range for the force is approx. 20% (+/-).
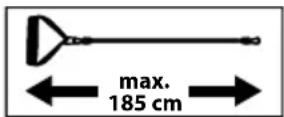
The expander bands must not be extended beyond the maximum stretch length!
Intended use
This item was designed as a fitness and massage device for private use and is not suitable for medical or commercial purposes. The item is suitable for indoor use and is designed for use by one person who has a maximum body weight of 130kg.

Safety information
Risk of electric shock!
Faulty electrical installation or excessive mains voltage can lead to electric shocks.
- Connect the item to an easily accessible socket only, so that you can quickly disconnect it in the event of a fault.
- Only connect the item to a properly installed earthed wall socket and only if the mains voltage of the socket corresponds with the specification on the name plate.
- Do not operate the item if it is visibly damaged or the power cable or mains plug is faulty.
- If the item's connection cable is damaged, it must be replaced by a particular connection lead which is available from the manufacturer or his service agent.
- Do not open the housing, instead leave that to the repair specialists. Contact a specialist repair work shop for this. Liability and warranty claims are excluded for repairs that are independently carried out, improper connection or incorrect operation.
- Only parts corresponding to the original device data may be used in repairs. There are electrical and mechanical parts in this item that are necessary for protecting against sources of danger.
- Do not submerge the item or the power cable or the mains plug in water or other fluids.
- Never touch the mains plug with wet hands.
-
Never pull the mains plug out of the socket using the power cable, always take hold of the mains plug.
-
Never use the power cable as a carrying handle.
- Keep the item, the mains plug and the power cable away from open fires and hot surfaces.
- Lay the power cable in such a way that it isn't a trip hazard.
- Do not bend the power cable or lay it over sharp edges.
- Only use the item indoors. Never operate it in wet rooms or in the rain. Protect the item from dripping and splashing water.
- Never reach for an electrical device if it has fallen into water. In such an event, disconnect the mains plug from the socket immediately.
- Make sure that children do not stick any objects into the item.
- Always turn off the item and disconnect the mains plug from the socket, when you are not using it, or when cleaning it, or if a malfunction occurs.

Risk of damaging your health!
Too much exercise, or exercising incorrectly can lead to health problems.
- Do not exercise for longer than 10 minutes at a time. Drink enough fluids.
-
Never exercise with legs or arms stretched taut.
-
Never place your upper body or head on the vibrating board.
- Consult your doctor before commencing training. Ask him or her to what extent training is appropriate for you. Have a general fitness check to prevent damage to your health or to minimise existing risks. Consult your doctor about specific complaints, such as orthopaedic conditions, taking medications etc.
- Using the vibration board is strictly prohibited if one or more of the physical conditions listed here apply to you. If this is the case, you may not commence exercising. Consult an expert, such as a GP, a specialist or a physiotherapist if you are in doubt.
- Under no circumstances should you use the item if you have:
- acute inflammation or infection
- acute rheumatoid arthritis
- epilepsy
- fresh (surgical) wounds
- joint disorders and osteoarthritis
- heart valve defects
- cardiac arrhythmias
- cardiovascular disorders (heart and blood vessels)
- untreated hypertension (high blood pressure)
-
metal or plastic implants such as pacemakers, spirals, joint implants, breast implants (more recent than 6–9 months)
-
existing stents (more recent than 2 years)
- heart and brain pacemakers
- recent thromboses or possible thrombotic disorders
- acute back problems after fractures
- higher level osteoporosis (with fractures)
- slipped discs, spondylosis
- pregnancies
- severe diabetes (with angiopathy)
- tumours
- Consult a doctor before using the item to clarify the possibility and type of use if you have:
- non-acute back pains such as ankylosing spondylitis
- metal or plastic implants like spirals, joint implants, breast implants (older than 6–9 months)
- existing stents (older than 2 years)
- acute joint disorders or osteoarthritis
- acute migraine
- gall stones
- kidney stones
- Pay attention to your body's signals while exercising. Stop exercising immediately and consult a doctor, if you feel pain, chest tightness, irregular heartbeat, extreme difficulty in breathing, nausea, or dizziness while exercising.
Risk of injury!
You may injure yourself if you mishandle the item.
- Place the item on a flat, level and non-slip surface and ensure a secure footing.
- The item is designed for one person. Never allow more than one person to exercise on the item at the same time.
• The maximum user weight is 130kg. - Check all parts for tightness and wear before each use.
- Do not use the item if it shows signs of damage. Have faulty parts replaced and do not use the time again until the repairs have been made.
- During and after exercising on the board, make sure that nobody can injury themselves on protruding parts.
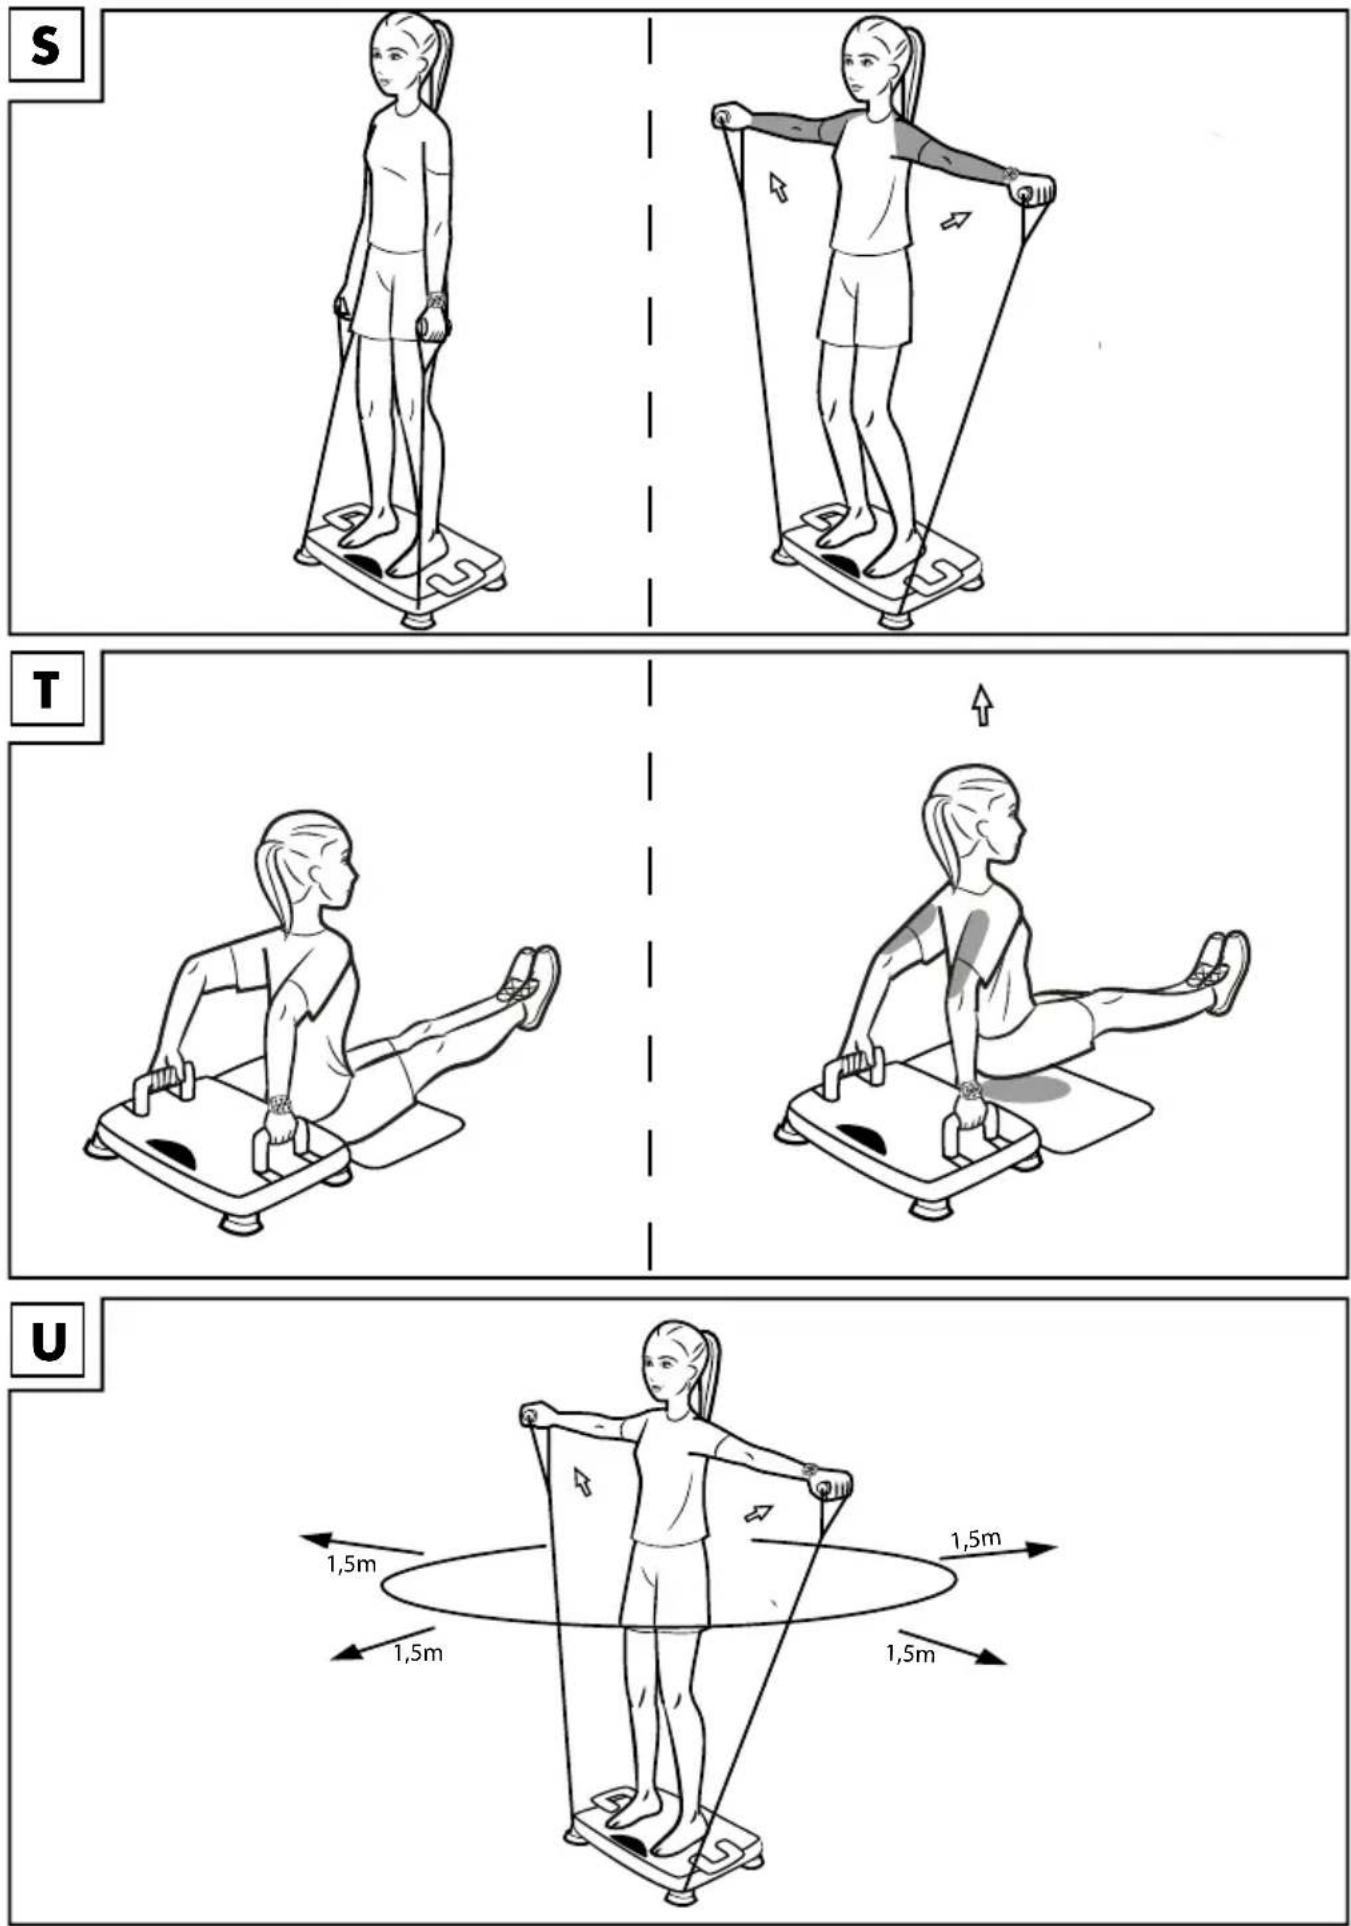
- Maintain a safety distance of 1.50 ~m × 1.50 ~m around the item to persons and objects (Fig. U).


Risk of injury to children and persons with reduced physical, sensory or mental abilities (for instance partially disabled, elderly persons with limited physical or mental abilities) or lack of experience and knowledge (for instance, older children).
- This item may be used by persons with diminished physical, sensory or mental abilities, or those with little experience and knowledge, if they are supervised or have been instructed with regard to its safe use, and provided they have understood the potential associated risks.
- The product may only be used by people with vestibular disorders under supervision.
• Children under the age of 14 may not use the item.
• To eliminate the risk of injury, small children must not be within the operating range of the item during the workout. Keep pets away too.
• Children should not be allowed play with the item.
• Cleaning and maintenance may not be carried out by children. - Do not leave the item unattended while it is in operation.
- Do not let children play with the packaging foil. Children could get caught up in it and suffocate while playing.

Dangers due to wear and tear
- Only use the item if it is in perfect condition. Check the item for damage and wear and tear before each use.
The safety of the item can only be guaranteed if it is regularly inspected for damage and wear. If, for example, the expander bands show signs of damage, do not use them any more.
- Use only original replacement parts.
- Protect the item from extreme temperatures, sun and dampness. Improper storage and use of the product could lead to premature wear and tear, and possible breakages in the structure, which could result in injuries.
- Check the item regularly for damage or deterioration.
- Do not use the item any more if it is damaged.
- Protect the item from splashes of water, moisture, dust and high temperatures. Do not expose it to direct sunlight.
- Put a suitable, non-slip pad under the item's feet if you are using it on fragile flooring so as to prevent possible damage to the floor.

Battery warning notices!
- Remove the batteries when they are flat, or if the item is not in use for an extended period.
- Do not use different types or brands of battery, or new and used batteries together, or batteries with different capacities as these can leak and cause damage.
• Take note of the correct polarity (+/-) when inserting the batteries. - Replace all batteries at the same time and dispose of the old batteries as prescribed.
- Warning! Batteries may not be charged or reactivated by any other means, taken apart, thrown into fire or short-circuited.
• Always keep batteries out of reach of children. - Do not use rechargeable batteries!
- Cleaning and maintenance may not be carried out by children without supervision.
- Clean the battery and device contacts as needed and before inserting.
- Do not expose the batteries to extreme conditions (e.g. radiators or direct sunlight). Otherwise there is an increased risk of leakage.
- Batteries can be life-threatening if swallowed. Therefore, always store them out of reach of small children.
Medical attention must be sought immediately if a battery has been swallowed.
Danger!
- Handle damaged or leaking batteries with extreme caution and dispose of them properly as soon as possible. Wear gloves when doing so.
- If you come into contact with battery acid, wash the affected area with soap and water. If battery acid gets in your eye, rinse it with water and seek medical attention immediately!
- The connection terminals must not be short-circuited.
Using the item
How the vibration board works
The item works according to the rocking or side-alternating principle and describes a vertical movement, by which the right and left side of the vibration plate move up and down in opposite directions, similar to a seesaw.
You can set the vibration frequency for your workout yourself or select from one of the five pre-set programmes. The recommended training area is between 5 and 16Hz. Start low and only increase the intensity if you still feel comfortable.
Vibration level
The item has over 20 vibration levels which you can use to set the desired vibration frequency (5-16Hz).
Display (Fig. H)
During the workout, the current training values are continuously shown on the display plus a corresponding display symbol:
- Time of workout remaining (display symbol: TIME)
• Vibration level (display symbol: SPEED)
• Vibration frequency (display symbol: HZ)
• Calories used (display symbol: CAL)
Connecting the item
- Insert the mains plug on the power cable (7) into the device's plug connection (1f).
- Plug the mains plug into a permanently installed earthed wall socket.
Turning the item on and off WARNING!
Risk of electric shock!
Improper use can lead to electric shock.
- After use, always switch off the product using the on/off switch (1g) and disconnect it from the power supply by pulling the mains plug (7) out of the socket.
- Set the on/off switch (1g) to 1, to put the device on standby.
- Press and hold the ON/OFF touch-sensitive button on the product's display for 3 seconds or press the "Power on/off" button (3a) on the remote control briefly to put the item back into standby mode after exercising.
- Press and hold the ON/OFF touch-sensitive button on the product's display for 3 seconds or press the "Power on/off" button (3a) on the remote control briefly to turn on the item in standby mode.
- Set the On/Off button (1g) to O, to turn off the device completely.
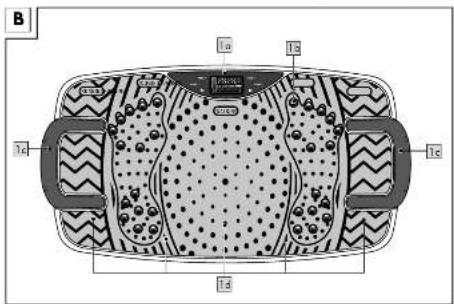
Using the handles
Note: Make sure that the handles are locked in place firmly and securely before you use them. Performing press-ups on the vibration plate can put increased pressure on your wrists, causing pain and interfering with your workout.
The handles help to keep your wrists straight during the workout and thus greatly reduce the stress on your wrists.
You have 2 options for positioning the handles. A further handle promotes the training of the large chest muscles especially, with closer positioning the triceps are activated more strongly.
To use the handles, pull or insert them as shown in figures C and D.
Using the expander bands
Important! The expander bands may only be used in combination with the vibration board and not otherwise.
You have the option of doing exercises on the board using the additional expander bands.
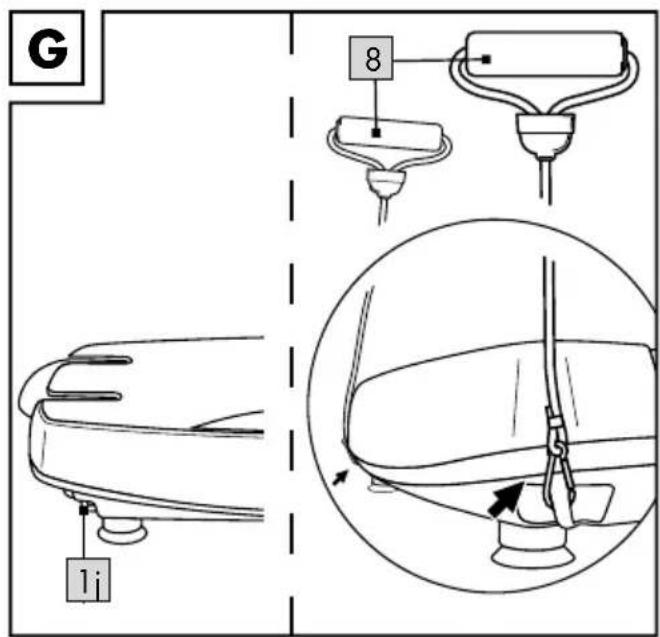
To do this, hook the expander bands (8) onto the side eyelets (1j) of the item with the snap hooks (Fig. G).
Remote control
Always use the remote control while exercising. Otherwise, there is a risk of falling if you press the touch-sensitive buttons on the display during the workout.
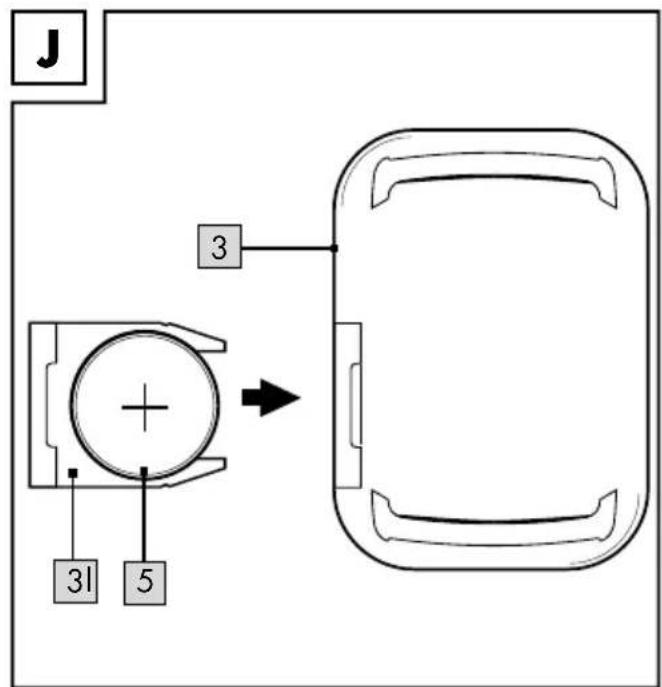
Inserting the battery into the remote control (Fig. J)

CAUTION: Observe the following instructions to avoid mechanical and electrical damage.
The battery compartment (31) is on the side of the remote control (3). Insert the battery (included) into the battery compartment (31) of the remote control (3) as follows:
- Pull the battery compartment out of the remote control carefully.
- Carefully insert the 3V CR2032 battery into the battery compartment with the + pole pointing downwards. The battery must be completely fitted into the battery compartment.

CAUTION: Check the plus/minus poles of the batteries and insert them correctly.
- Insert the battery compartment into the remote control.
Replacing the battery

CAUTION: Observe the following instructions to avoid mechanical and electrical damage.
If the battery (5) stops working, replace it as described in the instructions above. Remove the battery in the item before inserting a new one.
Using the remote control with the case
Insert the remote control (3) into the case (4) as illustrated in figure K.
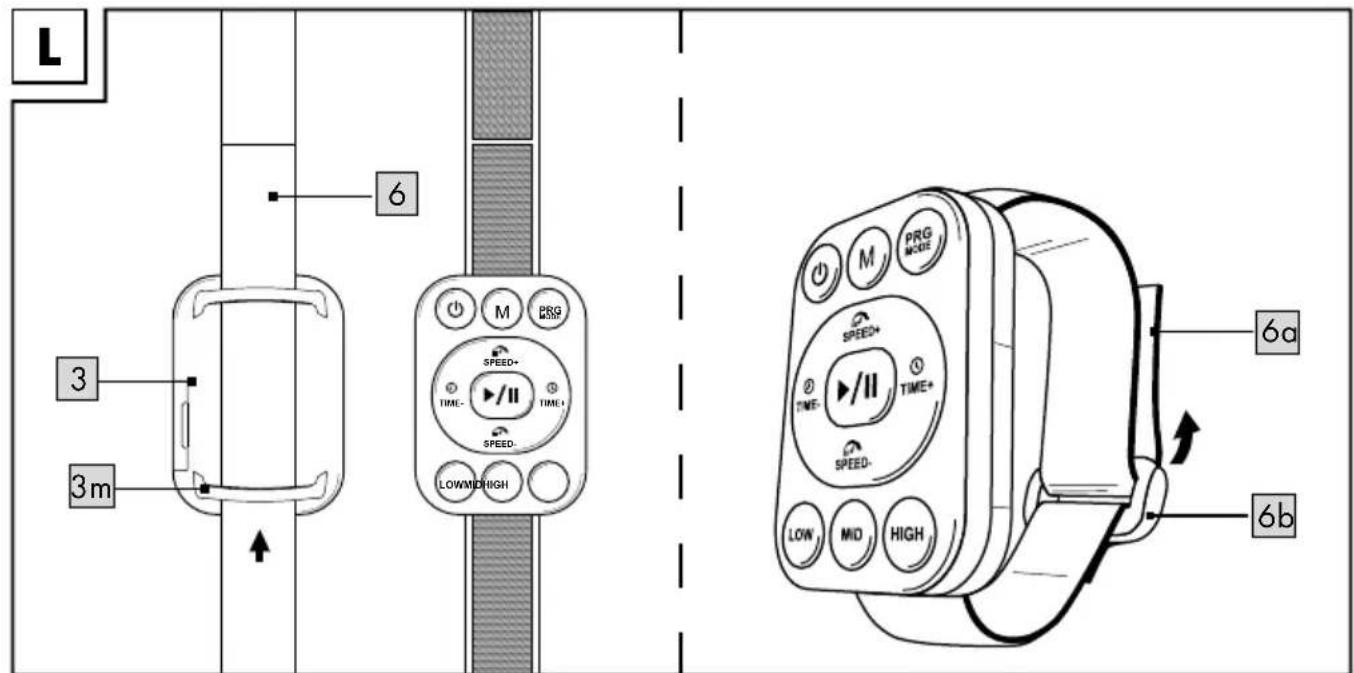
Using the remote control with the wrist strap
You have the option of wearing the remote control (3) directly on your wrist. Remove the remote control from the case (4) if it is in it.
- Draw the wrist strap (6) through the loops (3m) of the remote control.
- Put the wrist strap with the remote control around your wrist and close it with the Velcro fastener (6a)/(6b) (Fig. L).
Using the remote control (Fig. I)
The remote control (3) has a range of approx. 2.50m.
Point the remote control at the sensor on the display as precisely as possible.
The device beeps each time a button is pressed.
Using the speed dial buttons
The speed dial buttons (3g–3i) on the remote control have specific Vibration levels:
- Speed dial button (high): vibration level 18 (3g)
- Speed dial button (mid): vibration level 12 (3h)
- Speed dial button (low): vibration level 6 (3i) When you are customising your training (see the chapter on "Customised training") you can set the appropriate vibration level directly by pressing one of the speed dial buttons during your workout.
Selecting the mode
You can either complete a customised standard training session or select from 5 pre-programmed workouts (P1 to P5).
Making pre-programmed settings WARNING!
Risk of injury!
Improper use can lead to injury.
- When you are standing on the vibration plate with the vibration function on, only make adjustments using the remote control, so as to prevent falls/loss of balance when operating the touch-sensitive buttons on the item.
- Training always begins with the last vibration frequency set. You cannot change the speed until the training has started.
Exercising in programme mode
The item has five pre-set programmes (P1–P5), which last for a maximum of 10 minutes, in which the frequency automatically changes after certain intervals.
- Press the SET touch-sensitive button on the display (Fig. H) repeatedly, or the PRG MODE (3c) button on the remote control, until the desired training programme P1, P2, P3, P4 or P5 shows up on the display.
- Press the START/STOP touch-sensitive button on the board's display or the button (3k) on the remote control to start the item.
Note: You cannot control time and speed manually in programme mode.
- Press the START/STOP touch-sensitive button on the item's display or the button (3k) on the remote control to end the workout early.
Programme selection
P1
Easy pyramid training: 10 minutes
- Minute 1 - 3 from 5Hz to 7.32Hz; warm-up phase
- Minute 4–7 from 8.48Hz to 11.96Hz; stress phase with moderate activation of the supporting hip and back musculature and an improvement in intermuscular coordination
- Minute 8–10 from 10.8Hz to 8.48Hz; relaxation of the muscles and cool-down Select the workout P1, as described in the section "Selecting the mode" and start the training session.
P2
Intermediate pyramid training: 10 minutes
- Minute 1 - 2 from 5.58Hz to 7.9Hz; warm-up phase
- Minute 3–8 from 9.06Hz to 10.22Hz; stress phase focussing on intramuscular coordination
- Minute 9-10 from 7.9Hz to 5.58Hz; relaxation and cool-down
Select the workout P2, as described in the section "Selecting the mode" and start the training session.
P3
Interval training with shallow peak: 10 minutes
- Minute 1 - 2 from 5Hz to 7.32Hz; jump from supportive musculature to deep muscle
- Minute 3–4 from 5Hz to 10.22Hz; larger jump from intramuscular coordination to deep muscle
- Minute 5-6 from 7.32Hz to 13.12Hz: full load jump to the maximum muscle strain in this programme
- Minute 7–9 from 5Hz to 13.12Hz to 10.22Hz; final peak for maximum muscle strain
• Minute 10: 5Hz; relaxation and cool down
P4
Advanced interval training with a higher peak: 10 minutes
- Minute 1 with 5Hz; warm-up phase with stress on intermuscular coordination
- Minute 2–3 from 5.58Hz to 7.9Hz; jump from intermuscular stress to intramuscular stress
- Minute 4–5 from 9.06Hz to 10.22Hz; stronger jump from inter to intramuscular stress
- Minute 6–7 from 11.38Hz to 12.54Hz, light recovery phase for regeneration
- Minute 8–10 from 13.7Hz to 14.86Hz to 16Hz; renewed maximum load with subsequent relaxation and cool down
P5
Full load interval training with maximum peak: 10 minutes.
This programme is recommended for advanced users only and repeats jumps between 7.32Hz (limits of the transition from intermuscular to intramuscular Stress) and peaks from 16.0Hz (the maximum frequency of average muscle contractions is at 27Hz) whereby the entire body must work to stabilise itself by muscle contractions. This programme is designed to improve mobility and increase the strength of the stressed muscles and should only be commenced when the body is well warmed up.
Customised training
- Switch the item to standby mode (see the chapter on "Turning the item on and off").
-
Press the SPEED -/+ touch-sensitive buttons on the display or the SPEED -/+ buttons (3d/3f) on the remote control, repeatedly if necessary, to set the vibration level you want.
-
Press the TIME -/+ touch-sensitive buttons on the display or the TIME -/+ buttons (3e/3j) on the remote control, repeatedly if necessary, to set the length of the workout. You can set the workout time to 1-10 minutes.
-
In standby-mode, press the PLAY touch-sensitive button on the board's display or the button (3k) on the remote control to start the item.
Note: Before the programme starts, the display counts down from 5 to 0. You can put yourself into the correct position during this time. The vibration begins afterwards.
-
Press one of the speed dial keys (3g-3i) on the remote control to quickly change one of the pre-set vibration levels (SPEED 6/SPEED 12/SPEED 18) during the workout using speed dialling.
-
Press the PLAY button on the item or the button (3k) on the remote control to end the workout early. The item does not stop moving abruptly but slowly comes to a stop.
General exercise notes and tips
- Wear comfortable clothing.
- Warm up before each training session and end the exercise session gradually.
• Take breaks between the exercise routines and drink enough. - As a beginner, place your feet close together on the board and use the mat that comes with it. In this way you will gradually get used to the board.
- The board's vibrations can be increased by not wearing shoes. There is an additional massage effect if you place your bare feet on the massage balls.
- Perform all exercises smoothly, not jerkily or fast.
- Make sure to breathe steadily. Exhale during exertion and inhale upon release.
- Maintain correct body posture while exercising.
- Make sure that your feet are optimally placed on the item.
- Always stand on the board with your limbs bent (arms or legs, depending on the starting position). If your muscles are stretched, they cannot absorb the vibration.
The vibration is then carried over your bones to your skull.
- If you feel the vibrations in your head (noticeable in your voice and/or eyes) then you are standing in an incorrect position on the item and must correct your starting posture.
- You should not carry out sitting exercises on the item until you have become accustomed to the item.
- Follow the instructions on the starting position, the exercise itself and the recommended rest times exactly, so as to maximise effectiveness and to prevent injury.
- Always tense your muscles when taking up the exercise positions and lift your heels slightly. In this way you will prevent your voice from vibrating.
- Place the mat underneath for all exercises that are carried out with body parts other than the feet, such as the hands or the bottom.
- Make sure your back isn't hollow when performing the exercises. Keep your back straight.
- Do not lean back on the item as the board may tip over.
- An exercise can be for strengthening, stretching or relaxing depending on its position and frequency.
- The recommended length of time per position is between 30 and 60 seconds but the total duration must not exceed 10 minutes.
- Before beginning to exercise, think about which areas you want to reach. Choose the appropriate positions. Try them once. Thus you will see if a position is comfortable for you and you can focus on the correct posture.
- Only hold a position as long as is comfortable for you and you are able to maintain body tension. Change to another position however no later than after 60 seconds.
- Always change from one position to another in a controlled manner. If necessary, get off the item briefly to take up the new position in a controlled manner.
- Finish an exercise if it becomes uncomfortable for you and you are no longer able to hold general body tension, but finish it no later than after 10 minutes. Listen to your body and do not overstrain it.
Warming up
Give yourself enough time to warm up each time you use the board. Some simple exercises to do this are shown below.
You should repeat each exercise two to three times.
Neck muscles
- Turn your head slowly to the left and to the right. Repeat this movement four to five times.
- Rotate your head slowly, first in one direction, then in the other.
Arms and shoulders
- Clasp your hands behind your back and pull them carefully upwards. If you bend your upper body forwards at the same time, all your muscles will be maximally warmed up.
- Rotate both your shoulders forwards at the same time and then change direction after one minute.
- Pull your shoulders up to your ears and let your shoulders fall again.
- Rotate your right and left arms alternately forwards and then, after one minute, backwards.
Important: Don't forget to keep breathing steadily!
Exercise routine
You should observe the following the first time you stand on the board:
- Familiarise yourself with the item and its vibration. For instance, test the vibration by putting just one foot on the vibrating plate when it is at a low frequency. Then stand on the board with both feet, and then on tiptoes with knees bent in order to feel the vibration.
- Always stand on tiptoe first so that the vibration is absorbed by your calves and thighs.
Checking your pulse
For a healthy fitness training, it makes sense to check your own pulse rate regularly.
- Check your pulse even during supposed passive training, to prevent health risks due to excessive training.
-
From a sports medicine point of view, an exercise heart rate (pulse) of 60% to 85% of your maximum pulse is optimal.
-
The more trained or fitter your body is, the slower your pulse rises and the faster it falls back in the rest phase again. To trace your training successes, record your values in a chart regularly. You will get the following values depending on when you take your pulse:
• Before training: Resting heart rate - Immediately after finishing training (10 minutes): Stress/exercise pulse
- 1 minute after finishing training: Recovery pulse. Use the following standard values when checking your stress/exercise pulse:
- Pulse frequency 60%: Here you are training in the very efficient range of 60%, ideal for beginners.
- Pulse frequency 85%: This 85% of maximum pulse range is suitable for athletes and advanced persons.
- Pulse frequency 90%: The anaerobic range of 90% of maximum pulse is only suitable for professional athletes and short exercises.
Taking your pulse
- Lay the index and middle fingers of your right hand on the inside of your left wrist.
- When you feel your pulse, count the number of beats in 15 seconds.
- Multiply the number of pulse beats you counted by four.
- The result is your pulse rate per minute.
- Compare the pulse frequency you have obtained this way with the valid limit values applicable to you (see "Calculating your exercise pulse").
Calculating your personal maximum heart rate
Maximum heart rate = 100%
Formula: 220 minus your age
Calculating your lower and upper limit training heart rate
Pulse lower limit = 60%
Formula:
(220 minus your age=maximum heart rate) × 0.6
Pulse upper limit = 80%
Formula:
(220 minus your age=maximum heart
rate) × 0.85
Varying the amplitude
By varying the (parallel) position of your feet on the plate, and thus changing the distance between the vibrating muscles or body parts and the centre of the body, you increase or decrease the degree of difficulty of the exercises.
You can choose between three positions (WALKING, JOGGING, RUNNING) (1d) (Fig. B):
- To do this, position your feet on the item parallel to one another, either more towards the outside or more towards the inside. Thus the amplitude and thereby the degree of difficulty are either increased (feet further out on the board) or decreased (feet further in on the board).
• Work your way up the level of difficulty from the inside out. - At the beginning, start completely on the inside.
Varying the frequency
The frequency determines the number of vibrations per second in which the item moves.
You can change the frequency from 5–16Hz with the SPEED -/+ touch-sensitive buttons on the display (Fig. H) or the SPEED -/+ buttons (3d/3f) on the remote control.
Structuring your workouts
- Be sure to read the safety information before you start your personal fitness training.
- Give yourself enough time for your fitness training and allow for the time you will need for warming up and recovering.
- A single workout should consist of three phases:
- Warm-up phase: 5–10 minutes of gymnastics and stretching to prepare your muscles for the stress.
- Vibration training: maximum of 10 minutes of intensive but easy training.
- Cool-down phase: at least 5 minutes of relaxation exercises.
Stopping the workout
To prevent injuries, stop exercising immediately if you notice any of the following symptoms:
- If your muscles tense uncontrollably.
- If you become dizzy while exercising.
- If you feel pains while exercising.
- If you feel unwell or have cramps or feel nauseous.
Exercise suggestions
Ensure that you always keep the handles horizontal when pulling the expander bands (8). Do not bend your wrists, otherwise there is a risk you will strain your joints.
You can place the mat (2) on the item (1) depending on the intensity. We recommend doing the exercises with the mat while you are getting used to the item.
You have the option of setting various vibration levels:
- easy 1-5
• intermediate 6-12 - difficult 15–20
Note: Start with the lowest level and increase the vibration level slowly, depending on the exercise. Make sure that you feel fine during the exercise and that you find the vibration level comfortable. Start in the middle of the board as the amplitude is higher in the outer areas which means the exercise is more difficult.
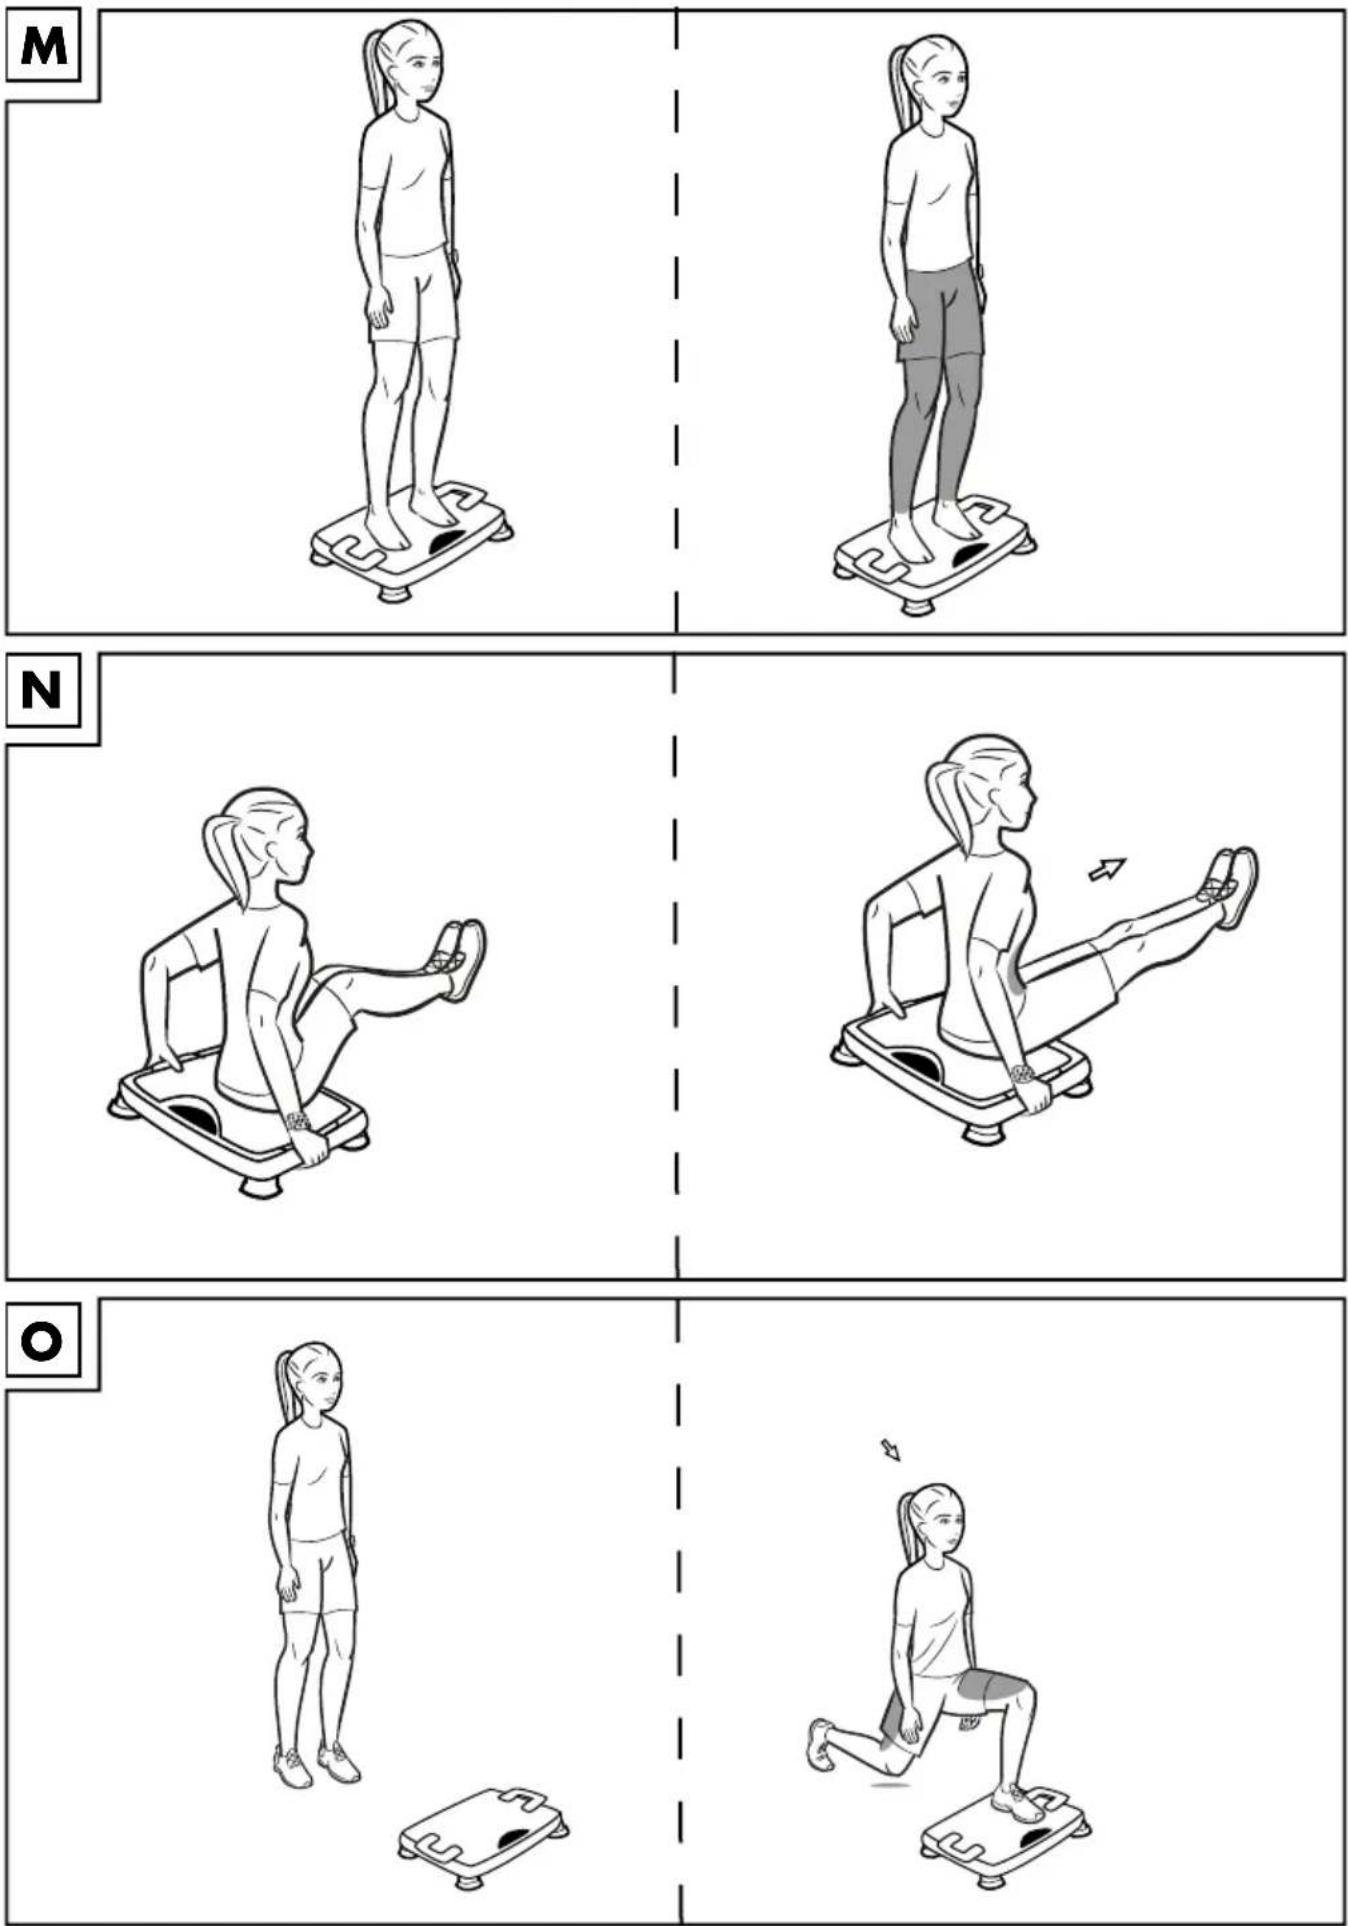
Exercise for getting used to the vibrations (Fig. M)
Starting position
- Set the board to the lowest time and vibration strength.
- Stand with your feet on the board. Stand firmly on your heels with your knees slightly bent.
End position
- Tense your leg muscles.
- Start the board using the remote control.
- Hold your body tension during the vibration.
- Stay on the board until the end of the set vibration time and rest afterwards for a few seconds.
Important: During this exercise, keep your upper body and pelvis straight. Vary the vibration levels, vibration strength and vibration time. Try out different foot positions (centre to outside).
Sit-ups (Fig. N)
Starting position
- Set the item to your desired time and vibration strength.
- Sit on the middle of the item, with your back to the display and start the board using the remote control.
- Hold on to the sides of the item and stretch your legs out in front of you. Your heels touch the floor.
End position
- Tense your leg and stomach muscles.
- Raise your legs and pull your knees towards you. Keep your back straight and your arms slightly bent. Your head forms a straight line with your back.
- Stay in this position for a moment and then go back to your starting position.
- Repeat this exercise until the end of the set vibration time and rest for a few seconds between each one.
Important: During this exercise, keep your upper body and pelvis straight. And maintain body tension during the exercise.
Lunge (Fig. O)
Starting position
- Set the item to your desired time and vibration strength.
- Stand in front of the item, with your feet on the floor, shoulder-width apart.
- Keep your back and neck straight and look straight ahead.
- Take a big lunge forwards on one leg onto the centre of the board.
Note: Make sure that your thigh and calf form a 90 degree angle to each other and that the bent knee is behind the front section of your foot.
End position
- Tense your stomach and bottom muscles.
- Start the board using the remote control.
- Let your arms hang loosely by your sides or support them at your hips.
- Remain in the position for the set vibration time.
- After the end of the exercise, change legs and repeat the exercise.
Important: During this exercise, keep your upper body and pelvis straight. And maintain body tension during the exercise.
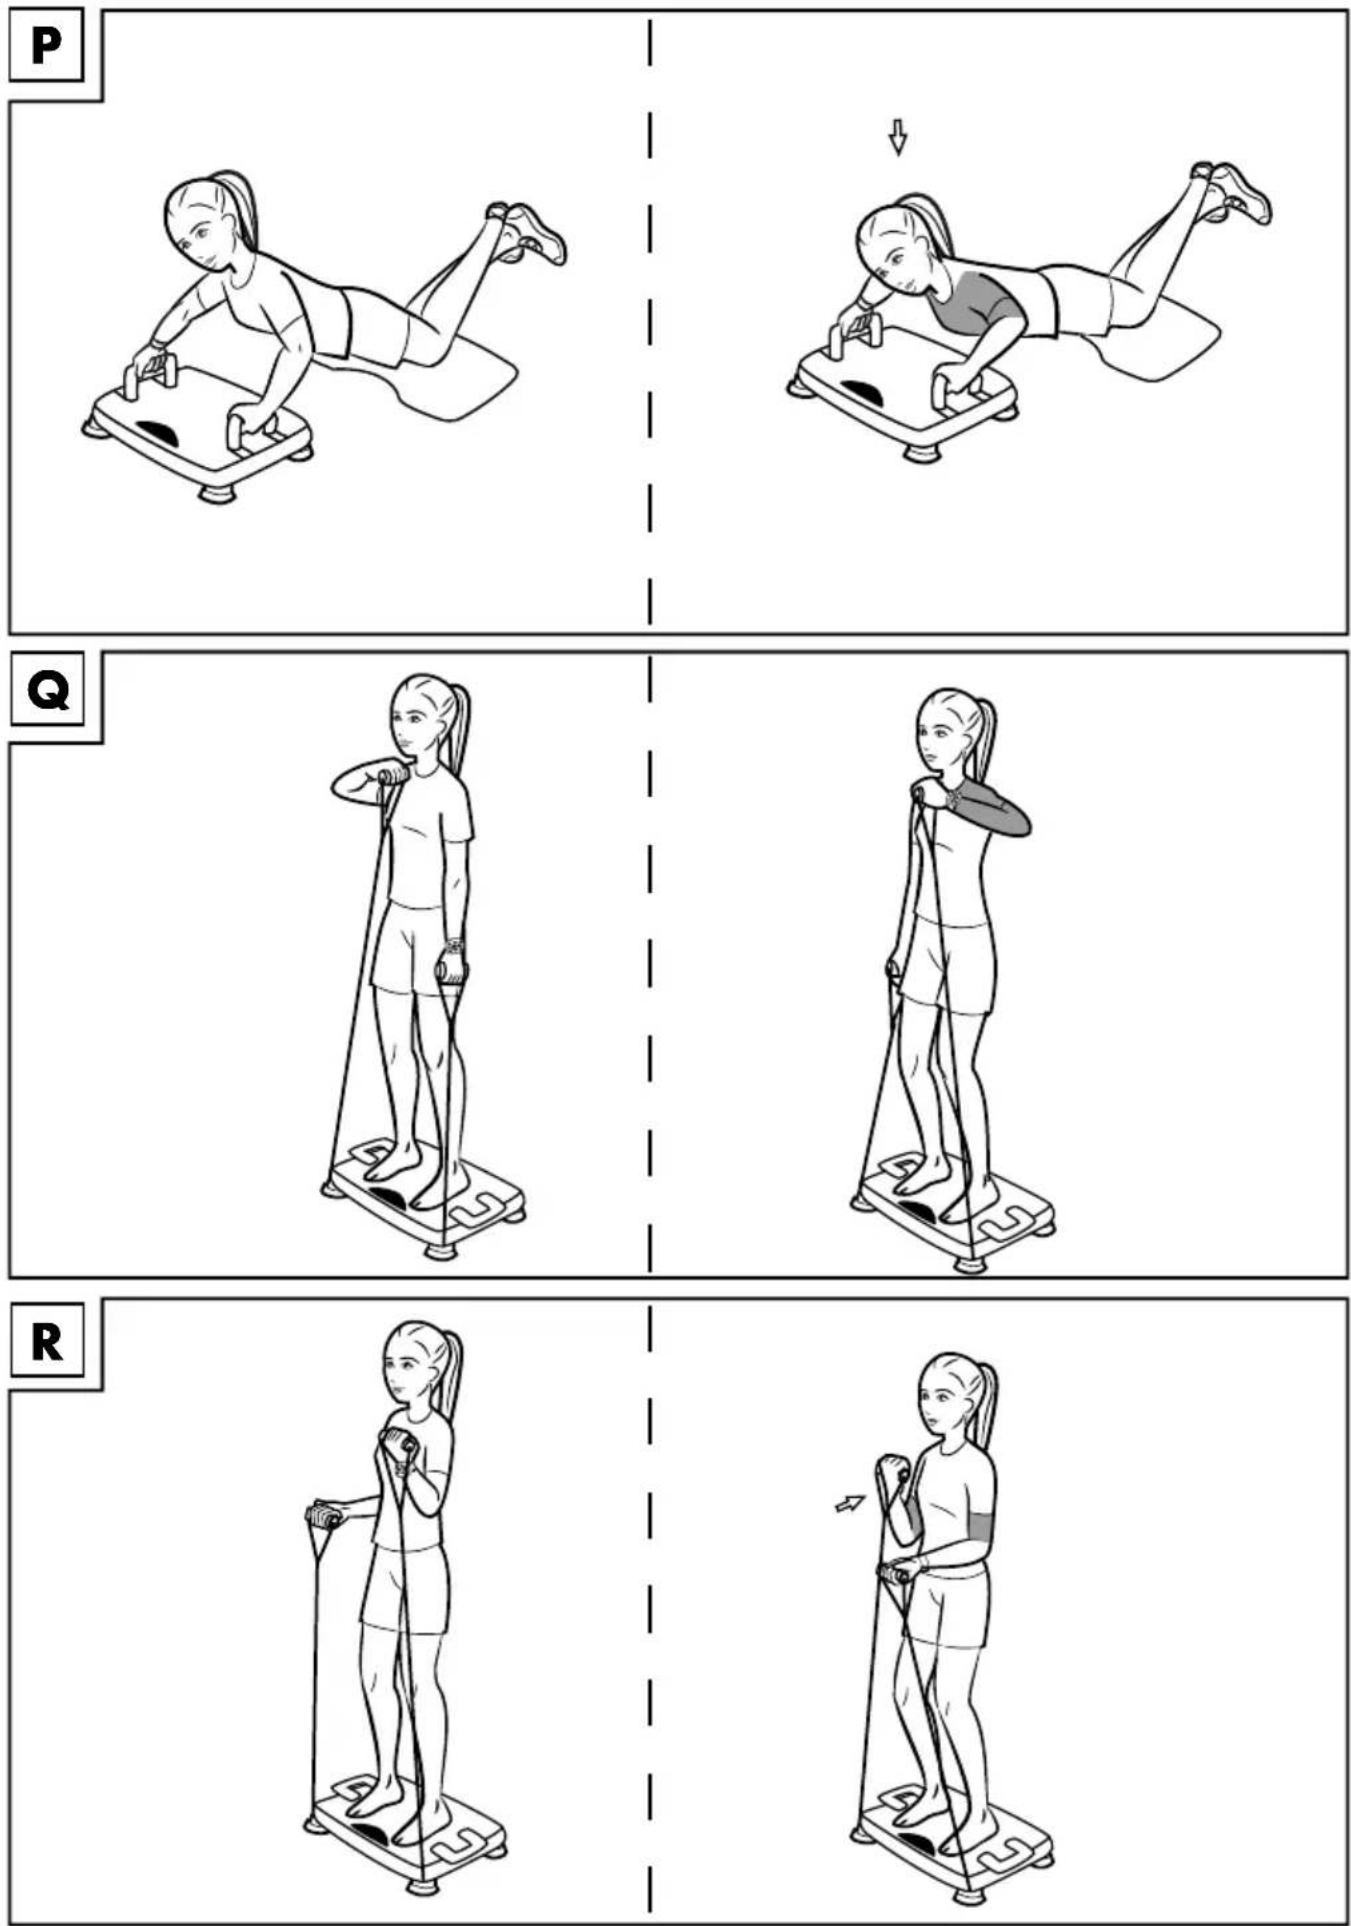
Push-ups with arm supports (Fig. P) Starting position
- Place the mat (2) one step in front of the item.
- Pull the integrated handles (1c) out of the item and position them where you want them.
- Set the item to your desired time and vibration strength.
- Kneel down on the mat with your upper body facing the item and start the board using the display.
End position
- Clasp the handles from the outside and cross your ankles.
- Tighten your arm and stomach muscles. Your head, upper body and legs form a line.
Note: Keep your wrists straight and your elbows slightly bent.
-
Facing the item, slowly lower your upper body. Your arms stay close to your body and your upper body does not touch the item.
-
Stay in this position for a moment and then go back to your starting position.
-
Repeat this exercise slowly, until the set time has elapsed.
Important: During this exercise, keep your head, upper body and legs in a line and maintain body tension throughout.
For arms, and especially for the shoulders (Fig. Q)
Ensure that you always keep the handles horizontal when pulling the expander bands (8). Do not bend your wrist joints, as this would overstrain them.
Starting position
- Set the item to your desired time and vibration strength.
- Attach the expander bands (8) and stand with your feet on the item.
- Grasp the handles of the expander bands and let your arms hang loosely by your sides.
End position
-
Start the board using the display.
-
Tense your arm and stomach muscles and pull your right arm towards your chin. While doing this, pull your elbow up sideways to shoulder height, with the back of your hand facing upwards.
- At the same time, keep your left arm by your body.
- Stay in this position for a moment and then go back to your starting position.
- Now, pull your left arm up towards your chin. While doing this, pull your elbow up sideways to shoulder height, with the back of your hand facing upwards.
- Repeat this exercise slowly, until the set time has elapsed.
Important: During this exercise, keep your upper body and pelvis straight.
For arms, legs, bottom and especially the upper arms (Fig. R)
Ensure that you always keep the handles horizontal when pulling the expander bands (8). Do not bend your wrist joints, as this would overstrain them.
Starting position
- Set the item to your desired time and vibration strength.
- Attach the expander bands and stand with your feet on the item.
- Take hold of the expander bands and hold your hands at hip-height. Your elbows remain close to your body. The palms of your hands are pointing upwards.
End position
- Start the board using the display.
- Tighten your arm and stomach muscles.
- Pull your right and left forearms upwards alternately. Keep your back straight, your arms close to your body and your knees slightly bent.
- Repeat this exercise slowly, until the set time has elapsed.
Important: During this exercise, keep your upper body and pelvis straight. Your knees stay slightly bent and body tension is maintained throughout.
For the back, shoulders, chest, legs and bottom (Fig. S)
Ensure that you always keep the handles horizontal when pulling the expander bands (8). Do not bend your wrist joints, as this would overstrain them.
Starting position
- Set the item to your desired time and vibration strength.
- Attach the expander bands and stand with your feet on the item.
- Take hold of the expander bands and hold your hands close to the sides of your body.
End position
- Start the board using the display.
- Tighten your bottom and stomach muscles.
- With outstretched arms, pull the expander bands up to shoulder height, and then lower them again. The palms of your hands are pointing downwards. Your head is an extension of your spine and your upper body is upright.
- Repeat this exercise slowly, until the set time has elapsed.
Important: During this exercise, keep your upper body and pelvis straight. Variation: Perform the exercise with the palms of your hands facing upwards.
Triceps push-ups with arm supports (Fig. T)
Starting position
- Put the mat (2) in front of the item.
- Pull the integrated handles (1c) out of the item and position them where you want them.
- Set the item to your desired time and vibration strength.
- Start the board using the display and sit on the mat with your back to the board.
- Reach back, lean on the handles and stretch your legs out.
End position
- Tighten your arm, bottom and stomach muscles.
- Push your bottom up from the mat to the height of the board.
-
Your elbows point away from your body and your shoulders remain down. Make sure that your head is an extension of your spine and your upper body is upright.
-
Stay in this position briefly and then go back to your starting position.
- Repeat this exercise slowly, until the set time has elapsed.
Important: Maintain body tension during the exercise and keep your shoulders down.
Use the QR-code

You can watch the exercises described here as a video using the QR-code. You will need a QR-code scanning app on your phone or tablet to do this.
- Start the QR-code scanning app.
- Hold your phone or tablet and use it to scan the QR-code provided.
Stretching
Take enough time to stretch after the exercises. Some simple exercises to do this are shown below. You should perform each exercise 3 times per side for 30–40 seconds.
Note: Do your stretching on a non-slip surface.
Neck muscles
- Stand in a relaxed position. Pull your head gently to one side with one hand, first to the left and then to the right. This exercise stretches the sides of your neck.
Arms and shoulders
- Stand up straight with your knees slightly bent.
- Bend your right arm behind your head until your right hand is between your shoulder blades.
- Grab your right elbow with your left hand and pull it backwards.
- Change sides and repeat the exercise.
Leg muscles
- Stand upright and lift one foot off the floor.
- Rotate it slowly, first in one direction, then in the other.
- Switch feet after a while.
Important: Make sure your thighs remain parallel to each another. Push your hips forwards, keeping your upper body upright.
Storage, cleaning
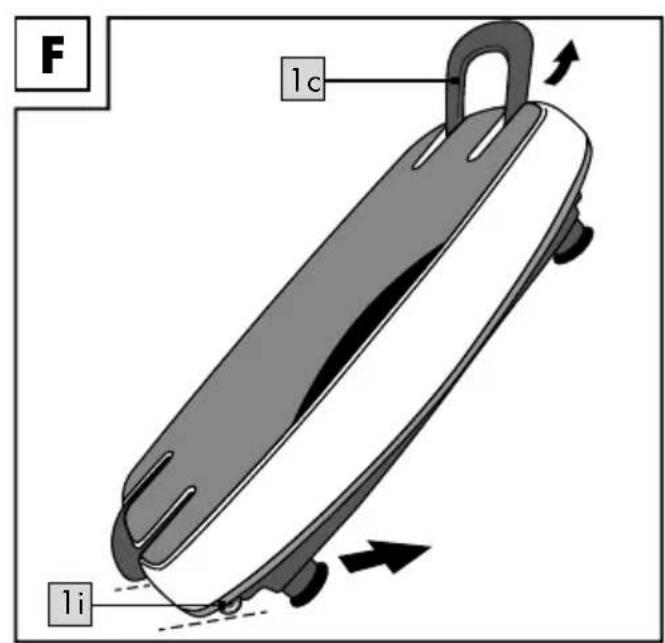
Always store the item dry and clean in a temperature-controlled room. To stow, simply fold up the handle on the side of the castors (Figs. C and D) and lift and pull on the opposite handle as shown in figure F. When not in use, the remote control (3) with the case (4) can be stowed in the specially provided compartment (Fig. E).
Protect the item from:
- Shocks,
- Falling,
- Dust,
- Moisture,
- Direct sun light and
- Extreme temperatures.
Store the item out of reach of children.
Short-circuit risk!
Water or other liquids penetrating the case may cause a short-circuit.
- Never submerge the item in water or other fluids.
- Make sure that water or other fluids do not penetrate the case.
Risk of damage!
Incorrect handling of the item may cause damage.
- Do not use harsh cleaners, brushes with metal or nylon bristles or any sharp or metallic cleaning items such as knives, hard spatulas and the like. These could damage the surfaces.
- Disconnect the mains plug before cleaning.
- Wipe the item with a slightly damp cloth.
- Let all parts dry completely afterwards.
Information on disposal
Dispose of the item and its packaging materials in accordance with current local regulations. Packaging materials like e.g. foil bags must be kept away from children. Store the packaging materials out of reach of children.

Dispose of the product and the packaging in an environmentally friendly manner.

The recycling code is used to identify various materials for recycling.
The code consists of the recycling symbol
- which is meant to represent the recycling cycle
- and a number which identifies the material.
Devices with this symbol may not be disposed of with household waste. You are obliged to dispose of such old electrical and electronic appliances separately. Please research information on controlled waste disposal options from your local authority. Remove the batteries from the item before disposing of it.
Disposal measures for batteries

Please note: Batteries are considered hazardous waste, and by law, may not be disposed of with household waste. You may in used batteries free of charge at municipal action points or in shops.
Special collection containers are available here for this purpose.
Notes on the guarantee and service handling
The product was produced with great care and under constant supervision. You receive a three-year warranty for this product from the date of purchase. Please retain your receipt.
The warranty applies only to material and workmanship and does not apply to misuse or improper handling. Your statutory rights, especially the warranty rights, are not affected by this warranty. With regard to complaints, please contact the following service hotline or contact us by e-mail. Our service employees will advise as to the subsequent procedure as quickly as possible. We will be personally available to discuss the situation with you. Any repairs under the warranty, statutory guarantees or through goodwill do not extend the warranty period. This also applies to replaced and repaired parts. Repairs after the warranty are subject to a charge.
IAN: 310298

Service Great Britain
Tel.: 0800 404 7657
E-Mail: deltasport@lidl.co.uk

Service Ireland
Tel.: 1890 930 034
(0,08 EUR/Min., (peak))
(0,06 EUR/Min., (off peak))
E-Mail: deltasport@lidl.ie
Possible defects
Potential faults are listed below, along with their causes and how to rectify them.
| Defect Possible cause Remedy | ||
| The item (1) can't be turned on. | Mains connection not established correctly. | Check the power cable connections (7) to the socket and the item's connecting socket (1). |
| Item is not in standby mode. | Check the main ON/OFF switch (1g). It must be at 1. | |
| Prolonged use may cause the item to overheat. | Turn the item (1) off at the main ON/OFF switch (1g) and let it cool down for a while. | |
2011/65/EU - Directive RoHS
Push-ups met steungrepen (afb. P)
Uitgangspositie

$$ 1 \times 3 V = C R 2 0 3 2 $$