
IAN 79397 - Lighting Livarno Lux - Free user manual and instructions
Find the device manual for free IAN 79397 Livarno Lux in PDF.


User questions about IAN 79397 Livarno Lux
0 question about this device. Answer the ones you know or ask your own.
Ask a new question about this device
Download the instructions for your Lighting in PDF format for free! Find your manual IAN 79397 - Livarno Lux and take your electronic device back in hand. On this page are published all the documents necessary for the use of your device. IAN 79397 by Livarno Lux.
USER MANUAL IAN 79397 Livarno Lux
text_image
www.lidl-service.com PDF onlineLED-GartEnstrahLEr
DE AT CH
LED-GartEnstrahLEr
Operation and Safety Notes
FR CH
Before reading, unfold the page containing the illustrations and familiarise yourself with all functions of the device.
GB Operation and Safety Notes Page 29
text_image
A 2 5 4 3 1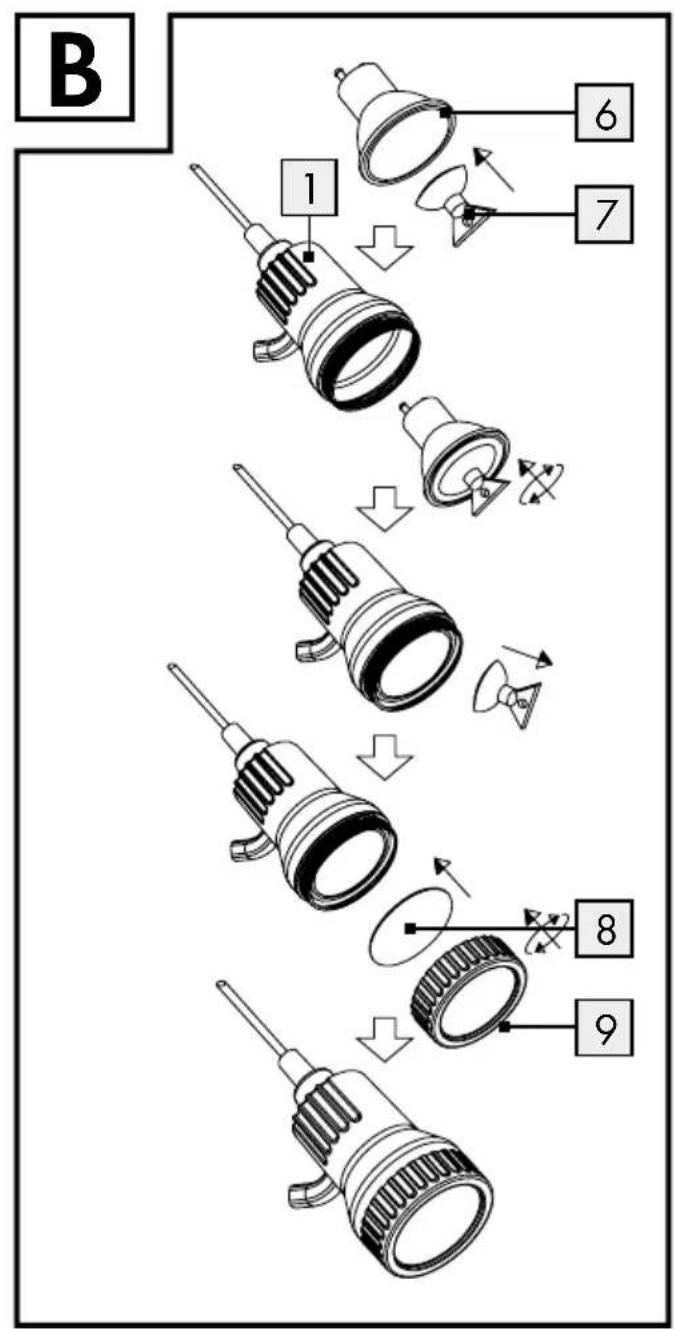
text_image
B 1 6 7 8 9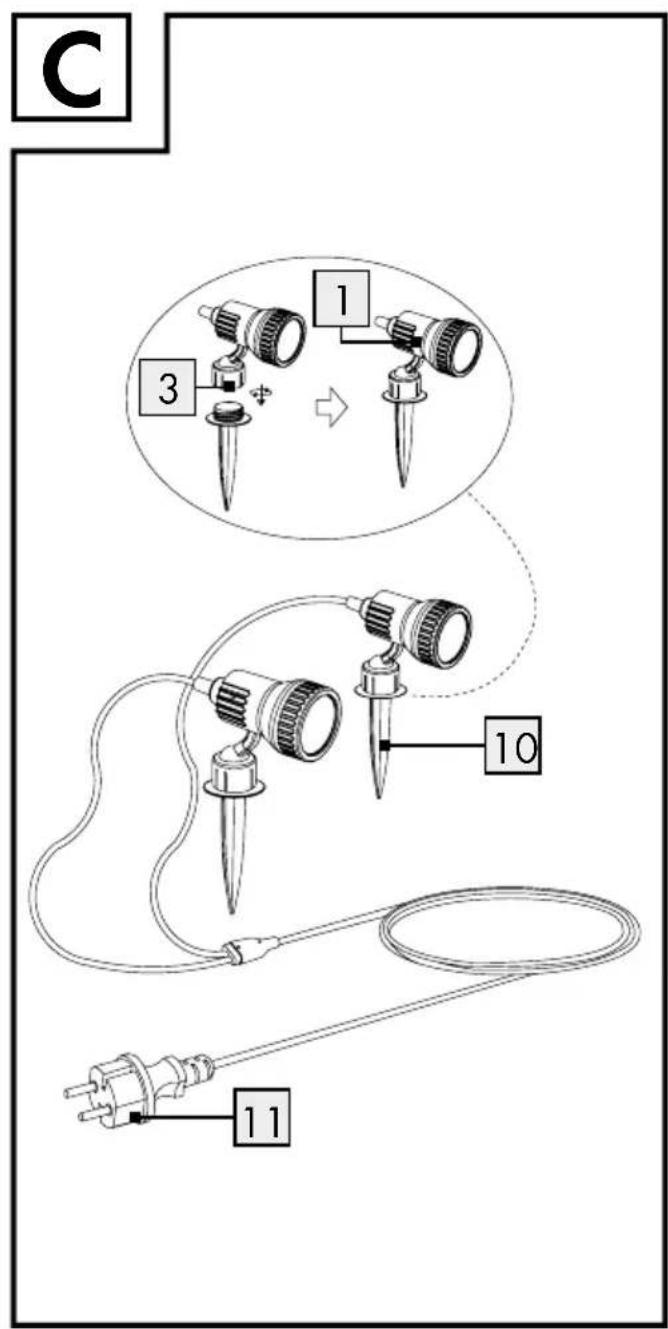
text_image
C 1 3 10 11Einleitung
Intended use......Page 30
Parts description Page 30
Technical Data Page 30
Scope of delivery....Page 30
Safety notes......Page 30
Safety advice for installation......Page 31
Preparation
Required tools and material....Page 31
Mounting garden light on the wall/ceiling Page 32
Mounting garden light with ground stake....Page 32
Inserting colour filter....Page 32
Directing the spotlights....Page 32
Start-up Page 32
Changing the LED light bulb....Page 32
Cleaning and Care....Page 33
Disposal Page 33
Warranty and Service
Warranty Page 33
Service address......Page 33
Declaration of conformity....Page 33
Manufacturer......Page 33
LED Garden Lights
- Introduction
Congratulations on your new product. You have selected a high quality product. Please be sure to carefully read the complete operating instructions. These instructions are part of the product and contain important information on setup and handling. Always follow all safety instructions. Before using this product for the first time, verify the correct voltage and that all parts are properly installed. Should you have any questions or you are unsure about operating the product, please contact the dealer or service centre. Please keep these instructions in a safe place and pass them on to third parties as applicable.
Intendeduse
This product is suitable for indoor and outdoor use as decorative lighting. This product is intended for use in private, domestic environments only and not for commercial purposes.
Partsdescription
1 Spotlight
2 Screw
3 Union nut
4 Wall bracket
5 Dowel (ø 6 mm)
6 LED light bulb
7 Suction cup
8 Colour filter (blue/green/orange/yellow)
9 Lamp cover
10 Ground stake
11 Mains plug
●TechnicalData
Model: 3077-025L
Operating voltage: 230 V \~, 50 Hz, 2 x max. 3 W
Light source: 2 x LED light bulbs, GU10,
2.3 W (included in the delivery)
Protection class: II/

Protection type: IP44 (splash-proof)
- Scope of delivery
Immediately after unpacking, verify the parts are complete and that the device is in proper condition.
1 LED garden light (2-bulb set)
4 Screws
2 Wall brackets
4 Dowels
2 LED light bulbs, GU10, 2.3 W
1 Suction cup
8 Colour filters
2 Ground stakes
1 Operating and safety instructions

Safetynotes
Damage due to failure to comply with these operating instructions will invalidate the guarantee! We assume no liability for consequential damage! We assume no liability for material damage or personal injury due to improper handling or failure to comply with the safety instructions!
DANG RONING!
LIFE AND RISK OF ACCIDENTS FOR INFANTS AND CHILDREN!
Never leave children unattended with the packaging material. The packaging material represents a danger of suffocation. Children frequently underestimate the dangers. Please keep children away from the product at all times.
Children or persons lacking knowledge or experience in handling the device, or who have limited physical, sensory or mental abilities, must not use the device without supervision or
instruction by a person responsible for their safety. Children must be supervised at all times to prevent them from playing with the device.

AVOID DANGER TO LIFE DUE TO AN ELECTRIC SHOCK!
Before using the product, ensure that the available mains voltage corresponds with the required operating voltage for the device (230 V\~).
■ Always check the product for damage before connecting it to the power supply.
■ Never use the product if it is damaged in any way.
The connection cable can not be repaired. If the cable is damaged the appliance should be disposed of.
■ Never open any part of the electrical equipment or insert any objects into it.
- Protect the product from sharp edges, mechanical loads and hot surfaces.
■ Always unplug the mains plug from the socket before installation, dismantling or cleaning.
■ Never touch the mains plug or garden light with wet hands.
CAUTION! RISK OF OVERHEATING! Do not operate the garden light in the packaging or if the cable is wrapped around the garden light.
■ Only use the light with the accessories which were delivered with it. Otherwise any warranty claims will be invalidated.
During long periods of non-use (e.g. holiday), disconnect the garden light from the power supply.
- Keep the product away from ponds and other bodies of water. Install the garden light at least 2 m away from water containers. Avoid locations where flooding could occur after heavy rain.
■ Only use the garden light outdoors with an electrical socket, which is fuse protected by a residual-current circuit breaker (FI or RCD) with a maximum residual current of 30 mA.
This garden light is splashproof (IP44). This protection class will only be maintained, if the electrical socket used also complies with at least this protection class.
- Ensure that the cable of the garden light is not laid out through areas, in which lawn mowers, trimmers, shears or similar cutting tools could be used.
■ Never pull on the cable of the garden light and make sure it is routed in such a way that no one could walk or trip over it.
If you have any questions about the product or are unsure about any of its aspects, please seek the advice of an electrical equipment specialist.
● Safety advice for installation
CAUTION! RISK OF ELECTRIC
SHOCK! Make sure that you do not hit electricity, gas or water supply lines when you are drilling. Check with a cable detector before drilling if necessary.
- Do not attach any other objects to the garden light.
- Avoid excessive bending of the power supply cable. This can lead to damage of the power supply cable.
- Avoid excessive heating of the garden light.
CAUTION! Only use LED light bulbs with a GU10 fitting and a maximum output of 3 watt.
●Preparation
- Required tools and material
The tools and materials cited are not included in the scope of delivery. This information and these values are non-binding and are provided for guide purposes only. The nature of the material is determined by the individual local conditions.
- Pencil / marking tool
- Cross-tip screwdriver
- Electric drill
- Drill (ø 6 mm)
- Hammer
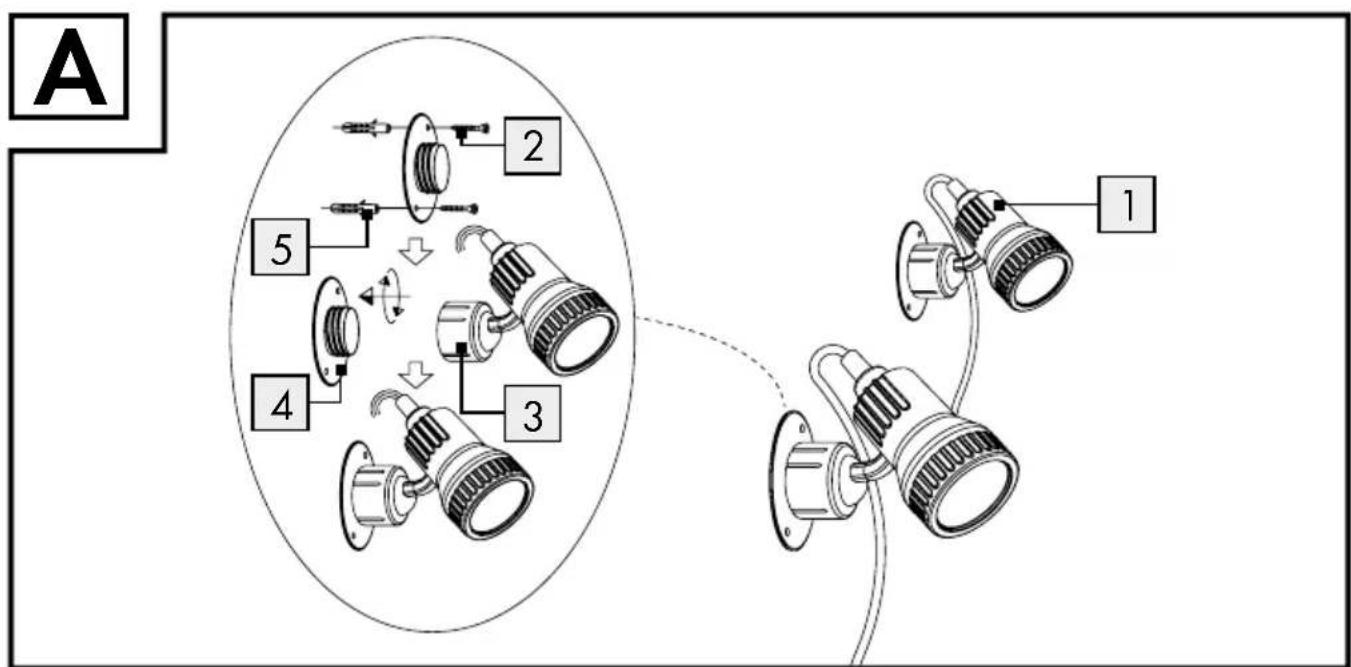
- Mounting garden light on the wall / ceiling (Fig. A)
Note: you will need an electric drill for the installation.
⚠️ CAUTION! DANGER OF INJURY! Please refer to the operating instructions of your electric drill.
Note: The product can be used on all surfaces officially classified as being of normal flammability.
☐ Mark the drill holes on the wall / ceiling using the holes of the wall brackets 4.
☐ Now drill the fixing holes (∅ approx. 6 mm, depth approx. 40 mm).
CAUTION! Make sure that you do not damage any supply lines in the wall / ceiling.
☐ Insert the dowels 5 into the drill holes. Use a hammer if necessary to help.
□ Fasten the wall brackets to the surface with the screws 2.
☐ Fasten the spotlights 1 onto the wall brackets by screwing the union nuts 3 clockwise onto the wall brackets.
- Insert the dowels 5 into the drill holes. Use a hammer if necessary to help. - Fasten the wall brackets to the surface with the screws 2. - Fasten the spotlights 1 onto the wall brackets by screwing the union nuts 3 clockwise onto the wall brackets.
Check for correct fitting.
- Mounting garden light with ground stake (Fig. C)
☐ Fasten the spotlights 1 onto the ground stakes 10 by screwing the union nuts 3 clockwise onto the ground stakes.
- Inserting colour filter (Fig. B)
Open the spotlights 1 by turning the lamp cover 9 anticlockwise.
- Mounting garden light with ground stake (Fig. C) - Fasten the spotlights 1 onto the ground stakes 10 by screwing the union nuts 3 clockwise onto the ground stakes. - Inserting colour filter (Fig. B) - Open the spotlights 1 by turning the lamp cover 9 anticlockwise.
Note: the LED light bulb 6 has already been pre-installed.
☐ Insert the desired colour filter 8 in the lamp cover 9 and position the rough side of the colour filter in the direction of the LED light bulb.
☐ Close the spotlights by turning the lamp cover 9 clockwise.
- Insert the desired colour filter 8 in the lamp cover 9 and position the rough side of the colour filter in the direction of the LED light bulb. - Close the spotlights by turning the lamp cover 9 clockwise.
Your light is now ready to use.
- Directing the spotlights
CAUTION! DANGER OF BURN INJURIES! Only change the positioning of the spotlights 1 when the light is switched off and has cooled down completely.
Note: Release the union nut 3, since otherwise the spotlights can not be moved.
☐ Turn the individual spotlights in the desired direction.
☐ Tilt the individual spotlights to the desired angle.
☐ Check afterwards that the spotlight are firmly in place. Tighten up the union nut slightly if necessary.
- Start-up
☐ Insert the mains plug 11 into the electrical socket to switch on the light.
☐ Pull the mains plug from the electrical socket to switch off the light.
● Changing the LED light bulb (Fig. B)
Note: When changing the LED light bulbs, the colour filter 8 can become lost, since this is only inserted loosely.
Open the spotlights 1 by turning the lamp cover 9 anticlockwise.
☐ Use the enclosed suction cup 7 to change the LED light bulbs. To do this, press the suction cup onto the front face of the LED light bulb.
☐ Remove the LED light bulb by turning this anticlockwise through a 14 of a turn.
☐ Insert the new LED light bulb carefully into the holder using the suction cup and turn this clockwise by a 14 -of a turn.
Check for correct fitting.
☐ Remove the suction cup by gently pulling on the side nipple of the suction cup.
☐ Close the spotlights by turning the lamp cover 9 clockwise.
- Cleaning and Care
CAUTION! RISK OF ELECTRIC SHOCK!
First unplug the plug from the mains socket.
CAUTION! RISK OF ELECTRIC SHOCK!
For reasons of electrical safety, never clean the light with water or other fluids, or immerse it in water.
- Do not use any solvents, petrol etc. Otherwise the product may be damaged.
☐ Use a dry fluff-free cloth when you are cleaning.
●Disposal
The package and packaging materials consist entirely of environmentally friendly materials. They can be disposed of at your local recycling facility.
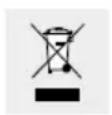
The symbol of the wheelie bin with the line through it means that, in the European Union, the product has to be disposed of in a separate refuse collection. This applies to the product and to all components bearing this symbol. Do not dispose of products bearing this symbol in your normal household waste, but instead they must be taken for recycling to a collection site for electrical and electronic appliances. Recycling helps to reduce the consumption of raw materials and protects the environment.
●WarrantyandService
Warranty
You receive a 36 month warranty on this product, valid from the date of purchase.
The appliance has been carefully produced under strict quality control.
Within the warranty period we shall rectify without charge all material and manufacturing defects. In the event of a defect arising during the warranty period, please send the appliance to the listed Service Centre address, making reference to the following article number: 3077 - 025L.
Wearing parts (such as bulbs) and damage caused by improper handling, non-observance of the operating instructions or unauthorised interference with the appliance are excluded from the warranty. The performance of services under the warranty does not extend or renew the warranty period.
Serviceaddress
When inquiring about your product, please have your receipt and product number (e.g. IAN 12345) ready as your proof of purchase.
- Declaration of conformity CE
This product conforms to the requirements of the applicable European and national directives (Electromagnetic Compatibility 2004/108/EC, Low Voltage Directive 2006/95/EC). Conformity has been demonstrated. The relevant declarations and documents are held by the manufacturer.
Manufacturer
59929 Brilon (Germany)
© by ORFGEN Marketing